How to disassemble a flat tank water heater
Action plan:
- the boiler is disconnected from the power supply, the water is drained and the check valve is unscrewed;
- unscrew the plug nut;
- plastic shields are dismantled;
- in the center of the plastic cover, a screw is unscrewed, which is most often sealed with a sticker;
- the bottom cover is removed and access to the complex circuit of electrical components is opened (before disassembling it, it is advisable to photograph the structure, sketch and label each component, this will then help to assemble everything correctly and quickly);
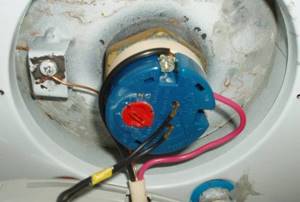
- The next step in disassembling a water heater with a flat tank will be to disconnect the control board and thermal protection, for which you unscrew all the screws and nuts of the grounding bracket (you should remember that the thermal protection and electronic board are afraid of water, so it is very important to protect them from its influence);
- disconnect the connector that comes from the outer board from the electronic control board;
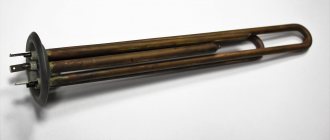
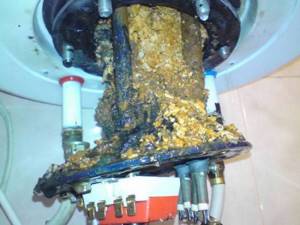
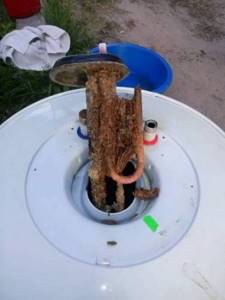
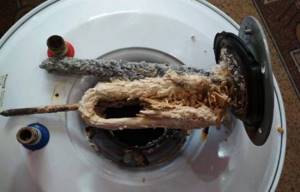
- to dismantle the heating element, which is attached to the flange, you should unscrew the nuts (the work can be complicated if the heating element is covered with scale; remove it slowly, with extreme caution).
Sometimes it is necessary to dismantle both the internal and external control board, which is located on the outside of the water heater body. Before removing it, remove the plastic sticker from the front panel and unscrew the bar.
It's simple. Anyone can do this kind of work with their own hands, without the help of specialists.
The best posts
- How to make a plasterboard ceiling in the kitchen with your own hands
- Painting drywall - step-by-step instructions
- How to join drywall in corners and the process of building a decorative niche
- Sealing drywall joints - recommendations from professionals
- Epoxy resin, application
- How to seal a doorway with plasterboard - installation diagram
- DIY plasterboard ceiling installation - video tutorials and installation instructions
- How and how to glue a foam plastic ceiling plinth
Draining water from the storage tank
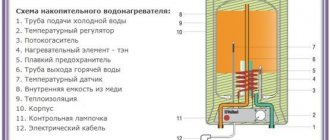
Diagram of the heating element device.
Using a shut-off valve, the cold water supply to the apartment is shut off. If a local valve is provided for the boiler, which shuts off only the necessary part of the apartment water supply, it should be used.
The hot water intake valve on the boiler and the cold water supply check valve are closed.
Using an adjustable wrench, the cold water supply hose to the water heater is disconnected, but the hot water extraction hose is not disconnected.
A rubber hose is placed on the boiler check valve. The second end of the rubber hose is directed into the sink, jacuzzi, bathtub. Water from the boiler will drain through it.
The boiler check valve and the hot water intake valve open. All hot water taps connected to the water heater are fully opened: in the bathroom, in the kitchen.
Atmospheric pressure is generated in the boiler storage tank, and water is pushed out through a check valve. Typically, water is discharged from the boiler in several portions as the pressure in the tank increases.
You can check that all the water has been drained by blowing into the rubber hose on the check valve. If water remains in the tank, a characteristic gurgling sound will be heard.
It may happen that the pressure in the water supply system is not enough to displace all the water from the boiler. In this case, the hot water extraction hose is removed and additional pressure is pumped into the tank through the hot water extraction tube using a compressor.
Attention! The cold water supply pipe to the storage tank rises above the level of the bottom wall. Therefore, a small part of the water will remain in the boiler and will drain only through the mounting hole of the heating element panel. This factor must be taken into account when further disassembling the water heater.
How to drain water from a water heater
Before disassembling the water heater, it is necessary to drain the storage tank - drain the remaining water in the water heater. Typically, two pipes are connected to the device:
- liquid withdrawal system;
- system for collecting liquid from a water supply system.
Drying can be done in several ways.
Standard method
This method is given in the operating instructions for the device. You will need to use a tee, which is located next to the valve and pipes of the system. Drying is carried out by shutting off the water supply pipe. The remainder of the already stored liquid is drained through the mixer.
The described method is relevant for models of the previous generation; modern devices are most often not equipped with a tee.
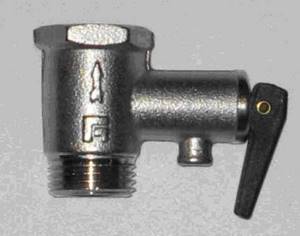
Using a lever (trigger)
A device located on the safety valve will help quickly get rid of accumulated water. All you have to do is simply bend the lever and the boiler will drain. It is worth noting that the procedure performed using a trigger can take a long time. Connecting a hose will help speed up the process significantly. By attaching it to the spout, you will greatly facilitate the outflow of water, but the water will still drain within two hours.
Alternative method
If none of the listed devices are installed on the device, you will have to resort to a more complex method. To do this, you need to unscrew the check valve counterclockwise. The pressure of the drained water will be very strong, no need to panic because of this, prepare a suitable container and clothes that you don’t mind getting wet. To protect the room from water, experts recommend using a durable hose, the length of which will be sufficient to connect it to the drain of the bathtub or toilet.
We recommend: How to clean a gas water heater from scale and soot with your own hands
If water does not flow after unscrewing the valve, this means that the hot water supply is cut off. At the same time, the flow of air is blocked, without which draining is impossible. Only after completing this procedure can you begin to further disassemble the boiler.
How to disassemble a water heater with a heating element
This is a relatively inexpensive type of boiler that has a heating element attached to nuts. This device, as a rule, does not have external adjustment. Its distinctive feature is the presence of a hexagonal flange, which can be unscrewed with a 55 wrench or a regular gas wrench.
Algorithm for disassembling a water heater with a heating element:
- the device is disconnected from the network, the water is drained and the check valve is dismantled, which will only complicate the work;
- the boiler cover is removed, which is screwed closer to the pipes;
- The thermostat is being dismantled;
- place a container under the water heater into which the remaining dirt, water and scale will be drained;
- unscrew the flange counterclockwise (existing dirt and scale can complicate the work, so they are carefully cleaned off with a wooden or plastic knife; as soon as the thread ends, the flange is carefully removed);
- in order to remove the heating element, remove the scale from the bends of the heating element and, carefully swinging it left and right, pull out the lower part of the element.
How to disassemble an economy class water heater (boiler) Economy class water heaters are distinguished by their oval flange shape, therefore the principle of their disassembly has some peculiarities.
Stages of disassembling an economy class boiler:
- the device is disconnected from the power supply, the water is drained and, if necessary, the check valve is unscrewed;
- There are two screws near the drain and fill pipes that should be unscrewed and the water heater cover removed;
- with a sharp downward movement, the thermostat is removed and access to the flange is opened, which is attached with a nut to the body using a strip; After the nut is unscrewed, you can remove the flange.
READ MORE: Rating of chainsaws by quality and reliability - the best models
How to disassemble a medium-class water heater Medium-class water heaters have an average price category. The device comes with flanges that are attached directly to the neck using 6 bolts.
The disassembly process for this water heater is as follows:
- the power supply to the device is turned off, the water is drained and the check valve is removed;
- to remove the cover, find the screws and unscrew them (the location of the screws may vary);
- after this, it is necessary to remove or remove the thermostat (depending on whether it is connected to the heating element with a wire or inserted into it);
- all necessary screws or nuts are unscrewed.
Types of boiler breakdowns and their possible causes
There are many reasons why boilers break down, most of which can be fixed with your own hands.
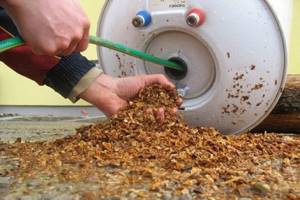
- The boiler does not heat the water. The cause may be a breakdown of the heating element or the electrical system of the device. If the water takes a very long time to heat up, then a large layer of salt scale has accumulated on the heating element, which must be removed. Limescale can also cause the device to be turned on or off too often.
- The water is overheating. The cause may be a thermostat failure.
The thermostat has a special temperature sensor and automatically turns off the heating element when the water is heated to a predetermined limit.
Tank leaking or leaking from under the flange. The problem may be damage to the tank due to corrosion or mechanical stress. The reason is usually a lack of grounding or natural wear of parts.
Often the cause of a leak from the tank is wear of the rubber gasket through which the heating element flange is pressed against the body
- The plug or socket gets very hot. Typically, overheating occurs due to a mismatch between the power consumed by the heater and the electrical wiring capabilities or due to loose contacts.
- Extraneous noises in the boiler. Possible reasons include: scale on the heating element, water pipes that are too narrow, or a failure of the check valve that needs to be replaced.
- Error indication on display. Devices with built-in electronic systems may malfunction due to power surges. In this case, the electronic module breaks down and needs to be repaired or replaced.
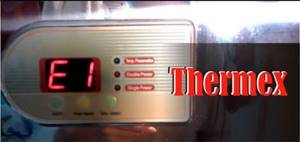
An error indication is often the result of a failed electronic module, which is usually easier to replace
- No hot water supplied. This means that the thermostat or heating element has failed (poorly secured).
- The water is too hot or steam formation is occurring. The reason may lie in an incorrect connection of the boiler or a broken thermostat.
- Low water temperature. The thermostat temperature mode is set incorrectly, the heating element is installed or is faulty.
- Hot water is black. The reason is corrosion, which is caused by too hard water. The boiler may need to be replaced.
- The boiler is deformed (inflated). The reason is high pressure, which is not provided by the device manufacturer. A pressure regulator needs to be installed.
The pressure regulator maintains the water pressure within the limits for which the boiler is designed
- The boiler is electrocuted. This may happen because the cable is damaged, the heating element has burst, or the electronic panel or control board has failed.
- The boiler does not turn on. The cause may be low water pressure. The instructions for each device indicate the nominal pressure value, which will ensure high-quality operation of the device. The same problem can occur when contacts burn out, which are destroyed over time due to weakened fastening. Therefore, they need to be tightened regularly.
- The boiler does not turn off. The shutdown button is melted, the temperature sensor is faulty, as a result of which the relay contacts stick and cannot turn off the heating element after the water supply stops.
- Heating elements often burn out. The cause may be a large layer of scale on the element or an incorrectly installed unit.
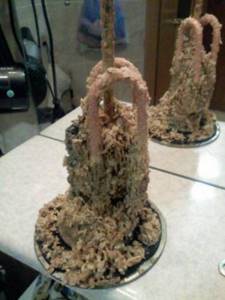
If a large layer of scale forms on the heating element, it begins to work with increased intensity and quickly burns out
- Air appears in the boiler. Air may enter the system due to a malfunction of the check valve or a leak in the gaskets.
- The boiler does not let water through or the indirect heating boiler does not see the boiler. This may indicate that the device is not connected correctly.
- The gas water heater whistles, makes noise or blows. This behavior may be a sign of low gas pressure, insufficient draft in the chimney, or contamination of the pilot burner wick. The whistle appears when scale is deposited in the heat exchanger or a foreign object gets into it. The malfunction may also occur due to a defective valve, which modulates the combustion power of the flame.
- A pipe broke off the water heater. The cause may be improper connection of the device, wear of fasteners and gaskets, or too much water pressure.
How it works
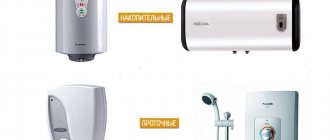
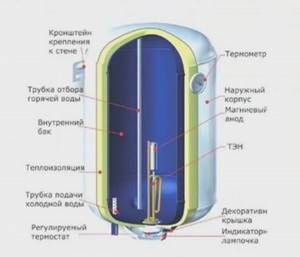
To minimize problems with the device, you should study its structure and operating principles. Typically, private households use storage models rather than flow-through ones, which allow them to use electricity more efficiently. Such a device consists of a heat exchanger tank, inside of which a heating element is installed - a heating element, connected to the power supply.
An important part of the device is the thermostat. This element allows you to maintain a constant temperature of the water inside the storage tank. Water flows through pipes into the heat exchanger. If its temperature is too low (and this is usually the case), then the thermostat sends a signal and turns on the heating element.
The water is heated until it reaches the required temperature. After this, the thermostat operates again and turns off the heating element. Hot water is taken from the tank and replaced with cold water, the heating process is repeated again and again. This is a general diagram of the design and operation of a conventional storage water heater.
Flow models are designed somewhat differently. They heat not a static volume of water, but a flow. They use more powerful heating elements that start when the water is turned on and stop when it is turned off. To study the operation and design of a particular model in more detail, you need to carefully read the technical documentation accompanying it.
The heater tank is a durable stainless steel container, one or two millimeters thick. No matter how resistant this material is to corrosion, these processes still periodically arise and develop, which leads to water leaking from the device. One of the common causes of such breakdowns is electrocorrosion.
Flow-through heaters usually break down for the same reasons as storage models. Diagnostics and repair of such devices are carried out using similar methods ( )
To prevent it, you need to regularly, i.e. annually replace the magnesium anode installed inside. This element is designed specifically to prevent electrocorrosion
Over time, it wears out, and storage tank owners neglect to replace this important part.
As a result, the tank, which has been serving well for some time, suddenly begins to leak. The incorrect condition of the magnesium anode can also affect the condition of the heating element. On the outside, the storage tank is usually enclosed in a metal or plastic housing, and it also has an insulating shell that prevents heat loss.
Damage to the outer shell and insulation occurs rarely, usually due to careless handling of the device. Cracks and chips on the body of the water heater may not disrupt its operation, but this will lead to a deterioration in the properties of the heat insulator and will negatively affect the functioning of the device as a whole.
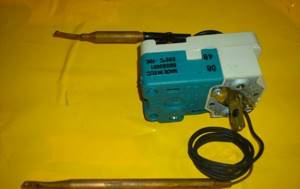
Inlet and outlet pipes for cold water and outlet pipes for hot water usually do not cause any problems if the heater is installed correctly. Typically, a water heater is equipped with two thermostats, one of which is designed to control the water temperature, and the second monitors the condition of the first device.
READ MORE: 5 real reasons for female loneliness
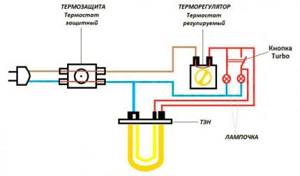
Sometimes a third thermostat is used, which determines the working condition of the heating element. In any case, a broken thermostat will have to be completely replaced. There are capillary, rod and electronic types of thermostats. Their design is different, but the principle of their operation is similar.
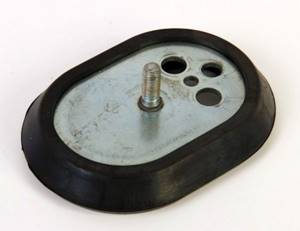
The insulating gasket not only serves to seal the connection between the elements of the water heater, it is also necessary as an electrical insulator. It is recommended to replace this element regularly during each maintenance of the water heater.
The thermostat shows to what temperature the water inside the device is heated. If this element breaks, the water heater will still perform its functions, although data on the degree of heating will not be received.
Boiler assembly and care

You can assemble a boiler with your own hands, but you need to act carefully. Step by step, in the reverse order in which he understood, all the parts should be put in place. However, the elements must only be dry.
Wet parts should not be connected, otherwise a short circuit may occur. After assembly, test for leaks and finally install on the wall.
Important!
Empty tanks cannot be used when plugged into the network. First it is connected to a water source, filled and only then connected to electricity.
Cleaning a boiler with your own hands is a long process and involves a certain risk: what if after assembly the boiler stops functioning? To avoid risk, you need to properly care for titanium. Here's how it's done:
- install filters on pipes; they cut off a significant part of the dirt;
- Galvanized or ferrous heating elements deteriorate faster; you should not purchase them;
- if the water is too hard, it is not recommended to heat titanium to more than 60 degrees;
- insufficient temperature conditions are also harmful: microorganisms cannot be sterilized and occupy the internal cavity of the boiler;
- if titanium sits idle, the water must be drained from it - a filled, stagnant tank quickly rusts and leaks.
And, of course, the service life of the magnesium anodes in the heater is taken into account. They are operational for more than 1 year, after which they are replaced. Timely replacement of anodes increases the service life of equipment
Timely replacement of anodes increases the service life of equipment.
Step-by-step instructions: remove the cover from a domestic water heater
Disassembling a boiler takes place in several stages, which can be handled successfully if you know exactly how to remove the cover from a domestic water heater.
We recommend disassembling the structure in the following sequence:
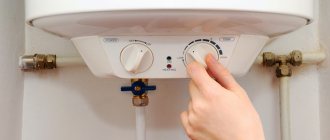
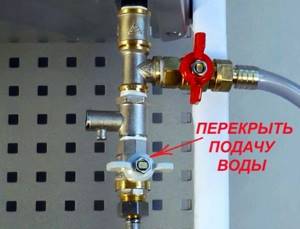
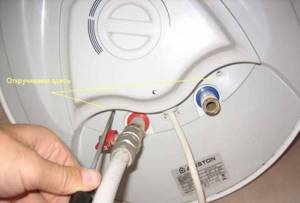
- Turn off the water supply. In most cases, the valve is located at the bottom of the housing.
Cold water valve location
- It is necessary to disconnect the equipment from electrical networks. If the device is not connected directly, but through a surge protector, it is better to completely unplug the extension cord from the outlet and take it out of the room, since devices connected to the network only increase the likelihood of a current short circuit.
- Next, you need to drain the water from the hose attached to the drain pipe. It is better to pour it into a basin or bucket, and then into the toilet. This will prevent accumulated scale from clogging your bathroom or sink drain.
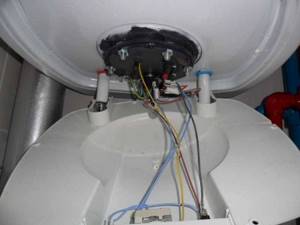
- Using a straight screwdriver, unscrew the screws and remove the protective cover from the bottom of the case. The tight-fitting lid is removed very slowly - as if unscrewing the lid on a can of canned food. It is very important not to damage the enamel.
Removing the protective cover from the tank
- After removing the cover, use an indicator screwdriver to determine the voltage at the terminals. To do this, ring all the contacts one by one, touching the iron cap of the screwdriver. The light in the screwdriver should not light up or blink in any case.
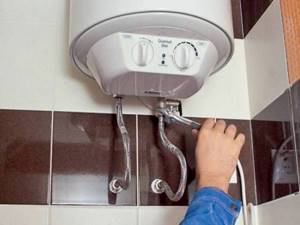
- Next, you need to empty the tank of water. You must wait until the contents of the tank cool down. Some models need to be removed from the wall. In this case, it is necessary to disconnect the hot and cold fluid supply hoses.
- If the equipment is still under warranty, you cannot drain the water, otherwise it may be considered as a non-warranty case. This must be indicated in the instructions or warranty card.
To drain, you will need a gas wrench and a hose. The sequence of actions to free the water heater from water is as follows:
- Use a gas key to turn off the cold water supply - the valve for incoming water;
- open the hot tap on the mixer to avoid vacuum;
- drain the water to the mark - this will take from 1 to 10 minutes;
- do not close the mixer, open the tap and let the water drain, you can also simply tighten the nuts at the cold water inlet and the liquid will easily drain;
- connect the water outlet hose to the thread of the heater, lower its second end into a sink or some container deep enough;
- then disconnect the hot water outlet hose from the body - this way we will get rid of the liquid accumulated around them;
- when you unscrew the nuts, the remaining water will finally drain from the water heater tank.
READ MORE: Types of non-stick coatings on frying pans: manufacturers and equipment
Emptying a small tank from residual water
This method of draining remaining water is suitable for units whose volume does not exceed 20 liters. Most often these are heaters of the Termex, Ariston, and Oasis brands. If the tank volume is large or a valve without a lever is installed, you will have to remove the water yourself. You cannot unscrew such a part, but you can press out the spring yourself.
Disassembling the boiler
To effectively clean the boiler you must first disassemble it. And here many may ask how to disassemble the boiler before cleaning so as not to damage it. Everything here is quite simple, you just need to follow the scheme. Almost all boilers have an identical structure. So, to disassemble the boiler we may need: a screwdriver, pliers, a special spanner.
Disassembling the boiler can be visually divided into several steps. The first step will be kind of preparatory. For subsequent disassembly, we need to disconnect our device from the mains and remove all water. In order to remove water, you will need to stop the water supply to our device and disconnect the hose from the hot water outlet on the boiler.
Then attach a rubber hose to it so that the water flows to the desired location. All boilers have a special valve that will prevent water from flowing without pressure.
Now we need to proceed to the second step and disassemble the boiler itself. To do this, we will use step-by-step instructions on how to clean the boiler. For ease of work, you can remove it from the wall, but if this is not possible, then we will disassemble it in a suspended state.
Different brands of boilers have different heating elements. For some they may be at the bottom of the device, for others at the top. We unscrew the protective cover, or simply use a screwdriver to snap it off to gain access to the heating element.
If you find the correct side, then under it you will see the wires that are connected to the heating element. We disconnect them and move them to the side as far as possible.
Now we need to remove the heating element itself. To do this, use a wrench to unscrew the fastenings of the heating element, holding it with your hand. Be prepared for the fact that when you pull out the heating element, the scale that lies at the bottom may fall off.
We take the heating element out of the boiler, and you can start cleaning it. Reassemble in reverse order, strictly observe tightness. It is also necessary to dry the wires. You can use a hairdryer for this.
Types of instantaneous water heater control systems
Depending on the model and design of the water heater, the control system for its operation can be designed differently. For example, in the THERMEX STREAM model, temperature control is carried out by controlling the water flow. The flow itself is regulated by special shower or washbasin nozzles included in the delivery set. In this case, the protection components are a pressure switch and a thermal fuse (temperature sensor).
Flow-through heater THERMEX STREAM disassembled
Accordingly, the electrical circuit diagram of this water heater differs significantly from the electrical circuit given above - here the phase current passes sequentially through the pressure switch and the thermal fuse, which returns to the on position after the temperature drops. Before repairing the water heater yourself, you should definitely study the electrical diagram and instructions from the manufacturer.
Example diagram of instantaneous water heaters THERMEX STREAM
As can be seen from a comparison of two circuits from the same manufacturer, the principles of control and protection in these models of water heaters differ significantly. Water heaters have a completely different design, and the circuit will be different. Below, for example, is the electrical circuit of the Atmor water heater.
Scheme of instantaneous water heater ATMOR, power 7 kW
Also, some models may have an electronic interface directly connected to power relays for controlling the supply of heating elements. This means that a breakdown in this electronic board, or a failure of the algorithm, can lead to the stoppage of the water heater. Some instantaneous water heaters may have temperature control, which is achieved by switching heating elements, or using an electronic circuit.