The heated floor design is drawn up by qualified specialists who make calculations using special programs and taking into account all the customer’s requirements. However, the cost of such work is quite high. Therefore, a large number of people independently carry out calculations using various recommendations. One of the necessary parameters in the calculation is the distance between the heated floor pipes. Read on to find out how to determine this parameter.
Determination of floor parameters according to the diagram
Classification of water floor systems
Among the techniques for laying water floors, there are two options: concrete and flooring systems.
Options for concrete and floor heating systems
The concrete method involves installing a water heating system under a layer of concrete screed. It involves an impressive amount of work and, accordingly, requires labor costs. The drying time over which the work lasts depends on the thickness of the concrete coating, and the room cannot be used. Only after complete drying can the finishing floor covering be laid.
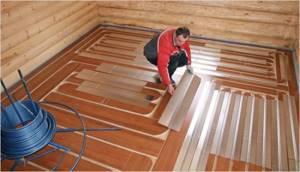
Wooden water heated floor system
The laying method is characterized by the use of ready-made materials, the absence of concrete work and additional financial costs. When using ready-made materials, installation time is significantly reduced. On the other hand, you will have to spend more money for purchased material that is laid in several layers. The flooring method of installation can be divided according to the type of the main material being laid: polystyrene, wooden modular and slatted.
How to calculate the number of pipes
The approximate pipe flow rate can be calculated by knowing the area of the heated room.
Data can be obtained by subtracting from the total area of the room the area of zones that do not need to be heated (the floor under large pieces of furniture) and the area of indentations from walls and partitions. The indentation, as a rule, is taken to be 20 cm, and for a standard room with an area of 20 sq.m., the area of such a zone will be about 3.5 sq.m.
The pipe consumption per 1 sq.m of area with a pitch of 100 mm will be approximately 10 m, with a pitch of 150 mm - 6.5 m.
Attention! In cases where the heat loss of the room is higher than the heat transfer, reducing the laying step may not give the expected result. Here, first of all, it is worth thinking about additional ways to insulate the room.
Water floor testing
Before pouring the floor, it is necessary to test it under conditions of increased pressure and temperature, for which the following technology is used:
- The system is completely filled with coolant;
- The pressure in the circuit is brought to 5 bar;
- Since the pressure will gradually drop to 2-3 bar, the previous operation will need to be repeated several times;
- During the pressurization process, you need to inspect all pipelines and connections for leaks;
- The pressure is set at about 1.5-2 bar (working pressure), after which the system is left in this state for a day;
- If the pressure has not dropped during the day, then you need to set the maximum operating temperature and wait until the coolant passes through all circuits;
- If each section of the system maintains a similar temperature throughout the day, then the system operates normally.
After checking, which confirmed the functionality of the system, all that remains is to fill in the finishing screed.
Pipe distance from the wall
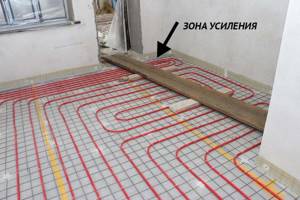
When installing underfloor heating pipes, you need to pay attention to the distance of the pipes from the walls.
In short, the minimum offset is 100 mm, the desired 200 mm, 150 mm will do.
Otherwise, you need to act according to the situation. You should not make large indentations from the walls. This threatens with not entirely comfortable consequences.
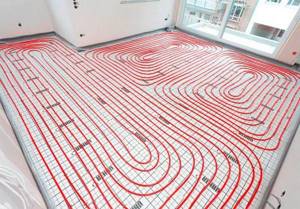
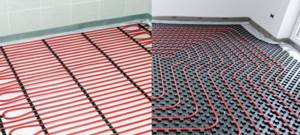
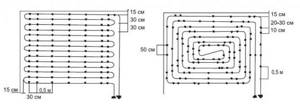
Pipe laying options
The consumption of materials and the amount of heat in the room depend on the installation method. There are three main methods for placing pipes on the floor:
- "snake";
- "snail";
- combined.
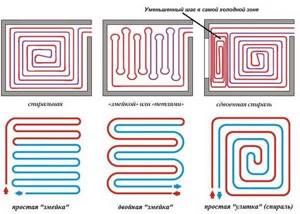
Pipe laying options
Snake laying is easy to design and install, which makes it widely used. The serpentine pipe arrangement is ideal for rooms with low heat loss and industrial facilities that require year-round heating.
Snake pipe laying
But such a scheme for placing heat sources can lead to temperature changes in different areas of the floor, which will affect the degree of comfort and the possibility of individual zones exceeding the permissible SNiP values, according to which the temperature maximum for heated floor coverings in places where people are constantly present is +25°C, periodically + 32°C. To reduce the effect of uneven heating during design, a number of restrictions are imposed on the inlets and outlets of heating fluid circuits:
- the maximum temperature difference is no more than 5 °C, the method cannot compensate for larger values;
- The maximum power of the heating system is 80 W/m².
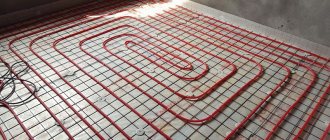
Laying heated floor pipes in a “snail” pattern
A more complex arrangement of coolants is the “snail” method, sometimes called a spiral or “shell”. Despite the more labor-intensive execution and the required accuracy of design calculations, this method is characterized by a uniform distribution of the temperature field over the entire surface of the floor. This is achieved by alternately placing forward and return pipes. Temperature equalization is carried out using a surface concrete screed, the recommended thickness of which is 3-5 cm, or aluminum plates placed on top of the coolant. Installation with a “shell” helps to eliminate the temperature gap from 10 to 25°C and uniformly distribute the temperature over the entire area.
Pipe laying option
The combined method is a combination of different laying methods over large areas. Significant surfaces of the coating are divided into zones in which insulation materials are installed according to the location of the site - pipes are placed in a snake pattern near windows, entrance doors and external walls, and along.
water heated floor
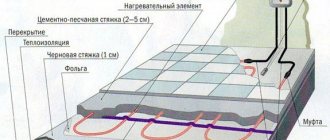
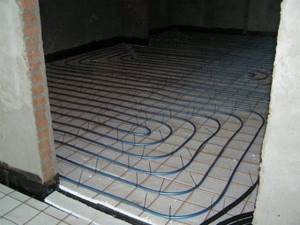
Cement pouring process
Correctly done installation of a heated floor cable should be completed by another testing of the entire system.
In particular, all connecting points are checked for strength and the presence of the necessary and permissible resistance. These manipulations will be much more difficult to carry out after creating the screed. After this, the pre-prepared cement mixture is distributed over the entire surface on which the heated floor is laid. Whatever installation methods are used, experts recommend leveling the screed solution strictly along the heating elements, and not across them.
If the screed is made on a standard concrete surface, its height is usually maintained at 3-5 cm
It is very important to prevent the formation of voids and irregularities. Such voids during subsequent operation greatly reduce the heat transfer of the installed system.
Moreover, local overheating of individual elements may result, which will lead to breakdown of the entire structure.
its constant checking for complete serviceability at all stages of installation. Upon completion of the screed, the cable is again checked for integrity. If no violations are detected, the screed is left until completely hardened. This procedure is carried out using an electrical tester.
The completely cured screed is covered with the selected floor covering. It could be:
- stone or ceramic tiles;
- laminate;
- linoleum.
As for coatings such as parquet boards or laminated parquet, which are based on natural wood, it is recommended to choose them especially carefully. It is very important to first compare their maximum permissible heating temperatures with the nominal temperature of the selected system.
The best option when working with the latest materials will be. The choice of this heating system is recommended by many construction industry specialists. Before installing the parquet, it must be thoroughly dried and a humidity level of 4-6% achieved.
Upon completion of all the above work, you need to wait until the screed is completely dry and only then turn on the heating elements. If work has been done with concrete, it should be left for 1 month, after which it will completely harden. As for the mastic, it dries completely within a week. If you do not adhere to this rule, you can damage the integrity of the created coating. In particular, cracks form in it, leading to failure of heating cables and the entire floor covering.
The “warm floor” system only at first glance seems complicated and finicky to install. If you strictly adhere to all the rules and recommendations, you can create maximum comfort in your home yourself and without the help of qualified specialists. The main thing is to want it and not to rush at all stages, but to carefully and responsibly carry out all successive stages.
Types of pipes for water heated floors
Pipes for water heated floors can be divided into two groups:
- Metal.
- Polymer.
The second group also includes pipes with a metal screen.
Metal pipes
Copper pipes. This is the most expensive, but also the most proven type of pipe. They have a number of undeniable advantages:
- Excellent ductility.
- Highest thermal conductivity.
- Inertia.
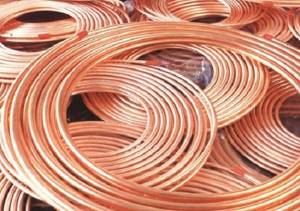
From these data it follows that it is possible to withstand freezing, to lay with a small bend radius (from 4 ᴓ pipes), and most importantly, the ability to use pipes with a smaller diameter. After all, copper has the highest thermal conductivity. The only drawback of copper pipes is the price. 1 lm of pipe ᴓ 12 mm, costs about 200 rubles. There is an option to use a copper pipe in a polyethylene sheath. Its price is 12-15% lower. Additionally, when using such pipes, protection against stray currents will be required. But if everything is done correctly, then your grandchildren will walk on this warm floor in old age.
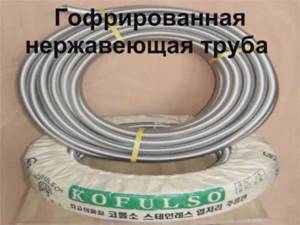
Corrugated stainless steel. These pipes appeared on the market relatively recently, about 10 years ago, and are very poorly distributed. But nevertheless, they have earned themselves a worthy reputation. They also have high thermal conductivity and unique flexibility (bending from 3 pipes)
And what is important, there are no fakes on the market yet, because the process of making them is too complicated. Their cost is almost two times lower than that of copper pipes
A high-quality corrugated stainless steel pipe for underfloor heating from the leader in this market segment, KOFULSO, will cost 80-85 rubles/m.p. at ᴓ15 mm. If you do not take into account the relatively high price, then their only disadvantage is the need to protect the water-heated floor circuit from electrochemical corrosion.
Polymer pipes
Due to the fact that the coolant in the water heated floor circuit should not heat above 30°C, we will not pay attention to the operating temperature range. Polypropylene pipes
Three modifications are available:
Polypropylene pipes. Three modifications are available:
A. PPH – homopolymer;
B. PPB – block copolymer;
B. PPRC is a polymer made from propylene and ethylene.
For a high-quality water heated floor system, only PPRC pipes with continuous aluminum foil reinforcement are suitable. And here are the reasons. Continuous reinforcement eliminates gas permeability. And this is a very important parameter. Basically, perforated reinforcement was introduced by Turkish manufacturers to facilitate the welding process. And fiberglass reinforcement does not affect the gas permeability parameter at all. Particularly attractive about PPRC pipes is their affordable price ≈ 50 rubles/m (ᴓ20 mm). Although it is higher than that of PPH and PPB pipes.
But propylene pipes have a huge disadvantage - elasticity. These pipes can only be bent using special equipment, with a bending radius equal to 8 pipes. Also, polypropylene pipes have very low thermal conductivity. That is, the heat transfer from the coolant to the screed will be extremely slow, which will increase the inertia of the system.
Metal-plastic pipes
- The inner and outer layers of the polymer are equal in thickness;
- The fittings are located strictly in the center;
- The foil is butt welded!
- A clear and legible inscription on the pipe indicating the batch number and manufacturer;
- Buy goods from reputable stores;
- Ask for a quality certificate for this particular batch of pipes.

Polyethylene pipes
Only two types of polyethylene pipes are suitable for organizing warm water floors:
- PERT;
- PEX.
These pipes are made from the same monomer - ethylene, but with a different approach. In the manufacture of PERT pipes, during the polymerization process, microscopic fractions of saturated hydrocarbons with the number of carbon atoms from 7 to 10 are added to the reaction mass. This leads to the formation of cross-links between the layers of oligomers.
The same effect can be achieved in a finished product if it is irradiated with a powerful electron flow (PEXc) or treated with chemical reagents at elevated pressure (PEXa, PEXb, PEXd). This approach produces PEX pipes. The subscripts indicate the different reagents used to form additional bonds.
In terms of their properties, these pipes are approximately equivalent, but PERT still has the advantage. After all, its properties are innate, not acquired. Guaranteed service life of 80 years. They are not afraid of freezing, are chemically inert, and are relatively easy to weld. Their only drawback is their fairly high elasticity. Therefore, they require reliable fixation when laying on the floor. Price for 1 linear meter of pipe ᴓ 20 mm: PEXc - 70 rubles, and PERT - 85 rubles.
Calculate the length of the contour
When making calculations to determine the number of pipes for laying a structure - a water-heated floor, the following points should be taken into account:
- the total area of all premises;
- number of collectors;
- room layout;
- the size of window openings and doors through which heat can escape;
- wall thickness;
- placement of furniture;
- air humidity;
- purpose of the rooms;
- presence of other heating systems.
Based on the average, 1 m2 will require 5 linear meters of pipe, with a laying step of 20 cm.
To most accurately calculate the size of the pipeline, the following formula is suitable:
L = S/N x 1.1
Where:
- S is the area of the room;
- N—laying step;
- 1.1 - reserve for making turns.
To the data obtained, you should add the number of meters from the floor to the manifold cabinet and back.
For clarity, let's look at the calculation process using an example:
- room area - 15 meters;
- the maximum distance to the manifold cabinet from the floor is 4 meters;
- distance between pipes - 0.15 mm;
15: 0.15 x 1.1 + (4 x 2) = 118 meters
Another way to calculate the amount of pipeline is to reflect the laying diagram on graph paper. At the same time, it is necessary to observe the scale and take into account the size of the room.
After reflecting the entire system on paper, you need to measure the length of all the coils in the drawing using a ruler, and multiply this result by the appropriate scale.
Pipes for water floors and the main criteria for their selection.
In order to choose the optimal type of pipes, you should clearly understand the conditions in which they will function. In addition, you need to imagine some of the features of warm water floors:
- The operating temperature of the coolant in heated floors rarely exceeds 50 degrees. Usually it fluctuates between 30-40 degrees. Therefore, the material used in the manufacture of underfloor heating pipes must have very good thermal conductivity (to transfer heat through the cement screed)
- The length of the laid pipe quite often exceeds 100 m (the length depends on the diameter). Therefore, to facilitate the operation of the pump, the inner walls of the pipe should be as smooth as possible.
- When the water floor pipe circuit is heated, it lengthens. Therefore, the pipe material must have a small coefficient of thermal expansion. Or have sufficient elasticity and strength of the shell to prevent deformation and destruction.
- In the event of force majeure, in the event of a collector failure, the material must withstand the water temperature of the central system (70-90 degrees)
- In addition to the above, the material must have the following properties: increased protection against corrosion, complete tightness, ease of installation and the absence of joints. Such careful selection of material can be avoided by choosing an electric heated floor.
- Pipes and components must have a reasonable price.
Can the outline be of different lengths?
The branch of a warm water floor should not exceed 120 meters. Otherwise, you should make several separate loops. Ideally, they should all be approximately the same length. Then there will be no need for additional work on balancing and setting up the system.
If we consider an apartment with three rooms, one of which is a bathroom, then it is natural that the length of the pipeline in this room is much shorter than in the rest. The question arises: is it necessary to divide the coil in other rooms into parts so that it is equal to the size of the pipes in the bathroom?
This is not necessary; there is an acceptable discrepancy along the length of the pipeline of up to 30 to 40%, in rooms of different sizes. In addition, by using different pipe diameters and varying this by changing the laying step, you can reduce the area of a large room.
For your information! Do not forget to exclude from the area of the largest room the places where large-sized furniture will be installed.
Regardless of the chosen scheme, you should first prepare a drawing for laying the pipeline, taking into account the size of the contours and the intervals between the branches of the warm water floor.
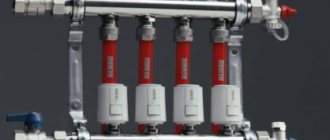
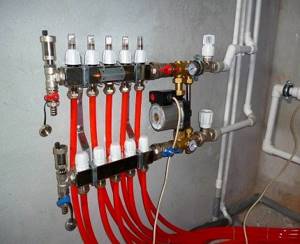
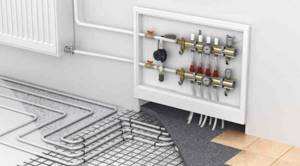
Collector connection diagram
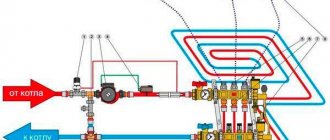
The choice of a ready-made mechanical or automatic collector model depends on the characteristics of the heating system.
The first type of control module is recommended to be installed for heated floors without a radiator, the second can be used in all other cases.
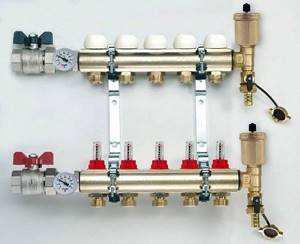
Valtec collector groups are the most popular. The manufacturer provides a 7-year warranty on its products. The installation diagram for the liquid circuit manifold is already included in the package of the finished mixing unit
According to the diagram, the assembly of the distribution comb for heated floors is carried out as follows:
- Installation of the frame. The following can be selected as the installation area for the collector: a prepared niche in the wall or a collector cabinet. It is also possible to mount directly to the wall. However, the location must be strictly horizontal.
- Connection to the boiler. The supply pipeline is located at the bottom, the return pipeline is located at the top. Ball valves must be installed in front of the frame. They will be followed by a pump group.
- Installation of a bypass valve with a temperature limiter. After this, the collector is installed.
- Hydraulic test of the system. Check by connecting to a pump, which helps build up pressure in the heating system.
In a mixing unit, one of the required elements is a two- or three-way valve. This device mixes water flows of different temperatures and redistributes the trajectory of their movement.
Shut-off valves and fittings are installed on both pipelines, return and supply, connected to the manifold installation, designed to balance the volume of the coolant, as well as to block any of the circuits
If servo drives are used to control the manifold thermostats, then the mixing unit equipment is expanded with a bypass and bypass valve.
Better with a project
Remember! There is nothing better than a ready-made heating system project, which indicates everything necessary for turnkey installation of heating. This also applies to the pipe laying step.
The project will give you the exact diameters of the mains and the required pipe laying step in each room. The project will indicate the length of the highways. You will be able to select coils with an accuracy of several meters and you will not have a lot of waste.
Well, and most importantly, the project saves real money and you don’t have to guess what and how to do.
But if you don’t have a project, then we’ll look at a typical step for laying heated floor pipes.
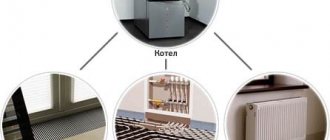
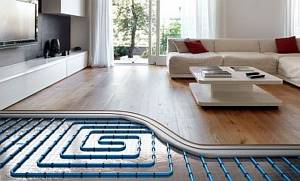
What is a heated floor
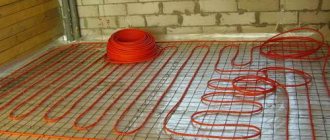
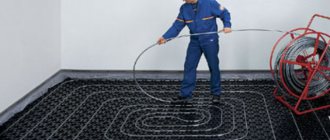
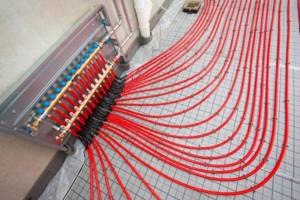
This is a special system designed to maintain floor temperatures in the required ranges. Warm floors allow you to maintain optimal temperatures in your house or apartment, regardless of the time of year. Water and electric heating systems are most often used. The design of a water floor consists of a pipeline through which water flows and a special device that heats the liquid and distributes it throughout the system. The tubes are mounted in a concrete screed.
Warm water floor
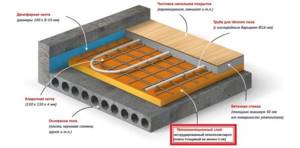
Heated floor installation
A few words about saving
If we consider heated floors from the economic side, then their benefits appear only in some cases. First of all, when installing an electrical system, heating mats must be selected in accordance with the dimensions of the floor surface that will be heated. Using mats that are too large will waste electricity. Provided that the electrical system is equipped with a temperature controller, it is safe to say that the cost of central heating will be equal to the cost of heating underfloor heating. But the house must be well insulated and equipped with high-quality plastic windows.

How beneficial is a warm electric floor?
Water heated floors or electric
Advantages and disadvantages
pros
- uniform heat distribution over the room area;
- the system does not create any problems for people suffering from asthma or allergies;
- the generated energy is absolutely safe;
- simple installation and operation of heated floors;
- the installed system does not occupy useful space in the house;
- There are no convection currents when using a floor heating system.
Minuses
- high cost of electricity when compared with other types of fuel;
- the presence of a thermostat and their skillful use is a prerequisite for the operation of a heated floor;
- if any malfunction occurs, it is necessary to dismantle the floor covering;
- the system is not used in large industrial premises (their heating is not profitable from an economic point of view).
Heated floors have few disadvantages, which is why this system is very popular and the modern construction market offers several types of such systems.
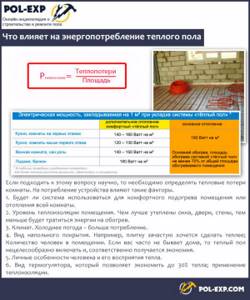
What affects the energy consumption of underfloor heating
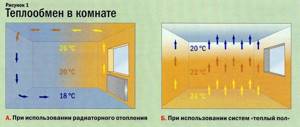
Features of heat exchange in the room
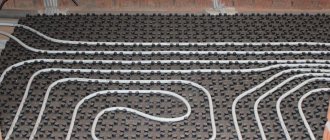
What does a water heated floor look like?
Choosing the optimal step
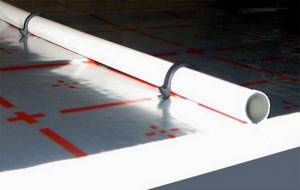
After choosing the pipe material and the method of placement under the floor covering, the required distance between adjacent turns of the circuit is calculated. This indicator is directly dependent on the diameter of the pipes.
If large cross-section pipes are laid too tightly, the floor surface will overheat. Conversely, placing small pipes with a large pitch will lead to the formation of thermal voids. In this case, the warm floor can no longer be considered a single heating system.
To correctly determine the step, a number of points must be taken into account:
- Depending on the cross-section of the pipes, the laying pitch varies from 50 to 450 mm. For convenience of calculations, this indicator is most often taken as a multiple of 50, and for private households it is 100, 150, 200, 250 or 300 mm.
- The laying step directly depends on the purpose of the room and the magnitude of the thermal load. For an average load of 50-80 W/sq.m, the best solution would be a step of 100-200 mm.
- When the load is below 50 W/sq.m, the step is taken equal to 200 mm, more than 80 W/sq.m – 100 mm.
- In rooms of large volume or area, the laying step should be smaller.
Water floors in wooden houses
Features of heating a wooden floor
Water-heated floors under wooden floors, and even more so on a wooden base, are not installed so often. There are several reasons for this:
When working with wooden bases, it is necessary to compensate for the heat capacity of wood using reflective elements
- Thermal conductivity of wood. On the one hand, this is a plus - the wooden base acts as a heat insulator. On the other hand, the floor will take quite a long time to warm up. In addition, there is a risk that a significant portion of the energy will be spent on heating the subfloor, and only part of the heat (relatively small) will enter the room.
- Temperature deformation. Laying hot water pipes in the thickness of a wooden floor can lead to uneven changes in the linear dimensions of its individual sections. As a result, the stability of the structure is significantly reduced - primarily due to the appearance of cracks in both the rough flooring and the frame.
Wooden bases are subject to temperature and humidity deformations - this feature will have to be taken into account
- Exposure to moisture. Of course, water heated floor systems are made airtight, trying with all their might to avoid leaks. But when laying under a wooden covering, even condensation caused by temperature differences can cause the wood to swell.
Pipes must be hidden under supporting elements, otherwise they will be damaged when walking on the floor
- Significant thickness of heating elements. If water heated floor pipes are laid in a screed, their thickness can be easily compensated by pouring the required layer of concrete. When installing on a wooden base, you have to solve these problems differently, since simply laying a finishing coating over the pipes will not work.
The traditional option of pouring screed (pictured) will not work here - the load is too great
However, everything that I noted above does not mean that a wooden water floor system is unrealizable in principle. If we take into account all these shortcomings and use modern materials, devices and technologies in our work, then a warm floor on joists or planks will work to the envy of our neighbors.
Is it possible to join pipes to each other?
If a water floor made of copper pipes is laid in a screed, then the pipes will have to be joined to each other. This will make the structure more reliable and durable. When installing polypropylene products, the connection is made by soldering, and in cases with a polyethylene circuit, the connection is made by welding a heat-resistant coupling.
The situation is more difficult when connecting PE-X and PE-RT pipes with fittings. Installation of press fittings is acceptable, but not recommended, as leakage may occur. But to connect the pipeline to the collector unit you cannot do without press fittings.
Important! Connecting circuits using push and compression fittings is prohibited. This also applies to push-in connectors for HDPE.
It is better to take a flexible pipeline for a warm floor, in one solid piece. This is more reliable and practical, since if there is a leak, repairing the lower floor will cost more.
Warm floors are a modern heating system that, with the correct choice of material and accurate calculations of the distance for laying loops, can create an ideal microclimate in the house.
Distance of pipes under furniture and kitchen units
Remember one simple thing. Furniture tends to change, move and be thrown out of your home. That's why we ALWAYS install heated floors under furniture! As for the very step of laying the heated floor pipes, we don’t pay attention to the furniture. We install according to the information provided above.
With the kitchen set the situation is a little different. Even if the kitchen set changes, it often remains in the same place. Therefore, installation of underfloor heating pipes under the set is not necessary, or the pipe can be laid there in increments of 20 mm.
Increasing the distance between individual strands of the heating cable.
For all manufacturers, the permissible distance between adjacent threads can vary from 5-6 to 15-17 cm (when laid in a screed 3-5 cm). There is no need to greatly increase the distance between the individual threads, because uneven heating will become noticeable. On the other hand, reducing the distance leads to excessive cable consumption and the risk of unacceptable proximity of adjacent cable strands. When installing cable heating, the floor temperature sensor should be placed in a plastic corrugated tube. This is done so that in the event of a malfunction, the broken control device can be easily replaced.