Today, the industry offers several types of heated floors, such as, for example:
- electrical,
- infrared,
- water,
- others.
The most common are water heated floors. The popularity is largely due to the durability and reliability of such a system. However, without the correct design of such a floor, the costs of its construction may increase significantly and its performance properties will decrease.
Warm water floor system
Design of heated floors
The design of a water heated floor can be drawn up independently, or by specialists for a fee. One way or another, some initial data will be required to draw up the project.
Advice! If the installation work will be carried out by special workers, then the project must be completed, since on its basis an agreement can be drawn up, under the terms of which claims can be made.
To build such a system with your own hands, a project is also necessary. Often the cost of installing a heated floor in an apartment or house exceeds the cost of the entire interior decoration. With proper design and calculations, you can save significantly without purchasing unnecessary shaped elements and materials.
A project is necessary in any business
Initial data
So, to design water floors you will need to know, or you will need to tell the designer the following data:
- Floor plan of the whole house. If the house has several floors, then plans of all floors;
- Information about what material external walls, windows, doors are made of, as well as their types;
- Indication of the required temperature, that is, the desired temperature in the room;
- Place of installation of the heating boiler, as well as its height above the floor level;
- Availability of risers and outlets indoors;
- Some information about the arrangement of furniture.
After collecting all such data, it will be possible to make a thermal calculation of the warm water floor system. And based on it, as well as on the basis of some of the data given above, draw up an installation diagram.
It must be said that before designing a warm water floor, it is not superfluous to take care of such things as the location of furniture, boiler and others. It’s worth deciding in advance. This is due to the fact that warm water floor pipes are not laid under large pieces of furniture in order to save money.
Installation diagram
When drawing up a project, the designer will also create an installation diagram. If it is created with your own hands, then all its individual elements are taken into account immediately.
But when creating it by other persons, it is better to ensure that the following provisions are included in it:
- Scheme of dividing the surface into separate sections . It must be said that this is a very important stage, since over large areas the thermal expansion of materials can lead to cracking of the cement screed. That is why expansion joints are installed between individual sections. The area of one plot should not exceed 40 square units. U-shaped and L-shaped premises should be divided regardless of the area;
The diagram shows individual contours
- Indication of the presence of expansion (temperature) joints , which were discussed just above.
They are gaps between individual sections, which are filled with the following material:
- Damper tape;
- Eps pieces;
- Foamed polyethylene.

Damper tape
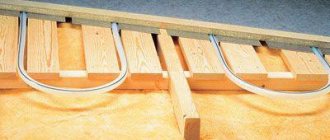
Pipes in such a seam must be placed in a casing. The corrugation can act as a casing.
- Installation technology . Knowing it, you can easily select and purchase the necessary materials. It must be said that now there are two main technologies: “wet” and “dry”;
- Depending on the wishes of the temperature inside the room, the temperature of the pipes is also calculated . You need to know it in order to choose the right finishing coating.
For example, parquet is allowed to be heated up to 25 degrees, no more. Knowing that the temperature of the supply pipe will be, for example, 32 degrees, this finishing option is eliminated.
Pros of plinth
The technology, which is fundamentally different from traditional heating systems, looks like an ordinary decorative element from the outside. She received nationwide love thanks to her filling:
- A warm do-it-yourself plinth is equal in thickness to its traditional counterpart, but the height is slightly larger - 12-15 cm. This is done for the convenience of installing the heating system inside the element.
- The finishing is mounted at the junction of the floor and walls along the entire perimeter of the living space, organically fitting into any interior.
- The principle of operation is simple - electricity or coolant heats the tubes, and they, in turn, give off heat to the outer aluminum casing.
The benefits don't end there:
- Installing a warm baseboard allows you to get rid of inconvenient radiators - the dream of many owners. Nothing will stop you from turning any idea of an interior designer into reality. You don’t have to hide ugly batteries in closets, behind screens or curtains.
- This system allows you to increase the service life of your furniture, because, for example, a cabinet standing next to a conventional converter quickly dries out due to hot air.
- A warm baseboard with your own hands can be either a full-fledged heating method or an auxiliary one. This element can not be placed along the entire perimeter of the room, but only where additional heating is needed. This reduces energy costs without reducing the efficiency of the device.
- The innovative heating system can be installed not only in a new apartment, and not only during renovation. Its installation is possible even months after the completion of construction and repair work.
- You can use a warm baseboard with your own hands in any room. They are suitable for living rooms, bedrooms and offices; they perfectly warm glazed verandas, terraces, winter gardens, balconies and loggias, can be installed in the bathroom and toilet, and are safe even for a child’s room.
Another great advantage of a warm baseboard with your own hands is that it does not create a “thermal cushion” under the ceiling. The entire space of any room is heated evenly:
- Standard heating systems work in such a way that hot air inevitably rises. In this case, drafts on the floor are possible. If the room is small, then this is not so noticeable. But, for example, in country houses this difference is quite large.
- The skirting system works in such a way that heat is transferred not only into the space, but also into the walls. This advantage will be useful for owners of private houses whose walls often freeze, and for residents of corner apartments in high-rise buildings.
But many people prefer this system rather than a warm floor, because to install a warm baseboard you do not need to prepare a concrete screed; the modular design of the system is very mobile. At any time you can pick it up and move it to another room.
What documents should be
So, after carrying out all the calculations, as well as drawing up descriptions and installation diagrams, you should have the following documents on hand:
- Heating system plan;
- List of all necessary equipment and all materials.
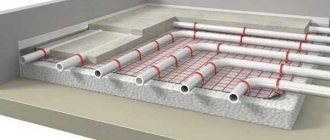
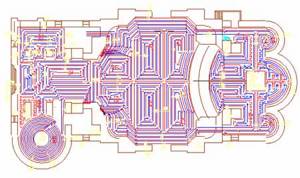
3D model of the heating system plan indicating the underfloor heating system
The plan itself must contain the following data:
- Installation locations and sizes of heating radiators;
- Pipe layout diagram, which should indicate their diameters and the lengths of all straight sections;
- Pipe laying diagram, which should indicate the distances between the pipes, the temperature of the coolant in each pipe, as well as the lengths of all circuits and the diameters of the pipes in them (all this can be indicated in the previous diagram);
- Some data on the power required to heat each individual room (that is, the power of one radiator and their location);
- Some information on setting up automation.

Approximate plan of a heated floor system indicating some data
It should be noted that you can find out all such data yourself, and also, based on them, make a thermal calculation of the water floor. However, in case of an error, you will have to either finish or redo something.
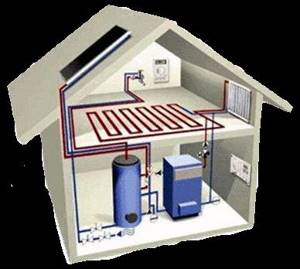
The role of a water floor as a main or additional source of heat
A warm floor in a room as a heating system can perform an additional or primary function. As an additional system, underfloor heating affects the comfort of the flooring surface. In this case, the main source of heat is traditional heating radiators. To maintain the coolant temperature, the thermostatic regulation principle is used.
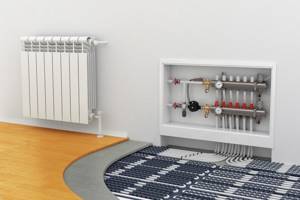
Combined heating system
Controlling the heating level of the coolant allows you to compensate for heat losses in the room and protect it from temperature changes outside, when the water floor is the main source of heat. The warmer it is outside, the lower the coolant temperature should be and vice versa.
In fact, a heated floor is a low-temperature type of heating system and, theoretically, the required coolant temperature can be obtained by setting the boiler to minimum heating. However, a conventional boiler set to a low temperature range is characterized by a sharp decrease in efficiency and from the economic side such a system becomes unprofitable.

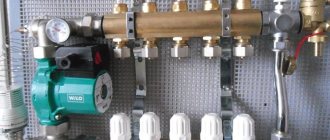
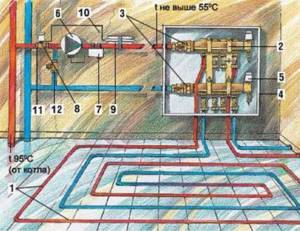
Mixing unit
In this regard, there are other ways. For example, the use of a modern heat generator that supplies coolant heated to +30 - 50 degrees. When such a boiler is equipped with a circulation pump, each circuit has a coolant of the same temperature, due to which the most economically efficient process of heating a house with a “warm floor” system is carried out.
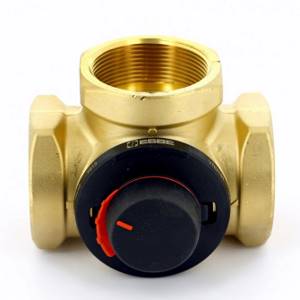
Three way mixing valve
If the boiler is not equipped with a low-temperature operation function, then a three-way mixing valve can be used, and the required temperature can be obtained by equipping the mixing unit with a thermostat.
Note! When installing a combined floor covering, for example, wood and ceramic tiles, a separate circuit is laid under each material, since each material differs in thermal conductivity. The water in the circuits will have different temperatures to create uniform heating of the room with such a floor.
It is also worth considering that some types of finishing materials are not suitable for water floors and can be installed in tandem with film or cable electric heating systems.

Infrared film for heated floors
Required material
As already mentioned, the design of warm water floors is accompanied by drawing up a list of necessary materials.
In general it should include:
- Manifold cabinet;
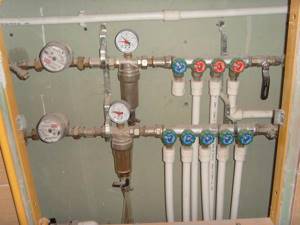
Manifold cabinet with pressure sensors and meters
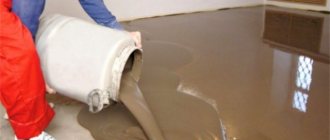
- Cement, sand, plasticizer;
- Distributor and flow meters;

Distributor
- Pipe fastening;
- Material for expansion joints, as well as damper tape or EPS strips;
- Thermal insulation;
- Pipes that are specifically designed for heating systems. They must withstand high temperatures, high pressure and not allow oxygen to pass through.
Some other issues taken into account at the design stage
At the stage of designing a heated floor, it would be a good idea to draw a laying diagram taking into account the location of the furniture and existing diagrams. In addition, you need to take care of the final coating in advance, based on the factors discussed a little higher.
You should also decide on the coolant, that is, what kind of liquid will flow through the pipes.
Advice! It is better to determine such issues at the design stage, since now it is still possible to change something. For example, select a suitable installation scheme, taking into account the location of the boiler, manifold, furniture and other items.
If later, when making calculations, it turns out that the scheme simply does not fit, then everything will have to be redone, but it is not a fact that all the purchased material will be useful, but its price is high.
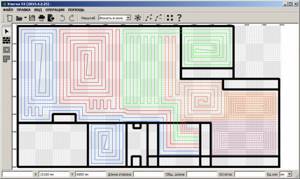
Types of schemes
So, today we can distinguish only two main installation schemes:
- Spiral;
- Snake.

Laying schemes
All the rest will just be different variations. For example, there is a snake laying with and without an edge zone.
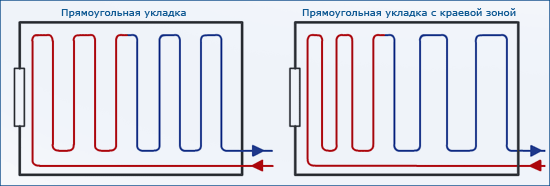
The photo shows diagrams with and without an edge zone
Using qualified assistance to draft a project
Many people underestimate such things due to lack of funds/desire/experience/time. Professionals offer each client:
- creating a plan taking into account all needs;
- implementation of invested resources by 100%;
- consideration of all prices, from small expenses to the total estimate;
- implementation of a turnkey underfloor heating project;
- quality results supported by experience/knowledge/scientific data/proven methods;
- guarantee of effective heating if all instructions are followed.
We recommend: Is it possible to use underfloor heating as the main heating?
All this seems unreal until you have to fully face it. But at the time of reading this article, a person has already appreciated some of the benefits of such information. In large cities, trusting unverified companies is very dangerous.
Which is why it’s better to play it safe once again to achieve your plans. Especially if it is your own comfort and safety.
- Related Posts
- How is a heated floor connected?
- How to make a warm floor from a heated towel rail?
- How does a comb for heated floors work?
- What are the characteristics of Aura underfloor heating?
- How are pipes for underfloor heating made of cross-linked polyethylene laid?
- How to properly install a heated floor?
Features of both schemes
Let us stipulate that the “snake” scheme is suitable for most small rooms. This scheme is characterized by uneven heating of the pipes.
Those pipes that are located closer to the manifold cabinet, that is, at the very beginning, will warm up most quickly. It is these pipes that are laid along the wall that has the greatest heat loss.
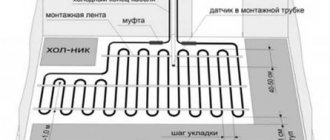
The distance between the pipes in such a scheme should not exceed 30 cm. Otherwise, warm places (above the pipes) and cold places (between the pipes) will be clearly felt. As for the outermost pipes, the distance between them should be made even less - 20 cm, or even less.
As already noted, snake laying gives uneven heat distribution. You can get rid of this effect in a simple way - lay another snake, only in the reverse order.
The second scheme precisely solves the problem of unevenness. The spiral is constructed in such a way that the pipes (supply and return) are laid parallel to each other. For this reason, in each section (above the supply and return pipes) the temperature will be approximately the same.
This scheme is used for rooms with large areas. Pipes are laid at a maximum distance from each other of 20 cm. It is recommended to lay them at an even smaller distance.
Laying pipes according to the “spiral” pattern
It is determined by the minimum bending radius of the pipe. For example, for a pipe with a diameter of 20 mm, the minimum bending radius is only 10 cm.