Home/Heated floors – Questions about floor repair, installation./Heated floor pie: Water floor and electric
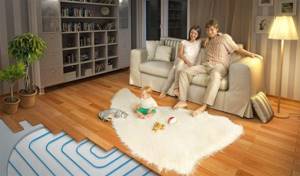
Underfloor heating systems are an excellent alternative to radiator heating. Their design is located under the floor covering, which increases the free space of the room. And the uniform distribution of heat will create the most comfortable temperature for living. But when installing heated floors, there is such a term as - heated floor pie. Many beginners wonder what it is and what its purpose is for the heating system. This article will help answer these and related questions.
What is a heated floor pie and its purpose?
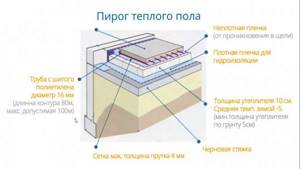
Every consumer of heated floors wants not only to create the optimal temperature for living, but also to ensure that the floor remains level and fits into the interior of the room. But, as you know, wooden coverings and old concrete screeds are susceptible to deformation and rotting over time. Therefore, if you place one heating system under the floor covering, the heating of the room will not be of high quality, and the system itself will quickly fail. For this reason, a design was developed for layer-by-layer installation of heated floors using additional materials, which visually resembles a layer cake.
So, a heated floor pie is a multi-layer structure for all types of heating systems. Each material is laid in a specific sequence and performs specific functions. The general task of the floor pie includes:
- Reduce heat loss at home.
- Avoid moisture in the heating elements of the system and the building structure.
- Direct the flow of heat in the right direction.
- Create sound insulation.
In addition, a heated floor pie will help protect the heating model from the negative effects of the environment.
But here it is worth paying special attention to the fact that the design of the pie is influenced by the model of the heated floor and the ceiling of the building. Therefore, in order to avoid mistakes, each type of heating system installation should be considered in more detail.
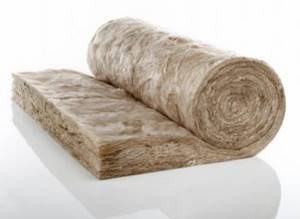
Thermal insulation layer
You can get a base protected from freezing and heat loss by creating a high-quality thermal insulation layer. And the underfloor heating system will be additionally protected from external influences of low temperatures. The functional essence of the design of a heated floor on the ground is that the thermal insulation layer blocks heat leakage (about 20%) and directs it straight upward into the heated room.
A high-quality thermal insulation layer has a number of features:
- low thermal conductivity;
- high strength;
- preservation of basic characteristics at high humidity, etc.
Today you can choose many types of materials for laying thermal insulation.
Particular attention should be paid to polystyrene foam.
There are several options for using this material:
- pure polystyrene foam needs to be coated with polyethylene on both sides;
- expanded polystyrene coated with aluminum foil - the easiest to install and does not require additional fastenings;
- extruded material does not require additional coating.
Features of the heated floor pie
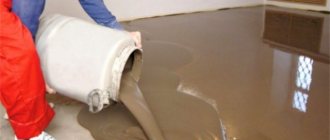
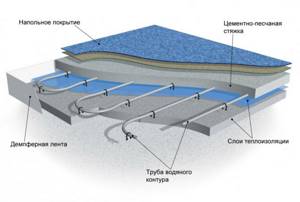
The moment of drying is accompanied by expansion of the concrete. Because of this, a damper tape is attached along the entire perimeter of the fill. It compensates for mechanical stress resulting from heat generation. Plus, mixing with laying the screed takes place without the presence of air inside the mixture.
Of course, within acceptable limits. It is important to lay a high-quality solution next to the pipes. This increases heat transfer to the maximum limit.
It is better to leave the water during the process. This way the weight of the screed will not push through the entire heating system. Even 50 mm of concrete can produce a mechanical impact of sufficient force. The reinforcement is attached only to the ceiling.
Foam insulation is not always suitable for use in heated floors. Its density must be taken into account. Ideal figures are 35kg/m3.
The installation of pipes in a heated floor pie does not exceed the circuit length established for all. More than 80 meters becomes difficult to pump coolant. Doorways are separated by special expansion joints, as are rooms larger than 30 square meters.
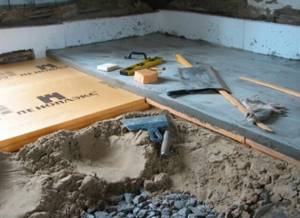
Concrete is poured under pressure in a system of 1.5-2 Bar. Before starting, pressure testing is carried out up to 8. The sand level is controlled by beacons/laser level. Both methods are suitable, but the second speeds it up by literally a third.
The process of laying a heated floor cake
The sand is leveled according to the rule of lighthouses. Then a polyethylene film with a thickness of 150 microns is pressed tightly. The overlap should be at least 10 cm. It’s better not to exceed 15! Next, the insulation comes into play.
It is important that the grooves coincide one on one. The permissible thickness is from 3 to 20 cm. An additional membrane is placed on the polystyrene. Excess waterproofing raises the welded mesh by an average of 15 cm.
The reinforcement frame is used from minimum 4 mm beams. One cell 150x150/200x200. Nylon clamps tightly fix the metal-plastic pipe. Before pouring, the damper tape is attached using a construction stapler. Under no circumstances should a large heating system be placed under furniture.
The best base for a heated floor cake
Each of the subtypes of such heating can be easily mounted on most known elements. The only important nuance will be proper consideration of the room parameters. Water heating is not always suitable for a city apartment. But a private house will appreciate all the advantages according to its intended purpose.
Wood, sand, concrete floors. All these are just individual preferences of people. From a fire safety point of view, it is worth taking a closer look at the infrared option. It is best protected from fire.
For increased safety, the electrical cable is laid with metallized plates in specific places. And a water floor is not always suitable for a wooden base. It is worth strengthening with beams in advance. The large weight will affect the launch stage.
When additional water is released through the tubes, it will also add several kilograms. In new/private houses, the heated floor pie is installed on the ground. It’s safer, more economical, better quality, more durable.
Designing a heated floor pie based on the thickness of its layers
Specificity is necessary to make accurate calculations. The finishing floor is tied to the base of the foundation. Then there remains a height reserve of almost 10-15 cm. The base is cleared of debris, sand, small objects/stones, and other unnecessary elements.
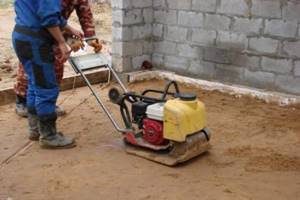
The ground level is exactly the same as the concrete floor. That is, the thickness does not collapse under the weight of the rest of the structure. Compaction of screenings, sand, gravel, and earth occurs 4-6 times. Experienced craftsmen recommend a sand-gravel mixture. In the language of builders, such a layer is called a “pillow”.
Thermal insulation thickness is up to 120 mm. More is possible, less than 50 is not. On top is a 200 micron layer of polyethylene. The reinforcing mesh can have 4-5 mm in diameter rods. It may not be able to withstand anything thinner. If you take it thicker, you don’t always get into the general plan. There is a 16 mm pipe for it.
We recommend: Do-it-yourself greenhouse made from profile pipes 20×20 and 40×20
It is secured with clamps for fixation. The material is only metal-plastic/cross-linked polyethylene. Experts advise leaving at least 25 mm for pipes with mesh.
Concrete screed is used in the range from 50 to 100 mm. The ideal value is 80. Then the warm-up time is, in principle, suitable for most expectations. After all, there is still a finishing coat on top.
Which is installed on the appropriate fasteners. Thus, everything together should have at least 140 mm from the top point. The indicator is considered standard for all heated floors on a concrete screed.
Installation of the pie on a concrete screed
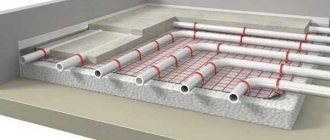
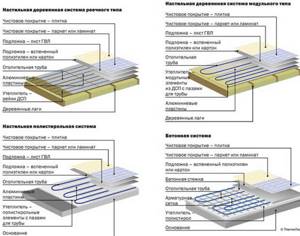
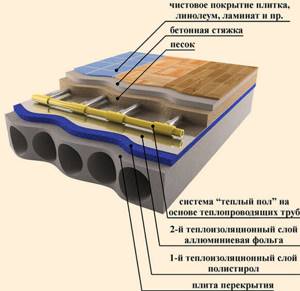
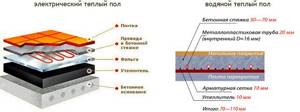
The underfloor heating pie on concrete slabs, regardless of whether it is water or electric, looks like this:
- concrete foundation - this can be a concrete foundation or concrete monolithic slabs;
- waterproofing - ordinary polyethylene film;
- insulation with a reflective surface - polystyrene foam, cork backing, etc.;
- reinforced mesh;
- heating system pipes or cables;
- concrete screed;
- floor covering.
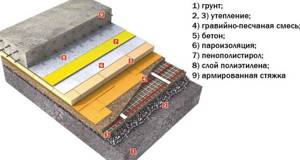
On the ground
Installation of the pie on the ground of a water or other type of floor is allowed if the soil is not loose and the groundwater is at least 5 meters from the surface. The difference between this design and the installation of a floor pie on concrete lies in the additional stage of work.
The bottom line is this:
- the surface is cleaned and leveled;
- sand (5 cm) is poured, which is compacted and lightly watered;
- the next layer of the heated floor cake, 7-8 cm thick, is gravel or expanded clay, it is also compacted;
- then waterproofing, which is reinforced with mesh;
- then a rough screed (10 cm) is poured;
- then a layer of waterproofing and polystyrene foam insulation is laid, its thickness depends on the conditions of the room itself (5-15 cm).
In the future, the process of installing a heated floor on the ground is no different from laying a cake on concrete slabs: reinforced mesh, heating elements, pouring screed or underlay, and floor covering.
On a wooden base
If the basis for a heated system is a wooden covering, then the principle of installing the pie is the same as on concrete slabs.
There is a second method, which differs in technology - using wooden logs. In this case, plywood is laid down like the base of a pie. There are logs on it, on top of which a waterproofing film is spread.
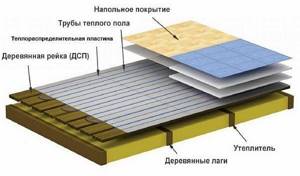
Insulation boards 10 cm thick are laid between the logs. For heating elements (pipes or cables), grooves are made in which they are installed. When arranging a water pie, first a reflective plate or foil is placed in the grooves, and only then the pipes are laid.
There is another option - flooring, when chipboard sheets equipped with channels for pipes are placed on the insulation laid in the logs.
Another method is rack-and-pinion, they are stuffed onto the base. The distance between them must correspond to the size of the heating elements.
For your information! The concrete screed in a pie with logs, when installing a heated structure with slats or floors, is not poured.
Thick plywood is laid as a base for the finishing coating. A decorative coating is mounted on it. If you plan to install a laminate, then you can abandon the plywood and lay it directly on the pipes of the water system, since any of the profiles listed above can withstand such a load.
On a monolithic slab
The monolithic slab has high strength. It is leveled with a rough screed and the installation of the layers of the pie begins.
This base is very cold, so it is important to properly insulate the floor. Extruded polystyrene foam is used for the heat-insulating layer. It is placed between a monolithic slab and a rough screed.
Next, the layers are laid in the same way as for concrete.
In the bath
Most often, bathhouse floors are installed directly on the ground. In this case, be sure to raise the floor above ground level. For this, beams with a cross section of 7*10 cm are used. They will take part of the load on themselves and allow it to be distributed much more evenly. In addition, leveling the base in this case will be very simple.
Two layers of waterproofing are laid on the support posts and foundation. Most often, roofing felt is used in this case.
After this, supporting beams are placed. Along the edges they are installed on the foundation, and in the center they are supported by 2-3 columns. The logs are fixed to the beams. To create a slope, they are cut in the center by 2 cm.
Skull blocks are nailed to the bottom of the logs using nails or self-tapping screws. They are positioned so that they form the letter T. The subfloor will be fixed to them.
Insulation intended for baths is placed on the subfloor boards. It is attached to the joists using a stapler with staples. After this, a vapor barrier membrane is laid. It is placed on the walls to a height of 20-30 cm.
To increase the reliability of the structure, all connections are glued with tape.
Lastly, the tongue and groove board flooring is secured. Self-tapping screws are attached to the groove at an angle of 45 degrees. In this case, they will not be visible on the floor covering.
Be sure to leave a gap of 2-3 cm to ensure proper air circulation. To do this, after fixing the vapor barrier layer, additional bars are filled.
On a dry screed
Dry screed is a loose material on top of which plasterboard or plywood is spread. The instructions for laying the cake on a dry screed under a heated floor are as follows:
- the damper tape is rolled out around the perimeter of the room;
- sand or crushed stone is scattered onto the ceiling and leveled;
- Aluminum plates are laid out along the contour of the pipes;
- A dry screed is laid on top - two plasterboard sheets on which the floor covering is mounted.
For your information! Professionals advise using expanded clay; it is the best heat insulator.
Which base is best for a heated floor?
Almost every type of heated floor can be installed on any surface. In city apartments, where the base is concrete floor slabs, it is allowed to install any heated floor on them: electric, infrared or water, although the latter is recommended only on the first floor of high-rise buildings.
We recommend: About marble
In a private house, the floor pie is usually mounted on a wooden base. You can place any device on it. However, the infrared type is more preferable, as it is fireproof and easy to install. Read the article on how to install water and electric heated floors over wooden floors in a private house.
In cases with a cable system, you will need to take additional care of safety and lay metallized plates in places where the wires are laid. When installing a heated water floor on a wooden base, you need to make sure that the ceilings can withstand the heavy structure.
When building a new house, the ideal solution would be a warm floor on the ground, water or cable, which will be installed in parallel with the construction of the building.
CONCLUSION! To summarize, we can say that the easiest installation and speediest option would be to lay a cake with infrared mats on a concrete or wooden base. Water or cable systems with concrete screed will cost more, and installation will take longer, but this option is considered more effective and is therefore popular. Laying heated floors on a dry screed is also a simple and inexpensive method, and is suitable for any system.
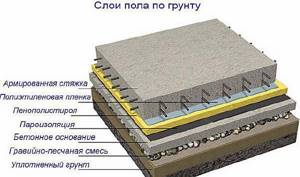
Soil preparation
When installing a heated floor on the ground, a “pie” is prepared, the thickness and filling of which are determined individually. But this data is important already at the first stage of work, so that, if necessary, the earthen floor is deepened and not sacrificing the height of the room.
In general, the soil is removed 30-35 cm below the level of the planned floor covering, taken as the zero point. The surface is carefully leveled in the horizontal plane, the layer of geotextile is backfilled with incompressible material, in most cases ASG is used for this.
After careful manual compaction of the backfill, preparation is carried out with low-grade concrete. For additional thermal insulation, this layer may consist of lightweight expanded clay concrete
It is important that the surface is brought to a common plane located below the zero mark by the thickness of the pie plus about another 10-15 mm
Related Posts
- Optimal temperature for heated floors
- Electric heated floor in a private country house: installation features in a wooden and frame house
- Calculation of underfloor heating power
- We make a water heated floor from a gas boiler
- Installation of an electric heated floor: types, diagrams, do-it-yourself installation
- "penoplex" under a warm water floor, the advantages of the material, methods and technology for its installation
- Step-by-step technology for pouring self-leveling floors
- Electric heated floor under linoleum
- Heated floor consumption, how much electricity is needed
- Warm floor under laminate on concrete floor
- Water floor in a private house connected to the heating system
- Floor screed thickness
- Subfloor in a wooden house: making a strong joist base for the finishing coating
- Which pipes for heated floors to choose: characteristics and installation methods
- Warm floors on a balcony or loggia
- Insulation of a concrete floor in an apartment
- Insulation under laminate. From what and for what?
- Installation of heated floor heating mats under tiles
- Insulation of a veranda in a wooden house
- Installation of beacons for floor screed
- How to make a heated floor from a stove in a bathhouse
- Level the floor with your own hands: instructions on how to level a wooden floor in an apartment
- Floor screed mortar
- How long should a floor screed dry?
- Insulating a balcony with panoramic glazing: useful to know
Read with this
- Optimal temperature for heated floors
- Electric heated floor in a private country house: installation features in a wooden and frame house
- Calculation of underfloor heating power
- We make a water heated floor from a gas boiler
- Installation of an electric heated floor: types, diagrams, do-it-yourself installation
- "penoplex" under a warm water floor, the advantages of the material, methods and technology for its installation
- Step-by-step technology for pouring self-leveling floors
- Electric heated floor under linoleum
- Heated floor consumption, how much electricity is needed
- Warm floor under laminate on concrete floor
Interfloor pie in a frame house
When planning to make a frame house with your own hands, as described in this article, you should not forget about the floors, even if the house is one-story. The ceilings between the rooms and the roof are made using almost the same technology as in multi-storey buildings, and that when constructing the ceiling of a house with 2 floors. The structure of a layered floor pie looks something like this:
- Ceiling decoration on the lower floor.
- Rough ceiling coating.
- Vapor barrier.
- Load-bearing beams and joists, between which a thermal insulation layer is laid.
- Rough floor.
- Waterproofing layer.
- Noise insulation.
- Floor covering.
Between floors, thermal insulation, moisture and vapor barrier materials are laid so that they protrude along the entire perimeter with a tolerance equal to the thickness of the walls.
Interfloor pie in a frame house. Kraft paper is used as a windbreak.
Floor pie of a frame house on a strip foundation
With a strip foundation, you can make the floor in a frame house using joists, but it is more advisable to make a floor on the ground or a screed. Since the construction of the floor using joists is described in detail above, we will focus on the second option.
The foundation is backfilled with compaction in layers. You can use sand first, then crushed stone. Insulation is laid on the compacted layer. In such structures, backfill material, for example, expanded clay, is often used. Expanded clay is leveled and filled with a cement screed, on which the floor covering is subsequently laid. A device of this design requires certain skills.
If it is planned to install a warm electric or water floor, then heating systems are installed in the screed.
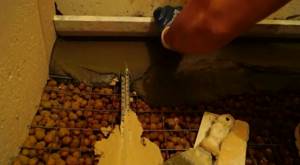
Installation of cement screed on expanded clay.
Preparatory stage
Any construction of a building structure/object begins with a calculation on paper. An estimate is drawn up, which is then used to determine each parameter. The initial stage involves:
- preparation of the base;
- ensuring the proper level of waterproofing/thermal insulation;
- calculation of heat losses, their compensation;
- choice of heating system.
Concrete screed with all its subtleties is present in the cake of a warm water floor. This is due to the need for careful preparation. Correctly adjusted parameters even apply to backfilling of sand. This method is suitable for private homes.
Tamping took place at the stage of completing the plastering of the walls. Checking the thermal insulation and installing waterproofing are the final steps at this stage.
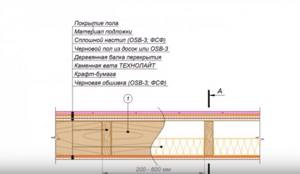
Floor pie of a frame house with mineral wool and OSB
As a rule, OSB boards for frame floors are used in the construction of multi-story buildings. OSB material does not have such a long service life, so it is not recommended to install it as a floor covering on the 1st floor. Due to the fact that OSB boards are quite durable and large in area, they are often used to create floors on the second or third floor.
A pie of this gender is not much different from any other. Only instead of a rough covering made of boards, OSB boards are used, with additional impregnation. This material is also used for the outer layer of the floor, especially if it is planned to install a continuous finishing coating, carpet, ceramic tiles, linoleum, or parquet.
The only peculiarity is the installation of rubber gaskets on the load-bearing beams under the OSB slabs, so that the structure does not play. And it is also recommended to use an additional soundproofing layer, since the large area of the slabs creates sound resonance when walking or moving large objects.
Technology for creating an insulated pie on beams
The constituent elements and layers of the first floor are clear. Now we should consider the installation process and the nuances of each layer.
Priming
Soil compaction
Soil preparation should be carried out during the construction of the house, before the start of work on arranging the floor.
- Inside the strip foundation, a layer of soil with vegetation is removed to a depth of 15-20 cm. In this case, local soil removal can be done in the places where the pillars are installed.
- An uneven base is leveled with sand with a moisture content of no more than 4%. Dry soil is poured on top of the sand at the level of the removed soil and compacted thoroughly.
- The backfill base is moistened and crushed stone or gravel several centimeters deep must be pressed into its structure.
- On top of the bulk soil there should be a layer of sand-crushed stone mixture, which is compacted and compacted.
Attention! Replacing soft layers of soil is necessary in advance, because crushed stone and sand on the surface are compacted over time and form a stable surface for laying brick pillars.
Brick pillars for beams
On the compacted soil surface, a layer of roofing felt waterproofing should be laid under the posts. Brick pillars are built on top of the waterproofing layer, on which the beams for the floors will be laid.
It is advisable to apply a waterproofing layer between the pillars so that moisture cannot penetrate into the underground space.
We recommend: What are thermal bridges?

Brick pillars
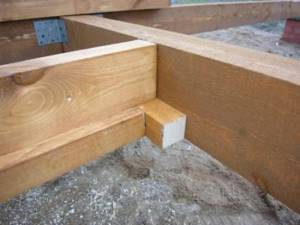
Brick pillars must be lined up at the level of the foundation, because the beams will lie on the foundation, and the pillars will perform a reinforcing function.
The distance between the pillars should be 70-100 cm in one row, and between the rows - 180-220 cm. The beams are used with a cross-section of 150x150 mm.
Installation of lags
The logs are laid perpendicular to the incident light so that the finishing coating lies along the windows. If the sun's rays are in the direction of the boards, then the gaps between them are better visible.
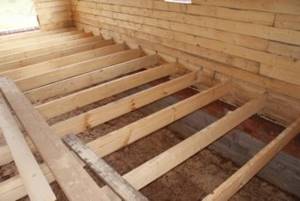
Support system for finished floor
First of all, the outer ones are placed, establishing a gap of 2-3 cm from the wall. Subsequently, intermediate ones are laid.
For supports under the final coating, bars with a cross-section of 150x50 mm are used, which are attached to the beams with angles. If the previous structural elements are correctly installed level, the bars will be laid faster and easier. In this case, it is still necessary to check the level with a rule of 2 meters, because there may be individual defects in the bars.
Skull bars and subfloor
It is impossible to use insulation material without using subfloors.
A subfloor is installed from unedged boards or low-grade plywood on 4x4 cm cross-section screwed into the skull blocks.
Skull block
The cranial bars are attached either from the lower end side across, or from the lower side between the lags longitudinally. The second option is preferable because this method of fastening ensures the strength of the structure.
A subfloor of 20 mm boards is laid on top of the skull blocks and a layer of vapor barrier is placed on them. Thus, when attaching 4 cm cranial bars and 2 cm boards, 7 cm out of 9 remain for insulating material. As already mentioned, lay the insulation without a gap flush with the upper end side of the bars - do not allow air to ventilate above it.
Insulation circuit
Rolled mineral wool
Various materials can be used as insulation. The most common and popular material is mineral wool. It is worth noting several nuances of laying mineral wool slabs.
- There are different thicknesses of mineral wool. It is better to use a thermal insulation circuit made of mineral wool slabs in 2 layers, rather than 1. This will allow the top layer of slabs to cover the joints of the lower layer.
- If it is necessary to insulate 7 cm out of the 9 remaining board heights, you can use slabs of various thicknesses of 45 and 30 mm.
- When choosing mineral wool as an insulation material, you should pay attention that there is a standard material width of 61 cm. Thus, the bars can be installed in increments of 60 cm so that you do not have to cut the slabs.
- When using another step, it is worth considering that you need to cut the width of the slabs 1 cm wider so that the material fits between the boards with emphasis on the sides.
Important! If you use expanded clay as insulation, then with the same thickness of the insulating layer, the heat-shielding properties will be 2 times less.
Insulation layers
The insulation material must be protected from moisture and water from the upper side of the room, therefore a waterproofing layer is laid.
Polyethylene film can be used as a waterproofing material. The sheets are laid overlapping each other by 20-25 cm and secured with construction tape.
Finish floors
Finish floors can be made of tongue and groove boards. With a step of support bars of 60 cm, convenient for laying mineral wool, the optimal thickness of the boards will be 35 mm. When using a smaller pitch, you can use smaller thickness of boards.
On top of the bars you can lay plywood or OSB boards with a thickness of 16-20 mm, on top of which there is a finishing coating.
The floor pie along the beams of the first floor has a multi-layer structure. In order for wooden structures to serve the required period, it is necessary to comply with the technical rules for laying each layer.
Tips for Newbies
One sequence when installing a heated floor pie will not be enough for high-quality heating of the room. To achieve the desired temperature for comfortable living and at the same time extend the life of the underfloor heating system, you need to familiarize yourself with the following expert advice:
- It is best to leave the design of a heated floor system to experienced professionals.
- The heating system must be installed exclusively on a flat surface.
- To reduce the temperature load on the concrete screed, the area where it is poured should not exceed 40 sq.m.
- Pipelines must be laid no closer than 10 cm from the walls of the building.
- The water system circuits must be made of solid material.
- When laying the cable system, sharp bends of the heating elements are not allowed.
- Laying the floor covering should be carried out only after checking the heating system for functionality.
So, summing up this article, about the cake of the heating water heated floor and electrical system, it is also necessary to add that during installation it is very important to observe the sequence of laying and the thickness of the materials. And also follow the advice of experienced specialists. Otherwise, these errors at the initial stage of installing systems can lead to irreparable consequences, including failure of heating models.
Conclusion
Before installation, it is better to once again go for a consultation with knowledgeable specialists. Their experience and knowledge will help you visualize the entire order of work in the correct sequence. Only this approach will eliminate serious errors and provide high quality performance.
- Related Posts
- What is a mobile heated floor?
- Instructions for laying heated floors
- What characteristics does Warmstad underfloor heating have?
- How is Lavita underfloor heating installed?
- How to connect a heated floor from a stove?
- How to lay heated floors over wooden joists?