If during the cold season the electric heater in the house does not turn off, and mold has grown on the walls due to dampness, it’s time to think about thermal insulation. The most popular method is to line the building with insulating material on the outside.
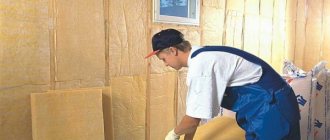
However, this option is difficult to implement in apartment buildings. Therefore, residents are wondering whether it is possible to insulate the interior with penoplex in order to retain heat in the apartment without disturbing the aesthetics of the building.
In an apartment, using penoplex you can insulate the walls, floor, and balcony.
General information
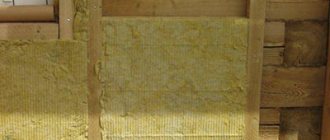
Previously, foam plastic and glass wool were used for such work. From the point of view of reliability, moisture resistance and heat-saving properties, there are no complaints about these materials. But glass wool contains harmful substances that, if inhaled, can cause an allergic reaction or poisoning. Extruded polystyrene foam developed in Russia is safe for health and easy to use.
There are products from different manufacturers on the market.
Preference should be given to brands whose names are associated with high-quality and reliable building materials.
The influence of production technology on harmful properties
During the creation process, expanded polystyrene is subjected to melting and chemical treatment. It acquires a dense, solid structure and loses its negative properties, i.e. stops releasing any harmful fumes into the air.
Unlike glass wool and low-grade foam, the material obtained as a result of extrusion is environmentally friendly and can be used in rooms where small children or allergy sufferers live.
Characteristics and properties of penoplex
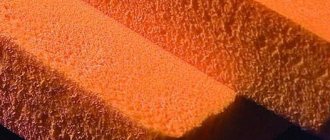
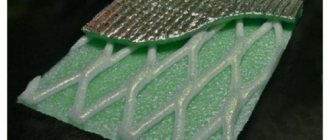
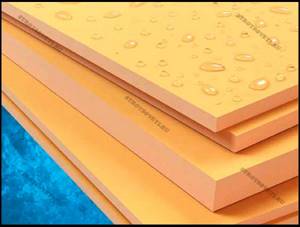
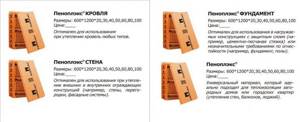
Depending on the installation location, there are 4 types of penoplex: for roofing, for walls, for foundations and universal. The color is the same, orange, but the design is slightly different. For example, wall panels have ribs to improve adhesion to the surface.
The qualitative characteristics of penoplex make it a universal insulation material.
The main characteristics of the material include:
- low ability to absorb and retain moisture;
- no loss in thermal conductivity coefficient during the service life;
- resistance to water vapor;
- extended service life - up to 50 years;
- flammability class - G1-G4;
- Possibility of installation in rooms with temperatures -50…+75°C.
Types of foam boards
Depending on the density of the slabs and their scope of application, penoplex is divided into several categories:
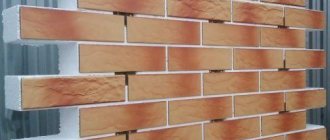
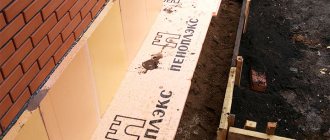
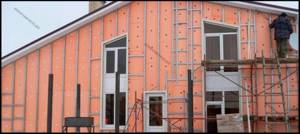
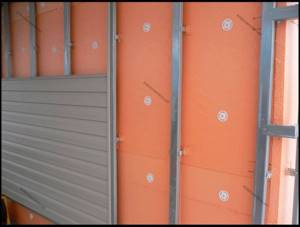
- “Wall” - slabs with a density of 25 to 32 kilograms per square meter are designed to insulate walls, both internal and external, as well as partitions and plinths. This insulation helps to effectively retain heat and reduce heating costs. In addition, slabs of this type are used in the construction of buildings with walls laid in a “well tub” type. When insulating external walls, you can lay plaster on top of the mesh or treat the walls with siding, tiles or clapboard;
- “Foundation” - this insulation has a density from 29 to 33 kg per square meter. It is used for insulating basements, septic tanks or foundations. This material is characterized by increased strength and has almost no water absorption coefficient;
- “Roofing” - the density of the material ranges from 28 to 33 kg per square meter. These are special slabs that are used to insulate roofs, both flat and pitched. The material is lightweight, moisture-resistant, and has improved thermal insulation characteristics.
- “Penoplex 45” - the density of this insulation is 37-47 kg per square meter, and it is used to equip road surfaces, for example, runways. It is also used to prevent frost heaving and destruction of the upper layers of soil. It can also be used to insulate roofs where pedestrian areas or parking lots are located;
- “Comfort” - this material has a density of 25 to 35 kg per square meter; it is most often used for insulating residential buildings, walls in apartments, as well as balconies or loggias.
Key Benefits
Along with durability, soundproofing properties and ease of installation, extruded polystyrene foam has an impressive range of advantages.
Permeability
Foam plastic, like many other porous materials, allows moisture to pass through. There are voids inside it, which, when gradually filled with moisture or steam, worsen the thermal insulation properties. Penoplex is free from this drawback due to its integral structure. It absorbs moisture on average 10 times less than foam.
Mechanical strength and safety
The integrity of the structure affects the strength characteristics of penoplex.
With temperature changes and increased pressure during vertical installation, it does not crumble, deform or shrink like glass wool.
The flammability of the material is determined by the manufacturer. Depending on what processing was carried out during its creation, a class is assigned from low to high flammable. When purchasing, you should study the technical description of the goods and choose the safest one.
The undoubted advantage of penoplex is its non-toxicity.
The best option
A comparison of the advantages and disadvantages of various materials allows us to conclude that extruded polystyrene foam is the most suitable option for insulating rooms from the inside, loggias, floors, roofs, garages or verandas.
Medium thickness slabs (40 mm) are conveniently and securely installed on wood, concrete or brick surfaces.
Disadvantages of penoplex insulation
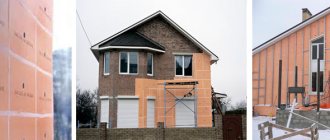
In modern conditions, the requirements for buildings under construction have changed significantly and are seriously different from those that were imposed on buildings a few decades ago. If previously it was quite common to construct buildings without thermal insulation, now in the process of constructing objects without thermal insulation, the delivery of the object is not carried out. Everyone understands that a house or industrial premises that is well insulated allows heat loss to be reduced to a minimum, which makes it possible to save energy resources for heating.
When the task arises of insulating a specific building, each owner is faced with the problem of choice. If he is starting such an operation for the first time, then it is difficult for him to decide on the material for insulation. If you turn to the Russian market, you can find a large selection of different materials there. Their use makes it possible to ensure high performance of the building in terms of thermal insulation.
Many people know about such material as mineral wool. It is most often used when insulating buildings. However, besides them, there are other materials. One of them is penoplex. It is used not only for insulating buildings. It is also used in solving problems of thermal insulation of balconies. However, before making a choice in its favor, you need to get acquainted with its positive qualities. It is also worth finding out what negative aspects are associated with its use for insulation. Unfortunately, it also has them, just like any other material. The main disadvantages of such insulation as penoplex will be discussed further in this material.
Starting to list the disadvantages of this material , it should be noted as the main thing that this heat-insulating material has low resistance to fire. Experts consider this disadvantage to be one of the main ones. In general, a rather ambiguous situation arises with foam-based materials. The insulation materials included in this group have different degrees of flammability, depending on their modification.
Insulation in its pure form is a material that is prone to easy combustion. An open flame causes it to ignite quickly. Therefore, this material without additives is used in the construction industry in rare cases. Knowing about this drawback, manufacturers strive to reduce it to a minimum. Therefore, during the production of this insulation, special additives are added to its composition. They are called fire retardants. They should be understood as substances that reduce the flammability of the insulation material. Experts classify insulation based on foam plastic with fire retardants as self-extinguishing.
The combustion process of such insulation is accompanied by the formation of black smoke, which contains a large amount of toxic substances that are harmful to human health. It should be understood that material with fire retardants is quite expensive. In addition, it is necessary to keep in mind that toxic substances are present in certain types of fire retardants that manufacturers use in the production of materials.
Another disadvantage that penoplex presses is its short service life . Many consumers, when choosing a material, put forward such as a long service life among the main requirements. It must be practical and have a significant period of operation of the facility.
In our country, the standards stipulate that any insulation must have a service life of at least 25 years. If we take into account the information from manufacturers of thermal insulation materials based on polystyrene foam, then their products fulfill this requirement. Note that certain types of insulation can have a service life of 50 years or even more.
When using penoplex for insulation, you should not forget that it is a vapor-permeable material. However, this parameter has a low value. All this results in the fact that it is not able to remove steam from wooden structures. The consequence of this is the formation of fungi on their surface. They have a permissive effect on structures made of natural materials, leading to a reduction in the service life of the structure itself. It is also necessary to know that although polystyrene foam does not act as an optimal environment for the development of fungi. However, they easily appear on it and can reproduce in large colonies. Especially if the insulation comes into contact with a structure made of wood.
Another disadvantage of this insulation is its low safety and rather low environmental properties. If you take the insulation in its pure form, it is not harmful to health. However, it is quite rare to find it on the market of abundant supplements. Manufacturers mainly offer products that already contain additives. And they contain substances that are toxic to a certain extent. This means they have a negative impact on human health. And besides this, they do not have the best impact on the environment.
Types of penoplex
Based on technical features and installation location, penoplex is divided into several types:
- “C” - used for thermal insulation of rooms on the ground floors, walls and room partitions;
- “F” - used for insulating foundations and basements;
- “K” - installed on roofing structures;
- “Comfort” - used when arranging loggias and free-standing small buildings;
- “45” (density 35 - 47 kg/m³) - suitable for thermal insulation of industrial structures, used at airfields and in civil engineering.
Main types of penoplex.
Material selection criteria
In order for the insulation to serve for a long time and justify the money invested in it, you should check whether it complies with GOST. Sometimes manufacturers offer products that are made in accordance with their internal requirements, but have passed state certification. In this case, the properties of the material may differ from generally accepted ones and require careful study.
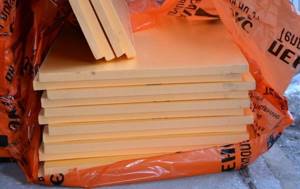
It is recommended to touch the material before purchasing. It should be durable and not deform from light pressure. You should evaluate the storage location of the product, its protection from sunlight and possible exposure to solvents (acetone, petroleum products, etc.).
Before purchasing penoplex, you need to check the certificates of conformity.
The thickness of sheets of the same type must be the same. Pay attention to the fire safety mark. If, as a result of finishing, it is necessary to enhance sound insulation, the layer of material should be thicker.
Thermal insulation with PPU foam
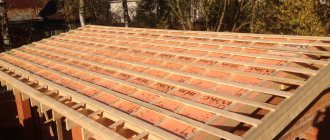
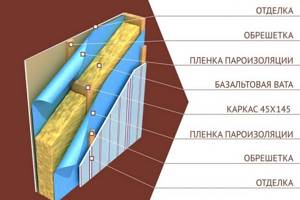
A frame house has one interesting feature, and if it is not taken into account, there will be large heat losses. Such a house is assembled from boards and beams, so there are gaps between the frame beams for the entire thickness of the wall. If they are not insulated, then a cold bridge and condensation are guaranteed.
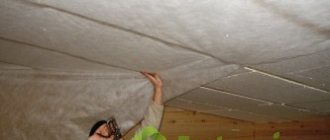
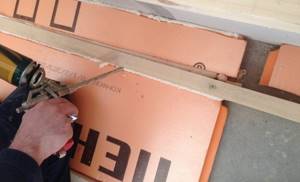
Such cracks can only be filled by spraying polyurethane foam. The video shows just such problem areas and insulation with polyurethane foam.
As you can see, everything is very simple and fast. The thermal insulation layer is continuous, without seams or joints, the warmest among competitors. We cover all metal fasteners with foam, so there is no condensation and wood rotting.
We close a frame house measuring 10 by 10 m in one day.
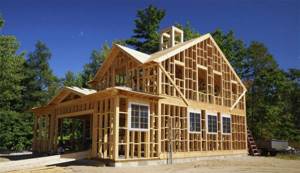
Internal insulation of a frame house
Basically, frame houses are insulated from the inside. As a rule, the external wall cladding is OSB-3 board, boards, etc. are possible. We spray 15 cm thick open-cell polyurethane onto the sheathing from the inside of the house. This thickness is the minimum to ensure proper thermal insulation in our climate according to SNiP.
Open cell polyurethane foam and OSB-3 provide sufficient vapor penetration from the room to the street. However, additional ventilation is advisable. Vapor barrier films between the insulation and finishing are not required. See our thermal insulation work.
External insulation
External insulation is provided as additional insulation in case of insufficient internal insulation. Here we use closed cell PU foam. This material allows less water vapor to pass through and serves as exterior insulation for a frame house and as waterproofing for walls.
In this case, bars are attached to the sheathing to secure the external finishing. Foam is sprayed between the bars. There should be an air gap 3-5 cm thick between the finishing finish and the thermal insulation layer for ventilation.
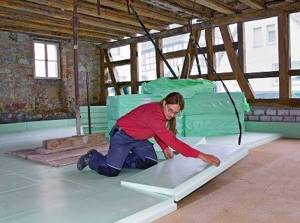
If we are talking about thermal insulation of the floor, then everything is also simple and fast. We spray 10-15 cm from below, fill all the cracks and junctions. It turns out warm and airtight. See this link for what problems spray foam solves.
Sequence of work
If you decide to carry out the insulation work yourself, it is better to study in advance and subsequently follow the procedure for performing the work.
Insulation calculation
First, determine the required thickness of the sheets. The final consumption of material depends on it. The thermal resistance indicator (in Russia it ranges between 3.5 to 4.6 m*K/W) is divided by the thermal conductivity coefficient of penoplex slabs. The second parameter is found in the characteristics of the material.
After taking measurements of the insulated room, the required amount of material is calculated. When purchasing, it is recommended to make a reserve of 10-15% to compensate for possible losses from defects or installation errors.
Required tools and materials
If work is carried out on the ceiling, scaffolding will be required to avoid the collapse of the structure. In all other situations, a basic set of tools is sufficient:
- drill with hammer;
- hacksaw;
- sandpaper or fine construction grater;
- laser level;
- hammer;
- spatulas of different sizes.
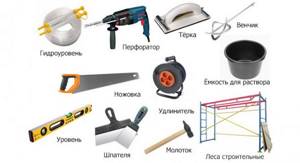
A set of tools for laying penoplex.
Auxiliary materials will also be required:
- dry adhesive mixture for installation of extruded polystyrene foam;
- polyurethane foam;
- reinforcing mesh;
- dowels;
- plaster mixture;
- finishing materials (lining, drywall, etc.).
Preparation
To ensure that the slabs are light, even and dense, before installation, you need to remove old finishing materials, dust and cement residues from the working surface. After this, using a building level, you should check the evenness of the structure and, if necessary, eliminate deviations with putty and plaster. Then the surface is primed.
When it stops being wet, you can start insulating it. There are 2 common installation methods: with glue and with the additional use of dowels. Whichever one is chosen, the slabs are first lightly rubbed with sandpaper to improve adhesion. The glue is applied with a spatula.
During installation, you can lay the finishing material directly on the insulation, or you can use a wooden frame and guides installed at the width of the slabs. The frame method will take more time, but is considered more reliable.
Walls
It is recommended to start insulation from the bottom corner of the wall, slightly moving the slabs at each next level. For reliable fixation, use bitumen mastic, cement-based glue, polyurethane glue or polyurethane foam.
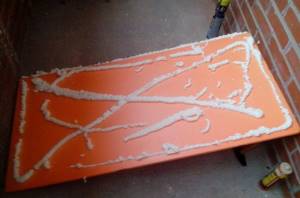
The slabs are attached to the wall using special glue.
After applying glue to the slab, it should be pressed firmly against the wall and held for 1 minute, if necessary driving in dowels in the corners and in the center. The adhesive layer may be uneven, so it is necessary to check the evenness of the installation from time to time using a level. The gaps between the plates are filled with polyurethane foam. When it dries, the resulting mounds are cut off.
Ceiling
As in the case of walls, it can be mounted with or without a frame of guides. If a private house is being insulated, then penoplex is laid on the ceiling from the inside and outside, from the attic side.
In apartments there is no possibility to use the outside, so installation is carried out only from the room.
The ceiling should be cleaned, leveled and primed. Glue is applied to the material and pressed tightly to the installation site. For best fixation, dowels can be used. The seams are sealed with foam.
Finishing
Depending on what decorative material will be used to complete the finishing, the finishing of the insulation is carried out. Reinforcing plaster is applied under the tiles or wallpaper, then a reinforcing mesh is laid, plastered again (the second layer is at least 3 mm) and puttied.
It is permissible not to apply plaster under drywall. When the glue has dried, the decorative sheets are mounted to the insulating structure with self-tapping screws, and the joints between them are puttied. Before gluing wallpaper, the surface should be sanded.
The need to install vapor and waterproofing
If the outside of the wall is not insulated, experts recommend adding a vapor barrier.
Vapor barrier installation diagram.
This rule does not apply to wood and other “breathable” surfaces. The waterproofing layer is added when installing extruded polystyrene foam using a frame method, with lathing. At the same time, it is secured with a stapler, overlapping, after first checking that the layer is laid correctly. The joints are taped.
Common Mistakes
At first glance, insulation work looks simple. However, inexperienced installers may make mistakes that will not allow them to achieve the required thermal insulation properties or may lead to delamination of the material. Most often, beginners make the following mistakes:
- The number of slabs is calculated incorrectly or the design stage is completely neglected. There is not enough material or there is a large residue.
- During installation, moisture is allowed to enter the work surface or the temperature regime is not observed.
- The place and tools are poorly prepared. This increases the risk of damage to the insulation or contamination of surfaces.
- They do not follow a checkerboard pattern when laying them. Because of this, cracks form and heat escapes from the room.
- Glue is applied unevenly or in insufficient quantities.
- Neglect grinding the material. The grip becomes less strong.
- Do not fill the seams with foam.
To insulate the joints, fill them with polyurethane foam.
Carrying out finishing work
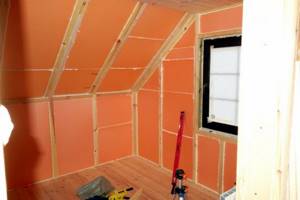
Internal insulation of a frame house with foam plastic
When all the insulation boards are laid, the remaining glue should be used to prime the dowel caps so that they are not noticeable.
After this, you can begin finishing work. The entire surface is coated with a primer for outdoor use. This allows for additional protection of polystyrene foam from precipitation and high humidity. It is best to apply the putty twice, the second time no earlier than 30-60 minutes after the first, so that it can dry out.
Polystyrene foam cannot be called a particularly attractive material. Because of this, finishing material is applied on top of it. Some people prefer to use regular acrylic putty or facade paint. A rich range of colors makes it easy to choose the most suitable color and shade. But you can also spend extra time and money to install sheets of siding. They will not only give the frame house a wonderful appearance, but also provide additional protection from rain, snow and even hail.
Now you know how to insulate a frame house with polystyrene foam, as well as choose the appropriate materials and tools. Having carefully studied the theory and followed all the above tips, you can easily do all this work yourself, without spending extra money on the services of specialists from construction companies.
Video about the dangers of polystyrene foam
Now on the market of the Udmurt Republic there are many insulation materials that are used to insulate frame houses. These are polyurethane foam, mineral wool, penoplex and polystyrene foam. They can also be used to insulate other types of houses: log, brick and foam block.
Another mandatory attribute of any home should be ventilation. It is needed to remove steam from indoors to outdoors. Rarely do any owners think about this. Without a ventilation system, insulation, walls, ceilings, and structures become wet, quickly deteriorate, and become moldy.
Myths and misconceptions
To finally decide to install extruded polystyrene foam, it is worth understanding the misconceptions and myths associated with it:
- Penoplex is harmful to health. It releases toxic substances into the environment. This is a myth, because during initial processing the material becomes denser and loses the ability to release any vapors.
- Walls must “breathe”, and insulation prevents this. This is a misconception, because if city houses were permeable to air or steam, they would be damp and cold in winter.
- Using insulation increases the risk of fire. This statement is partly true. To reduce the risk of fire, you should choose a material with a high class of fire protection and additionally treat them with protective substances.
Pros and cons of penoplex
As a conclusion from the above, we can formulate the positive qualities of the material :
- It does not get wet in water and does not absorb it at all, that is, not only does it not need additional water or vapor protection, but it can also serve as such.
- Designed for use in a wide temperature range – from -50 to +75°C.
- It is capable of withstanding significant mechanical loads without destruction; the critical value for it is the impact value of up to 4 kilograms per square centimeter. For comparison, for polystyrene foam this figure does not exceed 0.5.
- Easy to use due to high machinability.
- Long – up to 50 years – service life.
Negative factors regarding penoplex can be considered:
- It is more expensive than other types of insulating materials; its price is comparable only to mineral wool.
- The material is destroyed under the influence of direct sunlight, so you should not delay finishing the insulation layer. Of course, this only applies to surfaces exposed to direct sunlight.
- Penoplex (and polystyrene foam) is very attractive to house mice; when using it, you need to think about protection from these uninvited guests.
- Performance claims about the non-flammability of polystyrene foam are easily destroyed by a regular lighter. Its inclusion in the group of actively combustible substances (G4) is completely justified.
Reviews about penoplex insulation from the inside
Oleg, 36 years old, Moscow: “Our loggia runs along the room and kitchen. They installed double-glazed windows, but in the frosty winters we were still cold, and this also affected the temperature in the apartment. I read the reviews on the forum and chose penoplex for insulation. I did it myself by watching videos on the Internet. I liked that almost no debris was generated during operation. I installed all the slabs in a day, and another 2 were spent on clapboard cladding. The temperature on the loggia is now significantly higher than before insulation.”
Mikhail, 45 years old, Kaluga: “I bought an apartment on the ground floor with a rough finish. I decided to use thermal insulation when screeding the floor. The building materials store recommended penoplex. I was surprised by its weight - the slabs are light, but they are not so easy to break. I placed a reinforced mesh between the insulation and the cement. Installation went quickly and without any difficulties. And I didn’t have to spend money on electric heated floors.”