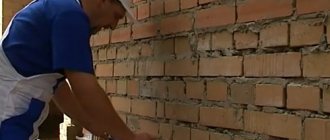
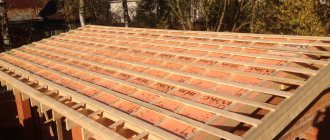
Methods for attaching penoplex to the walls of a house
One of the problems of modern houses is low indoor temperatures in winter. Various insulation methods help to cope with it, for example, using Penoplex, which has recently been actively displacing other materials. It is not surprising that more and more novice builders are wondering how to attach Penoplex to the wall, because the effectiveness of insulation depends on the careful adherence to the technology and the reliability of the fastenings. Moreover, the choice of installation method is influenced by many factors, which can affect the final result.
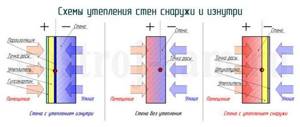
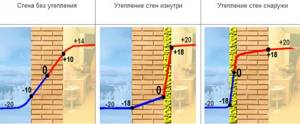
Insulation inside and outside the building
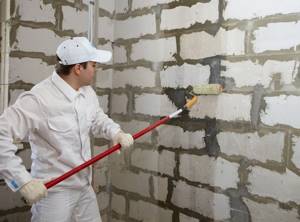
The described material is made of expanded polystyrene and is widely used in construction, for example, it is common to insulate walls outside and inside with Penoplex. True, it must be used with caution with the “wet facade” technology, because in this case a prerequisite is created for the rapid destruction of the glue. It is best to use Penoplex for insulating basements, where it is possible to create a ventilation space and carry out waterproofing.
If you need to insulate the house from the inside, it is also worth buying Penoplex thermal insulation boards: after their installation, the wall will effectively maintain the temperature in the room and can be subjected to various types of finishing. The method is not without its drawbacks, for example, there is a possibility of condensation, and the living space is also somewhat reduced. However, there are undeniable advantages of using Penoplex as insulation for internal walls. It allows for good insulation, is highly durable and flexible, which makes its use very convenient.
Insulation from the inside
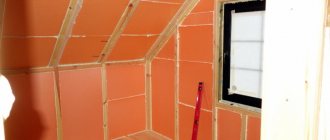
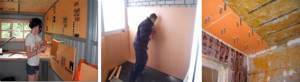
If for some reason it is impossible to insulate the walls externally, the walls are insulated from the inside with penoplex. This could be a loggia or an outer wall in the direction of the dominant winter winds, or a wall adjacent to a cold vestibule. In this case, it is necessary to carry out insulation at the expense of the living space.
Another inconvenience lies in the fact that it is necessary to remove furniture from the room during the period of work. In addition, since it is not possible to ensure the correct natural operation of the insulation system, when materials are positioned as vapor permeability increases towards the street, it is necessary to provide a ventilation system to remove excess steam. As a rule, air conditioning is performed in such rooms.
For insulation from the inside, it is better to select penoplex with a tongue-and-groove edge, which gives a more complete fit of the plates to each other. Since the load on the internal walls is much less than on the external ones, for insulation you can use PPS25-RG-B brand slabs, as they have the best thermal characteristics.
When insulating from the inside, the following stages of work are necessary:
- Surface preparation.
- Installation of a vapor barrier membrane.
- Installation of penoplex with adhesive composition.
- Additional fastening with dowels.
- Fastening the reinforcing mesh with glue.
- Finishing.
Surface preparation for internal insulation is the same as for external insulation:
- the wall is cleaned of dust, dirt, oil stains and oil paints;
- the adhesion of the plaster to the base is checked by tapping, the peeling plaster is knocked down, the surfaces are repaired;
- a primer is applied to strengthen the base, increase adhesion, and prevent the formation of fungus;
- metal elements protect against corrosion.
Then a vapor barrier membrane is attached to prevent the flow of moisture to the insulation from the street. From bottom to top, foam boards are mounted onto the glue in a staggered manner; after the glue has dried, the fasteners are duplicated with dowels.
Apply glue to the surface of the slabs with a notched trowel from bottom to top to a width of 1 m, and use a smooth trowel to embed the reinforcing mesh into the glue. Finishing is done using the dried adhesive composition.
Mounting methods
When answering the question of how to attach insulation boards to walls, it is worth taking into account the type of surface, working conditions and other factors. The most commonly used devices are:
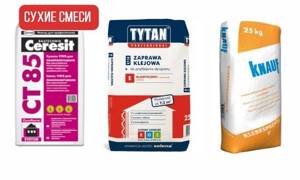
- Adhesive compositions. There are several varieties. When insulating the foundation, it is worth securing the slabs using special bitumen glue. Also, there are compositions based on cement and polyurethane. This method allows you to eliminate wall unevenness and is considered very economical and simple, but where a large load is expected, it is better to use additional fasteners.
- Dowels. When insulating facades and plinths, it is customary to combine these fasteners with gluing to increase strength. True, drilling holes in sheets has a bad effect on tightness. A type of dowels are mushrooms, which are a structure made of a nail and a wide head. It is not recommended to use plastic dowels to fasten Penoplex slabs to the façade walls of multi-storey buildings and where the load will be significant.
- Polyurethane foam. It is inexpensive, applied quickly, but cannot be used separately, as it may break down over time. Treatment with polyurethane foam can be combined with other methods.
- Self-tapping screws. Often such a mount for Penoplex is supplied complete with sheets of material. Self-tapping screws are quite reliable, but require pre-drilling holes.
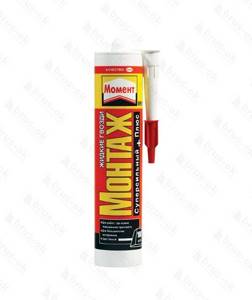
- Liquid Nails. One of the fastest and most convenient ways. However, it is used quite rarely, which is due to the high cost of the composition.
When choosing an installation method, it is very important to consider what the surface is made of. For example, fungi are used to attach Penoplex insulation to a brick wall and concrete bases, while it is better not to use self-tapping screws with stone, as it can crumble. If you choose glue, you should buy mixtures specifically designed for certain surfaces. Liquid nails are universal, but require the wall to be perfectly even and smooth.
Wall insulation technique
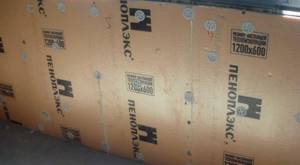
To carry out high-quality fastening of Penoplex with your own hands, prepare the material itself, fasteners and tools. The insulation is produced in the form of slabs with a thickness of 20-100 mm, a width of 600 mm and a length of 1200. In addition to it, the following will be useful: glue, mushroom dowels with a calculation of 5 pieces. per sheet plus several spare ones (or other types of fasteners), polyurethane foam, copper sulfate, reinforcing mesh. Tools required: brush, hammer, hammer drill, plumb bob, knife for cutting Penoplex.
The process consists of several stages:
- Preparation. Traces of dirt and old finishing are removed from the surface. If there is mold, apply copper sulfate with a brush. All bulges are cleaned out, and dents are plastered over.
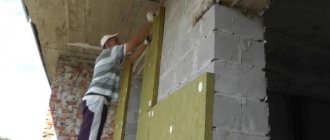
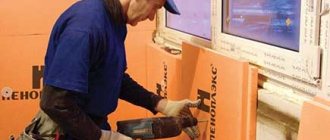
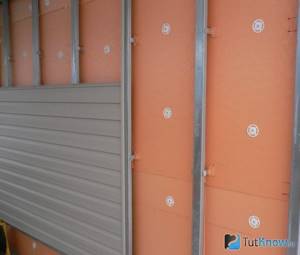
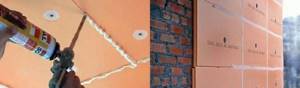
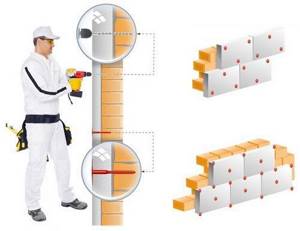
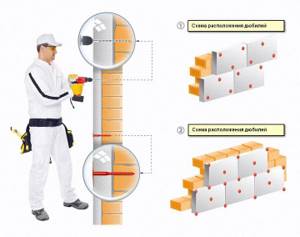
- Installation of insulation. Penoplex slabs are attached to the outer surface of the walls with special fasteners: the material is applied to the wall, holes are drilled with a hammer drill (four in the corners, and one in the center) the length of the dowel, then they are filled a little with polyurethane foam, and at the end a mushroom is hammered in. If an adhesive base is used, then it should be applied to the penoplex around the perimeter and in the center. Where whole slabs do not fit, you need to use sections; evenness is checked with a plumb line. The seams are sealed with polyurethane foam. Penoplex, unlike foam plastic, is attached to the façade after pre-treatment: it is rolled with a needle roller to make it rougher.
- Finishing work. A reinforcing mesh is attached on top of the Penoplex, leveled with an adhesive solution, after which the cladding is applied.
Insulation of the base requires the installation of a special profile after preparing the surface. Before attaching Penoplex to a wall made of foam concrete, a vapor barrier is performed, which is not necessary when we are talking about non-porous materials.
Preparing walls before insulation with penoplex
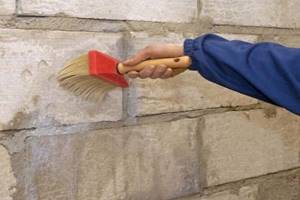
Before fixing the insulation sheets, it is necessary to clean the surface from dust, oil and mastic contaminants, as well as poorly retained old mortar or a layer of paint. Only those coatings that cannot bear the load should be removed.
The old paint layer must be removed to a solid base mechanically or using special compounds. If fungus, mold or other negative microorganisms are present on the surface, then to eliminate them you should use appropriate mixtures with bactericidal properties.
Next, you need to thoroughly check the evenness of the walls, using a building level 2.5-3 m long. If recesses, holes, cracks or irregularities larger than 2 cm are found, then in order to avoid breaking the penoplex during the installation process, you should first plaster the surfaces with cement-sand mortar. After complete hardening, the walls need to be opened with a primer in 2 layers.
Note! Smooth sheets do not always fully adhere to the adhesive mixture, which is why before installation you need to go over them with a needle roller, which is designed for drywall, or use an ordinary metal brush. In addition, before starting work, it is imperative to fix window sills, ebbs and make slopes.
Mounting methods
Having studied the features of the base and selected the appropriate installation option, you should decide on the materials. They must be suitable for the insulation and the surface to be insulated to ensure maximum adhesion. To increase the reliability of fixation, several installation methods are used simultaneously.
With lathing
Building a frame takes more time. It is important to decide on the lathing material.
Wood slats or aluminum profiles can be used. After constructing the frame, foam boards are inserted into it. They are sealed with polyurethane foam. The final finishing is carried out on top of the thermal insulation material, for which siding, block house, etc. are suitable.
Polymer and bitumen mastics
Mastics are universal, therefore they are used for installing extruded polystyrene foam on walls, plinths, foundations and other structural elements. These viscous mixtures are sold in ready-to-use form. The content of petroleum products requires compliance with safety precautions during application. For reliable fixation, it is necessary to evenly apply the mixture onto the foam sheet and press it tightly to the base for 60 seconds.
Dry mixes
With the help of dry building mixtures, you can save money, since they are among the most affordable on the market. It is important not only to know how to properly attach penoplex, but also to observe dilution proportions to ensure high-quality fixation. For ease of mixing, a special construction mixer is used. The mixtures are made on a cement base and are ideal when working with concrete bases.
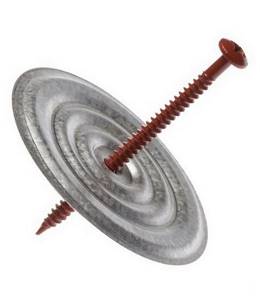
Disc-shaped dowels
Dowels for thermal insulation have a wide head. They are often used for insulating brick buildings. For fixation, holes are first made in the wall, up to 6 cm deep. They are filled with foam, after which the fasteners are inserted. Each foam board will require at least 5 dowels. They are attached at the joints of adjacent slabs, as well as additionally in the middle of the sheets.
Preparation for installation of penoplex on walls
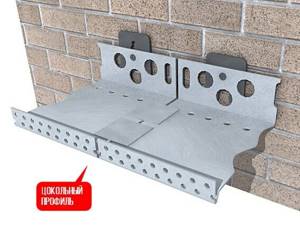
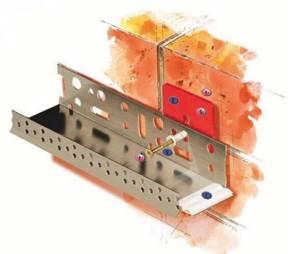
Installation of the base profile
Base profile for penoplex
Immediately before installing the heat-insulating boards, it is recommended to screw the base profile along the lower edge of the first row; this will help protect the penoplex from such troubles as mechanical damage, moisture, and rodents.
Features of installation of the base profile:
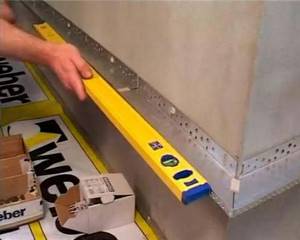
- The profile is fastened in steps of every 30 cm; self-tapping screws are used for this on wooden walls, and dowel-nails from 40 mm to 100 mm on brick and concrete walls.
- In those places where the base profile will be attached, it is imperative to ensure that it fits tightly to the base of the wall; for this purpose, it is allowed to use special washers for the lining;
- The connection of the profile is made with special locks at its ends; in no case is this connection made with an overlap.
Advice! In order to ensure effective drainage of water from the base of your house and to avoid possible wetting of the facade structure, it is recommended to use a base profile with a drip.
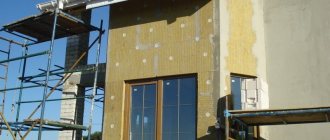
Installation of thermal insulation boards on walls
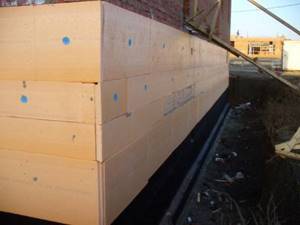
Installation of penoplex on a brick wall
- The first row of penoplex is installed directly on the base profile.
- Bend all pre-screwed U-shaped hangers into the working position in advance. In those places of the material that fall on the screwed hanger, slits are made; with their help, the penoplex will subsequently be strung onto the hangers.
- During the installation of the first row of penoplex, it will not be superfluous to ensure that the insulation boards fit tightly to the edge of the profile and do not extend beyond its edges;
- Penoplex is fastened to walls made of brick and concrete using special mushroom anchors with large caps. If the wall is wooden, then use wood screws and washers;
- The second and subsequent rows of heat insulation are mounted on the wall according to the principle of brickwork, so that the vertical seam of the previous row does not fall on the seam of the next row. The discrepancies between the seams must be at least 200 mm;
- After the wall is completely covered with foam boards, it is necessary to carefully inspect all the joints. If leaky joints are found, you need to seal them with penoplex strips cut to fit the wedge.
It is important to know! Under no circumstances should you fill the resulting gaps with polyurethane foam, glue or sealant; in the future, this can lead to cracks and subsequent wetting of the facade.
Note! According to a similar description, the house is insulated with polystyrene foam under the siding with minor additions. Advice! Install the slabs from bottom to top. It is imperative to ensure that the thermal insulation material fits tightly to the wall of the building. To insulate a house, the thickness of the penoplex should be at least 50 mm. It is not recommended to leave already mounted slabs on the wall for a long time, not protected from ultraviolet radiation. This has a detrimental effect on the material.
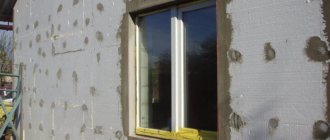
Installation of penoplex around doorways and window frames

Insulation around windows and doors
- The installation of penoplex slabs in the upper corners of door and window openings should be made only from solid slabs; all unnecessary fragments from the door or window opening are cut out in place.
- The technological cutout in the penoplex must necessarily overlap the line visually running along the corner of the opening by at least 200 mm. The production of a technological cut is made along the cut line.
- If the existing door and window openings are recessed relative to the plane of the facades, then in this case the slopes are also insulated with penoplex. To do this, the material is laid around the window or doorway with a slight overlap, and strips are cut onto the slopes according to the required size of the window slope.
- Before installing penoplex on the door or window frame, a specially designed “adjacent profile” is mounted around the entire perimeter. It is installed so that the size from the junction profile to the window clearance remains uniform.
- The connection profile is mounted in such a way that when installing the thermal insulation slab, it does not protrude beyond the window and door frame. In this case, installation is carried out only on three sides of the door and window openings (on the sides and top).
- And only after this are pre-cut foam boards installed on window and door slopes. They should be pressed tightly against the inside of the profile.
Types of dowels
Disc-shaped dowels differ in size and diameter of the cap. The main classification affects the material of manufacture. According to this criterion, they distinguish:
- Polymers are characterized by low strength. Therefore, the cost is low. This option is suitable for concrete and brick. Such dowels are unable to withstand increased loads.
- Metal dowels are more durable, but have high thermal conductivity, which negatively affects the result of insulation. This leads to the formation of cold bridges. The susceptibility of metal to corrosion causes yellow spots to appear. To avoid this phenomenon, you will need to treat the rods with an anti-corrosion compound.
- Metal ones with a thermal head are designed as an alternative to metal dowels. Coating the cap with metal with a low thermal conductivity coefficient eliminates the appearance of cold bridges. This feature affected the price of the products. The cost of metal dowels with a thermal head is high.
Disc-shaped dowels are selected taking into account the characteristics of the insulated surface, which will allow you to get the maximum benefit from thermal insulation and extend the service life of the insulation.
Liquid Nails
When insulating surfaces of a small area, it is advisable to use liquid nails. You will need a glue gun for application. The composition is applied to the foam board around the perimeter, as well as in the center. Fixation is almost instantaneous, just press the sheet firmly to the surface. To use this type of fixation, you will need to perfectly level the walls and also prime them. When thermally insulating surfaces of a large area, using liquid nails is irrational from a financial point of view, since the cost of the material is high.
Self-tapping screws
The easiest way to attach penoplex is with self-tapping screws. This installation method is only suitable when working with wooden bases or when insulating with lathing.
The use of self-tapping screws leads to the appearance of cold bridges and deterioration of thermal insulation performance, since the fastener heads are small and it is necessary to use about 8 pieces to fasten each plate.
Polyurethane foam
Polyurethane foam is used as an additional fastening for thermal insulation using dowels or self-tapping screws. They help seal the joints of the insulation and improve adhesion to the base. The foam is applied to the slab in the same way as liquid nails: along the perimeter and in the center.
Installation of profiles for siding
That's all, you have completely insulated the walls of your house. And most importantly, I would like to hope that these instructions helped you. But that’s not quite all; you have an equally complex and responsible job to do - covering the house with siding and insulation.
In fact, installing profiles for siding is not such a difficult job, provided that you do everything slowly and think through every step. By the way, if price is an important criterion for you and you want to save a little, then this can be done on profiles. Instead, with no less success, you can use timber measuring 20X40 or 20X50 . You will, of course, save on price, but it is also worth considering that the timber is not as durable as a galvanized metal profile.
Work on installing profiles should begin from the corners of the building.
Installation of galvanized profiles under siding
We hope that our article helped you in your work, and you have successfully completed all the insulation of the external walls of your house with penoplex and improved the appearance of the siding you have chosen. If you still have any questions, then the detailed video in this article will help you understand everything completely (find out also whether polystyrene foam is harmful as insulation).
Which side should the penoplex be attached when installing from the inside and outside?
Using extruded polystyrene foam for external and internal insulation, users wonder which side to attach the insulation to correctly. Both sides of the slabs are the same, so there is no difference. The presence of a pattern does not change the situation, since after thermal insulation the finishing is carried out. There are nuances when using smooth sheets. To improve the adhesion characteristics, the surface of the penoplex is pre-treated with a rough roller. In this case, the glue will better adhere the slabs to the surface. If additional fastening with dowels is used, this procedure is not necessary.
Application of penoplex
Penoplex or extruded polystyrene foam appeared relatively recently and gained popularity so quickly that it now occupies second place in insulation systems after mineral wool. It is used for insulation of all types of structures - foundations, walls, ceilings, roofs. Distinctive characteristics of the material:
- Light weight.
- Energy efficiency.
- Low water absorption.
- High mechanical strength.
- Wear resistance.
- Vapor permeability.
- Durability without loss of performance up to 50 years.
- High degree of sound insulation.
- Wide temperature range of application – from minus 100 to +75 °C.
- Ease of processing.
The addition of special reagents during the production of the material reduces the fire hazard and increases resistance to rotting and rodent damage.
IMPORTANT: Since penoplex has a smooth surface with poor adhesion to adhesives, the adhesive application areas must be cleaned before installation.
As a popular insulation material, penoplex is often counterfeited. To avoid being deceived by the seller, it is better to buy material from a large company specializing in the production of insulation, or from a network of specialized stores. When purchasing, ask for a certificate of conformity and manufacturer's instructions.
To perform insulation, you will need, in addition to penoplex, the following materials and tools:
- SSS glue or foam glue;
- dowels at the rate of 6 pcs. on the stove;
- smooth and serrated spatulas;
- needle roller or sandpaper;
- carpenter's knife and hacksaw with fine teeth;
- perforator;
- a screwdriver or drill with an attachment for mixing glue;
- starting strip for external insulation;
- primers;
- reinforcing alkali-resistant mesh;
- finishing material.
Double insulation: when used and implemented
Double thermal insulation involves laying insulation in two layers. Most often, penoplex is combined with penofol. The procedure is expensive, so it is recommended to carry it out in exceptional cases:
- for thermal insulation of balconies to expand living space;
- when insulating load-bearing walls and parapets.
The insulation is installed offset to cover the joints and increase the efficiency of thermal insulation. The first layer is fixed using one of the methods described above. The second layer of foam foam can be secured with staples or adhesive.
Using penoplex for insulation can reduce heat loss by more than 60%.
To improve the thermal insulation characteristics, it is necessary to choose the right installation method. This will make the insulation durable and of high quality. When deciding on the installation option, it is necessary to take into account the type of base, the area of the insulated surface and make a choice based on the available financial capabilities.
Features of work on insulating walls from the inside with penoplex
The best way to insulate a building is to attach appropriate material to the outside of the wall, which prevents heat loss and protects it from freezing. The main difficulty of internal insulation lies in the unpleasant consequences of poorly executed insulation. Places of moisture condensation can move towards the room and end up on the surface of the partition, which causes it to become wet and increase dampness in the room.
Loggias and balconies are often protected from the inside with this material. In the main premises, internal walls are insulated with penoplex in exceptional cases:
- If there are architectural features on the facades that make insulation ineffective.
If the building is classified as an architectural monument, it is prohibited to change the facade.
If there is an unheated room nearby in which it is impossible to install heaters.
If it is necessary to insulate the wall only with an insulator made of a specific material.
If the construction project plans for internal insulation with penoplex.
If the room is located on the upper floors of high-rise buildings, which requires the use of special equipment and the work of steeplejacks.
- If it is necessary to soundproof a room, an insulator outside the building is ineffective for these purposes.
Penoplex is produced in the form of 0.6 x 1.2 m slabs. It is sold packaged in protective film, 7 or 10 pcs. Each sample has grooves, thanks to which there are no gaps between the panels.
For internal insulation, buy material with a thickness of 20-30 mm and a density of 31 kg/m 3, which will prevent the formation of condensation in the wall. It is cheaper than penoplex, which is intended for facade work.
At construction markets you can find a line of slabs with letter designations. If possible, take a product with the “C” brand, for example, “Penoplex 31C”, which is intended for such purposes.
It is recommended to attach the insulation to an adhesive solution with additional safety fixation using special dowels with wide heads. Unlike the external version, a frame is not required to level the coating.
How to attach
Where to buy PENOPLEX® thermal insulation?
is a manufacturer of thermal insulation; distributors sell products. On the website, in the “Where to buy” section, you can select: country, city, partner status and select the supplier closest to you. You can also order PENOPLEX® products in the online store
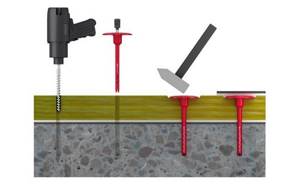
How to attach PENOPLEX® thermal insulation?
The method of fastening PENOPLEX® directly depends on the structure in which thermal insulation is used.
— When insulating structures located below ground level, such as foundations, plinths, blind areas, preliminary adhesive fixation and weighting using backfilling of soil is sufficient.
— When thermally insulating a floor under a screed, PENOPLEX®, in principle, does not require any fastening.
— As for the walls, preliminary adhesive is required, as well as mandatory mechanical fixation, for which disc-shaped dowels are usually used. In some special cases, mechanical fixation of PENOPLEX® slabs using lathing is possible.
Basic recommendations for installing PENOPLEX® boards with PENOPLEX® FASTFIX® glue
1. It is advisable to make notches on the surface of the slab or process it so that it becomes rough.
2. Special PENOPLEX® FASTFIX® adhesive is intended for installation of PENOPLEX® thermal insulation. Recommended method of application: in even stripes around the perimeter at a distance of 1-3 cm from the edge and along the slab in the middle.
3. To attach PENOPLEX to the facade, in addition to adhesive, it is necessary to also use mechanical fixation.
Basic recommendations for installing PENOPLEX® slabs on dowels
1. To ensure good thermal insulation ability, disc dowels made of synthetic materials with low thermal conductivity are used in the facade system, which prevent the formation of cold bridges.
2. As a spacer element for disc dowels, driven or screw-in spacers made of galvanized or stainless steel with a thermally insulating plastic head are used, which minimizes heat loss.
3. The hole for the dowel is drilled 10-15 mm deeper than the driven part of the dowel itself.
4. If the base consists of heavy concrete, then the minimum length of the spacer part of the dowel entering the wall should be 45 mm. In solid brick masonry, the depth of fixing the dowel is 60-70 mm, in hollow brick masonry - 80-90 mm. In bases made of foam or gas silicate blocks, it is required to fasten to a depth of at least 100 or 120 mm (with a dowel diameter of 8 and 10 mm, respectively).
5. If PENOPLEX® thermal insulation is attached to a waterproofing layer, then it is necessary to use weld-on fasteners instead of dowels.
How does PENOPLEX BASE® differ from PENOPLEX COMFORT®?
The main differences between PENOPLEX® materials are in different areas of application. Thermal insulation PENOPLEX OSNOVA® is used at industrial and civil construction sites.
PENOPLEX COMFORT® slabs are intended for private housing construction. They are used for insulation of country houses or city apartments in structures where special load requirements are not imposed. PENOPLEX COMFORT® boards can be purchased at hardware stores.
Does PENOPLEX® burn? What is its flammability class?
The PENOPLEX® material has a flammability group of G4. At the same time, many design solutions developed using PENOPLEX® thermal insulation have a fire hazard class of K0.
Design solutions indicating the fire hazard class can be found at RAPEX STO:
Technical solutions for roofing systems are separately described at the link on the website:
How to insulate a loggia/balcony?
The basic principles and recommendations for insulating balconies and loggias can be found by following the link:
What thickness of PENOPLEX® should I choose?
The thickness of the insulation is a very important parameter that must be calculated based on the region in which the work is being carried out, the purpose of the object (residential building or outbuilding), as well as the existing materials of the enclosing structure.
All these values can be taken into account in our calculator on the website and find out the required minimum value of thermal insulation thickness for your case. In addition, the calculator allows you to make an aggregate calculation of the total number of slabs.
How to buy PENOPLEX® 35?
How many slabs does PENOPLEX® FASTFIX® adhesive last for?
One bottle of PENOPLEX® FASTFIX® glue is enough for 100 linear meters of seam. We recommend applying PENOPLEX® FASTFIX® adhesive in one strip in the middle of the slab and along its perimeter, at a distance of 1-3 cm from the edge. With this method of application, one cylinder of PENOPLEX® FASTFIX® is enough for gluing up to 10 m2 of PENOPLEX® boards.
What is the volume of packaging, what is the volume of slabs?
In the “Catalogue” section of our website you can find data on the filling and occupied volume of packaging of slabs of all brands of PENOPLEX®.
Where can I find the price? What is the price?
is a manufacturer, we work through a network of regional dealers, the list of which is located at the link: “Where to buy”
You can also check prices and order PENOPLEX® products on the official online store
Calculation of dowel length and fixation pattern
Fixing the dowel
To securely fasten the insulation to the wall, you need to correctly calculate the length of the dowel. For this there is a formula L=H+I+K+W, where:
- L – final result of calculations;
- H – insulation thickness;
- K – thickness of the plaster or glue on which the thermal insulation is attached;
- I – anchor recess depending on the material from which the wall is made, but not less than 50 mm;
- W – margin taking into account the curvature of the wall.
To understand how long to take fasteners, you need to consider an example. If foam plastic with a thickness of 30-50 mm is used, a layer of glue is 5-10 mm, and the wall is fairly flat, then a dowel 100-110 mm long is sufficient. If the surface distortion reaches 5 cm, then it must be taken into account when choosing the length of the fastener. If you choose insulation up to 10 cm thick, then you need to take a 210 mm dowel.
When the wall is made of hollow materials, the fungal fastener should extend into it by 8-10 cm. Not in all cases, longer means more reliable. The thickness of the walls should also be taken into account. For example, in apartments it is not too large, so an incorrectly chosen dowel can stick out from the back side.
There are several ways to secure insulation. The most reliable method of fixation is considered to be fastening with 5-6 fungi. 4 are hammered in the corners, retreating 5-10 cm from the edge, and 1-2 - in the center. Sometimes an option is used where the dowel is driven at the junction of two slabs. So the cap of one umbrella holds 3 plates at the same time. Additionally, 1 fastener is hammered into the center of each slab.
Sometimes, to save money, the insulation board is fixed with only 1 dowel. This option is only possible for foam plastic if there is no cladding. This method is not suitable for mineral wool, since it tends to gain moisture and, accordingly, increase its weight. It is also worth considering the height of the insulation mounting. If the foam is located at a height of more than 8 m, it is necessary to fix it with 7 dowels per 1 m². When the height exceeds 20 m, 9 fasteners are used for penoplex. This amount is due to the increased wind load on the building and the pressure of the upper rows of thermal insulation on the lower ones.
Typically, to fix insulation that is laid on a blank wall, there are 5-6 dowels per 1 m² in increments of 50 cm. Additional fasteners are installed along the perimeter of the openings at expansion joints, at the parapet, and in the corners of the building. The pitch in this case is 300 mm.
Houses are different, and they need to be insulated in different ways.
The use of various technologies and materials in construction leads to the fact that it is impossible to give a universal answer to the question: what to consider when attaching penoplex to the walls of a house? Methods for fastening and preparing surfaces have been developed for different surfaces and operating conditions. You need to know this in order to control those who insulate the house. And even more so for those who insulate the house with their own hands, using their potential.
Houses can be made from stone and wood building materials. Already at the stage of surface preparation, peculiarities in the work begin to appear.
When preparing concrete and brick surfaces, you must:
- clean the walls from dirt, deposits, paint, fuels and lubricants, and then remove dust;
- treat the areas where the fungus is spreading with copper sulfate (antiseptics);
- remove efflorescence on brick;
- clean and seal cracks in the insulated wall;
- apply a deep penetration primer;
- smooth out unevenness with putty;
- apply a deep penetration primer after filling.
Preparing the tree is much easier. It is treated with impregnations that prevent wood rotting. Wall material such as oriented strand board or thermal wood may not be treated. Then a base of impregnated timber is installed, which ensures ventilation of the facade.
Features of fastening to different types of walls
Houses and industrial buildings are built from various materials, each of them has features of wall insulation technology.
Brick
Rough brickwork has pronounced differences in height and unevenness, which interfere with the tight fit of the penoplex and reliable fixation with glue. Therefore, experts recommend combining different fastening methods:
- assembly adhesive;
- liquid Nails;
- dowels;
- self-tapping screws;
- cement mortar;
- polyurethane foam.
Before installation, the rough base should be prepared and primed. Use a hammer drill to drill holes for the dowels.
To attach penoplex to a brick wall, it is recommended to combine methods, for example, use glue and dowels
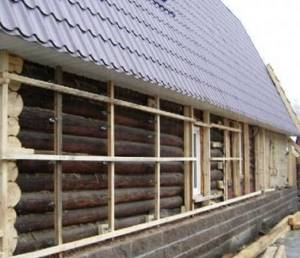
Wooden
It is better to insulate wooden walls from the outside to avoid reducing the space of rooms and excessive humidity inside the house. Walls insulated with penoplex stop breathing - this is a disadvantage of such insulation. Under the influence of changes in humidity and temperature throughout the year, wood changes its size and remains unstable. A wooden house must last at least one year and shrink.
Preparation of the base consists of leveling the surface with a plane, sealing cracks and impregnation with antiseptics and fire retardants.
For fastening, a two-component adhesive is used that retains elasticity after drying; it prevents the sheets from detaching during thermal expansion of the wood.
Additionally, the sheets are fixed with self-tapping screws. If the final cladding of the facade is planned using a frame, then the insulation panels are laid in the cells of the sheathing.
It is recommended to cover wooden walls with insulation on the outside
Block
Aerated block walls cannot be left open; they absorb moisture and become damp. Before insulation, be sure to treat the wall with impregnation, which reduces glue consumption and strengthens the structure of the base.
If the wall is uneven, it can be processed with a drill with a chisel attachment, cutting off the protruding parts. Fastening is done on the sheathing if the finishing is chosen in the form of wall panels and on glue and dowels if frameless cladding is planned.
Before attaching penoplex, the block wall must be treated with a special impregnation
The joints of the slabs should not coincide with the technological seams; each subsequent row should be fastened with an offset. The adhesive composition should not contain aggressive chemicals that can damage the penoplex.
Concrete
The concrete base is very porous and highly absorbent. In this case, glue consumption is increased and adhesion is low. To solve this problem, it is necessary to treat the concrete with impregnating soil. It will fill micropores and strengthen the structure of the material, increase adhesion, and also save the adhesive composition.
For more reliable fastening of the insulation, dowels are used
To avoid moisture penetration into the concrete, foam sheets are laid in a checkerboard pattern with the seams offset.
General installation rules
Correctly attaching penoplex is very important to obtain a high-quality layer of thermal insulation. First of all, you need to secure the starting bar. It can be made independently (we use a wooden beam), or factory-made from perforated metal. In the second case, it is better to purchase a strip in accordance with the width of the insulation, complete with the required number of corners (the corner can be external or internal).
Installation of the strip is carried out as follows. A horizontal line is drawn along the perimeter of the building according to the level. To fasten the “starter” it is better to use dowels. Its use will prevent the insulation from sliding down and maintain the “geometry” of laying the insulation, which is especially important when doing work yourself.
The side of the penoplex on which the adhesive composition will be applied must be rolled with a needle roller to create roughness. The slabs must be installed from bottom to top with an offset of half a slab in each horizontal row.
During installation, the plates are pressed against each other as tightly as possible. For a more durable and “warm” connection, the second row is inserted into the grooves of the first. In order to save adhesive composition, it is possible to seal the joints with polyurethane foam upon completion of installation.
Advantages and disadvantages of wall insulation with penoplex
This material has a number of the following positive qualities:
- Thanks to its low thermal conductivity, even wet penoplex provides complete thermal insulation, perfectly maintaining its performance characteristics.
- It does not rot, eliminating the possibility of mold and mildew.
- Its light weight makes it easy to cut the material according to the required dimensions, as well as carry out the installation process without much difficulty, even with your own hands. In addition, the insulation is easier to store and transport, and after installation it does not load the walls.
- Penoplex tolerates severe frosts and significant temperature changes. It is intended for use in the range from -50 to +70°C.
- The insulation contains no toxic substances that can harm health.
- The foamed structure of penoplex ensures its complete moisture resistance, due to which water does not penetrate through it. In view of this, the material can be effectively used to insulate roofs and foundations in conditions of increased humidity.
- Manufacturers indicate a service life of at least 50 years.
- Some materials contain fire retardants, which prevent them from burning.
- Affordable price, thanks to which a significantly larger number of people can choose it.
In addition to the above advantages, penoplex also has certain disadvantages:
- When exposed to fire, it begins to melt and emit acrid toxic smoke.
- Weak adhesion with adhesive mixtures. Wall mounting is done using fasteners.
- Under prolonged exposure to sunlight, the material deteriorates, which is why it needs to be covered on the outside with a protective layer, which will also make it possible to achieve greater strength of the penoplex, which is not initially too high.
- The insulation has a low level of vapor permeability. Because of this, after installing the material on the walls, they stop “breathing.”
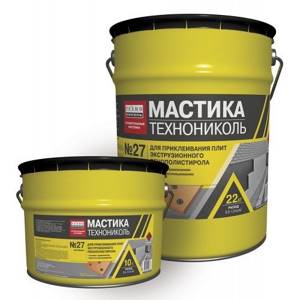
Mastic: the basics
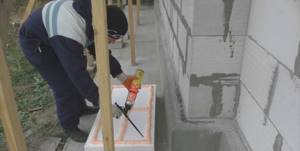
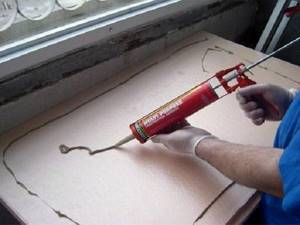
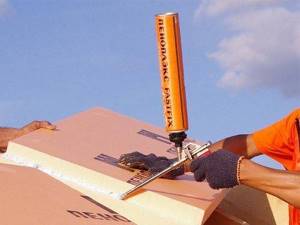
Bitumen-polymer mastics are one of the most common materials due to their price and ease of use. This technology has found wide application in insulating the plinths of buildings operating in extremely unfavorable conditions of constant humidity, the presence of reagents, and mechanical stress. They provide quick and reliable installation of penoplex with stable resistance to harmful external factors. Mastics are sold in tubes, ready for use. The tube is installed in the sealant gun.
The composition is applied around the perimeter and pointwise to the center (when laying the second one and then next to it, it is also applied to the grooves). Then the installed insulation is pressed for a short time. The glued insulation can be repositioned within one hour.
How to carry out double insulation
This finishing will ensure maximum comfort inside the finished building.
This technology is mainly used for finishing balconies. With this treatment, a double layer of thermal insulation is used to cover the load-bearing wall and parapet. The floor, ceiling and side walls can be treated with one layer of insulation. For such cladding, penoplex is often used together with penofol.
Although such insulation materials are independent materials, together they can provide a higher quality result. The first step is to fasten the penoplex using one of the previously discussed methods. After this, penofol is laid. Its installation is carried out using staples or an adhesive mixture.
Dry mixes: simply reliable
The use of dry mixtures allows you to glue penoplex to concrete and brick without much expense or hassle. The dry mixture is added to the water in proportions determined by the instructions for use. The solution is mixed using a drill mixer attachment operating at the lowest possible speed. The resulting mixture is applied to the surface using a notched trowel; the grooves are filled with the trowel. The insulation, installed in place, is held for one minute.
When attaching penoplex to a concrete wall and brickwork, a cement-based mixture is used as the main fastening element.
Preparation of the adhesive base
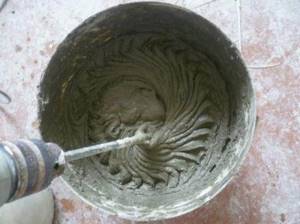
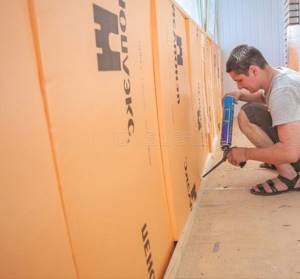
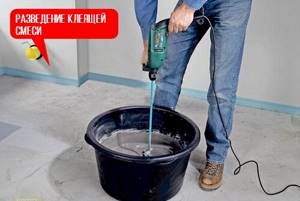
Several different options can be used as adhesive for penoplex. If the base or foundation is being finished, the use of special bitumen mastics without solvents will be mandatory. An excellent solution would be. It has a consistency similar to polyurethane foam and is applied using a gun. All of these options require no cooking. Another thing is dry mixes. In relation to them, it is necessary to comply with the required proportions recommended by the manufacturer. Only in this case will it be possible to achieve a good consistency. Do not pour water on the glue, as it will simply scatter throughout the room. The mixture must be added to water gradually. Mixing is best done using a construction mixer. Each new portion must be mixed in a clean container. It will not be possible to work with such a composition if the outside temperature is below +5°.
Adhesive foam: quick installation
Adhesive foam allows you to very quickly insulate smooth stone surfaces. Thanks to the high adhesion of the adhesive composition, smooth slabs are perfectly fixed on flat concrete surfaces without subsequent displacement. The application technology is as follows. Adhesive foam is applied around the perimeter and in the middle of the slab along the long side using a foam gun. With the grooves filled with glue, the plate is pressed for 30 seconds. The average setting time for adhesive foam is 20 minutes. Further work with penoplex, installation on dowels and grouting is possible after 2 hours.
Rules for installing insulation
To effectively perform thermal insulation with penoplex, it is very important to know the installation rules. They look like this.
At the initial stage of work, a starting bar is set. This is a wooden strip or perforated corner. The plank is designed to keep the slabs from sliding and also indicates the direction of laying. It is selected according to the thickness of the penoplex.
It is possible to buy a ready-made set, including strips, external and internal mounting angles for joints.
The choice of method of fastening the slabs depends, firstly, on the coating material, and secondly, on the operating conditions. Insulation is installed on concrete and brick using the following adhesives and fasteners.
Using a bitumen-polymer thick sticky composition is a simple and cheap way to glue insulation. Due to its special properties, mastic is used on buildings located in special conditions.
The material is packaged in tubes. To work you need to have a special gun.
When laying, the edges and center of the slab are coated with mastic. After this, the insulation is applied to the base and held in place for up to an hour. If necessary, the slab can be moved at this time.
The main binding element of dry mixtures for insulation is cement.
Before use, the adhesive solution is mixed in water according to the instructions indicated on the package. For high-quality adhesion, after mixing, the solution is allowed to settle for two hours to obtain a homogeneous composition without water.
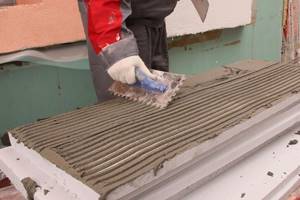
Applying glue to penoplex with a notched trowel
Before laying, the adhesive is applied to the foam plastic with a notched trowel, and then the insulation is applied to the base and held for several minutes. With this type of fastening, additional reinforcement with dowels is not required.
- Glue.
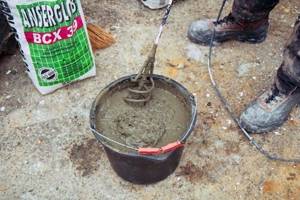
Mixing glue for penoplex
Adhesives with the addition of cement are very common due to their ability to level the surface. With such glue, as a rule, additional fasteners are used.
The composition is applied to the slab in a continuous or dotted manner up to 200 mm wide.
Technology of fastening with adhesive mixture and dowels:
Polyurethane foam has become widespread. However, it is not suitable for fastening foam boards, as it collapses over time and does not hold the load well.
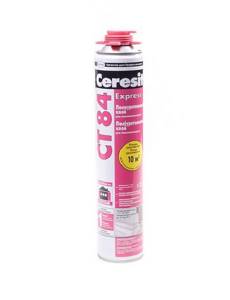
A special material for external fastening of insulation is adhesive foam in the form of a polyurethane foam binder. It has improved adhesion and good grip. Penoplex slabs installed with such an adhesive composition reliably adhere to concrete and stone walls.
During installation, adhesive foam is applied from a gun along the perimeter of the slab and in the center. Then the insulation is pressed against the base for a few seconds. After 20 minutes, the slab is firmly set, but further work can only be done after two hours.
Adhesive foam fastening technology:
- Glue "liquid nails".
This is a well-known adhesive composition that is widely used in everyday life. It glues quickly and reliably. When insulating, it is used in small and hard-to-reach areas. To apply such glue to a large area of coverage will require significant costs.
Glue has strict requirements for the condition of the surface. It should be smooth and coated with primer.
Priming the surface before gluing
“Liquid nails” are packaged in tubes, so they are applied pointwise with a special gun: in the center and along the edges of the slab. The glue dries quickly, so the insulation is applied to the base and then held in place for about a minute.
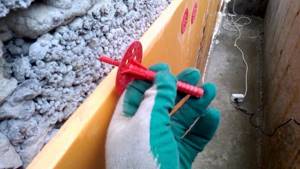
- Disc dowels.
To improve strength, fastening the insulation with dowels is combined with gluing. Unfortunately, drilling holes for dowels breaks the seal of the slab, which means there is a passage for the cold.
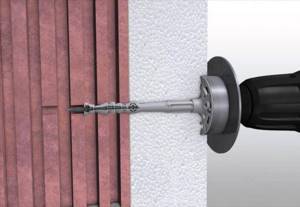
The widely used mushroom-shaped fastening dowel has a core, a sleeve and a wide head. It can be solid plastic and hollow for use with a screw or nail. The spacer zone prevents the dowel from being removed from the hole and also ensures reliable fastening.
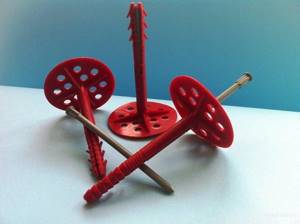
The core can be made of plastic or metal
Before installation, a hole is drilled in the insulation. The dowel is installed so that the cap does not protrude beyond the surface of the insulation. After this, the spacer element is screwed in or hammered in.
Each slab is secured with five dowels: four at the edges and one in the center. For adjacent slabs, the common fasteners are located inside the seam.
Most often, self-tapping screws are used to strengthen the fastening of plates made by other methods. They are used when there is a wooden sheathing on the surface.
At least five dowels are used to fasten each slab. For them, holes are drilled in the insulation. To prevent the self-tapping screw from pushing through the slab, a washer is placed under its head.
ADVICE!
Penoplex boards have a smooth surface, so for better adhesion before gluing, you need to treat them with a needle roller or scratch the surface with a hacksaw.
Disc dowels: long lasting strength
The use of disc-shaped dowels is justified in the case of a large insulation area or uneven façade surfaces. For fastening to dowels you need: a hammer drill (impact drill), a drill of the appropriate diameter and length, and a hammer. Holes are drilled with a recess of 50-60 mm into the base. The holes are filled with polyurethane foam. Then the dowel is driven in with a hammer so that the dowel fungi do not protrude above the surface of the slab. It is best to use dowels in combination with metal screws to increase the reliability of the connection. Installing 5 dowels per slab is sufficient. Adjacent sheets are fastened with one dowel. It must be installed in the seam between the slabs.
Installation methods
When deciding whether to use penoplex, the installation technology must be selected based on a number of factors: the quality of the surface, the level of loads exerted on the wall.
Dowels
This is a mushroom-shaped fastener with a wide cap. This method is recommended to be chosen when it is necessary to ensure increased strength of the thermal insulation structure. For example, dowels are used if you plan to fasten certain types of finishing materials (heavier ones).
The sheets are attached to plastic or metal dowels - umbrellas. Plastic ones are cheaper and do not transmit cold.
The main disadvantage of this method is that there is a possibility of the formation of cold bridges, so drilling holes in the slab leads to a violation of the tightness of the structure.
Glue
Mixtures of different structure and composition are used; they are selected taking into account the type of material of the surface being treated. For example, for foundations it is recommended to use adhesives based on bitumen. There are mixtures that contain cement, as well as a polyurethane analogue.
Methods for applying glue to insulation sheets. The adhesive must be designed for gluing tiles, for example Ceresit CT-83.
There are two disadvantages of this fastening method: low reliability of the coupling, which is why it should not be used on surfaces that are exposed to significant loads; the risk of damage to the insulation if you choose the wrong adhesive.
Polyurethane foam
This method is recommended to be used as an additional measure, for example, if fastening with dowels is performed. In this case, the base is glued with polyurethane foam.
This method is most often used for gypsum and plastic surfaces.
This is one of the most affordable materials, and in addition, it is easy to work with. It is not recommended to use foam as an independent fastening composition, as there is a possibility of its destruction over time.
Self-tapping screws
This method has more disadvantages than a similar technology option - fastening with dowels. Self-tapping screws do not have wide margins, so they are usually placed directly in the slab itself, 4-5 pieces each. Accordingly, more cold bridges will appear, which means that the thermal insulation qualities of the structure will be lower.
The use of mushroom-shaped dowels allows the placement of fasteners in the corners between the plates. Accordingly, the dowel violates the integrity of the slab to a lesser extent, therefore a single hole is drilled - in the center. And penoplex is mainly held in place by fastener caps.
Liquid nails: will be a bit expensive
Liquid nails can be used to attach thermal insulation to a well-leveled and primed base. Glue is applied using a sealant gun pointwise around the perimeter and center of the sheet. Fastening is done by briefly pressing it to the surface.
Expensive adhesive significantly increases installation costs. Even with high-quality bonding to the surface and ease of use, the technology of using “liquid nails” is economically feasible for small areas of insulation.
Reinforcement with dowels for insulation
If you doubt the reliability of the glue, additional fixation will be provided by special dowels for insulation. These plastic fasteners have a wide poppet head and a spacer area at the end. They produce both solid plastic structures and hollow versions equipped with a channel for a screw or nail. The disadvantage of dowels is the creation of holes in the insulation, which can become “cold bridges”.
To fasten one sheet, you will need five dowels: one in each corner and one in the center. For each dowel, a channel is drilled in the insulation and the wall (with a hammer drill or drill). The depth of each hole is 5-6 cm. Dowels are inserted into the holes, then a spacer element is driven (or screwed) into each of them. The caps should not protrude above the surface of the penoplex, as they will interfere with attaching the external finish.
Insulation of walls outside and inside – which is better?
There are several options for insulating the walls of a private house:
If you look from a practical point of view, external insulation of walls is much more convenient and effective. In addition, it becomes possible to additionally decorate the facade of the house with an unusual material, such as mosaic or decorative plaster.
Due to penoplex, the walls of the house are additionally leveled, saving finishing material . The only obstacle to external wall insulation may be a ban on facade repairs in apartment buildings.
Comparison of insulation methods
But don’t despair, because there is always the opportunity to insulate the walls from the inside. Interior wall decoration with penoplex can be done in any season.
When using penoplex, installation work is simplified and you can do it yourself. Whatever finishing method you choose, it is necessary to carry out cleaning work on the walls where the foam sheets will be located. Then the surface is treated with special moisture control agents and antifungal solutions.
Chips, cracks and other damage formed in the walls are repaired. Penoplex is installed only on a well-dried surface using a special adhesive composition, and then additionally attached to the wall with mushroom dowels.
The sheets must be fastened with a slight offset, and the gaps between them are sealed with polyurethane foam or construction tape . After installing the penoplex, you can begin design work on the facade.
What functions does the dowel perform?
Penoplex is light in weight, so many people think that it is enough to secure it with glue. But when fully assembled, the system of thermal insulation materials, together with glue and external finishing, will weigh a lot, so it is worthwhile to provide for additional fastening of the penoplex using dowels. Decorative finishing and glue puts a lot of stress on the insulating material itself, so after some time, it can peel off from the surface of the walls or completely fall, this happens in the absence of reliable fastening. To avoid such problems, penoplex is secured with dowels that have a spacer system.
Fastening elements can be of various types, the quality of the spacer system depends on this. Fastening dowels are fixed to various types of surfaces, their holding capacity depends on this. For example, porous hollow materials make it difficult to attach the dowel. That is, before purchasing, it is necessary to calculate the holding capacity of the dowel, that is, how much material is needed for one square meter; this indicator depends on the material of the wall structure.
Which penoplex to choose for wall insulation? Which one is better for external insulation?
Penoplex is divided into several main types. They differ from each other in composition and characteristics. The better the properties of the material, the higher its price. The name of each brand speaks for itself, so it is easier for the builder to choose the option that suits him:
- Roofing – used for thermal insulation of all types of roofs;
- Wall - used for thermal insulation of walls and the inside of the house;
- Foundation – used for insulating the foundation of a building or basement. The main advantage of this type is its water resistance, specially designed for such work;
- Penoplex comfort - is more popular when decorating balconies and apartment rooms. It has fairly good characteristics, but a high price for the material;
- Penoplex 45 is the highest sheet density. It is used in the construction of highways and airport runways. This type of penoplex is resistant to even the most critical temperatures.
Features of fixing thermal insulation to the wall using dowels
The technology for fastening materials such as penoplex, polystyrene foam, and polystyrene foam is the same. First, the thermal insulation material is prepared, then the sheets are fixed to the walls using an adhesive composition. When the solution dries, they begin to fix the penoplex with dowels; before this, all seams must be processed so that cold bridges are not created through them. After this, the thermal insulation material is finished with a finishing coating, this can be various panels or plaster.
Technology for fixing insulation using dowels
Penoplex is actively used for foundation insulation, since this material does not collapse under the influence of humidity, and also does not change when temperature changes. The section of the foundation located above the ground is covered with insulation and fixed with dowels. To provide the building with high-quality protection from low temperatures, penoplex can be laid under the concrete screed of the blind area.
Dowels for fixing foam sheets should have a length of 50 centimeters greater than the thickness of the material itself; you can calculate the number of elements, taking into account that 6 pieces are required per square meter. It is best to use dowels with a thermal head and a metal rod. To secure the penoplex with dowels, make one hole in the center of the sheet and four in each corner. Thus, the insulation sheet will be held by several fasteners at once.
Dowels are placed in the holes, then spacers in the form of a nail are driven into them. If the work is done on a brick surface, then the immersion depth should be at least 50 millimeters.
Preparing the surface for installation
Penoplex panels are attached only to treated and smooth surfaces.
The preparatory stage includes the following operations:
- The surface is carefully inspected, after which all dirt, remnants of the old destroyed coating, and peelings that will not withstand the load of the insulation are removed.
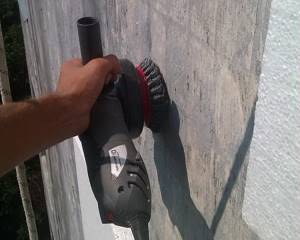
Cleaning the walls with a wire brush
- Particular attention is paid to surface damage by mold and mildew. The damaged area is cleaned with a stiff brush and then treated with a special composition, which is made at home using copper sulfate or purchased in a retail chain.
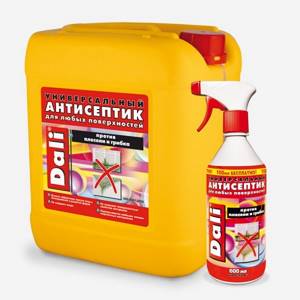
Ready-made compositions against fungus and mold
- To eliminate irregularities, a map of problem areas is drawn up. After this, alignment is performed using any of the following methods:
- plastering is a simple and reliable method. The solution is selected individually for the surface material. The insulation can be attached when the plaster has dried;
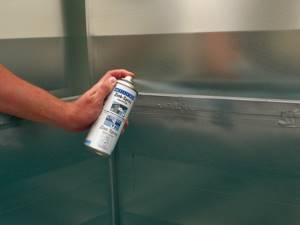
Anti-corrosion composition WEICON Zinc Spray
- Brackets are mounted for equipment that will be hung in the future, for example, an air conditioner.
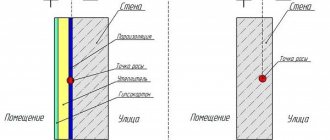
Internal insulation wall cake
A wall pie is a collection of materials laid in a certain order that are necessary to ensure a comfortable indoor environment.
The pie, the insulation for which is penoplex, consists of the following layers:
- interior wall;
- counter rack;
- waterproofing layer;
- OSB boards;
- penoplex;
- sheathing;
- vapor barrier film;
- finishing materials (plasterboard, OSB, putty).

wall pie
For insulating surfaces made of brick, foam blocks or concrete buildings, a pie with penoplex insulation looks a little different:
- interior wall;
- vapor barrier;
- adhesive solution;
- penoplex;
- reinforcing mesh;
- adhesive solution;
- finishing materials (plasterboard, putty).
NOTE! When insulating from the inside, the likelihood of dew point formation, and, as a result, condensation, is high, so it is recommended to lay a vapor barrier layer.
There is no need for these layers of cake if the structure is additionally insulated from the outside.
Penoplex - advantages and disadvantages, technical characteristics
In recent years, construction has increasingly begun to use
penoplex. All thanks to the special properties and unique manufacturing technology.
This is an inexpensive, synthetic thermal insulation material that is much easier to install than, for example, glass wool.
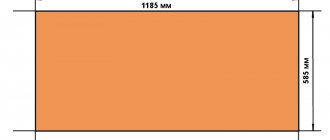
The standard dimensions of a penoplex sheet are length 1.2 m, width 60 cm. Only its thickness can be different, from 2-10 cm.
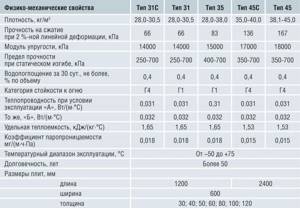
From a technical point of view, penoplex has the following characteristics:
- Thermal conductivity according to GOST. the standard should be 0.03 W/m*C;
- Vapor permeability should not exceed 0.008 mg/m*hour/*Pa;
- Sound insulation at 41dB;
- Moisture resistance no more than 0.6%;
- The density of the material varies between 28-45 kg/m 3 ;
- The maximum pressure when compressing the sheet between the plates should be no more than 0.18 MPa;
- Temperature difference range from –100 to +55 C 0 .
When choosing a material for better thermal insulation, focus on these characteristics. This guarantees you high-quality insulation of the facade of a brick house with a low rate of liquid absorption.
Like any building material, penoplex has a number of advantages and disadvantages.
Advantages:
- The best thermal insulation performance in comparison with other insulation materials;
- High protection against vapor formation due to the unusual structure of the material;
- Good moisture protection, so the material can be used to insulate baths and saunas;
- The material is durable, withstands heavy loads both in compression and in rupture;
- Excellent soundproofing characteristics;
- The material is treated with special solutions at the production stage, therefore it is resistant to fire;
- Protected from the development of fungal parasitic organisms;
- Easy to carry out installation work without additional assistance;
- Processing of penoplex can be carried out using improvised means without additional purchase of special devices, for example, for cutting sheets;
- The material is very light;
- Long service life - up to 50 years while maintaining the basic properties of the material.
Flaws:
- Although the material does not ignite, during a fire it melts, releasing toxic and dangerous smoke, and even after extinguishing it continues to smoke for a long time;
- The material is afraid of direct sunlight, and loses its properties when exposed to the sun for a long time.
- Susceptible to the use of solvents, destroyed;
- The price depends on the properties and qualities of penoplex;
- Practical zero vapor permeability, therefore not recommended for insulation of wooden and frame houses .
Comparison of penoplex with other insulation materials