Heat exchanger breakdowns
Repair of the geyser heat exchanger is needed quite often, since, given the quality of the water, scale forms there.
Scale appears in the heat exchanger if the water temperature reaches 800C, so we can draw a simple conclusion: if you do not use water at this temperature, then there will be no scale. Also, scale forms in the heat exchanger if the pilot burner is constantly burning. This is practiced in both old and new models. And as a result, it turns out that the water temperature in the heat exchanger drops to about 900C.
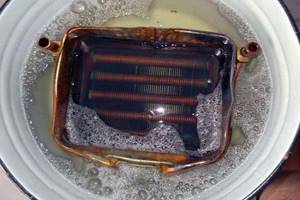
Rice. 4 Place where the leak occurred in the heat exchanger
In order not to repair the heat exchanger of the gas water heater, you just need to completely turn off the water heater. How to understand that the heat exchanger of a geyser is clogged with scale:
- Poor pressure of heated water, despite the fact that the pressure in the cold tap is good;
- The device may not turn on at all;
- The device turns on and turns off immediately.
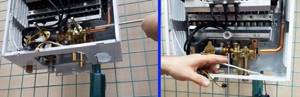
Before repairing the heat exchanger, you need to remove the housing from the device. The heat exchanger needs to be cleaned with a special anti-deposit solution, which can be purchased at a specialized store. First you need to drain the water from the heat exchanger. Pour the solution very slowly for greater efficiency and leave for a while. Sometimes this procedure is not enough and you need to clean the heat exchanger again.
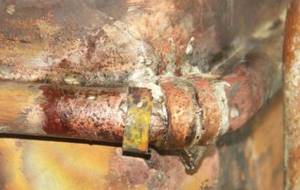
Repair of an old geyser can also be carried out due to a heat exchanger leak (Fig. 4). It is often recommended to replace the old heat exchanger with a new one, but it is quite expensive. You can simply solder the damaged area with your own hands. Soldering is a fairly reliable method, as it melts at 2000C. Before soldering the heat exchanger, you need to drain the water.
In any case, if gas equipment breaks down, it is much more profitable to repair it. All the parts separately are quite expensive, for example the heat exchanger has a price of about 1/3 of the entire device.
Other malfunctions of flow-through heaters
In addition to the problems listed above, speaker owners have to deal with the following problems:
- weak sparking, sometimes single discharges slip through, the gas does not flare up;
- ignition is accompanied by a strong bang;
- after closing the DHW valve, the burner continues to operate until the electromagnet cuts off the fuel supply due to strong heating (at the command of the sensor);
- spontaneous ignition after connecting to a power source;
- insufficient heating;
- Water is leaking from the water heater.
Advice regarding weak discharges on electrodes. If the batteries and contacts are in order, try cleaning the ends of the electrodes and adjusting the gap between the needles and the plane of the burner (the value is indicated in the technical data sheet of the product). If there is no result, call a specialist - most likely the reason is in the pulse block.
The gap is set by bending the end of the needle.
Problems with sparking generate pops - gas manages to accumulate in the combustion chamber before a sufficiently powerful discharge is formed. If the spark remains weak, the fuel-air mixture ignites when it reaches a high concentration, which is accompanied by a micro-explosion. There have been cases where the pops damaged the heat exchanger, disrupted seals and normal contact in the electrical circuits of the sensors.
Continuing heating after turning off the water is a rather dangerous malfunction. If it coincides with a failure of the overheating sensor, a vapor phase will form in the heat exchanger that can rupture copper tubes and honeycombs. The reason is the jamming of the “frog” rod that opens the gas valve. How to repair:
- Remove the water module according to the instructions above.
- Disassemble the “frog” and remove the plastic plate.
- Unscrew the nut (or screw) in the left half of the membrane chamber and remove the pusher.
- Change the seals, thoroughly clean all parts from deposits, including the spring monostat (located on the right side of the “frog” behind the membrane).
Recommendation. Before assembly, check how freely the rod moves inside the new seals. For details on disassembling and repairing the speaker, watch the video:
Spontaneous start of heating without turning on the water is a consequence of sticking of the pusher. When the burner of the device does not turn off and the thermostat trips, the user temporarily turns off the power source. Since the rod remains pressed, after the power supply is restored, the column turns on itself, without opening the DHW tap. The “treatment” method is described above.
The reason for low heating is total contamination of the main elements of the unit - the heat exchanger and burner. The column needs to be completely disassembled and serviced; it is better to entrust such work to a specialist. In case of burnout and leakage, the heat exchange unit must be removed and properly soldered, which is not always possible to do at home.
Checking the correct assembly
Place the faucet handle in the closed position. We open the gas supply. Press the automatic button. We bring the match to the igniter. The igniter must not light up!
Turn the tap handle to the igniter position. Press the automatic button. We bring a match. The igniter should light up (this may take up to a minute, since air may have entered the system during disassembly and reassembly). Release the automatic button. The pilot light should be lit; when the hot water tap is opened, the main burner should not flare up!

Turn the tap to full open mode. Open the hot water tap. The main burner should light up.
Place the faucet handle in the closed position. The igniter should go out completely.
After making sure that the gas tap is working correctly, we light the column and check the tightness of all gas connections with a soap solution. If the column is not ignited, the tightness can only be checked up to the automatic button.
Troubleshooting the Electrical System
If the electric heated towel rail does not heat up, then to determine the malfunction you will need:
If the heated towel rail malfunctions, check the power supply and the phase of the heating element.
- measuring device, tester;
- indicator screwdriver, voltage indicator.
Before claiming that the heating element is faulty, it is necessary to check the 220 V power supply circuit. To do this, use an indicator to check the presence of a phase on the heating element. The presence of phase voltage does not always indicate correct voltage supply, since there may be a break in the neutral conductor (absence of “zero”). A break in the neutral conductor can lead to partial operation of the heating element. In this case, the heated towel rail heats, but not well enough. You can more accurately check the presence of supply voltage using a tester by measuring the network voltage. Do not forget to configure the device before taking measurements. The measurement parameter is AC voltage, the measurement limit is above 250 V. If it turns out that the supply voltage of 220 V is present, we begin to check the heated towel rail itself.
To check, disconnect the heater from the network and use an ohmmeter to measure the resistance of the heating element. The resistance should correspond to a value of several ohms. Simultaneously with the continuity test of the heating element, we check its short circuit to the housing. The absence of resistance of several ohms indicates a malfunction of the electric heater and it should be replaced.
When working with electricity, follow safety precautions and use tools with insulated handles.
How to solder a geyser radiator if the fistula is in a place inaccessible for soldering
If the location of the water leak occurs on the wall of the heat exchanger adjacent to the base of the gas water heater, then repairing the heat exchanger by soldering on site is impossible, and it must be removed from the gas water heater. The designers of NEVA LUX-5013 did their best. To remove the heat exchanger for repairs, you need to disassemble almost the entire gas water heater and, most unpleasantly, disconnect the gas pipe. I didn’t want to mess with gas pipes, as it’s dangerous.
The removal of the heat exchanger for repair was hampered by an umbrella for removing gas combustion products, secured with four aluminum rivets to the base of the gas water heater. I had to drill out these rivets with an electric drill, remove the umbrella, and only then did it become possible to remove the heat exchanger. During assembly, instead of rivets, the umbrella was secured to the base with two M4 screws. If the wall does not interfere, you can secure the umbrella with self-tapping screws.

Next, the repair of the gas water heater was carried out using the technology described above. Over the past two years, I have had to repair the heat exchanger, soldering the fistulas, five times. The last time, water began to leak from the side adjacent to the wall of the heat exchanger, and I decided to buy a new one, which I did. I'm going to repair the old heat exchanger of the geyser, I'll tin and solder the tube along its entire length. Photo of the heat exchanger from the side attached to the base.
When purchasing a heat exchanger for a geyser, I was surprised to find that they gave me not a new one, but an already repaired one. The heat exchanger tube had the same soldering that I did when repairing my old heat exchanger. As a result, out of four available in the store, only one heat exchanger was not soldered. It turns out that the plant ships repaired heat exchangers for spare parts that failed during the warranty period. They seal fistulas in them and sell them again. The heat exchanger has a warranty period of only 1 month. It turns out that in a few months the gas water heater will have to be repaired again!
Symptoms of malfunctions
The following signs indicate that the column is clogged:
- The burner does not light well and a loud bang may be heard;
- The heater starts, but the burner goes out almost immediately;
- Soot is pouring out from under the casing below;
- The unit operates at maximum capacity, but the water barely heats up.
Recommendations on how to clean the heat exchanger of a geyser or igniter will be different, so you need to immediately understand what and where exactly the problem is. So cotton in the chamber indicates that excess gas is accumulating before ignition.
Recommendations for choosing a new speaker
The main parameters when choosing a geyser are power and performance
They should be given priority attention if you do not plan to redo the project when installing the column in its original place. The power of the new device should not exceed that specified in the project
For a family of 1 - 2 people, a dispenser capacity of 10 liters per minute is usually sufficient, which corresponds to a power of 17 - 18 kW. If replacing the device is associated with the desire to use two points of water consumption at the same time, for example, a sink and a shower, then the productivity of the gas heater should be at least 13 l/min.
For three points, including filling the bathtub, you need to focus on 15 l/min. Provided there is sufficient pressure in the water supply.
When choosing a new water heater, it is important to decide whether the previous power of the water heater is enough for the needs of the family or whether you will need to purchase a more efficient device, which will entail the need to order a new project
Many models of geysers have a flame modulation function. Its purpose is to maintain a constant temperature (with an accuracy of 1 - 3 degrees) at the outlet of the device, regardless of water consumption. Choosing such a model will allow you not to worry about adjusting the temperature when several family members turn on hot water at the same time.
Before installing the column, you need to check the condition of the chimney, pipelines, taps, and determine which elements will require updating.
Why does the speaker go out?
Let's think logically: if the gas burner device ignites, then the water block and the sparking system are working properly. The problem lies in the solenoid valve, or more precisely, in its shutdown and interruption of the fuel supply. Troubleshooting comes down to 3 sensors:
- traction;
- ionization;
- heat exchanger overheating.
The malfunction of the draft sensor was already mentioned above - the faulty element did not allow the column to start. The fact is that heaters of different brands can work differently; in some, the draft sensor does not allow the burner to light, in others it works later, after a gas flash. The result is that the column lights up and immediately goes out.
The test method is the same - we close the terminals of the draft sensor with a wire and turn on the water heater. If the burner does not go out, install a new part. It is strictly not recommended to constantly use a jumper wire instead of a non-working traction thermostat!
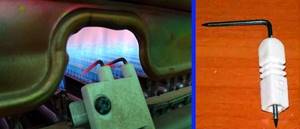
The flame control sensor creates a small EMF in the electrical circuit, which is directed to the ignition unit. Externally, the thermocouple is very similar to the ignition electrode
An ionization flame sensor (thermocouple) produces a direct current when the tip of the needle is heated by the burner flame. The signal is sent to the control module and the safety solenoid valve coil, keeping it open. Traction and excessive heating sensors are connected in series to the same circuit.
Key moment. As soon as the signal from the thermocouple disappears, the electromagnet turns off, the flow of gas stops - the column goes out.
How to check and repair the ionization sensor:
- An insulated cable from the pulse ignition module is connected to the needle located in the combustion zone. Remove the end of the wire from the socket and shorten it by 0.5-1 cm to ensure reliable contact.
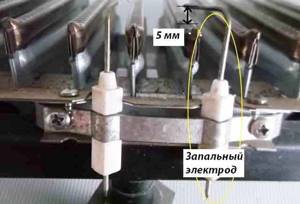
- Adjust the gap of 6.5 mm (or other as required by the manufacturer) between the tip of the needle and the surface of the burner for optimal heating immediately after ignition.
- If the previous steps do not help, try shorting the terminals of the overheating sensor attached to the heat exchanger with copper wire.
- Does the column continue to die out a second after ignition? Remove the thermocouple, connect a voltmeter to its contacts and heat the needle with a gas stove burner. A working sensor will produce a voltage of 0.02 volts or more. If the reading is lower, go buy a new thermocouple.
In rare cases, the electromagnet itself or the ignition module coil fails. The first can be checked using an ohmmeter - connect the device to two of the three terminals alternately. Normal readings on the first pair are 400...600 Ohms, on the second - 7...8 Ohms, on the third - about 400 Ohms (the data are given for Neva speakers, they may differ on other devices). To diagnose the pulse unit, you will have to call a specialist.
When the water heater turns off 5-15 minutes after starting, the following problems are possible:
- the heat exchange honeycombs are half clogged with scale, the water flow is weak, the device quickly overheats, which triggers the sensor;
- too little pressure in the water supply, the result is similar;
- malfunctions of other components and parts leading to critical heating of the heat exchanger.
Conclusion. If the burner turns off after some time, you should look for the cause of overheating; the sensor itself is probably working. A common problem is long-term scale in the heat exchanger, which can be removed in various ways at home.
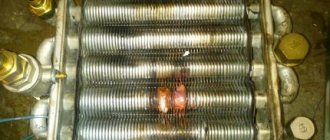
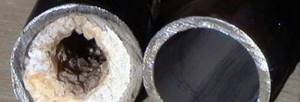
Reasons for heat exchanger failure
The period of operation is determined primarily by how the water in the city water supply is disinfected. In Russia, either pure chlorine or chlorine dioxide is used. When the water flowing through the copper tube heats up, it causes a violent chemical reaction. Copper chloride is inferior to pure metal in strength, and therefore fistulas appear quite quickly. The luckiest people are residents of cities where tap water is ozonated.
But there are still very few such settlements. The high cost of the modern solution does not allow us to count on the rapid spread of ozonation. Moreover, now manufacturers have begun to save in every possible way. And if previously troubles happened quite rarely with thick tubes of heat exchangers, now thin, low-quality copper is used everywhere. The service life of products has significantly decreased.
Which column has a good heat exchanger?
It was described above that both steel and copper heaters have their strengths and weaknesses. A comparison of heat exchangers showed that each type of coil is optimally suited for its specific tasks and purposes. The only important condition. You should not buy a cheap water heater.
The lower cost is due to savings on the cost of the coil. To do this, they reduce the thickness of the walls of heaters and tubes, which leads to their rapid burnout, add various impurities (shortening the service life by at least a third), and use cheap grades of stainless steel that are unsuitable for domestic purposes. Chinese companies are especially guilty of the latter.
Below are two lists of gas boilers with copper and stainless steel heat exchangers. These speaker models have proven their reliability, have high build quality and are popular with domestic consumers.
- Zanussi GWH 10 Fonte
Electrolux GWH 265 ERN NanoPlus
Gorenje GWH 10 NNBW
Each of the listed instantaneous and storage water heaters is suitable for domestic use, easy to use, economical and reliable.
The geyser radiator is leaking
It is worth noting that replacing a leaking heat exchanger with a working one is not the only option for repairing speakers. If we take into account that buying a new radiator will be very expensive (a third of the cost of the entire device), it will be very useful to know how to repair a geyser with your own hands in this case. The repair will involve soldering the coil. Due to the fact that solder melts at higher temperatures than those that occur in the radiator, this repair option is quite reliable. Spare parts for geysers are very expensive, so repairs are an excellent alternative to replacing them.
Statistics show that cracks form mainly on the pipe located on the outside of the heat exchanger. Before starting soldering, it is necessary to empty the heat exchanger of water. If this is not done, the water, by removing heat, will not allow the solder to set well. In order to get rid of water, you should open the hot tap, then remove the fasteners for supplying cold water to the device. After these steps, the bulk of the water should drain. What remains can be blown out with a compressor.
Now you can proceed directly to soldering. Using sandpaper, you need to treat the area of the crack, and then clean and degrease it. Tinning is carried out at a temperature of 180 degrees, it is best to use a soldering iron of at least 100 W. It is recommended to use rosin when soldering, but if this is not available, you can replace it with regular aspirin tablets. The soldering area must be covered with an even layer of solder. It is recommended to increase this layer to two millimeters, and then this defect will never manifest itself. After this, you should inspect the entire radiator tube. If there are green inclusions, these places also need to be soldered, since, most likely, they also formed due to cracks, only smaller ones. If this is not done, they will become larger over time, which is why you will again have to repair the gas water heater yourself.
In cases where the cracks are located in inaccessible places, soldering will not be possible. This will require removing the heat exchanger, which will require complete disassembly of the gas water heater. This procedure is very dangerous, so repairing the Junkers geyser from Bosch, as well as domestic ones, is best left to specialists.
Restoring geyser pipe flanges by soldering
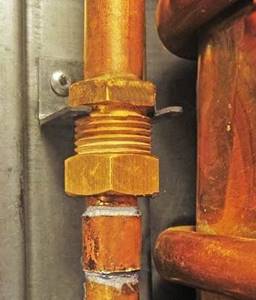
Somehow my eye caught two pieces of copper tubes with flanges, onto which American union nuts were put on. These parts are designed for installing a water supply system made of copper pipes.

When soldering the heat exchanger of the gas water heater, I remembered them, and the idea arose to restore the previously cracked copper pipe connecting the outlet pipe of the heat exchanger to the hot water supply, soldering to them new flanges that had been collecting dust on the shelf. The task was somewhat more complicated, since the copper tube for the available parts was bent at a right angle. I had to take a hacksaw for metal.
First, a part of the tube with a flange was sawed off at the place where the bend begins. Next, the expanded part of the tube was sawed off from the opposite end for further use as a connecting ring. If the tube were straight, there would be no need to saw. The result was two pieces of tube about a centimeter long.
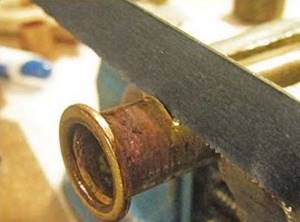
The next step is sawing off the cracked flange from the pipe. The sawn piece of pipe should be equal in length to the section of pipe with a flange prepared for repair in the previous step.
As you can see in the photo, the sawn-off piece of the gas water heater pipe had many cracks at the place where the flange formed.
The photograph shows parts prepared for soldering. On the left is the end of the gas water heater pipe, on the right is a new flange with a union nut, in the middle is a connecting ring.
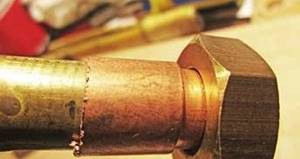
Before soldering, you need to check how the prepared parts fit together. The pipes of the nozzle should fit into the ring easily, with a small gap.
Before joining by soldering, the mating surfaces of the tubes and rings must first be cleaned with fine sandpaper to remove the oxide layer. It is convenient to clean the inside of the ring by wrapping sandpaper around a round rod, such as the handle of a small screwdriver. Next, the cleaned surfaces must be tinned with a thin layer of POS-61 tin-lead solder using a soldering iron with a power of 60-100 watts. As a flux, it is best to use acidic zinc chloride flux, in other words, hydrochloric acid slaked with zinc. Since copper parts are soldered, rosin or aspirin will also work.
When soldering, you need to ensure that the joint of the pipes is approximately in the middle inside the ring. If after tinning the tubes do not want to fit into the ring, then you need to heat them with a soldering iron, the solder will melt and the tubes will fit. Do not forget to put a union nut on the tube before soldering the pipe.
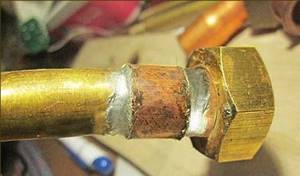
Once the tubes are joined, all that remains is to fill the gap with molten solder. As you can see in the photo, the result is a completely sealed and mechanically strong connection. The pipe has been repaired, and you can install it in place in the gas water heater; it will serve no worse than new.
The check showed that the pipe was tight at the soldering point, but a leak arose at its other end, and a microcrack appeared for the same reason. I had to repair the other end of the pipe in the same way. The geyser has been working with the repaired pipe for more than a year. No water leaks were observed.
Using this technology, it is possible to restore the tightness of not only copper and brass tubes, but also stainless steel and iron tubes. The technology is applicable not only for repairing geysers, but also for repairing other devices and machines, including cars.
Incorrect water heating
The cause of this problem may be the incorrect choice of installation power. To do this, when purchasing, you need to make sure that the gas water heater from Bosch or another company has the necessary characteristics for your home. In addition, the device may be clogged. This is confirmed by the presence of soot and the uncharacteristic color of the flame. If the heating is insufficient, you can try adjusting the energy supply. This is done using a special tap.
There is also the opposite situation - the water is too hot. Here, the Bosch gas water heater does not require repair, since this is not considered a malfunction. This is because in summer the water temperature in the water supply is warmer and the pressure drops. Many geysers are not designed for this mode. The characteristics of geysers include the optimal water pressure, which ensures normal operation of the unit. The solution to this problem is the following: it is necessary to reduce the energy supply.
The heat exchanger is clogged with scale
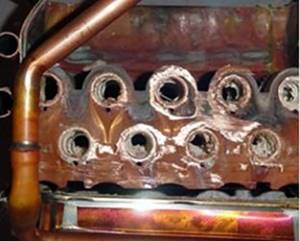
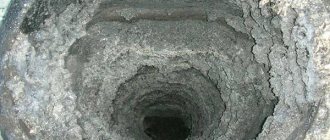
With our water quality, heat exchangers in geysers become clogged with scale quite quickly and very heavily, which reduces their thermal conductivity and increases gas consumption.
The longest process in terms of time is cleaning the main tube (radiator) from deposits that arise when heating tap water. If you turn the gas knob all the way, and the water coming out is barely warm, then this indicates that the heat exchanger is clogged with ordinary scale, which does not transfer heat well.
This happens quite often if the gas water heater does not have automatic ignition (with a igniter). Scale also forms if you set the water heating temperature too high. The unit overheats, the tube (radiator) heats up to 80-850, which contributes to the rapid (a little more than an hour) formation of scale. Isn't it better to just turn off the speaker in time? Then there will be no problems, because 40-600 is enough for all washing and washing processes.
Before starting work on the heat exchanger, check the inlet tap or valve. Maybe the whole reason is that they are clogged. But if they are working properly, it is necessary to get rid of deposits in the tube.
There are two ways to solve the scale issue. We will consider both options.
Auto
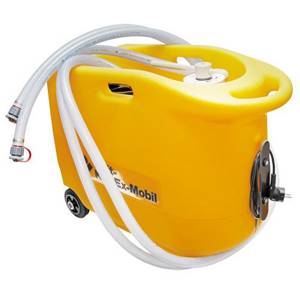
The Cillit KalkEx cleaning system does its job quite well. With its help you can quickly descale any boilers. Unfortunately, it is not very accessible to ordinary users of geysers.
This is an expensive method using a special device (Cillit KalkEx) and a set of special preparations for washing. Your speaker doesn't even need to be removed from the wall. You just need to disconnect the water hoses (inlet/outlet).
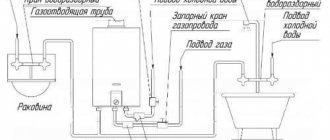
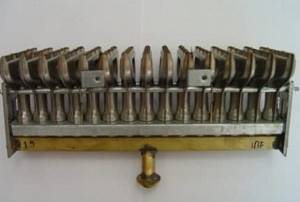
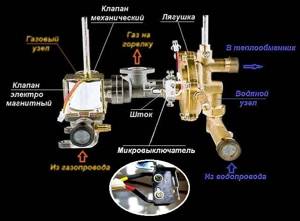
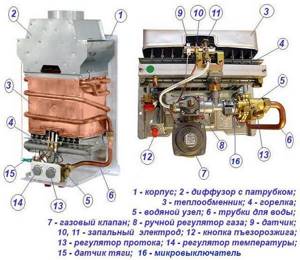
Gas water heater design: detailed inspection
Metal equipment, similar to a cabinet, is a box with two pipes connected. One is running water, the other supplies gas. The main parts are the heat exchanger and both burners (main and pilot).
A more detailed structure of the gas water heater is as follows:
- Water node.
- Gas unit.
- Water flow regulator.
- Diaphragm valve.
- Connection to the chimney.
- Hood for hood.
- Power control.
- Switch.
- Back panel.
- Heat exchanger.
- Ignition.
It is important to know that this equipment differs in the ignition method. The methods are as follows - electronic, manual and piezoelectric ignition
These devices function differently.
How to turn on the gas water heater and adjust the temperature and pressure
Before lighting the gas water heater, initial settings are carried out in order to optimize water heating, gas consumption and installation performance for the user. Adjustment may also be necessary after repairs, or if for some reason the settings are lost.
Water consumption
The nominal parameters of water flow are indicated by the manufacturer in the passport for the dispenser. For example, to set a value of 10 l/min, you need to turn on the hot water tap, set the adjustment knob to this value, and then close the mixer.
Gas consumption
To begin with, set the fuel supply knob to the minimum setting; after connecting the equipment to the network or placing batteries in it, open the gas valve on the main pipe. Next, open the hot water mixer, the column will turn on automatically and begin to heat the water. The fuel regulator should then be set at a level that will heat the water 25°C above the inlet flow mark. It should be remembered that the equipment will take some time to heat up.
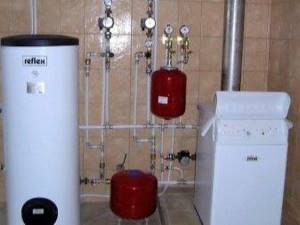
Installation and adjustment of the water heater
The geyser turns off spontaneously
This is a temperature sensor that measures the temperature of the geyser during operation, preventing it from overheating.
A temperature sensor is installed on each gas water heater, which ensures that the water heater does not overheat; if it fails, the water heater may turn off spontaneously during operation. It usually looks like this:
After normal operation, for some time, the heater “stalls” for about 20 minutes. After this time, it can be turned on for the same period of time. The malfunction is usually seasonal and appears only in summer or winter when the windows are closed.
The device turns off when it wants and then does not light up. This can happen when the sensor wire is shorted to the body. Check the wires to ensure they are intact and well insulated.
In order to check the sensor itself for functionality, you should remove two contacts from it and short-circuit it with a needle, a paper clip, or a piece of tin. If the gas appliance turns on and works, the sensor must be changed.
Attention! Many owners “for the first time” (if they didn’t get the sensor) leave a paper clip and insulate it for the operation of the gas water heater, but, as a rule, the sensor is never changed. We don't recommend doing this.
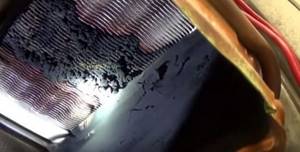
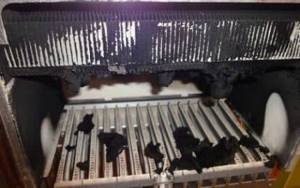
Removing contaminants from combustion products
Soot, soot and other solid combustion products, although formed in such devices in small quantities, can still cause serious damage.
If you need to clean this part of the device, you need to remember the manufacturer's instructions again, especially if the warranty period has not yet expired. Some manufacturers require that such work be carried out only by professional gas fitters.
You can remove soot and soot from the surface of the heat exchanger using a regular stiff brush, but to clean the injectors you will need a metal wire
The easiest way is to clean the column radiator from combustion products. To do this, turn off the gas and remove the protective casing from the device. After this, the surface of the element is treated with a regular household vacuum cleaner.
If the gas in the column does not ignite, or burns unevenly and weakly, the injectors may be clogged. To clean them from accumulated layers of soot, use a thin wire or a brush with metal bristles.
Of course, in this case, you should turn off the gas and remove the casing. Cleaning must be done carefully so as not to damage the elements of the device.
When soot accumulates too quickly, it makes sense to think about the presence of other faults that provoke this situation. A common reason for this phenomenon is a leak at the joints of the gas tubes inside the column.
The gas water heater burner consists of narrow nozzles. If they are clogged with soot, the gas will flow unevenly and the water will heat up more slowly.
The gap may be so small that it is not possible to detect the leak by smell. If you suspect a malfunction of this type, apply a soapy solution to the connections and then apply gas to the device.
If the solution begins to bubble, you should stop work, turn off the gas and immediately call an experienced gas technician. Self-indulgence at this stage can be fatal.
The water pressure is normal, the soot has been removed, but the column still does not turn on? Now is the time to check your traction. Modern models usually have special sensors that detect the lack of draft and do not allow the device to be turned on, cutting off the gas supply to the ignition device.
To check, it is better to use strips of thin paper. The flame of a candle or lighter can be dangerous if the problem is caused by a gas leak.
If soot particles and other combustion products accumulate in the column too quickly, you need to find the malfunction that leads to this result
Having discovered weak traction, it is necessary to identify the cause of the situation. Usually it is enough to clean the chimney to restore normal operation of the appliance. If this does not help, you should consult with a gas equipment engineer; there may be flaws made during the installation of the chimney structure.
Repair and installation of a geyser
For wall-mounted models Bosch, Ariston, Electrolux, etc., the device is quite reliable, but still there comes a time when malfunctions occur.
Repair of the Oasis geyser may be required for several reasons:
- Device defect due to natural wear and tear;
- Element failure due to improper use;
- Manufacturing defects.
Correct fault diagnosis is very important, especially for electronically controlled devices.
Sometimes it is difficult to determine the defect in them immediately. It seems that the reason for the failure is a malfunction of the electronic ignition unit. But when repairing a Bosch gas boiler, another element may be damaged.
Therefore, we carry out accurate diagnostics, then restore and, if necessary, replace elements. We have a large range of spare parts. We order some parts from the manufacturer. Sometimes, if it is necessary to replace the heat exchanger, it is more profitable to replace the equipment.
In order for the water heating unit to serve for a long time, you must adhere to the operating rules:
- Have a diagram of a gas water heater;
- Read the instructions;
- Check traction;
- Before the heating season, a general inspection of the system is necessary;
- Do not carry out repairs yourself.
And also, to avoid frequent repairs of Ariston gas boilers, we recommend regular maintenance. It is advisable to clean the system to prolong the smooth operation of the unit.
If there is a strong smell of gas, we strongly recommend that you contact a specialist immediately!
See also:
How to clean a gas water heater at home. Why does soot appear?
Caring for the speaker primarily involves cleaning it from soot. You can perform the procedure yourself, using a cleaning product and following simple rules, or contact a specialist. Clogged nozzle holes can be easily pierced with a wire brush or thin wire.
The column needs to be cleaned regularly - according to reviews, the nozzles in most models clog quickly, and the igniter also requires regular maintenance. Regular cleaning of the igniter of a Bosch and other brands of gas water heater will avoid costly repairs in the future, since this procedure extends the life of the unit.
Every equipment owner should know how to clean the burner in a gas water heater, since problems with igniters occur in models. But if the device constantly goes out, for unknown reasons, nothing helps, it would be better to contact the service.
Soot may appear due to leaks in the gas supply pipe. With a minimal release of gas masses, there will be practically no odor, and the user will not understand anything. You can check the system like this - apply a soap solution to the pipe connection areas with a brush, turn on the column and see how it behaves. If bubbles appear, there is a problem. Options for how to clean a gas water heater at home will not help here - call a gas technician.
The next potential problem area is a clogged radiator. It often causes increased accumulation of soot. The easiest way to clean a speaker radiator is with a vacuum cleaner; any model will do.
Turn off the gas supply, remove the casing from the column, and remove the soot. If this still doesn’t help, check the draft by turning off the gas and holding a lighter or candle. Normally, the flame should deflect or go out. If the candle burns as if nothing had happened, the chimney needs cleaning. When the device has a forced draft fan, such problems do not arise in principle.
Tools
To perform the work, prepare the following set of materials and tools:
- the certified unit itself with instructions
- drill
- Adjustable wrench
- open-end wrench - 27/30, 32/36
- FUM tape or tow
- PVC water pipes or hoses, with an internal diameter of 13 mm and a length of no more than 2.5 m
- metal-plastic pipes for gas
- gas hose
- fittings - “American” and for metal-plastic
- mounting clips
- gas taps
- water tap
- pipe cutter
- soldering iron
- filters - magnetic and salt
- Mayevsky crane
- dowels
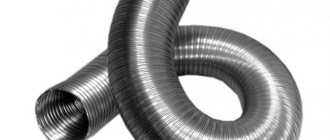
When venting combustion products through a chimney, purchase:
- corrugated or galvanized pipe with a thickness of 1 mm, the diameter must match the diameter of the boiler inlet on the column (see the exact parameters in the instructions)
- rosette ring for decorating the chimney (the dimensions must match the dimensions of the corrugation).
Full disassembly service
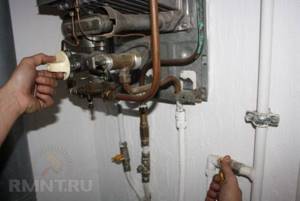
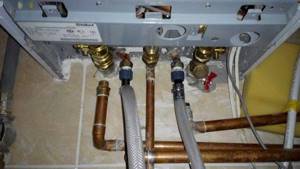
Do not be afraid to disassemble the water heating installation, the procedure is not that complicated. You will need the most common tools - screwdrivers, pliers, standard wrenches. What to do before starting work:
- Close the taps of the cold water, hot water and gas supply pipelines. Unplug the turbocharged dispenser from the outlet.
- Substituting the container, unscrew the union nuts (American) on the connection of the water pipes. Disconnect the connections from the unit without losing the rubber gaskets.
- For convenience, it is recommended to remove the gas heater from the wall. It is not easy to disassemble and clean a unit that is hung too high or installed in a narrow niche.
- To dismantle the water heater, disconnect the gas line and the chimney pipe. Remove the unit from the hooks.
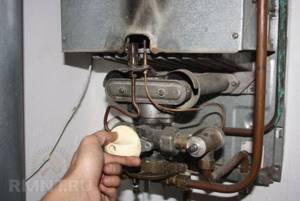
How to solder a geyser heat exchanger
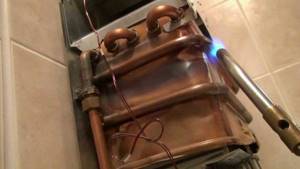
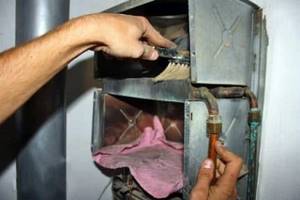
Preparation for soldering
First of all, you need to remove the casing from the column. This must be done carefully, first disconnecting the wires from the display. In some models of water heaters, for example Neva 4510, the gas and pressure regulators must be removed before doing this.
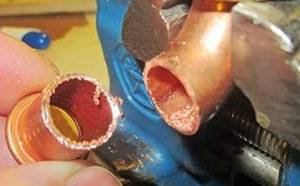
Next, turn on the water and locate the leak. Often it is located on the bend of the heat exchanger pipes near the sheathing. If it is easily accessible, it will be possible to seal the fistula without removing the column.
If there is no direct access, and the fistula is located from inside the radiator, you will need to disassemble the column and remove the heat exchanger.
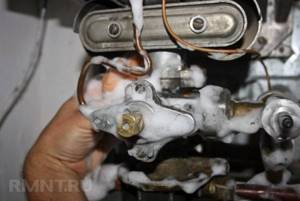
Modern dispensers have a special plug for draining water, after opening which the liquid is poured into a substitute container. Remaining moisture is blown out with a compressor or vacuum cleaner.
This is important because during soldering the liquid will boil and evaporate, creating pressure and blowing the solder through the fistula. The last stage of preparation is cleaning and degreasing the leak area
This is done using fine-grained sandpaper. You need to clean it carefully so as not to make a through hole, since the pipes in the heat exchanger can be very thin. After this, the cleaned tube is wiped with any solvent or white spirit to remove any remaining dirt and grease.
The last stage of preparation is cleaning and degreasing the leak area. This is done using fine-grained sandpaper. You need to clean it carefully so as not to make a through hole, since the pipes in the heat exchanger can be very thin. After this, the cleaned tube is wiped with any solvent or white spirit to remove any remaining dirt and grease.
Soldering methods
There are three ways to solder the geyser heat exchanger:
Powerful soldering iron
To solder the fistula site with your own hands, you will need a soldering iron with a power of about 110 W, flux and solder.
The first stage of soldering is applying flux. This is a substance that cleans the surface of the material from oxides and allows the solder to spread more evenly. Flux paste containing copper is best. If it is not available, you can use regular rosin or an aspirin tablet.
Burner with gas cylinder
You will need a burner, a small gas cylinder, flux, and solder. The burner is connected to the cylinder and ignited. You need to choose a not very strong flame so as not to damage the column radiator.
First, the leak site warms up well. This is done to ensure that any remaining moisture in the pipes evaporates. After this, the pipe is heated and solder is supplied to it.
After soldering, it is imperative to remove any remaining flux, because it contains acid and can subsequently corrode the walls of the heat exchanger pipes.
Cold welding
It is important to choose a cold weld that will not melt from hot water. All actions must be carried out wearing protective gloves.
A small amount of cold welding comes out of the package. You need to knead it in your hands for about three minutes. As soon as the material begins to harden, you need to apply it to the site of the fistula and hold it tightly until it hardens completely.
If there are several fistulas nearby on the heat exchanger tube or there is a large hole in the tube, you need to solder a copper patch. You can also make soldering from a piece of copper pipe.
How to check for leaks
After soldering the geysers, you need to check the tightness of all pipes. To do this, they are carefully examined to see even the smallest fistulas - their presence is indicated by small green spots. To avoid re-disassembling the column in the near future, these defects are also cleaned and soldered.
After this, you need to connect water to the gas water heater with a soldered heat exchanger and open the tap.
At the very end, the boiler with a gas water heater is turned on to check its performance when in contact with hot water. In this case, the soldered areas can be wiped with a dry cloth to detect the slightest signs of moisture.
The column does not ignite initially
Before you climb inside the water heater, you should perform a number of basic steps:
- Replace the batteries and clean the contacts in the power compartment.
- Make sure there is natural chimney draft and normal pressure in the cold water supply system.
- In a turbocharged dispenser powered by mains power, check the fuse. Try switching an imported unit by turning the plug in the socket - some models are sensitive to phase location.
- Clean the dirt filter installed on the cold water supply pipe. Sometimes the mesh at the inlet is provided by the design of the water heater itself.
- After opening the DHW mixer, observe the ignition electrodes - a spark should jump from them. In a turbocharged apparatus with a closed chamber, the clicking of discharges can be clearly heard.
Heater repair begins with cleaning the electrodes and installing working batteries
Advice. If there is external access to the ignition electrodes through a window, immediately clean their working part with a long brush.
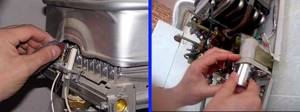
Did the above measures not produce results? Then remove the column casing and proceed to troubleshooting, following the step-by-step instructions:
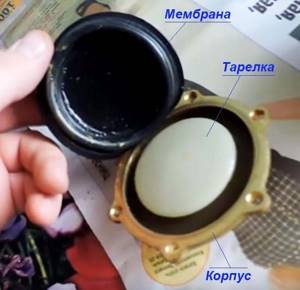
- Open the hot water (ask an assistant) and watch the movement of the rod, which should move the pressure plate away from the microswitch button. If the pusher does not move, the reason is 100% inside the water block. You will have to disassemble it, clean it and change the membrane.
- The rod presses on the plate, but the button remains pressed. Probably, the stroke of the pusher has decreased due to scale inside the “frog”, which needs to be opened and cleaned.
- The pusher moves, the button turns off, but there is no sparking. Surely the microswitch is to blame, diagnosed as follows: disconnect its connector and short-circuit the 2 terminals with a screwdriver. If the switch is faulty, then after a direct short circuit a spark will appear on the electrodes.
- The discharge skips on one needle, the second is silent. Pull the high voltage cable out of the electrode housing, trim it slightly and insert it back.
- The “frog” functions, the microswitch is triggered, the electrodes spark, but ignition does not occur. This means that gas is not supplied - the solenoid valve is closed. The culprits of the circuit break are the traction and overheating sensors; to check they need to be closed one by one using a wire. Another option is a break or fracture of the supply wires, which is diagnosed by testing with a multimeter.
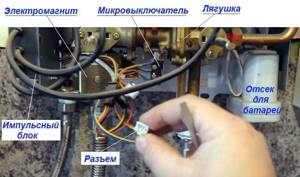
You need to short-circuit the connector connected to the pulse unit, and not the microswitch plug
An important nuance. When you discover a faulty microswitch, be sure to inspect the water block housing at the installation location. It happens that the element is flooded with water dripping from under the stem seal. It is necessary to dismantle the “frog”, pull out the leaky seal and install a new spare part.
In some models of electronically controlled gas flow columns, a special flow sensor controls the start. It operates on the principle of a limit switch - the water flows, the circuit is closed. Diagnostics is simple: open the DHW valve and test the element contacts with an ohmmeter or a light bulb - it should light up. The algorithm for a complete check of the water heater is demonstrated by the technician in the video:
How to replace the membrane
The procedure for replacing a rubber (or silicone) diaphragm differs little on speakers from different manufacturers. To independently remove and disassemble the water-gas unit, you will need standard tools - open-end wrenches, screwdrivers and pliers. The work order is as follows:
- Turn off the gas and cold water taps on the supply pipelines, remove the casing of the device.
- Disconnect the water supply and fuel supply pipes.
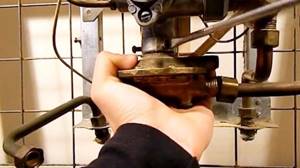
- Unscrew the heat exchanger tube from the “frog” (located on the right), move it to the side or disconnect the interfering wires.
- Unscrew the fastening of the block to the body and remove the assembly.
- Disassemble the membrane unit by unscrewing 4-8 mounting screws. Remove the defective diaphragm and install a spare one, having first cleaned the insides of the camera from scale and dirt.
Note. On simple Chinese devices, the “frog” can be disassembled without removing the entire water-gas unit. It is enough to disconnect the heat exchanger pipe and the screws on the flange.
Disassemble the mechanism carefully so as not to lose the sealing gaskets or rubber rings. Reassemble in the reverse order; after connecting the gas pipe, test the reliability of the joints using the soaping method.
On outdated columns with a wick and a thermocouple, the membrane is replaced using the same technology. The difference is in the orientation and location of the water unit - here the block stands vertically, as shown in the photo.
To unscrew the membrane chamber on older models, you need to disconnect 2 water tubes and loosen the locking screw
Replacing a leaking rod seal
If you notice water leaking from the frog onto the microswitch, replace the worn seal immediately. A wet “limit switch” will quickly become unusable, the column will stop igniting and as a result you will have to buy 2 parts instead of one.
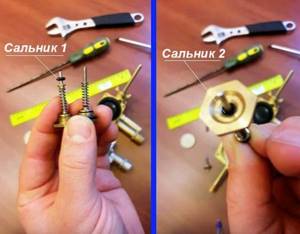
How to replace the oil seal yourself:
- Perform all the manipulations to dismantle the water block indicated in the previous section.
- Disassemble the “frog”, set one half with the membrane aside. Pull out the plastic plate from the second part by slightly prying it with a screwdriver.
- Using a spanner or socket, unscrew the nut from the inside of the chamber membrane and pull out the pusher.
Reference. The method of fastening the oil seal and rod depends on the brand of gas-fired water heating installation. In Neva columns, the pusher is pulled out along with the plate, and the rubber ring is hidden under the screw.
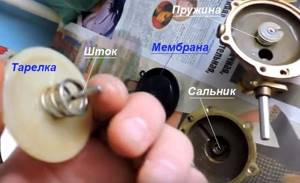
On Neva units, the pusher looks different - it is attached to the plate, and the oil seal is located in the body.
Then you can go in 2 ways: replace the entire rod (recommended) or only the rubber sealing rings. The first is located at the end of the pusher, the second is pressed inside the nut. Buy rings of identical size and replace the worn parts.
Please note: the length of the rod and the diameter of the oil seal depend on the brand of the gas water heater; it will not work with another model. The disassembly process is clearly shown in the video:
Installing a new speaker
It is quite acceptable to install a new gas water heater yourself, but with the exception of connecting the device to gas (this should be done by a licensed specialist).
The independent actions of the column owner will be as follows:
- If necessary, prepare the wall for installation of new equipment, and also replace the fasteners.
- Having hung the device on the prepared place, they begin to connect the communication systems one by one - first the chimney, and then the water supply hose.
- They invite a specialist to connect the gas hose, install the shut-off valve and register the column.
- After making sure that there is sufficient draft and that there is no smell of gas or leaks, the equipment is started.
- They regulate the water supply and the power of the device.
DIY cleaning methods
Regardless of the brand - “Neva”, “Electrolux”, “Bosch”, “Oasis”, “Vector” - the removal of contaminants is approximately the same. The cleaning agent may vary. Let's describe several methods.
Using hydrochloric acid
If you want to clean the heat exchanger parts from scale, use hydrochloric acid.
Important! In this way you can remove plaque from copper heat exchangers. For other alloys, citric acid can be used.
Sequence of work:
- First you need to remove the cover.
- Remove the screws that hold the casing in place.
- Turn off the water supply.
- Open the faucet to allow the hot water to drain completely.
- Disconnect the thread of the heat exchanger with the tap. Place a container as water may spill out.
- Prepare a 3-5% hydrochloric acid solution. Be careful, the dosage should not exceed the norm, otherwise the walls will begin to dissolve instead of scale.
- Take a ½" threaded pipe or use a hose.
- Connect one end to the radiator input, the other to the output.
- Connect a funnel or a piece of plastic bottle to the pipe. Wear gloves while working. Gradually pour the solution into the funnel to clean the parts. Foam may form - this is normal.
- As soon as there is strong pressure on the other side, the task is completed, the heat exchanger is cleared of scale.
- Rinse it thoroughly to remove any remaining acid. It shouldn't get into the water.
Use a tank with a pump
To do this, prepare 7-10% acid, a tank with a centrifugal pump. You can't work with your hands here.
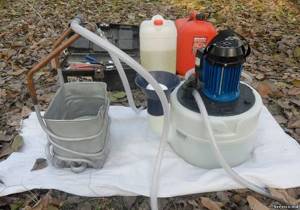
To remove deposits, do this:
- Close the water and gas supply valve.
- Open the faucet and drain the remaining mixture.
- To disassemble the casing and get to the radiator, unscrew the bolts.
- Pour the prepared acid into the tank, connect the cleaning system to the heat exchanger.
- Start the pump. Let him run the liquid for an hour until all deposits are removed.
There is a less effective way to clean the column yourself. It comes in handy when special equipment is not available.
Application of citric acid
You will need a deep container (metal bowl or basin) to accommodate the entire heat exchanger. Dissolve 80 g of acid in 700 ml of water. Fill the container 30% with water and place it on the stove. Place the radiator inside and fill with solution. Let the contents heat for about 30 minutes. Then turn off the oven and let the liquid cool.
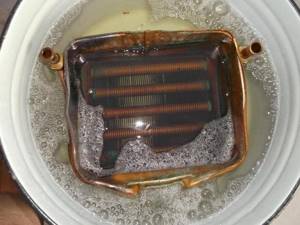
Remove the parts and rinse under running water until any remaining scale is removed. Experts recommend carrying out cleaning work at least once a year. This will help the speaker function fully.
The easiest way to descale a geyser.
I would like to immediately make a reservation: the article is about cleaning the flow part of a water heater from scale
. At the same time, we warn you that we categorically do not recommend interfering with the operation of the gas part of the water heater. Gas workers should deal with gas. Otherwise, the slightest mistake can cause big troubles.
The most common malfunction of gas instantaneous heaters or geysers is the overgrowing of the water heater with scale.
accumulated in the heat exchanger.
Conclusions and useful video on the topic
Often the problem of geyser heat exchanger leakage is eliminated by soldering tubes. However, not everyone will have the necessary tools and materials in their home. There is an alternative way to solve the problem - without soldering. How to do this, see the following video:
Fixing a leak in a water heater of any brand is not a complicated procedure - all the work can be done independently, having a standard set of tools in the house. To do this, it is not necessary to have special skills and knowledge, but simply use the instructions given above and do not forget about the safety rules when using gas equipment.
And if during the process of carrying out repairs with your own hands you discover a gas leak, you should immediately call the gas specialists.
Would you like to tell us about your own experience of eliminating a gas water heater leak? Or do you have your own opinion about the advisability of independently searching for the cause of the leak and further repairs on your own? Express your opinion, share your experience, participate in discussions - the comment form is located below.
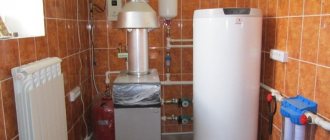
How does a water heater work and work?
To learn how to repair a gas water heater, you must first understand how it is designed and how it works.
Units can be of the following types:
- With an open combustion chamber or atmospheric.
- With a closed combustion chamber or turbocharged. They are also called inflatable.
The air required for gas combustion enters the atmospheric column from the environment naturally. It enters the device through an opening located at the bottom of the column. To remove combustion products, a chimney with natural draft is installed.
Turbocharged or inflatable speakers differ from atmospheric ones in one feature: their combustion chamber is closed, and a built-in fan provides forced draft. Air inflow and exhaustion is carried out forcibly through a coaxial chimney (double-walled).
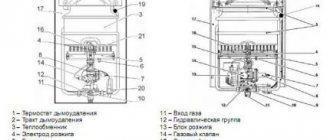
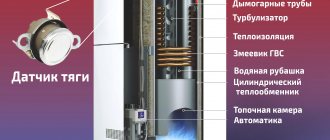
You can familiarize yourself with the structure of a gas water heater in general terms by looking at the following illustration.
The photo shows the structure of a typical gas water heater. A design feature of this water heater is piezo ignition of the burner. Also, batteries (or from a 220 V network), a hydraulic turbine can be used to ignite various models
Below is the operating principle of a modern gas burner with an automatic ignition system:
- The column starts working when the mixer tap is opened. The water flow passes through the water supply unit and the heat exchanger of the gas device.
- Inside the column body there is a water regulator membrane, which pushes the rod under the influence of pressure arising from the water. This allows the rod to compress the spring of the mechanical gas valve in the block to allow fuel to reach the burner itself.
- At this stage, the solenoid valve circuit is closed, which occurs when the microswitch button is released by the rod. The valve provokes the release of gas into a special tube, which is a supply tube. Gas flows to the already open spring valve.
- The pulse device is triggered. It delivers a discharge to the electrodes that are located next to the burner. Sparks are formed, as a result of which ignition begins. This allows the water passing through the heat exchanger to be heated.
The electromagnetic circuit consists of 3 sensors that are switched on in series. These include a draft, overheating and flame sensor. When the last element of the chain fixes the fire, at this moment the formation of sparks ends.
We discussed the operating principle of the column in more detail in this material.
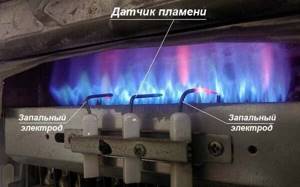
Old gas water heaters had one contact and a constantly working igniter. Now they are making devices with two electrodes that ignite the burner
We service the igniter and water intake unit
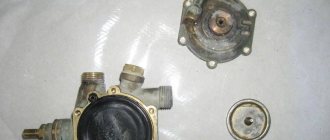
If there is a need to clean the water unit, do not rush to disassemble the entire device. Take a look at the operating instructions for the water heater, find the “frog” in the diagram and follow the following algorithm:
- Remove the adjuster knobs and front cover.
- Dismantle the water unit by disconnecting the pipes.
- Unscrew the screws holding the cover, remove it and get to the membrane.
- Clean the filter - mesh and water holes in the frog body using a wooden stick or soft copper wire. Remove scale with a brush.
- Rinse the parts with water and assemble the assembly. Replace damaged or cracked membrane immediately.
Clean the pilot burner jet (wick) with thin copper wire or a toothpick moistened with alcohol. Wipe the ignition electrodes and the flask of the flame sensor (thermocouple) thoroughly from soot, otherwise over time the column will begin to turn off spontaneously.
Connecting the gas outlet pipe to the geyser hood
To repair the heat exchanger, it is necessary to dismantle the gas exhaust pipe. When installing this pipe in place, it is necessary to ensure the tightness of its connection with the geyser hood.
Even a large gap of up to a centimeter can be easily sealed using asbestos soaked in water. This is a heat-resistant material that is available in sheet form. In water, asbestos disintegrates like cardboard and forms a soft mass that molds well. After drying, asbestos becomes quite hard and dense again. Asbestos can be reused. Soak the extracted pieces of it in water.