Briefly about the temperature sensor
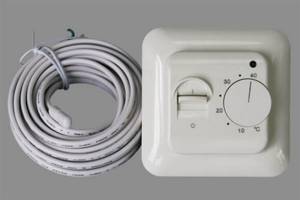
The set includes a thermostat and temperature sensor. The temperature sensor is installed using a plastic corrugated tube. The sensor in the corrugation is placed in the screed.
New sensors have a programming function. Thanks to this function, the owner can set the temperature controller so that during his absence the heated floor will operate in economic mode. At the same time, a certain time before the owners arrive, the device goes into normal mode, thereby heating the room to the required temperature. Despite the fact that the cost of a programmable thermostat is more expensive than a regular one, it is better not to skimp on it, because it pays for itself in 2 seasons.
Cable systems
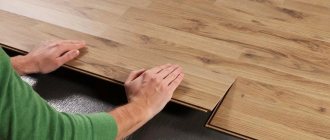
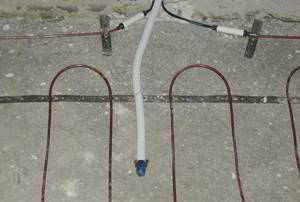
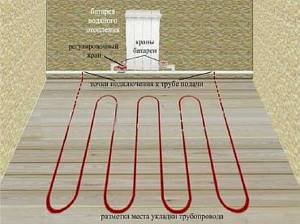
Installation of the cable structure begins with preparing the base and laying insulating material. The insulation is usually spread on the surface of the concrete screed. If the latter is made from a self-leveling mixture, the thermal insulation can be located inside. Before connecting the heated floor to the thermostat, you need to attach a temperature sensor to it. It is placed between the cable lines. To prevent external factors from affecting the connection of the temperature sensor to the regulator, the cord is hidden in a corrugation.
The exact connection diagram for the underfloor heating sensor, phase, zero, ground and heating cable is displayed in the instructions. Once the build is complete, you need to test the system. If the equipment is working normally, you can begin installing the flooring. Never start laying tile, linoleum or laminate until you are sure that you have managed to connect the thermostat correctly. If the process goes wrong, you will have to dismantle the surface you just laid.
Choosing a location for installing the temperature controller
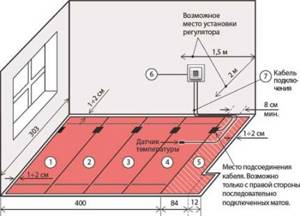
Before connecting the heated floor thermostat, you should select a suitable installation location. If you choose the right place in which the device should be placed, this will contribute not only to ease of use, but also the entire heating system will be able to work correctly. Therefore, when choosing where to install the thermostat on the wall, it is important to consider the following points:
- The placement should be near an outlet.
- The most optimal height for placement on the wall is 1-1.5 m.
- If the device is located near the door, then you need to install it as follows: when the door opens to the right, the device is mounted on the left, and vice versa.
- The sensor is not installed near window openings; the farther away, the better.
Types of control
For each type of room, you should choose a specific type of heating controller.
For the bathroom it is better to purchase mechanical varieties. The connection diagram for a heated floor thermostat most often involves installing this device near an outlet indoors. The bathroom is often damp and there are significant temperature changes. Devices with digital displays will work less under such conditions.
Therefore, mechanical control is relevant here. In the kitchen, room or hallway, you can install a digital thermostat that will show the heating level on the screen.
There are programmed devices on the market. They are given a temperature based on time. He works according to this program for a week, then the cycle repeats. The thermostat connection diagram does not differ depending on the type of control.
Preparatory work
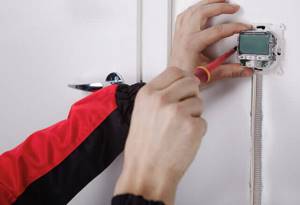
Before connecting the temperature controller, be sure to pay attention to the instructions that come with it. The point that specifically addresses the installation of the sensor and the procedure for carrying out this work deserves special attention, because these processes differ from different manufacturers.
First, you need to remove the front panel and carefully disassemble the control mechanism; on simple models it is in the form of a wheel. To remove it using a screwdriver, you need to pry off the element, and then unscrew the screw that secures the front panel to the mechanism itself. Other models have special plastic latches that hold the front panel in place. To remove it, just press the latches with a screwdriver and it will snap off.
However, if you cannot remove the panel, you should not remove it using mechanical force. After all, in this way you can easily break the latches, and to solve such a problem you will just have to buy a new regulator. To avoid this problem, you just need to carefully study the instructions and try to remove the panel again, but in the correct sequence.
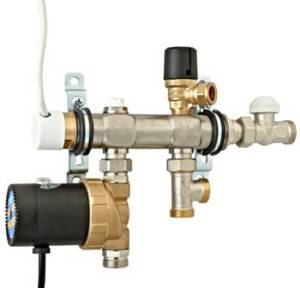
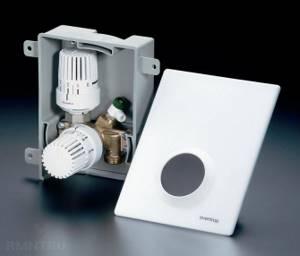
The next step is to purchase devices for installing a heated floor thermostat. The first thing you need to have is a corrugated pipe. Usually it comes complete with a sensor, but if the manufacturer does not provide such a kit, then it must be purchased separately. The ideal corrugation diameter is 16mm. In order to determine the required length of the corrugation, you should determine at what height the temperature regulator will be installed, and at what distance from the wall the temperature sensor will be located. Next, from the indicated height, using a tape measure, you need to measure the length to the sensor, which will be in the floor.
You will also need the following accessories:
- mounting screws;
- screwdriver;
- mounting box (socket box);
- indicator screwdriver, which can be used to determine the presence of voltage in the network;
- level.
Connection diagrams
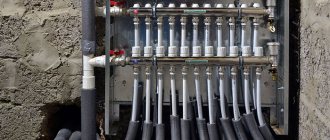
Water-heated floors often act as an additional source of heat. It is mainly combined with a general heating system or hot water supply. The specifics of adjusting heated floors depend on the connection method.
There are several schemes for connecting water heating devices.
Combined
A popular and technologically justified method is combined heating, which includes a radiator and a heated floor system. However, to arrange this structure we will need:
- boiler;
- pump;
- expansion tank;
- collectors for radiators and heated floors;
- radiators;
- pipes.
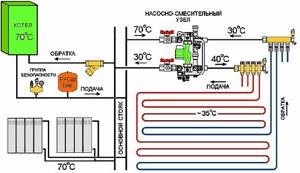
It is important to correctly combine different heating devices so that they function effectively. The main methods of connecting radiators with warm water floors into a single structure:
- Parallel connection of the collector unit to the heating system. The circuits cut into the highway up to the batteries. Liquid circulation is provided by a pump.
- Connection via rings, primary or secondary. When laid, the pipeline forms rings; they cut into the supply system in several places. The coolant temperature depends on the distance of the coil from the heat source.
- Connection to a coplanar manifold, to its extreme point. Water moves in the circuit due to the operation of a common house pump located in the generator room. In this case, the warm floor has priority when supplying hot coolant.
- Using a hydraulic distribution unit is an excellent option: if there are several heating devices, with differences in the length of the floor loops and the water flow in them. In this scheme, you also cannot do without a coplanar collector.
- Local connection of the circuit through a unibox in a parallel circuit. Suitable for rooms with a small area: bathroom, corridor.
Connection to radiator
A common way to recharge underfloor heating is from radiators. With this scheme, the temperature of the liquid in the water floor is directly related to the degree of its heating in the radiator.
Don't miss: How to heat a coal stove in your home correctly?
To build this system, you need a main line that has a supply and return, as well as floor pipes and a unibox. Since the water in the radiators heats up to 80 degrees, it is recommended to connect the floor loops to the return line.
From the boiler
This is a simple option - the installed boiler is intended only for heating water for heated floors, so no regulators are needed.
If you have a modern gas boiler, it is able to regulate the temperature itself; just set the required indicator on the panel. Even with a two-contact system, when the boiler heats water for radiators and heated floors, the values for each device can be easily adjusted by the boiler’s automatic system.
When using a boiler that runs on solid fuel, a compensating barrel is required. The level of temperature and pressure is regulated by installing a safety unit on the barrel, which consists of a pressure gauge, an air release valve and a thermostat.
For your information! The functioning of a water heated floor is affected by the pipe laying pattern - find out what laying patterns there are, as well as how to connect heated floors. With a “snake”, the heating will be uneven, with cold and hot areas. When the circuit is placed according to the “snail” pattern, uniform heating is ensured.
Connecting the thermostat to the mains
Connection can be made in two ways:
- Connect through an outlet using a plug.
- Pass a three-core wire in a pre-prepared groove from the thermostat to the outlet.
In order to connect the regulator in the second way, you need to install it under the socket. To do this, a hole is made for a regular socket box. Using a crown, a hole is drilled into which the box is installed. There are also special boxes in plasterboard; thermostats can also be installed in these boxes.
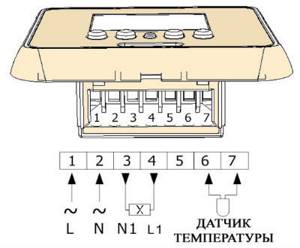
When connecting the temperature controller, you should pay attention to the contacts located on the back of the device; they are marked with three letters that indicate different wire colors:
- L – phase, brown or red wire;
- N – zero, blue or blue wire;
- PE – grounding, yellow-green or yellow wire.
Usually the cable comes complete with a thermostat, the wire length is up to 3 meters. It is connected to a temperature controller and a temperature sensor.
For the entire circuit to work, you must connect a thermostat with a temperature sensor and a heated floor. Before connecting, make a groove from the temperature regulator to the floor and lay the wires using the diagram that is in the instructions. We talked about how to perform wall gating in a separate article.
So, you can connect the thermostat to the heated floor as follows:
- Connect the temperature sensor to terminal numbers 1 and 2 of the thermostat.
- The wire from the network must be connected to terminal numbers 5 and 6. The phase is placed on the fifth, and zero on the sixth.
- The heating cable is connected to terminals 3 and 4.
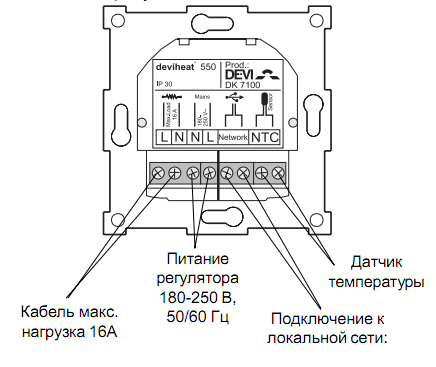
Please note that the markings on the thermostat may be different and, accordingly, the connection diagram will be different (for example, the power cable will be connected to terminals 1 and 2).
It is also important to understand that not all houses have the opportunity to connect the regulator to a three-wire network, because many old houses do not have grounding. There are also single-core or double-core underfloor heating, this also affects the installation method.
Connection diagram for a heated floor thermostat with grounding and without a grounding wire:
The temperature sensor is installed under tiles or other floor coverings, so it should be installed in such a way that in the event of a malfunction it can be removed without damaging the floor covering. Despite the simple connection diagram for the thermostat, it is important to carefully read the instructions, because if the connection is incorrect, the heated floor will not work.
The video below clearly shows how to install a temperature controller and connect it to the network with your own hands:
This is the technology used to install a heated floor thermostat in the bathroom and other rooms. Now you know at what height to install and how to correctly connect the wires from the heating system and temperature sensor to the regulator.
It will be useful to read:
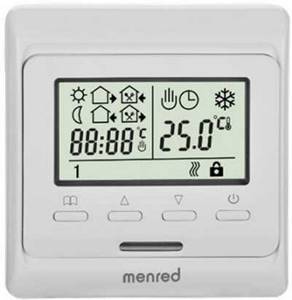
To control modern heating systems that can maintain a constant comfortable temperature, a thermostat for heated floors is used. Together with an external temperature sensor, it monitors and regulates not only the heating of the floors themselves, but also the air in a given space. Thermostats can be installed in each room where there are heated floors and regulate the degree of heating in each of them. Some models are equipped with touch controls, additional temperature sensors, and can be programmed for different temperature values at certain times of the day or days of the week.
Regulator calibration
Calibration of the electromechanical regulator is carried out as follows:
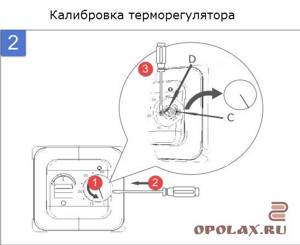
- Measure the temperature in the room. This will be the calibration zero (normal);
- Remove the regulator cover (1);
- Using a screwdriver, set the knob dial to the room temperature (2.3);
- Replace the handle.
conclusions
Taking into account that the thermostat is not a complicated device, the choice of thermostat should be based on your financial capabilities and interior design. But in fact, the seller gives a guarantee for the heated floor sold and completes the system with a thermostat; you only choose its type.
Other articles in the section: Floor heating
- What is the best electric heated floor under tiles?
- Warm floors and furniture in the room: the effect of warm floors on furniture
- Advantages and disadvantages of solid fuel boilers
- What is a low voltage indicator and why is it needed?
- Three elements of an electric heated floor: the electrical part of heated floors
How to choose a thermostat for a heated floor
Normal operation of a heated floor is impossible without a thermostat, which allows you to save a significant amount of energy and money. When performing the assigned tasks, this device only turns the heating on and off at a set period of time or in accordance with the readings of the thermometer. When choosing a thermostat, it is necessary to take into account its power, which must correspond to the power of the heated floor.
The creation of the most comfortable conditions in the room, as well as the safety of the floor covering, largely depends on the operation of the thermostat. If the temperature is too high, the floor covering may become deformed, crack and lose its quality. Therefore, which thermostat is best to choose for a heated floor is an important issue when installing heating systems.
Among the huge number of models and designs of thermostats, experts distinguish several main groups:
- Devices that provide an economical mode of operation, allowing to reduce energy consumption in the absence of owners. At this time, the heating power decreases by several degrees.
- Models with a programmable timer that allows you to set any time intervals during which the room will be heated at a given intensity. All commands from the timer are transmitted to the thermostat, which, in turn, maintains the required temperature level.
- There are highly intelligent designs where entire operating modes can be programmed and set, in which periods of heating and saving alternate. The command from the device goes directly to the heating element at a set time, depending on external factors and specified settings.
- Thermostats using a built-in limiter, which is a special sensor that protects the floor covering and the heating element itself from overheating. Such devices are most effective for laminate, which should not heat above 260C. Otherwise, the release of harmful toxic substances will begin.
The choice of thermostat for a particular room depends on its area. For a small room, a regular device without programming or installation will be sufficient. The use of more complex programmable devices is best suited for larger spaces. Most often in such cases, electronic thermostats with temperature sensors installed inside the floor are used.
How to choose a thermostat to adjust
The first thing people pay attention to when it comes to a comfortable stay in an apartment or house is the air temperature in the room. Whatever the interior, the heating method and all the associated consequences turn out to be more important
If the room is evenly heated, there are no damp floors, corners and nooks with cold drafts, it is pleasant to be in the room. A thermostat for heated floors with a remote sensor allows you to achieve a comfortable temperature level in each room separately. However, it is not advisable to buy a mechanical thermostat for such purposes. It does not have the ability to control the temperature in several rooms simultaneously.
Before buying a thermostat, you need to think about what temperature control problems this device will solve. If there is a need to regulate the heat in the absence of the owners, a programmable thermostat will cope with this task perfectly.
When family members cannot decide on the general temperature regime in the house, a multi-channel electronic thermostat will help, which will regulate the heat level using sensors installed in different rooms.
The most inexpensive and easy-to-use mechanical thermostat will help maintain the desired temperature level in a small apartment.
When choosing a thermostat, you must know its power. It must match the power of the underfloor heating system.
Different types of room thermostats for water heated floors are designed for heating systems with certain technical characteristics and heat-saving indicators of buildings and the climate of a given region. The wishes of the consumer are taken into account. For example, different models and manufacturers have different interfaces with which it is convenient to monitor the operation of the device.
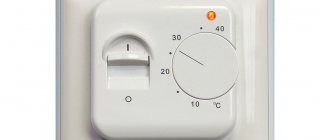
Mechanical thermostat for heated floors
The simplest devices include room mechanical thermostats equipped with a manual control panel. This panel in most models is made in the form of a rotary regulator, around which there is a temperature scale. The device is turned on and off using a special key.
When deciding which thermostat to choose for a heated floor, it is necessary to take into account the absence of any electronics in mechanical devices. These devices do not require electrical energy to operate, although many models have indicator lights on the panels that indicate the status of the heating process. Some designs are equipped with a mechanical timer that sets the operating time of heated floors at a certain time.
The air temperature in the room is measured by a special built-in temperature sensor for a heated floor thermostat, the operation of which is based on the properties of gases or bimetallic elements. Under the influence of the environment, they are able to change volume or shape. That is, when the desired temperature is reached, the electrical circuit begins to close or open. In this case, the temperature of the heating elements themselves is not controlled.
Thus, the mechanical control device is able to maintain the desired temperature until it is turned off. If necessary, just turn on the thermostat again and wait for the heated floor elements to heat up.
Temperature adjustment
Adjusting the floor temperature has its own characteristics, which depend on the type of heated floor structure installed in the house. This can be either a water heating system or an electric one. The last type is a cable, which is laid under the floor covering, or special films equipped with a controller. This heating system is equipped with precise temperature controllers. But regulating a water heating system is more difficult and expensive. Here one switch is not enough: a whole set of valves and pumps is used. This heating system works in conjunction with radiators.
If both radiators and heated floors are used for heating, in this case it is necessary to set a comfortable temperature on the floor. It is necessary that the coolant that heats the floor has a temperature two times lower than that of the radiators. Here the indicator will be 33-34 degrees. So how can you achieve better results?
Attention! If you decide to install a water heated floor, but have never encountered such work, in this case it is better to seek help from professionals, because there are many pitfalls when installing such a structure.
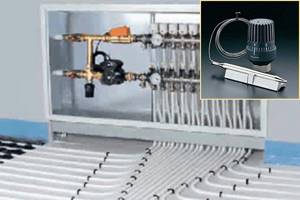
Several solutions are proposed to increase or decrease the temperature of the water floor. One method is somewhat unconventional: when the installation of a surface-type thermal relay is performed directly on the return manifold, and the other is standard - installation of an automatic pumping and mixing group. Let's take a closer look at both of these options.
The first method involves installing a thermostat on the return pipe. The thermostatic valve is designed in such a way that it quickly responds to changes in the temperature in the room, and when it is equipped with an immersion sensor, it also responds to changes in the temperature of the coolant that passes through the pipes. The thermostat is responsible for regulating the installed valve, which regulates the flow of coolant that passes through it and, consequently, the temperature. The main advantage of this control method is considered to be ease of installation and low price.
Thermostats
Second way. Here, the pump mixing group, which operates automatically, is responsible for temperature regulation. This includes a pump, valve and thermostat. The pump pumps water at the required pressure and speed. The valve regulates the temperature of the coolant (water) that passes inside the pipes. And the last element that supports the desired mode. - This is a thermostat. These units are of one design, which reduces installation time and simplifies the installation process itself.
Mixing unit
Electronic thermostat for heated floors
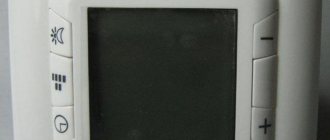
The most widely used are non-programmable electronic thermostats, which allow you to control the temperature level with an accuracy of 0.5 degrees.
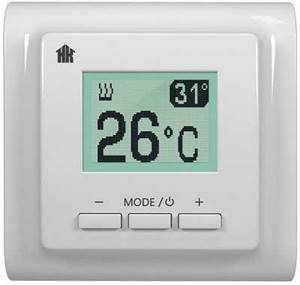
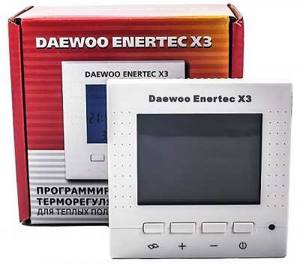
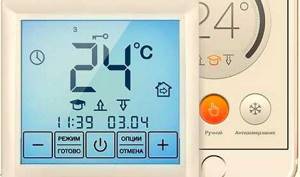
The liquid crystal display of the device displays the current and set floor temperature, as well as the room temperature. In addition, a special symbol appears on the screen when the heating system is on. Various types of technical messages and symbols indicating malfunctions in the underfloor heating system are periodically displayed. This function allows you to perform diagnostics in electronic thermostats. Direct control of the device is carried out by three small keys located on the external panel.
Power is supplied to the heating elements in the same way as with mechanical thermostats. It should be borne in mind that an electronic device can constantly change on and off cycles, which allows saving about 30%. Its work will continue until the warm floors are forcibly turned off by the owners.
Typical connection diagrams
Water heated floors are rarely used as the only source of heating. Heating only due to underfloor heating is permissible only in regions with a mild climate, or in rooms with a large area, where heat removal is not limited by furniture, interior items or the low thermal conductivity of the floor covering. Almost always it is necessary to combine radiator circuits, hot water preparation devices and underfloor heating loops in one heating system.
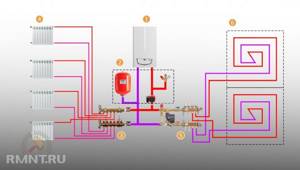
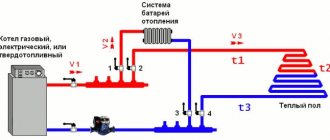
Typical diagram of a combined heating system with connection of radiators and underfloor heating circuits. This is the most technologically advanced and easily customizable option, but it also requires significant initial investment. 1 - heating boiler; 2 — safety group, circulation pump, expansion tank; 3 - manifold for separate two-pipe connection of radiators in a star configuration; 4 — heating radiators; 5 - underfloor heating manifold, includes: bypass, three-way valve, thermostatic head, circulation pump, combs for connecting underfloor heating circuits with gearboxes and flow meters; 6 - heated floor contours
There are quite a large number of variations in the design of the boiler room piping, and each individual case has its own principles of operation of the hydraulic system. However, if you do not take into account very specific options, then there are only five ways to coordinate the operation of heating devices of various types:
- Parallel connection of the underfloor heating collector to the main line of the heating unit. The insertion point into the main line must be made up to the connection point of the radiator network; the coolant supply is provided by an additional circulation pump.
- Association according to the type of primary and secondary rings. The line, wrapped in a ring, has several supply connections in the supply part; the coolant flow in the connected circuits decreases with distance from the heating source. Flow balancing is performed by selecting the pump supply and limiting the flow with regulators.
- Connection to the extreme point of a coplanar manifold. The movement of the coolant in the heated floor loops is ensured by a common pump located in the generator part, while the system is balanced according to the principle of priority flow.
- Connection through a hydraulic separator is optimal when there are a large number of heating devices, a significant difference in flow rates in the circuits and a significant length of underfloor heating loops. This option also uses a coplanar manifold, but the hydraulic arrow is necessary to eliminate the pressure drop that interferes with the correct operation of the circulation pumps.
- Local parallel loop connection via unibox. This option is well suited for connecting a short-length heated floor loop, for example, if you need to heat the floor only in the bathroom.
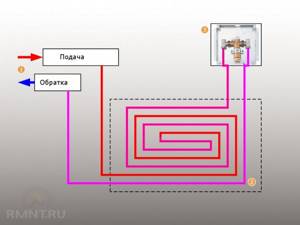
The simplest option is to connect a heated floor circuit to a radiator heating system with a coolant temperature of 70-80 °C. 1 - line with supply and return of the high-temperature circuit; 2 - heated floor contour; 3 - unibox.
It must be remembered that the nature of the operation of a heated floor may also change depending on the installation pattern of the coil. The “snail” scheme is considered optimal, in which the tubes are laid in pairs, which means that the entire area is heated almost evenly. If the warm floor is arranged as a “snake” or “labyrinth”, then the formation of colder and warmer zones is practically guaranteed. This drawback can be eliminated, including through proper configuration.
Programmable thermostat for heated floors
When heating large areas, saving energy is of great importance, especially when using heated floors. This problem is easily solved with the help of a programmable thermostat, used not only with cable, but also with film systems.
The operation of programmable thermostats is carried out according to the same schemes as in conventional electronic devices. The fundamental difference is the ability to configure operating modes in accordance with the calendar. In this case, all necessary time intervals and temperature values are set for each day of the week, which leads to a reduction in electricity consumption by up to 70%.
To do this, periods are assigned when the heated floors must operate at full capacity or, conversely, be turned off for a certain time. All adjustment processes occur automatically, after all the necessary settings. For example, days from Monday to Friday and Saturday and Sunday are configured separately. The cycle will be repeated continuously until the settings are changed.
Installation and connection of the sensor
The device must be installed in strict accordance with the instructions and assembly rules. In addition, before connecting, you need to find out the temperature of the maximum heating of the floor covering (for example, for parquet it is +28 degrees). Also, comfortable heating of the room is taken into account (in living rooms 22 degrees, bathroom - 25).
- Through a socket.
- Three-core wire to the junction box.
Important! If you do not have the skills to connect three-phase networks, it is always better to contact a professional.
In case of installation along a separate line to the electrical panel, an automatic switch is inserted into the circuit, opening it in the event of overloads and short circuits.
Important! Periodic turning on and off of the sensor indicates problems with its performance.
Step-by-step description of DIY installation
- There is a hole in the wall for the mounting box. It should be located at a height of 0.5 meters from the floor.
Thermostat for electric heated floors
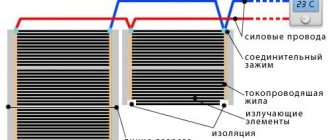
Thermostats or thermostats are equipped with a temperature sensor, which allows you to maintain a set temperature by periodically turning the circuit on and off. The thermostat for infrared heated floors operating from the electrical network works in exactly the same way.
In most cases, heated floors are initially equipped with thermostats. If such devices are not included in the kit, they can be selected individually, since they are all standardized and suitable for all electrical underfloor heating systems.
Standard room devices have a power of 3-3.5 kW and are designed for a current of 16 amperes. If the power of the floors is higher than the power of the thermostat, the connection should only be made using a contactor. Each device is equipped with two temperature sensors - internal and external. The first measures the temperature of the floors, and the second measures the air temperature in the room.
In order to choose the best thermostat for a heated floor, you must be guided by certain criteria. First of all, the value of the maximum floor power should be taken into account. Otherwise, the lack of power will cause the heating temperature of the cable to drop. If necessary, the devices are connected to a single network and freely provide a total power of over 3 kilowatts. They are installed separately at different ends of the room.
Another factor is the type of installation, that is, the regulators can be surface-mounted or built into the wall. Installation features of each device are reflected in the instruction manual. When choosing, you should also take into account the type of control. For example, devices that are simultaneously equipped with built-in and remote sensors are considered the most accurate. Great importance is attached to functionality and ease of use.
Rules for installing a thermostat
Electrical cables and wiring from temperature sensors must be connected to the thermostat hung on the wall. To do this, appropriate grooves are made in the slab - grooves. In them, wires are laid to the electrical panel and to the floor.
The floor temperature sensor must be as far from each other as possible from adjacent heating elements, otherwise when they are turned on, it will immediately trigger and disconnect the electrical circuit
If the equipment is installed in a room with high-quality interior finishing, then you can use overhead devices and run cables over the walls in boxes.
The following are the basic rules that must be observed when installing thermostats:
- It is better to place the adjusting device at a distance of 40-170 cm from the floor, unless otherwise provided in the instructions. If you have a mobile control panel, the main box can be installed in any convenient place.
- The main functions of the floor temperature sensor are to prevent overheating of the floor covering and foot comfort, but not to control the temperature of the air in the room.
- In damp rooms, it is permissible to use thermostats with appropriate protection against water ingress.
- When the device is built into a wall, a mounting box made of non-combustible materials is used.
- Wires from the regulator to underfloor heating heaters with a power of more than 1 kW must be routed in hollow heat-resistant tubes.
- The floor temperature sensor should be located between the heating elements and at least 50 cm from the walls.
- When turning on the device for the first time, it is necessary to take into account the minimum operating temperature specified in the instructions.
- Wire connections to the thermostat terminals must be made exclusively according to the diagram specified in the manual.
- Installation of the thermostat begins only after the heating elements are finally laid on the floor in order to correctly calculate the length of the wires.
- When filling the floor with solution, it is necessary to well insulate the end of the tube with the temperature sensor.
- Before pouring the solution onto the floor, it is necessary to check the functionality of all elements of the system.
- Heating mats must be grounded, and an RCD is installed in front of the thermostat.
Compliance with these rules will protect residents from electric shock, the house from fire, and equipment from premature failure.
How to install a thermostat for a heated floor
Before installing the device, be sure to read the attached operating instructions. It indicates the procedure for removing the front panel, that is, the control panel. This procedure must be carried out correctly, otherwise the device will become unusable. For built-in models, a recess is prepared into which the mounting box is inserted. It is recommended to place the thermostat close to outlets at a height of 0.6-1.0 m from the floor. Before starting work, the home network must be de-energized.
Optimal temperature parameters
Content
- Optimal temperature parameters
- Connection diagrams
- Combined
- Connection to radiator
- Temperature
- Rules for refueling the system
- Methods for adjusting the temperature of heating floors
- Automatic adjustment
- Manual temperature equalization
- Hydraulic leveling of the system
- Three-way valve capabilities
- Video instructions
Setting up a water heated floor is carried out depending on individual needs. Some people like it when the room is warm, while others prefer invigorating freshness, even in the most severe frosts. But despite this, there are general standards that were developed taking into account sanitary standards, these include:
- floor heating up to 28 degrees;
- if there is another heat source or if you live indoors permanently, the ideal level is from 22 to 26 - these are optimal conditions for a person;
- if this type of heat source is the only one, or it is located in the bathroom, corridor, balcony, or in a house where people do not live permanently, it is permissible to raise the degree to 32.
Setting the floor heating thermostat
Various models of thermostats can operate in manual and automatic mode. This factor must be taken into account when choosing a thermostat for a heated floor. All necessary adjustments depend on this. The hours and days of the week are set, and in-depth setup and calibration is also performed. If necessary, one of the temperature sensors can be disabled.
All adjustment steps are described in detail in the instruction manual. Separately, there is a lock against children, who may accidentally change the settings out of curiosity. To do this, press the “up” and “down” keys simultaneously. You need to unlock the thermostat using the same keys.
Modern heating systems are a whole complex of pipes, wires, sensors and regulators. One of the main control elements are thermostats (thermostats), which are used to control the entire “warm floor” system. In combination with a remote sensor, the heating of the air in the room is also controlled.
The use of a thermostat helps save energy costs and prevent overheating of heating elements.
If you do not use a thermostat, then it is not possible to control the heating of the floor and air in the room. Today we will look at the main types of thermostats. How to install and connect them correctly.
Tips for choosing devices
When purchasing a thermostat, you need to know certain nuances in order to pay only for the necessary functions and ensure the longevity of the floor heating system and the device itself.

When choosing a thermostat, you should pay attention to the quality of the plastic case. If the manufacturer saves on this, then it is worth thinking about the reliability of internal components
These selection features include the following rules:
- For heating small rooms, an inexpensive mechanical or electronic thermostat with an internal air temperature sensor is suitable.
- It makes sense to buy a programmable thermostat if you need multi-zone temperature control, as well as to save energy when there are no residents at home during the daytime.
- The thermostat must correspond to the maximum power of the heating elements with a margin of 25-30% in case of operation at reduced voltage.
- For houses with wooden interior decoration, only overhead thermostat boxes are suitable.
Also, when choosing a device, it is necessary to take into account its design.
The existing model range allows you to buy not only reliable equipment, but also a thermostat that will fit perfectly into the interior of the room.
Tips for choosing
When purchasing a specific model, you need to pay attention to the technical specifications. First of all, this is the rated power of the device. A thermostat diagram for a heated floor will help you figure out how to connect the device to heating elements and temperature sensors.
Currently, there are many companies producing devices for monitoring the operation of heating cables. In practice, European models are not much different from Chinese ones - their assembly technology is the same, the difference can only be in the material of manufacture. You should pay attention to online reviews, which will help you get an objective picture of the quality.
Which thermostat for underfloor heating is best suited for installation in a specific heating system? It is best to take the advice of specialists - based on their personal experience, they can suggest the best model of the device.
Aspects of choosing a thermostat
It is necessary to pay attention to what the heated room is used for, the functions performed and the price. For those who spend a lot of time at home and those who have young children, reliable and cheap mechanical regulators are suitable.
For busy people, we can recommend programmable devices that regulate themselves.
According to experts, it is optimal to choose a thermostat with weekly adjustments. This is the best value for money.
Mechanisms with advanced customization options are not worth buying. A floor surface heated above 30C is expensive and uncomfortable.
High temperatures negatively affect the condition of the flooring itself, as well as the furniture located on it. You don't want to pay for unnecessary features, do you?
Thermostats can be installed separately in each room, but they will cost you more and it is advisable to install them in large rooms. Thermostats installed in an electrical panel have a labor-intensive installation process, but they are cheaper.
The choice primarily depends on ease of use, possible functions and its cost . Expensive devices with programming and various bells and whistles are manufactured in Germany by manufacturing companies Kermi and Legrand.
The Legrand Etika series floor heating thermostat has a huge advantage. Among their products you can find simple and budget devices. Mechanical models from the German brand Eberle are optimal in terms of ease of use and price.
Types of thermostats
Nowadays there are a huge number of thermostats from different manufacturers and different functionality in stores. Depending on design and function
- Mechanical. These are the simplest and cheapest manual thermostats.
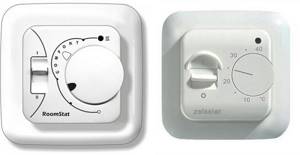
The device is turned on and off using a special key, and the temperature is set using a rotary controller.
Intuitively easy to use. Is in wide demand. The heating element will heat up until you manually turn the switch to the “off” position.
The device consumes virtually no electricity, but some models are equipped with light indication and at the same time consume a minimum of electricity. If it fails, it can be repaired.
- Electronic. Underfloor heating systems have also become widespread. The temperature control accuracy is half a degree.
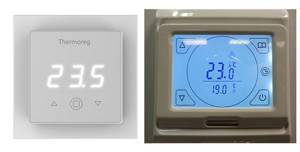
Information about the set temperature for heating, the current temperature, as well as the air temperature in the room is displayed on the LCD screen.
The thermostat is controlled by three buttons. Errors are also displayed on the display, and it is possible to diagnose the device.
The heated floor is turned on and off automatically according to cycles, and the work will not stop until you turn off the thermostat yourself. Without your participation, the thermostat saves up to 30% of electricity.
- Programmable. The name “floor programmer” is often applied to them.
Typically, these thermostats are used in large heating areas, where efficiency and energy savings come to the fore.
It’s simple, you can program the modes of turning on and off the heating elements of the heated floor, both for a week and a month in advance. Setting operating modes and time intervals. Most models are equipped with a control panel.
There are models that can be connected to a single local network or connected via Wi-Fi and, accordingly, controlled from a computer, tablet or phone. With balanced and detailed programming, approximately 70% energy savings can be achieved.
It should be noted that the “warm floors” kit should contain a thermostat, but if it is suddenly missing, then choosing one will not be difficult, since they all have the same standard and are suitable for both electric heated floors and infrared heated floors.
You should also adhere to the rule of one room - one thermostat.
A standard room thermostat is designed for a current of 16A. and power consumption is 3 kW., that is, if your heated floor consumes more power, then you should buy a more powerful thermostat, or split the circuit into two independent parts.
And one more thing: it is strictly forbidden to install a thermostat in rooms with high humidity.
Types of sensors
The sensors must also be supplied complete with heated floors.
In cases where the room is small, and the “warm floor” system is used as additional heating of the room, it is advisable to use a thermostat with a remote sensor for the floor.
It is installed at a distance of 50 cm from the wall, deep into the room between the coils or mats of heating elements, and is connected with special marks on the thermostat body.
If you plan to install a concrete screed over an electric or water heated floor system, you should consider laying a pipe in which the sensor will be located. This mortgage will help you replace the sensor without any problems.
In cases where underfloor heating plays the role of the main type of room heating, you should use a room temperature sensor.
Thermostats are usually equipped with built-in air temperature sensors, but there are also remote ones.
They should be located in semi-dark places not in a draft, without direct sunlight and so that there are no sources of cold or heat nearby. Since these are negative factors that can affect the readings and operation of the device.
Experts recommend using two-level regulators, that is, two sensors work at once. This also saves energy.
Functions and principle of operation of a heated floor thermostat
The principle of operation is simple, the device receives readings from floor or air sensors, then the thermostat compares the readings with the set parameters in the settings.
And after that he makes a decision: at low temperatures we turn on the system, and at high readings we turn off the heated floor system. This cycle repeats continuously until you make changes.
How to eliminate the causes of blowing windows
Before moving on to eliminating the most likely causes of a PVC window blowing in, you must take the following steps:
- identify the reasons why, with one degree of probability or another, a draft appeared from a PVC window;
- determine the exact place where the cold air comes from;
- try to fix the problem at the expense of the manufacturer or window installer.
If you have to do the work yourself, you should follow the basic rules and recommendations described below. The choice of repair method mainly depends on the location of the leak and the reason why it occurred.
Blows from the hinges
Blowing in the hinge area occurs for three main reasons:
- incomplete or insufficient filling of mounting holes. To eliminate blowing, it is necessary to inspect the window sash and, firmly installing it in its original position, close it;
- the presence of gaps necessary for installing a mosquito net or similar devices. There is no need to use a mesh in cold weather, so to eliminate problems, simply close the holes;
- poor-quality or incorrectly installed fittings. The problem can be eliminated by replacing low-quality parts or adjusting them correctly.
Rice. 7. Adjustment of the lower loop.
Rice. 8. Rules for adjusting a plastic window.
Blowing from the handle of a plastic window
The main reason for blowing from under the handle installed on the window, in most cases, is that it is not pressed tightly enough to the base. As a result, a gap is formed, through which the cold from outside enters the room.
To eliminate the cause, it is enough to either tighten the fastenings of the handle so that it fits tightly to other structures, or replace the element that has become unusable. It's quite possible to do this yourself:
- first, the bar is shifted 90 degrees in any direction, which covers the place where the handle is attached to the block;
- the fastening screws are either tightened all the way (to ensure a tight connection), or, on the contrary, unscrewed and then reinstalled when replacing the handle.
Rice. 9. Installation of the handle.
Blowing from under the glazing bead of a plastic window
In case of penetration of cold outside air into the room from under the glazing bead (spotwise or along the entire length of the structural element), the reasons, as a rule, are:
- poor-quality or inappropriate insulation. Fixed by simple replacement. Silicone seals have the highest performance qualities. The replacement work is quite simple: the glazing bead is dismantled, and then the gasket;
- the opened profile is carefully and thoroughly cleaned of dust and dirt, and then washed;
- a new, preferably silicone, seal is glued;
- glazing bead is installed;
Rice. 10. Replacing the rubber seal.
a defect in the glazing bead, which can be either factory-made or caused by poor-quality installation, when the necessary tight pressure to the window frame was not ensured. It can be eliminated either by replacing the glazing bead (in the first case), or by additional sealing of the joints.
Blowing between the window sill and the plastic window
The reason for the blowing is poor quality of window installation work. Most often this is caused by a small amount of thermal insulation foam laid when installing the window unit.
The sequence of work to resolve the problem consists of the following steps:
dismantling the drain from the outside of the window; cleaning old polyurethane foam, if present; thoroughly foaming the junction with a new sealant
Please note that it is for year-round use; re-installation of the window sill... Carrying out the specified work almost always eliminates the existing problem
Carrying out the specified work almost always eliminates the existing problem.
Rice. 11. Foaming the space between the window and the opening from the outside.
Blowing from under the windowsill
The main reasons for the penetration of cold air from outside into the room from under the window sill are usually the following:
- improperly performed window installation work. If you need to carry out repairs yourself, one of the ways may be to additionally insulate the joint between the window sill and the window structure;
- improperly performed work on installing the window sill. In this case, the best solution is to dismantle the window sill, then carefully fill the resulting space with polyurethane foam, followed by reinstalling the window sill in accordance with the technology requirements;
- high level of seal wear. Repair consists of replacing the worn-out seal with a new one.
Rice. 12. Insulation after dismantling the window sill.
Blowing from the slopes of plastic windows
Most often, blowing out for this reason occurs after several years of window operation. It is usually caused by the deterioration of the mounting foam that fills the space between the window frame and the wall.
Work to eliminate blowing is carried out in the following sequence:
- slopes are dismantled;
- the opened space around the perimeter of the window frame is cleared of old mounting foam;
- The space between the wall and the frame is carefully filled with new mounting foam;
- reverse installation of slopes is carried out.
Options for eliminating blowing are presented in the following video:
In addition to repair work or replacement of parts of window structures, the installed fittings are usually adjusted. One of the main ways to adjust window structures is to change the operating mode to the appropriate time of year. Obviously, in case of blowing, it is winter.
The adjustment is made using three eccentrics located at the bottom end of the window structure. They are quite easy to turn and install into the desired position, using a special hexagon.
Rice. 13. Operating modes of a plastic window.