Warm floors are becoming increasingly common among owners of private houses and city apartments. Especially among the latter, since the use of water heated floors in city apartments is strictly prohibited. Practice shows that electric floors have great advantages, one of which is that installing a film heated floor in a private house or city apartment can be done independently, without the involvement of third-party craftsmen. This significantly reduces the cost of the process. Let's try to understand what needs to be done in order to install the floor with your own hands, incl. which side to lay the film heated floor and how to do it.
Preparatory work
Preliminary procedures are divided into two parts - calculation and acquisition of the required materials, as well as preparation of the floor covering in the room. There is a simple way to calculate the thermal power of a heated floor; in fact, it is equal to the product of the heating area and the coefficient of electrical energy consumption W/sq.
After performing this calculation, it becomes known how much power is needed to heat one square meter of room. By multiplying the area of the room by the result obtained, the total power sufficient to heat the room will become known. Afterwards, you can go to the store to select a heated floor. Its power parameters are indicated on the packaging.
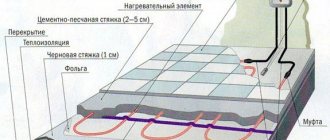
The installation of a film heated floor is not complicated and resembles a layer cake consisting of thermal, hydraulic insulation and reinforcing mesh. When buying a heated floor, it is better to play it safe and purchase products from well-known manufacturers. In addition, the seller is obliged to show safety and hygiene certificates upon request. The fact is that the demand for these products has led to the fact that there are many counterfeit products on the market, the use of which is unsafe.
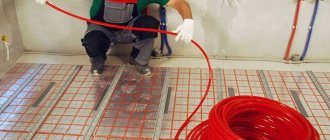
Installation of film heated floors begins with appropriate surface preparation. It is performed in several operations. During the first, the surface is cleaned from dust and debris. During the second, a layer of hydraulic insulation is constructed. This layer should extend onto the wall to a height of 100 mm. We must not forget about the compensating tape; it compensates for thermal expansion during heating.
Thermal insulation is needed to ensure that the generated energy does not go into the floor. It can be made of a foil backing, for example, penofol. This insulation is sufficient if the floor will be used for walking on. If the heated element is used as a means of main heating, then extruded polystyrene foam with a thickness of 20-50 mm will have to be laid. A reinforcing layer can be mounted on top of such a heat insulator; as a rule, this is a special mesh.
What is foil insulation?
This is a combined material that consists of a layer of aluminum foil or metallized film connected to a thermal insulation material. The reflective layer can be one-sided or two-sided. It is easy and quick to install due to its elasticity. Thinner than other thermal insulation materials.
In addition to preserving heat, it can be used as waterproofing, as it does not allow moisture to pass through. The thinner the foil layer, the better it transmits heat through itself.
The procedure for laying film heated floors
The installation technology is not very complicated and this allows you to install the heated film floor yourself.
The installation order looks something like this:
- To turn on the film heated floor, it is allowed to use only those materials that are named in the instructions for use. The power cable is laid from the switchboard, where it is connected to a separate device, to the point where the thermal regulator will be mounted.
- If the thermal structure is installed in a room with high humidity, then the reinforcing flooring (mesh) must be grounded. To connect the grounding, a wire made of copper is used. A residual current device (RCD) with an operating threshold of 30 mA is installed in the switchboard.
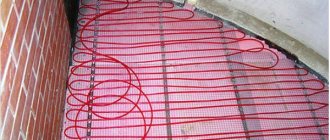
- Thermal film is installed on the concrete screed. Its front surface must be smooth. Rolls of film are rolled out along the length of the room, this is required to reduce the number of connections. The electrical terminals of the film must be oriented towards the temperature controller.
- To secure the heater, fastening rings are used, but tape can be used. This is required to prevent movement of the coating.
- To connect the electrical contacts of the film, soldering or riveting to a strip made of copper is used. Once connected, everything must be isolated.
- A polyethylene film 0.5 microns thick is laid on top of the heated flooring. The strips are laid overlapping and joined together using tape.
- A polyethylene sleeve with a size of at least 0.5 microns is laid on top of the heated film floor. Adjacent strips are laid overlapping and connected with tape.
- To protect the wire at the intersection points of the joint line of the floor slabs, a corrugated pipe is used.
- To install a built-in thermostat, you need to drill a blind hole; a core drill is suitable for this. A groove is laid from the floor to the installation hole and a corrugation is placed in it, and a power cable and a wire from the temperature sensor are pulled along it.
- The wiring from the temperature sensor and the machine installed in the switchboard is connected to the clamps indicated in the instructions for use.
Installing a film heated floor with your own hands is shown in the video below.
Heated surface layout
First, it is necessary to correctly distribute the film heated floor over the heated surface. The instructions instruct not to lay the film where massive furniture will be installed. In addition, the following rules must be followed.
- When laying the film, it is necessary to distance yourself from the risers of central heating systems, pipes and heating boilers. This is necessary in order to avoid failure of the heating elements under the influence of high temperature.
- Before starting work, it is necessary to develop a scheme for laying the film heated floor. On a rectangular sheet of paper, use a wavy line to mark the areas where the infrared heating element will be placed.
- To place an automatic thermostat, you need to choose an area on the wall that is not crowded with furniture or heavy curtains.
- For adjacent rooms and areas located on a common territory, it is recommended to plan the installation of systems independent from each other, with separate regulators and connection to the electrical network.
- After the layout is completed on paper, the diagram is transferred to the floor surface. To cover the area, the required number of elements and connecting wires are selected to connect the temperature sensor and regulator.
- It should be taken into account that the width of the film heated floor can be different: 50, 80 and 100 cm. It is sold in rolls that can be cut in certain places. There are different types of film heated floors: the power depends on the characteristics of the film (150, 220 or 400 W/m²).
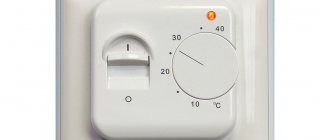
Temperature controller installation
The presence of thermostats in the heating system is a necessity. This is explained by three reasons:
- Their presence ensures stable maintenance of a comfortable temperature in the room, and it is possible to determine its own temperature level in each room.
- Installation of these devices allows you to obtain significant cost savings on maintaining the required temperature, especially if we are talking about the heating system.
- A thermostat installed in a heating system allows you to smooth out temperature changes that accompany such systems.
Installation of thermostats begins with their selection and purchase. When choosing, you need to know that the temperature regime can be affected by:
- draft;
- the presence of objects that absorb heat, etc.
The thermostat design consists of a sensor and valve that operate without the use of external power sources.
There are two types of thermostats - built-in and external. They differ in the installation method - the first type is installed directly into the wall, the second type is installed on its surface. The distance from the regulator installation site is one meter.
The dimensions of the built-in regulator allow it to be installed in sub-sockets. For installation you will need:
- a hammer drill equipped with a crown and groove drill;
- corrugated sleeve.
What coatings is it suitable for?
Infrared heated floors go well with virtually any type of floor covering. The film is ideal for laminate (if you use the right laminate classes), linoleum, cork, carpet, parquet. Such a heating system can also be installed under tiles, but for heating ceramics, the best option would be to use a cable heated floor. According to experts, film structures are absolutely safe when laid on a wooden base. In this case, there is a minimal likelihood of the material igniting.
The film is heated to a temperature of +50 degrees, these indicators are quite safe for wood and other surfaces. Infrared heated floors go well with linoleum, but the material in question must be laid on a pre-leveled hard surface, such as sheets of plywood or fiberboard. Next, a special heat-reflecting substrate and finishing coating are installed. A good finishing option is the use of laminate. Laminated panels are also laid on top of the substrate; they are resistant to high humidity and sudden temperature changes.
How to choose linoleum for an apartment that would also be suitable for heated floors, read the link.
Another option for flooring for film flooring is tile. Such products have high thermal conductivity, which ultimately improves the efficiency of the heating system. To increase comfort, heated floors are installed in rooms such as the kitchen, bathroom and corridor.
Connection and performance check
When connecting, you must follow the requirements set out in the instructions for use. As a rule, it shows a circuit diagram for connecting the heater to the electricity supply network and shows how to properly connect a film heated floor.
After the connection has been made, it is necessary to test the correct functioning of the floor.
In practice, two methods are used. For the first, a multimeter (tester) is used, the second, the so-called folk or old-fashioned one.
When using the first method, you will need to configure the device to measure resistance. If during the measurement process a zero appears on the indicator panel, this means that a short circuit has occurred in the heating system.
If the instrument panel shows a value tending to infinity, this means that a break has occurred, most often it occurs at the point of connection of wires or panels.
When the measurement results are comparable to the passport data, this may mean that the floor is in good condition and ready for use.
When using the traditional method, there is no need to use measuring instruments. To do this, the film is connected to the network directly, past the thermostat. You will have to do the following manipulations:
- Turn off the power.
- Connect the film.
- Turn on the heated floor and if after 30 - 40 minutes it becomes warm, then everything is in order, if not, then you need to look for a break.
Before you start testing, you need to understand how to connect the heated film floor to each other.
Attention! If, when connecting a heated floor, the protection device is directly triggered, then it is quite possible that there is a short circuit or another problem.
Installation requirements
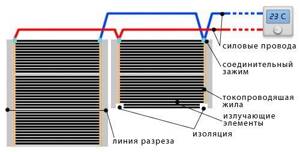
Infrared floor connection diagram.
Laying begins with determining the layout of the infrared emitters. Such a plan is drawn up taking into account the following recommendations. The radiating film is placed towards the wall where the thermostat will be placed, i.e. where the power supply will come from. It is not advisable to place the film in areas where it is planned to install large-sized stationary furniture. Warm floors are installed at a distance of 10 to 40 cm from the walls. If another heat source is expected in the room, the distance from it to the beginning of the heated floor is chosen to be at least 1 m.
The installation density of an infrared heated floor is determined by its purpose. If it is the only source of heating the room, the density of the strip elements should be at least 70-80% of the total floor surface. When using an infrared source as an additional heater, the area is reduced to 40-50%. When used as a local heater, the tape is placed in the desired location over a certain area.
The maximum length of one piece of film should not exceed 8 m. When planning installation, remember that the film can only be cut in marked places so as not to damage the radiating filler.
Connecting film floor plates to each other
In the consumer market for heating systems, film floors have become in demand. They represent one of the many options for heating rooms. The reason for the sharp increase in the popularity of these products is due to the fact that they are inexpensive, easy to assemble, reliable and safe to use. This is especially important for houses and apartments.
This heated floor operates from a standard 220 V network. The films are connected in a parallel circuit. Connections are described in the instructions for use.
In addition to thermal film, the package includes:
- Bituminous paper.
- Clamps for connecting film and network.
- Wires having a cross-section sufficient to supply the required current.
Bitumen insulation is required to cover tire cuts and open electrical contacts not used when the heater is connected to the network. The main thing is to prevent the formation of bubbles filled with air between the insulation and the tire.
The advantage of bitumen insulation is that when connected to the network, it heats up and takes on the shape of the insulated connection. This ensures maximum sealing of the joint.
A contact clip is installed at each connection point between the wires and the copper bus. Installation is carried out as follows - one side should go inside the film, the second half should remain outside, on top of the copper strip. Then crimping is performed; pliers are used for this operation. At the end of this operation, the film strips are secured with tape. This allows you to prevent their mixing when continuing further work.
The ends of the wires are connected to the clips by crimping. Each connection must be covered with bitumen paper.
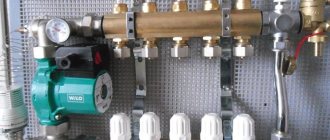
Connecting the thermostat to the electrical network
Typically, temperature controllers are designed for a current of 16A or 3520 W, which means that the maximum heated area of the thermal film will be 15.7 m². There are models of thermostats that allow you to program the duration of operation, the time to turn on and off infrared floor heating, and the heating temperature. Depending on your needs, a thermostat is selected.
To connect the thermostat to the electrical network, it is better to invite a qualified electrician. If you make the connection yourself, you must follow all safety precautions. If the system power is more than 2 kW, I recommend connecting it from a separate machine.
Conduct a visual inspection of the system, check the reliability of the wires and insulation. Measure the resistance of each heating strip; its value should be at least 1 MOhm.
To check the operation of the system, turn on the heating system and check the floor temperature for each strip of thermal film by hand. The film should radiate comfortable heat of about 40⁰ C.
Lay sheets of plywood (under parquet, linoleum, carpet, parquet boards) or gypsum fiber board sheets (under tiles) on the vapor barrier, attach them to the floor with anchor bolts (screws) and level them with the finishing coating.
There are many different insulation materials. Foil insulating material reflects up to 97% of infrared radiation in the direction of its arrival.
In this article, we will look at which side to lay insulation with foil on the floor, the types and characteristics of materials, and the rules for their installation.
Content:
Design and purpose of a temperature sensor
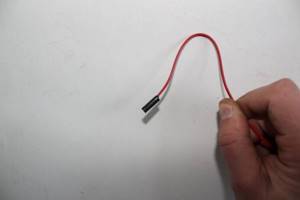
So, the temperature sensor for a heated floor system is a thermistor protected by a glass bulb, and also has a copper conductor about 3 meters long for connection to the thermostat. In addition to the glass bulb for tile floors, the temperature sensor itself is also protected by a gel shell. The conductor is insulated with high-quality PVC (polyvinyl chloride) to protect it from external influences and damage. The length of the conductor can be increased, and naturally, reduced, up to 50 meters, the main thing is that there is an undamaged sensor at the end of the conductor.
To easily replace it in the future, it is recommended to place this structure in a metal-plastic tube, even if the manufacturer included a plastic corrugation with a diameter of 16 mm. The metal-plastic pipe has a smoother inner surface, so it is much easier to remove and install, as well as connect a new temperature sensor in case of failure. These types of temperature sensors are installed in hard floor coverings (under tiles or porcelain stoneware).
Another type of sensors recommended for laminate, carpet, that is, soft types of flooring material, are special plastic cylinders that are connected to the end of the electrical cable.
The principle of operation of the temperature sensor is very simple; when the temperature changes, its resistance changes, thereby giving a signal to the thermostat to turn on or off the heated floor system from 220 V, the most common network in everyday life.