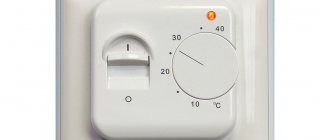
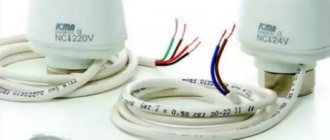
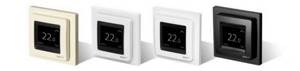
Description of Devireg D 130 regulators
Heated floor temperature regulators are designed to maintain a stable, uniform floor temperature at any time of the day for installation with open wiring.
If anyone doesn’t know, “open wiring” is wiring laid openly in boxes, corrugated pipes, and cable ducts. Wiring is laid openly, usually where it is not possible to hide wires under plaster and in concrete, for example, in wooden country houses; sometimes open wiring can be seen in administrative, office and industrial buildings. In contrast to “open wiring,” there is “hidden wiring,” for example, in ordinary apartments it is hidden under a layer of plaster, in the voids of concrete floors, etc. When installing heated floors in a room with hidden wiring, hidden wiring thermostats are used. An analogue of the regulator for open wiring is the dust- and moisture-proof regulator Devireg D 610, which can be installed in damp rooms, as well as outdoors. Temperature regulators D 130, 131, 132 are installed on the wall without tedious drilling out the socket box with a crown; it is enough to fasten the thermostat to 4 dowel nails or self-tapping screws (experienced craftsmen can screw in 2 self-tapping screws diagonally). Wires from the heated floor, from the sensor, power supply is 220V, the wires are connected and covered with a housing on top.
In terms of functionality, the regulators do not differ from each other - they are all needed to regulate the temperature of the heated floor and to turn it on and off. The only difference is in the temperature sensors:
- D 130 - with a floor sensor on a wire;
- D 131 - with built-in air sensor;
- D 132 - with floor and air sensor.
In addition to controlling the floor temperature in interior rooms, controllers can be used in outdoor anti-icing systems with heated surfaces, such as steps (with installation of the controller indoors).
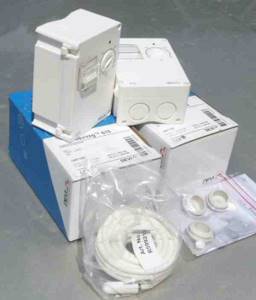
Preparing for installation
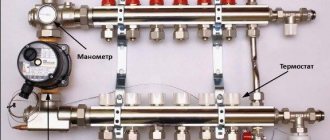
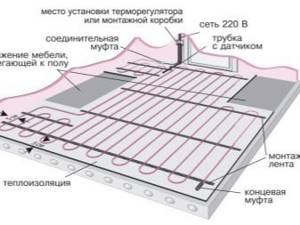
Power supply and floor temperature sensor (Fig. 5)
Make a recess (groove) in the wall for the power cables and the corrugated pipe with the floor temperature sensor on the wire, from the connection point of the thermostat to the location of the floor temperature sensor. A separate corrugated pipe is installed in the groove (Fig. 5). Make sure that the corrugated pipe for the temperature sensor does not intersect with the heating cable and enters the room at a distance of at least 50 cm from the edge of the heated area and the sensor is located between the lines of the heating cable. The minimum bending radius of the corrugated pipe must be at least 6 cm.
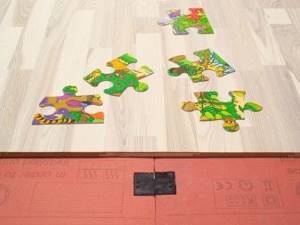
Floor surface
Before installing the heating mat, it is necessary to prepare the floor surface. Make sure there are no sharp corners or objects that could damage the heating or power cable or the floor sensor corrugated pipe. Clean the floor from dust and dirt and prime it to securely fix the heating mat (Fig. 6).
Errors when installing DEVI heated floors
Warm floor DEVI basic installation options
Despite the fact that the installation of heated floors (and heating mats under tiles and heating cables in the screed layer) is not an extremely complex process and simply following the installation instructions will allow you to enjoy the comfort of a heated floor For many years, many workers, either due to their own carelessness or from a “great” mind, make mistakes, from which the client then suffers. Unfortunately, the failure of a heating mat or cable risks not only the installation of a repair coupling on the heating element, but also the loss of one or two expensive floor tiles, which have to be broken to get to the location of the cable damage. Who knows, maybe this tile collection has already been discontinued?
Here are the most common mistakes that installers make when laying heated floors (not only DEVI, but also from other manufacturers).
- A common mistake when installing a heating mat is when the cold end (the power cable that goes to the regulator in the wall) is not put into a groove in the screed, with a smooth transition from the wall to the floor, but is simply thrown on top of the screed. The wire at the wall-floor junction sticks out, and when laying the tiles, the tiler uses the sharp edge of the tile to cut or damage the supply wire of the heating cable, breaking the external insulation, lowering the insulation resistance, which eventually leads to failure of the entire heating element.
- A common mistake when installing heating mats in the kitchen is setting aside the kitchen furniture. When laying heated floors, a distance of 10-15 centimeters is usually made from the walls. This is done to reduce the heating area and is acceptable, since, as a rule, no one stands close to the wall. However, it is completely wrong to make such a retreat from the kitchen (cutting table, sink, hob, etc.) because... in this case, the person stands exactly close to the furniture and his heels are in the warm zone, and his toes feel all the coldness of the tiles near the cabinet. This causes discomfort. The heating element should be located along the working wall of the kitchen furniture.
- When laying tiles, craftsmen sometimes damage the outer insulation of the heating element. If any damage occurs to the heating cable, its outer sheath, and even more so to the screen or cores, do not wrap this place with electrical tape. Over time, especially quickly in damp rooms, the heating cable will begin to deteriorate, its insulation resistance will decrease and, in the best case, the automatic protection will begin to operate. In the worst case, the heating cable will burn off, and you will have to break the tile when the repair is already completed to install the repair coupling. It is better to immediately contact a specialized service that will install a repair heat-shrinkable adhesive sleeve with a quality guarantee. The cost of such repairs is much lower than the subsequent search for the damage site and repairs. And it’s almost impossible to buy one or two tiles to restore the floor after renovation (especially if several years have passed since the batch was released). It is optimal to save several tiles of different designs after repairs, since damage to the heated floor when installing door stops, cutting tiles in place, and also completely eliminating manufacturing defects is impossible.
- During installation, it is necessary that the junction of the heating cable and the “cold” (supply) wire be laid evenly. Do not allow the heating cable to turn sharply immediately after the coupling. When a heated floor operates, constant deformation of the outer sheath of the cable occurs. As a result, after a few years, with constant mechanical stress at the connection point at the turn, the internal heating cores can simply be torn out of the bushing sleeves, which leads to failure of the heated floor.
- If you need to drill a hole in the floor where the heating element is laid, it is better to call a specialist with a thermal imager who will accurately indicate the location of the cable so that expensive repairs are not required later.
Warm floor. Instructions and Guides
This section contains manuals, instructions from underfloor heating manufacturers and other useful materials.
Information materials
- DEVI product catalog “Cable electric heating systems” (pdf, 1.8 Mb)
- Manual “Cable electric heating systems” (pdf, 4.3 Mb)
Instructions for installing thermostats
| Devireg 130 (pdf, 418 Kb) | Devireg 530 (pdf, 984 Kb) | Devireg 535 (pdf, 834 Kb) |
| Devireg 550 (pdf, 864 Kb) | Devilink (pdf, 2.5 Mb) | Devireg 316 (pdf, 224 Kb) |
| Devireg 330 (pdf, 523 Kb) | Devireg 610 (pdf, 192 Kb) | Devireg 850 (pdf, 1.2 Mb) |
Certificates for heating cables
| Deviflex DTIP-10 (pdf, 462 Kb) | Deviflex DTIP-18 (pdf, 963 Kb) | Deviflex DSIG-20 (pdf, 987 Kb) |
| Deviflex DSOT (pdf, 531 Kb) | Deviflex DTCE (pdf, 251 Kb) | Deviflex DPH-10 (pdf, 1 Mb) |
| Deviflex DTIV-9 (pdf, 350 Kb) |
Certificates for heating mats
- Devimat DSVF-150 (pdf, 556 Kb)
- Devimat DTIF-150 (pdf, 496 Kb
Certificates for heating cables and mats
- Certificate of compliance of Deviflex and Devimat with regulatory documents
- Fire safety certificate for cables DTIP, DSIG, DSIA, DTCE, DTIE-10
- Fire safety certificate for cables DSIZ,DSIX,DSM3
- Fire safety certificate for self-regulating cables iceguard, pipeguard
- Fire safety certificate for self-regulating cable DPH-10
- Sanitary and epidemiological certificate for deviflex heating cables and mounting brackets
Certificates for other products
- Certificate of conformity of Devirail heated towel rails with regulatory documents
- Certificate of compliance of steel and copper mounting tape devifast with regulatory documents
- Sanitary and epidemiological report on Devirail heated towel rails
- Sanitary and epidemiological certificate for Devicell mounting plates
- Sanitary and epidemiological report on Devifast mounting tape
- Sanitary and epidemiological certificate for the DEVI coupling for installing a heating cable in a pipe
Installation of heated floors. If you decide to install Devi floors, keep in mind that this is a highly reliable heating system that can be used both as the main heating system and for simple floor heating.
- Read more about installing heated floors.
- Photos of laying heated floors in this section of the site
Installation of infrared film floors . Anyone can install an infrared film floor. If you are not an expert in installing and connecting film, follow the further instructions. You can easily install infrared film flooring under laminate, linoleum or parquet boards and carpet.
- Read more about installing film heated floors
- Movie about styling
Warm floors in thin floors. Installation in a layer of tile adhesive. Floor heating can be carried out without any kind of extra expenses, destruction of floors, any dust and dirt. This is done as follows - thin DEVI heating mats are placed in a light layer of tile adhesive. Devimat mats are characterized by their low thickness - from 2.3 to four millimeters, depending on its type.
- Read more about installing heating mats in a layer of tile adhesive
- Photos of Devimat styling in this section of the site
Warm floors in concrete floors. Installation in cement screed . An ideal option in cases where you are planning to install a heating system in a building that has not yet been fully completed, where there is no screed yet - Deviflex heating cable. Its installation is carried out in a concrete or cement-sand screed, the thickness of which is from three to seven centimeters, due to which the floor warms up evenly, and its temperature remains comfortable at all times. Read more about installing a heating cable in a cement screed
Warm floors in wooden floors. DEVIDRY mats . Devidry heating mats are designed specifically for the so-called “dry” installation of heated floors under various coverings, such as laminate, carpet, linoleum, parquet, parquet boards less than 2.5 cm thick. Now the required temperature underfoot can be achieved easily and quickly, without any unnecessary work such as installing a heating cable in the screed. More about DEVIDRY mats
Installation of heated floor Devi, its features
Warm floor on a wooden floor under linoleum technical features, do-it-yourself installation, step-by-step instructions
Installing a DEVI heated floor is quite simple and, if desired, you can do it yourself, however, it is still advisable to involve specialists if you do not have at least a little experience working with electric heated floors
First of all, when planning the placement of a warm electric floor, it is important to correctly zone the room for its installation - for example, a warm floor under furniture or plumbing fixtures is not needed
To avoid problems with installing a heated electric floor, let's look at the list of the most important points, which, if ignored, increases the risk of the floor being unsuitable for use:
- When choosing the cable length, you should remember that it will not be possible to reduce it, since it is impossible to cut or shorten heating cables in any other way;
- the electric floor can be turned on for the first time only after the screed or adhesive solution in which they were laid has completely dried - until this moment, heating cannot be started even in test mode;
- before laying the cable, the surface must be cleaned as much as possible from dust and other debris, and it is also advisable to treat it with a primer;
- Do not walk on the heating cable in shoes with hard soles or shoes with heels;
- the temperature sensor must be placed in a corrugated pipe and under no circumstances be embedded in a screed solution or adhesive solution;
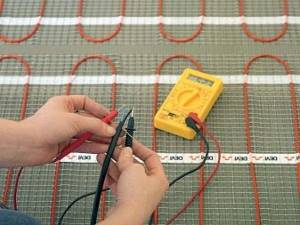
- when laying a heated floor, it is necessary to control the resistance indicators “before” and “after”, checking with the corresponding acceptable similar indicators in the product passport;
- be sure to draw a floor laying diagram, not forgetting about the distances to walls or large objects that can act as landmarks;
- cables or film may fail if, due to an oversight or for the purpose of dubious economy, air cushions are left above them - the entire surface of the heated floor must be completely insulated;
- You cannot use a heated floor to heat the screed or tile adhesive solution to make them dry faster - the heating cables are 99% likely to fail.
Installation of cable heated electric floor:
- before starting cable laying, it is necessary to completely dismantle furniture, household appliances and old flooring, if necessary, level the floor and remove as much debris and dust as possible;
- Even at the stage of planning the placement of a heated floor, it is necessary to determine the location where the thermostat will be located, and also, if necessary, to establish a separate connection point for the floor to the local electrical network;
- the thermostat is installed before laying the cable, connected and connected after it;
- before laying the cable or film, it is also necessary to place a layer of thermal insulation (usually foam foil coated with foil), carefully gluing the joints with mounting tape;
- a mounting grid is laid on top of the insulation, onto which the cable is already mounted in increments of 20-25 cm;
- the cable is filled with cement mortar; remember, the system is turned on only after it has completely dried;
- Installation of finishing floor materials can be carried out no earlier than 5 days after laying the heated floor cables.
Installation of an infrared film floor is carried out up to a certain stage according to the same scheme as a cable one:
- dismantling furniture, appliances and old flooring;
- maximum cleaning of the floor and its leveling if necessary;
- laying insulation with a reflective surface and fixing the seams using mounting tape - excluding the stage of filling the cables with mortar;
- installing a thermostat close to an outlet;
- connecting thermostats to the floor covering;
- cover the film with a fiberglass mesh and lay the floor finishing only on top of it.
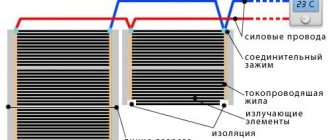
The film floor consists of Mylar films, copper or silver conductors and a graphite heater, which are laid on the reflective surface of the insulation - the use of this technology ensures that heat flows are directed directly to the floor covering, and not to the base of the floor.
After laying the film floor according to the previously drawn diagram, you can lay the main floor covering - parquet, floorboard, laminate or linoleum.
Below is a comprehensive video instruction for installing a Devi heated floor from the manufacturer’s specialists (be sure to watch it - the whole installation is in full view!)
Installation and operating instructions
This page contains instructions for installation and operation of products sold by our company. The instructions are Adobe Acrobat Reader files, so you must have Acrobat Reader installed on your computer to view them. The program is distributed on the Internet for free and can be downloaded from the developer's website.To download the program from our website you can use this link: Adobe Acrobat Reader
| Thermostats |
| Instructions for the thermostat menred RTC 70.26 Instructions for the thermostat menred E 91.716 Instructions for the thermostat FRONTIER TH-0502 Instructions for the thermostat FRONTIER TH-0502R Instructions for the thermostat FRONTIER TH-0506 Instructions for installing and programming the thermostat FRONTIER TH-0507 Instructions for the timer FRONTI ER TM-848 Instructions for the programmable radio-controlled thermostat FRONTIER TH-920D(TX) Instructions for the Raychem TA thermostat Instructions for installing and programming the Raychem TC thermostat Instructions for the OJ Electronics MTU2-1991RU thermostat Instructions for the OJ Electronics OTN-1991H11 thermostat Instructions for installing the OJ Electronics OCC2-1991H thermostat Instructions for programming the thermostat OJ Electronics OCC2-1991H Instructions for programming the thermostat OJ Electronics OCC4-1991 Instructions for the thermostat DEVI devireg 120 Instructions for the thermostat DEVI devireg 130 Instructions for the thermostat DEVI devireg 316 Instructions for the thermostat DEVI devireg 330 Instructions for the thermostat DEVI devireg 520 In instructions for regulator DEVI devireg 527 Instructions for the thermostat DEVI devireg 530 Instructions for the thermostat DEVI devireg 535 Instructions for installing thermostats DEVI devireg 540 and 550 Instructions for programming thermostats DEVI devireg 540 and 550 Instructions for the central device DEVI devilink CC Instructions for the thermostat DEVI devilink FT Instructions for the sensor air DEVI devilink RS Instructions for the thermostat DEVI devireg 610 Instructions for the thermostat DEVI devireg 810 Instructions for the thermostat DEVI devireg 850 with ground sensor Instructions for the thermostat DEVI devireg 850 with roof sensor Instructions for the thermostat DEVI devireg 850 III Instructions for the DS-8 controller |
| Electric convectors |
| Instructions for the NOIROT Spot E2 convector Instructions for the NOIROT Axane convector Instructions for the NOIROT Melodie Evolution convector Instructions for the NOIROT Verlys Evolution convector Instructions for the NOIROT Eco-6 programmer cassette Instructions for the NOIROT Memoprog programmer cassette Instructions for the NOIROT Progtout mode switch Instructions for the Thermor Evidence convector Instructions for Thermor Evidence Mecanique convector Instructions for the Thermor K-7 programmer cassette Instructions for Electrolux ECH/L electric convectors |
| Heated towel rails |
| Instructions for electric heated towel rails RAX TR-45, TR-65, TR-85 Instructions for electric heated towel rails RAX TRS-60 Instructions for electric heated towel rails Soma Therm Instructions for electric heated towel rails Dryson / Energy Instructions for electric heated towel rails NOIROT Corelia |
| Electric boilers |
| Instructions for the electric boiler Severyanin 3-7.5 kW Instructions for the electric boiler Severyanin 9-30 kW Instructions for the electric boiler Severyanin 60-150 kW |
| Adhesives, sealants, primers and resins |
| Technical information for Unidur N Technical information for EPONAL PU 456 Technical information for BOSTIK KU 320 Technical information for BOSTIK KS 330 Technical information for BOSTIK Mastifix A100 Technical information for BOSTIK Mastifix Ultra |
| Other |
| DEVI Product Catalog 2010 DEVI manual 2010 Warm floor ECOFLOOR (Czech Republic) Instructions for infrared heater NOIROT Royat 2 Instructions for hand dryer NOIROT Galet Instructions for exhaust fans PAX series 200 and 201 Instructions for exhaust fans PAX series 210 and 211 Instructions for installing the DEVI repair kit with devirep filling Instructions for installing the docking kit for single-core cable DEVI devicrimp CS-1 Instructions for installing the connecting set for double-core cable DEVI devicrimp CS-2 Instructions for installing the connecting set for self-regulating cable |
Installation of Deviflex heating cable
The Devi heating cable must be installed during construction work. It is necessary to install 2 plastic tubes to the groove from each location for the mounting box. After this, thermal insulation no more than 2 cm thick is laid on the base of the floor, cleared of unnecessary objects. It is preferable to also install waterproofing. Next, a sand-cement screed is poured. Then the installation of the heated floor continues with the installation of the heating cable:
- It is necessary to lay the mounting tape every 50 centimeters, securing it with nails or screws. If you make the distance between its fastenings 25 mm, then the Devi warm floor can be installed in an area of any configuration. And also, thanks to this distance, you will be able to differentiate the heating power in local areas.
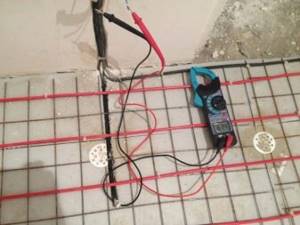
- Now you need to check the resistance of the heating cable, it should be the same as on the coupling sticker.
- The next step is to secure the heating cable to the mounting tape. Remember that the cable lines should not touch each other. The bend of the heating cable must be at least 5 cm in diameter.
- It is necessary to install a corrugated tube between the heating cable lines; subsequently, a floor temperature sensor will need to be placed in it. In order for the sensor to function correctly, the safety tube must be secured in the center of the cable loop.
- And the last thing you need to do is install a floor temperature sensor.
Installation of Devi heated floors in the video below.
This completes the installation of the Devi heated floor in the Deviflex heating cable version. Next, the floor is filled with sand-cement screed. Care must be taken during this process to ensure that no air pockets are left behind. When the screed has hardened, the decorative flooring is installed.
Repair of this floor heating system is carried out in the same way as repair of any other electric cable heated floor.
Floor coverings
- Laminate
- Warm floor Installation
- Choice
- Manufacturers
- Boilers
Floor construction
- Skirting
- Floor screed
- Leveling the floor
- Sound and waterproofing
- Insulation of floors
- Concrete floors
- Floor repair
- Substrate
Calculation of laminate boards Calculation of paving slabs
Tell us about us
PolGuide 2012-2019 | Information
When copying materials active link to the site is required
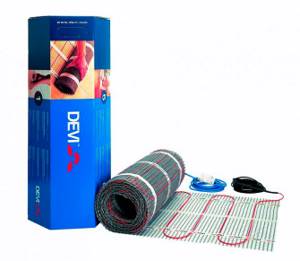
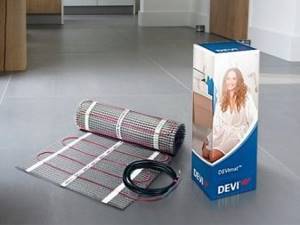
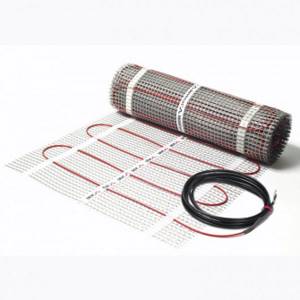
Heating mats
For indoor heating system equipment, it is recommended to install heating mats. They are thin, 3 mm. A single-core or two-core cable is fixed on the surface of a mesh made of heat-resistant plastic.
An adhesive layer is applied to the base of the mat, which makes it possible to quickly carry out installation work. The mats can be laid on any surface: on wooden logs, concrete screed, on old tiles.
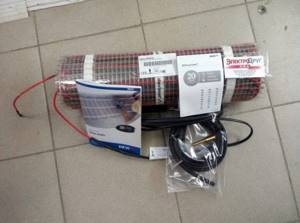
- “DEVImat” has a power of 150 W, operates on a voltage of 230 V. The product is used in rooms with any temperature and humidity. A two-core cable is located on the mesh as a snake.
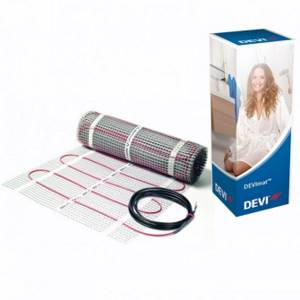
- “DEVI” mats have another modification – “DEVIheat DSVF 150 S”. The system is manufactured with a single-core cable. Two cold ends of the conductor are connected to the thermostat. It is not recommended to install the system under a screed. Tile adhesive is used for the heater. The mats are adapted for installation on wooden joists. Cable diameter 2.5 mm; Suitable for arranging thin floors. The system is laid under the laminate.
- “DEVIcomfort DTIR-150” – equipment power 150 W. A two-core cable is fixed on the mats. Devimat operates from 220 W. It is recommended to lay mats under ceramic tiles. The layer of tile adhesive is no more than 2 cm.
The mats are placed on the surface with the cable facing up. The mesh must be completely straightened. Thanks to the adhesive backing, it sticks well to the floor. Additionally, you can strengthen it with tape. If there is a need to rotate the mat, then cut the mesh, leaving the cable untouched. It is not recommended to violate its integrity. The product is rotated 1800 and installation work continues.
The bending radius of the cable should be equal to 6 conductor diameters. The distance between the turns is maintained at 2-4 cm. A temperature sensor is placed on the grid between the turns of the conductor. The wires from the mats and the sensor are connected to the thermostat. They are first placed in corrugated tubes.
Since the mats are designed for a thin floor, the system is vulnerable to mechanical stress. Heating is provided only in the usable area of the room. According to the instructions, it is not recommended to install the system under cabinets and sofas that fit tightly to the floor.
Cable blockage may occur. Do not lay carpet or rugs on warm floors. Ceramic tiles are used as cladding.
Warming up the systems will take time, up to 48 hours. To ensure that there is always a comfortable microclimate in the house, it is recommended to connect sensors to the software and control the heating system via a computer. DEVI has a representative office in Moscow and other large cities throughout the CIS.
YouTube responded with an error: The request cannot be completed because you have exceeded your quota.
- Related Posts
- What is the pipe consumption for underfloor heating per m2?
- How to lay heated floors on a balcony?
- How to install a heated floor sensor?
- How to properly install a heated floor?
- What are the characteristics of Rehau pipes for underfloor heating?
- How to lay heated floors on planks?
Features and Specifications
Heated floors from well-known manufacturers Devi are very popular in interior decoration. The materials produced by this brand are made to high standards and qualities. Anyone who decides to install underfloor heating comes across this brand.
Warm floor Devi differs from other manufacturers in that it produces not only heating cables, but also special equipment - regulators, connection elements, thermostats with an LCD display. Cooperation between heating systems has been created. Due to this, this brand is recognized as the safest and most environmentally friendly device: it has received an ISO 14001 class certificate.
The main advantages of Devi underfloor heating:
- Heating of the house occurs in a fairly short period of time. Thanks to the installed Devireg thermostat, you can set a certain constant temperature without the risk of changes. You can control the system using a PC. Each room can be set to a different temperature.
- Energy flows are transferred to the surrounding air. They rise up and heat flows through the legs. Due to the fact that energy does not rise to the ceiling, it is not wasted, as with conventional heating of an apartment. Therefore, heat is distributed evenly throughout the room.
- Operates independently of the main central heating.
- Does not emit foreign odors or harmful fumes.
- The manufacturer's warranty for heated floors is 10-20 years, but the actual period is much longer.
- Installed under any floor covering and in a specific area that needs to be heated.
- It does not take up space in the apartment, thus the interior of the house does not change.
- A suitable option for a family with small children. Thanks to its automated system, if a human body is detected touching the cable, the system will automatically turn off.

Like many other types of heated floors, the Devi product also has its drawbacks:
- High cost of production.
- For chronic leg diseases, the use of this heating is prohibited.
- The operation of an electric floor requires special attention. If the structure breaks down, it will be difficult to find out where the failure occurred.
- Heat transfer is much greater near the walls than in the middle of the floor. Therefore, it is necessary to install an electric floor so that the heat transfer is distributed evenly.
- Electricity can damage rooms that have high humidity.
Characteristics
A warm mat with a self-adhesive base can last more than 20 years.
The heating mat of the Devi system is a system with a self-adhesive base, inside which wires with two or one cores run. It is complemented by regulators and sensors, with which you can change the power and prevent overheating. The mats are easy to install and are suitable for installation under tiles, laminate or any other covering. The main advantage of the Devimat system is that anyone can install it; no special skills are required.
The mats can heat up to 80 degrees and are excellent for installing heated floors in houses and apartments, office premises, country houses and country cottages, as well as technical buildings. They are produced in the form of convenient rolls that can be cut, which makes it easy to lay mats in rooms even with a non-standard layout. Additional special equipment from Davy, including regulators, thermostats with LCD display and connecting elements, fit well with modern heating systems.
The Devi system is able to heat a house in a short period of time without additional electricity costs. A special thermostat for heated floors Devi is able to automatically regulate the temperature and prevent its sudden changes. The system can be controlled using a PC or in the traditional way, which allows you to set different temperatures in each room and connect additional options. Suitable for families with small children.
The manufacturer provides a maximum warranty of up to 10-20 years, but in reality the system can last much longer without failure.
Warm floors Deviflex heating sections in screed
Advantages: by changing the step of laying the heating section, you can change the power of the heating system, installation is possible with any configuration of the heated surface, due to the large thickness, the system is inertial - it takes a long time to heat up, but also retains heat for a long time after that. Disadvantages: cable installation is more labor-intensive, laying in a screed layer - minimum increase in floor level 3 cm, inertia of the heating system
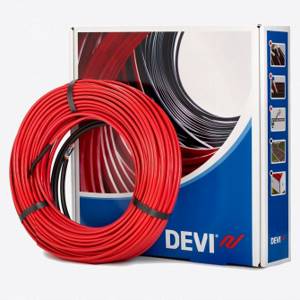
Under the general name DEVIflex, a whole series of different heating sections for electric underfloor heating systems is presented. The heating section is a piece of heating cable of a certain power and length, to which an electrical power cable (power, “cold” end) is connected. They are connected using a special sealed coupling. The thickness of the heating cable is 6-9 mm. For example, the diameter of the most popular DEVI cable for underfloor heating equipment - Deviflex 18T - is 6.9 mm
Therefore, you need to take into account that the use of heating sections for laying heated floors entails an increase in the floor level by at least 3 cm. When working with heating sections, you need to remember several rules:
- It is prohibited to connect the heating cable directly to electricity (connection is made only through a “cold” wire)
- It is prohibited to shorten or lengthen the heating cable (if necessary, you can shorten or lengthen the “cold” power cable)
- It is prohibited to squeeze or bend the heating cable too much during installation (this leads to local overheating and further burnout of the cable)
- In case of local failure of the heating cable, a special repair coupling is installed
- If a sufficiently large section of the cable is burned out, it must be replaced with exactly the same cable to maintain the power characteristics of the heating section
As a rule, in “electric heated floor” systems, the heating sections are installed in a screed layer (SCL) with a thickness of 3 centimeters. DEVIflex sections are attached to the subfloor using a special mounting tape, or with plastic clamps to a mounting mesh reinforcing the screed. The heating section is laid in a “snake” pattern. The distance between the cable turns (laying pitch) is calculated depending on how powerful the heating system needs to be made. For example, on balconies or loggias it is recommended to install a system with a power of 180-200 W/sq.m. Those. to heat 3 square meters of balcony you will need a heating section with a power of 550-600 W. In this case, the laying step can be calculated using the formula:
h (laying step, cm) = (S area, m* 100) / (L cable length, m).
Heating sections
Heating sections are used as the main or additional heating of rooms. It consists of a cable of limited length. Depending on the conditions of the premises, sections of a certain power are selected. The system is installed in both residential and non-residential rooms. Warm floors “DEVI” are recommended for use both in country houses and in city apartments.
- Two-core cable with reflective screen.
- The screen is made of aluminum foil. Additionally, the cable contains a copper drain core.
- The heating core insulation is made of PEX cross-linked polyethylene.
- The outer insulating shell is made of heat-resistant polyvinyl chloride. It can withstand temperatures of 105 0C.
- The maximum cable heating temperature is 65 0C.
- If a voltage of 230 V is applied to the conductor, then its power is 10 W/sq. m.
- At a voltage of 220 V, power density is 9.15 W/sq. m.
- It is not recommended to place the cable at an acute angle. The minimum bending radius is 4 cm.
- The section is laid under a screed or under tile adhesive. It is recommended to use mixtures specifically for heated floors. Fillers are added to them, which increase the heat resistance of the solutions.
We recommend: Features of Korean heated floors
DEVIflex cable sections are used for heating office and residential premises with normal air humidity. DEVIflex DTIP 18 sections are used not only for organizing heating in the house. The cable is also laid in open areas: on garden paths, on roofs, in car parks, in areas of the yard to melt snow.
The power of the heated floor “DEVI” is 18 W/sq. m. It can be placed in damp rooms and for heating areas with reduced temperatures. For laminate flooring, choose a system with low power.
Installation of the section does not take much time. A thermostat is installed on the wall in the room. It will serve as a guide to start laying the cable. 2 corrugated tubes are taken from it. One will contain the wire from the temperature sensor. At the other end of the heating section.
- The floor is leveled and cleared of debris.
- Thermal insulation is placed on the base. It is recommended to use polystyrene foam boards.
- Polyethylene film is placed on the slabs. It will serve as additional protection from moisture.
- The mounting tape is strengthened on the surface in increments of 20 cm. It contains devices for securing the cable.
- The section is laid with a snail or snake.
- At the cold end of the cable there is a termination; It is recommended to isolate it.
- The hot ends of the conductor are led out into a corrugated tube. The temperature sensor is fixed in the center between the turns of the cable. The distance from the edge of the heated floor is 20-60 cm.
- Connect the wires to the thermostat. On the back of the device there is an electrical connection diagram.
- The temperature of the heating system is adjusted and testing is carried out.
- At the end of testing, the section is filled with mortar. The thickness of the screed can be up to 6 cm. For “DEVI” heated floors, sections under the tiles are filled with an adhesive solution with a heat-resistant filler.
- The system can withstand any floor covering. You can arrange the interior of the room without restrictions. The cable will not be blocked.
Before installation, it is recommended to check the section for resistance level. It must comply with the standard: it is indicated on the cable coupling. The wires coming out of the temperature sensor are also checked for resistance. If the indicators are normal, the section is installed and connected to the thermostat.
The cable can also be laid under laminate. To do this, you need to make a circuit with passages for the conductor. This is necessary in order to reduce the load on the section.
The work is complex and painstaking, so we recommend using special “DEVIcell” plates. They are two-layer. The base is made of 12 mm polystyrene plate and 0.8 mm aluminum coated sheet. The plates already have a contour for laying the cable. A backing, laminate or parquet is laid on the section.
It is recommended to use “DEVIcell DRY” as insulation and the basis for heated floors. A layer of pressed profiled aluminum is applied to the insulation. The coating distributes heat well. The sheets have locks for connection. The mounting tape is strengthened on them and the cable is laid.
Review of Devi thermostats for heated floors
Thermostats that control heated floors operate mainly on one principle: they are triggered to turn the heating cable on and off by a temperature sensor.
The response algorithm for turning on a heated floor for all regulators is as follows: the sensor, sensing a decrease in the temperature on the floor, changes its resistance, and when the floor temperature drops below the set value, the thermostat closes the contacts of the switching relay and begins to supply 220V power to the heating cable of the heated floor, and this heating The cable, accordingly, heats up, and along with it the floor structure heats up.
The floor temperature sensor, under the influence of heating, begins to change its resistance in the opposite direction, and when the temperature value set in the regulator is reached (i.e., when the floor is heated to the temperature you specified in the regulator), it sends a command to turn off the relay. The warm floor begins to cool down.
The cycle repeats an infinite number of times. The only difference with programmable regulators: they control the time of day and day of the week, and if you and your household are not at home or you are sleeping, and the regulator knows about this through the settings you have set, then the warm floor will not turn on. In addition, some regulators have a built-in air temperature sensor.
Description Devireg D 610
The dust- and moisture-proof controller Devireg D 610 is designed both for controlling Devi heating cables in systems such as electric heated floors, in snow melting and anti-icing systems, heating pipes, containers, tanks (freeze protection), and for controlling cooling systems (ventilation , air conditioners).
The temperature regulator Devireg D 610 can be installed outdoors, the operating temperature of its surroundings is from -30°C to +50°C. In addition to installation on the street wall of the house, the Devireg D 610 regulator can be mounted using clamps on a heated pipe, and, of course, can be installed inside warm rooms, incl. and in damp areas.
At its core, this D 610 regulator is an analogue of simple mechanical D 130 regulators controlled by a temperature sensor, and is also similar to the operating principle of D 330 regulators, which are mounted on a DIN rail.
Construction Devireg D 610
The dust and moisture-proof housing of the B 610 regulator is manufactured with a high degree of tightness, and according to Russian standards it complies with IP44. The on and off button is protected by a transparent rubber pad. There is a rubberized seal under the temperature adjustment wheel. There is a protective rubber gasket around the perimeter of the opening lid.
At the ends and bottom of the regulator there are holes for entering wires from the sensor, from the heating cable and 220 V power supply; the holes are drilled with a crown (do not knock them out with a screwdriver). The kit includes rubber seals, which are inserted into the holes made by the installer and wires are passed through them. As an option, instead of rubber seals for wire entry, you can screw in a cable sealed gland (purchased independently). The diameter of the holes to be punched is 20 mm 3 pcs (one on the side and two on the bottom) and 10 mm 1 pc (on top).
With all the listed advantages, this regulator is not without a relative drawback, namely, the small current load power that the D 610 can pass through its own relay contacts. The connected load (power of heating cables) should not exceed 10A, which corresponds to 2.2 kW at Russian 220V.
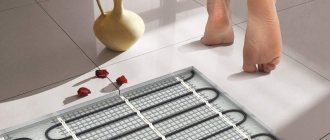
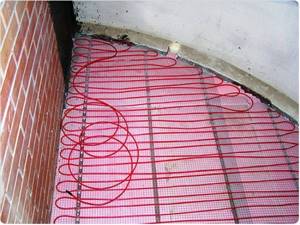
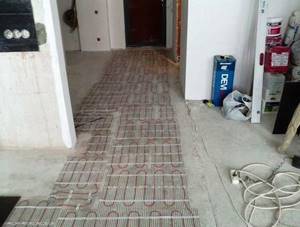
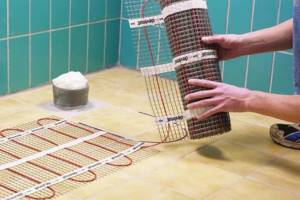
Installation of heating mat
Remove the protective film from the adhesive surface of the mat. Unfold the mat with the adhesive surface down, according to the drawn plan. Position the heating mat so that its power cables (cold ends) are in the place where you plan to install the thermostat (Fig. 7).
Unroll and secure the heating mat according to the installation plan. For changing the installation direction in front of walls, cabinets, etc. you need to cut the plastic adhesive mesh (in no case the heating cable) and continue installation in the opposite direction (Fig. 8a-8b).
Note. The heating cable and couplings must then be completely covered with screed or similar material. These may require making a recess into the base of the floor.
Principle of operation
When connected, the electrical cable transfers thermal energy to the floor covering, which acts as a heat exchanger. This causes the air to heat up.
The floor heating process looks like this:
- The Devi thermostat receives data from the temperature sensor about the current temperature.
- From the set temperature, a current of a certain magnitude is supplied to heat the floor covering.
- When the desired air temperature is reached, the power turns off automatically.
When the temperature drops, the whole process resumes again. The most popular thermostat model is Devilink. It has the ability to control the entire surface heating system (temperature sensors, boiler, radiator). The amount of electricity consumed depends on the set temperature.
The heating time of the floor covering is short: it occurs within 10 minutes. The heating temperature of the surface largely depends on the correctness of the installation work performed.
To correctly connect the underfloor heating system, you must read the operating instructions.
Advantages of Devi heated floors
You can turn on each room separately - controlled via a PC.
Devimat warm electric floors have many advantages and stand out from analogues from other manufacturers. Buyers note their improved characteristics, quality of materials, ease of operation and installation, durability and maximum reliability. The list of main advantages of the system includes:
- the ability to uniformly heat the entire area of the room during one heating cycle;
- savings on electricity due to thermostats, which allow you to save up to 25% of the total amount of payments during the cold season;
- the ability to use the system at any time, regardless of the operation of centralized heating;
- combination of the system with any type of floor covering;
- the ability to warm up both the entire room and a separate zone;
- installation is as simple as possible;
- no additional costs for system maintenance.
The system is suitable for any type of interior as it is completely hidden under the floor. It does not disrupt the style of the room and can be combined with all types of floor coverings.
Warranties and equipment
At this point, Devi holds its own. They provide a 20-year warranty on their heating cables, provided the insulation is intact. A very bold statement requires strict control over the products sold. Therefore, Devi cables are sold only in whole pieces! In other words, they won’t sell you 50 meters of cable in a store. There are sections of 40 m, and there are 60. Take any. And if you shred it, the warranty will be voided.
There are quite a lot of standard sizes, and it is unlikely that you will be able to find any kind of length gradation system. Some series have pitches of 5, 7 or 14 m, some have 3 and 6 m. If desired, you can choose to suit your needs. But the prices are quite high. The “cheapest” heating cable will cost ≈ 170 rubles/m.p. Subject to the purchase of a bay of 198 m.
And heating mats are even more expensive. With a single standard width (50 cm), mat lengths vary from 1 to 24 meters. At the same time, a mat with an area of 0.5 m2 will cost ≈ 5.5 thousand rubles, and 12 m2 will cost 26 thousand rubles.
That is why there are no ready-made Devi Warm Floor kits on sale. For each room, an individual set is compiled. Considering that the products of this Danish company are sold in specialized centers, you can count on the full assistance of consultants.
Installation
Below we briefly describe the principles of installation work for some categories of heated floors:
For a heating cable, the installation principle is quite simple. Installation is carried out using the snake method into the floor screed, then connected to the temperature controller. When connected to the network, the cable heats up, which leads to heat in the premises. The warming up time is quite short, which allows you to get a warm, comfortable floor in a short time interval.
The most common option currently is a self-regulating cable version, due to which heat is accumulated.
Installation of the heating mat is not particularly difficult, as is its configuration. You need to connect the mat according to the diagram provided by the manufacturer. To do this, you need to roll out the roll onto the base and connect the cable to the electrical outlet, which has a temperature regulator. This option is considered the best for tiles, because they can be laid directly on the cable system.
How to choose
Below are several rules for choosing a heated floor:
- When purchasing an electric heating element, you should pay attention to the compliance of this brand with the floor covering under which the heated floor will be laid. This is not difficult to find out: you need to pay attention to the pictograms indicated by the manufacturer on the packaging.
- The power of the heating elements is also an important factor. There is a relationship between the floor covering and this indicator. It is necessary to consult the seller.
- Indoor wiring. Here it is important to know whether the existing wiring can additionally take the load from the heated floor.
- Calculation of required power. To do this, you need to know the characteristics of the building, glazing areas and much more.
- Company manufacturer. The emphasis should be on branded products: even if they are more expensive than analogues, the consumer will be calm about the quality of the product. After all, such a system should last several decades.
Deviflex D 131 regulator with air sensor
The remaining “third brother” of the listed regulators is the Deviflex D 131 regulator with an air sensor; it controls the operation of the heated floor using only one air temperature sensor (it is inside the housing). The operation of a heated floor from such a regulator may not be entirely correct, because... The temperature sensor does not sense changes in floor temperature, but senses changes in air temperature and can respond, for example, to drafts. Experience using such regulators shows that with one adjustment of the regulator the floor can be too warm, and with a slight decrease in the knob the floor can become too cold. Typically, such regulators are used where repairs have already been made, but they forgot to install the sensor, or walled it up in concrete (which is why it quickly fails), and there is no way to install a new sensor without opening the floor and walls. In addition, the Deviflex D 131 regulator with The air sensor can be used for other highly specific purposes, for example in industry.
Additional functions in Devireg mechanical thermostats
Structurally, Devireg thermostats may not have a separate button for turning the heated floor on and off; its function is performed by a rotary wheel. To turn off the heated floor, the wheel is turned towards the minimum temperature (counterclockwise) until it stops, and the power is completely removed from the heated floor.
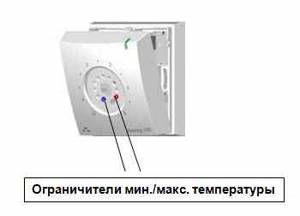
Among the additional functions, you can add the following: the ability to set limits on the maximum and minimum floor temperatures. Setting a limit on the maximum floor temperature may be relevant in heated floors with natural wood covering, where laminate, parquet boards, or parquet are used as a covering. With such coatings, it is not recommended to heat the heated floor to temperatures exceeding 28°C, because high temperatures can damage the floor covering. In addition, adjusting the limiters may be necessary where there are small, curious children who touch, twist and twirl everything.
The limitation of the maximum and minimum floor temperature in the deviregs is adjusted as follows: using a small slotted screwdriver, remove the rotary wheel. Blue and red stoppers are inserted into the holes inside; to change the setting, simply pull out the desired stopper and insert it into the desired hole. Put the wheel back in place.
It remains to add that if a conventional scale is marked on the temperature regulator with a gradation from the off state to 5 conventional units, then keep in mind that one conventional scale unit corresponds to approximately 8°C, and the maximum value at “5” corresponds to 35°C on the surface floor (inside the floor it may be 10°C more).