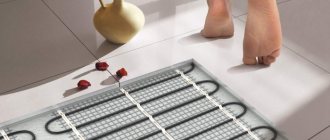
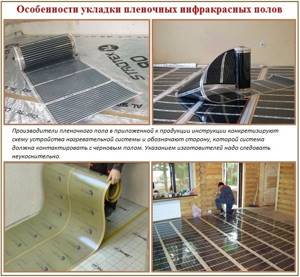
Having set the task of installing a warm floor under linoleum on a concrete floor, you will have to solve a difficult problem. Although linoleum is presented in a wide range on the construction market, not everything that is offered can withstand temperature loads. It’s worth understanding the device technology and the choice of materials. Isn't it true?
We will talk about how a floor heating system is constructed on a concrete base followed by laying linoleum. The article we have proposed describes in detail all stages of construction: from the selection of materials to the finishing work. Popular device options are described.
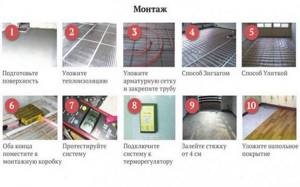
Step-by-step installation instructions
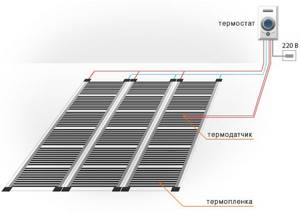
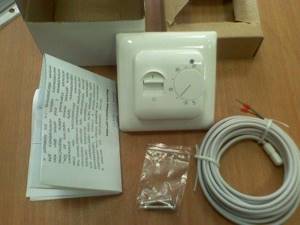
Once the type of linoleum has been selected, you can begin the process of laying the heated floor. To do this, you will need thermal film (the specific amount will be known after taking the dimensions) with all additional elements, a thermostat to control heating modes, any heat-reflecting material, ordinary plastic film, tape, a stapler, a mounting knife, scissors, pliers and a screwdriver.
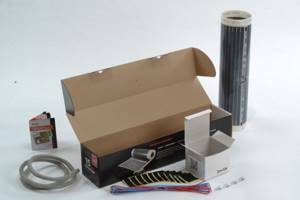
Film heated floor set

Choosing a heated floor kit
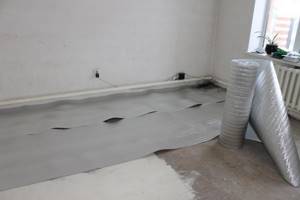
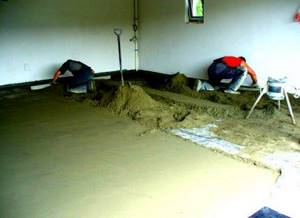
Step 1. Preparing the base. If the floor is placed on concrete floors, then the surface needs to be leveled. To do this, it is better to make the screed with a cement-sand mortar; there should be no protrusions on the surface of more than 3 mm.
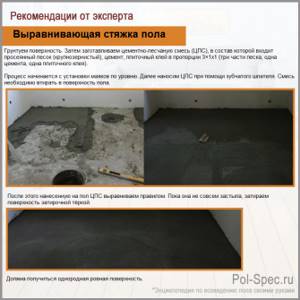
Floor leveling screed
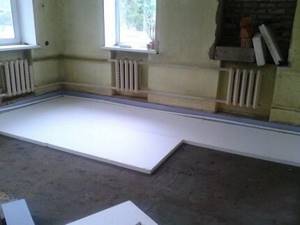
Waterproofing should be placed on a completely dry screed (you can use ordinary film or coat the base with modified bitumen mastics), and sheets of OSB or plywood should be laid on top. It is recommended to fasten to a concrete base with dowels in a checkerboard pattern.
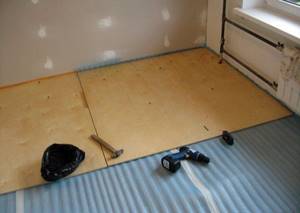
Laying plywood on the floor
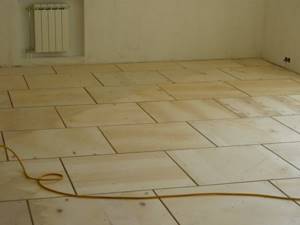
Laying plywood in a checkerboard pattern
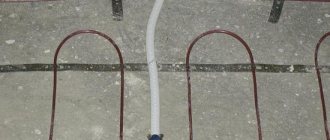
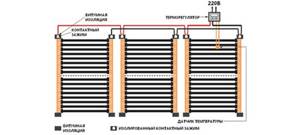
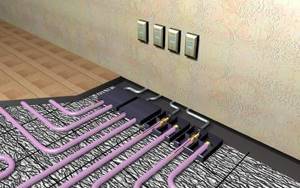
Step 2. Take measurements and draw up a diagram of the location of the thermal film. In this case, the features of the room layout and the placement of sockets or electrical cable distribution boxes are taken into account.

Infrared film installation plan
Important. When installing a heated floor, the electrical wiring capabilities of the room must be taken into account. Heated floors consume approximately 200 W per square meter of room, exact data is available in the instructions supplied by the manufacturer. The overall load on electrical networks increases significantly; it is necessary to ensure that cables and protection fittings can withstand this increase. If the heating power is more than 3 kW, then you need to make separate power wiring.
If not, then you will have to resolve issues with electricians, sometimes you will need to replace wiring and protective devices, and permission from the owners of electrical networks to increase power.
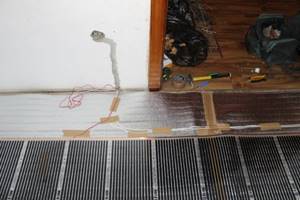
Laying the IR film system
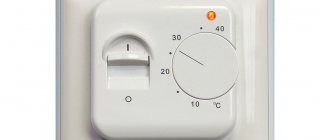
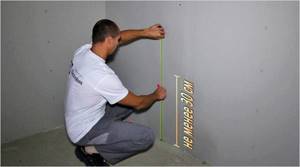
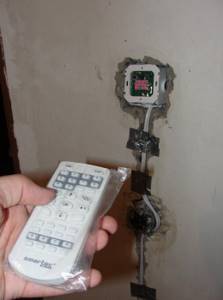
Step 3. Select a place on the wall where you plan to install the thermostat. It must be accessible, the distance to the power source is minimal. The most optimal is considered to be a site near existing switches or sockets.
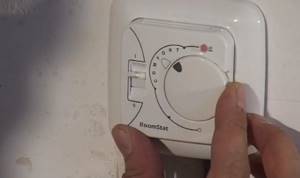
Choose a location for the thermostat on the wall
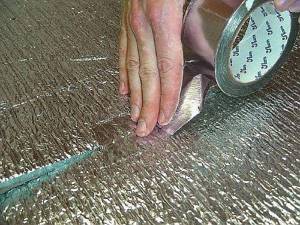
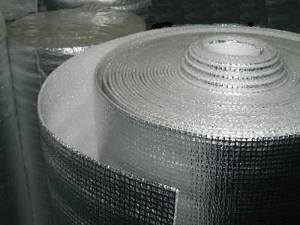
To improve thermal insulation and reduce unproductive losses, a thermal insulator with reflective aluminum foil is placed on the base of the floor under the thermal film.
Laying foil insulation
The thickness ranges from 5–6 mm; ready-made rolls with excellent performance characteristics are available. The thermal insulator can be fixed with double-sided tape or staples using a stapler. The joints between the strips must be sealed with tape, the surface must be as airtight as possible.
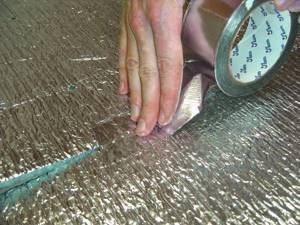
Installation joints or accidental cuts in the panels are glued with self-adhesive aluminum tape
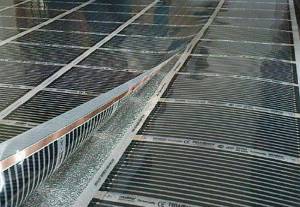
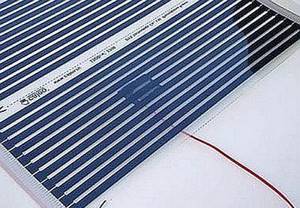
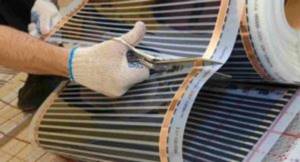
Step 4. Place the thermal film, while paying attention to the markings, the bottom side should be facing the heat-reflecting film.
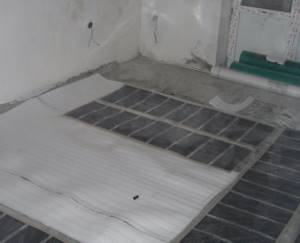
The photo shows an unfolded IR film
Practical advice. It is recommended not to heat under low furniture for two reasons. Firstly, it is ineffective due to weak air convection. Secondly, elevated temperatures cause premature wear of furniture, it dries out, and factory settings are violated.
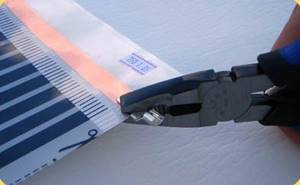
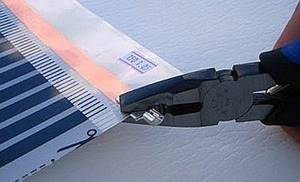
In the designated areas, the thermal film is cut to the required size.
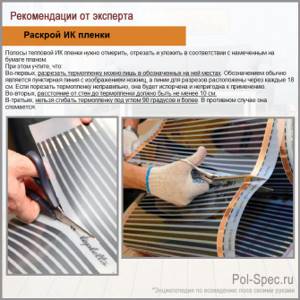
Cutting IR films
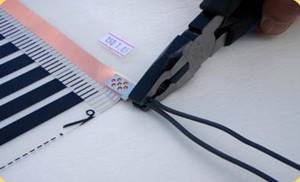
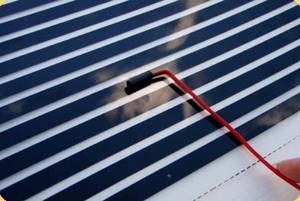
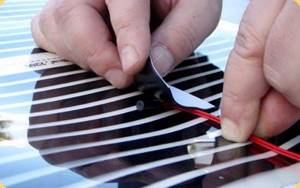
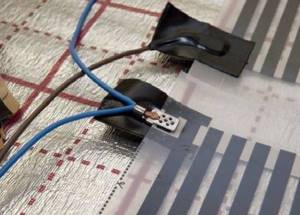
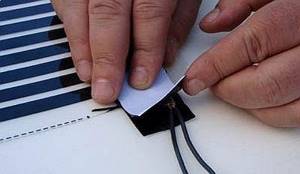
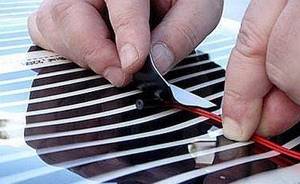
Step 5. Connection and isolation. All work should be carried out in unconditional compliance with the requirements of the PUE and the manufacturer’s recommendations. The heated floor is equipped with a full set of connectors and special insulating materials; their use guarantees long-term and safe operation of the structure. The cut areas of the wide copper bus are insulated with special bitumen insulation; make sure that it fits over the entire area of the conductive element. In the places where the wires will be connected to the copper bus, contact clamps are installed, one side of them should be located inside and the other outside the thermal film. The clamps are squeezed tightly with pliers.

Attaching the contact clip to the thermal film
Attaching the contact clip to the thermal film
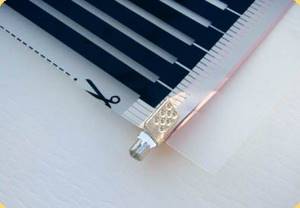
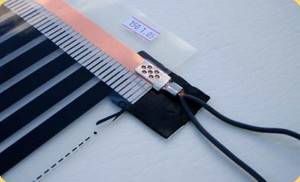
Contact clip mounted on thermal film (bottom view)

An example of the correct installation of insulation on a copper busbar cutting line

Completion of the process of insulating the copper busbar cutting line
Step 6. All strips of thermal film should be secured together with tape to eliminate the possibility of shifting. Next, check the correct installation of the clamps and film; if everything is fine, then you can connect the power wires.
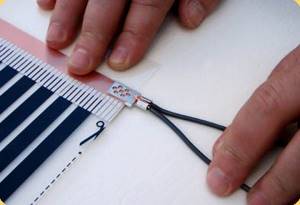
Connection of installation wires with a contact clamp Connection of installation wires with a contact clamp
To increase service life, it is advisable to tin the bare ends. This not only improves contact at the joints and prevents oxidation processes, but also increases the safety of using heated floors. If there is insufficient contact, the clamps become very hot and can melt the linoleum. Leg burns, electric shock or fire may occur. All terminals with connected wires must be insulated with a special bitumen film on both sides. Make sure that the silver contacts of the thermal film are completely insulated at the bottom and top.
Clamp the wires securely into the terminal clamp
Example of correct installation of the bottom insulation sheet for contact terminals
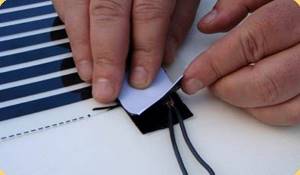
Installing the top insulation sheet
View of an insulated contact clamp with wires connected
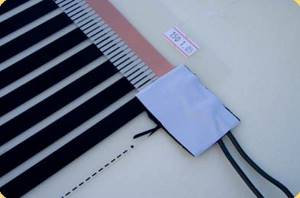
Step 7. You can begin connecting the thermostat only after carefully reading the attached instructions. The heating temperature sensor is mounted on a black strip of thermal film and secured with insulating tape. There are cases when it is installed above the floor and reacts to the air temperature inside the room.
Installing a floor temperature sensor
The sensor is attached to the thermal film with bitumen insulation
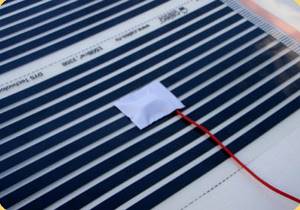
installed and glued floor temperature sensor. Bottom view of thermal film

Installed and glued floor temperature sensor. Top view of thermal film
Step 8. Use a mounting knife to make recesses in the thermal insulation for all the clamps and sensor. The protruding parts of the elements will be hidden in these recesses, the floor will be flat, and there will be no technological elevations on the linoleum. The same grooves are made for the wires so that they lie in the designated places and are fixed on top with tape.
Step 9. Install the thermostat on the wall. To do this, you need to remove the mounting panel and make markings for the installation locations of the dowels. The holes are drilled using a drill with pobedite surfacing. The case must be firmly fixed, do not allow it to wobble.
Choosing an installation location
Installation of a thermostat for film heated floors
Mechanical thermostat
Installing a thermostat
Video - How to connect the regulator to a heated floor
Practical advice. When drilling holes in a brick wall, there are times when the drill gets into a seam. In this place, the fixation strength of the dowel is insufficient; it wobbles and is easily pulled out. To securely fasten, insert matches or toothpicks into the hole around the perimeter; they should press the dowel tightly on all sides. After driving the dowel-nail, the connection will be very reliable.
Step 10. According to the connection diagram, attach the wires to the thermostat and connect the system to the electrical network. If the heating power is more than 2 kW, then be sure to install a separate automatic machine.
At this point, the installation work is completed, you can begin testing the floor heating system.
Film installation
First you need to know about the requirements for infrared flooring under linoleum:
- The power should not be higher than 150 W per square meter.
- The thermostat power is calculated by multiplying the floor power by quadrature.
- Film heated floors cannot be laid in places where furniture and household appliances are expected to be placed.
- The thermostat is located on the wall that will be closer to the connection point.
Secrets of the masters: correct installation of heated floors under linoleum
- First of all, you need to cut a channel for electrical wiring in the wall and prepare a place for installing the temperature controller.
- The sensor temperature sensor is installed as close as possible to the temperature controller. It is best to make a recess in the substrate and hide it there: despite the fact that it has a flat shape, a small bump may form that will interfere with the laying of linoleum. After this, you can begin to lay the electric floor.
- An important condition: you must maintain the ratio of the width of the strip to its maximum length. It is more convenient to use rolls 1 meter wide, while the maximum possible length is 4.5 m. Laying should be calculated in such a way that there are as few joints as possible.
- The edge opposite to the connection point must be insulated with bitumen insulation. Secure the joints together with masking tape, at intervals of approximately 10-15 cm.
- Cutting the material is allowed only in the light sector; black coating must not be damaged.
- In the production of heated floors, a series connection of copper conductors is used, so the connection of the system to the electrical network must be the same.
- To connect, you need to use the copper clamps that come with the kit. At the connection point (it is indicated in the instructions), a clamp is installed so that its lower part is between the copper core and the film, and the upper part lies on the film. Then you need to squeeze the clamp with pliers with such force that it breaks through the top layer of the film, but does not damage the copper core. Bitumen insulation is also required at the connection points.
Installation and connection of the thermostat
The thermostat operates on 220 V, so it can be connected directly to an outlet. But the best solution would be to connect to a circuit breaker, which will de-energize the floor in the event of a short circuit.
Read more about choosing and setting in the article: Thermostats for heated floors.
The sequence of work will be as follows:
- Connect the wire that supplies voltage to the film floor to the corresponding output from the temperature controller.
- Connect the circuit according to the technical data sheet of the device.
- When connecting a thermostat to a circuit breaker, the wiring is connected to terminals F and L, where F is phase and L is zero.
- If you use a direct connection to the outlet, then you can determine the phase and zero using an indicator screwdriver.
- After turning on the power, you need to set the temperature regulator to the minimum position, then turn on the floor heating with the switch and set the maximum temperature. A characteristic click will indicate that the temperature controller is connected correctly.

Infrared floor paired with linoleum
Affordable prices do not prevent linoleum from being a rather “capricious” coating. Heating may cause budget brands to warp, stretch, or shrink. Cheap material can release toxins when the temperature rises. Expensive representatives with an insulating backing nullify all attempts of heat to pass through them and reach the consumer’s feet.

Coating suitable for infrared heating
Before the advent of film floors, the proximity of linoleum to “warm floor” systems required serious technical tricks or was outright excluded. Direct cooperation with electrical or water circuits was allowed only for marmoleum - natural linoleum. Although serious claims are made against it regarding heat retention.
With the introduction of infrared heating systems, linoleum joined the ranks of materials that allow you to install a “warm floor” underneath. In addition, manufacturers of numerous types of coating have made significant changes to the formula, which ensures resistance to temperature increases up to +35ºС and dimensional stability.
However, when choosing linoleum for laying over even an infrared heating system, you should carefully study the markings. It must indicate the compatibility of the material with electric heated floors. If the manufacturer's assurances turn out to be false - the coating will deteriorate from contact with the heating system, the money for it must be returned.
You can get acquainted with good options and purchase linoleum on the website Remontnick.ru. There they will advise you and help you choose what you need.
By the way, no one will compensate you for losses that occurred due to violations of film floor installation technology. Lost funds will not be returned if the conditions for installing linoleum over infrared heating were not met. Therefore, it is worthwhile to thoroughly and thoughtfully familiarize yourself with the technological requirements for the design of film systems.
Warm floor compatible with linoleum
The consumer is now presented with a wide variety of film heating systems.
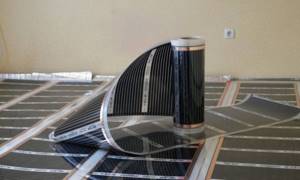
There are options with a solid carbon heating element or with large rectangular segments. With their help, large health centers and public organizations are equipped. Such systems are installed mainly in screeds.
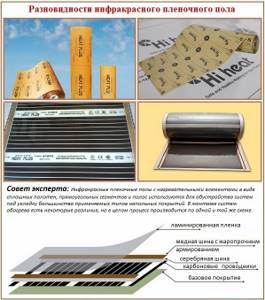
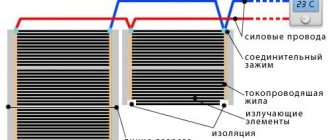
In everyday life, so-called striped films are most often used. The heat-generating carbon in them is arranged in transverse stripes. The edges of the strips on both sides are clamped with copper and silver busbars, which impart energy to the elements, ground and prevent sparking. Infrared heating systems are covered with a thin polymer film on the outside and inside.
Depending on the function assigned by the manufacturers to the copper and silver busbars, film floors are laid up or down with the side with the copper strip. This technical point is indicated by manufacturers in the instructions; close attention should be paid to it before installing a specific brand of infrared film.
Otherwise, the installation processes for all types of infrared heated floors are similar. They are carried out in stages with mandatory preliminary calculations, design and preparation before construction.
All types of film heating before laying linoleum require the installation of a protective layer of plywood, hardboard sheets, gypsum fiber board or fiberboard with a thickness of 3 - 5 mm.
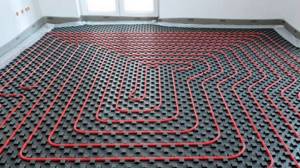
Infrared film on concrete floor
This version of the heating floor is the most loyal to linoleum, but the thin film is easy to damage, so the concrete base underneath must be perfectly level. For effective heat transfer by infrared heaters, this process must occur in one direction.
Any other “warm floor” system operates on the same principle. One-sided heat transfer is possible only in the case when the thermal conductivity of the materials located below and above in relation to the heating elements is radically different.
The heat capacity of the top layer should be significantly higher than that of the subfloor. If these conditions are met, the efficiency of an infrared floor can reach 97%. At the same time, the installation of this system does not make significant adjustments to the height parameters of the room.
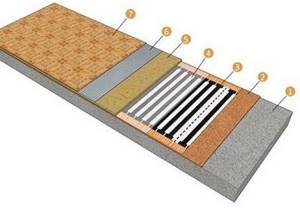
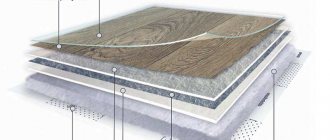
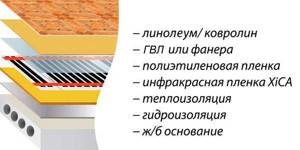
Components of a heated floor: concrete base (1), heat-reflecting substrate (2), infrared floor (3), polyethylene film (4), plywood sheet (5), adhesive layer (6), linoleum (7)
To install infrared film on a concrete floor, you must first install a thermal cutoff. After this, work begins prior to laying the linoleum.
Features of the shielding layer and its installation
A heat shield, due to its high reflectivity, can reduce heat transfer to a concrete floor by an average of 75%. The best option is a foil coating with a lavsan base.
There are other cheaper metallized materials made on the basis of foamed polyethylene, but their thermal conductivity is higher, so heat loss will be greater. A rational approach to this issue involves purchasing an electrical and thermal insulation system together with heating elements.
It’s better when all this is released by one reputable manufacturer. The quality of insulating materials is a guarantee of rational consumption of electricity for heating. A heat shield is only needed in places where the film is laid, but it is better to lay it over the entire area to avoid unevenness.
Installation is carried out in the following sequence:
- Place the thermal strips on the concrete base, with the reflective side facing up.
- Connect the individual strips with double-sided tape.
- Place the temperature sensor between the tapes and secure it with tape.
- Connect the sensor and the regulator with wires, protecting them with a box or hiding them in grooves made in concrete.
The good quality of infrared films and components produced by such manufacturers as Q-term, Lavita, Enerpia, Rexva has been noted by many consumers. They have approximately the same technical characteristics, and the difference in cost is a feature of the pricing policy of a particular company.
The choice should be made based on bandwidth and maximum power. For linoleum, the optimal power is 150 W/m². With such a value, the structure of the coating does not change and no harmful substances are released.
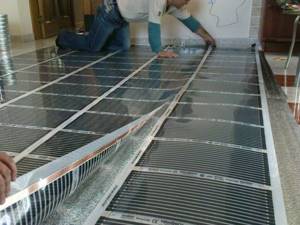
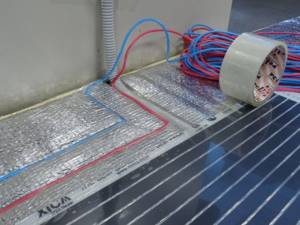
Installation of infrared film
To minimize the number of segments and connection points, the strips are placed along the room. Before installation, the film is divided into parts. The length of the panel depends on its width. For a meter film, cutting into segments up to 7 m long is allowed, for a width of 0.8 m - 10, and for a half-meter film, the maximum length of the thermal strip is 13 m.
It is better to connect the blocks with a PV wire - 3.1 x 1.5, which will ensure minimal heating in the event of a peak load of 10 A. A VVGng cable is used to power the thermostat. The blocks are connected individually to the thermostat or the nearest junction boxes
A competent layout - a distance from the walls of 200 mm, a gap between the strips of 30 to 50 mm, contacts as close as possible to the wall on which the thermostat will be placed.
Under no circumstances should overlaps be allowed. The thermal canvas is attached to the heat shield using masking tape. The cuts on the sides are also fixed using screws or staples.
Tips are placed on the edges of the copper strip of film located in close proximity to the thermostat. The power wire will be connected to them. It is inserted into the tip and pressed down with pliers. Cuts and connection points of wires on both sides are insulated with bitumen tape. The strips are connected in parallel.
Upon completion of installation, connect the wires connecting these elements to the infrared film to the thermostat and temperature sensor. Check that the connection has been made correctly, then test the operation of the system on a concrete base.
If everything goes according to plan, the thermal fabric is covered with plastic film, making an overlap of 20 cm, then the waterproofing is secured with tape.
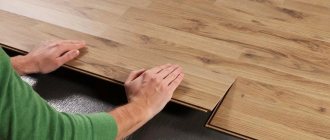
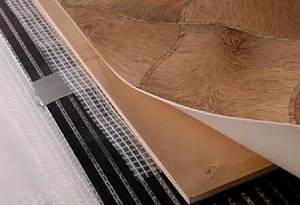
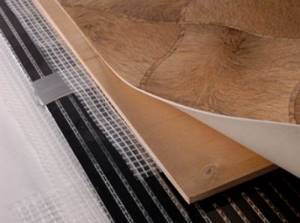
Laying linoleum over an IR system
This material is not particularly rigid, so in order not to deform the heating elements when walking, a leveling layer is needed under it. It is made from plywood with moisture-resistant properties, about 0.8 cm thick.
In order not to damage the film when fixing plywood sheets, it is necessary that the fasteners fall into the technological gaps provided between the heating elements or on the edges of the film. The fastening pitch is about 150 mm.
A plywood underlay for linoleum will help compensate for minor unevenness and cracks in the concrete base, and the finishing coating will last longer
When laying between walls and sheets of plywood, compensating gaps of 0.1 - 0.2 cm should be left. Subsequently, they are filled with moisture-resistant sealant. After the sealant has dried, remove dust from the entire surface with a vacuum cleaner. Next, the plywood is primed, the primer is allowed to dry and the linoleum is laid in the usual way.
What are the benefits of heated floors?
This heating system allows for optimal heat distribution in the room. According to the laws of physics, heated air rises and gradually cools down there. Because of this, most of the heat given off by various heaters is wasted for other purposes. As a result, the temperature under the ceiling and in the floor area can differ by 5–8 degrees, which is quite significant for a person. A warm floor gives warmth to the area of our feet, which is very useful from a physiological point of view.
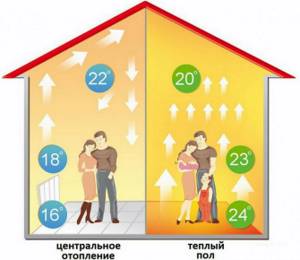
Temperature distribution
Temperature distribution
In addition, this system has many advantages over traditional heating systems:
- The air with this type of heating does not dry out, which is useful for everyone, and especially for small children and people with respiratory diseases.
- There is no need to clutter the room with radiators or other heating devices, which gives more space for interior design.
Along with comfort, heated floors bring health to the residents and savings on the home heating budget.
Concrete floor installation
You can immediately solve the problems associated with installing the “Warm Floor” system on a concrete base and choose the appropriate type of linoleum when the subfloor already exists. If instead there is only an old rotten wooden base or just soil, you need to start constructing the concrete floor itself.
The process consists of several stages:
- dismantling the old floor, if any;
- leveling the base;
- pillow devices;
- arrangement of an insulating layer;
- preparing and pouring concrete mortar.
Leveling the soil is done using a shovel. Then they begin to create a pillow. To do this, crushed stone or small pieces of brick and broken slate are poured to a height of about 50 mm. All this is lightly compacted.
The perimeter of the room is covered with sheet foam having a thickness of 20 - 50 mm. It will serve as formwork and at the same time balance the thermal expansion of the concrete base. Clean sand is poured onto this layer - 10 centimeters.
Next comes the installation of the second type of insulation. Extruded polystyrene foam is most suitable for this, preferably the Penoplex brand, which is produced in the form of rigid slabs with a thickness of at least 50 mm.
Expanded polystyrene or penoplex is resistant to temperature changes, environmentally friendly, tolerates compression loads well, moisture resistant, durable
The manufacturer has provided a locking connection on the sheets, so there are no gaps left when laying them. During installation, you need to ensure the horizontal position using a level. Waterproofing is not needed here, because... the material is extremely moisture resistant.
The next stage is preparing the solution. The optimal ratio of components is 1 part cement, twice as much sand and three times as much screenings. As a result, the solution should not be fluid, but not excessively thick.
In order not to heavily load the floor, light fillers and levelers are introduced into the concrete solution. Before pouring the solution, place beacons near the walls and stretch a cord between them. Using these marks as a guide, intermediate marker strips are placed.
A cement base of a traditional composition with a height of 10 mm weighs about 20 kg, so it can only be used when a heated floor is installed on the ground floor of a house or when there is a very durable floor underneath it
The surface is moistened and the solution is placed on it between the beacons and leveled with the rule. As it sets, the surface is leveled. At the end, apply a building level to check the horizontalness. Afterwards, the marks are removed, the resulting voids are filled with solution and everything is left until completely dry.
Is it possible to lay linoleum on a heated floor?
However, not all types of heated floors can be laid under linoleum. A water-based floor is exactly the type for which it is worth using another material as a finishing coating.
In recent years, linoleum is increasingly used together with infrared film flooring, since the rolled synthetic material is compatible with the electric version, and only the film one.
Common types of coating can withstand heating of no more than +26 – 28 °C. When this value is exceeded, vapors that are harmful to human health begin to be released. Water heating has a significant excess of the required temperature.
But not all types of electric heating are used. To lay linoleum on a warm floor, infrared film is ideal. With this design, a screed is not needed, which simplifies installation and reduces the heat consumption spent on heating the screed itself.
Cable electric floor
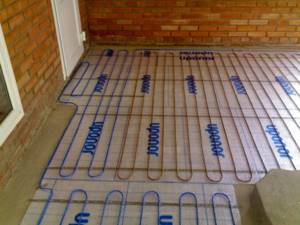
When laying a cable system, the concrete floor is first leveled, then a reinforcing mesh or special fastening tape is laid on it. The cable is placed on it, fixed, and then filled with concrete mixture. When the screed is dry, lay linoleum.
Before all this work, determine the length of the cable. If it is placed in 15 cm increments, one loop will take approximately 25 cm.
Given the known area of the room in which the heated floor is to be installed, calculate the number of turns, cable branches and its overall length. To the resulting value is added the segment running from the screed to the wall where the thermostat is located.
When calculating the area covered by a heated floor, the mandatory five-centimeter distance from the walls and the space occupied by furniture are subtracted from its total value. On a clean concrete floor, thermal insulation is applied over its entire area. Tape the joints with foil tape.
In the area reserved for the installation of heated floors, a metal tape is laid to secure the cable so that it is enough to cover the entire area. There is a place on the wall for the regulator. Then a hole is made for installing the mounting box and grooves are laid. After installing the regulator, a temperature sensor is attached to it.
The wire coming from the heating elements is laid to the temperature regulator. A temperature sensor mounted in a corrugated pipe and a cable from the main power supply are also brought here
The heating cable is laid starting from the edge of the corrugated tube, on which the cable end sleeve should be present. The electric floor is assembled by adhering to the calculated step in the form of a snake; the branches are laid evenly, excluding creases at turns. Fix the heating cable with hooks located on the previously laid metal tape.
You shouldn’t pull it too hard, but the cable should still be as straight as possible. The pitch is calculated by multiplying the heated area by 100 and then dividing the result by the length of the cable.
After briefly testing the system, a 5-centimeter layer of screed is poured. When it dries, install the finishing coat.
Choosing the right brand of linoleum
There is an opinion that linoleum is a completely synthetic floor covering that, when heated, releases chemicals hazardous to health, such as phenol.
Linoleum is also reproached for its poor ability to withstand heat. When exposed to high temperatures, the coating may noticeably deform.
Marmoleum is a type of linoleum made from natural materials. This coating looks great and goes well with heated floors.
Finally, the material was originally created not to transfer heat, but to protect from the cold penetrating from below. All this is true, but only partly. Linoleum is easy to install and moderate in cost, which is why it remains an extremely popular floor covering.
Modern technologies and developments have allowed manufacturers to create new types of linoleum. Among them there are those that perfectly transfer heat, tolerate moderate heat without compromising their appearance and do not emit any dangerous fumes.
There are five main types of linoleum:
- alkyd or griftal;
- nitrocellulose, also known as colloxylin;
- relin or rubber;
- vinyl, or rather PVC;
- natural, known as marmoleum.
Without going into details of the production technology, we can immediately note that the first three options are categorically not suitable for use with heated floors. All of them react poorly to heat, and Relin is not at all suitable for use in residential areas.
Image gallery
Photo from
Choosing linoleum in a specialized market
Acceptable marmolium
Linoleum with thermal insulation backing
Dry screed for laying the coating
The most popular version of linoleum is its PVC version. This coating is very diverse in design and thickness, relatively safe, and has a pleasantly moderate price. After installation, vinyl covering almost always emits a not particularly pleasant characteristic odor, which dissipates over time.
However, PVC linoleum is not dangerous; it is suitable for premises where people live. When purchasing, it is recommended to study the labeling of the material; there should be a mark on the packaging stating that this coating is intended for installation on underfloor heating systems.
For example, ordinary linoleum can be equipped with an additional layer of heat-insulating material, which is completely unnecessary over a heated floor.
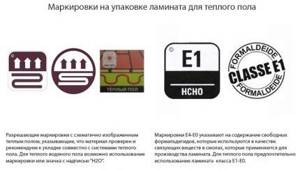
Not all linoleum is suitable for laying over underfloor heating systems. The markings on the flooring packaging will help you choose the right material (+)
Natural linoleum, also known as marmoleum, is a cutting-edge word in the flooring market. The material contains exclusively natural ingredients, such as crushed cork bark, pine resin and linseed oil, powdered limestone and natural dyes.
Of course, when heated, such material cannot emit any harmful substances, only natural fumes. Marmoleum is sensitive to strong heat, so the issue of choosing a temperature regime for such a coating must be approached very responsibly. However, this is also true for vinyl materials.
Marmoleum can only be blamed for its substantial price, but the high wear resistance and safety of the material fully justify such costs. Marmoleum does not change color over time and also effectively resists fire.
When choosing linoleum for a warm floor, you need to pay attention to the thickness of the material. A coating that is too thin will expose all the unevenness of the base; an excessively thick material will reduce the efficiency of heating the room.
Which linoleum to choose?
Linoleum on the market, despite its visual similarity, differs in various respects. It may have different thickness, composition, structure, and the reinforcing base, if present, may differ in type.
When choosing linoleum, you need to correctly use the information encrypted in the markings applied by the manufacturer. It contains encrypted information about the composition of this type of coating, the possibility of heating it, and the maximum permissible temperature.
You should immediately exclude from your list a material based on glypthal polymer, i.e. alkyd linoleum. It is a low thermal conductivity coating and changes its size over time. For the installation of heated floors, these properties are a big disadvantage.
Coloxiline linoleum based on nitrocellulose, which is highly flammable, is also an unsuitable option. Although this linoleum contains fire retardant boric acid, which somewhat reduces the fire hazard of the material, it is not recommended to install heated floors under it.
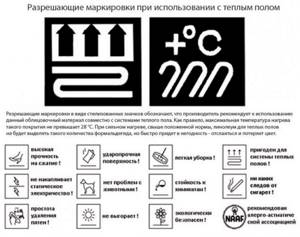
If the selected linoleum is recommended by the manufacturer for installation in pairs with a heated floor, it will bear the approval markings shown in the photo
Relin rubber linoleum should also not be considered. In addition to being a good heat insulator, when heated from below, the material can change its structure. This will quickly lead to its destruction.
Polyvinyl chloride linoleum with good strength and hygienic characteristics is more suitable for heated floors than other types. A more expensive option is natural linoleum (marmolium), created on the basis of safe components.
It contains jute fabric, natural dyes and other natural ingredients. The main rule: PVC linoleum can only be heated to 30⁰, and natural - to a maximum of 27⁰.
When choosing PVC linoleum for finishing a heated floor, it is better to consider not the household type, but the commercial or semi-commercial one, as it is more durable. A thermal insulating base is not needed for this purpose; it will only reduce the efficiency of the system.
More suitable material would be either without a base or with a very thin fabric backing. At first, vinyl linoleum paired with a heating cable may emit an unpleasant odor, but then it will disappear.
What you need to install heated floors
After completing the selection of the type of linoleum, you can begin the process of creating a warm floor.
To do this you need to purchase:
- thermal film (to find out its footage, you need to measure the area of the room) and additional elements for it;
- thermostat, which is designed to control the degree of heating;
- heat reflecting material;
- ordinary polyethylene film;
- construction stapler;
- scotch;
- scissors;
- mounting knife;
- screwdrivers;
- pliers.
How to test the functionality of floor heating

Testing the system
Set the heating setting on the thermostat to 20–25°C, wait a few minutes. Check by hand whether all installed film heaters are warming up. Turn off the power completely, check the heating of the wiring connections. They must be at the same temperature as the film. If it is significantly higher, then the contacts are unreliable. It is necessary to check them, be sure to find and eliminate the cause of excessive heating.
Film floor
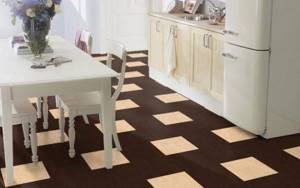
Warm electric floor creates additional comfort. It is not recommended to consider it as the main source of heating. This type of insulation is considered an addition to the main system. Infrared heated floors under linoleum are used in living quarters, kitchens, and loggias.
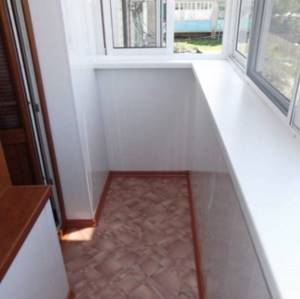
On the balcony
Infrared heated floor is a roll material that is laid out under linoleum. A necessary condition is an electrical connection. To arrange the structure you will need a layer of heat reflector. It is better if it is produced by the same company that produced the film coating.
Cable or infrared film?
Heated floor systems that operate on electricity are clearly divided into electric and infrared. Electrical systems consist of a heating cable, which is laid on a special mesh and then covered with a screed. A similar system in which the cable is already laid on special mats may become more convenient for installation. They are laid in strips and connected to each other.
Infrared or film floors are designed fundamentally differently. This is a complex system that looks like a thin, less than one millimeter, dark film. It is actually a graphite heating element sandwiched between two strips of thin polyester. To connect to the electrical network, special copper-silver conductors are used. The degree of heating can be controlled using a thermostat; it is usually supplied with the system. An undoubted “plus” of infrared heated floors is low energy costs for heating.
Infrared film floor
Such a warm floor heats the room using infrared rays and does not require a screed. It is placed on the prepared base, and the floor covering is mounted on top. Film systems are best suited for laying under linoleum. They do not heat up too much, so dangerous overheating of the coating in this case is practically excluded. The film is very thin, it can be laid almost without problems, even if the renovation of the room has long been completed.
To do this, the floor covering is removed, the base is leveled, the film is installed, and then the floor covering is laid again. The floor level will rise only a few millimeters. But it should be remembered that such systems are quite expensive, and also that they require very high quality installation work. For example, the base for an infrared heated floor must be almost perfectly level. Even a small difference in height can damage the film.
Does this mean that you cannot use cable electric flooring with linoleum? Not at all. This decision also has every right to exist. But installation in this case will be more difficult, and the thickness of the so-called floor pie will be greater.
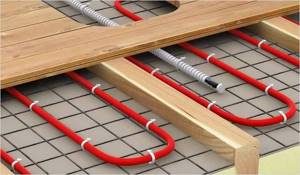
The heated cable floor is laid on a base made of heat-insulating material and secured to a reinforcing mesh, after which it is filled with concrete screed
Due to screed, thermal insulation, vapor barrier and other components, the floor level can increase significantly. An important point is the correct temperature. A heating level of 22-25 degrees is usually enough to make the experience comfortable, and this temperature will not harm the floor covering.
Principle of operation
The operating principle of IR film is simple. The current is applied to the metal bars, which heat up and heat up the carbon fiber strips. They, in turn, when heated, begin to generate infrared waves in a range that is safe for living organisms. The radiation is captured by any opaque objects, accumulated by them, and then released into the air. This way the room warms up quickly and efficiently.
- Floor
We solve a difficult problem: how to lay linoleum in a room with furniture
Why should you choose heated floors?
The classic use of heating systems involves the presence of radiators, which distribute their heat when heated, and then maintain warmth in the room. As a rule, batteries are mounted at a certain height in the area where windows or load-bearing walls are located. The air in the room gradually warms up.
Following physical laws, warm air masses rapidly rise upward. As a result, the top of the room becomes warm and the floor becomes cold. Thus, a large amount of energy is wasted inefficiently.
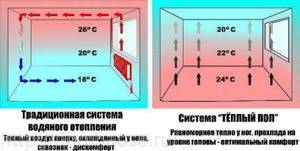
Scheme of operation of heating systems of various types. The advantage of heated floors is manifested in the uniform distribution of heated air throughout the entire volume of the room
When using underfloor heating technology, heated air masses accumulate at the bottom, and slightly cooled ones accumulate in the upper part, under the ceiling. This option of temperature distribution with a difference of up to 2-4ºС is the most optimal and comfortable for humans.
Finish coating for heated floors
If testing is completed successfully, installation work can continue. Thermal film must have a protective coating against exposure to water. For these purposes, you can use special modern waterproofing (expensive option) or ordinary polyethylene film (recommended option). The effect will be the same, and the savings will be significant. Spread the film with an overlap of about ten centimeters, the joints must be taped. Work carefully, do not leave gaps or loose joints.
Linoleum is a flexible coating material; it cannot be placed directly on thermal film. Manufacturers recommend protecting the heating layer with sheets of plywood approximately one centimeter thick.

Lay plywood and linoleum on top of the film
The sheets are attached to the base with small nails. They must be driven in very carefully so as not to damage the conductive elements. Check the exact location of the nail before hammering it in. Nails should be driven only along the perimeter of the sheet, this makes it possible to accurately control their position. Before fixing, it is strongly recommended to dry the plywood thoroughly in a warm, ventilated area. In this way, you can prevent the appearance of cracks during the operation of the heated floor.
Types of linoleum
Manufacturers produce several types of this material:
- On a polyvinyl chloride basis . It is considered one of the most affordable options, but it has a limitation regarding the maximum heating temperature, at which it cannot exceed plus 28°C. Warm floors under linoleum should be installed with caution, maintaining constant control over the operating mode.
- Glypthal . The surface of such linoleum is coated with heavy-duty glyphthalic varnish. The consumer characteristics of this coating meet modern requirements. It is the best choice if you are deciding how to make a warm floor under linoleum. It has a big drawback - high cost.
- Rubber . This type of linoleum is the cheapest. It is rarely installed in residential premises due to unsatisfactory quality indicators. When installing heated floors in industrial buildings, rubber linoleum can be used.
- Single layer . This flooring material is inexpensive and at the same time fragile, it needs to be changed often. This linoleum is laid in contaminated areas. Installation is carried out with an overlap, welding it using special equipment.
- Insulated linoleums . The floor covering made with their use is laid in a thick layer; it has a low degree of thermal conductivity. Experts do not recommend using insulated linoleum for heated floors, as this leads to a decrease in the efficiency of the heating system.

When purchasing this material, you need to pay attention to the presence/absence of a fabric bedding layer. If it is present, then the degree of thermal conductivity is significantly reduced and therefore laying a heated floor under linoleum is undesirable.
Temperature limits for a wooden base under heated floors
Any coating or base for electric heating has its own thermal limitations in operation. So, the optimal temperature for a wooden floor is 25–26 degrees. The maximum permissible temperature is 27 °C. This indicator is valid for the floor surface. But you should understand that the sensor is not mounted on the floor, but directly in its structure. Therefore, on the thermostat you should expect the parameters listed in the following table:
From the above data it is clear that for soft species (pine) higher temperatures are allowed, while when using hard types of wood (oak, hornbeam) one should strive for a slightly lower regime.
Important! At an average room temperature close to 20 degrees, a specific power of 80–100 W/m will be sufficient for the floor. In this case, the temperature on the surface of the coating will be approximately 26 °C.
When using infrared heating in a room with poorly organized insulation, the issue of achieving optimal temperature conditions is not extremely pressing. In this case, it is possible to operate heating devices with a specific power of at least 80 W/m2.
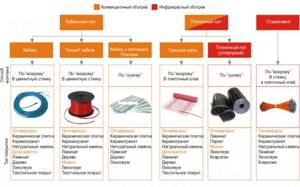
Overview of types of heated floors
When choosing a particular type of system, you must act as responsibly as possible. In general, they are all conditionally divided into three large groups:
- electrical;
- water;
- IR.
As for electrical systems, the main element in them is a heating cable laid inside a cement screed. This is a simpler option than, for example, water heated floors, and in this case the heating is more uniform over the entire area of the heated room. And this is very important when it comes to preserving a material such as linoleum laid on top. But such a warm floor heats up quite quickly, which is why the floor material can easily become deformed. For this reason, experts do not recommend using heating systems of this type under linoleum.
The next category is water systems. They are, in fact, a system of pipes in which the working fluid circulates (the latter, as a rule, is water). These systems are rarely found in city apartments where central heating is available. In addition, when installing water systems, there must be a screed between the pipes and the floor material, which is not always advisable with low ceilings.
And the third category is infrared heated floors. Essentially, it is a thin film containing graphite heating strips. When the system is connected to the electrical network, the canvas begins to heat up (and smoothly and evenly), and therefore the linoleum certainly will not deform, which is often observed during sudden temperature changes. The power of IR floors ranges from 60 to 400 watts per square meter.

Note! If we consider our case specifically, that is, the use of linoleum, then it is better to give preference to a canvas whose power is in the range of 60-150 watts per square meter. Such a system will cope with heating the floor material up to 28-30 degrees, while the original properties of the coating will be preserved.
It turns out that for linoleum it is preferable to use infrared heated floors, since heating in this case will be uniform and gentle, and the performance properties of the flooring material will not change (as well as its appearance). We invite you to watch the video guide on choosing infrared heated floors.
Video - How to choose the right IR heated floor
The easiest way

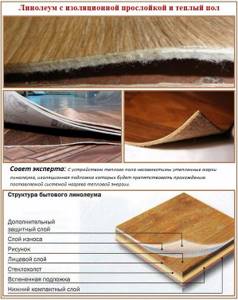
For lining a concrete base, a material with a thick lining is suitable. If you need to cover a concrete floor base, characterized by its cold surface, in the shortest possible time, the best option would be to use linoleum with glued insulation.
This coating consists of 2 layers. The top one is decorative, made of high-quality PVC coating, the bottom one is a heat-insulating lining.
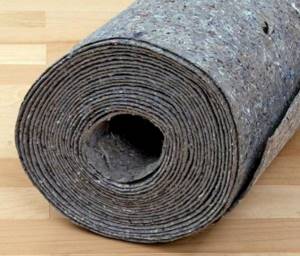
Felt also serves as a floor leveler
The first layer is usually no more than 2 mm in thickness and is very elastic. In addition, it has an increased service life and ease of maintenance.
The inner layer, made of felt or rope no more than 5 mm thick, serves not only to insulate the cold base, but also plays the role of an excellent leveler for small surface defects.
The disadvantage is the inability to glue such a coating without compromising the heat-insulating properties.
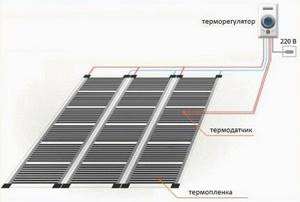
Drawing up a laying diagram
The laying plan must be drawn up when calculating the materials. It shows how much material is required, how many strips of heating film there will be. Based on this, you can calculate how many wires will be required.
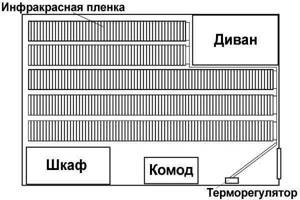
In this case, five strips of film are placed in the room. The space occupied by furniture and the location of the thermostat must be taken into account. It is better to take the quantity of wiring with a margin of 20 percent. Before laying it, it must be visually checked for damage to the insulation and ringed for the absence of internal breaks.
Step-by-step instructions for laying heated floors under linoleum
- Step 1. Install the thermostat on the wall
It's better to do this first. For installation, you will have to drill a hole in the wall with a hammer drill. It is done at a level of at least 30 cm above the floor. If you leave it for later, you will have to remove crumbs of concrete or brick. If installation has already begun, it will be extremely difficult to remove them, and you may miss something. The recess should be of such a size that the device is securely fastened in it, without the slightest wobble.
Also, immediately cut a groove in the wall down from where the regulator is installed. You will lay the wires in it.
- Step 2. Preparing the floor for installation
If the infrared film floor is planned to be laid on a concrete surface, then it should be carefully leveled. This can be done with a screed along the beacons. Composition: 3 parts sand, 1 part cement, 1 part tile adhesive. The sand must be sifted thoroughly. The screed should be as even as possible.
You can also use screed using self-leveling mixtures. When preparing them, you must carefully follow the instructions.
Waterproofing made of bitumen mastic or polyethylene film is laid on top of the screed. The joints of the film are taped with wide tape.
Now we lay sheets of OSB or plywood. They are fastened with dowels in a checkerboard pattern. If the concrete base is coated with mastic, then the sheets can be placed on it without additional fastening.

If laying a heated floor is carried out on an existing base, then step 1 can be skipped.
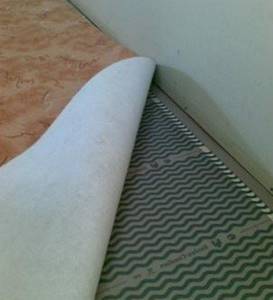
- Step 3: Laying the Underlay
To prevent the warm floor from wasting energy on heating the concrete base, you need to lay an insulating backing. A special option is suitable, in which one side has foil. This is a rolled material 5-6 mm thick. The foil should reflect heat upward.
On a film floor under linoleum, you can use two types of substrate: foamed polyethylene or extruded polystyrene. Polystyrene is considered better, but polyethylene is cheaper. Most craftsmen prefer to use polyethylene for heated floors under linoleum.
The substrate should be laid with foil on top, joint to joint without overlap. All joints are carefully taped with wide foil tape to create a single fabric and ensure tightness.
You can attach the backing to the plywood base using staples.
- Step 4. Install the film heated floor
We lay out the infrared film strips according to the diagram drawn up earlier. Look carefully at the markings - the film has them on top. The bottom side should be facing the foil. Careful installation is important; the infrared mat must be cut strictly along the lines indicated by the manufacturer. Such places go every 250 mm. Cutting in another place, especially at an angle, is unacceptable.
To ensure that the warm floor warms up evenly, it is better to lay individual infrared strips with an overlap of about 1 cm.
Step 5. Connection, wiring, insulation
The connection must be made correctly; the instructions must be followed scrupulously; deviation from them is not recommended. If you are not confident in your abilities, it is better to call a professional electrician for help.
Warm linoleum flooring is equipped with contact clamps and special bitumen-based insulation. At the cut site, the copper busbar is sealed with bitumen insulation on both sides.

The contact clamp is connected to the connection side of the infrared film tape. Two contacts are placed on each segment.
To install the clamp, you will need pliers. The clamp is installed on the end of the busbar so that the busbar fits all the way between the contact plates. After this, the contact is compressed with force using pliers.
We check the correct installation of the clamps, the position of the film, and the presence of insulation at the cut sites. If everything is correct, we move on to the next stage.
- Step 6. Connect the wires
The wires to the contacts are also clamped with pliers. For reliability, it is recommended to solder their ends with tin before installation.

It is necessary to clamp carefully, otherwise the connection points will heat up and a fire may occur. After connection, the terminals must be insulated on both sides with bitumen insulation.
The wires are laid near the walls, from where they go to the thermostat. Using a knife, cuts are made under the clamps and wires in the substrate. We recess the wires into the cuts so that they do not protrude later under the linoleum.
- Step 7. Install the heating sensor
Read the instructions. Typically, the sensor is mounted under the floor, pressed against one of the carbon heating elements, secured to it with electrical tape. But there are systems where the sensor is installed above the floor in the room itself, monitoring the air temperature. I don’t recommend this option, because... The thermostat in this case may overheat the floor covering.
You also need to cut a recess in the substrate for the sensor.
To ensure that the heating system does not move during operation, the strips of thermal film must be glued together with tape. If the strips are located far from each other, the film is glued with tape to the substrate.
- Step 8. Connecting the system
We install the thermostat in a pre-dugout hole, fix it in it, and connect the wires to it according to the connection diagram. If the system power exceeds 2 kW, then you will have to install a separate automatic fuse on it.

Testing the functionality of floor heating
To check if everything is working, turn on the heating to a temperature of 20-25°C. Wait about 5 minutes. Carefully walk around the entire room, checking each infrared element for functionality. This can be done with your hand by moving it over the element.
Now turn off the power, check the contacts. If any of them heats up noticeably higher than the film itself, then it is unreliable. Correct the problem.
Only if there are no complaints can we consider that the installation is complete and the infrared film floor is ready for use. All that remains is to lay the linoleum.
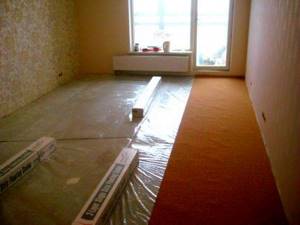
Laying linoleum
A waterproofing coating must be laid on the infrared film. Expensive waterproofing is offered in stores, but you can get by with plastic film no thicker than 2 mm. It is no worse than mastic, but much cheaper.
We spread the film with an overlap of 10 cm, and seal the joints with wide tape. Along the walls, move the edges of the film up 3-4 cm. The edges will be hidden by the baseboard and will not be visible. But if you spill water and it flows under the baseboard, the liquid will not get under the floor.
Linoleum cannot be laid directly on infrared film. After a layer of waterproofing, a flat, solid base must be installed on the heated floor.
They use plywood 1 cm thick. Too thin can warp over time, too thick will warm up worse.
Plywood must be installed with special care. You need to cut it so that the individual sheets fit each other with maximum precision. The plywood must be well dried, so before installation it is better to dry it in a well-ventilated, warm room.
The plywood sheets are fixed with nails, they go into the lower wooden base and securely fix all layers of the floor. The sheet should be nailed very carefully, so that the nails fit between the conductive elements. To do this, the sheet of plywood is shifted and marks are made on its edge with a pencil where the fasteners need to be driven in. Nails are driven only around the perimeter of the sheet.
Now you can spread the linoleum. It is cut so that the coating does not reach the walls by about 1-1.5 cm. It is advisable that the width of the coating roll be equal to the width of the room or larger than it - this will avoid joints.
It is better not to use mastics for gluing linoleum. They may swell when heated. It will be difficult to remove the bubbles later. Yes, and mastic can release harmful substances. It is better to simply spread the material without additional fixation. If you still decide to glue the coating to mastic, then choose those that are compatible with heated floors.
After spreading, the linoleum should rest for about a couple of weeks. During this time it will completely descend. Once the linoleum has settled, we install the skirting boards. The plinth will securely secure the flooring, and it will no longer move or bulge.
Conclusion
- Laying heated floors under linoleum is possible and not a difficult task.
- You can handle it yourself without outside help.
- You need to carefully select materials and only those that are suitable for installing infrared heated floors.
- There is no need to rush and simplify the technology. Only careful work will guarantee that the warm infrared floor will last a really long time.
Laying linoleum
Among other things, plywood will generate heat by absorbing the flow of infrared radiation.
We have almost installed our heated floors, all that remains is to install the linoleum. If we lay it directly on the film, it can fail even under the weight of a person. Therefore, plywood is laid between the film and linoleum. This will distribute the weight and prevent damage to the IR film.
Preparing a concrete floor for laying linoleum
Concrete flooring is considered the best option for laying linoleum on it.
This is due to the fact that it is quite easy to level and achieve almost perfect smoothness. The first thing to do is clear the surface for the upcoming actions. Furniture is removed from the premises, old baseboards are removed, and trash is swept away. The easiest way to prepare the floor for laying linoleum is to use a screed made from a solution of sand and cement. For the solution, river sand is taken, which should be sifted. The solution is mixed for 1 hour. – cement + 2.5-3 hours. sand. (Mark of solution 50-100 kg/cm².)
The easiest way to prepare the floor for laying linoleum is to use a screed made from a solution of sand and cement
Sometimes cement-casein mastic (1/4) is used, for example, when it is planned to glue linoleum to the same composition.
After removing all excess, dust and dirt, the prepared surface should be thoroughly moistened with water. To maximize the result, it is recommended to use beacons, which are slats made of wood or metal. The lighthouses are placed at a distance of one and a half meters, while maintaining their same horizontal level. All slats are supported from below in increments of 0.5 m. This is done so that the beacons do not bend. Then the space between the slats is poured and carefully leveled with a small spoon. The thickness of the screed is affected by the topography of the concrete floor.
Filling the floor using beacons
After laying the mortar, leveling is done manually with trowels. Then the surface is rubbed. It should be leveled until there are no holes and good smoothness. Experienced craftsmen do not recommend strengthening screeds by ironing with pure cement. A surface that is too smooth reduces the quality of adhesion between the floor and linoleum, which in this case will not be durable.
The finished surface is constantly kept moist for 5 days to prevent it from cracking. To do this, water it 1-3 times a day. As a result of this technique, the floor dries out gradually and evenly.
cement m300
Flooded screed
Sometimes you only need to slightly repair the base. In this case, everything unnecessary is removed from the old screed: dust, dirt, etc. Then the base is checked with a 2-meter bar. All problem areas are marked around the perimeter with chalk.
Checking the base with a 2-meter bar
The solution for cement-sand screed is the same - 1/3. For repairs you will need brushes, spatulas, trowels and trowels. After the defects have been removed, these areas are dried. All debris is swept away and polished, usually done using special bars. Finally, you can sand it with sandpaper or pumice. The quality of work will be much better if you grind using a grinding machine.
The quality of work will be much better if you grind using a grinding machine.
In order to fill small irregularities and voids, the surface is also puttied. This is most often done in non-residential premises; at home you can do without it.
Putty
Practical advice
To improve the operating conditions of film heated floors under linoleum, it is recommended to follow several rules.
Warm floor under linoleum
- Do not heat the material above +26°C. As a result of prolonged heating to high temperatures, linoleum can delaminate, change its original color in places of greatest heating, soften and significantly reduce the factory strength characteristics. Increased heating increases the amount of chemical compounds released into the air.
- When laying linoleum, do not use mastics to fix it. In addition to the fact that all mastics become additional sources of release of harmful compounds, during uneven heating they can form swelling on the surface. Removing such defects later is very difficult, and in many cases impossible. Linoleum is simply spread over the floor surface. If there are concerns about movement, then you can fix the covering in several places with a stapler; staples are driven in in inconspicuous places; the best option is under the floor skirting boards.
- Do not allow thermal film to overlap each other. If the configuration of the room is very complex, then it is better to leave a small section of the floor unheated.
- The temperature in the room when laying linoleum should be at least +18°C, otherwise difficult to remove wrinkles may form. But you cannot spread it on a hot floor; after testing, it must cool to room temperature.
- It is not recommended to use this type of floor as the main heating system. The fact is that you can heat rooms to comfortable temperatures by heating the floor to t° ≥ +28°C, but this should not be allowed when using linoleum.
Adjust the operating modes only after carefully reading the instructions. During the first few days of using a heated floor, it is advisable to check the reliability of operation more often. To be sure, it is recommended to check the floor temperature with an accurate household thermometer. If significant differences in indicators are found, then it is necessary to make adjustments during the installation of thermal control.
Video - The process of laying film flooring under linoleum
Temperature regime of a heated floor - what are its features?
To begin with, we note that in order to choose the right and suitable linoleum, you do not have to have any special knowledge. We have already dealt with the key points, and the manufacturers themselves will inform you whether their products can be used together with underfloor heating systems. For this they use special markings.
Along with the marking, the maximum permissible temperature must be indicated - try to observe this point in any case. If we talk about natural linoleum, that is, marmoleum, then it can be used at a temperature of no more than 27 degrees. In this case, a material made on the basis of PVC can warm up to about 30 degrees (if more, the material will begin to swell and lose its original color). In addition, those mentioned at the beginning of the article will most likely begin to be released, as well as various kinds of unpleasant gases. To maintain acceptable temperature conditions, you will need to purchase a high-quality thermostat that can maintain the required temperature automatically. Here, the warm linoleum floor will certainly not disappoint you.
Possible errors and their elimination
When installing a heated film floor, installation of which under linoleum can cause difficulties, errors may occur.
- Errors inevitably occur during work. This is a completely normal and natural process. In order to avoid them, you need to understand in advance what the amount of work is. The most common mistake is a simple lack of time. In order to prevent such developments, it is better to leave plenty of time for editing.
- Also, some manage to melt linoleum. This is possible when connecting the installation wires.
- Don’t forget to fix the strips of thermal film. To do this you need to use tape.
After all the work is completed, they conduct testing and see how the design as a whole works. If any problems arise with it, it is best to entrust the installation to professionals.
Carbon rods
Heating elements in the form of carbon rods emit infrared waves when the temperature rises. The systems are produced in the form of mats.
We recommend: How does the underfloor heating calculator work?
Installation is carried out on a base made of concrete or self-leveling floor mixture. The coating must be prepared. Waterproofing, insulation, and a reflective foil screen are placed on it.
- The entire floor area is covered with mats. The rods can withstand high loads of furniture and household appliances.
- If it is necessary to rotate the mats, then the wire between the elements is cut and further installation is carried out.
- Strengthen the rods to the floor surface with tape.
- All conductors are connected in parallel and lead to the thermostat. This device controls the operation of the heating system.
- A temperature sensor is placed between the rods. It is placed in a corrugated tube and connected to the regulator.
The “warm floor” made of carbon rods under the linoleum is covered with a concrete screed no more than 5 cm deep. A thin underlay is strengthened on it and the linoleum is laid.
If the floor surface undergoes a high mechanical load, then it is recommended to lay gypsum fiber board sheets on the screed. If the floor covering is tile, then tile adhesive is applied to the carbon elements with a layer of 3-4 cm.

Recommendations and possible errors
The cake made from infrared flooring and linoleum should have five layers from the rough base:
- Izolon (heat-reflecting substrate).
- Infrared thermal film.
- Polyethylene film (waterproofing).
- Flooring made of wood or gypsum fiber boards 3–5 mm thick.
- Finish linoleum covering.
Without a heat-reflecting substrate, the high energy efficiency of an infrared underfloor heating system will be seriously compromised. And without polyethylene and protective flooring, it will sooner or later fail. The plywood layer absorbs some of the thermal radiation, but it is impossible without it.

Connection diagrams
Linoleum on top of an infrared heated floor should be laid in the form of natural marmoleum or vinyl PVC. At the same time, its marking must have a special icon. And it should go without an insulating sublayer from below. Choosing an air conditioner will require a lot of thought. With the finish, everything is simpler here. The main thing is not to take the colloxylin or rubber version, which will begin to release harmful substances when heated.
Selecting a heating system
So, floor heating systems can be divided into water and electric. In the first case, heating occurs due to circulating heated water through pipes laid in the floor pie. Typically, the installation of the pipe system is carried out directly during the pouring of the screed. Water is heated by heating boilers, and underfloor heating pipes can be connected to the central heating system, but only in certain situations - if the house has a communications system designed to connect underfloor heating.
Warm floor from central heating
Unfortunately, an apartment is not a place for water floors for several reasons:
- risk of flooding of rooms located below;
- in most cases, there is no possibility of connecting to a central heating system;
- the need to fill the screed, which increases the weight of the floors;
- inability to control the temperature if the pipes are connected to a central heating system, and in this case the linoleum may overheat;
- complexity of installation.
Water heated floor
It is best to install a water system In this case, it is possible to connect it to your own heating boiler, and there is no risk of flooding your neighbors. And it is prohibited to install such floors in an ordinary apartment without the permission of utility services.
Electric systems heat floors, as you might guess, using electricity. To install them, you do not need to purchase generators - you can connect to the general power grid. Such systems can be made either in the form of a cable laid inside the screed, or in the form of mats and films that are mounted directly under the floor covering.
Types of electric heated floors
On a note! Infrared film floors are classified as electric heating systems. They are the best option that is suitable for installing heating in the presence of materials such as wood and linoleum.
Film infrared floor
The ideal option for installing a floor heating system in conditions of a wooden floor and linoleum as a finishing coating is just an infrared film floor. It has many advantages:
- possibility of installation without installing a new screed;
- absence of EMR (electromagnetic radiation);
- uniform heating of the surface;
- ease of installation;
- possibility of laying under some types of linoleum;
- no additional load on the floor;
- no need to dismantle the wooden floor;
- ease of temperature control.
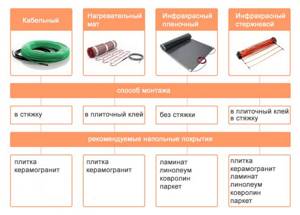
Installation and recommended floor coverings for different types of heated floors
On a note! Infrared heated floors are perfect for heating a room of less than 30 m2. And they can also maintain the temperature optimal for linoleum - less than +27-30 degrees.
How to install infrared heated floors under linoleum
- Content:
- Is it possible to lay a film floor under linoleum?
- Which infrared heated floor is better for linoleum
- Installation principle and installation procedure
- What kind of linoleum is needed for infrared heated floors?
- Recommendations for proper use
IR heated floors are designed for installation under any type of floor covering. The only limitation is the use of materials that, when heated, emit harmful substances formaldehyde. Laying infrared heated floors under linoleum requires compliance with certain installation conditions.
Do you need thermal insulation?
In the case of a concrete floor, everything is clear: you can’t do without thermal insulation. What about wood flooring? If you approach the solution of the issue thoroughly, then it is better to lay insulation. Wood conducts heat well, which means it will “take away” the useful temperature from the IR heated floor. Which material to choose?
The thickness of the insulation should not be less than 3 mm. It is desirable that the surface has reflective properties, but the presence of foil, which conducts electricity and can cause a short circuit, is not allowed. Energoflex or any other products will do.
Thermal insulation must be laid end-to-end, without creating an overlap or gap. The edges of the sheets must be secured using ordinary mounting tape.
Safety precautions
When installing heated floors under linoleum on a wooden floor, you must follow the safety rules:
- The thermostat can only be connected after a power outage.
- You should check the presence of insulation on all contacts and only then test the system.
- If there is no thermostat, it is prohibited to connect the heating.
- The heating temperature should not exceed 30°C. Otherwise, harmful substances will begin to be released, and the coating may completely deteriorate.
- Damage to the heating film must not be allowed, so if linoleum is used, then hard material (plywood) should be laid under it as a protective layer.
Based on the above material, we can conclude that it is not difficult to install and connect a heated floor under linoleum to a concrete floor. If you have experience in electrical work, you can make the connection yourself, but you should remember the safety rules.
Water floor covering
The water heating system goes well with the concrete base. But the final covering made of linoleum is not the best choice in this case. Still, a certain type of linoleum can be laid. The main thing is that it is not thick and of low quality.
The scheme should be thought out in advance. A waterproofing layer is laid on a pre-prepared base. Strips of tape are glued along the joints between the strips. Slab thermal insulation is placed on top, which is secured with special fasteners - “fungi”, for which holes are pre-drilled.
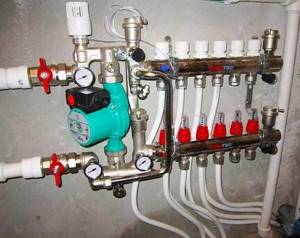
In the collector, the temperature of the water entering the system decreases, because Here the heated coolant is mixed with the cold one. In addition, this device is responsible for adjusting the volume of coolant supplied separately to each circuit
Using the same “fungi”, a reinforcing mesh is attached to the insulation, making an overlap, the size of one cell, and using plastic clamps to connect the individual strips. A manifold is installed on the wall, and pipes are subsequently connected to it. Thermal expansion of the floor is compensated by gluing a special tape to the walls surrounding it.
After this, you can attach the pipes that form the heating circuit to the reinforcing mesh, and then connect them to the collector. A more advanced way of fixing underfloor heating pipes is to use a specially designed mounting system with click clamps or guide clips. It is fixed to the concrete base before the pipes are laid.
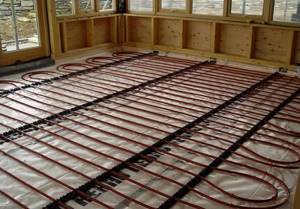
This system of fastening the tubes guarantees precise pitch adjustment and reliable fastening that prevents them from moving during pouring of the screed and its hardening.
To start pouring screed on a water floor, the pipes need to be filled with water, and beacons must be installed on the floor and leveled with a laser level. A screed with a minimum thickness of 40 mm is poured according to the same rules as for installing other types of heated floors.
It will be possible to decorate the floor with linoleum no earlier than in a month. During this time, the cement screed will gain the necessary strength. Until this moment, the water heated floor cannot be put into operation.
The technology for constructing a heating system for linoleum on a wooden base will be introduced in the following article, which thoroughly examines the rules and features of such a system.