Boilers ensure independence from public utilities, supplying people with water around the clock and at any time of the year. If the safety valve is dripping in the water heater, this circumstance should be considered objectively, without nerves or showing emotions. First of all, you need to understand that the faucet is designed for water to drip from it. The only question is how often this happens and what volumes of liquid leave the tank per unit of time. A calm analysis of this phenomenon will allow you to understand the nature of its origin and take effective measures to eliminate the malfunction.
Main functions of a safety valve
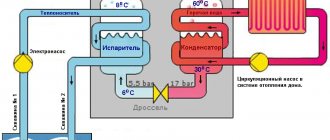
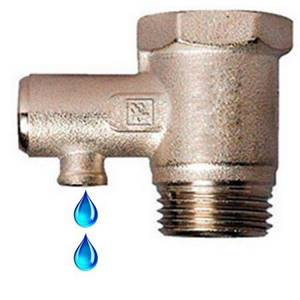
The safety valve protects the device from excess pressure and water hammer.
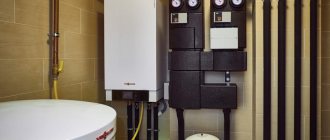
The first water heaters went on sale without components; the packaging of modern products always contains a safety valve. The instructions for installing and operating the tank state that operating the boiler without this part is strictly prohibited. The manufacturer indicates the location and method of attaching the valve. This recommendation is justified by the fact that tanks have a limited safety margin, and excessive internal pressure can simply rupture them. This situation is extremely dangerous for the life and health of people and can cause large-scale flooding of several apartments in a multi-story building.
Main functions of a check valve:
- Discharge of water from the tank when, when heated, it expands and begins to press on its walls with a force greater than that provided by the calculated data. Depending on the pressure level, water may run or drip at different rates.
- Compensation for water hammer. During such phenomena, the water pressure increases to values that are critical for domestic boilers. Thanks to a well-designed emergency mechanism, the faucet reduces the pressure by releasing liquid through a special pipe.
Most often, water drips from the boiler through the valve at night, when the volume of its consumption decreases significantly, but the pressure remains the same. The sound of falling drops may annoy household members, but this is not the worst thing. The main thing is that the emergency valves are working properly and people are not in danger. You can easily get rid of the noise - just tie a bandage, rope or long piece of fabric to the pipe and take it out into the bathtub, sink or toilet. Subsequently, the material should be replaced with an elastic drainage tube.
Principle of operation
If there is excess pressure, water is discharged into the sewer through the supplied pipe.
The check valve is a direct-acting safety pipeline fitting designed to protect water heating equipment from mechanical destruction under the influence of critical pressure. The principle of operation is to automatically adjust the water pressure inside the boiler. When it reaches the limit values, water is discharged. Release is carried out until the pressure reaches operating values.
The accuracy and functionality of the safety valve is determined by the parameters and settings of the internal parts.
How much water should the valve drain?
A small amount of water should be dripped from the valve device. The total volume of liquid removed directly depends on the pressure level in the water supply system, as well as the temperature regime used for heating and the volume of the water heating equipment tank. On average, the amount of water released can be about 1.5-3.0% per day.
There are several ways to drain water from a water heater. For detailed instructions, see our website.
Read all about the pros and cons of hygienic showers for toilets here.
You will find options for finishing a bathroom with plastic panels in this topic.
Types and design of valves
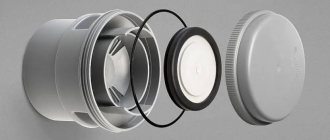
According to their design, products are divided into monolithic and collapsible. The first are a monoblock, inside of which parts are pressed. The second option is equipped with a hole through which, after unscrewing the lid, access to the inside of the product is possible. The valves also differ in the way they drain drainage. Some have drops falling from a protruding pipe, others are equipped with a closed piping system with outlet to the sewer.
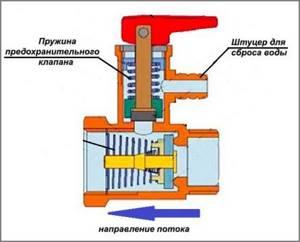
Structure of safety valves
General arrangement of safety valves:
- Frame. It has internal and external fastening threads and a side pipe. Made from steel or brass. Can be plated with nickel, chromium or zinc.
- Big cylinder. Located at the bottom of the body. Opens when opening the mixer and to fill the tank. It closes after the pressure inside the container and in the water supply system is equalized. Prevents water from flowing back into the supply pipe.
- Small cylinder. Located in the middle of the product, it is equipped with a more powerful spring. It contracts when the water pressure in the boiler or water supply exceeds the established norm. The drainage hole is released, through which the liquid flows out.
High-quality products from leading manufacturers have clear markings made using the molding method during the casting process. There are no visible seams or other defects. Branded parts are accompanied by a certificate of conformity. The price of such a product can reach up to 1000 rubles, but the safety is worth it.
Water dripping at night
It is very important to distinguish between natural water discharge and failure of components. When the water heating equipment is connected to the electrical network, and in the absence of its operation, a small amount of it should flow through the fitting part of the valve device, including at night.
When the appliance operates in an average load mode, including regular washing of dishes and cooking, water flows out of the valve device periodically, in a volume slightly higher than the usual amount. Constant leakage, including at night, may indicate device failure.
Water is leaking from the boiler
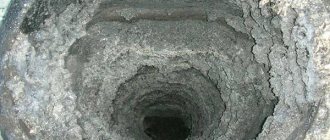
The main reason for dripping water at night is that the fitting or the inside of the fitting is clogged with scale or debris. The spring mechanism that opens the valve is not able to close it at the right time, so water flows out even when the water heating equipment is turned off. An equally common cause of water leakage at night is too high pressure in the water supply system. In order to check the working water pressure, it is measured in the main water supply.
The simplest valve devices belonging to the first “protective group” are easier not to clean, but to be completely replaced with a similar device, which is due to the lack of maintainability and a very affordable price.
Valve installation and adjustment
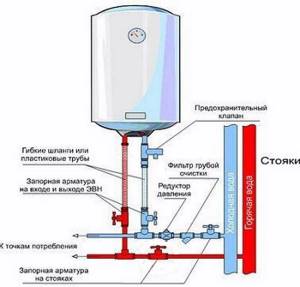
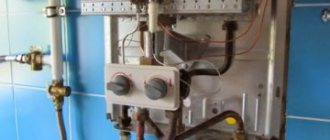
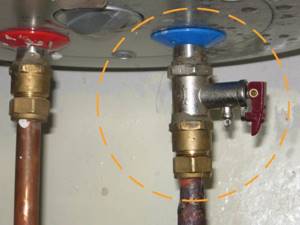
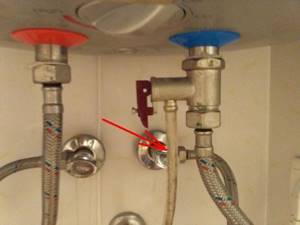
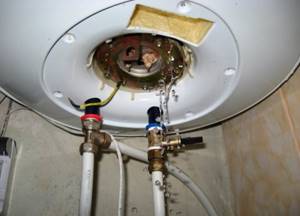
The safety valve is mounted on the cold water pipe.
The check valve is attached to the cold water pipe. For ease of work, manufacturers mark it in blue. You can screw the tap on at any stage of installation, but it is more advisable to do this before hanging the tank on the hooks. When the heater is on the floor, working with it is much easier, more convenient and safer.
Installation should be done in the following sequence:
- Unscrew the mounting bolts and remove the plastic cover. To prevent it from interfering with your work, you do not need to remove the light bulb from it and then put it in a safe place.
- Inspect the threads on the inlet pipe of the tank, visually check its integrity. Clean the coils with a brush and remove transport grease with a dry cloth.
- Carry out a similar procedure with the upper union nut of the valve. If there are burrs, they must be carefully removed with a knife or file.
- Wrap tape around the FUM pipe. This should be done clockwise, moving the thickening towards the side. The layer thickness should be 1 mm at the cut and 3 mm at the beginning of the thread.
- Take the valve, catch the edge of the thread and start screwing it on. The product should go tightly and with effort. It is important that at the end of the rotation the nut does not rest against the side. This will mean that not enough FUM tape has been wound. The procedure will have to be repeated.
After fixing the safety valve, you can immediately attach the ball valve to it. The procedure is similar.
How to make your own check valve
This possibility exists, since the device of an elementary valve is simple to implement, and everything necessary for this is commercially available. A standard male threaded coupling will serve as a seat. The body is made of a tee with internal thread. It is difficult to determine the spring stiffness, but it can be selected experimentally.
The diameter of the metal ball should be slightly smaller than the internal diameter of the tee. This will provide him with free movement. The lid will be a plug made from a plumbing threaded plug. You should immediately make sure that you have FUM tape available for sealing threaded connections.
The manufacturing procedure is complicated only by the fact that a special tool is required. You need to screw the elements together with keys, including gas keys. In addition to a set of keys, you will need a hacksaw, a vice, a tape measure and a tool for cutting threads, both internal and external. If all this is available, anyone can make a check valve.
The step-by-step instructions are as follows:
- The coupling serving as a seat is screwed into the side branch of the tee. In this case, it is important to recess it so that the coupling overlaps the main channel by 2-3 mm. This will prevent the ball from moving randomly.
- A metal ball is placed into the working chamber. It can be taken from an old bearing. Then the spring is installed.
- The second side pipe is screwed on and the connection is sealed. A plug is installed that serves as a stop for the spring.
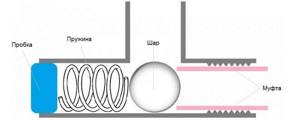
The main thing is to choose the right spring. It should have a smaller diameter than the hole in the tee and smaller than the ball. But at the same time, when compressed, it should not bend or fold relative to the longitudinal axis. The required rigidity is determined experimentally after appropriate measurements of pressure and throughput.
Causes of safety valve failure
With constant high pressure, the spring inside weakens, the part needs to be replaced.
If the valve on the boiler drips constantly, regardless of the time of day and the intensity of water use in the house, there is a high probability that the product is faulty. There can be many reasons for this.
- Manufacturing defects. As a rule, these are weak springs and leaky cylinders. Such products will operate even under operating pressure. Those who are trying to save money and buy cheap Chinese counterfeits have to deal with such a nuisance.
- Blockage. Occurs when the tank is not cleaned properly or due to poor water quality. The essence of the breakdown is that after compression, the spring cannot expand, since solid particles form an obstacle in its path. With such a malfunction, the product will leak even when the device is turned off and the tap is closed.
- High system pressure. This is not uncommon on the top floors of high-rise buildings with overhead water supply. Since the pressure is maintained at a constantly high level, the valve will leak continuously, regardless of the time of day.
- Mechanical damage. Occurs during transportation or during installation. Internal parts can also be damaged during cleaning - deformation of the spring, rupture of gaskets. When dropped, a gap appears at the point where the pipe enters the boiler body.
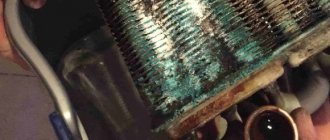
- Storage tank leaking. In such cases, there is water on the outside of the product, but it may appear that the valve on the water heater is leaking. The cause of leakage is corrosion or a broken seam.
- The top part is leaking. There is a weak connection. This is one of the most common causes of dripping on the valve. In most cases, this occurs due to a hardened gasket under the nut or insufficient amount of FUM tape.
- Wear of springs. Over time, they lose their elasticity and begin to shrink even with slight pressure. Nothing will help here. All that remains is to install a temporary drain and go to the store for a new valve.
Once a leak has formed, it will not go away on its own. The situation will only get worse until it reaches a critical state. Therefore, if the safety valve on the boiler is leaking, it is necessary to take urgent measures to determine the causes of this phenomenon and restore the functionality of the water heater.
Expert advice
If the purpose of check valves is to protect water supply elements, it is necessary to install mechanisms made of brass and other alloys that are resistant to corrosion. When it comes to heating that runs on a special coolant that prevents rust, you can use iron models.
Experts recommend embedding the shutter elements at a distance of 350 mm from the floor or more. This rule applies to any type of valve. When the system does not require a drain, the installation point should be the highest in relation to the drainage level. And when it is planned to modernize the heating system, the valve fits into the return circuit in front of the boiler with heat exchangers.
Before installing equipment in an apartment building, you need to take into account the location of the water meter. The valve is installed after it. This is the case when separate water supply to apartments is provided. In any case, all connected appliances, including the washing machine and dishwasher, will be safe. And it makes sense to even equip the sewer with a return shut-off mechanism to avoid flooding with sewage.
Repair work
To diagnose and fix the breakdown, you will need to stock up on a set of tools and some consumables.
To work you will need:
- adjustable wrench, plumbing pliers, screwdriver;
- scissors;
- awl;
- indicator;
- FUM tape or tow;
- flexible hoses for easy draining of water from the tank;
- lemon acid;
- box for collecting small parts;
- rags.
Measures should be taken to protect limbs and vision. It is better to carry out repairs wearing protective glasses and gloves.
Valve repair is usually combined with scheduled boiler cleaning, so as not to waste time disassembling the device
First you need to make sure that the cause of the leak is the check valve. It is enough to check whether its body is dry or not. If there is no moisture on it, then you need to start disassembling. This event can be timed to coincide with cleaning the heater and the tank from scale. In any case, the effort will not be wasted.
Dismantling should be carried out in the following sequence:
- Turn off the water. If a walk-through tap is installed in front of the mixer, it is better to turn it so as not to turn off the entire apartment.
- Disconnect the device from electricity. Remove the cover and disconnect the wires from the terminals.
- Unscrew the underwater pipes from the boiler. Remove the ball valve and safety valve.
- Screw flexible hoses to the nozzles, the water will flow in the desired direction.
- If there is a pressure gauge, check the operating water pressure. Ideally, it should be 1.5-2 atm.
- While the liquid is draining, remove any remaining FUM tape and inspect the parts for cracks and dents.
- Clean the tank and heating element from limescale and scale. Rinse the inside of the container using a shower head.
The removed check valve must first be washed under running water to remove scaly fragments. After this, the product should be immersed in a container with a solution prepared from water and citric acid in a ratio of 10:1. You can speed up the cleaning process by boiling. 10-15 minutes are enough for the valve to become like new. All that remains is to treat it with silicone grease and you can put it back.
Extending the service life of the boiler
The main enemies of the boiler and check valve are impurities in the water and increased pressure in the pipeline. These problems are solved by installing an input main magnesium filter and a special gearbox. If this cannot be done, depending on the degree of water hardness, you need to carry out preventive cleaning of the boiler and its servicing fittings every 3-9 months.
In order to prevent strong expansion of the water in the tank, it is recommended to heat it to a temperature no higher than + 55ºС.
Fixing leaks in the water heater
- Replacement of the safety valve.
!Attention: It is strictly prohibited to operate the water heater without this component.
- If the reason is high pressure in the main line, then a pressure reducer must be installed at the water inlet to the apartment. With its help, you can regulate the pressure of the liquid coming out of it.
- If the leak is associated with the discharge of excess volume, then a flexible and, preferably, transparent hose can be attached to the drainage hole, the end of which should be led into the sewer or any suitable container.