When it comes to an autonomous water supply system, many owners of country houses immediately associate with two important units - a pump and a water supply accumulator.
This is due, first of all, to the fact that these structural elements play a very important role in the water supply in a private house.
It is also worth noting that a lot of information has been written about water supply pumps, but the opposite is true about hydraulic tanks. To correct this state of affairs, in this article we will describe the design of the hydraulic accumulator in as much detail as possible, talk about its functional purpose in an autonomous water supply, and also tell you what the importance of the membrane is in the design of the hydraulic tank.
- 2 Unit design
- 3 Types
3.1 Flat
- 3.2 Balloon
Advantages of using a hydraulic tank
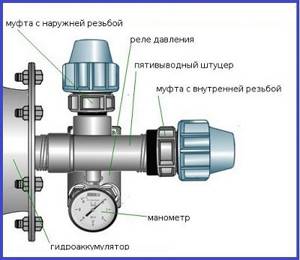
The hydraulic tank, logically built into an autonomous water supply system, performs a number of the following important functions:
- maintains stable pressure in the water supply;
- compensates for water leaks from the water supply main;
- protects the pipeline from water hammer when turning on the pumping equipment;
- extends the life of the pump, as it limits the switching on and off of this unit.
As you can see, the hydraulic accumulator is a very important structural element of any autonomous water supply system, therefore, it is worth understanding that the functioning of the entire water supply primarily depends on its stable operation.
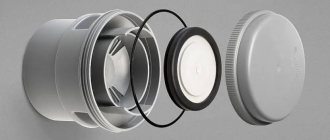
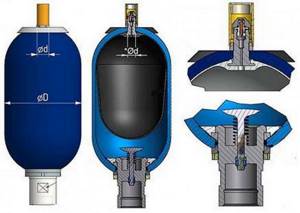
What is a hydraulic accumulator
The design consists of a steel tank located on a pedestal. Inside the tank there is a pear-shaped rubber membrane. Water pumped into it gets into it. The space between the membrane and the walls of the tank is filled with air under a pressure of 1.5 atm.
A rubber bulb filled with water expands, squeezing the air, which increases pressure. It turns out that the water is always under pressure from the pumped air and due to this enters the water supply network. As soon as the air parameters are equal to the water parameters, the pump will immediately turn on and begin to fill the bulb.
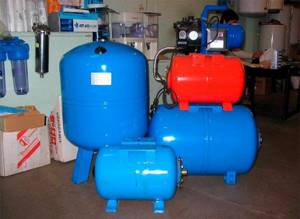
All hydraulic accumulators on the market differ in size. When choosing a tank, it is necessary to take into account the requirements for water volume. The larger it is, the better: the pump will turn on less often.
Kinds
In the modern pumping equipment market, as a rule, two types of membranes for hydraulic tanks are offered:
- diaphragm flat;
- balloon type.
Let us dwell in more detail on the description of each type of membrane.
Flat
The diaphragm flat membrane is fixed hermetically inside the hydraulic tank housing, while dividing it into two parts:
- air;
- "wet".
The operating principle in this case is as follows:
- when the pump is turned on, water is pumped inside the unit, and the membrane begins to compress and create excess pressure in the air compartment;
- at a certain level of pressure in the accumulator, the relay turns off the pump, and the membrane directly pushes the accumulated liquid into the pipeline;
- when the minimum level is reached, the water pressure switch turns on the pump again, and the whole process is repeated cyclically.
Thus, as we see, there is a saving of both electricity and the energy resource of the pump itself.
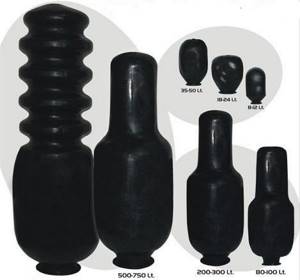
Balloon
The balloon type of membrane is a rubber container, which in small tanks with a volume of 5 liters or more resembles a regular jar or a medical heating pad in shape, but in models with a volume of 24 liters or more it has a more pear-shaped shape.
The principle of operation of the balloon membrane consists of the following important points:
- using a pump, water is pumped inside the rubber cylinder;
- excess pressure appears between the walls of the rubber container and the body of the hydraulic tank, which, when the pump is turned off, pushes water into the main pipeline.
Thus, the balloon membrane significantly reduces the effect of water hammer on the water supply system.
You may be interested in an article on how to make a hydraulic accumulator with your own hands. Read an informative article about Gilex hydraulic accumulators here.
Main varieties
Today on sale you can find various options for hydraulic tanks, which differ in the principle of their operation, design, installation methods, as well as a number of other operational characteristics.
Depending on the installation option, it is customary to distinguish two main types of hydraulic accumulators:
- horizontal;
- vertical.
The principle of their operation is the same. You just need to take into account the fact that vertical hydraulic accumulators, the volume of which exceeds 50 liters, have an additional special valve on top designed to bleed air. During the operation of such containers, air inevitably accumulates in them, collecting in the upper part of the tank. Without the presence of special valves, complete airing of the entire system and rupture of pipes at the connections may occur. Accordingly, the installation of such a hydraulic accumulator is carried out taking into account the location of the mandatory protective mechanism.
In horizontal devices, a special drain or a small tap is installed specifically for bleeding air, located behind the hydraulic accumulator. The need to install them slightly increases the cost of the equipment used. At the same time, homeowners who do this work on their own often forget about the mandatory use of additional safety taps. This subsequently leads to problems with the operation of the autonomous water supply system.
Depending on the purpose, it is customary to divide three types of hydraulic tanks:
- painted blue - for cold water supply;
- painted red - for hot water supply;
- painted scarlet - tanks for closed autonomous heating systems.
It is customary to distinguish hydraulic tanks by their volume. Such installations can be intended for both a small country house and a full-fledged cottage where several families live simultaneously. The most popular today are hydraulic accumulators for water supply systems, the size and volume of which are 100-200 liters. They are affordable and compact in size. Such installations make it possible to provide high-quality, proper water supply to a private home inhabited by 3-5 people.
Causes of wear
Among the factors influencing membrane wear are the following:
- temperature changes in the accumulator;
- a constant process of compression and stretching;
- friction of the membrane against the walls of the unit housing.
The membrane naturally wears out from the above factors. As a rule, the following important points indicate signs of membrane failure:
- the hydraulic accumulator began to operate jerkily;
- the pump turns on too often at short intervals;
- the pressure gauge readings suddenly reach a high level and then rapidly fall;
- the faucet seems to “spit” water.
In situations of this kind, the obvious fact is that it is necessary to replace the hydraulic tank membrane.
How to determine that the membrane has become unusable
In general, manufacturers claim a service life of 5 years for these products. However, in practice, this rarely happens. After all, they really don’t like membranes:
- temperature rise above the set value;
- frequent pressure changes;
- intense compression.
In practice, it is rarely possible to avoid operating the hydraulic tank in hard mode, so the service life of the bulb is reduced to 3 years.
How to determine when it’s time to change the membrane in a hydraulic accumulator:
- the pump started to turn on too often;
- The water pressure does not maintain constant pressure.
These are clear signs of damage to the membrane, however, it may also indicate damage to the accumulator housing. Therefore, before disassembling the container, it is advisable to check the condition of the tank itself.
Preparation
When a new membrane has been purchased, you need to prepare a set of keys and proceed to the repair. First, you need to drain the water from the container itself. For this:
- the water supply to the hydraulic accumulator is cut off;
- the air is vented from it;
- water is drained.
An important point is that if air comes out of the battery when water is drained, it means that the rubber bulb is damaged. The nipple also swings in the same way - if water comes out when bleeding air, this indicates a breakdown.
The fact is that the bulb divides the inside of the tank into two independent chambers. Therefore, mixing of water and air is excluded. If this happens, then the internal integrity is broken.
Repair stages
When the water from the tank is drained, you can proceed directly to the repair. Replacing the membrane in a hydraulic accumulator is done as follows:
- first, you need to remove the flange; to do this, unscrew the nuts holding it with a wrench;
- after this, the old membrane is taken out;
- it must be carefully examined and the place of damage must be found. Firstly, this will make sure that it is torn, and secondly, you need to assess the extent of the damage. After all, if they are small, you can try to vulcanize it;
- Now it is advisable to inspect the inside of the tank - most likely there will be dirt and rust in it. Therefore, it needs to be cleaned well;
- after this, you need to carefully inspect the flange - there should be no damage or burrs on it. If there are any peelings, they are smoothed out with sandpaper. The same applies to the seat - it needs to be thoroughly cleaned;
- now you need to take a new membrane, straighten it and insert it in place of the old one;
- after that, it is covered with a flange and it is tightened with nuts.
This completes the replacement process. Now, you need to do a test run of the hydraulic accumulator. To do this, it is connected back to the water supply. But at the beginning, you need to pump air into it to operating pressure, which is 1.5-2 atmospheres.
And then the water supply is turned on. At the same time, you should not open the supply valve to full capacity. This can lead to rupture of the membrane, therefore, water is added gradually.
Thus, changing the membrane with your own hands is quite simple. And this can be dealt with without any problems without involving specialists. Moreover, the cost of replacement in a specialized center can be quite high.
How to change
To replace a worn membrane with your own hands, you must perform the following sequential steps:
- disconnect the hydraulic tank from the water supply system;
- remove air pressure in the unit through the nipple;
- drain the remaining water from the hydraulic accumulator;
- the lid with the pressure gauge is unscrewed;
- the worn membrane is pulled out through a special hole at the bottom of the body;
- the new membrane is installed in the reverse order;
- the flange with the valve is installed in place.
By following these simple steps, you will restore the hydraulic tank’s functionality with your own hands.
Thus, in this article we talked in detail about accumulator membranes, as well as the reasons for their breakdowns. We hope that by using the tips and recommendations outlined in the article, you will easily replace the hydraulic tank membrane.
Watch the video in which the user demonstrates in detail how to replace the accumulator membrane with your own hands:
Replacing the membrane
If the cause has already been determined, then repairs need to begin. And the first thing you need to do is purchase a new product
Here it is important not to save money and buy original spare parts, because... cheap fakes can quickly fail
And the situation will turn out to be that in six months you will have to do everything again.
Preparation
When a new membrane has been purchased, you need to prepare a set of keys and proceed to the repair. First, you need to drain the water from the container itself. For this:
- the water supply to the hydraulic accumulator is cut off;
- the air is vented from it;
- water is drained.
An important point is that if air comes out of the battery when water is drained, it means that the rubber bulb is damaged. The nipple also swings in the same way - if water comes out when bleeding air, this indicates a breakdown.
The fact is that the bulb divides the inside of the tank into two independent chambers. Therefore, mixing of water and air is excluded. If this happens, then the internal integrity is broken.
Repair stages
When the water from the tank is drained, you can proceed directly to the repair. Replacing the membrane in a hydraulic accumulator is done as follows:
- first, you need to remove the flange; to do this, unscrew the nuts holding it with a wrench;
- after this, the old membrane is taken out;
We take out the old membrane - it must be carefully examined and the place of damage must be found.
Firstly, this will make sure that it is torn, and secondly, you need to assess the extent of the damage. After all, if they are small, you can try to vulcanize it; Checking where the membrane has broken - Now it is advisable to inspect the inside of the tank - most likely there will be dirt and rust in it. Therefore, it needs to be cleaned well;
- after this, you need to carefully inspect the flange - there should be no damage or burrs on it. If there are any peelings, they are smoothed out with sandpaper. The same applies to the seat - it needs to be thoroughly cleaned;
- now you need to take a new membrane, straighten it and insert it in place of the old one;
- after that, it is covered with a flange and it is tightened with nuts.
This completes the replacement process. Now, you need to do a test run of the hydraulic accumulator. To do this, it is connected back to the water supply. But at the beginning, you need to pump air into it to operating pressure, which is 1.5-2 atmospheres.
And then the water supply is turned on. At the same time, you should not open the supply valve to full capacity. This can lead to rupture of the membrane, therefore, water is added gradually.
Thus, changing the membrane with your own hands is quite simple. And this can be dealt with without any problems without involving specialists. Moreover, the cost of replacement in a specialized center can be quite high.
Features of sealing a damaged membrane
To repair the described product, the vulcanization method can be used. Thanks to the latter, the operational life of the membrane can be extended by another couple of weeks - this should be enough to search for, purchase and install a new model. However, any repair work in this case is only a temporary measure, so a new membrane will still have to be purchased.
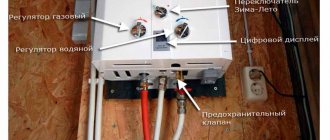
Checking and diagnosing hydraulic tank problems
Let's start with the fact that the normal functionality of the entire plumbing system largely depends on the operation of the hydraulic accumulator. And if the water supply fails, then you are obliged to find the cause as soon as possible and make quality repairs. Otherwise, this can lead to more serious breakdowns, which, in turn, will inevitably lead to the failure of all equipment. And the most common reason is the membrane for the accumulator.
Let's look at how to find out, how to diagnose and replace this element.
As a rule, all problems can be easily fixed with your own hands. Let's get acquainted with the main “symptoms” and what needs to be done in a particular situation.
The pump malfunctions and turns on/off frequently
Most likely the membrane has failed. To diagnose this malfunction, disconnect the hydraulic tank from the water supply system, and then start draining the liquid. If air escapes during this, it means that there is mechanical damage to the membrane. The problem can be solved by replacing the failed membrane with a new one.
Water leaks from nipple
This is also evidence of membrane failure. The diagnostics in this case are the same, but replacing the damaged element can solve the problem.
The faucet is leaking intermittently or there is a leak behind the air valve.
Everything here is the same as in the previous two cases.
Water pressure is weak
In this case, there are two possible reasons: failure of the pump or incorrectly selected volume of the accumulator. In the first case, the problem is solved by installing a new pump, and in the second, by carrying out calculations and replacing the product with a more suitable one.
The system pressure is too low
Everything is simple here: either the nipple is broken, or there is simply no compressed air in the container. Therefore, to solve the problem it is necessary to replace the nipple or pump up the pressure to the required level.
Water is leaking from under the flange
The reason, apparently, is a violation of the tightness of the connections. You just need to tighten the fastenings or replace the worn element.
Note! To extend the service life of the hydraulic accumulator, be sure to periodically inspect and diagnose the main components, as well as monitor the pressure in the water supply system.

We also recommend that you familiarize yourself with some useful tips regarding hydraulic tank maintenance. They are listed below.
- Every month, inspect the device, check whether its operating parameters correspond to the standard (the latter is individual for each specific tank model).
- If the accumulator will not be used for some time, it must be kept in a dry place, taking care that it does not come into contact with any heating devices (otherwise the membrane material may dry out and collapse).
- Check to see if there are any rusty spots at the connections or on the body.
- Check the membrane to ensure its integrity approximately every six months.
- In addition, regularly check whether there are any wet surfaces or smudges on the connections.
- Finally, if you experience any device malfunctions or malfunctions, fix them immediately!
You are also probably wondering how to check the initial pressure inside the hydraulic tank? There is nothing complicated here - just follow the instructions.
Step one . First, disconnect the accumulator from the main line.
Step two . Drain all the water from it.
Step three. Next, connect a special device to the nipple - a pressure gauge.
Step four . If the pressure gauge readings are lower than those set by default, then, using, for example, a compressor for a car, pump up the pressure to the required value.
Note! If your accumulator membrane needs to be replaced, then be sure to purchase a new product with the same characteristics! We are talking about volume, dimensions, maximum temperature of the liquid, neck diameter, material used in manufacturing, and so on.
What about a hydraulic tank without a membrane?
In addition to standard industrially produced hydraulic accumulators, there is another alternative option - to make such a device yourself. In fact, a hydraulic tank without a membrane will be a simple reservoir for water, since it was it (the membrane) that was “engaged” in maintaining pressure in the plumbing system. However, it is much easier to purchase a ready-made hydraulic tank - even the most inexpensive one.
To make such a hydraulic tank yourself, you will need the following equipment and materials:
- fitting;
- container with a volume of at least 30 liters;
- nipple;
- ball valve;
- gaskets made of rubber;
- 1/2 inch tap;
- sealant for sealing;
- nuts and washers for fasteners.
After preparing everything you need, you can proceed directly to the work process. The latter is not complicated, and the algorithm for the necessary actions is presented below.
Step one. First, make holes in the tank - in several places (on the side, on the bottom or lid).
Step two. In the hole located on the lid, install a 1/2-inch tap, be sure to use sealant and rubber gaskets to seal the connection, and at the end securely secure it with washers.
Step three. Place a tee on this faucet.
Step four. Take a 3/4 stopcock with a tee fitted and install it in the bottom hole.
Step five. There is only a hole left on the side - install the ball valve here.
Note! Once again, we note that all connections should be treated with sealant for more reliable fixation.
As a result, we emphasize once again that if the hydraulic tank is faulty, the plumbing system will not be able to function normally. And the cause of the malfunction is, as a rule, the membrane for the accumulator. But if you follow our tips and instructions, you can easily fix any problem that arises!
Do not forget about timely prevention - it will help extend the service life of the hydraulic tank and the pipeline itself!