Features and types of homemade stoves from a gas cylinder
All solid fuel stoves made from a gas cylinder have common design elements:
- A housing in which holes are cut for the door, vent and exhaust pipe.
- Blower.
- Exhaust pipe equipped with a throttle valve.
- A grate located low above the bottom of the stove. Fuel is placed on it and its combustion occurs.
- Internal walls that form the flow of combustion products.
- Legs.
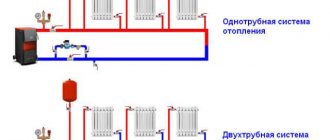
Through the door, fuel is loaded and ash and slag are removed from the grate space. An air flow enters the combustion chamber through the blower and the combustion mode is adjusted. The blower is made as a structural part of the door or is made in the form of a separate hole with a damper. A throttle-type damper is installed into the exhaust pipe, which also regulates the combustion mode. Gas cylinder stoves are available in vertical and horizontal versions. A horizontal oven is easier to implement, but takes up a lot of space. The vertical one can be placed in any corner of the room; it has significantly better draft and fuel combustion efficiency.
In liquid fuel furnaces (they are also called oil or drip furnaces), instead of a grate, a burner of one design or another is fixed and a fuel supply pipeline is installed. The door is much smaller - it is not needed for loading fuel and removing ash and slag, but only for adjusting the air flow, as well as for installing and servicing the burner.
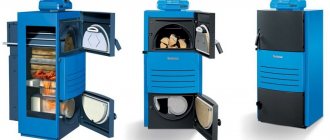
To the basic configuration of a gas cylinder stove, a home craftsman can add various improvements: a burn-protection guard, burners for heating and preparing food and drinks, hangers for drying clothes and shoes, etc.
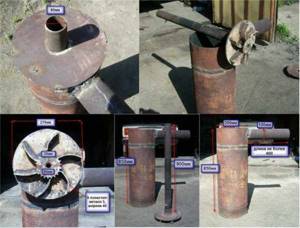
Assembling a horizontal stove-stove
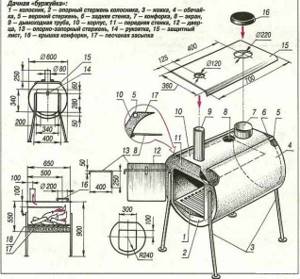
Stages of assembling a horizontal stove from a gas cylinder:
1. The upper part, where the valve was previously located, is cut off from the cylinder at the level of the “shoulders”.
2. Legs are welded to the cylindrical body, which give the stove stability in a horizontal position.
3. A round hole is made in the upper part of the body from the closed end, to which the chimney will be connected in the future. After that, a ring “collar” is welded over the hole, which is made from a strip of steel 5 cm wide.
4. Horizontal grate bars are installed inside the cylinder, the distance from which to the bottom point of the body circumference should be equal to ¼ of the cylinder diameter. To make the installation process more convenient, you can first make holes in the wall of the cylinder for the grate rods, which are subsequently mounted with a circular weld on the outside. You can install the grates inside the body in another way: by welding two shelves from the corners inside, on which to lay the grates. This option looks more preferable, since replacing burnt-out grates in this case is easier and faster than with tapping.
5. A sheet of steel is welded to the front side of the cylinder, in which an opening is cut for the door and a fitting with a ball valve is welded, which will be used as a blower. The door is attached to the body using hinges and is equipped with a latch for tight closure. There is an alternative option, which requires welding a 10 cm wide ring-shaped belt around the body. In this case, the ring-belt is mounted on both the inside and outside of the body, forming a gap for installing a hemisphere cut from the top of the cylinder, which will serve as a door into the combustion chamber. In this case, the blower is the hole for the valve, equipped with a throttle valve or ball lock.
Such a stove must be installed only on a steel sheet, the width of which is at least a meter and the length of at least one and a half meters, while in front of the door to the combustion chamber there must be a platform at least half a meter long.
How to choose a cylinder
A 5 liter household gas cylinder is too small to heat the room. And fuel can only fit in it in the form of briquettes or wood chips. A 12-liter cylinder will allow you to develop thermal power up to 3 kW. This stove can warm a small lodge or tent. Gas cylinders of 27 liters provide up to 7 kW, we can talk about heating a small garden house, greenhouse or garage.
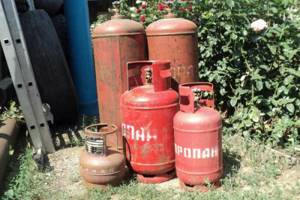
Gas cylinder options
And finally, the king of household gas cylinders is the 50-liter giant. This is the best option for creating a potbelly stove with your own hands, suitable for heating a country house. 40-liter industrial gas cylinders have too small a diameter and thick walls. It is better to cut and shorten them. Thick walls will take longer to warm up and retain heat longer. Such a stove will also last significantly longer.
Technology for making a stove from a conventional gas cylinder
IMPORTANT! Before starting work with any gas cylinder, it is necessary to completely remove any remaining gas from it! To do this, the cylinder is filled with water and detergent, designed to rid the future stove of gas odors and mercaptan fragrances.
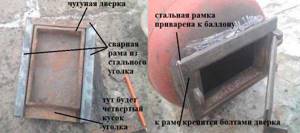
Next, mark the holes for the door, vent and exhaust pipe and cut them out with a grinder. You can purchase a ready-made cast iron stove door in a block with a blower. In this case, a frame of their corners is welded to the opening in the gas cylinder, and a cast door is bolted to it. If aesthetics are not so important, then the door is made from a cut piece of a cylinder. In this case, a more or less wide gap will inevitably remain. In the most primitive version, there are no grates and protrusions that form the flow of combustion products.
The fuel is loaded onto the bottom of the stove, and after it is completely burned out, the ash is removed with a scoop. In this embodiment, it is difficult to implement a continuous combustion mode. Features of making a horizontal potbelly stove A horizontal stove made from a gas cylinder is quite suitable for heating a garage or greenhouse.
In a horizontal potbelly stove there is little space left to place the grate and ash tray, so sometimes the grate is welded into the bottom of the stove, and the ash box is welded from below. Potbelly stove doors are hung on purchased or homemade hinges. An interesting option is that hinges are three links of a massive drive chain from a powerful engine or other mechanism; the outer links are welded to the wall and to the door, respectively.
Manufacturing technology of a horizontal potbelly stove
1. First, the top of the gas cylinder is cut off.
2. Then a lattice is made. To do this, you can simply drill the wall of the cylinder body. Another option: inside the cylinder, corners are welded onto which the grille is placed. In this case, it is easy to replace if it burns out.
3. The legs need to be attached to the oven body. They can be welded or screwed. You also need to install a container at the bottom of the furnace to collect soot. It is welded from sheet metal and corners.
4. In addition, air will be supplied to the oven through the same container. Therefore, it needs to be equipped with an adjustable door to change the draft. 5. For the door of such a furnace, a part of the cylinder, cut off at the very beginning, will do just fine. However, you can find a ready-made stove door made of cast iron. It will not have to be modified, and it already has a latch for closing.
6. Now you need to make a chimney. First, a pipe is prepared that will connect the stove to the chimney pipe. The latter, depending on the conditions, can be brought out both into the roof and into the wall of the room.
7. Finally, the chimney pipe is inserted into the prepared hole. The chimney design must include an elbow.
A horizontal potbelly stove made from a gas cylinder is improved using the same methods as the previous design. These designs have great potential for improvement. Therefore, you can try out all your ideas on them.
Post your implemented ideas with or without photos, or those that have not yet been implemented, in the comments. The best ones will be published.
Advice. The efficiency of any steel stove increases several times if a fan is directed at it.
Vertical oven assembly process
A vertical oven is more difficult to manufacture, but requires less space for its installation and has better user qualities. The volume of the cylinder is used more rationally. The principle of operation of the furnace does not change, but is implemented with greater efficiency. In the vertical version, two doors are made - for loading fuel and for the ash tray. Grate bars made of reinforcement are welded between these doors.
In principle, the entire upper part of the furnace can be dedicated to loading fuel, which will ensure long-term operation on one load. However, the volume of the combustion chamber is often reduced to accommodate additional heat exchangers in the upper part. One of the interesting options is through metal pipes welded into the upper part of the gas cylinder, through which air is driven by a fan (necessarily heat-resistant).
The process of assembling a vertical stove from a cylinder
Such a device will significantly increase heat transfer and reduce the heating time of the room several times. If forced water circulation is established through the passage pipes, a water heating system can be installed.
Other stove options
Of course, not everyone chooses potbelly stoves. Many car owners, in search of the most economical ways to heat their garage in winter, opt for options that run on exhaust gas or from gas cylinders. Despite the fact that the operation scheme of such furnaces is approximately similar, we will still dwell in more detail on the alternatives so that you can complete the project yourself without any help from specialists.
On used oil
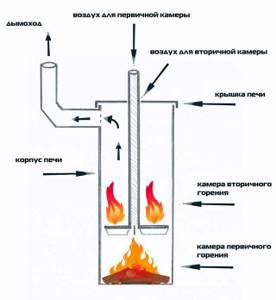
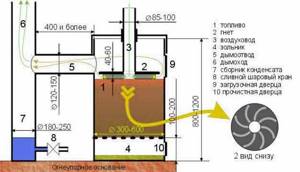
The main difference between this design and a standard potbelly stove is that it consists of 2 chambers. They are connected to each other by a metal pipe with holes: it is from them that the flame comes out.
- lower chamber - designed for spent fuel, here it burns and turns into gas;
- the upper chamber is for mixing the resulting gas with air; the more optimal the design, the better the heat transfer.
Operating procedure:
- we take sheet metal and give it the desired configuration, you can skip this step if you have a ready-made round or rectangular metal container;
- we make a lower section out of it, into which spent fuel is poured, and make a damper so that the air entering the chamber can be regulated;
- we attach legs from the bottom made of thick wire or any available material - they will ensure the stability of the stove;
- We insert a perforated pipe with thick metal walls into the hole from above - it serves as a support for the upper compartment and is constantly exposed to high temperatures, so it must be reliable;
- to make the upper chamber, we take a cylindrical metal blank;
- the final touch is the chimney, installed on top.
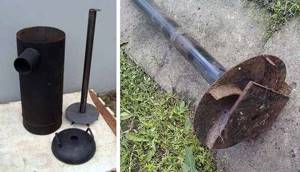
Long burning
Such a stove can be easily made from an old gas cylinder. Or a metal barrel with strong walls. Required conditions:
- cylindrical shape;
- vertical arrangement.
To make it, you need to weld together a metal circle that acts as a weight and a small pipe. They are placed directly into the workpiece and ensure uniform combustion of fuel due to a stable air supply.
A removable lid should be installed on top, and the smoke will come out through a pipe from the top side. It’s good if you can weld the handles - convenience!
Firewood, sawdust and any other type of solid fuel are placed both in the primary combustion chamber - the very bottom of the cylinder, and directly on a metal circle. Such stoves are called long-burning precisely because the wood used for kindling slowly smolders and releases gas, which burns in the upper part, providing the required level of heat.
Brick
Perhaps the most labor-intensive and not always justified option, which captivates with its aesthetic appearance and high efficiency.
In order to give the structure stability and increase fire safety, it is necessary to build a foundation.
Brickwork is also carried out according to a special scheme in order to increase strength to the maximum level. Clay mortar is used for gluing, and the seams between the fragments reach 1.5 cm.
You will also have to make a combustion and blower door. For ash you need to install a grate. Don't forget about the cast iron panel: solid fuel will be placed on it. The final point seems to be the execution of the valve, but this is a trifle in comparison with what remains to be done before.
Drawings of projects already tested in practice will help you.
Long-burning stove bubafonya
A bubafonya-type stove made from a gas cylinder is a potbelly stove only in appearance. The design and principle of its operation are significantly different from a simple potbelly stove.
Scheme of operation of the bubafonya long-burning stove
Furnaces of this type are produced by several industrial enterprises, but they are not cheap. If you have an equipped home workshop and basic skills in welding and plumbing, a bubafonya stove from a gas cylinder is quite affordable to make with your own hands.
Carrying out the assembly
When a potbelly stove is made from a gas cylinder, the drawings help to carry out the work without making mistakes. At the next stage, you can start cutting holes in the circle prepared in advance. To do this, use a grinder or chisel. You need to weld the curtains to the finished lid and fix the doors on them. The latter are pasted over the contour. This structure is attached to the cylinder by welding. At this point we can assume that the front part of the oven is ready.
Now you can start working on the back. A chimney is installed there. To do this, a hole is made, the diameter of which is equivalent to the diameter of the pipe used to remove smoke. A chimney of the required shape and dimensions is attached to it. A thick-walled pipe should be used for the chimney. After this, the oven can be used, as it is completely ready for use.
Features and principle of operation
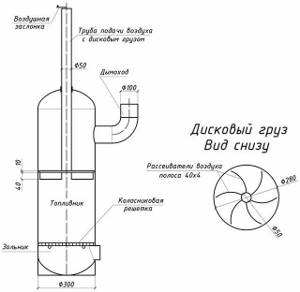
It implements the principle of long-term combustion, based on the physical and chemical phenomenon of pyrolysis - the smoldering of fuel with a lack of oxygen and the combustion of gases released during this process. One load of firewood is enough for 4-8 hours of burning. The design of the stove is different in that the air supply pipe with a damper at the end is located vertically and exits through the top of the stove with a small, non-sealed gap,
Read also: How to sharpen a hunting knife with a whetstone
The pipe has vertical mobility. At its lower end there is a massive disk with guides for the flow of gases. The chimney is welded to the top of the stove on the side. Firewood is loaded into the oven vertically, the disk presses it against the grate. As the lower layers of fuel burn, the disk lowers and combustion air is supplied to the upper layer of fuel, which is subjected to pyrolysis.
Advantages and disadvantages
The advantages of the Bubafonya top combustion stove are as follows:
- High fuel efficiency. Heat does not escape into the chimney.
- Ease of manufacture and operation.
However, the design also has disadvantages:
- It is impossible to replenish the fuel supply in the stove before it is completely burned.
- It is impossible to interrupt the combustion process.
- When the sand draft decreases, it smokes.
- Not suitable for quickly warming up cold rooms.
Necessary materials for making a bubafonya stove
The necessary materials are the same gas cylinder, fittings for the grate, a 90-degree pipe, a metal pipe one and a half meters long and a heavy disk with a diameter slightly smaller than the internal diameter of the gas cylinder.
A self-made bubafonya stove made from a gas cylinder is suitable for heating a greenhouse or other uninhabited space.
Features of operation
During operation, it is important to remember the following: Firewood in layers must be of the same length, they should be loaded carefully and evenly, avoiding distortions
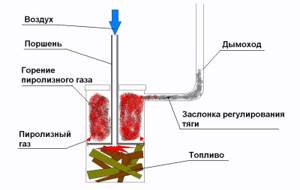
Diagram of a long-burning stove Bubafonya
For initial warming up and entering the pyrolysis mode, the stove requires an hour or more, and up to one fifth of the fuel is consumed.
It is also necessary to carefully monitor the position of the damper to prevent smoke from entering the room.
Features of operation, cleaning and repair
Here are a number of useful tips for proper and economical operation of the stove.
- The stove is installed 20-30 cm from the surface on which it stands. This is the optimal gap for heating the room.
- It is recommended to install a shut-off damper (view) in the chimney to save firewood by reducing/increasing natural draft.
- You can create a radiator version by welding metal strips/plates to increase the heating area of the stove walls at a distance of 5-7 mm.
- It is not necessary to paint the stove, but if the aesthetic appearance is important, only heat-resistant paint should be used.
- The stove must have a concrete/brick/metal support underneath it for fire safety purposes.
- It is advisable to clean the chimney 1-2 times a year before and after the heating season. To reduce heat loss, the chimney is sometimes insulated with non-combustible materials.
- All chimney joints must be made as airtight as possible, or at least they should not let harmful combustion products and smoke into the garage.
- A prefabricated chimney is the optimal solution. The assembly should begin from its outer part, and not from the potbelly stove. In this case, its dismantling for maintenance, cleaning or repair will be more comfortable.
- In a garage made of brick or concrete, the shortest distance to the wall is not defined. But in any case, everything that is not fireproof must be at least half a meter away from the stove body.
- If the interior decoration of the floor, walls or ceiling of the garage is made of flammable materials, the floor must be covered with a sheet of non-combustible material. It should protrude from the firebox by 700-800 mm, the adjacent walls are covered with a non-flammable substance to a height exceeding the dimensions of the stove by at least half a meter.
The following video will clearly show you how to make the most convenient and functional version of a potbelly stove from a gas cylinder.
Furnace in production
A waste oil furnace operates as follows: a supply of oil is poured into the fuel compartment, it is ignited, and more or less air flow is supplied through the air damper, thus controlling the power of the furnace. Combustion products rise through a vertical perforated pipe and carry with them vapors of evaporating oil.
This mixture is burned along the entire length of the pipe and enters the afterburner chamber, divided into two parts. In the first, oil vapors are burned, in the second, with a lack of oxygen, nitrogen compounds are split into oxygen and nitrogen. The resulting oxygen promotes afterburning of combustion products, ensuring constant temperature and energy efficiency.

Pyrolysis oil furnace
A pyrolysis oil furnace made from a gas cylinder has a very high efficiency - about 80%. The disadvantage of such a pyrolysis device is harmful fumes and an unpleasant odor. This stove is not suitable for residential premises or areas where animals are kept.
How to make an oil stove from a cylinder
The gas cylinder exhaust furnace is made in a vertical design. The top part of the cylinder is cut off, into which the afterburner chamber is welded. There is a hole in the floor of the chamber that can be closed with a flap for adding oil. The outlet for the chimney from the afterburning compartment should be located as far as possible from its partition, at least 20 cm.
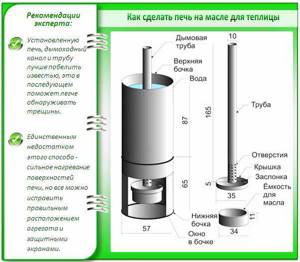
Oil stove for greenhouse
It is important to remember that oil should be added extremely carefully to a hot pyrolysis oven from a gas cylinder; it is better to wait for it to cool completely. In more complex designs, the oil pipe is removed through the top cover; oil can be added to such a stove without interrupting combustion. Making such a stove from a 50-liter cylinder is quite affordable for an average skilled craftsman
Options for increasing the room heating rate
In order to quickly raise the temperature in the room where a propane cylinder stove is installed, you can use the following devices:
- Regular fan . It is mounted in such a way that the forced air blows over the housing and the chimney. Craftsmen often go further, equipping the upper part of the cylinder body with through pipes, welding them into pre-designed holes. A heat-resistant fan is installed on one side of the improvised channels, capable of maintaining several speed modes: this makes it possible to regulate the temperature of the air leaving the pipes.
- Ventilation holes in the housing . In this case, additional activation of air flows is carried out without the use of a fan. To achieve this, a wood-burning gas cylinder stove is additionally “dressed” in a special casing, the surface of which has a series of holes in the upper and lower areas. Through the lower gaps, cold air is sucked in, which usually accumulates in the floor area. Blowing through the hot body, the air flows gradually heat up and exit through the upper slots into the surrounding space. Approximately the same operating principle is used in Buleryan stoves and sauna heaters.
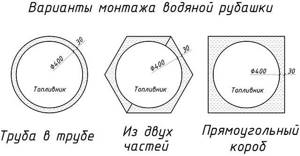
A simple water heating boiler can be made from a gas cylinder. To do this, a water jacket is installed around the finished pyrolysis furnace from a gas cylinder: from it, the heated coolant is supplied through pipes into the batteries. Such a system must have an expansion tank installed above the potbelly stove and radiators. Thanks to it, surges in internal pressure in the heating circuit due to the expansion of heating water are compensated. Since we are talking about a primitive boiler without any adjustment, cases of water boiling inside the system will occur quite often. The volume of the expansion tank is at least 10% of the total displacement.
Making a potbelly stove from a gas cylinder with your own hands is not a very complicated procedure. During operation of the finished device, one should take into account the fact that the temperature of its body can reach significant levels: this imposes additional requirements for the fire safety of the heated room.
Do-it-yourself potbelly stove - for the cottage and garage
The potbelly stove appeared more than a hundred years ago, and imitated the fireplaces used by the rich class. But it fulfilled its intended purpose flawlessly - there was always warmth in the house, and this warmth was cheap, since the stove could be heated with anything. To quickly warm up a garage, workshop or other utility room, such a stove is the most convenient and simple solution.
Types of oil furnaces
Using waste oil, you can make the already discussed pyrolysis furnace. Another type of oil stove made from a gas cylinder is a dripper or long-burning stove. There is a brick at the bottom of the combustion chamber. Above it there is a tube supplying oil (or diesel fuel).
Using a valve with a poppet valve, the oil supply is adjusted so that approximately one drop drips per minute. To start the furnace, a small puddle of oil is poured onto the brick and set on fire, the brick becomes hot, and the next drops burst into flames upon contact with it. Combustion products rise to the top of the stove and heat it.
Manufacturing of vertical structure
A homemade potbelly stove made from a gas cylinder can also be vertically oriented. When manufacturing such a design, the system can have two versions. The first involves a greater number of manipulations that are associated with cutting. But during installation you will face much fewer difficulties. When choosing this method, using a grinder, you should get rid of the top of the container. The second method will save effort and time. But it is considered extremely inconvenient. When a pyrolysis stove is made from a gas cylinder using the second method, the upper part remains in place. A large combustion hole should be cut on the front part. Below is a hole for blowing and cleaning ash.
Pros and cons of IV drips
- Extremely simple design, minimal amount of materials.
- Economical.
- Flaws.
- Not suitable for rooms with people and animals.
- High fire hazard.
Perhaps one of the proposed options will attract the attention of a home craftsman, and he will try his hand at making a stove from a gas cylinder with his own hands.
If you find an error, please select a piece of text and press Ctrl+Enter.

If in private homes it is customary to use serious heating equipment, then it is better to rely on a home-made unit of a simple design that runs on wood and coal for heating a garage, cottage or greenhouse. A proven option is the Bubafonya stove, made with your own hands from a steel pipe or gas cylinder. This potbelly stove is so popular that it is often used for heating homes. Anyone who is familiar with it only by name will find here detailed information about the operation of the stove, its manufacture and reviews from real users.
Ways to improve heat transfer from a propane cylinder stove
As mentioned above, the main disadvantage of a garage stove made from a gas cylinder is its poor thermal efficiency, because... a significant part of the heat obtained during combustion simply goes out through the chimney along with the gases.
There are several ways to improve the heat transfer of a homemade stove:
- Apply afterburning of flue gases . In this case, the design of the potbelly stove will resemble a “bubafonya” or “slobozhanka” stove. This will make it possible to increase the efficiency of the device by an order of magnitude.
- Extend the chimney pipe. In this case, part of the heat that goes outside remains inside the room. To do this, the pipe is given a broken configuration, without horizontal sections and negative angles.
- Use a smoke pipe . Another cylinder in a vertical position is welded onto the horizontally located stove body from a wood-burning gas cylinder: it will act as a smoke pipe. Improved heat transfer of the stove is achieved here by increasing the area of the heating surface. The condition for preventing smoke from entering the room is the presence of good draft.
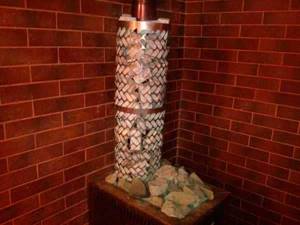
- Arrangement of the heater . This technique is widely used in baths, where rubble is used for additional heat accumulation. The metal chimney is equipped with a mesh into which stones are poured to take heat from the pipe and transfer it to the room. In this case, it will take some time to warm up the stones: before this, the air will heat up with some slowdown. But in the future, the surface of the pipe will not burn, and the heated stones will evenly heat the surrounding space. Even after the wood burns out, the accumulated heat will continue to maintain a comfortable temperature in the room for some time.
When selecting stones for backfilling, it is recommended to give preference to round river samples: it is desirable that they have a uniform color without any inclusions. Other types of stones can even be dangerous, bursting when heated, or releasing substances harmful to health.
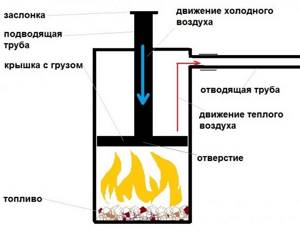
About the principle of top combustion
Today, there are 2 types of heaters that use this principle - homemade Bubafonya and boilers from the Lithuanian brand Stropuva. The bottom line is this: solid fuel is loaded inside a combustion chamber made in the form of a vertical cylinder, and then ignited from above. From there, air is constantly supplied to the combustion zone through a vertical pipe ending with a disk weight with air flow distributors.
Reference. It is not known which top-combustion unit was invented earlier - a Lithuanian boiler or a Russian stove. But many domestic manufacturers picked up the idea and began to produce heat generators operating on this principle, equipping them with automation and even forced pressurization.
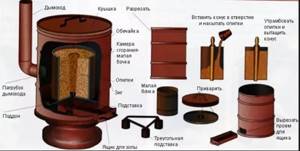
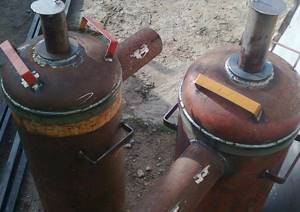
Actually, the traditional Bubafonya stove consists of only 3 parts, shown in the photo:
- a cylindrical body with a chimney pipe, installed vertically (available with or without grates);
- top cover with a hole cut in the center for the air duct;
- piston - a pipe with a welded “pancake” equipped with ribs at the bottom - air diffusers.
As already mentioned, the chamber is filled with any solid fuel - firewood, sawdust, wood chips or coal. The filling is pressed down by the weight of the piston, and a lid is placed on top of the pipe. The stove is ready for use. Now let's learn more about how it functions:
- After ignition and installation of the weight with the lid, air is sucked into the combustion zone through a vertical pipe due to the draft of the chimney. Coming out from below, under the “pancake”, the flow spreads in all directions thanks to distributors made of steel strips.
- Flue and pyrolysis gases go around the edges of the disk and rush to the upper zone, to the chimney opening. Secondary air also enters here, penetrating into the gap between the cover and the pipe (it is not specially sealed). As a result, flammable gases emitted by wood or coal are burned.
- As the logs burn, the piston lowers until it reaches the bottom or grate, after which a new load of fuel is required.
Scheme of upper combustion of solid fuel
It has been tested in practice that one load of firewood into a firebox made from a standard gas cylinder lasts for about 5 hours, and coal for 10-12 hours. Therefore, Bubafonya is rightfully considered a long-burning stove.
Oven operation
Before igniting the Bubafoni, it is necessary to remove the welded air duct from inside the housing, first removing the top cap. Wood logs are placed inside the stove in a horizontal position, close to each other. When stacking vertically, some obstacles may arise in the path of the piston movement: this usually happens in cases where the logs are not completely burned. As a result, smoldering in the primary chamber will develop into full-fledged combustion, which seriously impairs the proper functioning of the stove. In this case, firewood is consumed much faster, and smoke begins to seep out of the air duct. When laying logs, it is prohibited to block the area where the chimney is welded.
A layer of chips, sawdust or chopped branches is poured onto the firewood. On top of them you need to put old cloth or paper soaked in kerosene. A piston is installed end-to-end on the fuel filler and a cap is put on. To light firewood, you need to light a piece of rags or paper and throw it inside through the air pipe. Matches are ineffective in this case, since they go out before they can reach the fuel. After lighting the firewood, pause for 15-20 minutes, allowing it to flare up well. When the flame gains strength, the valve on the air pipe should be closed: thus, Bubafonya is transferred to the main operating mode.
How to make a stove from scrap materials
To make the case, you can take any metal product that has a cylindrical shape:
- propane tank;
- receiver from a railway car;
- regular barrel with a volume of 100 or 200 liters;
- pipe with a diameter of 300-500 mm.
Bubafonya stove from a large barrel
Note. The Bubafonya stove, made with your own hands from a barrel, does not last too long due to the thin walls that quickly burn out. The problem is solved simply - the unusable barrel is replaced with a whole one. The operation will take literally 30 minutes, which is required to weld the chimney pipe.
The piston is welded from a steel pipe, the diameter of which depends on the size of the fuel chamber. For a diameter of 300 mm (like a cylinder), a pipe of 57 x 3 mm is sufficient. A two-hundred-liter barrel needs more air, so the diameter of the air duct increases to 76 x 3 mm. The cross-section of the chimney pipe is selected accordingly, in the first case it will be 10, in the second - 15 cm. A steel sheet 1 cm thick will do for the load; a strip of 40 x 4 or 50 x 4 mm will be used for the distributors.
Read also: How to tighten an eccentric tie
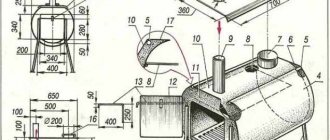
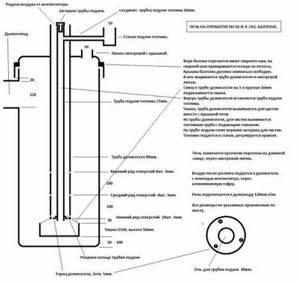
The most common design shown in the drawing is made from a gas cylinder in the following order:
- Unscrew the valve of the cylinder, fill it with water and cut off the cap with a grinder, focusing on the factory weld. Cut a hole in it with a diameter of 60 mm, and weld a shell made of steel strip along the contour for a tight fit to the end of the body.
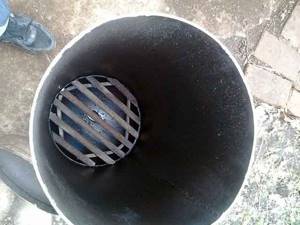
- Cut holes for venting gases and cleaning the ash pan, as shown in the drawing. Make a grate from 18-22 mm reinforcement and place it on two corners welded at the bottom of the firebox, as shown in the photo.
- Install a door or cleanout hatch and weld the smoke pipe.
- Cut a disk out of thick metal, make a hole in the center and attach the pipe by welding. The diffusers are made from bent strips, welding them to the back side of the load. To regulate the flow, install an eccentric valve at the second end of the pipe. That's it, the stove parts are ready.
Advice. It is very important to make distributors from bent strip. Their arrangement promotes fan-like dispersion of air in the firebox and uniform burning of wood.
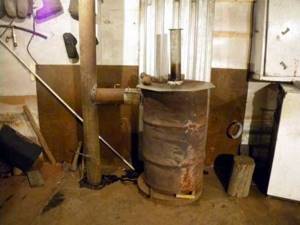
Installation of Bubafoni and its connection to the chimney is carried out according to the standard scheme, as seen above in the picture. If you did not make grates and an ash pit door, then it is better to place the body on fireclay bricks so that the concrete in the garage does not crack due to heat. The lifting height of the chimney pipe is at least 4 m, and preferably 5 m. To get more visual information about the design and operation of the stove, we suggest watching the video:
Bubafonya with a water jacket
Many home craftsmen make this stove with a water circuit, turning it into a full-fledged long-burning boiler for water heating at home. If you want to follow their example, we suggest studying the drawing of a heating unit made from a pipe with a diameter of 40 cm:
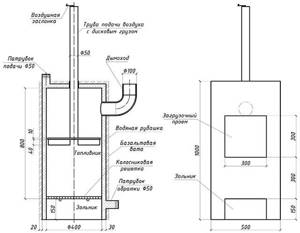
During assembly you will encounter one difficult moment. At home, it is impossible to roll a steel sheet 2 mm thick and give it a cylindrical shape; rollers are needed. There are several ways out - take a larger diameter pipe or bend the metal at different angles. How you can make a square and hexagonal water jacket for Bubafoni is shown in the diagram:
The rest of the work is done as follows:
- Cut openings for the doors in the body and install grates as described in the previous section. Make a piston with air distributors.
- Weld the door frames and water jacket hermetically. Do the same with the chimney pipe.
- Install fittings with a diameter of 40 mm to connect the water heating system.
- Test the Bubafoni water circuit for leaks, then wrap it in basalt fiber insulation and cover it with painted thin metal.
Reference. The resulting top-burning boiler is capable of operating not only on wood, coal and sawdust, but also on waste oil supplied through the air duct by drip. How to organize this, watch the video:
Why the stove smokes - operating features
Along with the important advantages that contribute to its popularity, the Bubafonya long-burning stove has a number of significant disadvantages:
- requirement for good draft in the chimney, without which it smokes into the room during heating;
- impossibility of reloading firewood until the previous portion burns out;
- in the slow smoldering mode, little heat is released, while the chimney quickly “overgrows” with soot;
- a burning firebox cannot be completely extinguished, since air will still penetrate through the gap between the pipe and the body.
This suggests a conclusion: during operation, the stove requires constant supervision, and the chimney must be periodically cleaned or burned at maximum mode and with high-quality fuel.
Important point. Bubafonya can smoke for one more reason - reloading with fuel. That is, when the user, for the sake of burning time, stuffs firewood into the firebox at the very top, which should not be done. Loading height – 5 cm below the edge of the smoke hole.
Reviews about the stove on the forum pages
The craftsmen who have made and use a top-burning stove speak mostly positively about it, but with caution. Here are some reviews from real participants of the famous forum:
Andrey, Naberezhnye Chelny, Russian Federation.
I made such a stove to heat a 6 x 6 m box in 2 days. I'm happy with the result; it burns on waste chipboard for 6 hours. What improvements are needed: an air casing and a blower, then the room warms up completely and quickly. Second: you need an ash unloading hatch; turning the body over is very inconvenient.
Valentin, Saransk, Russian Federation.
Bubafonya is good for garages and other similar premises; it cannot be placed in a house. It smokes when there are gusts of wind outside and when reloading with firewood, and with a water jacket it quickly becomes clogged with soot due to the drop in temperature. I made conclusions after a year of testing and modifications to the design. You can also heat with damp wood, but then the heat is much less, which is natural.
Yuri, Vytegra, Russian Federation
I made Bubafonya from an old sauna stove - 500 mm pipe and 8 mm wall, height - 1 m. After launch, the result was pleasantly surprising; it burned on birch logs for almost 9 hours. Only it takes too long to warm up, but in my case the reason is clear - the metal is too thick, you need twice as thin, then the efficiency will increase.
Vitaly, Grodno, Republic of Belarus.
This device was installed at the dacha, the initial goal was to heat at least one large room. Everything turned out better than I expected, the room is very warm, and you load firewood twice a day. Next winter I want to do it with the water circuit and connect the old batteries in the adjacent rooms.
Selection and preparation of the cylinder
If we compare gas cylinders based on the volume/wall thickness/weight ratio, the best option is to make a stove from a 50-liter propane cylinder. Its height is 85 cm and its diameter is 30 cm. Thanks to the sufficient thickness of the metal, such a homemade stove will not burn out over several seasons of active use.
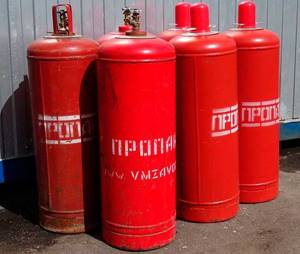
Choosing a cylinder for the stove
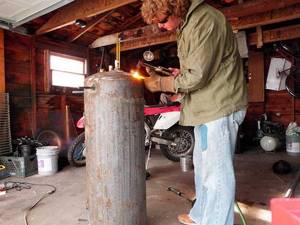
The manufacture of the furnace begins with the preparation of the cylinder. To eliminate the risk of gas residue exploding when cutting the cylinder, it should be properly prepared.
- unscrew the tank valve and leave overnight so that the gas evaporates;
- turn the cylinder upside down and drain the condensate into an unnecessary container;
- fill the container to the top with water;
- drain the water completely.
Read also: Classification of cylinders, boiler inspection rules for testing cylinders
Work technology
If you are making a potbelly stove from a gas cylinder, then you need to start manipulations with preparatory work. This procedure is mandatory, otherwise the gas that remains in the container may cause an explosion after interacting with a spark generated during cutting. First, unscrew the valve of the cylinder, allowing the gas to escape. At the next stage, the container is turned over, which helps get rid of condensation. It should be noted that it has an unpleasant odor. Therefore, it is recommended to collect it in a container. If drops fall on the floor or other surface, weathering will take quite a long time.
A potbelly stove from a gas cylinder can only be made after careful preparation of the body. The container should be installed vertically, and then it is filled to the top with water. This will help any remaining gas that might be trapped inside to come out. Then the container is turned over on its side and the water is drained. The balloon can now be further manipulated. After the preparation has been completed, the master must decide what type of oven will be. It can be vertical or horizontal.
How to make a potbelly stove from a gas cylinder: general principles
To work, you will need a welding machine, a tool for cutting and drilling metal, sheet steel with a thickness of 3 mm, fittings, an angle or pipes for installing a support frame (for a horizontal stove), and pipes for the chimney.
A stove made from a gas cylinder can be equipped with a ready-made stove door by cutting a suitable size hole in the body and welding strips of metal around the perimeter so that there are no gaps between the door frame and the cylinder.
Installing the door on a gas cylinder
The second method is to cut a rectangular hole in the cylinder, and the cut out fragment of the wall serves as the firebox door. It is hung on welded hinges; a strip of metal can be welded on three free sides to cover the cracks. The valve is also welded on.
It is advisable to make the chimney from the stove to the exit into the street broken, consisting of several elbows, otherwise the main part of the thermal energy will immediately go outside through the pipe, without having time to heat the room. It is important that the knees are not at a right or negative angle, otherwise there will be no traction.
How to make a vertical stove from a gas cylinder?
At any convenient height, a firebox opening is cut into the cylinder (about 30x20 cm), and a blower opening is placed below (about 20x10 cm).
For such a stove it is necessary to make grates. The grate is welded from reinforcing bars; it is better not to fasten it tightly inside the stove, but to place it on scraps of corner welded to the walls - if the grates burn out, it will be easier to replace them.
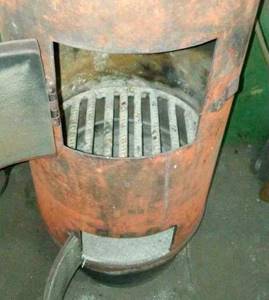
Vertical stove with grates
The convex upper part of the cylinder can be cut off and a circle of sheet metal welded in its place. This hob is convenient for heating food or tea. In this case, a hole for the chimney is made in the side of the stove and a short horizontal elbow is installed. If there is no need for a “tile,” a hole for the chimney is drilled at the location where the gearbox is installed.
A vertical stove is convenient to use if the room is small and there is no extra space. Such a homemade potbelly stove does not require the installation of a supporting structure, so it is easy to move and install as a temporary heat source, for example, for heating a greenhouse during periods of low temperatures and frosts.
Horizontal stove made from a gas cylinder
An opening for the firebox is cut out in the end part of the cylinder, and a door is installed. Grates are usually not installed inside a horizontal stove so as not to waste useful space. Instead, holes in 5-6 rows are drilled in the lower part of the horizontal stove, and a flat sheet metal box is welded on the outside - it will serve as an ash pit.
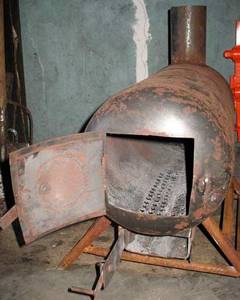
Horizontal stove
The stove body is mounted on a frame welded from suitable steel pipes or angles. It is recommended to prepare design drawings in advance, calculating the optimal dimensions of all external elements.
By welding a small metal sheet on top of the body, you can get a convenient cooking surface.
A horizontal potbelly stove made from a gas cylinder with your own hands is suitable for a garage, a country house, it can be installed in a bathhouse if you build a heater.
Increasing efficiency
A potbelly stove made from a gas cylinder has a significant drawback: the fuel in it burns out quickly and the bulk of the thermal energy goes outside.
In addition to lengthening the inside of the chimney, you can increase the efficiency of the stove in other ways
:
- Mount an external metal casing with holes in the lower and upper parts - due to intense convection, the air in the room will warm up faster.
Potbelly stove in a metal casing- Weld metal strips (ends) or pipes to the stove body, creating convective fins.
- Cover the stove with brick - the structure will take longer to warm up, but at the same time give off heat more evenly and for a long time. In addition, the risk of accidentally getting burned is reduced.
- Mount a metal mesh on the stove body or around a vertical pipe and fill it with stones. This is the principle used to make a sauna stove; the stones (like the brick in the previous version) act as a heat accumulator. To prevent stones from bursting when overheated, it is necessary to choose a material with a homogeneous, non-layered structure, without inclusions. Please note that some rocks emit radon, especially when heated. It is better to purchase stones for the stove in a specialized store.
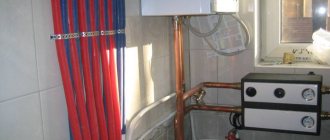
Cylinder in a mesh of stones- Install a water jacket on the chimney and mount a circuit for supplying coolant to the radiators - in this case we get a heating boiler from an unnecessary gas cylinder. Such a system will be more efficient when using a pump for forced circulation of coolant. And we must not forget about the expansion tank, the volume of which must be at least 10% of the volume of liquid in the system.
- Water circuit
But the highest efficiency is for a stove made from a propane cylinder if it is a pyrolysis stove, the manufacture of which will also be discussed in this article.
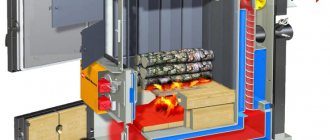
Manufacturing of a pyrolysis furnace
In such a stove, fuel combustion occurs slowly, since only its top layer burns. At the same time, flammable gases released during smoldering of the fuel are burned in the upper chamber. Such a long-burning stove made from a gas cylinder economically consumes fuel and allows you to extract maximum thermal energy from it.
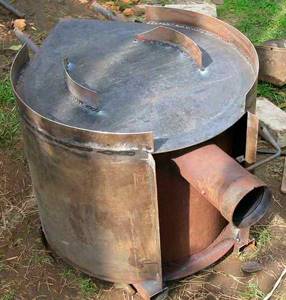
Pyrolysis stove from a gas cylinder
A pyrolysis oven made from an old gas cylinder consists of the following elements
:
- Fuel tank (a cylinder with the top part cut off, it can be increased in height by 30-40 cm by welding part of the same cylinder, such a stove will work longer on one load of fuel);
- Cover with a hole for the air intake pipe;
- An air intake pipe with a weight platform dividing the furnace into chambers.
The top part of the container is cut off and a metal strip is welded around its circumference to obtain a tight-fitting lid. A hole is cut in the lid in the center for the air intake pipe - it should move freely vertically, but at the same time it is advisable to leave a minimum gap.
A hole is cut for the chimney pipe just below the lid. The elbow must be removable, since the chimney of such a stove requires regular cleaning.
Note! It is difficult to make perfectly round holes for a removable chimney and air intake pipe, so it is most convenient to turn a metal washer with a suitable internal diameter on a lathe and weld it hermetically in the place where the hole is drilled.
The length of the air intake pipe should be 10-15 cm greater than the height of the firebox with lid. A round plate with a hole in the center is welded to the bottom of the pipe. The diameter of the plate should be slightly smaller than the internal diameter of the cylinder - flammable gases will penetrate through the gap into the upper part of the firebox. The thickness of the plate is from 6 mm, otherwise it will have to be additionally reinforced on top with stiffeners made of strips of metal.
6 blades from curved metal strips are welded from the bottom of the plate. In the center, on top of the strips, attach a small disk made of the same sheet metal, and drill a hole in it in the center.
The easiest way to regulate the intensity of fuel combustion in such a DIY stove is to install a valve in the form of a round metal plate with a bolted connection on the top of the air intake pipe.
Conclusion
A homemade stove from an empty gas cylinder is an economical option that allows you to solve the problem of how to heat your country house, garage or workshop for quite a long time.
DIY potbelly stove
In the container, you need to cut out a blower with a chisel (or cut it out with a grinder) measuring 20x40 cm. The distance from the bottom is up to 30 cm. Another hole needs to be made in the upper part of the container - it will serve as the basis for the chimney. The top of the barrel (or box) can be welded tightly (then you can cook food on this stove) or made removable. In the removable version, the hole for the chimney is cut from the side, 10-15 cm below the top edge.
An effective chimney for a potbelly stove can be made from any iron pipe with a diameter of 110-150 mm or bent from roofing sheet iron. And the last hole is cut below the blower to clean out the ash. Any size, depending on ease of cleaning. Both the ash pan and the ash pan must be covered with a door or valve.
Next, a grate or grates are made. You can make one grate platform in the form of a thick metal sheet with cut holes for the passage of air, or you can make several grate bars from reinforcement 10-16 mm thick. Both structures are placed on special protrusions-thresholds, welded inside the barrel at the height of the lower level of the blower.
This potbelly stove is intended for a summer house or garage. It should be installed at a distance of 1-1.5 meters from walls, partitions, shelves and other objects. As a mobile foundation, you can use simple bricks, or weld metal legs 20-40 cm high to the bottom of the potbelly stove.
Potbelly stove for a summer residence
If a potbelly stove for a dacha operates stationary, then it can be lined or made of brick - this technique will significantly increase its heat transfer and thermal inertia. In suburban conditions, such a homemade stove can be used not only for heating a country house. but also for heating the bathhouse. greenhouses or barns with animals. Household and economical craftsmen are trying to make heating more efficient and economical, for which thick metal accumulator plates are welded into the upper part of the furnace to increase heat transfer.
Since you are supposed to be at the dacha longer than in the garage, the potbelly stove for the dacha will be in use almost around the clock. Therefore, the furnace body must be made of thicker metal (3-4 mm). The easiest way is to weld the body from sheet metal, giving it a rectangular shape. This will not affect the efficiency, but will increase reliability. First, the side sheets are welded together, and a thick lid is welded to them.
Next, the grate and the bottom are attached to the body. It is also advisable to make a chimney for a stationary stove from thick iron or line it with half a brick and clay mortar.