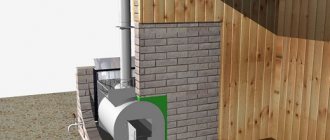
Boiler thermal insulation
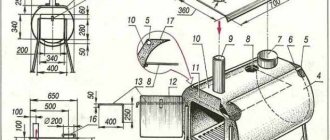
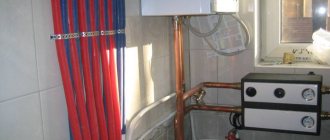
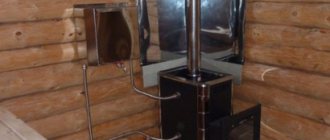
Boiler connection diagram.
Before installing the boiler, you need to make its own thermal insulation. This should be done to reduce heat loss and increase system efficiency. Using glue, wrap our boiler with insulating building material. You can also use foam for installation. You can also make thermal insulation using two containers of different sizes. In this option, we isolate the space between the containers we use. This insulation option increases the performance of the water heater and reduces energy costs.
By making a boiler with our own hands, we save a lot. The quality remains virtually unchanged.
Design and principle of operation of a gas sauna stove
A gas sauna stove is structurally similar to a simple boiler. The main difference is the principle of heating the room. The working process is based on natural or forced convection of air flows in the steam compartment.
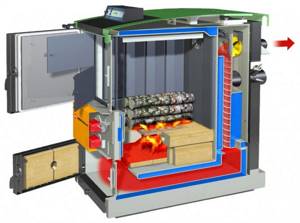
Internal structure of a gas furnace
According to the standard, gas stoves for baths have the following elements in their design:
- a gas burner is installed in the housing;
- then a sealed connection is made between the gas pipeline and the burner;
- Additionally, you can attach a water container;
- A tray with stones is installed on top of the body and a tube is installed to remove gas combustion products.
Considering that cold water will be poured into a gas heater for a bath to create water vapor, then you need to select ideal stones that can withstand such a sharp change in environmental conditions. Large sea or river stones are the best that can be used to create steam in a steam room.
In practice, they have been proven to perfectly withstand extreme thermal stress and temperature changes. They heat up very quickly, and the maximum incandescent temperature reaches 200 degrees Celsius.
Additionally, a thermostat and a fuse are built into each gas sauna stove, blocking the gas supply when the fire goes out. The gas chamber, where fuel combustion occurs, is located clearly under the heater, which allows the stones to be heated to maximum temperature in the shortest possible time.
Operation and first firing
When the homemade stove from a gas cylinder is ready and installed on the prepared base, you need to perform the first heating. For this, it is recommended to use straw, large chips without large firewood. The first heating should be carried out in a gentle mode for 3–4 hours. You need to carefully inspect the connection points for gaps.
Operating rules:
- We must not forget to regularly clean the chimney, ash pan, and grate from soot and ash.
- It is not recommended to throw too much wood into the firebox.
- Surrounding surfaces should be covered with non-combustible materials.
- Place stones in the heater from large to small.
Place a sheet of metal on the floor in front of the stove to prevent it from being burned by coals. Store firewood away from stove equipment.
In order not to spend extra money on buying a stove in a store, you can assemble it yourself from a gas cylinder. To do this, it is enough to have basic skills in using a welding machine, grinder, or drill.
You can learn more about making a stove from a gas cylinder from the video:
How to make a stove with your own hands from gas cylinders
An old liquefied gas cylinder can probably be found in almost every home. The device is quite suitable for creating many useful devices, including elements of the heating system. All you need is desire and a welding machine at hand. You also cannot do without some additional materials when constructing a stove from a gas cylinder.
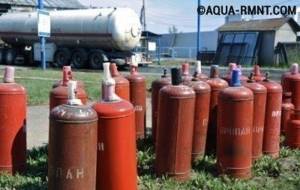
Cylinder selection
An old and unnecessary gas cylinder is a suitable housing for a future furnace. But in order for a potbelly stove to effectively heat the room, you need to choose the right size of container. Five-liter cylinders are very small; their volume is not enough to create heat even in a small room. Cylinders of 12 and 27 liters can be used for heating small rooms, however, such stoves will be low-power. The most suitable option is a 50-liter gas (propane) cylinder.
If you happen to have a forty-liter industrial gas tank at hand, then it can also be used as a housing for a potbelly stove. However, it should be borne in mind that the walls of such a cylinder are thicker and the diameter is smaller.
Important! Freon cylinders are not suitable for making potbelly stoves, as they are large in mass and size. The power and heating speed of the furnace directly depends on the size and thickness of the walls of the cylinder.
The optimal tank volume for a potbelly stove is 50 liters
The power and heating speed of the furnace directly depends on the size and thickness of the walls of the cylinder. The optimal tank volume for a potbelly stove is 50 liters.
Before using a gas cylinder, it is prepared for use; for this you need:
- unscrew the tank valve;
- leave the cylinder overnight and allow the remaining gas to escape;
- turn the container upside down;
- drain the condensate and collect it in unnecessary containers;
- fill the container with water to the very top;
- turn over and drain.
↓ Be sure to study the recommended material on the topic ↓
Important! Failure to remove gas residue from the cylinder increases the risk of an explosion when welding or cutting the tank. Be careful
Before starting work on creating a potbelly stove, the gas cylinder is cleaned of gas residues. Otherwise, an explosion and unpleasant consequences may occur.
Preparing the gas cylinder
The valve is unscrewed from the cylinder. This is the first and main condition. A sealed cylinder inevitably contains gas residues, and if you start cutting it, this is fraught with an explosion.
- The valve is twisted.
- The open container is washed with water and ventilated for at least several weeks. Only “fresh” cylinders pose a danger. If it has been ventilated for a month or more, there will be no problems.
- If there is no time for ventilation, more extreme methods are used. After washing the container with a thick detergent, fill it with water “to capacity” and then cut it with a grinder.
- The paint burns in the fire.
Do-it-yourself long-burning stove from a gas cylinder
Although “slow” boilers contain a pyrolysis process, they are still not pyrolysis (the latter are 10 percent more efficient than them, have a different structure, complete combustion of fuel, are more environmentally friendly and cost).
But the Bubafonya stove does not need turbocharging with a fan and can be made from a gas cylinder with your own hands.
Ready-made stove Bubafonya
Principle of operation
Let's look at how a gas stove for a summer residence with a cylinder (on a cylinder) works.
The entire lower part of such units is densely filled with fuel. Combustion occurs in a thin top layer. Efficiency is achieved through afterburning of pyrolysis gases. In Bubafon, pyrolysis takes place under pressure, which presses the fuel and lowers as it burns.
Through a pipe welded to this pancake, oxygen is supplied for the combustion process. The oppression plate has ribs, the curved shape of which distributes air.
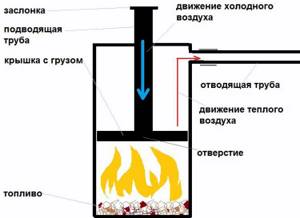
Scheme of operation of the Bubafonya stove
The diameter of the tank for loading Bubafoni fuel must be from 30 to 80 cm! It turns out that the balloon, with its 30 cm, is the minimum limit.
Assembly
Procedure for making a furnace:
- With a diameter of 30 cm, the height of the boiler is 90 cm, but the entire cylinder is 85. There are two options for solving the problem. Firstly, you can cut off the entire vaulted part and add the missing height with a fragment from another cylinder. Secondly, you can turn this vaulted part into a lid. The top cut is made where the straight part of the body begins.
- A press is being made. A circle with a diameter of 27 cm is cut out of metal (6-10 mm thick). A hole is made in the center to the size of the air duct pipe.
- The ribs are made 4 cm high. They are slightly bent and welded onto the pancake so that the bend goes clockwise.
- A door is cut into the lower part of the body - an ash pan 17 cm wide.
- Grate bars. The grate can be welded separately from metal rods. The legs welded to it will help you place the grill at the desired height. Their height is taken based on the height at which the ash door ends.
- Air duct pipe. Diameter 7.5 - 8 cm. Its lower edge should protrude from the pressure sheet (reach the edge of the ribs). The top edge is 15 cm above the collar welded onto the lid. The pipe is welded to a round press with ribs.
- A damper is made on the upper edge of the air supply pipe, with the help of which the intensity of the air supply is regulated. A bolt is welded along the outer wall of the pipe along the axis, and a hole is drilled in the damper. The damper turns out to be rotary.
- Lid. Must dress tightly. To do this, you can weld a bead ring along the outer edge of the body. It will be convenient if the lid and body are equipped with handles.
- In the center of the straight lid and at the top point of the vaulted one, a hole is made through which the air duct will exit. Its diameter is equal to the outer diameter of the air duct + the minimum gap that will ensure the free passage of the pipe (no more than 2 mm).
- A collar is placed around the perimeter of the hole. Its height is the size of the gap increased by 80 times.
- Chimney. A piece of pipe (40 cm or more in length) will be positioned horizontally and connected to a vertical chimney pipe (10 - 12 cm in diameter). Stepping 1 - 2 cm down from the cover, a hole equal to the diameter of the chimney is cut out, and a short pipe is welded to it. This is the final stage of making a stove in a workshop. Further work is carried out after installation on site.
- Part of the chimney is lowered below the junction with the pipe and a device is made in it to collect and drain condensate, which is inevitable in such stoves.
- The chimney is routed through the roof and welded to the stove.
It is not advisable to heat a homemade stove with coal. The heat from this fuel is intense, and as already mentioned, the steel of the cylinder is not heat-resistant. And when maximum heating from the wood occurs, it is better to close the damper almost completely.
Gas cylinder stove
Having determined that metal stoves show high efficiency in small farms, and, therefore, will become the choice of the majority, you should consider the available examples.
Such a heating element is economical, since improvised means are used in its manufacture.
Cylinder selection
To make a furnace, select a cylinder without visible damage or holes in the metal. The presence of paint is not a mandatory factor. The coating will burn off during use. It is advisable that the valve be removed in advance and the gas released.
Advice! There is no need to buy a new container. You can contact the nearest scrap metal collection points or your friends. It is better to spend the money saved on the purchase of other materials, the services of specialists in working with metal and welding, or for personal purposes.
Tools and materials
To complete the work you will need:
- gas cylinder;
- metal sheet 3 mm thick;
- fittings for making grate and handles;
- metal corners or remains of a profile pipe for legs;
- chimney pipe with a diameter of 120 mm and a length of 400 mm;
- metal rods or fittings for the heater;
- bricks for the foundation and cladding of the furnace location;
- welding machine and protective equipment;
- electrodes for welding metal parts;
- grinder and a set of trimming and cleaning discs;
- set of locksmith tools.
Preparing the walls
Small stoves are light in weight, so making a special foundation for them does not make practical sense. But the walls must protect.
When fuel burns, a large amount of heat is released. Temperature easily damages wooden and fusible surfaces. To protect against damage, the wall cladding is covered with foil. The metal reflects the temperature into the room, reduces the load on the wall and increases the efficiency of the furnace.
Note! Brick cladding is carried out over the entire part, the stove is in contact with the wall.
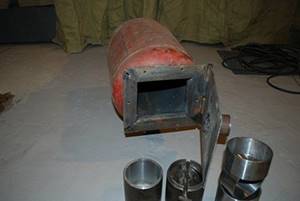
Manufacturing process
They begin assembling the stove from a gas cylinder after preparing all the necessary items. This will save time. After studying the step-by-step instructions with drawings and photos, you will learn how to build the most efficient sauna stove with your own hands.
Procedure:
- Prepare a gas cylinder. If the valve has not been removed, remove and drain the remaining gas.
- The container is filled with water to prevent ignition while working with the grinder.
- Cut off the top. To do this, draw a line along the rounded part. This cut will serve as a door.
- On the cut top, close the hole for the tap and weld the handle, lock and hinges on the outside.
- The balloon is placed horizontally. A hole 100 mm wide is cut out in the lower part, 200 mm from the back. This is a hole for ash to fall out. For the sides of the ash pan, a metal strip 70 mm wide is welded to the edges. The bottom of the ash pan is made from the cut off lower part of the cylinder or metal sheet. The front part of the ash pan is closed with a door, hinges, handles and a latch are attached.
- Legs are mounted along the edges of the cylinder from the bottom and the stability of the structure is checked. If the stove stands and does not wobble, the job is done correctly.
- A hole for the chimney is cut out in the back of the container, a piece of pipe is installed and welded.
- Install the oven door by attaching the hinges to the body. A locking mechanism is also installed. Check the tightness of the closure and seal if necessary.
- To ensure that only ash gets into the ash pan, a grate is made along the entire length of the furnace.
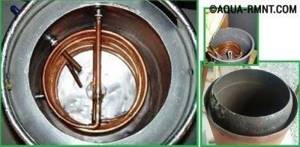
- Install a tank for heating water. The boiler can be made independently from metal or purchased ready-made. A cutout is made in the side for connection to the cylinder along the diameter of the container. All joints are thoroughly boiled so that the tank does not allow water to pass through. The roof for the water tank is made removable. This will make it easier to use. A tap is mounted at the bottom for convenient drainage of water.
- A heater is made from the remains of fittings and rods. The structure is made in the form of a mesh and welded to the top of the furnace. The distance between the rods is chosen less than the size of the stones used.
After final assembly, the stove is installed in the bathhouse and the chimney system is set up.
Note! Before first use, carry out a test run. The purpose of such a check is to identify existing shortcomings in the work
It is important to bring the water to a boil. During the test, paint and oil residues will burn, so all doors and windows are opened for ventilation.
The video shows how to make a simple mobile oven from a gas cylinder.
Operating principle of a potbelly stove
A potbelly stove is a primitive version of a metal wood-burning stove. This device works extremely simply: firewood is placed in the firebox, it burns, the stove body heats up and gives off heat to the surrounding air. Smoke gases are removed through the chimney, and the ash is poured through the grate into the ash pan, which should be cleaned periodically.
One of the main advantages of a potbelly stove is its simplicity of design. There are no strict dimensions here, the main thing is that the body can withstand heat and the chimney works properly. An experienced craftsman will make such a stove in just a couple of hours. And you can burn almost any dry wood in it: logs and sawdust. On our website there is an article with a detailed description of the process of making a potbelly stove with your own hands.
A potbelly stove is also heated with other flammable materials: diesel fuel, coal, peat, household waste, etc. If desired, you can cook quite successfully on such a stove. This point should be considered before the construction begins in order to create a smooth cooking surface.
A potbelly stove is a combustion chamber made of thick metal with a loading door, a chimney, a grate and an ash pit. You can use an old gas cylinder as a housing
But one should also take into account the disadvantages of such a heating solution. For starters, there is a high risk of burns and fires.
For the potbelly stove you need to choose a special place, decorated with fire-resistant materials. It is advisable for it to stand to the side, where no one will accidentally touch the body and get burned.
If desired, the upper part of a vertical potbelly stove from an old gas cylinder can be turned into a modest-sized hob
Such a metal structure weighs a lot, so we are not talking about any mobility of the device. It will be difficult to move a potbelly stove to heat different rooms.
Such stoves are usually used to heat utility rooms where there is no electricity or where it is supplied intermittently: garage, barn, workshop, etc.
From two gas cylinders connected perpendicularly, you can make an improved version of the potbelly stove, which allows you to retain more heat and get high efficiency when burning fuel
Another problem is low efficiency, since part of the thermal energy during the combustion of wood literally flies out into the chimney. There are various ways to retain heat and modify your stove slightly to make it work more efficiently.
Finally, you need to take care of good ventilation of the room in which the potbelly stove is installed, since such a device burns a large amount of oxygen during operation.
So, a potbelly stove consists of a metal body, the role of which is usually “invited” to be an old gas cylinder. It is necessary to make two doors in the case: large and small. The first serves to load fuel, the second is needed as a blower, through which air enters from the combustion chamber to ensure the combustion process and draft.
A drawing of a stove-stove from a gas cylinder allows you to make a device with specific parameters and calculated power, but such accuracy is not required
Below, at some distance from the bottom of the structure, a grate should be welded. It can be made from thick wire or simply take a sheet of thick metal and cut long slits in it. The distance between the grate rods should be such that the combustion material does not spill down into the ash pan.
If the potbelly stove will be heated only with wood, the gaps of the grate are made larger, but when it is intended to use wood chips, the grate should be made more frequent.
A curved metal chimney installed on a potbelly stove made from a gas cylinder allows you to retain more heat in the room and increase the efficiency of the structure
The ash box can be welded from sheet metal or take a ready-made metal container of a suitable size and resistant to strong heat. Some people prefer to do without an ash pan altogether, simply scooping out the ash from the lower section as needed, although this is not very convenient. As a rule, the chimney for a potbelly stove is oriented upward to provide the necessary draft.
The standard design of a gas cylinder stove can be modified to increase productivity by turning a solid fuel heater into a heater or hob:
How to make a potbelly stove from a gas cylinder: general principles
To work, you will need a welding machine, a tool for cutting and drilling metal, sheet steel with a thickness of 3 mm, fittings, an angle or pipes for installing a support frame (for a horizontal stove), and pipes for the chimney.
A stove made from a gas cylinder can be equipped with a ready-made stove door by cutting a suitable size hole in the body and welding strips of metal around the perimeter so that there are no gaps between the door frame and the cylinder.
Installing the door on a gas cylinder
The second method is to cut a rectangular hole in the cylinder, and the cut out fragment of the wall serves as the firebox door. It is hung on welded hinges; a strip of metal can be welded on three free sides to cover the cracks. The valve is also welded on.
It is advisable to make the chimney from the stove to the exit into the street broken, consisting of several elbows, otherwise the main part of the thermal energy will immediately go outside through the pipe, without having time to heat the room. It is important that the knees are not at a right or negative angle, otherwise there will be no traction.
How to make a vertical stove from a gas cylinder?
At any convenient height, a firebox opening is cut into the cylinder (about 30x20 cm), and a blower opening is placed below (about 20x10 cm).
For such a stove it is necessary to make grates. The grate is welded from reinforcing bars; it is better not to fasten it tightly inside the stove, but to place it on scraps of corner welded to the walls - if the grates burn out, it will be easier to replace them.
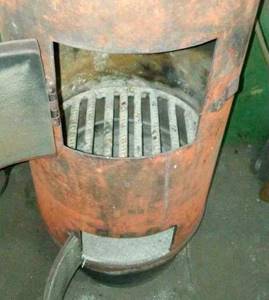
Vertical stove with grates
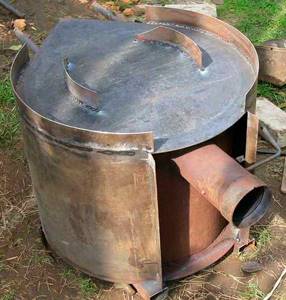
The convex upper part of the cylinder can be cut off and a circle of sheet metal welded in its place. This hob is convenient for heating food or tea. In this case, a hole for the chimney is made in the side of the stove and a short horizontal elbow is installed. If there is no need for a “tile,” a hole for the chimney is drilled at the location where the gearbox is installed.
A vertical stove is convenient to use if the room is small and there is no extra space. Such a homemade potbelly stove does not require the installation of a supporting structure, so it is easy to move and install as a temporary heat source, for example, for heating a greenhouse during periods of low temperatures and frosts.
Horizontal stove made from a gas cylinder
An opening for the firebox is cut out in the end part of the cylinder, and a door is installed. Grates are usually not installed inside a horizontal stove so as not to waste useful space. Instead, holes in 5-6 rows are drilled in the lower part of the horizontal stove, and a flat sheet metal box is welded on the outside - it will serve as an ash pit.

Horizontal stove
The stove body is mounted on a frame welded from suitable steel pipes or angles. It is recommended to prepare design drawings in advance, calculating the optimal dimensions of all external elements.
By welding a small metal sheet on top of the body, you can get a convenient cooking surface.
A horizontal potbelly stove made from a gas cylinder with your own hands is suitable for a garage, a country house, it can be installed in a bathhouse if you build a heater.
Increasing efficiency
A potbelly stove made from a gas cylinder has a significant drawback: the fuel in it burns out quickly and the bulk of the thermal energy goes outside.
In addition to lengthening the inside of the chimney, you can increase the efficiency of the stove in other ways
:
- Mount an external metal casing with holes in the lower and upper parts - due to intense convection, the air in the room will warm up faster.
Potbelly stove in a metal casing- Weld metal strips (ends) or pipes to the stove body, creating convective fins.
- Cover the stove with brick - the structure will take longer to warm up, but at the same time give off heat more evenly and for a long time. In addition, the risk of accidentally getting burned is reduced.
- Mount a metal mesh on the stove body or around a vertical pipe and fill it with stones. This is the principle used to make a sauna stove; the stones (like the brick in the previous version) act as a heat accumulator. To prevent stones from bursting when overheated, it is necessary to choose a material with a homogeneous, non-layered structure, without inclusions. Please note that some rocks emit radon, especially when heated. It is better to purchase stones for the stove in a specialized store.
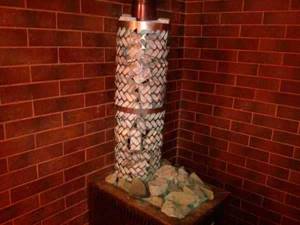
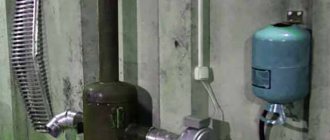
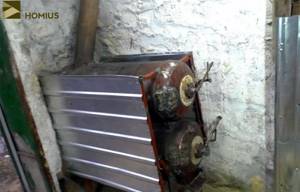
Cylinder in a mesh of stones- Install a water jacket on the chimney and mount a circuit for supplying coolant to the radiators - in this case, we get a heating boiler from an unnecessary gas cylinder. Such a system will be more efficient when using a pump for forced circulation of coolant. And we must not forget about the expansion tank, the volume of which must be at least 10% of the volume of liquid in the system.
- Water circuit
Cutting gas cylinders
Many people prefer to use a gas cutter at this stage, but using an angle grinder (angle grinder) is much more convenient. The fact is that the water from the cylinder does not drain, which means it will splash to the sides and boil, which is quite inconvenient (a conclusion from my personal experience). Using an angle grinder and a cutting disc, the top comes off fairly easily.
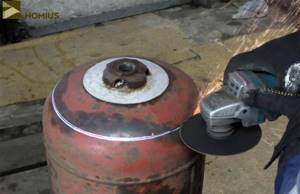
Cutting the cylinder using a grinder along the marked line
After this work is completed, the separated lid is removed and the water is poured into the second cylinder. In those areas where the hinges of our future potbelly stove door will be, the paint is removed from the surface. The second gas cylinder is prepared for the main work in exactly the same way.
All that remains is to weld the hinges so that the door can open. In addition, I made a hook for the locking mechanism, welding it to the side of the cylinder. The locking handle itself was made of a short bolt, which was screwed into place of the tap and a pin welded to it. Essentially, everything here is quite simple. In the photo below you can see what it looks like.
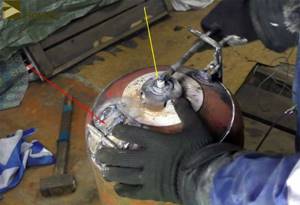
Red arrow – hinges (2 pcs.), yellow – locking mechanism, which can be completely turned out
Step-by-step instructions for making a stove based on a gas cylinder
Once the foundation has matured, basic plumbing work can begin. Their sequence can be displayed as follows:
The cylinder is inspected for irreparable defects. Excess pressure is released from the vessel using a valve. The valve is turned off and gas condensate is drained through its opening. Obviously, the above and previous paragraphs are performed in a well-ventilated area, away from sources of fire. To decontaminate the vessel from residual flammable hydrocarbons, the vessel is filled with water. Having slightly reduced the water level, using an angle grinder, an incision is made along the seam of the circumference, until the front end is separated from the cylinder of the cylinder body. Once opened in this way, the container can be completely freed of water. The separated part of the front end of the cylinder is geometrically shaped for use as a combustion door. At the same stage, the part is equipped with door fittings: awnings, handles, latches. The lower part of the cylinder cylinder is marked, and in it, using the same angle grinder, a long groove is cut with dimensions: width 90 - 120 mm, length for almost the entire reach of the body, with the exception of 220 - 250 mm of the metal rear sight left in the rear part of the cylinder. Two strips 75 mm wide, cut from a sheet of metal about 3 mm thick, are welded to the resulting groove in a vertical position. This is the body of the future ash pit. From below it is covered with a strip of metal cut out earlier. The end part is equipped with a door with accompanying fittings, which is a blower. The furnace body is equipped with legs, which can be made either in a monolithic version, using welding, or in a removable version, with the ability to adjust the height. In this case, fixation is carried out using bolted connections. Next comes the turn of equipping the bottom of the firebox with a grate. It can be one-piece and can be stacked. The role of the grate is performed by sections of reinforcing rod with a diameter of 16 mm. Alloy reinforcement gives very good results in terms of service life. The pitch of the grate set in the grate is about 8 - 12 mm. An alternative to making a grate is to perforate the bottom of the firebox in a random order using a drill with a diameter of 9 - 10 mm. It is difficult to objectively estimate the labor costs for implementing both options. It all depends on the quality of the tools and equipment used, as well as the skills of the operator. On the upper platform of the stove we arrange the mouth of the chimney, ensuring its straightness for the first 450 - 500 mm of the outgoing gas stream. Next, a basket for stone backfill is installed around the mouth, which is assembled from a reinforcing rod connected to each other by electric arc welding. It is worth noting that the height of the basket should be about 400 mm, while the height of the stone backfill will reach 270 - 320 mm. Next begins the stage of auditing the welding seams, the quality of the connections between the doors and the firebox, as well as the ash pan and ash pan. To give the stove an aesthetic appearance, welding seams can be refined using a grinding wheel. In addition, removing the top layer of a seam can reveal hidden cavities and cavities and visualize areas of lack of penetration. After examining the structure and eliminating any identified deficiencies, it is time to install it on the finished foundation. By this time, the specified place should be equipped with a chimney that communicates directly with the atmosphere. Here it is necessary to note strict compliance with all fire safety standards and regulations, especially regarding the interface of the chimney body with the contact surfaces of the floors and roof. The standard cross-section of the smoke channel for stoves of this design and power should be taken within 120 mm
It is worth paying attention to the need to equip the outer cut of the chimney with a windproof canopy, and also that its height should be 850 - 1100 mm above the level of the roof ridge. The smoke channel of the stove is connected to the chimney through a flexible insert. Corrugated pipes on the market normally perform this function, fully ensuring both the alignment of the working holes and their reliable sealing
Installation of a chimney for a homemade stove
Smoke removal is a very important process when installing a wood stove in enclosed spaces. Carbon monoxide is quite dangerous to human life and health. In addition, the draft will depend on the quality of the chimney, and therefore the quality of heating and the rate of temperature increase.
A hole was cut in the upper compartment of the stove. Here I used a gas burner, which turned out to be more convenient. The most interesting thing is that chimney pipes, if bought at the markets, will cost a fairly large amount. I was lucky; I had several pieces with a diameter of 100 mm lying in the garage. If there is no way to find them for free, then it is better to try to purchase them at scrap metal collection points.
To make the hole for the pipe more even, I used the rest of the disc from the grinder, although, in fact, there is no need for perfect accuracy here.
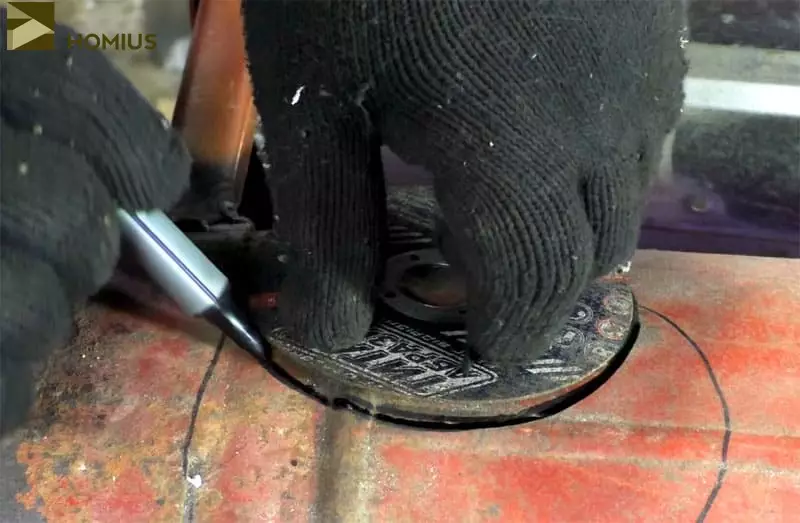
Marking the hole for the future chimney
I don’t think it’s worth talking about welding the smoke exhaust pipe itself. Each room has individual dimensions and layout, which means that in the end you won’t be able to find a single repeating option. For greater heat transfer, the chimney can be made using several elbows, although the heat that the flame will emit in such a potbelly stove is sometimes even too much.
The chimney was led out at a slight slope towards the wall, and then to the street (under the garage ceiling)
What do you need to prepare?
From the tools you need to collect:
- welding machine (200A);
- grinder – “grinder”, preferably with discs with a diameter of at least 180 mm;
- electrodes;
- circles for grinding and cutting metal;
- hammer cleaning slag from welding;
- a brush with metal bristles;
- folding meter, tape measure, chalk or marker for marking;
- drill and drill bits of the required diameters;
- chisel, regular hammer and pliers.
From materials, in addition to one or two gas cylinders, you must purchase:
- a sheet of metal, at least three millimeters thick - it is useful for constructing a hob and ash pan;
- ready-made cast iron doors, or you can also make them yourself from a metal sheet or a piece of metal cut from a cylinder;
- chimney pipe;
- corner or thick reinforcement - they will be needed for the manufacture of legs and grate. The latter can be purchased ready-made (from cast iron) or constructed using holes drilled in the bottom of the cylinder.
It should be noted here that both a standard gas cylinder and a small cylinder are suitable for the manufacture of such a stove.
As mentioned above, a cylinder stove can be vertical or horizontal. You can choose the one you need based on the amount of space allocated for installing the potbelly stove and the ease of its operation.
Preparing the balloon
Proper preparation of the cylinder is a very important step before starting work, especially if the potbelly stove is made from a container that recently contained gas. Residual gas may remain inside, and when cutting, which is accompanied by sparks, the cylinder may explode
- Therefore, you first need to unscrew the valve located on top of the cylinder and clear the passage for the remaining gas to escape - this procedure will take some time. It is better to leave the container open overnight in the open air or in a well-ventilated non-residential area, or even better - fill it with water to the very top.
- Next, the container is turned over and the resulting condensate is drained. It has a very unpleasant odor, so this process should also not be carried out in a room where people live.
The washed container no longer poses any risk of explosion when working with it, and you can safely begin the cutting process.
How to make a potbelly stove with your own hands
The most popular model for creating with your own hands is the so-called potbelly stove, that is, an emergency backup stove based on a gas cylinder. It can be built from a cylinder with a capacity of 12 or 27 liters. You can make it from a 50-liter container, but then it can only be used in country houses, and not in apartments.
The potbelly stove also has a main drawback - it will not be able to heat constantly, since sooner or later the thin metal with which the cylinder body is equipped will burn out anyway. However, it can be a great help during periodic blackouts, or can help out if additional heating is needed in utility rooms.
Making a potbelly stove is quite simple. You buy units, take a door for the firebox or a monoblock from the room for the blower. To create such a design, you will not need grates, ash pans or internal partitions. But what the stove cannot work without is a horizontal chimney based on a metal pipe.
Please note that the diameter of the chimney on a stove from a 12-liter cylinder should be 60 mm, on a 27-liter one - 80, and on a 50-liter one - 120, respectively
How to choose a cylinder
A 5 liter household gas cylinder is too small to heat the room. And fuel will only fit in it in the form of briquettes or wood chips. A 12-liter cylinder will allow you to develop thermal power up to 3 kW. Such a stove can warm a small lodge or tent. Gas cylinders of 27 liters provide up to 7 kW, we can talk about heating a small garden house, greenhouse or garage.
Gas cylinder options
And finally, the king of household gas cylinders is the 50-liter giant. This is the best option for creating a potbelly stove with your own hands, suitable for heating a country house. 40-liter industrial gas cylinders have too small a diameter and thick walls. It is better to cut and shorten them. Thick walls will take longer to warm up and retain heat longer. Such a stove will also last significantly longer.
Barbecue oven
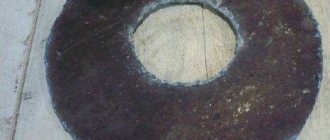
This wonderful device is made from two rims from passenger car wheels. Although, if someone wants a bigger stove, then there are no restrictions: you can use wheels from a UAZ or GAZ-53. One of them has the bottom carefully cut out and then the rims are welded together.
We invite you to familiarize yourself with the Bathhouse with a garage under one roof
In order for the unit to be securely installed on any surface, the legs are welded to the lower section, as shown in the photo. By the way, the hole for the hub must also be plugged, but the side holes can be left, air will flow through them into the firebox. To make it easier to carry, handles are welded to the outside of the body, and an opening for the door is cut in the side.
The latter is made from the same piece, mounted on hinges. That's it, the oven made from car rims for barbecuing and cooking is ready. As practice shows, it can accommodate 5 skewers with meat.
How to properly make a chimney?
To ensure maximum stability in the operation of a stove structure made from a cylinder, it is imperative to arrange high-quality draft.
To achieve this goal, the cut of the stove chimney pipe must be installed at a certain height. This is slightly higher than the edge of the mounted grate. When connecting a gas chimney to the side, it is necessary to ensure that the length of the strictly horizontal section is approximately 400 mm. At the very bottom of the vertically located part, it is worth organizing high-quality removal of accumulated moisture, as the drawings show.
- At the same time, it is recommended to use certain measures regarding the removal of incoming heat from the chimney part. There are two methods for carrying out this process:
- A horizontal section is being installed at a slight inclination of 35 degrees. Immediately after this, the channel turns upward and leads out. A completed or purchased heat exchanger of a special samovar category is installed on the chimney element; The pipe, which leaves the furnace at a special angle and then passes through the rooms, will be able to transfer warm air. Thanks to this, overall efficiency indicators become higher, while at the same time fuel consumption is seriously reduced.
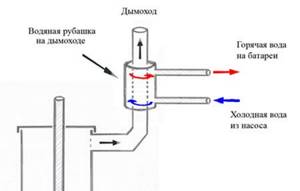
A heating system based on water fuel will provide the opportunity to install about 2 or 3 radiators in a country house or garage and provide them with heat. Such a device is characterized by simplicity in the manufacturing process, that is, a special water jacket is made in the chimney section, which has two high-quality pipes.
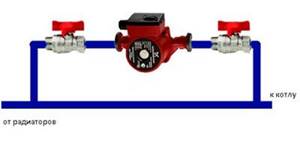
The circulation process present in the water circuit, which is mounted on the body of the stove chimney from a cylinder, will have to be adjusted in a forced manner. A household circulation pump is ideal for this purpose.
Chimney installation
The chimney is an important component for removing combustion products. They come in three types:
They come in three types:
- Ceramic. A ceramic chimney has the longest shelf life. Maximum resistance to high temperatures.
- Brick. Due to its rough surface, a brick chimney quickly accumulates soot and slows down air draft.
- Steel. A steel chimney is most suitable for a bathhouse due to its affordable price. Also, due to the rapid heating of the metal, a tank is installed and then used for procedures. A stainless steel chimney is the most current. This material is not afraid of water, high temperatures, is not susceptible to corrosion, is lightweight, durable and cheap.
Build process:
- Before installation, you need to mark the location for making the hole.
- A galvanized steel casing is installed on the pipe, after which rings are put on and fixed to the ceiling. The lower pipe is secured with self-tapping screws. The clamps securely fix the chimney.
- The second part is installed on the roof. The holes between the roof and the chimney are filled with expanded clay, clay or asbestos.
Tips and tricks
Experienced craftsmen advise making a potbelly stove from a gas cylinder, taking into account the following nuances:
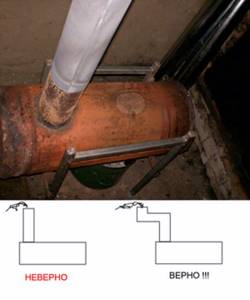
The chimney should not take the shortest route. In this case, the heat will leave along with the combustion products. The optimal type of chimney is a broken pipe.
The chimney is made in a broken shape so that heat does not escape from the stove along with the smoke. Curved pipe prevents heat energy from escaping
It’s just important that the pipe is not made of aluminum!
- Any type of fuel can be used as fuel - coal, wood. If necessary, you can burn household waste and carpentry waste in a potbelly stove.
- You can increase heat transfer and make a potbelly stove with high efficiency by increasing the length of the chimney. Parts with straight sections or downward slopes should be avoided.
- If you attach an additional one to the main body cylinder (in the form of a vertical pipe), then you can use the heat twice as much. Such a potbelly stove of two cylinders creates good draft; combustion products and smoke will not enter the room/garage/utility room. In addition, the heat transfer of the heating device will increase.
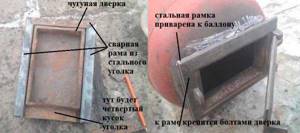
How to install a cast iron door on a metal cylinder
When making a sauna stove from a gas cylinder with your own hands, it is easier to attach a ready-made casting than to weld the door yourself. But it’s not clear how to join two different metals. It's really simple. Buy the cast iron door you like or the size that suits you. It comes with a frame. The same frame is welded from a metal corner of a suitable size. It is welded to the cylinder, and the cast iron door is bolted to it.
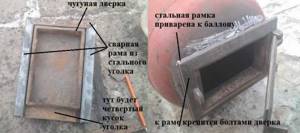
How to attach a cast iron door to a gas cylinder
To seal between the frames, you can lay a layer of asbestos or mineral wool cardboard (just make sure that it can withstand high temperatures - up to 1200°C minimum). You can do it differently - weld a small edge of 1-2 cm onto the metal frame, which will cover the gap.
Types of gas furnaces
Based on the nature of their internal structure, gas furnaces are divided into several types:
- by application - a conventional convection unit, which is the optimal solution for a sauna. The consumer receives dry steam at an air temperature exceeding ninety degrees. Such stoves are made of metal, the heater is closed. The peculiarity is that wet steam is supplied. Stones covered with a metal casing are able to retain heat longer, and the steam room does not immediately cool down after turning off the gas;
- According to the working principle, the steam room is heated using the convection method. Modern furnace designs are equipped with complex heat exchangers, and it is possible to connect a heating circuit. When such a stove operates, the steam room and adjacent rooms are simultaneously heated, while gas consumption does not increase significantly;
- for heating water - there are several models that heat water with different levels of efficiency:
- a stove with a remote water tank is a classic option. The storage tank is mounted on the chimney, the water is heated by accumulating heat from heated smoke, the temperature of which reaches one hundred degrees or more, which is quite enough;
- A heat exchanger is installed in the furnace body, maintaining a certain temperature regime for water. While the stove is heating, the water remains hot. The heating principle is flow-through;
- gas stoves with built-in water tanks are considered convenient for small steam rooms. For example, a tank with a capacity of forty to eighty liters will provide water for washing one to three people.
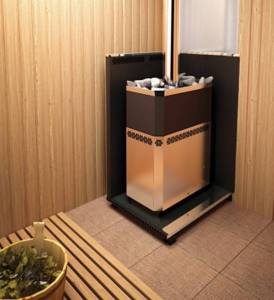
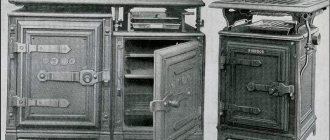
What does a gas sauna stove look like?
Advantages and disadvantages
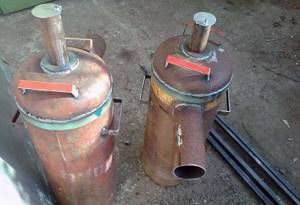
A significant advantage of a vertical stove over a horizontal one is its compactness, which allows it to occupy a minimum area in the bathhouse. Suitable for small spaces.
Other benefits include:
- saving money on investments;
- metal, as a reliable material, has excellent mechanical strength and can withstand temperature fluctuations that do not affect this property;
- Sufficiently thick walls of the material provide high heat transfer. After complete combustion of the fuel, heat is retained further;
- the rounded section of the pipe provides powerful heat distribution and the formation of the necessary draft;
- quick heating of the room in less than 1 hour;
- a metal stove will last more than 10 years if its manufacturing is done skillfully;
- The cylindrical shape of the pipe will eliminate unnecessary right angles and long welds. The main reason for the appearance of corrosion and holes through which carbon monoxide leaks is precisely the welds.
The main and common disadvantage of metal construction is that it is more susceptible to corrosion.
Features of operation and rules of safety regulations
It is very easy to operate such a sauna stove:
- collected thick and long firewood;
- they filled the entire volume of the firebox;
- They opened the damper and ash pan, made sure there was good draft and lit the wood.
Everything, as the wood burns, the stones heat up, the water heats up. You can call your friends, take brooms and a supply of herbal decoction or just kvass and, after throwing a few shakes on the stones, enjoy the fragrant and hot steam and conversation with loved ones.
When operating, it is important to follow the rules for safe use of the oven. There are few of them and they are very simple:
- Be sure to monitor the condition of the chimney. At the first sign of its malfunction or decrease in traction, all problems will need to be corrected immediately. It is recommended to clean the chimney at least once a month;
- after the wood starts burning, the ash pan door must be closed;
- The firebox door opens only to add firewood and control its combustion. The rest of the time, when the fuel is burning, the door must be securely locked;
- You should not try to heat the oven by touching the sides with your bare hands - this will lead to burns on your hands. The level of heating can be felt by the amount of steam from the stones when water is splashed on them from a ladle.