Features and types of homemade stoves from a gas cylinder
All solid fuel stoves made from a gas cylinder have common design elements:
- A housing in which holes are cut for the door, vent and exhaust pipe.
- Blower.
- Exhaust pipe equipped with a throttle valve.
- A grate located low above the bottom of the stove. Fuel is placed on it and its combustion occurs.
- Internal walls that form the flow of combustion products.
- Legs.
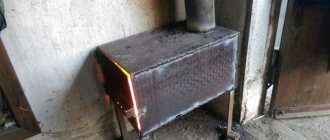
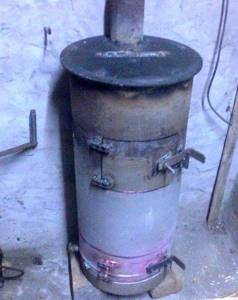
Potbelly stove design
Through the door, fuel is loaded and ash and slag are removed from the grate space. An air flow enters the combustion chamber through the blower and the combustion mode is adjusted. The blower is made as a structural part of the door or is made in the form of a separate hole with a damper. A throttle-type damper is installed into the exhaust pipe, which also regulates the combustion mode. Gas cylinder stoves are available in vertical and horizontal versions. A horizontal oven is easier to implement, but takes up a lot of space. The vertical one can be placed in any corner of the room; it has significantly better draft and fuel combustion efficiency.
Vertical oven from a gas cylinder Horizontal oven from a gas cylinder
In liquid fuel furnaces (they are also called oil or drip furnaces), instead of a grate, a burner of one design or another is fixed and a fuel supply pipeline is installed. The door is much smaller - it is not needed for loading fuel and removing ash and slag, but only for adjusting the air flow, as well as for installing and servicing the burner.
To the basic configuration of a gas cylinder stove, a home craftsman can add various improvements: a burn-protection guard, burners for heating and preparing food and drinks, hangers for drying clothes and shoes, etc.
Features of operating a mobile stove
Before lighting the stove, the blower valve is fully opened, after which scraps of paper or cardboard are placed in the firebox. Firewood is laid on top of them in a “hut” or “well”. After igniting the fuel, the combustion door should be slammed shut. As soon as a stable flame appears in the chamber, close the blower damper. By adjusting it, you increase the operating time of the heating device from one load and set the desired temperature. As it burns, add 3-4 logs to the working chamber.
If pizza or flatbreads will be baked in the oven, then a ceramic tray is placed on the roasting pan. After ignition, the wood is given the opportunity to burn thoroughly. Since smoke will enter the baking chamber during cooking, use only hard wood. For cooking, it is best to prepare a supply of “noble” fruit wood from cherries, plums, apricots, pears, etc. In this case, you will be able to obtain baked goods with an incomparable aroma. And, on the contrary, you should not use pine, laminated timber and various waste wood building materials for these purposes, since the substances released during their combustion can be hazardous to health.
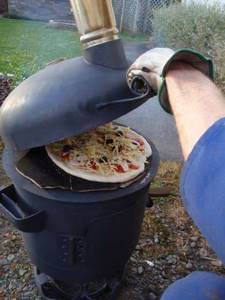
There is nothing tastier than pizza baked “smoky” in an oven you built yourself.
The temperature in the mobile oven can be adjusted in two ways. The first is the reduction in air flow through the blower described above. The second is a change in heating carried out by rotating the furnace hood relative to the opening for the exit of flammable gases. The closer the chimney is to it, the more heat will go into the chimney. Heating is controlled using a thermometer. For baking, a temperature of 200 to 260 degrees will be sufficient.
The simplicity and accessibility of the design described above allows you to build a stove with your own hands, spending one day on it. This unit is well suited for heating utility rooms and cooking food at the same time. Be sure to take advantage of the opportunity to make such a stove. It will be enough to take her out into the wild once and cook meat or smoky pizza for friends to ensure her reputation as a skillful host and unsurpassed cook for many years to come.
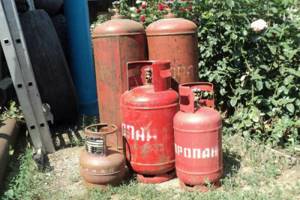
How to choose a cylinder
A 5 liter household gas cylinder is too small to heat the room. And fuel can only fit in it in the form of briquettes or wood chips. A 12-liter cylinder will allow you to develop thermal power up to 3 kW. This stove can warm a small lodge or tent. Gas cylinders of 27 liters provide up to 7 kW, we can talk about heating a small garden house, greenhouse or garage.
Gas cylinder options
And finally, the king of household gas cylinders is the 50-liter giant. This is the best option for creating a potbelly stove with your own hands, suitable for heating a country house. 40-liter industrial gas cylinders have too small a diameter and thick walls. It is better to cut and shorten them. Thick walls will take longer to warm up and retain heat longer. Such a stove will also last significantly longer.
Technology for making a stove from a conventional gas cylinder
IMPORTANT! Before starting work with any gas cylinder, it is necessary to completely remove any remaining gas from it! To do this, the cylinder is filled with water and detergent, designed to rid the future stove of gas odors and mercaptan fragrances.
Next, mark the holes for the door, vent and exhaust pipe and cut them out with a grinder. You can purchase a ready-made cast iron stove door in a block with a blower. In this case, a frame of their corners is welded to the opening in the gas cylinder, and a cast door is bolted to it. If aesthetics are not so important, then the door is made from a cut piece of a cylinder. In this case, a more or less wide gap will inevitably remain. In the most primitive version, there are no grates and protrusions that form the flow of combustion products.
The fuel is loaded onto the bottom of the stove, and after it is completely burned out, the ash is removed with a scoop. In this embodiment, it is difficult to implement a continuous combustion mode. Features of making a horizontal potbelly stove A horizontal stove made from a gas cylinder is quite suitable for heating a garage or greenhouse.
In a horizontal potbelly stove there is little space left to place the grate and ash tray, so sometimes the grate is welded into the bottom of the stove, and the ash box is welded from below. Potbelly stove doors are hung on purchased or homemade hinges. An interesting option is that hinges are three links of a massive drive chain from a powerful engine or other mechanism; the outer links are welded to the wall and to the door, respectively.
Potbelly stoves - proven and simple designs
Potbelly stoves were a hit of the 20s of the last century. At that time, these stoves competed with brick stoves and were installed everywhere, even in apartments. Later, with the advent of centralized heating, they lost their relevance, but are used in garages, dachas, and for heating utility or outbuildings.
Sheet metal
Potbelly stoves from a cylinder, barrel or pipe
The most suitable material for making a potbelly stove for a garage is propane cylinders or a pipe with a thick wall. Barrels are also suitable, but you need to look for ones that are not very large in volume and have a thick wall. In any option, the minimum wall thickness is 2-3 mm, the optimal is 5 mm. Such a stove will serve for many years.
By design they are vertical and horizontal. It is more convenient to burn horizontally with firewood - longer logs will fit. It’s easier to make one extended upward, but the firebox is small in size, so you’ll have to cut the wood finely.
A potbelly stove for a garage can be made from a cylinder or pipe with a thick wall
Vertical
First, how to make a vertical stove for a garage from a cylinder or pipe. Divide the selected segment into two unequal parts. Below is a smaller one for collecting ash, above is the main one for storing firewood. The following is the order of work:
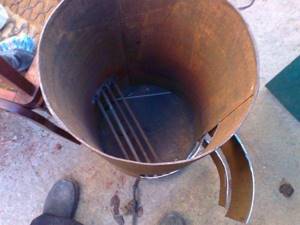
- Cut out the doors. Small at the bottom, solid at the top. We use the cut pieces as doors, so we don’t throw them away.
- We weld the grates in the chosen place. Usually this is steel reinforcement cut into pieces of the required length with a thickness of 12-16 mm. The reinforcement installation step is about 2 cm.
- Weld the bottom if there is none.
- We cut out a hole in the lid for the chimney, weld a strip of metal about 7-10 cm high. It is better to make the outer diameter of the resulting pipe fit standard chimneys. Then there will be no problems with the installation of the chimney.
- We weld the lid with the welded pipe into place.
- Using welding, we attach the locks and hinges to the cut-out door pieces and install it all in place. As a rule, potbelly stoves are not airtight, so there is no need to make seals. But if desired, you can weld a strip of metal 1.5-2 cm wide around the perimeter of the doors. Its protruding part will cover a small gap around the perimeter.
Overall, that's it. All that remains is to assemble the chimney and you can test a new stove for the garage.
Horizontal
If the housing is located horizontally, the ash box is usually welded from below. It can be welded to the required dimensions from sheet steel or a piece of channel of a suitable size can be used. Holes are made in the part of the body that will be directed downwards. It’s better to cut something like grate bars.
How to make a potbelly stove for a garage from a gas cylinder
Then in the upper part of the body we make a pipe for the chimney. To do this, you can weld a cut piece from a pipe of a suitable diameter. After the piece of pipe is installed and the seam is checked, the metal inside the ring is cut out.
Next you can make the legs. The best fit is pieces of a corner, to which small pieces of metal are attached from below so that they stand stable.
The next step is installing the doors. You can cut a piece of metal onto the ash pan, attach hinges and a lock. There are no special problems here. The gaps around the edges do not interfere - combustion air will flow through them.
There will be no difficulties if you are making a door from metal - welding the hinges is not a problem. Only here, in order to be able to at least slightly regulate the combustion, the door needs to be made a little larger - so that the perimeter of the opening is closed.
How to install stove casting on a metal stove
It is problematic to install furnace casting. Suddenly someone wants to have not a steel door, but a cast iron one. Then you need to weld a frame from a steel corner, attach the casting to it with bolts, and weld this entire structure to the body.
From two barrels
Anyone who has used a potbelly stove knows that very hard radiation comes from its body. Often the walls become heated to a red glow. Then it is impossible to be near her. The problem is solved with an interesting design: two barrels of different diameters, inserted one into the other. The gaps between the walls are filled with pebbles, clay mixed with sand (calcined over a fire, then filled in only after it has cooled). The inner barrel acts as a firebox, and the outer one is just the body.
This stove will take longer to heat up. It will not immediately begin to give off heat, but it will be more comfortable in the garage and after the fuel burns out, it will warm the room for another couple of hours - releasing the heat accumulated in the bookmark.
https://youtube.com/watch?v=PEWZxL2ebXE
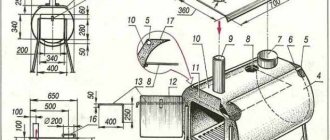
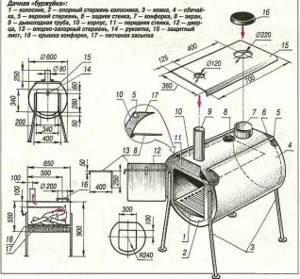
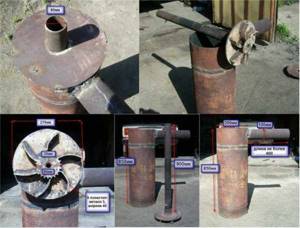
Vertical oven assembly process
A vertical oven is more difficult to manufacture, but requires less space for its installation and has better user qualities. The volume of the cylinder is used more rationally. The principle of operation of the furnace does not change, but is implemented with greater efficiency. In the vertical version, two doors are made - for loading fuel and for the ash tray. Grate bars made of reinforcement are welded between these doors.
In principle, the entire upper part of the furnace can be dedicated to loading fuel, which will ensure long-term operation on one load. However, the volume of the combustion chamber is often reduced to accommodate additional heat exchangers in the upper part. One of the interesting options is through metal pipes welded into the upper part of the gas cylinder, through which air is driven by a fan (necessarily heat-resistant).
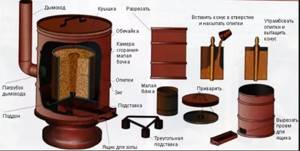
The process of assembling a vertical stove from a cylinder
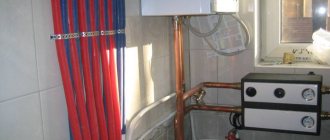
Such a device will significantly increase heat transfer and reduce the heating time of the room several times. If forced water circulation is established through the passage pipes, a water heating system can be installed.
Calculation of basic parameters: drawing and recommendations
To make an optimally efficient potbelly stove, an all-metal cylinder with a volume of 50 liters is suitable.
A standard 50 liter cylinder will be sufficient
Finding such a cylinder is usually not difficult. They are often used in households and industry.
To equip such a stove with a chimney, a pipe with a diameter of 100–125 mm and a thickness of at least 3 mm is used to make the chimney pipe. The chimney itself should be positioned vertically, but deviation from the axis is also allowed (slope no more than 30 degrees). The slope is made for greater efficiency of heat transfer from the chimney pipe. Although the location of the pipe directly depends on the local conditions for installing the potbelly stove.
For ease of operation, the firebox and ash pan compartments are equipped with doors with a locking mechanism. With the doors closed, the combustion process improves and the risk of fire hazardous particles falling into the room is reduced. And also by adjusting the gap with the ash pan door, you can regulate the intensity of air supply to the firebox.
The doors are made of any shape. The main thing is to take into account the standard size of firewood and the convenience of loading it.
An important part of the potbelly stove is the grate. The grate serves to support fuel (wood) and at the same time helps to separate loose combustion products
The combustion process takes place on the grate. Therefore, the metal from which the grate is made must be strong enough and resistant to high temperatures. It is better to make a grate from reinforcement rods with a diameter of at least 12 mm. Such rods are cut to the dimensions of the inside of the cylinder (width) and assembled into a grid with a gap width of 10–15 mm. The rods are connected by welding.
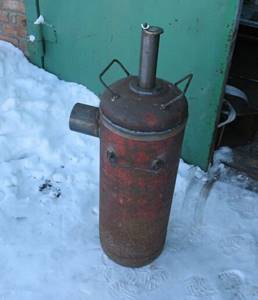
Potbelly stove from a cylinder
The approximate assembly diagram of a horizontal solid fuel stove is applicable to a gas cylinder.
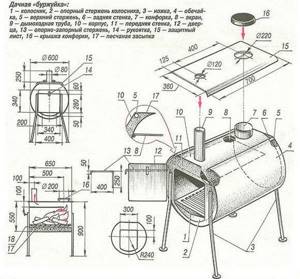
The diagram is applicable for a gas cylinder
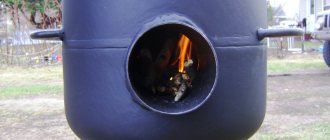
Long-burning stove bubafonya
A bubafonya-type stove made from a gas cylinder is a potbelly stove only in appearance. The design and principle of its operation are significantly different from a simple potbelly stove.
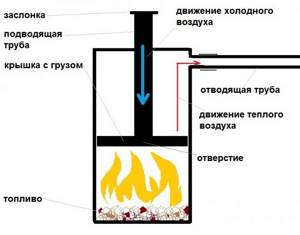
Scheme of operation of the bubafonya long-burning stove
Furnaces of this type are produced by several industrial enterprises, but they are not cheap. If you have an equipped home workshop and basic skills in welding and plumbing, a bubafonya stove from a gas cylinder is quite affordable to make with your own hands.
Strengths and weaknesses of Bubafoni
The pyrolysis stove has a number of positive qualities:
- Simplicity of design. Having welding skills and experience working with metal, building a stove will not be difficult.
- Universalism. Bubafonya is very unpretentious in terms of fuel: you can throw firewood, coal, sawdust, chips and other types of wood waste into it. The stove also copes well with pellets – inexpensive, environmentally friendly granules.
- Duration of work. The time it takes for one stack of firewood to burn out is almost a day: during this time, the stove regularly generates heat. This indicator may vary depending on the modification of the device, the volume of its firebox, the oxygen circulation rate, etc.
It is also worth mentioning the main disadvantages of Bubafoni:
- Low efficiency. The reason for this is uneven heating of the device body with sufficiently low heat transfer. More “advanced” pyrolysis furnaces are much more efficient in this regard: their efficiency often exceeds 90%.
- Inconvenient to clean. There is no ash pan as such in the design, so the remaining combustion products are removed through the top. Some modifications of the stove are equipped with a door at the bottom, which facilitates the procedure for removing ash and ash.
- Low aesthetics. The appearance of Bubafoni can hardly be called beautiful, so it is mainly used for heating utility rooms.
Features and principle of operation
It implements the principle of long-term combustion, based on the physical and chemical phenomenon of pyrolysis - the smoldering of fuel with a lack of oxygen and the combustion of gases released during this process. One load of firewood is enough for 4-8 hours of burning. The design of the stove is different in that the air supply pipe with a damper at the end is located vertically and exits through the top of the stove with a small, non-sealed gap,
The pipe has vertical mobility. At its lower end there is a massive disk with guides for the flow of gases. The chimney is welded to the top of the stove on the side. Firewood is loaded into the oven vertically, the disk presses it against the grate. As the lower layers of fuel burn, the disk lowers and combustion air is supplied to the upper layer of fuel, which is subjected to pyrolysis.
Advantages and disadvantages
The advantages of the Bubafonya top combustion stove are as follows:
- High fuel efficiency. Heat does not escape into the chimney.
- Ease of manufacture and operation.
However, the design also has disadvantages:
- It is impossible to replenish the fuel supply in the stove before it is completely burned.
- It is impossible to interrupt the combustion process.
- When the sand draft decreases, it smokes.
- Not suitable for quickly warming up cold rooms.
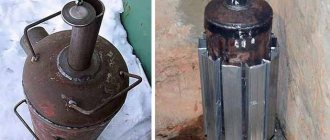
Necessary materials for making a bubafonya stove
The necessary materials are the same gas cylinder, fittings for the grate, a 90-degree pipe, a metal pipe one and a half meters long and a heavy disk with a diameter slightly smaller than the internal diameter of the gas cylinder.
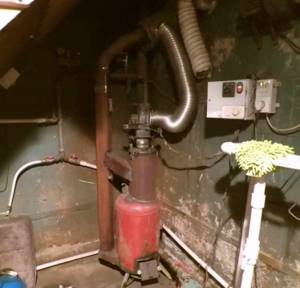
A self-made bubafonya stove made from a gas cylinder is suitable for heating a greenhouse or other uninhabited space.
Features of operation
During operation, it is important to remember the following: Firewood in layers must be of the same length, they should be loaded carefully and evenly, avoiding distortions
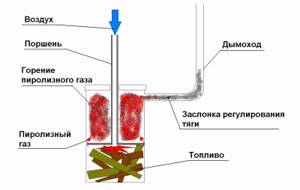
Diagram of a long-burning stove Bubafonya
For initial warming up and entering the pyrolysis mode, the stove requires an hour or more, and up to one fifth of the fuel is consumed.
It is also necessary to carefully monitor the position of the damper to prevent smoke from entering the room.
DIY pyrolysis oven
Those who own a country house, a bathhouse, a country house, or simply want to heat their home in a natural, inexpensive way will undoubtedly like a pyrolysis stove.
You say: “What, for example, is worse than a fireplace or a stone stove?”
Of course, stone stoves are very romantic and beautiful. However, in order to install such a structure in a house, you will need quite a lot of space, with a foundation prepared for it. Another disadvantage of fireplaces and heaters is that to maintain their combustion, you need to continuously add an impressive amount of kindling material.
Therefore, the most convenient option for accessible heat in a bathhouse or home is a pyrolysis oven.
Of course, such a stove has its advantages and some disadvantages, the latter, however, are quite insignificant.
Advantages of a pyrolysis oven.
- Very economical fuel consumption. This is achieved due to the fact that such a stove operates not only on fuel, but also on gases released during its combustion. For this property, the pyrolysis furnace received a “second name” - a gas generator.
- Almost any material can be used as fuel for the gas generator: from wood waste and old magazines, to recycled engine oil and plastic.
- Minimum amount of soot produced. Due to the fact that the pyrolysis furnace processes the materials it has already processed several times, there is practically no residue left in the form of burnt fuel. This is a very environmentally friendly home heating solution.
- High utility rate, up to 80%. Even if your entire house is heated by one steam generator, you can wear one T-shirt in all rooms, even in the most severe frosts.
- Easy to control the oven system. Without a doubt, any household member can cope with the principle of controlling this equipment. Moreover, it does not require close attention; you just need to set the heating power and occasionally load fuel.
- You don’t have to spend money on fuel or think about where to throw away household waste without harming the environment. Your waste is the fuel for the pyrolysis furnace.
Although this alternative type of heating has many advantages, of course, it is not without several disadvantages.
- If you buy a ready-made boiler in specialized stores, it will cost you a pretty penny.
- Fuel that is too wet cannot be used in any way for such a stove.
- The gas generator must be permanently connected to the electrical network.
As you can see, in the lists we have given, pyrolysis furnaces still have more advantages than disadvantages.
Furnace in production
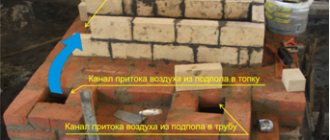
A waste oil furnace operates as follows: a supply of oil is poured into the fuel compartment, it is ignited, and more or less air flow is supplied through the air damper, thus controlling the power of the furnace. Combustion products rise through a vertical perforated pipe and carry with them vapors of evaporating oil.
This mixture is burned along the entire length of the pipe and enters the afterburner chamber, divided into two parts. In the first, oil vapors are burned, in the second, with a lack of oxygen, nitrogen compounds are split into oxygen and nitrogen. The resulting oxygen promotes afterburning of combustion products, ensuring constant temperature and energy efficiency.
Pyrolysis oil furnace
A pyrolysis oil furnace made from a gas cylinder has a very high efficiency - about 80%. The disadvantage of such a pyrolysis device is harmful fumes and an unpleasant odor. This stove is not suitable for residential premises or areas where animals are kept.
How to make an oil stove from a cylinder
The gas cylinder exhaust furnace is made in a vertical design. The top part of the cylinder is cut off, into which the afterburner chamber is welded. There is a hole in the floor of the chamber that can be closed with a flap for adding oil. The outlet for the chimney from the afterburning compartment should be located as far as possible from its partition, at least 20 cm.
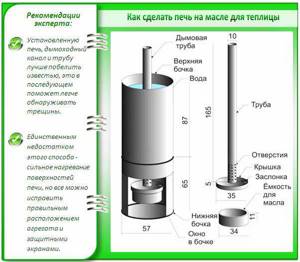
Oil stove for greenhouse
It is important to remember that oil should be added extremely carefully to a hot pyrolysis oven from a gas cylinder; it is better to wait for it to cool completely. In more complex designs, the oil pipe is removed through the top cover; oil can be added to such a stove without interrupting combustion. Making such a stove from a 50-liter cylinder is quite affordable for an average skilled craftsman
Types of oil furnaces
Using waste oil, you can make the already discussed pyrolysis furnace. Another type of oil stove made from a gas cylinder is a dripper or long-burning stove. There is a brick at the bottom of the combustion chamber. Above it there is a tube supplying oil (or diesel fuel).
Using a valve with a poppet valve, the oil supply is adjusted so that approximately one drop drips per minute. To start the furnace, a small puddle of oil is poured onto the brick and set on fire, the brick becomes hot, and the next drops burst into flames upon contact with it. Combustion products rise to the top of the stove and heat it.