About the design
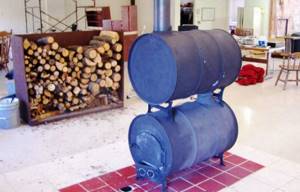
A homemade potbelly stove made from a barrel has a height of 89 cm, a diameter of 60 cm and a weight of 21 - 25 kg, has a solid hearth and a fairly high chimney. Sawdust, shavings, dry firewood and fuel briquettes are used as fuel. Due to the rather thin metal walls and the height of the body, the efficiency of such a furnace does not exceed 15 - 20%.
The principle of its operation is quite simple: wood is placed in the firebox and ignited. When burning, firewood releases a large amount of thermal energy, which is transferred to the body of the potbelly stove. The heated metal releases heat into the surrounding atmosphere and heats the room. The amount of heat increases due to the long chimney through which hot smoke moves to the street.
Expert opinion
Nikolay Davydov
Stove maker with 15 years of experience
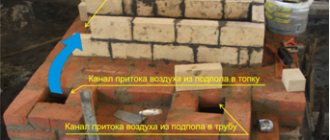
For the correct flow of gas-dynamic processes in a potbelly stove made from a 200 liter barrel, the blower should be located as low as possible. Otherwise, the lower part will take a significant part of the thermal energy and redirect it to the ground. If you need to place the ashpit higher, you can wall up the lower part of the container with bricks.
Types of stoves depending on location: vertical model
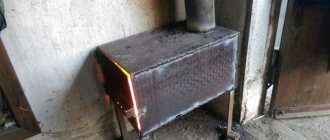
Depending on the plane in which the metal tank will be located, there are two types of homemade potbelly stoves: vertical and horizontal. Each of these types of heating devices has its own advantages and disadvantages.
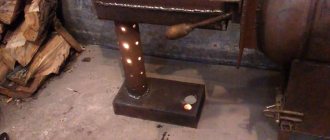
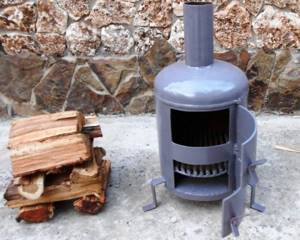
A vertical barrel stove is installed not on the floor, but on legs. To make the door, you will need to cut out the side of the tank and provide it with hinges. It is important to remember that the hinges must be fixed to the barrel and door not from the inside, but from the outside.
A mandatory element of this design is a perforated metal plate, which is called a grate. To fix such a grille, you can use ordinary corners. In order to make a blower, you will need to prepare a metal pipe with a gate valve. The thickness of the metal walls must be sufficient, otherwise the structure will quickly burn out.

A vertical barrel stove is always installed not on the floor, but on legs
The damper for a long-burning wood stove, located in a vertical plane, is fixed with special bolts. When igniting fuel inside the tank, open the blower as far as possible.
A hole in the shape of a circle must be made in the upper part of the canister. It will be needed to connect a chimney structure to a homemade stove. The pipe is joined to a metal surface using welding equipment.
The function of the grate is to protect the bottom of the canister from burning out, as well as to retain thermal energy. Thus, this element is necessary when installing a homemade long-burning stove.
Before starting assembly, it is recommended to draw up an individual drawing of the device. It should be as detailed as possible, contain a drawing of the future unit and its individual components, and also indicate their dimensions.
To make the door, you will need to cut out the side of the tank and provide it with hinges
Design features are determined depending on the purpose of the device and the place where it will be located. If you wish, you can download a ready-made drawing of a potbelly stove on the Internet. However, in this case it is necessary not to make a mistake with its volume.
The vertical version of a homemade heating device is easy to assemble. You can find application for such a unit both in a private home and in the country. The firewood used to light a heating device of this type is selected depending on the dimensions of the firebox.
Choosing a quality barrel
To make a potbelly stove, you can use any steel barrel used in the petrochemical, paint and varnish, chemical, and metallurgical industries for storing and transporting technical products:
- bulk - oils, solvents, paints, diesel fuel, sodium liquid glass;
- pasty - thick lubricants, bitumen;
- bulk - caustic soda, various plasticizers.
They are produced in two types - with an open and closed top; they also differ in the thickness of the bottom, lid and shell.
Any of these containers can be used as a potbelly stove if you first thoroughly clean and rinse its inner surface. However, the thinner the walls of the container, the faster they will burn out and the stove will fail. Therefore, for a potbelly stove you need to choose a product with a metal thickness of more than 2 mm.
Expert opinion
Nikolay Davydov
Stove maker with 15 years of experience
Well, the best option is a stainless steel barrel. High-alloy stainless steel is most resistant to high temperatures in the fuel combustion zone, which means a stove made from it will serve for a longer period.
Preparing the base
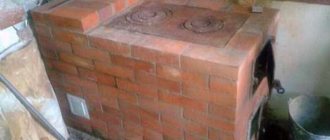
Before installing the stove, it is necessary to provide it with a safe and non-combustible place. Such a base can be made of brick laid on a concrete screed. It is important to know: the free space in front of the barrel is also made of non-combustible material, for example sheet metal. The best option is to make concrete floors, and then put iron on them and install a potbelly stove.
Under no circumstances should you place the barrel near flammable materials or explosive objects. The first include linoleum, polystyrene foam, polyurethane foam and bitumen. And for the second - gas cylinders and cans of gasoline.
Craftsmen recommend making steel legs on the stove from a barrel. To do this you will need reinforcement or metal corners. If the bottom of the barrel is 10 cm from the floor, then the device is located at a safe distance from the base.
Additional materials
To build a heating device, in addition to the 200-liter metal barrel itself, you will need the following additional building materials and stove fittings:
- small steel sheet;
- corner;
- fireclay brick for a vertical model or a reflector for a horizontal one;
- a small piece of channel;
- steel pipes for the chimney;
- fittings for the grate;
- sand, clay for making mortar;
- asbestos cord;
- combustion door;
- blower door;
- basalt wool for chimney insulation.
Final assembly of the furnace
All that's left to do is move the barrel onto the prepared brick base. After this, install the grate in the stove. Next, you need to weld the top cover and make a hole in it for the pipe. Once the chimney is installed, you can heat the stove with wood.
The next step is to place paper on the grate and set it on fire. Dry firewood must be laid carefully, since there is a high probability of accidentally getting burned. The stove from the barrel will gradually heat up. All that needs to be done next is to add more wood so that the flame does not go out.
The device's ash can become clogged with ash, so it must be periodically cleaned of burnt materials.
Required Tools
To build a high-quality potbelly stove from a 200-liter barrel with your own hands, you need to prepare a minimum set of tools, consisting of:
- welding machine;
- grinders or hacksaws for metal;
- standard hammer, pliers and chisel;
- steel brush;
- drills with a set of drills;
- measuring instruments: tape measure, level and plumb line.
Personal protective equipment is also needed when welding: a protective mask, dielectric gloves, protective clothing made of thick fabric and closed shoes.
Rules for installing a homemade potbelly stove
Before installing the stove, you need to familiarize yourself with some rules. This will ensure maximum safety when working with the unit. First of all, it is worth remembering that the potbelly stove should be located only on a surface that is resistant to fire.
You can create a fire-resistant surface yourself. To do this, you will need to prepare a brick or ceramic tile. A platform is laid out from any suitable facing material. It is also recommended to protect the walls from the high temperature produced by a wood-burning stove.
Another way to protect work surfaces from heat is to use special fire-resistant drywall. It is important to remember that there should not be any flammable materials in the immediate vicinity of the stove.
If desired, you can make a potbelly stove with a water circuit. This heating option is more complex from a design point of view. It requires the organization of a heat exchanger, as well as pipe wiring.
It is recommended to protect the floor from the high temperature produced by a wood-burning stove using tiles.
On a note! In a room that will be heated by such equipment, it is necessary to organize proper ventilation communication. It is most advisable to use a design that is of a forced type, since natural ventilation in this case may not be enough.
To make a potbelly stove, you should use only high-quality, reliable materials. Before starting work, it is recommended to study the video on this topic. Photos of stoves also help to understand the intricacies of assembly. A unit that has been made correctly can last for more than one year.
Do-it-yourself sauna stove: photo manufacturing instructions (read more)
Thus, in order to make a stove from a metal barrel, you do not need to have any special knowledge. Strict adherence to the instructions, as well as an understanding of the operating principles of this device, is all you need to know to make a reliable unit.
Where is the best place to install?
When installing a potbelly stove from a 200 liter barrel in a garage, it is important to follow established fire safety rules. In a small room, the heating device should be placed in a place opposite the door. In this case, the distance from it to the walls or other interior items should be at least 50 cm.
Expert opinion
Nikolay Davydov
Stove maker with 15 years of experience
No flammable items should be placed near the stove, and when moving, you should be careful not to accidentally contact exposed skin with its body to avoid burns. The room where the potbelly stove is installed should be well ventilated, at least naturally.
Conclusion
A potbelly stove is a fairly simple heating device, and it is for this quality that it is considered a brilliant invention. How to make a potbelly stove from a barrel can be understood from the instructions and you can build it yourself. A potbelly stove will bring considerable benefits: it will solve the problems of heating outbuildings and country houses remote from the central gas supply lines. In addition, it is easily transported and installed, and can be moved to another room if necessary.
Features of operation
When operating the stove, it is necessary to alternate its lighting cycles, which include:
- fuel storage;
- ignition of the stove;
- direct combustion process with room heating;
- cleaning of ash products from the combustion and blower sections.
The most important stage is the placement of fuel, which must be placed in a certain order to facilitate the ignition process. First you need to put paper and thin dry firewood on the grate, light a fire and close the door.
Once the kindling material has ignited, larger logs can be added. Wood must be loaded carefully to prevent the fire from dying out. Once the wood has been fully loaded, the fire door must be closed tightly.
The draft in a potbelly stove can be adjusted by using a valve on the chimney or by slightly opening the ash door.
While the stove is burning, you must not touch its body to avoid getting burned.
To restore draft after a long period of burning, it is necessary to periodically disassemble the chimney and clean its elements from accumulated soot.
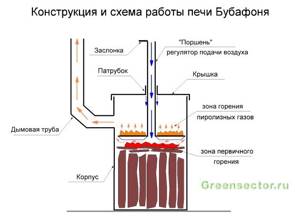
The principle of operation of "Bubafoni"
The well-known law of convection states that when heated, warm masses move upward, and cold ones take their place. The work of “Bubafoni” is based on this principle: when the fuel burns, the air heats up and rises, entering the outlet pipe; the cold flow enters the stove through the pipeline. This is how constant circulation of air masses occurs. This in turn supports the fuel combustion process.
The furnace design includes a damper on the inlet pipe (gate). By setting the gap at a certain level, you can regulate the intensity of fuel combustion.
The work process ends with the complete burning of the wood and the lowering of the piston with the load to the bottom of the fuel tank. It is possible to stop the operation of the furnace ahead of schedule if you completely close the damper on the inlet pipe. This will stop the flow of oxygen into the stove. Another way to complete the heating process is to use fire safety equipment.
Recommendations and common mistakes
Making a tandoor in a 200-liter barrel with your own hands is quite simple - you can do it in literally four hours. But if the calculations are made incorrectly, inaccuracies may arise. The main mistakes are:
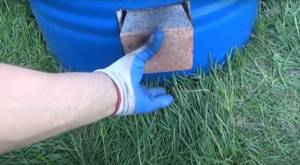
- Particular attention is paid to the brick elements - they need to be cut out very carefully in order to get truly isosceles trapezoids with sides diverging at the same angles.
- It is better to take at least 8-10 bricks with a reserve, since they may crack or not fit in size.
- When laying the top row, the last brick may not fit. There's nothing wrong with that: it just needs to be adjusted to size.
- When preparing shish kebab, it is more convenient to use a vertical skewer. Meat is strung on it, and the structure itself must be placed in a deep bowl made of refractory material so that fats do not drip onto the bricks. You can also bake potatoes in them, as shown in the photo.

- You can also use a small tray to collect fat. This is a pot that is attached to a metal crossbar and simply suspended inside the tandoor. In this case, for fastening in the masonry, you need to make slots at the same level, retreating 40-45 cm from the top part. After each preparation, it should be soaked in soapy water or washed immediately.
- For the blower, you will definitely need a plug to regulate the air flow and combustion intensity. It is also recommended to make it from refractory brick, as shown in the photo.
- Since the stove is stationary, it is better to install it not on grass, but on a pre-made foundation, especially since it is quite simple to make it. First, mark a circle on the ground slightly larger than the diameter of the bottom (15-20 cm) and dig it to approximately the same depth. The bottom is covered with a cushion of sand, and a reinforcing mesh is placed on top of it. After this, the formwork must be filled with concrete and wait a day until it completely hardens. It is better to work in dry, hot weather.
Fireplace made of an iron barrel. Fuel and firebox of a metal fireplace.
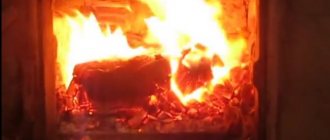
The ideal fuel for a metal hearth, as well as for a classic brick one, is firewood from deciduous trees. Coniferous trees emit large amounts of resin, which contaminates the heating device. The use of coal as fuel is strictly prohibited. The combustion temperature of coal is extremely high, this can lead to deformation of the body, rapid failure of the furnace itself, and increases the risk of fire.
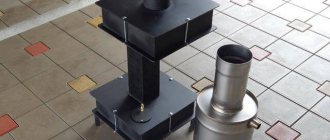
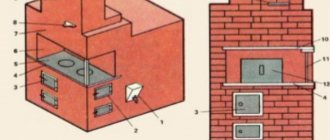
The firebox of a metal fireplace is built a little differently. It is divided into two chambers: in one the fuel burns, in the second smoke accumulates. The chambers are separated by a shutter.
The design of the fireplace is elementary, so for a person with welding skills it will not be difficult to weld such a fireplace. The double design of the firebox, like the double walls of the device itself, allows you to receive heat from the metal firebox, warming the cold air between the walls. When you want to assemble a fireplace made of metal, take this circumstance into account.
The stages of manufacturing a fireplace include assembling the chimney. To do this, you need to purchase special stainless steel pipes and elbows. These parts are the main components of the chimney. The pipe parts are connected to each other using sockets. The parts are secured with mastic, which is used for tiling. This is done like this: the end of one pipe, lubricated with mastic, is inserted into another pipe.
If the pipe does not rise straight up, and the exit is located somewhere to the side, so-called elbows are used, which are a kind of turn signals. Using brackets and wire, the pipe is secured to the wall. If the pipe exits through the attic, then the entire “attic” part of the chimney, like the “room” part, is wrapped in thermal insulation, which is a layer of glass wool wrapped with a mesh around the chimney, and a metal casing is put on the mesh.
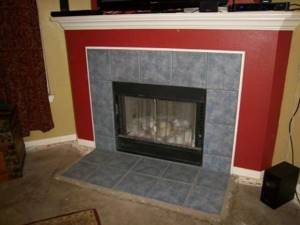
The prototypes of these stoves were ordinary “potbelly stoves”, which entered our everyday life in the 19th century. Since making a fireplace out of metal is quite within the capabilities of the average Russian, the popularity of these decorative heating units has increased greatly in recent years.
A metal fireplace can be quickly installed. It fits harmoniously into any interior of a country house or cottage. You can also add a fireplace mantel and other attributes of a real brick hearth to such a stove.
In the metal fireplace, the flames also flicker and the wood crackles merrily. It can be called an economical option for a large brick hearth.