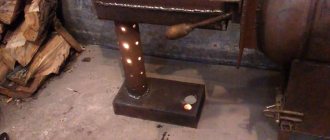
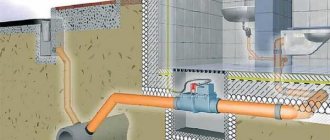
Features of potbelly stoves
The design of the potbelly stove is extremely simple. It is a rectangular or cylindrical combustion chamber to which the chimney is connected. At the bottom there is an ash pan with a grate. There are two doors in the front part - firewood is loaded through one, ash is unloaded through the second. The second door also serves as a blower. Sometimes, instead of two doors, only one is installed - if the combustion chamber is small.
To increase the efficiency of the potbelly stove, partitions are attached inside. They prevent combustion products from directly escaping into the chimney. First they will have to go through a curved channel formed by two sheets of iron. Here they will give up the accumulated heat to the maximum, after which they will leave the confines of the stove. Brick lining gives equally good results, increasing efficiency and retaining heat.
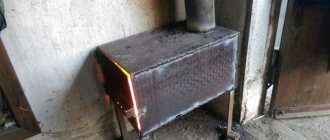
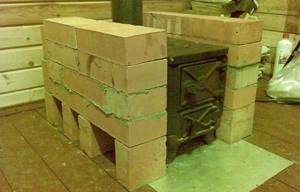
Potbelly stove with metal casing
To create a furnace you will need the following materials:
- metal sheet (3-4 millimeters);
- fire brick;
- corner (40×40×3);
- grate for grate;
- chimney pipe.
We mark the necessary elements on a steel sheet and cut out the necessary ones with a grinder or a gas cutter. On the sheets we mark a pair of side walls, the bottom, the cooking panel, the front and back walls. On the front wall we cut a hole for the firebox and ash pan. The top panel provides space for installing a chimney.
Drawing of a potbelly stove with metal casing
Installation of a potbelly stove
The creation of a steel body is carried out in the following order:
- We weld the side wall from the back and front with a continuous seam;
- We weld the bottom (also with a continuous seam);
- we install support for the masonry from a steel angle, which we weld around the perimeter of the body;
- we install the resulting structure on the foundation;
- Let's start laying refractory bricks.
For masonry you need a brick of this size:
- solid - 36 pcs.;
- halves (longitudinal) - 4 pcs.;
- halves (transverse) - 2 pcs.
- We make grooves on the bricks provided for the grate and place them so that the grate is level with the surface of the combustion chamber.
- We place the first row on the corner, which should hang over the ash pit.
Carrying out interior masonry - Next we lay the brick as in the picture.
Laying the side walls of a potbelly stove - We install the grate.
- We complete the laying.
We cover the top of the stove with bricks: ten solid ones and two with quarters cut off. The hewn ones are placed behind the stove - they form a hole for the chimney. For rigidity, you can also use a steel strip.
Covering the combustion chamber with bricks
- The masonry is done dry, but you can use a heat-resistant mixture.
- We weld the second sidewall and the cover where we install the pipe. We weld a pipe to the pipe to remove smoke to the street.
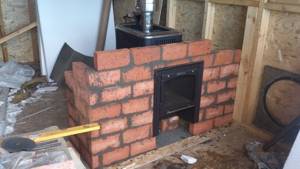
Is it possible to line a potbelly stove with bricks?
The easiest way is to make it brick from the beginning. A brick stove is more efficient. Let's consider its advantages:
- Long-term heat retention - bricks accumulate thermal energy and transfer it into space in small portions. The heat from them is soft, low-temperature, more pleasant than from bare metal.
- More stable air temperature in the room - a potbelly stove made of brick has high inertia. Brickwork takes a long time to warm up and cools down for a long time, which is why temperature fluctuations are hardly noticeable. Metal stoves are not so good in this regard - the extinction of the flame leads to a rapid drop in temperature.
- Appearance – metal stoves burn after the first use. Over time, they become covered with brown scale, which is not beautiful. The appearance of brick potbelly stoves is almost always stable. In addition, nothing prevents them from being covered with decorative bricks.
- Safety – it’s quite easy to get burned on hot metal walls, since their temperature is high. Brick walls have a lower temperature.
There are also some disadvantages. The first disadvantage is the increased dimensions of the potbelly stove due to the arrangement of the masonry. The second disadvantage is that in order to bring the stove to the set temperature, you will have to heat it longer than a metal one. However, to make a metal stove no less effective, it is recommended to cover it with stone or brickwork.
Why cover with bricks?
Potbelly stoves come in cast iron and metal. The first ones are, of course, more economical. The problem with all metal stoves is rapid heat transfer. As soon as all the fuel has burned out, the potbelly stove instantly cools down, and with it the heated room. Fast heat transfer helps when you need to quickly warm up a room, but requires constant loading of fuel. The potbelly stove got its name for such “gluttony” - no matter how much fuel you put in, it’s not enough. To increase the efficiency of a potbelly stove, during the October Revolution the chimney pipe was lengthened. Burning gases passing through a long pipe heated it, so the length of the chimney could be equal to the perimeter of the room.
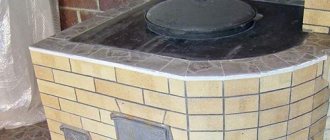
An easier way to retain some of the heat is to line the stove with bricks. The heat emanating from the stove heats the brick, and as it cools, it releases the accumulated heat. The brickwork will allow the stove to remain warm for a couple of hours after it has cooled down. Covering a potbelly stove with bricks in this way not only increases efficiency, but also externally transforms a cheap stove. For greater beauty, you can use special heat-resistant tiles. So a potbelly stove can become visually very attractive and resemble a Dutch or Swedish stove.
Cover example
How to properly line a stove with bricks
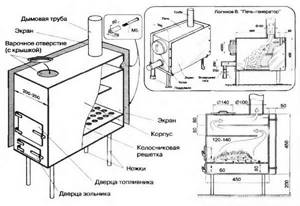
Let's see how to cover a potbelly stove with bricks in a country house or garage. As an example, let’s take the simplest stove, assembled with your own hands from sheet iron according to the following diagram.

Scheme of a stove-stove.
The stove is extremely simple, but is equipped with smoke channels for more efficient heat extraction. Its efficiency is within 70-80% - for solid fuel units this is an excellent indicator. To increase efficiency, let's try to cover it with bricks. For this we need:
- Suitable mortar for brickwork.
- Pen and paper for making calculations.
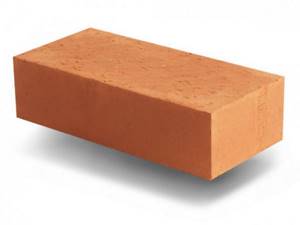
- Regular red brick.
The lining process is presented in three stages:
- Calculation of sizes.
- Construction of a light foundation.
- Construction of masonry.
Considering the small size of the masonry, we try to cover the potbelly stove with our own hands - a slight deviation from straight lines will not lead to destruction of the structure. After all, we are not assembling a house.
Preparation of the solution
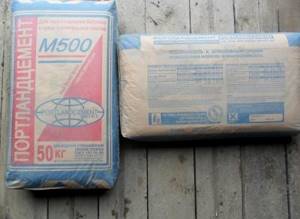
Some experts say that to cover a potbelly stove with bricks, any cement mortar is enough. Others say that clay must be mixed with the sand-cement mixture. The addition of clay increases the mechanical strength of the solution. And since we live not in the 19th, but in the 21st century, nothing prevents us from going to the nearest building materials store and purchasing a ready-made mixture, including fireproof one.
If you plan to brick your potbelly stove using a homemade mixture, experiment with the amount of clay. To do this, it is mixed with sand in various proportions. Each mortar is assessed for strength - pour it into some form, after hardening, try to break the frozen piece of mortar with a hammer. Choose the hardest option.
We are going to line the potbelly stove with red brick, which will not have direct contact with the flame - the stove is made of metal. Therefore, you can try to do without clay mortar by mixing more cement into the mixture. If you plan to purchase a ready-made mixture, choose heat-resistant clay-fireclay. A 20 kg bag is more than enough, and there will be some left over.
The solution for pouring a light foundation includes:
Take a look at the back of the cement bag - there are several recipes for different needs.
- Three parts of river sand.
- Three parts of crushed stone.
- One part of ordinary cement.
Marking and foundation
Before covering the potbelly stove with a layer of brick, it is necessary to prepare the foundation. We install the stove in its regular place and mark the outline of the stove with a pencil. We retreat 5 cm from this contour and draw the outline of the brickwork. Next, we construct the masonry in a rough version without using mortar - you need to see how much brick is needed for this procedure and how best to lay it. It is quite possible that the distance between the masonry and the stove body will change.
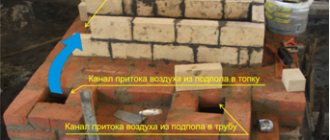
Let's see why this distance is needed at all. It prevents the bricks and the mortar that holds them from overheating – that’s it. It forms a gap to create convection - that's two. We are interested in the second, since convection will speed up the heating of the room. To improve it, make three holes in the lowest brick row - two on the sides and one on the back. Cold air will be sucked in through them. It will pass between the walls, warm up and go into the room.
After everything is marked, calculated and thought out, we proceed to installing the foundation. If the floor is earthen, dig a small trench under it. If the floor is wooden, cut out a rectangle and fill the area - it will be common for the stove and for the masonry. If the floor is originally concrete, do without a foundation. You can cover the potbelly stove a week after the foundation slab has hardened. It will gain its final strength in 28 days.
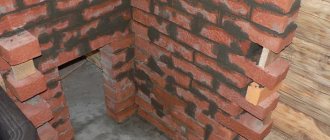
Brickwork construction
To line a potbelly stove, prepare 3-4 dozen bricks. Assemble the rough masonry and analyze its design. If everything looks good and beautiful, proceed to further work. Wet the prepared concrete surface with water, apply the solution to it, and lay the first brick. We recommend starting from the corners of the back wall. From there our lining will begin to grow. Check the correct installation using a level. Remember to tap the bricks to compact the mortar.
We have already said that holes should be left in the first row. In order for the second row of bricks to collapse, laying a piece of sheet metal 1 mm thick over the holes is quite enough. For three holes you will need three pieces of metal. Next, row by row we lay the next rows. If you decide to cover the stove with your own hands, without the help of an experienced assistant, pay attention to the position of the walls - they should be level and stand vertically.
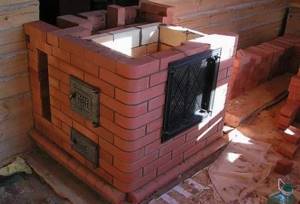
Construction of a potbelly stove
Structurally, a brick potbelly stove is similar to a conventional stove, but is more compact in size. Like a standard stove, a potbelly stove can be used not only for heating a room, but also for cooking.
When building a potbelly stove, the following materials are needed:
- ordinary red and fireproof (fireclay) bricks;
- steel or cast iron grate;
- doors for the firebox and ash pan;
- cooking panel;
- chimney pipe;
- waterproofing material (roofing felt);
- asbestos cord;
- steel wire;
- metal plate (thickness 4-5 millimeters) for afterburning;
- heat-resistant mixture for mortar.
Oven base
First of all, you need to prepare a rigid and durable base. If the room has a concrete screed, this is enough. If the floor is wooden, you will need to strengthen the base by creating a foundation. Moreover, the foundation should be at least 10 centimeters wider than the base of the potbelly stove.
Base for a stove in a wooden house
Sequence of work:
- dismantle the surface area under the foundation;
- We dig a hole 300-400 millimeters deep and fill it with a layer of sand (layer thickness - 60-70 millimeters);
- lay a layer of crushed stone on top of the sand;
- we put a mesh of reinforcement;
- we make wooden formwork (it should be about 100 millimeters above the floor level);
- pour concrete, bayonet it with shovels;
- level the screed and let it dry.
Drying lasts 2-4 weeks. Starting from the second day and during the first 7 days, you need to water the screed with water to prevent it from drying out. After the screed has dried, waterproofing (roofing felt sheet) is placed on its surface.
Even if a foundation is not required, a foundation for the masonry is required. To do this, asbestos material is placed on the boards and a polyethylene film is placed on top of it, which is covered with sand (up to 10 millimeters). You can start laying from the top.
Masonry process
Rules for laying bricks:
- On the first row, we apply mortar only from the end parts of the bricks. There is no need to connect the brick with sand. First we lay the first row dry and level it strictly according to the level. To keep the sand in place, it can be covered with a baseboard.
- On the second row we install the blower door.
We place it on a layer of mortar and attach it with wire. An ash chamber is formed behind the door. Installing the blower door - On the third row, we close the ash pan with a grate.
Installation of grate - On the fourth row, the smoke exhaust channels and combustion chamber begin. We lay the bricks on their ends. In the channels we make supports for the bricks of subsequent rows, since we need to maintain a hole for smoke removal. We lay the back wall dry. After the fourth row we install the firebox door.
- On the fifth row, we place the bricks flat, with the exception of those that form channels for smoke removal with the inner walls.
- On the sixth row we place the bricks with the end parts. This is the last row where the brick is laid in this way. The back wall consists of two rows of bricks placed at the end.
- The seventh row is laid as in the figure above.
- On the eighth row we block the firebox door with two bricks. We place hewn brick on the back wall, which will direct the fire to the burner.
- On the ninth row we place an asbestos sheet in the place where the cooking stove will be. Masonry as in the picture.
- On the tenth row we install the hob and begin to create a chimney.
- On the eleventh we install a damper on the chimney.
It is placed on asbestos and covered with a clay solution. Installing a damper on a chimney
After forming the last row, we begin laying the chimney (2-3 rows), to which we attach a steel pipe. The chimney is vented to the street. We insulate the pipe with a 200 mm layer of mineral wool.
Let the oven dry. After condenser vapors stop appearing on the potbelly stove doors, you can carefully begin operating the stove to allow it to dry completely.
Finishing is carried out with a clay solution. Then the potbelly stove can be tiled or whitewashed.
How to line a potbelly stove with bricks?
A potbelly stove is a device for heating a room. Easy to use and affordable price make it attractive to dacha owners. True, it also has its drawbacks. Since a potbelly stove is an iron stove, it heats up quickly, but it cools at the same speed. Due to maintaining the required temperature, a lot of raw materials are needed. It was because of its uneconomical nature that the stove was nicknamed the “potbelly stove.”
Necessary materials
On the building materials market you should purchase:
- metal sheet: thickness - 0.5 mm;
- asbestos cardboard;
- small pickaxe;
- hammer;
- plumb line;
- corner;
- Master OK.
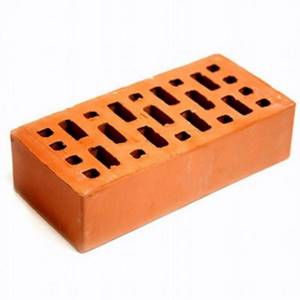
Sand-lime bricks or bricks with voids cannot be used. High temperature will simply destroy them. It is better to use a ceramic (withstands up to 800°C) or oven (allowable temperature up to 1000°C) briquette.
For the binding material, clay and sand are mixed in water. This is a traditional mortar for laying a stove. Proportions - 1:4 (clay:sand). The ratio of materials varies depending on the fat content of the clay. So, the fatter it is, the more sand you need. The main thing is that the solution maintains the integrity of the final result. The main thing here is to find a middle ground. It is important that the binder material is not too greasy or dry. For construction, clean sand of fine fraction is chosen. More often, sand for solution is sifted through a sieve with cells of 1.5 * 1.5 mm. The same criteria apply to water. Clean, without unnecessary impurities and minerals. Otherwise, stains will form on the masonry, which are difficult to get rid of.
The end result is a consistency similar to plasticine, which can take any shape, but must remain soft. An experienced master will immediately determine the readiness of the solution. Beginners can make a check, after which the stove can be safely covered, according to the following criteria:
- Roll out the sausage to about 20 cm: neither thick nor thin, roll it into a ring.
- If small cracks appear on it, the material can be used.
- The complete absence of cracks indicates that it is too greasy.
- If the ring cracks and crumbles in your hands, then the material is not suitable for building a fireplace.
Return to contents
Materials and tools
When deciding how to properly line an iron stove with bricks, you first need to decide on the materials suitable for this. They must have special characteristics.
Brick
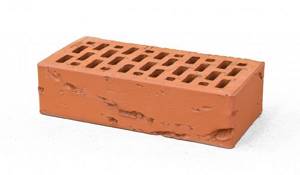
The main material for cladding must be of high quality: without voids, with high heat resistance and fire resistance.
You can choose which brick to line an iron stove in a bathhouse from two options:
Clay brick. It is used for lining the body, masonry of the firebox and chimney of a wood-burning stove. It can be ordinary, front, or with a decorative front surface.
Ordinary solid brick
Facing brick
Facing brick with decorative surface “oak bark”
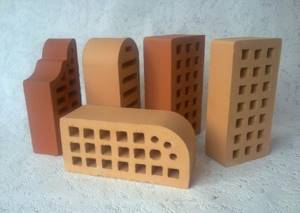
Using shaped bricks you can create unique shapes
Fireproof fireclay brick. Withstands temperatures up to 1800 degrees. It is recommended to be used for masonry and lining of coal-fired stoves.

Fireclay brick
The approximate quantity is calculated depending on the method of laying (half or quarter brick) and the perimeter of the cladding. In this case, the dimensions of the furnace itself and the distance between it and the lining are taken into account. This also includes the amount required to construct the site, since it is possible to cover a metal stove with bricks only on a solid foundation.
With this type of masonry, the brick is placed on a spoon - a narrow long part
Solution
The ideal masonry mortar is made from clay and sand in certain proportions, which depend on the quality of the clay. Without experience, it is very difficult to do it. Therefore, it is best to buy a ready-made refractory mixture based on red clay.
Before covering the cast-iron firebox with brick, you just need to dilute it with water, as required by the instructions on the package.
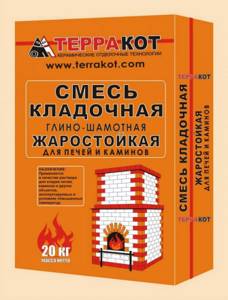
Heat-resistant terracotta mixture
In addition to bricks and masonry mixture, masonry mesh and fire-resistant sheet materials may be needed to create a protective screen for wooden surfaces. And also roofing felt as a waterproofing material.
Tools
The following tools will be required to complete this job:
- Container for solution;
- Trowel for typing it;
- Hammer for adjusting bricks;
- Pickaxe for dividing them into parts;
- Jointing for seams;
- Ordering is a strip with divisions applied to it, the distance between which is equal to the height of one or several rows, taking into account the thickness of the seam;
- Construction level and plumb line for level control;
- Cord for controlling the evenness of horizontal rows.
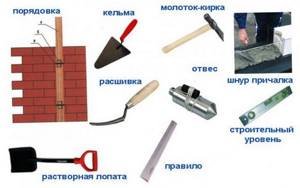
Tools required for masonry A sponge or rag and a bucket of clean water will also help to remove the mortar from the front surface of the masonry.
How to cover a potbelly stove with bricks: general rules
Before covering a potbelly stove with stone, it is important to make sure that it has a reliable base. For a stove weighing 800 kg, pour the foundation on the floor. A sheet of asbestos is placed under a sheet of metal. The steel sheet should cover the surface on which the stove is located, plus 30-40 cm in front of it, to avoid coal getting on the floor or carpet. The walls are also covered with this material. It is worth remembering that there should be a small distance (30-50 mm) between the metal sheet and the masonry. This measure is necessary for air convection. since the coefficients of linear expansion of the metal and the bar differ.
There is no point in building thick brickwork, since it will take a long time to warm it up.
Usually a potbelly stove is lined with ½ brick. Before starting work, you need to carefully measure everything and transfer the data to the diagram according to which construction will be carried out, taking into account the gap. The thickness of the binding material is no more than 0.5 cm. The first row is continuous. Several holes are made in the second row. And all subsequent rows are the same as the first.
It is necessary to cover the front part of the stove with bricks so that later it will be convenient to use. The door should function without problems - it should be easy to close and open. A round door requires, accordingly, round masonry. A metal corner is laid above it for further rows of brickwork to further line the stove. The top of the fireplace serves a purely decorative function. And the appearance depends on the imagination of the owner of this device.
Cast iron potbelly stove lined with brick
The characteristics of cast iron are such that potbelly stoves made from it do not require shielding. The heat capacity and thermal conductivity of cast iron structures is higher than that of steel products, but they are not without the already mentioned disadvantages.

Cast iron potbelly stove has greater thermal conductivity
Bricklaying
In this case, the work is somewhat simplified, since there is no need to organize a foundation for an installed cast-iron potbelly stove. Fundamentally, the ordering is no different from the process described above.
Do-it-yourself brick stove
Of all the benefits of civilization, the only one that it is impossible to do without in a garage or country house during the cold season is heating.
A potbelly stove is indispensable in these cases, since almost any man can make it, and the materials necessary for manufacturing can be easily found at the nearest landfill or scrap metal collection center.
The stove can be made from a used can, from an old metal barrel, or from sheet steel. You can also make a potbelly stove out of brick.
The resulting stove can be heated with almost anything, quickly warming up the room. But, unfortunately, the walls of the stove also cool down quickly if the fire in the firebox has already gone out.
In addition, a metal potbelly stove has several other disadvantages. It is a fire-hazardous structure; it burns out quickly, and if you accidentally touch its red-hot wall, you can get a serious burn.
Features of the operation of a brick potbelly stove
To ensure that the operation of the potbelly stove does not pose a threat to surrounding people, certain fire safety rules must be observed during its operation:
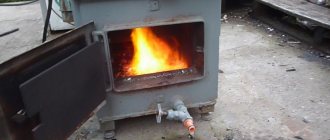
- Use only dry wood or coal as fuel.
- To ignite the installation, you need to open the chamber damper and place the required amount of firewood there, and only then set it on fire.
- When the fuel burns relatively well, the stove’s performance can be adjusted by opening/closing the ash drawer.
- To clean the stove from ash deposits, you need to completely cool the device, remove the ash drawer and take it out.
- Absolutely all flammable materials and household items must be located at a distance of at least 100 cm from the stove.
- It is prohibited to place more than 3 kg of fuel into the combustion space at a time.
- The firebox door must always be closed.
- It is forbidden to light a potbelly stove made of bricks if problems are detected in the smoke exhaust system.
- It is prohibited to leave the oven without adult supervision.
- While the oven is operating, you must not touch the walls of the oven to avoid skin burns.
Advantages of a brick stove
Brick stove
To eliminate all the above-mentioned shortcomings, a decision is made to line the potbelly stove with brick, which perfectly accumulates heat, unlike metal.
Lining a potbelly stove with bricks makes it much less dangerous in terms of fire. The likelihood of getting a burn when touching its walls is practically eliminated.
As a disadvantage of this technical solution, it should be noted the increase in time required to warm up such a furnace. But this disadvantage is more than offset by the duration of heat retention.
In addition, lining a potbelly stove with bricks can be done using technical solutions that can significantly reduce the heating time of a potbelly stove in a brick case. This is the installation of ventilation holes, the use of a special brick screen, etc.
You can make a potbelly stove out of brick entirely. In this case, the disadvantages inherent in its metal namesake are completely eliminated:
- a stove of this design weighs significantly less than brick stoves made according to other designs and takes up much less space;
- the furnace is energy independent;
- it accumulates heat better and heats the room more evenly;
- its efficiency is significantly higher than that of a metal potbelly stove.
How to attach a metal potbelly stove to a brick stove
Potbelly stoves are the most current types of stoves. You can not only buy them in a specialized store, but also build them yourself. These heating units can heat rooms using different types of fuel. But, despite all the advantages, their main disadvantage remains - the speed of cooling. This time can be extended by using bricks.
- History of the potbelly stove
- Types of fireplace stoves
- Fireplace stove with bench
- Wall fireplace stove
- Square fireplace stove with stove and oven
- Where to begin?
- Installing a potbelly stove in its original location
- Conclusions and useful video on the topic
- Ardenfire (META, Russia)
- Criterias of choice
- Preparation of the solution
- Criterias of choice
- Water circuit design
How to cover a metal potbelly stove with bricks?
How to cover a metal potbelly stove with bricks
There are a great many options for performing this work, since two identical metal potbelly stoves made on your own do not exist in nature. But, in any case, when deciding what to cover a potbelly stove with, you should follow certain general rules.
The brickwork is laid at a distance of ten to fifteen centimeters from the metal wall of the furnace and special ventilation holes are provided in it in the lower and upper parts of the masonry.
The air, heating up inside the screen, begins to circulate. Warm air exits into the heated room, and cold air, in the process of flowing around the walls of the metal furnace, reduces their temperature, thereby increasing their durability.
Features of operation and installation of a brick potbelly stove
If you are planning to build a stove like a brick stove with your own hands, in the country house or in the garage, do not forget that it will require a good ventilation system and preliminary implementation of fire safety measures:
- arrangement of firewood;
- moving flammable materials and liquids to places that exclude the possibility of their ignition during operation of the potbelly stove.
How to cover a potbelly stove with bricks is not an idle question. Carrying out the masonry in a checkerboard pattern, or without leaving the gap mentioned above, is an incorrect solution, from a technical point of view. “Checkerboard” masonry prevents air from circulating normally. In addition, such a wall has a significantly smaller surface area, which speeds up cooling.
Thermal radiation overcomes such a wall in transit, giving it a minimum of thermal energy and losing up to half of its value.
In the absence of a gap, the time to warm up the room increases significantly, and there is excess heat. Formed in the firebox. Literally “flies down the drain.”
If desired, and in cases where your qualifications allow it, a brick potbelly stove can be equipped with smoke circuits and doors can be installed that allow you to regulate the draft in the stove, which will allow you to achieve significant fuel savings.
Modern potbelly stoves
Other news from the Special Training category:. Earth smoke oven In summer, fish and animal meat can be preserved by hot or cold smoking. How to make a fire in winter.
Taiga Candle I have always been fascinated by those nameless, but the main people of humanity who gave the world their brilliant inventions. They gave it as a gift because their creations are so ingeniously simple that once seen, anyone can repeat the miracle. Survival in urban conditions in the absence of heat Fifteen years ago, this article would have seemed absurd to anyone. Camping bread If the question arises of baking bread without a bakery and a bunch of ingredients, a wooden primus stove is a candle.
A fire in a backpack. An Indian candle or a wooden primus stove is a candle. Only the smallest stove - from Professor Butakov “Gymnasium student” to square. The cost of “Indigirka” is now about 50 rubles. It's quite possible to save up. The cost of Butakovs from 9 to 32 is even easier. In my opinion, it is even cheaper than a standard heating stove. It would be blasphemous to compare with the Russian one; the old woman can be proud of her descendants, although they are still inferior to her in functionality and ease of manufacture. People, who knows more detailed data on stoves and heating boilers in Ukraine?
Well done, Seeker [. I was especially pleased with the stove and generator. Let me add a fly in the ointment: at work we had a huge Bulerian - a gluttonous and completely stupid monster.
Stages of laying a potbelly stove made of brick
Due to the fact that a potbelly stove made of brick is significantly heavier than a metal stove, it must be laid out on a special foundation.
Therefore, a do-it-yourself brick stove is a pipe dream for a person living in an apartment building, unless he is a resident of the first floor. A private house, garage and cottage do not impose any restrictions on the construction of a potbelly stove.
Usually the stove is placed near one of the walls. This saves space in the room, but increases the likelihood of a wall fire. Therefore, the part of the wall located in the immediate vicinity of the furnace installation site is insulated with a metal sheet, sheet asbestos or a layer of plaster.
The foundation is laid at the selected location. It is enough to dig a hole for it to a depth of 500mm. The bottom is compacted, covered with a layer of sand (3-5 buckets) and compacted again. Then comes a layer of crushed stone (100-150mm), which is also compacted, then leveled and filled with cement mortar (cement/sand - 1:3). Leave the foundation for a day for the solution to harden.
Despite the fact that a potbelly stove made of brick is not a stove of increased complexity, its laying must be carried out similarly to the laying of any stove of a different design, that is, according to a pre-calculated order.
Having the order in hand, we prepare the necessary materials and stove equipment, as well as the tools that will be needed when laying the stove.
We lay two layers of waterproofing on top of the poured foundation. We do the first row of masonry (basement) directly on the waterproofing layer.
This row is subject to increased horizontal requirements on its upper surface, since it sets the vertical of the entire furnace structure. This row is placed “on the edge”. All further rows are laid in ½ brick.
It is advisable to use a building level to check the vertical and horizontal alignment of the masonry every five rows. To prevent the walls of the stove from “moving” to the side, it is recommended to lower a series of air restrictors (a cord with a nut at the end) from the ceiling at the corners of the stove.
It is most convenient to arrange the firebox at the level of 4-5 rows, leaving for this a space two bricks wide and three rows high. Under it, it is advisable to provide a hole the size of one brick for the blower.
An option for ordering such a stove is given below.
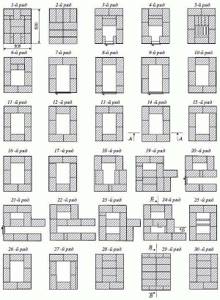
Furnace arrangement option
When laying it, red row bricks, fireclay bricks, fireclay clay, ordinary clay, sand, and cement are used.
It is easier to make a pipe from metal (the internal flow area must be at least 12 cm), and it can be discharged through the roof (traditional option) or through the back wall of the furnace.
In this case, the slope of the outlet pipe must be 30 degrees or more.
Please note that the thickness of the pipe walls, especially in its first meters, should be more than 3 mm. Otherwise, it will quickly burn out.
Features of chimney masonry and possible errors, masonry diagram and main elements.
Brick stove foundation
There is one more nuance that should be taken into account at the stage of choosing a place to install the stove in the house.
Types of fireplaces for home heating
Technologies used to improve heating systems have led to the creation of alternative types of fireplaces
How to build a fireplace in your home with your own hands
Assembling a fireplace with your own hands is a difficult task, since experience and skillful hands are important in this matter.
Laying bricks around a metal body
The work is carried out in this order:
- We lay the first row so that all the bricks are on the same level. To begin with - dry.
- We prepare the mortar and begin laying, using leveling pads if necessary. The first row should be close to the metal.
- The next rows are 50-70 millimeters away from the metal. We set the direction of the wall, maintaining the required gap, for which we lay pieces of brick close to the metal, providing the required gap.
- The brick can be laid either end-on or flat. However, in the latter case, you will need twice as much material.
- On the third row, you need to provide a hole for the circulation of air flows along the gap between the metal and the bricks.
Do not forget about the level and plumb line, which we use to check the verticality and horizontality of the rows. If you want the masonry to have an aesthetic appearance, you can use jointing. However, this must be done before the solution has dried. You can also use slats. Two rows before the end of the masonry (that is, in the penultimate row), it is necessary to provide gaps between the bricks to supply warm air into the room due to convection. If you have the material and the brick laying pattern, building a brick potbelly stove is not a difficult task. Success is guaranteed if you don’t rush and carefully follow the instructions, since if the evenness of the masonry is disrupted, a significant part of the work will have to be redone.
You can cover a metal potbelly stove with bricks yourself
Often people living in a country house or dacha use a potbelly stove as a heater, which is very unpretentious in maintenance and performs its direct functions quite well. But since it is made of metal, the idea of lining the potbelly stove with bricks will be simply wonderful. The advantage of such a connection is that the performance properties of a metal and brick device differ, and each of these building materials individually has a number of advantages and disadvantages.
Typical design of a potbelly stove.
Thanks to the decision made to line the potbelly stove with bricks on your own, you will be able to minimize the shortcomings of the materials and at the same time strengthen all the positive properties of brick and metal. Thanks to the work done, the resulting new stove will have the following set of qualities:
- It will produce more heat, since the brick walls of the structure will retain heat in their structure for a long time, which will then spread indoors at a slow pace. This will cause temperature fluctuations to become mild and barely noticeable.
- As a result, even after a long cooling of the room, the bricks will heat the room, and you will make a subsequent approach to the stove in order to flood it, in order not to re-warm the cold house, but to maintain the increased temperature.
- A brick-lined stove will be much safer. This way, you will not get burned from contact with the hot metal body of the stove.
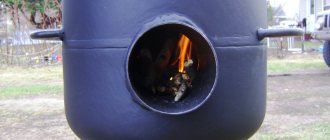
Potbelly stove from an old barrel or pipe
This stove can be made from an ordinary metal barrel or pipe of a certain diameter. It is quite suitable for installation in a residential area of a summer house, and with a beautiful, neat design it can also be suitable for a residential building.
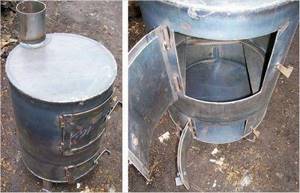
A simple version of a potbelly stove made of steel pipe
- At the desired level of the future furnace, two rectangular holes are marked and cut out, which will be the entrances to the firebox and ash pan.
- The cut out parts will be useful for making doors. They are framed with metal strips, bringing them to the required size, and a special handle with a latch is installed.
- About ten centimeters below the firebox door, corner brackets are welded inside the barrel or pipe on which the grate will be laid.
- You can weld the grate yourself from reinforcement.
- If the stove is made of a pipe, its bottom and upper part are welded.
- The legs are welded to the lower bottom part.
- A hole for the chimney is cut in the top panel and a pipe is welded into it.
- Then the doors are installed on the fixed hinges. According to their location, the hook for the lock is marked and secured.
- In order for the stove to have an aesthetic appearance, all welding seams must be thoroughly cleaned. If the oven is then coated with heat-resistant paint, it will be impossible to distinguish it from the factory product.
- Then, when the stove is completely ready, it is connected to a chimney leading outside.
In general, this is a good option for a potbelly stove if there is enough space for it in the room, since this model will take up a fairly large area. It should be noted that the top panel of the potbelly stove is large enough, and you can easily install a kettle or, for example, a frying pan on it.
Mortar for bricking a potbelly stove
In order to prepare the solution with which the brickwork of the furnace will be organized, you must first select the most suitable option. For example, one of the most popular types is cement mortar, to which a certain amount of clay is added. It is even more convenient to use a mortar that is intended for laying tiles. In this case, it is better to give preference to those options that have a high level of strength, for example, glue for installation work on the street.
Scheme of a potbelly stove with a heat exchanger.
Another version of the mortar has river sand and clay as its main components; it is considered traditional for stove masonry, but in our case the brick will be more of a decorative option, so experts do not insist on this type of mortar for cladding a potbelly stove. However, due to the fact that this option is the most difficult to prepare on your own, it is worth considering its technology.
It is noted that in order to properly prepare a solution based on sand and clay, you can use one of several instructions. One of which looks like this: initially, you should prepare several containers into which different amounts of clay and sand are poured. Leave these mixtures for 4-5 days. Then we knead them and from each individual solution we roll a cake, which needs to be dried and then thrown from a meter height onto asphalt or other hard surface; in this process, the final result is important to us.
Scheme of a potbelly stove made from a barrel.
The cake that remains uncrushed after the impact is the most reliable combination of sand and clay, with which you can build a high-quality oven. It is recommended to memorize proportions only if you are confident that next time you will use clay and sand materials of exactly the same type and quality. If other components are used, their proportions in the mixed solution will need to be determined experimentally again.
Preparation of the solution
It is not difficult to cover a potbelly stove with bricks, but the design requires a special mortar - heat-resistant. There are already proven dry mixes on the market for laying stoves. It is enough to add water to such mixtures and mix the solution in the proportions indicated on the package. The advantage of the ready-made solution is that you do not need to adjust the fat content of the clay and risk the quality of the masonry.
If the goal is to make a solution from scratch yourself, you need to take into account the subtleties of the technology. Different sources give different proportions of clay to sand. This is due to its quality - the fatter the clay, the more sand is required.
Before mixing, the clay is filled with water for a day, and the sand is thoroughly sifted and washed. Dry clay is poured with water 1:2, and oily clay 1:1. Next, the clay is filtered and sand is added to the consistency of thick sour cream. To strengthen the solution, it is recommended to add salt and cement. Salt 150g, and cement 1kg per 10 kg of clay. After mixing, the solution must be checked for the ratio of components.

Clay mortar for masonry
There are several ways to do this:
- Take a couple of bricks and fasten them with the resulting mixture. Wait 5-7 minutes. If after the specified time you can hold the structure by the upper brick, and the lower one will not fall, then the solution has been selected correctly.
- Roll the solution into a 20cm sausage, twist it into a ring and leave until dry. The presence of small cracks indicates that the solution is greasy; breaks and an excessive number of cracks indicate an excess of sand.
Preliminary work: foundation installation and marking
A stove, like any other construction project, will not function for a long time and efficiently if there is no strong and reliable foundation under it, which must be taken care of extremely responsibly, since the potbelly stove itself may weigh a little, but after you cover it with brick , her weight will increase several times. The red brick weighs quite a lot, so it can break through the unsupported floor underneath it.
Therefore, if your potbelly stove has standard dimensions, then you will only need to strengthen the floor under it in some places.
Having diluted the dry mixture of building components with water until a thick solution is formed, you need to pour it into the foundation where the brick is laid.
Larger furnaces will require an additional foundation. There is nothing complicated about this, you will just need to spend extra time in order to temporarily remove the potbelly stove itself and the part of the floor on which the stove will stand. Then prepare a solution for the foundation by mixing 3 parts sand, 1 part cement and 3 parts crushed stone. Having diluted the dry mixture of building components with water until the solution reaches the consistency of sour cream, it will be possible to pour it into the foundation into which solid bricks are laid.
Then you need to draw a marking along which the masonry will be carried out. First, choose at what distance from the metal walls of the potbelly stove you will lay the brick walls. The gap can be anything, from 3 to 10 cm. You should not go beyond the specified boundaries, as this will either lead to overheating of the masonry, or to the fact that the new stove will be too difficult to heat the room. Based on these features, experts recommend making a gap of 5 cm, which will allow you to use the most optimal properties of metal and brick.
Final work
After completing the masonry, clean all the seams again and remove any remaining mortar. Then leave the structure alone for the whole night so that it dries and gains strength. During this time, it will be possible to completely clean the surface of the stove. For this purpose, it is recommended to use a brush soaked in soapy water.
This way you can bring the entire structure into excellent condition. The top of the potbelly stove can be covered with asbestos-cement board or glass panels, depending on the chosen design, using the given rules and instructions on how to cover a metal potbelly stove with bricks.
Brickwork
Image 2. Stages of bricklaying.
According to the markings, start laying the brick. Try laying the first row without mortar first, just to check the fit of the bricks and the possibility of somehow fitting them, sawing it if necessary. The entire first row is laid completely, while in the second row small holes should be arranged - 2 on each of the 4 sides, keeping to the size of half a brick. They will act as ventilation holes, which can be made in the shape of circles or polyhedrons to give your stove a beautiful and original appearance.
During the laying process, do not forget that to ensure better adhesion of the bricks to the mortar, it is recommended to pre-wet them in water. All subsequent rows are laid out without making holes, but with constant checking of the evenness of the masonry. Every 3-4 rows, wipe the bricks with a wet cloth so that it is easy to remove excess mortar. Try to maintain the same thickness of the seams, making it no more than 5 mm.
Diagram of a cast iron stove.
You can make the hole that will need to be made for the potbelly stove door according to your personal desires and fantasies. Even if you are not making a wide opening, in order to organize a lintel over it, you will need to use a metal corner or brackets, under which you will need to make a small hole in the brick. Do not forget that, as with any other construction, brickwork is carried out in half a brick (image 2).
The top of the oven can be laid out however you like, according to your personal wishes, since it will not bear any special load. By applying the most sophisticated design ideas here, you can get a truly unique, beautiful and rich stove for your home.
Which brick to choose?
In order to cover a potbelly stove, ordinary brick will not work . You need to choose between special stove and solid ceramic. Kiln brick will withstand temperatures up to 1000 degrees, while solid ceramic bricks can withstand temperatures up to 800 degrees. Every stove maker will say that laying bricks on edge is strictly prohibited, although you can hear similar advice in order to save material. Heat-resistant bricks are placed in water before laying so that they do not draw moisture out of the mortar and provide maximum adhesion.
Use only heat-resistant bricks
To calculate the consumption of bricks, you need to measure the stove and take into account the 10-15 centimeters of gap between the metal wall and the brick. The potbelly stove is placed on one or two brick rows, and the top is laid as desired. The area of the proposed masonry must be divided by the area of the narrow side of the brick. This is a rough calculation without taking into account seams and air circulation holes in the masonry, but it gives an idea of the maximum amount of material required.
There are craftsmen who fill the space between the brick and the stove with sand. But a potbelly stove with sand rarely lives up to expectations - the sand becomes a heat insulator without increasing the useful time of the firebox. The same can be said about gravel, which is used along with sand.