5809
From this article you will learn:
- Is it necessary to insulate a house made of aerated concrete from the outside?
- What material should be used for external insulation of the walls of aerated concrete houses?
- What technology to use to insulate a house made of aerated concrete from the outside
- How much does it cost to externally insulate a house made of aerated concrete blocks?
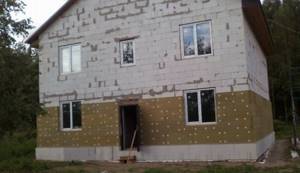
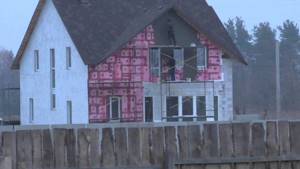
For low-rise construction, an increasing number of developers are choosing aerated concrete blocks. Statistics show that currently about 1/3 of all cottages are built from aerated concrete. Since this is a relatively new material, not all builders have yet understood its characteristics. For example, some people forget that buildings made of aerated concrete blocks must be insulated. In this article we will tell you how to insulate a house made of aerated concrete from the outside and what materials are best suited for this task.
Why insulate an aerated concrete house?
At first glance, it seems that there is only one reason - to save money on heating, but let's look at this in more detail.
Reasons for insulating aerated concrete:
- Reduced heat loss through walls, as the thermal resistance of the wall increases, resulting in lower heating costs.
- Closing cold bridges in walls, such as armored belts, lintels, thick seams. Not only do they cause heat to escape from the home faster, but they can also become wet areas in the home where mold can grow.
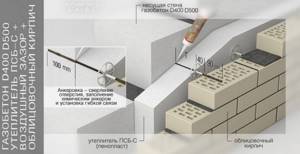
- Increasing the durability of the building. External insulation of aerated concrete with a thickness of 100 mm or more transfers the dew point from the wall itself to the insulation, that is, freezing of moisture in aerated concrete will not occur, which will make the service life of aerated concrete much longer.
Is it profitable to insulate aerated concrete or not? If we consider the economic feasibility of insulation, then we need to find out the payback of insulation. That is, how long will it take for savings on heating to pay for the insulation itself?
If the payback period for insulation is more than 10-15 years, then there is no point in such insulation; it is more profitable to put money on deposit in a bank.
But there are also cases when insulation is very beneficial:
- If gas and electricity are very expensive.
- If the house is located in a cold region.
- If the wall thickness is less than 300 mm.
- If the walls are made of high-density aerated concrete D600 and higher.
- If the walls have thick seams and many cold bridges.
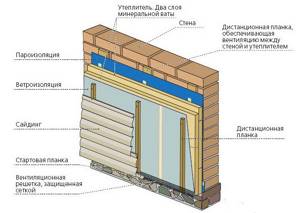
External thermal insulation methods
In practice, various technologies are used for external insulation of aerated concrete structures. The quality of the systems will directly depend on the purchased materials and how accurately the developer follows all the manufacturer’s installation recommendations.
It is not recommended to independently change consumables in the thermal protection system to equivalent and cheaper ones. For example, glue or plaster mortar for thermal protection is replaced with cheap and low-quality tile adhesive.
Outwardly, it will cope with such a task, but the vapor permeability of the multi-layer protective system will be impaired, after which the rapid destruction of aerated concrete wall structures occurs.
After choosing the installation option and type of insulation, the developer must carefully read the conditions for the work, which are established by the manufacturer and presented in the documents for the building material.
In practice, the most common thermal protection structures for insulating aerated concrete load-bearing walls are:
- “wet” light/heavy version;
- dry or ventilated façade;
- cladding without frame.
Wet - easy option
In reality, the installed protection is not wet; when installed, the façade walls remain completely dry.
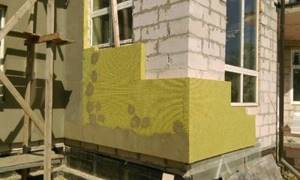
“Wet” defines the method of fixing the insulation to the walls using glue and solutions prepared with the addition of water, the entire structure is secured with special dowels.
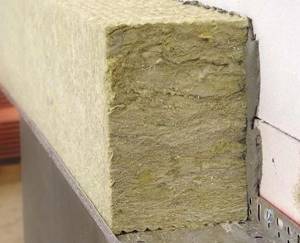
As a rule, using this technology, mineral wool with a high density of over 130 kg/m3 is installed, with adhesive designed for this heat-protective material.
Additionally, the heat-protective layer is secured with dowels, after which 2 leveling layers of plaster are applied , and a reinforcing fiberglass mesh is installed between them.
Since initially the walls made of aerated concrete are smooth, they do not require additional processing, only cleaning from dust. Decorative plaster is used as finishing.
Advantages of the light wet method of protection:
- high installation speed;
- availability of materials;
- low cost;
- high efficiency;
- the ability to carry out work on your own.
The disadvantages include low structural strength and a relatively short service life.
Wet - heavy method
This method is used if you plan to clad the facade with stone or other heavy varieties of ceramic-based finishing materials. In this case, the heat insulator is not fixed to the wall with glue, but is mounted with high-strength hooks, and the top layer is covered with a durable metal mesh.
This structure is reinforced with iron plates. A layer of sand-cement mortar up to 40 mm is applied to the reinforced mesh. And only after that the stone is laid.
Advantages of the method:
- high strength;
- durability;
- efficiency;
- solidity and aesthetic appeal.
The disadvantages include the high final price of such a protective system and the long lead times for the work.
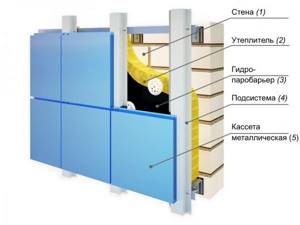
Dry or ventilated façade
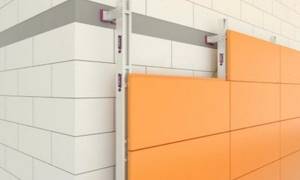
This is the most effective method of thermal protection of walls made of aerated concrete blocks, taking into account the operational characteristics of the stone.
Thermal-protective material is installed on a special frame made of wood or metal profile , in which an additional layer of vapor and water protection with ventilation gaps is placed so that the insulator can pass vapors from the walls.
As protection, you can use any heat-shielding material, mineral wool, glass wool, or Penoplex.
It is better not to use polystyrene foam in this design due to its high flammability. The speed of air circulation through the ventilation structure can lead to an increase in the combustion process of such insulation. The layers of such a protective structure are most often covered with metal or plastic siding.
Advantages of a ventilated facade:
- the most optimal design in terms of price-quality ratio, taking into account the features of aerated concrete blocks as much as possible;
- simple accessible materials;
- possibility of manufacturing on your own;
- increased thermal efficiency;
- powerful steam-hydroprotection;
- high noise protection;
- long service life over 10 years.
Many developers attribute its high price to the disadvantages of the design. Indeed, this method of protection is an order of magnitude higher than the simple light wet thermal protection option, however, the efficiency achieved during the implementation of such energy-efficient measures will pay for all the costs incurred by the owner in 4 years.
Cladding without frame
Previously, cladding without a frame was carried out only using the “wet” light thermal insulation option.
Today, with the advent of new thermal insulation materials, there are more methods of frameless thermal protection. For example, warm plaster can significantly increase the protective effect even for walls of considerable thickness.
Such insulation materials include plasticizers and polymers, sawdust and paper pulp. A 15 mm layer of this composition replaces 40 mm foam plastic in terms of efficiency. This mixture can be purchased at retailers or made according to a recipe yourself.
Thermal protection made from insulated plaster mixture
is inexpensive and has additional advantages:
- possibility of sound protection;
- does not require layers of vapor and waterproofing;
- natural base of plaster, and therefore it can be used for internal and external protection;
- endurance at high outdoor temperatures;
- has protection against damage by rodents;
- Easy to apply, no increased safety measures required.
Warm plaster is applied using the same technology as for traditional plaster. For external installation, an auxiliary one will be required; for this, after the main installation, the warm plaster is covered with regular plaster.
What thickness of insulation to choose
To determine the thickness of the insulation, you need to find out what the required thermal resistance of the walls is needed for your region, and how long it will take for the insulation to pay for itself.
It happens that people insulate their houses with a thin layer of insulation of 40, 30 and even 20 millimeters. Which is a big mistake in terms of feasibility and payback. The thicker the insulation layer, the lower heating costs will be in the future.
It is worth understanding that the cost of glue, foam, dowels, mesh, plaster and labor do not depend on the thickness of the insulation. That is, there will not be much savings on materials and work between thicknesses of 30 mm and 100 mm. But the insulation will differ significantly. Therefore, it’s definitely not worth saving on the thickness of the insulation.
Moreover, in order for the dew point to move from the wall to the insulation, the thickness of the insulation should be about 100 mm.
The optimal, economically justified insulation thickness for aerated concrete walls is 100 mm.
If the walls of the house are made of high-density blocks from D600 and higher, or if the wall thickness is only 200, then 150 mm of insulation can be used.
Difficulties and errors
During the work on external insulation of load-bearing aerated concrete walls, you must carefully adhere to the technology, otherwise the result from such measures may become not just zero, but negative, since the dew point will move closer to the interior, the walls will begin to flow, creating dampness in the room and with gradual destruction of the wall structure.
The most common mistakes that occur during thermal insulation work:
- use of low-quality materials;
- poor quality insulation fastening;
- lack of a vapor barrier and waterproof layer;
- Carrying out work on a damp wall and in damp weather.
When is it necessary to insulate aerated concrete?
Aerated concrete walls cannot be insulated immediately after their construction. The fact is that fresh factory aerated concrete is very wet, and this moisture must evaporate somewhere. Moisture comes out of the thickness of the wall both inside and outside the house, but what happens if you cover the outer part of the wall with insulation, for example polystyrene foam? All moisture will remain in the wall and will go inside the house, creating high humidity, mold and other inconveniences there.
It is worth noting that a damp wall retains heat in the house less well, and at subzero temperatures, the water in the wall turns into ice, slightly reducing the service life of aerated concrete.
Things are better with mineral (stone) wool, because it has good vapor-permeable properties and removes excess moisture. But then the aerated concrete itself is protected from the wind and takes much longer to dry. Plus, the mineral wool itself becomes more humid, worsening its thermal insulation properties.
In general, before insulating aerated concrete with mineral wool, you need to wait 2-6 months, and for foam plastic it is better to wait 6-12 months.
The drying speed of aerated concrete is influenced by the following factors:
- Wall thickness
- Air temperature
- Precipitation
- Force of blown meters
Materials and consumables for work
Before starting work on installing thermal insulation, you will need to calculate the volume of the base material for installing the heat-protective layer and consumables, purchase them in a retail chain and bring them to the construction site.
The master will need the following tools:
- carpenter's kit;
- Bulgarian;
- hammer drill with attachments;
- hand or electric saw;
- hammer;
- spatulas;
- buckets;
- measuring tools: tape measure, ruler and level.
Consumables for installing a heat protection system for the exterior of an aerated concrete house:
- glue mixture;
- primer with antiseptic;
- external plaster;
- dowels for fastening insulation;
- timber or metal profile for sheathing;
- reinforced mesh made of fiberglass material;
- vapor barrier;
- waterproof film;
- fasteners;
- lining or siding, for exterior decoration.
What material to choose for home insulation
To insulate an aerated concrete house, mineral wool and polystyrene foam are usually used. For the impatient, we will answer right away - mineral wool is more expensive and better, polystyrene foam is cheaper and worse. Now let's try to figure out why this is so.
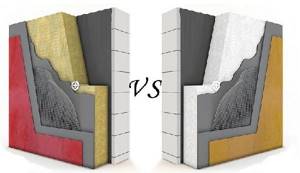
Mineral wool has excellent vapor permeability and removes excess moisture from the house and walls to the street. The vector of movement of water vapor is always directed from inside the house to the street.
This ensures a good microclimate in the house and the walls remain dry, and dry walls retain heat better. Moreover, mineral wool is absolutely non-flammable. Mineral wool slabs are more difficult to process and it is necessary to work with goggles, protective clothing, gloves and a respirator.
In terms of thermal insulation, wool and foam have almost the same properties.
Polystyrene foam is cheaper, easier to work with, it is easy to cut, and the cracks are filled with foam. Polystyrene foam is a flammable material and almost does not allow steam to pass through, which contributes to the accumulation of moisture in the walls and increased humidity in the house. A house insulated with foam requires good ventilation, and intense ventilation blows heat out of the house.
Recuperators come to the rescue - special fans that heat the air entering the house using the heat of the exhaust air.
In general, mineral wool has an important advantage - vapor permeability, and is the best choice for an aerated concrete house. But if finances are very pressing, you can also use polystyrene foam, but only with a thickness of 100 mm or more, so that the dew point is in the insulation + there is good ventilation in the house.
Criteria for choosing insulation
Insulating a house using aerated concrete ensures good ventilation, retains heat in the winter and prevents heating in the summer. Toxic and harmful substances released from plastics do not enter the living space if the house is insulated from the outside.
When choosing a material, their main physical and chemical indicators are compared.
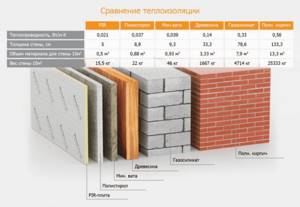
| Type of plastic | Thermal conductivity, W/(m0C) | Density, kg/m3 | Vapor permeability,% |
| Styrofoam | 0,06-0,1 | 45-75 | 0,014 |
| Penoplex | 0,03-0,034 | 40-150 | 0,2-0,4 |
| polyurethane foam | 0,029-0,04 | 30-75 | 0,05-0,06 |
| Mineral wool | 0,035-0,04 | 30-220 | 0,5-0,62 |
When choosing insulation, it is important to take into account temperature fluctuations in the winter-summer period, the proximity of groundwater, the relative humidity of the region, the amount of precipitation, even the location of the house and the wind blowing the walls of the house play a role.
Its water absorption depends on the structure of the insulation. The lowest coefficient of moisture adsorption is found in closed-cell foams, and mineral wool, due to its fibrous structure, is capable of drawing moisture by capillary action from groundwater if the foundation base is not high enough or the waterproofing is not installed correctly.
The density of the insulation affects its strength; they are directly dependent. Strength ensures resistance to deformation; it should not lose shape under its own weight, and have sufficient load-bearing capacity to withstand the weight of decorative plaster.
The insulation must be environmentally friendly, not emit toxic substances, and have low flammability.
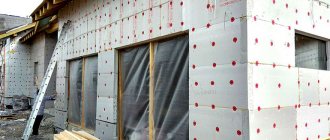
Prices for popular types of penoplex insulation
Penoplex slabs not only have excellent thermal insulation qualities, but also have an L-shaped edge, which allows the products to be effectively joined, eliminating the penetration of cold. Among the most common varieties, “Penoplex Comfort” should be highlighted, the thickness of which can range from 20 to 100 mm. For 20 insulation boards with the smallest thickness you will have to pay 1,520 rubles.
30 mm canvases are sold in a package of 13 slabs. The cost of this material will be 1326 rubles. If you have 100 mm products in front of you, then the package will contain four slabs, for which you will have to pay 1,356 rubles. If you want to insulate aerated concrete from the outside with penoplex, you can purchase the “Wall” variety. It is offered with a thickness of 50 mm, and 7 slabs will cost 1225 rubles.
Working with Penoplex
Insulation of aerated concrete with Penoplex is carried out using one of several technologies. Dowels can be used as mechanical fasteners. In other cases, these are wet methods, for example, using cement mortar, bitumen-polymer mastic, liquid nails or polyurethane foam.
The work involves five stages.
- First, the surface should be prepared by cleaning and sealing cracks.
- At the second stage, the sheathing is installed.
- The third stage is the starting bar and its installation.
- The fourth step is installation of penoplex.
- At the last stage you will need to seal the seams.
Prices for deep penetration primer
One of the important requirements that should be taken into account before carrying out insulation, regardless of whether mineral plaster is applied, polystyrene foam boards or mineral wool are installed, is the application of a primer. You can purchase NewStaR for 340 rubles. The composition is sold in a 10 liter container. After drying, a transparent film will be formed on the wall, which eliminates the ability of the material to absorb moisture. This will not only extend the life of the building, but also reduce the consumption of glue when installing thermal insulation.
If you plan to carry out work also inside, it is best to purchase “Optimist G106” primer in a concentrated version. For 10 liters you will have to pay 1900 rubles. The walls acquire the quality of moisture insulation, and such a layer can be used in conditions with high humidity. A universal composition is also the primer “VDAK-0181M” with deep penetrating ability. For 3 kg you will pay 162 rubles. This acrylic mixture is also excellent for interior work.
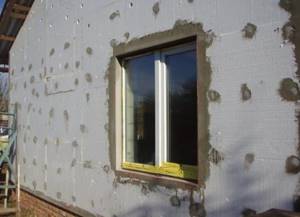
Installation of foam plastic
Two types of glue can be used to glue foam. One of them is made on the basis of cement and is prepared by mixing. In this case, a significant part of the time is spent preparing the composition.
Another material option is special compounds that are similar to polyurethane foam, but have a lower expansion coefficient. Such adhesives are applied using a gun, which is used for polyurethane foam. If the base is made with a small border that protrudes outward beyond the walls, then you can immediately begin installing the foam; if there is none, then you will need to first secure the starting strip.
The latter is a metal profile, the width of which is selected to match the thickness of the foam used.
At a height of 15–20 cm from the blind area, a line is marked with a dye cord. A metal profile is placed along this line and fixed to the wall using dowels and screws. It must be secured around the entire perimeter of the house. Next, glue is applied to the foam sheet with a snake, and it is tightly applied to the wall, supported by the mounted profile.
Installation must begin from one of the corners of the building. Each subsequent row is laid offset by half a sheet to ensure interlacing of the insulation seams. In this case, it will be easier to eliminate cold bridges and also provide greater surface strength. Each seam is additionally filled with glue.
The material is laid right under the roof.
In this case, glue alone for fixing the foam will not be enough, because as the plane grows, its weight increases.
Plastic umbrellas are used as additional fasteners for foam plastic. To install them on a sheet of foam plastic, you need to drill five holes. One of them is in the middle of the foam sheet and the other four are drilled into the seam in order to secure two adjacent sheets of foam with one umbrella. Umbrellas are hammered so that their caps are flush with the foam, after which their position is fixed with a plastic nail. After completing the installation of plastic fasteners for the foam, you can proceed to strengthening the insulated surface with fiberglass mesh. Self-tapping screws are not used to fix it.
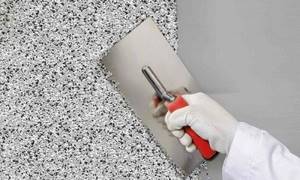
First of all, the entire surface of the foam is covered with a special cement-based material. The layer of material should be such that the mesh is easily recessed into it. As soon as a layer of material is applied to the width of the mesh roll, the latter is applied to the surface and recessed into the glue using a wide spatula. Individual sheets of mesh are laid overlapping on the foam to create a monolithic plane.
As soon as the layer of glue dries, it is grouted with fine sandpaper. Next, another layer of glue is applied to the foam, which is also sanded with sandpaper. The process is repeated one more time to achieve the desired result. After the plaster has gained strength, you can begin finishing.
How to insulate a balcony made of aerated concrete
Aerated concrete is used not only for the construction of load-bearing walls of low-rise buildings. In apartments, they fill the spans of frames, make interior partitions, and also build parapets on loggias and balconies. External enclosing structures are designed by the developer, the partitions do not need to be insulated - but what to do with balcony parapets?
- They cannot be insulated from the outside, not only because they are inaccessible, but also so as not to spoil the architectural appearance of the facade. And if you consider that a loggia or balcony is often attached to rooms, or some functional areas are moved there, the need for insulation still arises.
- For insulation to be effective, it must be done from the outside, but in this case, it is done from the inside. And here it is best to use not mineral wool, but polystyrene foam or polyurethane, which will trap vapors and prevent them from being absorbed into the gas-block masonry.
- The insulation process is no different. You can, just like on the facade, stick the slabs and perform surface plastering, or you can put insulation inside the sheathing, on which drywall, boards or some panels will be mounted.
Expert opinion Vitaly Kudryashov builder, aspiring author
Ask a Question
Note: When installing hanging materials, in addition to slab insulation, you can also use roll insulation - modern and very effective materials based on polyethylene foam.
Alternatively, to finish the parapet, you can use two-in-one materials: textured foam plastic or thermal panels to look like stone or brick.
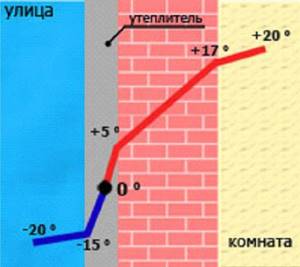
Dew point
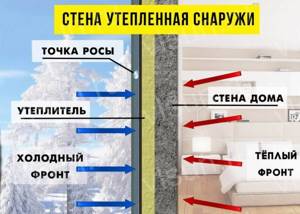
The inner surface of the sen has a temperature close to room temperature. The outside is much colder; in winter it has the same temperature as the outside air. If you consider the cross section of the wall, the heating of the internal and external surfaces is significantly different, sometimes the difference can be 40° or even 60°. That is, somewhere in the gap between the outer and inner surfaces there is an area with a temperature at which the vapor passes into the liquid phase. This area is called the dew point.
It is generally accepted that the dew point should be brought outside. This is done using a heat insulator - the walls are protected from the outside with a layer of insulation, which increases the temperature and shifts the dew point towards the outer surface. This is the generally accepted point of view, but experts approach this issue somewhat differently.
The greatest danger from the point of view of builders is not the dew point, but the zero point, that is, the area where moisture freezes and turns into ice. As you know from school physics courses, ice expands. Inside the walls, it begins to perform work similar to the action of an explosion - it destroys the bonds between particles of building material, turning it into crumbs. Experienced builders claim that a wet wall is not so dangerous, since the moisture evaporates. An icy or frozen wall is in danger of destruction, which elevates the danger to a critical level.
The situation can only be corrected with the help of insulation. This is especially true for a house made of aerated concrete blocks, since the material is hygroscopic and prone to moisture accumulation.
Features of the steam extraction process
Water vapor is absorbed into the wall, passes through it and evaporates outside. This is a somewhat simplified diagram. There is a rule according to which the vapor permeability of all layers of a wall pie should consistently increase in the direction from inside to outside. This is an important point that must be taken into account at the stage of drawing up the project and selecting materials. The interior finishing layer should have the lowest permeability, and the outer layer the highest. Any transition from one layer to another must be a transition from greater to less permeability. If this rule is violated, the steam will not be able to pass through the next layer and will begin to accumulate in the transition area. When the temperature drops (or simply due to accumulation), it will turn into liquid, the walls will begin to get wet and moldy. A damp, dank microclimate will appear in the house. It will feel cold, even if the room temperature is normal - slightly damp clothes or bedding do not cause a feeling of comfort.
The correct choice of heat insulator is one of the consequences of this rule. When purchasing material, you should first find out whether it is possible to insulate a house made of aerated blocks with it. If an impermeable material is used (foam plastic, penoplex or foamed polyethylene), the vapor is trapped at the wall-insulation transition line. There is a lot of information on the Internet where home owners describe the process of insulating brick or concrete walls with polystyrene foam. Usually not a word is said about vapor permeability and wetting of walls. At the same time, the process of moisture accumulation is inevitable, but it can only be noticed when the entire wall gets wet through or begins to collapse. Such articles or videos pose a certain threat - untrained people, unaware of the impending danger, use cheap and easy-to-use material. The consequences of such insulation of external walls can be very sad.
The role of ventilation
We found out that when insulating a house made of gas silicate blocks from the outside, it is necessary to use a vapor-permeable heat insulator. However, situations often arise when the owner is faced with a fact: a house has been purchased with a heat insulator already installed on the walls and the exterior finishing has been completed, or the work is being performed by a team of workers, whose actions the owner has no opportunity to observe. Redoing everything, clearing the walls of sheathing and insulation, is expensive and time-consuming. In these cases, the problem can be solved in another way.
Since the cause of all problems is water vapor in the internal air of the house, it is necessary to organize its removal using high-quality supply and exhaust ventilation. If you install a well-designed productive system, there will be no problems with the walls getting wet and steam escaping. At the same time, you should not rely only on ventilation - in small quantities steam will still be absorbed into the aerated concrete blocks. For protection, you can use a cut-off - for example, decorate the inside of the walls with plaster and cover them with vinyl wallpaper. The plastic layer forms a barrier that prevents steam from being absorbed into the gas blocks.
High-quality ventilation is necessary in any case. Modern plastic windows and sealed doors do not allow for natural air exchange, requiring the use of forced ventilation. This is especially important in houses with gas appliances (stoves, heating boilers). Therefore, the installation of supply and exhaust ventilation systems is necessary not only to remove excess humidity.
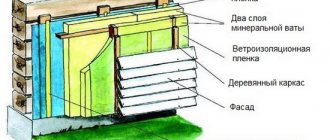
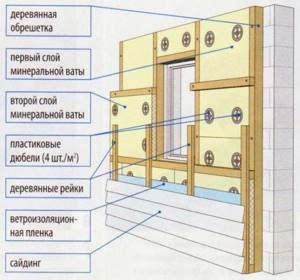
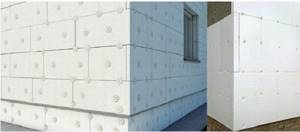
Technology of insulation of enclosing structures with stone wool
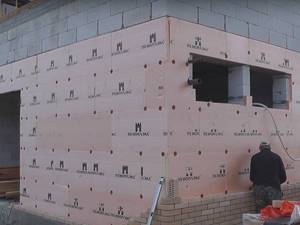
The ventilated facade system with siding cladding is one of the most popular among private owners, as it allows you to level out all base errors, and is also available in terms of independent implementation. If over time, under the influence of heaving forces or for other reasons, cracks form in the masonry, the hinged facing screen will not be damaged. And given the fragility of aerated concrete and its requirement for the strictest adherence to technology, many self-builders prefer cladding as a more durable finishing layer. Insulation of aerated concrete walls with stone wool before finishing with siding or other facing material is carried out in several stages.
Preparation
When insulating during the reconstruction of an already in use building, all functional and decorative elements are removed from the walls, the surface is cleaned of dirt, and, if necessary, primed. If there is doubt about the load-bearing capacity, the base is checked by tapping with a hammer. Severe unevenness must be removed (protrusions) or repaired (depressions). When insulating during the construction process, the remaining mortar is removed from the walls. If there was heavy rainfall before work, you need to let the box dry.

Marking
Before installing the sheathing, markings are applied to the wall using a level or level, along which the frame elements will be attached. The distance between the vertical beams of the sheathing depends on the dimensions of the insulation.
Polina Nosova
In order for the slab to stand flat, without the formation of cracks and without deformation, and to fit tightly to the wall, the vertical axes are marked at a distance of 10-20 mm less than the width of the insulation (length, when laid horizontally). If the width is 600 mm, the clearance distance (between the inner edges of the beam) should be 580 or 590 mm.
Installation of vertical racks
Since the complete absence of heat leakage through cold bridges is guaranteed only by two-layer insulation with overlapping joints, first a vertical sheathing is assembled on the wall according to the markings. The thickness of the beam should correspond to the thickness of the slab, usually it is a 50x50 mm beam. The racks are fixed to aerated concrete using special fasteners, since ordinary dowel-nails or self-tapping screws used on other bases are not suitable for lightweight cellular concrete.
Laying slabs in a vertical frame
The thickness of the layers is selected based on thermal engineering calculations; for most regions, a total thermal insulation thickness of 100-150 mm is sufficient. The absence of shrinkage and high elasticity of the slabs make it possible to simplify the technology and install mineral wool without additional fixation, laying it between the beams. If necessary, the slabs are trimmed with a knife or a hand saw with fine teeth. If, when assembling the sheathing, it was not possible to maintain the required distance, large gaps can be filled with a piece of slab.
Installation of horizontal racks
After laying the first layer, markings are applied under the horizontal frame, also using a level or level.
The distance between the posts also depends on the dimensions of the slab minus the compaction; the dimensions of the beam are selected to match the thickness of the slab.
The location of the second row of timber is made horizontal due to the fact that the further frame for the facing material will be attached to it in a vertical position with a pitch of 400 mm under the siding.
Laying slabs in a horizontal frame
Thermal insulation slabs are laid sideways, with offset seams, which allows you to completely get rid of cold bridges, even taking into account the use of metal fasteners when installing vertical racks.
Protective layer
To protect the insulation from atmospheric influences and the unhindered removal of condensate, a vapor-permeable, moisture- and wind-proof membrane is laid on top of the thermal circuit.
Polina Nosova
The membrane is rolled out horizontally, starting from the bottom row, the sheet is fixed to the horizontal sheathing using a stapler, the overlap between the sheets must be at least 100 mm. The seams must be insulated using a special double-sided tape.
Elements of the fastening system under the facing screen are fixed on top of the membrane; when installing the guides between the membrane and the facing, an air gap of 30-50 mm is created, which will provide the insulation with optimal operating conditions. The mounting step for the guides is 400 mm, unless the technology for installing the finishing layer requires a different size.
Despite the prevailing opinion that the feasibility of insulation is questionable, since the costs will significantly exceed possible energy savings even in the long term, heat calculations and practice prove the opposite. An aerated concrete house insulated with stone wool is not only comfortable, but also economical living.
External or internal finishing of aerated concrete, choosing the optimal solution
Novice developers do not always know how to properly insulate the outside of a house made of aerated concrete. Some craftsmen prefer interior wall decoration. Indeed, it is much easier to carry out thermal insulation measures from the inside. After all, this eliminates the need to install scaffolding, and it is also possible to easily plaster the walls, use inexpensive glass wool or plasterboard sheets. The owners of buildings are attracted by the fact that the large dimensions of the plasterboard slab allow them to quickly complete the insulation work.
Effective heat retention in the room
However, internal thermal insulation has serious disadvantages:
- shifts the location of the “dew point” inside the gas block mass;
- unable to provide a comfortable temperature in the room;
- negatively affects the durability of aerated concrete walls;
- does not prevent temperature reduction due to “cold bridges”.
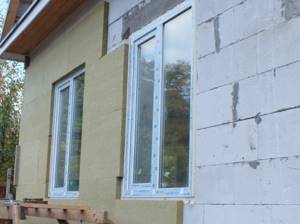
Sometimes the internal surfaces of aerated block walls are coated with a layer of paint. Remember that after painting the vapor permeability of the blocks is significantly reduced. The only correct solution is external thermal insulation of an aerated concrete house with polystyrene foam, mineral wool or expanded polystyrene.
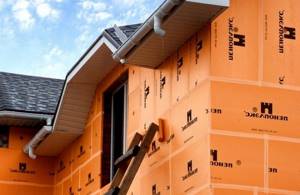
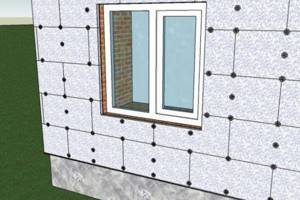
Insulation of a facade made of foam blocks from the outside under siding
The walls of the house may be uneven, and there is nothing to worry about. But the insulation process itself must be carried out on flat surfaces, what to do in such a situation? For this purpose, metal or wooden sheathing is used. It is this that will help hide various types of imperfections on the facade of the building.
The rules for installing such material are simple:
- before you start installing the sheathing on the facade, you should clean it of dust and dirt (you can use sandblasting);
- Do not under any circumstances carry out the process of installing such sheathing at temperatures below -10 degrees;
- you must leave room for insulation (for example, mineral wool);
- when installing the sheathing, you do not need to screw in the screws all the way (all the way);
- the lathing has its own pitch and it must be chosen based on the dimensions of the façade panels themselves.
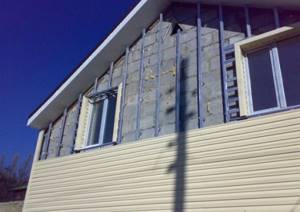
Lathing for siding
After this procedure, you can begin to insulate the facade. Step-by-step instructions on how to insulate the facade of foam blocks using mineral wool:
- The first thing to do is to free the entire façade of the house from dirt and dust. Also remove various brackets, communications, and so on. Make the walls “bare”;
- be sure to seal all cracks and cracks with a special solution;
- let it dry, then apply antifungal agents (you can buy them at a hardware store). There is no need to apply to all walls, do it only where there is a wall that will be exposed to moisture. This is necessary to prevent mold and mildew;
- install the sheathing, preferably from metal frames;
- lay a vapor barrier;
- start laying mineral wool slabs. Experts advise using cotton wool specifically in slabs, since working with rolls is not convenient and will bring many problems.
- after the insulation material has been laid out, it is worth applying waterproofing;
- carry out the process of siding (vinyl/metal);
- On the building materials market, you can find mineral wool of different sizes, but the best option is a slab 10 centimeters thick.
Mineral wool installation diagram
Lathing with metal profile
Nuances of choosing insulation
To make the right choice of material for insulating the walls of a house made of aerated concrete blocks, you will need to take into account the following nuances:
Physical properties of aerated concrete. The material successfully regulates humidity in the building; the walls will be open to water vapor escaping outside the house. Therefore, it is very important that the external finishing does not interfere with this process.
Is there a need for internal insulation?
They mainly talk about insulating walls made of gas silicate blocks from the outside. But you can potentially insulate a house from the cold from the inside.
It is important to understand that in this case you will have to put up with the following points:
- a portion of the usable area will be lost;
- it will be necessary to provide an additional ventilation system;
- the dew point moves inward;
- indoor humidity will increase;
- the risk of mold and mildew will increase.
If you think that this is not so critical, then no one will forbid you to carry out insulation.
Is it possible to insulate with mineral wool?
Mineral wool as an insulating material is much more practical than polystyrene foam
Mineral wool as an insulating material is much more practical than polystyrene foam. Of course, it has a higher cost, but it also has a number of undoubted advantages: high strength and vapor permeability. This material is recommended to be used to maintain a stable level of humidity and a comfortable microclimate in a private home.
The working life of the insulating material without loss of operational features is more than 50 years. Mineral wool insulators are produced in the following versions: some are in the form of slabs, others are produced in the form of rolls. For ease of installation, the slabs are produced in sizes of 500*1000 millimeters.
Work order:
- External walls must be cleaned of dust and dirt. For this, aggressive detergents, a hard brush and a metal sponge are used; Insulating walls with mineral wool will require a special glue; Additional fixation is provided by the use of plastic dowels; After the mineral wool has dried a little, a fiberglass mesh is attached to it, which will subsequently protect the walls from formation of cracks in paint or plaster; Another layer of glue is applied on top of the fiberglass mesh; It is recommended to start plastering and painting the insulating material after the glue has dried.
Features of the material
Many of the nuances of using polystyrene foam as an insulating material for aerated concrete can be understood from its positive and negative properties.
The list of the former is several times larger than the latter, so it is important to know about the pluses:
ease of transportation; ease of giving the required shape to the material; elasticity of the material; environmental friendliness; ease of self-installation; minimal thermal conductivity of the material; reduction of heating costs; absence of sudden temperature changes inside the house.
The ease of transporting polystyrene foam is due to its low weight.
The latter can be achieved by a special method of material production, in which polystyrene granules are filled with gas, which subsequently makes up 98% of the total volume of insulation. The weight of one sheet of material is practically not felt, which means that during the installation process you can do without assistants, and lifting the foam to floors above the first will not require significant effort. In the process of laying insulation, it is necessary to trim the material; in some situations, the shape of the insulation can hardly be called standard, but this is not a problem with foam plastic, because
because it can be formed with almost any sharp object. In addition, the insulation has sufficient plasticity to give it curved shapes of acceptable radii.
During the sanitary research process, no harmful releases of material were identified that could cause various diseases during operation. This makes it possible to classify polystyrene foam as an environmentally friendly material.
The thermal conductivity of polystyrene foam remains one of the lowest among insulation materials. It is only 0.038 watts divided by a meter multiplied by Kelvin. Thanks to this indicator, it is possible to reduce costs during the heating season, as well as on air conditioning in the summer.
In most situations, it is possible to avoid the use of cooling equipment, since the coolness accumulated at night or in the early morning is well retained inside the room.
Among the disadvantages of using polystyrene foam, you should know about:
fragility; fire hazard; instability to UV rays; high density of material; used by rodents as a place of residence.
The strength of the foam leaves much to be desired.
It is not difficult to damage the material with a small blow, which requires additional processing. Facade insulation options contain special substances that reduce the flammability of the material, but this does not exclude the possibility that foam plastic can melt in a fire, releasing harmful substances. The material also does not tolerate proximity to all types of paints that are based on organic solvents.
The insulation requires additional finishing to protect it from the sun's rays. If this is not done in time, the surface of the material will lose its strength and it will begin to crumble. Pests can settle inside sheets of foam plastic, which over time will negate its insulating properties.
How to calculate the thickness of penoplex for high-quality insulation
In order to accurately determine the required thickness of extruded polystyrene foam, you should take into account the material of the wall that needs to be insulated, its thickness, and the features of the finishing.
Thermal resistance is calculated. The data is determined based on SNiP readings for a specific region. So, for the central region this figure is close to 3.
The thermal resistance of each layer of the cake is different, so it is determined by adding the indicators of each layer and their thickness.
According to the formula, the thermal conductivity coefficient is determined as follows:
P=R/K, where R is the layer thickness, K is thermal conductivity.
Each material has its own thermal conductivity.
Calculation of penoplex thickness
After determining the values of the coefficients of all layers from the regional indicator (in our case it is equal to 3), the sum of all coefficients should be subtracted. This results in the thickness of the insulation layer.
IMPORTANT! As a rule, penoplex up to 30 mm thick is used for internal thermal insulation.
The manufacturer recommends using “Wall” penoplex for interior finishing.
Expanded polystyrene
Builders have an ambiguous attitude towards expanded polystyrene as an insulating agent for aerated concrete walls.
On the one hand, it is a popular thermal insulation material in Russia, which is 98% formed from air. In Europe, more than 60% of polystyrene produced is used for thermal insulation of various buildings.

Expanded polystyrene is a popular insulation material
The following are the advantages of insulation:
- neutrality, absence of emissions of harmful substances during operation;
- resistance to rotting and mold formation, but such colonies can form on its surface;
- absence of cases of infection with microorganisms;
- immunity to temperature fluctuations.
The disadvantages of expanded polystyrene include interaction with certain chemicals - organic solvents, alcohols, petroleum products. The panel may dissolve upon contact with these products. In addition, polystyrene foam is susceptible to combustion.
Table 1. Thermal insulation properties of polystyrene foam (PSB-S) 12 cm thick in comparison with building materials:
| Material name | Wall thickness, cm |
| Reinforced concrete | 420 |
| Brick | 210 |
| Expanded clay concrete | 90 |
| Wood | 12 |
On the other hand, the material has opponents who do not recommend its use on houses made of aerated concrete. They justify their opinion by the fact that polystyrene foam has a low level of vapor permeability.
Experts note the following. The building codes indicate that when designing multi-layer insulation, the layers must be positioned so that warmer and vapor-permeable materials are on the outside, and cold and deaf ones are on the inside. Otherwise, the outer layer of aerated concrete will not have time to dry out over the summer. As a result, moisture gradually accumulates in it, as a result of which the load-bearing capacity of the wall is gradually lost. Accordingly, the thermal conductivity of the material increases. Gradually, the dew point moves inward, and probably onto the inner wall. Condensation, fungus, etc. will appear on its surface.
The listed problems do not arise immediately after insulation, but after several years. For this reason, the use of polystyrene foam is recommended only in exceptional cases. Opponents of this building material believe that mineral wool is a more suitable material.
In view of the listed disadvantages, when insulating a house with polystyrene foam, it is especially important to correctly calculate the thickness of the insulating layer. It is also necessary to take care of normal ventilation of the premises.
Foam insulation technology
Before insulating walls with polystyrene foam, the surface is prepared, as when working with mineral wool. The surface of the blocks is then treated with antiseptic solutions to prevent the formation of mold and mildew. After drying, cover the facade with a primer.
Installation starts from the bottom and is performed in this order:
- An adhesive composition is applied to the slabs - along the perimeter and in several places throughout the rest of the area.
- Press each slab forcefully against the aerated concrete wall.
- After completing the first row, they are placed in a checkerboard pattern.
- They wait 24 hours.
- The sheets are fastened with umbrella dowels.
- Finishing is carried out (reinforcing fiberglass mesh, finishing decorative plaster).
Wall insulation with polystyrene foam
The walls in the room itself are insulated in the same order as outside.
The dowels used to fasten the panels must be made of plastic and not contain metal parts. During operation, metal is capable of creating additional “cold bridges”. Each sheet will require at least 5 dowels.
Video - How to insulate a house with polystyrene foam. All stages
When laying, you need to pay attention to the connection of the slabs at the corners of the building. So, in one row the panel protrudes, and the counter one rests against it, in the other - vice versa.
Gluing foam boards at the corners
Adhesive for polystyrene foam
Adhesive compositions for working with polystyrene foam should not include ingredients that can damage the structure of polystyrene foam - they were discussed above. For fastening use:
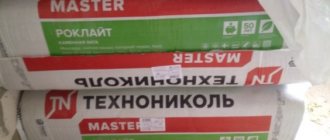
- ready-made dry mixes such as Bergauf Isofix Ceresiy CT 85;
- liquid adhesives such as Bitumast;
- assembly adhesives-aerosols - for example, TechnoNIKOL 500.
Work should be carried out in dry weather at an air temperature of 7 °C.
For interior work, appropriate products are taken, which are usually cheaper.