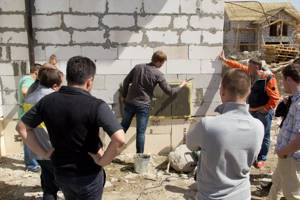
Although aerated concrete has a porous structure, which allows for the presence of air inside (the best heat insulator of all existing ones), it still needs insulation. But the performance characteristics of the material depend on the density. As it increases, thermal conductivity also increases, which entails the need for additional layers that protect cellular concrete from negative influences and make it more durable.
Typically, house construction is carried out using aerated concrete marked D500 and higher. This material is very durable, but has low heat-saving ability, so the walls need additional thermal insulation.
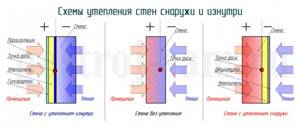
Insulating aerated concrete from the inside, like any other material, is not encouraged, but is still often carried out. If you still plan to carry out such work, you must ensure that the vapor permeability of the layers decreases closer to the room.
What is the best way to insulate aerated concrete walls - from the inside or the outside?
If you plan to insulate aerated concrete masonry from the inside, then:
- the owner of the house must be prepared to frequently replace the insulating layer, since there is a high probability of condensation forming on the surface of the masonry and insulation, since the dew point will shift into the thickness of the wall;
- a waterproofing layer and a ventilated layer are required. The first will protect the insulation from moisture, the second will remove condensation and maintain a pleasant microclimate in the room. All this significantly reduces the usable space of the rooms.
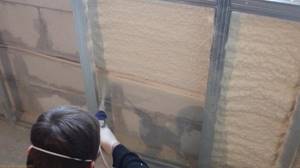
Technology of insulating a house made of aerated concrete blocks with polyurethane foam.
However, thermal insulation of aerated concrete walls from inside the house has one undeniable advantage. This is the ease of construction. In this case, there is no need to resort to the help of high-rise installers, even if the building is multi-story.
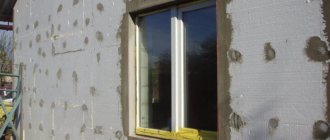
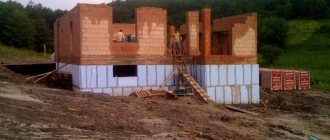
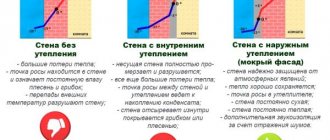
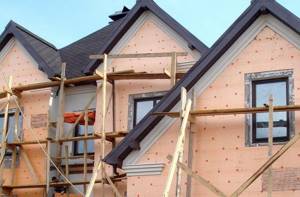
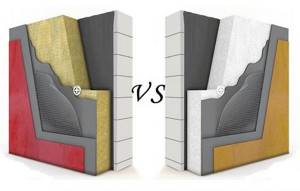
External wall insulation significantly extends the life of the house, helps remove moist air from the thickness of the walls, improves the façade of the building, and saves usable space in the rooms. However, from a technical point of view, it is more difficult to organize insulation outside the house than inside it.
Proper insulation of the facade of a house made of aerated concrete blocks
It is worth remembering that aerated concrete has high vapor permeability, so polystyrene foam and other vapor-proof materials are not suitable as insulation here. After all, they can disrupt gas exchange between the room and the environment. Moisture will condense at the wall-insulation interface and lead to moisture in the former. Aerated concrete from excess moisture will begin to rot and become moldy. The best option for insulating the walls of a house made of aerated concrete is polyurethane foam, but it costs a little more than polystyrene foam.
Technique for installing a thermal insulation layer on a wall made of aerated concrete
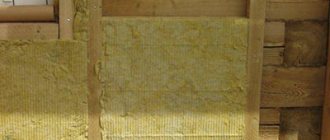
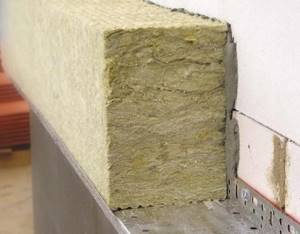
The main material here is mineral wool. At the initial stage, the wall is cleaned of dust and debris and primed. If the wall has significant unevenness, they are sealed with plaster mixture or pieces of thermal insulation.
Main stages of the process:
- choose mineral wool in the form of mats. This will not allow the insulation to settle under its own weight. Mineral wool is attached to the prepared wall using special adhesive mixtures, but not dowels;
- This is followed by a reinforcing layer of fiberglass, which does not disintegrate under the influence of the alkaline environment of the plaster. It is also mounted using silicate glue;
- the finishing layer is plaster and decorative painting.
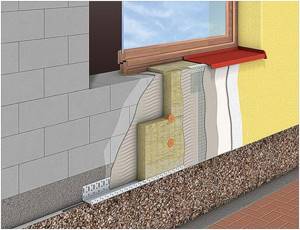
Important! When insulating, special attention is paid to areas near windows and doorways. The insulation is secured there using special corners or an additional layer of reinforcing mesh.
Calculation of the “Dew Point” for the walls of your cottage
On the Internet you can find corresponding online calculators for heating engineering of enclosing structures. We recommend the following:
Calculation example at the link: Region: Ekaterinburg, Sverdlovsk region; Premises: Residential; Construction type: Wall; Construction layers: Autoclaved aerated concrete D400, 400 mm thick (one layer, without finishing and insulation)
It is enough to select a region and enter information about the construction of the walls (layer by layer). Next, open the “Moisture Accumulation” tab. If the conclusion appears that “The enclosing structure satisfies the standards for waterlogging” - that’s it, the calculation is completed!
Please note: when calculating the “dew point”, the average temperature during the heating period is considered. In the Sverdlovsk region it is about -7°C. If within a few days the temperature drops to -35°C, the amount of steam that will fill all the pores will not have time to pass through the wall, the moisture will turn into ice, and the ice will “tear” the material. Especially if the walls are made of Twin Block - its frost resistance (F) is 100 cycles.
The lower the temperature, the lower the air humidity both outdoors and indoors. Thus, the probability of steam turning into water is low.
Summary: the “dew point” in the wall itself is not as dangerous as we are often afraid of. Risks arise only due to the accumulation of moisture in the walls during the heating period as a whole.
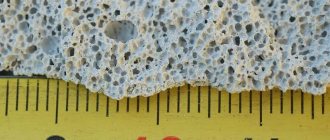
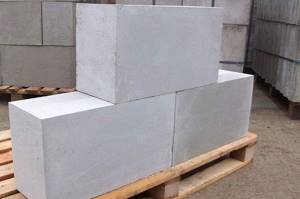
Characteristics of aerated concrete blocks
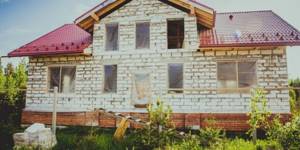
Aerated concrete, compared to the same brick, is a young invention. But over several decades, it has become one of those materials that is preferred when building houses in different climatic conditions, as well as if they want to insulate a wooden structure. What is the reason for its popularity and what is included in this building material?
Aerated concrete is produced by combining binder components (cement, lime, gypsum, quartz sand), additives from industrial waste (metallurgical production slag, ash) and special substances - gas-forming agents (aluminum powder or powder). When all the ingredients are mixed with water, a chemical reaction occurs with the release of hydrogen gas from the powder or powder. It seems to “swell” the mixture poured into the block, many cells are formed inside, and thanks to the “work” of the binding ingredients, it all quickly hardens. The result is a lightweight but quite durable material - aerated concrete. You can safely build houses up to 10 meters high (three floors) from it.
When constructing buildings with more floors, aerated concrete is used only in combination with reinforced belts. However, very tall buildings cannot be built from this material. But it is widely used in the arrangement of baths, saunas and other compact-sized utility rooms.
There is an opinion that the porosity of aerated concrete eliminates the need to insulate the house, but this is not so. The peculiarity of the material is that it allows air and steam to pass through very freely and acquires ambient temperature. So, if aerated concrete walls are not insulated outside or inside in time, you can experience big troubles.
Fortunately, insulating a house made of aerated concrete blocks is not difficult, although it requires caution. Still, this material is not simple concrete or standard brick.
It has features that you need to know about.
The vapor permeability of aerated concrete is of great importance, for example, when finishing a bathhouse or sauna. If insulation in these rooms is carried out incorrectly, the consequences can be disastrous. The walls will accumulate or, on the contrary, release moisture very intensively. Both will make the bath unsuitable for use in accordance with its intended purpose. Correcting the error will require a lot of effort, time and money. Therefore, it is better to carry out thermal insulation correctly from the very beginning.
Introduction
Aerated concrete is a relatively young material that in a short time has been able to reach the level of such construction mastodons as brick and wood.
At least a third of all individual buildings today are buildings made from this material. But when choosing a gas block, it is worth considering that a house made from it must be insulated either outside or inside, otherwise troubles may occur. Do you want to know how to avoid them and do everything right yourself? Give this article 15 minutes of your time, because making thermal insulation is not so difficult!
Simple and cheap insulation of a house made of aerated concrete blocks
“Wet facade” is what experts call a fairly simple method of thermal insulation of walls, when insulation (slabs) is glued to them, and then the structure is covered with layers of plaster. The type of insulating and finishing materials does not play a special role - the principle of installing insulation (whether dense slabs of mineral wool or polystyrene foam) is the same.
Surfaces are always carefully prepared for finishing. As for aerated concrete, its pre-treatment is not much different from manipulations with similar materials: the walls are cleaned of dust with a brush or broom and primed in several layers with a suitable composition. But one nuance should be taken into account: gas silicate blocks can be of different densities; the higher it is, the less primer we take for work.
For example:
- aerated concrete block D400 - about four layers of reinforcing composition;
- aerated concrete blocks D500 and D600 – three layers;
- aerated concrete blocks D700 and higher density levels - 1-2 layers.
Until the soil-covered walls are completely dry, you cannot proceed to the main installation stage! Ideally, the house stands on a wide block or strip foundation, and the base protrudes at least 50 mm. This space is just enough to support a thermal insulation structure made of foam plastic or cotton wool blocks. But often home builders do not leave any free space, pouring too narrow a foundation strip; the walls become flush with it, or even overhang. In this case, additional installation of the border will be required for finishing.
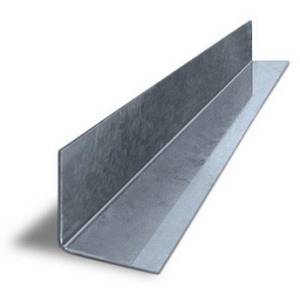
As a rule, L-shaped support profiles are chosen for this. They come in different widths and correspond to the size range of cotton slabs. The same profiles can be used for foam plastic (the dimensions of its plates are almost the same, but less in weight), and for any other slab heat insulator. The structure is fastened with anchors along the horizontal mark in increments of 250 - 300 mm.
Attaching mineral wool or polystyrene foam to aerated concrete walls is not a problem. The choice of special adhesive compositions is varied: if you want, immediately take them already diluted and ready for use, if you want, buy dry ones. The instructions are as simple as shelling pears: add water and don’t forget to stir with a special mixing attachment.
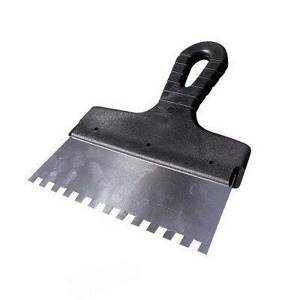
It is convenient to apply glue to the slab using a notched trowel with a slot depth of about 5 mm. If you are dealing with lightweight cellular aerated concrete, then the layer of glue that you place on the slab must be continuous. This is true for all porous surfaces. But on dense concrete or brick walls the composition can be applied spotwise.
It is recommended to glue the insulating plates tightly, without the slightest gaps; it is advisable to lay subsequent rows with a shift of at least part of the slab, or better yet, half. Even a beginner can handle such a simple technique.
Professionals try to make the coating itself in two layers for greater efficiency. They use thin thermal insulation boards. As a result, the thickness of the insulation is the same, but the quality is an order of magnitude higher: thanks to the overlap and shifting, there are no gaps left between the layers.
As soon as the first layer of glue has set, we cover the insulation with another one and, without allowing it to dry, immerse it in a fiberglass reinforcing mesh - serpyanka. This can be done with a needle roller or spatula. Thus, the entire external thermal insulation structure made of mineral wool or polystyrene foam is made of four layers.
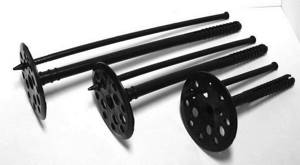
The slab insulation together with the serpyanka must be additionally attached to the wall while the glue is still wet. For this purpose, plastic dowels with wide perforated caps are used - the so-called “umbrellas”.
- Drill a hole of the required size using a hammer drill.
- Insert the dowel body.
- Hammer the inner rod.
- Press the dowel head into the sheet so that it does not protrude too much above the surface, and finally fix it with a tool.
Having secured all the “umbrellas”, we let the wall “rest” while the glue dries. Then we apply another layer of it, the final one. And only after everything has hardened well, we proceed to the decorative coating with plaster. You can take a ready-made composition for the “Bark Beetle” finishing, or you can throw on a “fur coat” - it will be cheaper.
The classic guide to finishing a “wet facade” looks a little different. It recommends fixing the slab insulation with “umbrellas” immediately after attaching it, and then applying the first adhesive layer, serpyanka, more glue, and after drying, decorative plaster.
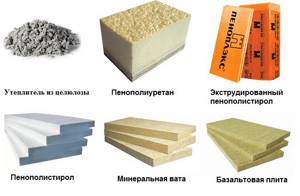
Types of materials for insulation
Insulation of an aerated concrete house is carried out using the following types of insulating compounds:
- mineral wool;
- penoplex;
- Styrofoam;
- polyurethane foam;
- vermiculite, etc.
The materials differ in technical characteristics (weight, density, composition), installation techniques and cost.
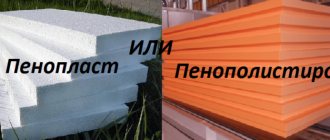
Styrofoam
Polystyrene foam is lightweight and easy to prepare and install. On the inside, the blocks consist of voids filled with gas bubbles that are formed during the manufacture of the composition. Foam plastic is suitable for the construction of residential and industrial buildings. The advantage of the material is its low cost and the ability to carry out the work independently.
Insulation of aerated concrete walls with polystyrene foam is carried out in compliance with multi-layer installation. Internal walls are finished with compounds with high thermal conductivity and high heat capacity. Polystyrene foam does not allow steam to pass through, is suitable for interior work and is not used for external insulation.
Experts do not recommend using the material in regions with high humidity to prevent rot and destruction of buildings.
In southern regions with dry air, polystyrene foam can be used for thermal insulation of houses after preparing the wall panels. It will be necessary to install a ventilation system to prevent the formation of condensation on the walls. When designing a building, it is necessary to take into account the large thickness of the foam blocks. The internal operational area of a building finished with polystyrene foam will be reduced.
Advantage of finishing material:
- aesthetics;
- high degree of heat retention in the room;
- light load on wall panels and foundation;
- high sound insulation;
- resistance to biological organisms (mold, fungus);
- preventing temperature fluctuations in the room.
Sequence of work
Installation of polystyrene foam is carried out using a special adhesive composition, similar to the solution for installing tiles. A layer of glue is applied to the wall, then the insulator plate is tightly applied to it and fixed with dowels with wide washers (fungi).
The material is installed as tightly as possible , without cracks or gaps, which should be immediately filled with polyurethane foam, thin strips of polystyrene foam or the same glue on which the sheets are attached. After the entire wall area is covered with foam plastic, a fiberglass reinforcing mesh is attached to its surface with brackets and a layer of plaster is applied.
You can use another type of installation, when a frame (lathing) is pre-installed on the wall, into the sockets of which pieces of insulation are tightly installed. Then the cladding is installed on the frame slats - lining, wall panels, sheet materials, etc. This method allows you to complete the work faster and avoid dealing with “wet” solutions.
Penoplex
Insulation of aerated concrete walls can be done using penoplex. Extruded polystyrene foam is manufactured at elevated temperatures and high pressure. The high cost of the material must be taken into account.
Advantages of the composition:
- small thickness;
- high vapor barrier characteristics;
- the non-flammability of the composition helps prevent the development of fire.
Sequence of work
Installation of penoplex is carried out using the same technology as installation of polystyrene foam . The only nuance in this matter is the preference for “wet” finishing , since the material is quite rigid and is able to provide a strong and reliable supporting plane for plaster.
It is recommended to choose a material with a corrugated surface ; the plaster adheres better to it, does not peel off over time, and allows you to drill holes for brackets for hanging furniture or appliances. The dry installation method is also used, although in this case there is no reason to create a full-fledged sheathing - it is quite possible to get by by installing vertical or horizontal strips at a distance convenient for installing the sheathing.
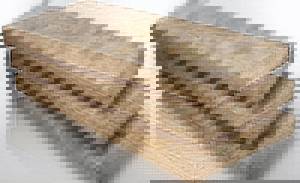
Mineral wool
Mineral wool is produced in the form of slabs or sold in rolls. The raw materials are fire-resistant, have vapor-permeable properties, high noise insulation characteristics, are made from environmentally friendly raw materials and are safe to use.
The service life of the composition is long, the cotton wool is resistant to fungus and mold. When fixing, it is necessary to provide waterproofing, because the composition allows moisture to pass through and can form condensation. When decorating the outside of a building with mineral wool, it is prohibited to use acrylic plaster, which will increase the formation of condensation.
According to GOST standards, 3 types of compositions are classified as mineral wool:
- glass fiber;
- fibers from slag;
- stone wool.
The materials differ in structure (thickness and length of fibers), resistance to loads, parameters of thermal conductivity and resistance to moisture, and fire resistance.
Glass wool consists of long fibers up to 15-50 mm with a thickness of 5-15 microns. The material is elastic, durable, but requires compliance with safety standards when working and the use of protective clothing (gloves, goggles, respirator). The thermal conductivity of the material is 0.03-0.052 W/(mK). The permitted heating temperature is limited to +450°C. The material has an average level of hygroscopicity.
Slag wool is made from blast furnace residues (slag). Its fibers reach 16 mm in length and thickness is 4-12 microns. The material has residual acidity and can negatively affect the metal at high humidity in the room.
Slag wool has good moisture absorption, therefore it is used for interior work and is not suitable for the design of facade structures or building plumbing systems. The material is fragile. The heating temperature is limited to +300°C, the thermal conductivity coefficient ranges from 0.46 to 0.48 W/(mK).
Stone wool is similar in technical characteristics to slag wool, but it is not brittle and does not damage surfaces. Cotton wool is easy to use and does not require the use of complex protection during repairs. Mineral raw materials from mining rocks have a permitted heating rate of up to +600°C. The thermal conductivity of the composition reaches 0.077-0.12 W/(mK). Average hygroscopicity indicator of the composition.
Sequence of work
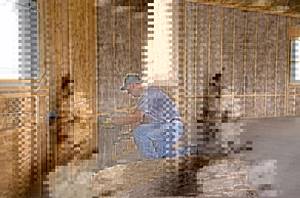
To install mineral wool, with a thickness of planks equal to or slightly greater than the thickness of the insulator is first installed The pitch of the sheathing is taken equal to the width of the roll or slab of mineral wool, so that it does not have to be adjusted to fit the nests of the frame. The material is tightly inserted between the planks; no gaps or cracks are allowed . If they do appear, you should fill them with polyurethane foam, for which you must always keep the container at hand.
A vapor barrier membrane is laid on top of the installed mineral wool in horizontal strips . First, the bottom strip is laid, fixed to the sheathing with a stapler, then the next one is overlapped by 10-15 cm - and so on until the very top. All joints must be additionally connected with special tape.
On top of the membrane in the transverse direction, strips of the second layer of the frame are installed - counter-lattice . They have a thickness of at least 4 cm (the minimum size of the ventilated gap), after which sheathing is installed on them.
Polyurethane foam
You can insulate a house made of aerated concrete with polyurethane foam. The composition is applied to the panels using special high-pressure spray equipment. Polyurethane foam can be used to cover an uneven surface; the composition fills uneven areas and cracks, after which an even, seamless coating is formed.
Spraying of raw materials is possible in hard-to-reach places. The advantage of polyurethane foam is its good adhesion to the surface and the absence of the need to construct a frame to insulate the facade.
When choosing polyurethane foam as thermal insulation, it is necessary to select materials for the interior decoration of the building that prevent the penetration of steam. Optimal compositions for decoration include vinyl wallpaper materials, alkyd dyes, cement crumb plaster, ceramic tiles, etc.
Sequence of work
Before application, the surface should be prepared . Remove all brackets, clean off deposits, remove crumbling or peeling parts. The material can adhere to damp (not wet) surfaces, but if there is ice on them, it should be removed.
The installation of the sheathing is carried out only to create a supporting structure for the subsequent installation of the sheathing, therefore all requirements for it are determined by the type and size of the outer covering.
Special equipment is used to apply polyurethane foam . Usually, specialists with the necessary equipment, experience and skills for such work are invited to do this. It is not recommended to apply it yourself, since it is necessary to know exactly the degree of expansion of the foam in order to ensure the correct consumption of material and create a layer of insulation of the required thickness.
Ground floor floor: requirements
In order to properly arrange the ceiling on the ground floor, you need to know about the requirements that it must meet:
- The material must be strong, reliable and durable.
- The ceiling must adequately withstand climatic, technological and temperature influences.
- The structure must withstand permanent and temporary loads from load-bearing walls and foundation.
- The base must be quite rigid, with regard to the permissible performance of the structure for deflection.
- The design should not create bridges of sound and cold;
- The material must have thermal insulation properties.
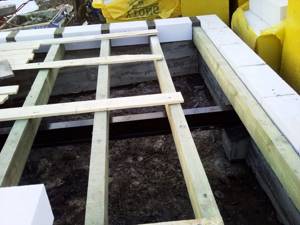
1st floor floor structure
How to insulate a house with your own hands using polyurethane foam?
3 instructions for action to choose from:
- Curtain façade. A special wooden or metal frame structure is created, the pitch of which is equal to the width of the thermal insulation material. Polyurethane foam is placed in the cells of the frame, and a decorative layer is mounted on top.
- Wet facade. The surface of the gas block is cleaned. Polyurethane foam is attached with glue and secured with dowels. After this, the wall is plastered in 2 layers using a reinforcing mesh.
- Wet façade with reinforcement. If you choose brick or natural stone, then you need to use hooks to fix the insulation. Then reinforce the surface with mesh and plaster. As soon as the plaster dries, the cladding is done. Thanks to this option, there is no need to strengthen the walls and foundation. This is the most preferred method in construction.
What is the best way to insulate gas silicate?
A house made of gas silicate blocks is considered one of the best in terms of thermal insulation. This is mainly due to the structure of the material, which is almost 90% air. The rest is a mixture of sand, cement, limestone and water using a certain technology. It is not always necessary to insulate a house made of aerated concrete due to the characteristics of the material, however, in the central zone of our country quite severe winter frosts prevail.
They do not allow you to do without insulating a house made of gas silicate blocks. This is a natural process. How to insulate a house from gas silicate from the outside will be discussed further.
How can you insulate gas silicate?
Insulating a house made of gas silicate blocks involves the use of a wide variety of materials. Most often, however, two types are used - mineral wool and polystyrene foam. It's worth talking about the advantages and disadvantages of both technologies in more detail.
When insulating a house made of gas silicate blocks with your own hands using polystyrene foam, do not forget about the ease of installation of this material. It can be mounted with ease, and a wide variety of tools can be used to cut it. Some use a regular construction knife for these purposes, while others use a hacksaw.
It all depends on the desires and capabilities of the person. At the same time, foam plastic also has a lot of disadvantages that make this technology less in demand. The fact is that polystyrene foam has low air permeability. At the same time, the main material, namely gas silicate blocks, have a higher indicator of this characteristic.
As for mineral wool, it is more acceptable as insulation for a house made of gas silicate blocks. This is simply an ideal option, which is widely used today. Mineral wool perfectly allows air to pass through and keeps it warm. This material is a little more difficult to install, but the characteristics of the walls will always be at their best.
There are other materials that are widely used for these same purposes, but they are used much less frequently than those discussed above.
Tools and materials
So, now it’s worth talking about what you might need to insulate a house from gas silicate blocks with your own hands. Here you will need to acquire the following:
- thermal insulation material, in this case we will talk about mineral wool;
- dowels;
- glue;
- perforated corners;
- container for diluting glue;
- building level;
- fiberglass mesh;
- perforator;
- putty knife.
Basically, this should be enough to carry out the entire range of events.
Now you can proceed directly to insulating the house from gas silicate blocks. First you have to prepare carefully. The wall is cleaned of various dirt, dust, and all defects are eliminated. This is done to improve the adhesion of the mineral wool surface through the use of glue.
If there are large defects on the wall, then they also need to be eliminated. This is done through plaster and primer. Only thorough surface preparation will allow all work to be carried out to the highest possible quality. At the ground floor level, it is worth installing the frame.
It will serve as additional support for the insulation. Beacons should be placed at the corners of the house. Next comes the actual process of attaching the mineral wool to the wall. First you need to coat the surface itself and the cotton wool with glue. This will improve the properties of the materials to be fastened. During installation, it is imperative to avoid the formation of cross-shaped joints.
Do not forget about additional fastening of the material. For these purposes, special dowels are used. They are umbrellas. They should be placed around the perimeter of the mineral wool slab, and they can also be additionally fastened in the center.
It is worth noting the fact that mineral wool itself is a soft material that needs to be further strengthened.
It is for these purposes that fiberglass mesh is used. Glue is first applied to the surface of the insulation, and then the fiberglass mesh itself is installed. Another layer of glue is additionally applied on top of the mesh.
After the process of reinforcing the insulation is completed, it is imperative to additionally insulate the corners of the building, door and window openings. This is done extremely simply. For these purposes, the same perforated corners that were purchased earlier are used.
How to insulate with penoplex itself?
Everything is done in several stages:
- Level the façade walls, seal cracks, and treat with primer.
- Glue the penoplex with glue and then fasten it with dowels.
- Apply reinforced mesh for finishing.
- “Finish” the finishing with façade plaster.
If you make the facade with siding or PVC panels, then do not forget to install vertical guides. Additionally, there is no need to cover anything with a vapor barrier, since the material will already be protected by vinyl siding.
The advantage of penoplex insulation is that you can install it yourself, even with two hands.
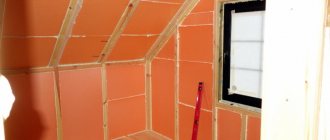
Interior decoration
In addition to the external insulation of aerated concrete, you can finish the room from the inside; this will completely preserve the wall from any external influence and will not only save the aerated concrete from destruction, but will also significantly save your money on heating bills in the future.
For high-quality insulation, only vapor-permeable materials are used; they complement all the properties of aerated concrete and maintain the desired indoor climate.
Preliminary work
A primer is applied to the wall, and after it dries, drywall is attached.
If the walls are smooth, it can be fixed immediately using dowels; otherwise, you need to make a frame from profiles that will make the corners perfectly even.
Fastening the insulating material
A layer of primer must be applied to the insulation to get rid of fungus and other unpleasant consequences. It needs to be given enough time to dry completely.
Afterwards you can apply a layer of plaster. It is laid out in a slightly thick layer, and after drying, the excess is cleaned off by leveling the walls.
Final stage
The next day, the surface of the wall is slightly moistened with water and smoothed again. After complete drying, you can apply paint or decorative plaster.
Important! Areas near windows or doors need to be additionally insulated from the inside. To do this, you can use special corners or a second layer of reinforcing mesh.
How to choose the thickness of insulation?
The thickness of the insulation depends on the climate in which the owner of the house lives. But still, you should not use slabs from two to four centimeters, since they are not particularly useful. The thicker the insulation layer on the walls, the less you will have to spend on heating in the future. In addition, by choosing thinner insulation, you will not save much.
A thinner layer will not contribute to better insulation, and is acceptable only for interior decoration. Then it is better not to take up the area of the room with a bulky ten-centimeter layer.
Return to contents
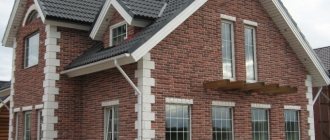
Finishing the outside of the walls
The last stage is the façade finishing of the house. For this you can use a variety of materials:
Insulation characteristics table.
- Special vapor-proof facade paints. This option is not only easy to apply, but also durable. These paints are available in various types; they provide protection to the façade wall and are resistant to adverse weather conditions.
- Polymer solutions perfectly protect the wall of the house and give it a decorative appearance. They are applied using a special technology.
- Foamed plastics are of higher quality, but are applied with special equipment. A team of craftsmen is called in to finish the facade using this method.
- Foam glass is an attractive slab that, in addition to finishing, provides additional insulation. Installing them is simple, but requires some experience.
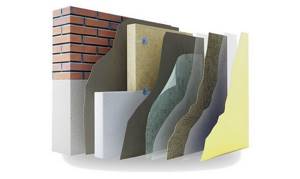
- Ventilated facades are the most optimal. Along with the finishing, the walls are also insulated; the resulting pie is as follows: aerated concrete wall, insulation, air gap, ventilated façade slabs. Today, similar methods for decorating the facade of buildings are popular. They are used not only for private housing construction, but also for urban multi-storey buildings, and for the restoration of dilapidated buildings.
Is there a need for insulation of aerated concrete? The manufacturer claims its highest thermal insulation properties, but does this mean that you can save on an additional layer of insulation? Experts still advise not to neglect protection and use foam boards or mineral wool as insulation. It is possible to combine thermal insulation and facade finishing, for which the so-called ventilated facade is used.
Do you need waterproofing and vapor barrier for aerated concrete façade?
Hydro- and vapor insulation of aerated concrete walls is necessary only for insulation from the inside , when reliable multi-stage separation of the material from the steam contained in the internal air of residential premises is needed. In this case, no precaution will become unnecessary, except for the situation when liquid polyurethane foam is used. It in itself is an excellent vapor-waterproofing agent; the use of additional layers is useless or even harmful.
If insulation is carried out from the outside, no cutting layers between the wall and the insulation are needed. There are exceptions here - it is allowed to install an insulating membrane between the wall and the mineral wool if there is a real danger of it getting wet.
In this case, there should be no impregnations or primers, otherwise the steam will be trapped in the wall and the result of insulation will be the slow destruction of the walls of the house.
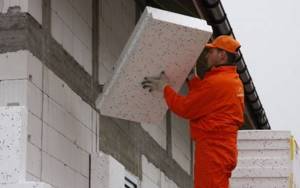
Expanded polystyrene
Insulation of external walls made of aerated concrete is often carried out with expanded polystyrene. Surface preparation in this case only involves removing irregularities that most often arise around the seams. If potholes appear during the construction of a house, they should be filled with cement mortar. If you still haven’t decided whether to use this particular material, then you should consider its positive characteristics, namely:
- affordable price;
- long service life;
- insignificant thermal conductivity.
After completing the work of insulating the walls with polystyrene foam, finishing materials, for example, plaster, can be applied to its surface.
Foam insulation technology
As soon as the walls have been freed from minor errors, they are coated with an antiseptic composition to prevent the occurrence of fungus and mold. This layer should dry well, a primer is applied on top of it to increase the adhesion of the materials. When externally insulating a gas block with polystyrene foam boards, an adhesive composition is applied to their back side. Ready-made powder mixtures are also suitable. Perhaps it is most convenient to work with liquid compounds or assembly adhesives, the latter of which are sold in aerosol packaging.
The outside air temperature must be suitable for the work. Typically this limit is in the range from - 10 to + 40 ˚С. There should be no wind, as the canvases have high windage and can break. You need to start working from the bottom, forming the first row. Then they begin gluing the remaining rows, moving along the perimeter. The plates should be pressed to the surface, placing them in a checkerboard pattern. Their position is checked using a level.

Adhesive for polystyrene foam
If you decide to insulate aerated concrete with polystyrene foam, you need to choose the right glue
When working with aerated concrete outside, it is important to take into account that the composition must be frost and moisture resistant. It should be able to withstand temperature changes well
For external work, adhesive foam, cement-polymer composition and bitumen mixture are suitable. The latter option contains a light solvent that is not capable of adversely affecting polystyrene foam. Such mixtures are very common; they are sold ready-made, which makes them easier to use.
Before use, the surface of the walls is dried and sanded. Then you need to apply a primer to the surface. The base must be freed from dirt and dust, as well as rust. It is convenient to use a comb spatula for application. With its help, an even layer of material is distributed over the back surface of the aerated concrete, and then the slab is attached to the wall of the house.
Is it worth insulating?
Aerated concrete itself is an excellent material with low thermal conductivity, which is used as an alternative to classic brick or other blocks. The material is lightweight and, when installed correctly, can prevent heat dissipation.
But it really needs additional finishing, because it can collapse under the influence of moisture.
For the most part, this happens during the cold season, when moisture accumulates in the pores of aerated concrete and increases its thermal conductivity, which increases heat transfer and negates the insulating properties. In addition, frozen moisture expands and damages the internal structure of aerated concrete. Insulation allows you to increase the insulating properties and prevent moisture from entering the pores of aerated blocks.
Due to its porosity, aerated concrete has vapor permeability, which helps dissipate excess moisture that accumulates indoors during human activity.
This means that the ideal insulation method for aerated concrete is a ventilated facade, which is necessary to remove the moisture released. The easiest way to implement it is with mineral wool, which also has vapor permeability. If you install foam plastic on top of aerated concrete, which is not vapor permeable, this can lead to moisture accumulation between the insulation and the block.
The result of this may be the appearance of mold and destruction of aerated concrete. It is this factor that causes concern among many users as to whether it is worth insulating aerated concrete with foam plastic. If everything is done correctly, then polystyrene foam can still be used to insulate gas and foam blocks.
Principles for choosing insulation for a house made of aerated concrete blocks
What should you consider when choosing insulation for aerated concrete walls?
- Main characteristics of the material. Thanks to the ability of aerated concrete to “manage” humidity, the walls in the room “breathe”. The finishing should not interfere with the passage of steam out.
- The quality of the insulating layer. The insulation, like the walls themselves, must be vapor-permeable, but in this parameter it must exceed the properties of aerated concrete blocks.
- The right combination of insulation. The more insulating layers in the façade finishing, the higher the vapor permeability of each new coating should be. After insulation, which does not allow enough air to pass through, be sure to leave a ventilated space.
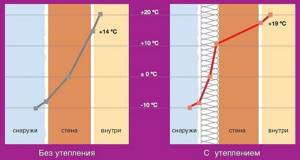
When insulating a house made of aerated concrete blocks, one should take into account such an important concept as the dew point (the temperature of condensation as a result of the difference between external and internal temperatures, as well as the plane in which this occurs). If the preparatory and main work is carried out correctly and in compliance with the above conditions, the dew point can be shifted outward
Then no condensation will cause damage to the walls and room. Otherwise, unprotected masonry risks severe damage. The moisture that accumulates inside will certainly freeze at low temperatures, therefore, a noticeable loss of heat will occur. As the degrees increase, the volume of moisture will increase. Repeated changes will inevitably lead to destruction of the building material
If the preparatory and main work is carried out correctly and in compliance with the above conditions, the dew point can be shifted outward. Then no condensation will cause damage to the walls and room. Otherwise, unprotected masonry risks severe damage. The moisture that accumulates inside will certainly freeze at low temperatures, therefore, a noticeable loss of heat will occur. As the degrees increase, the volume of moisture will increase. Repeated changes will inevitably lead to the destruction of the building material.
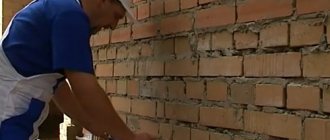
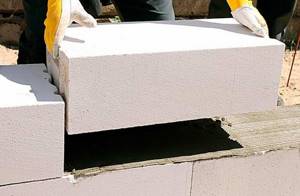
The energy efficiency of a building depends not only on high-quality insulation. An important role is played by how competently the masonry of the walls is done. If, for example, the seams are too thick or have other deviations from the norm, even perfect insulation will not help. The correct thickness of the adhesive seam is 1.5-2 mm. When the blocks are fastened with cement-sand mortar, the layer of which is 10-12 mm, heat loss is ensured by 20%, and accordingly, the heating fee will increase.
You can, of course, insulate the house from the inside, but this alternative option has a number of disadvantages.
- You will have to sacrifice square meters. There will be less living space.
- Additional ventilation will be required. The air exhaust system must be powerful.
- The dew point will be indoors. An increase in humidity is inevitable. Combined with heat, this will increase the risk of mildew (fungus).
For those who value useful space and are interested in preserving walls for a long time, external insulation is more suitable. You can choose materials such as:
- Styrofoam;
- extruded polystyrene foam (penoplex);
- mineral wool;
- polyurethane foam.
As for the last layer of external insulation of a house made of aerated concrete, well-proven ones are suitable for it:
- lining;
- siding;
- decorative rock;
- face brick;
- grouting the joints with further application of vapor-permeable paint;
- plaster.
Many homeowners prefer plaster: regular or mineral, which is created for walls made of aerated concrete blocks.
So, by choosing good insulation from the outside of the structure, we get obvious advantages:
- A country house whose walls are protected from environmental influences will last longer without major repairs.
- High-quality insulation of a building helps prevent heat loss, which means avoiding unnecessary heating costs.
- Insulating a house made of aerated concrete blocks using high-quality materials helps to simultaneously solve the issue of sound insulation - housing becomes as comfortable as possible.
- The facade of buildings with external insulation looks more attractive.
Related Posts
- Pros and cons of aerated concrete blocks
- Adhesive foam for aerated concrete blocks
- How to decorate the facade of a house made of aerated concrete?
- Do-it-yourself insulation of walls with polystyrene foam - detailed instructions
- Do-it-yourself aerated block house
- Which is better to build a foundation for a house made of aerated concrete?
- How to make aerated concrete?
- Do-it-yourself aerated concrete laying technology
- Do-it-yourself sibit house
- Insulation of a veranda in a wooden house
- We are not afraid of the gray wolf: straw house-building technology
- Thickness of aerated concrete walls
- Insulation of facades. insulation for exterior walls of a house
- We insulate the wall of the apartment from the inside with our own hands
- Is it worth replacing wallpaper with paint in an apartment: what to paint with, is it possible to do the work yourself, and what paint to choose for the wall
- External or internal plastering of aerated concrete walls with your own hands: technology for plastering aerated silicate blocks and advice from professionals
- Methods for finishing the walls of a house and apartment made of foam blocks inside
- What is the difference between aerated concrete and foam concrete?
- Advantages and disadvantages of ceramic blocks
- Which blocks are better for building a house?
- House made of monolithic foam concrete
- How to build a house from expanded clay blocks with your own hands
- 10 tips for those planning a kitchen renovation
- Polyurethane foam that can be used instead of cement
- Finishing the facade of the house with foam plastic
Read with this
- Pros and cons of aerated concrete blocks
- Adhesive foam for aerated concrete blocks
- How to decorate the facade of a house made of aerated concrete?
- Do-it-yourself insulation of walls with polystyrene foam - detailed instructions
- Do-it-yourself aerated block house
- Which is better to build a foundation for a house made of aerated concrete?
- How to make aerated concrete?
- Do-it-yourself aerated concrete laying technology
- Do-it-yourself sibit house
- Insulation of a veranda in a wooden house
More about the advantages of aerated concrete
Less significant, but still important advantages of the material are:
- Relatively low cost. Light weight. Ability to pass steam and gas. Low thermal conductivity. Strict linear dimensions of the blocks.
Walls made of aerated concrete blocks must be constructed so that the permeability of the surface to steam decreases towards the inner layer from the outer one. Insulation of aerated concrete walls from the outside should be carried out taking this into account.
If you neglect this point, the steam that accumulates in aerated concrete blocks will lead to increased humidity, which will negatively affect not only the quality of the building material, but also the entire structure. Additional advantages include frost resistance and fire safety
What is aerated concrete?
Aerated concrete is a building material from the category of cellular concrete. It has excellent heat-saving properties due to the porous structure obtained thanks to additives that form many hydrogen bubbles.
At the same time, aerated concrete is durable and able to withstand heavy loads, which is the reason for the growing popularity of the material. Insulation of a house made of aerated concrete is not always required, but for regions with low winter temperatures this procedure is necessary in any case, otherwise the moisture present in the thickness of the material will begin to freeze, expand and cause the destruction of the walls.
Separate reviews about insulating a house from the inside and outside, insulating the foundation of a house, floor, ceiling and loggia.
How to insulate with mineral wool yourself?
- Prepare the façade. To do this, clean the walls and level them with cement mortar. After this, prime the surface and, if necessary, level it with vapor-permeable plaster.
- Proceed to installing the frame. To do this, secure the guides of the frame structure taking into account the size of the material used (roll or rectangular mats). The frame will help form a ventilation gap, which will be sufficient for air circulation along the wall and steam removal.
- The next question is about fixing the mineral wool with glue, which must be applied to the slab material. Additional fixation is provided by plastic umbrella dowels.
- Prepare everything for finishing. To do this, strengthen the layer of mineral wool with mesh and glue.
- Final stage. Cover the walls with primer and plaster. Or cover with putty and paint. Important! Do not use acrylic plaster with moisture-proof properties when finishing. This will cause condensation to form.
Service life of insulation
The main insulation materials on the building materials market are wool and polystyrene foam. As you understand, insulation ages over time, losing its thermal insulation properties, that is, it needs to be replaced, which costs money and time.
The actual service life of mineral wool is about 15 years, provided that it is installed correctly. Polystyrene foam protected with plaster has a service life of about 50 years. If we consider that the service life of an aerated concrete building is 100 years, then during operation, the wool will have to be changed many times, which is not economically feasible.
Foam plastic, on the one hand, is a more interesting option, since it will last longer and its cost is much lower. But the problem is its poor vapor permeability, which requires good ventilation in the house, for example with recuperators. Also, to select the thickness of the foam, you need to make calculations for your climate zone so that the aerated concrete under the foam does not freeze, otherwise moisture will accumulate in the thickness of the aerated concrete, freeze near the insulation, and destroy the aerated concrete.
Polystyrene foam does not allow steam to pass through well, which is why aerated concrete cannot dry properly on the outside of the wall. As a result, water vapor gradually accumulates, and if there is too much water vapor at the dew point, and at the same time the aerated concrete freezes to it, then a slow destruction of the aerated concrete will occur.
To prevent this from happening, it is recommended to use foam plastic with a thickness of 100 mm or more, since such a thickness will prevent freezing of the aerated concrete. In most cases, 50 mm will not be enough, it is better to make calculations and find out for sure. When insulating with polystyrene foam, good ventilation of the house is necessary.
Another important tip for insulating aerated concrete. Fresh aerated concrete leaves the plant very wet, and it will take about 2-3 years to dry to equilibrium moisture content, which is about 5%. Before insulation and finishing, it is better to let the aerated concrete dry. Read more about drying aerated concrete in our article.
As a result of our article, we note that if you think long-term, it will be cheaper to immediately make single-layer walls from aerated concrete without using insulation. The optimal aerated concrete, which does not require insulation, is D400 with a thickness of 375 mm.