Cause of failure
The client's complaint was that when you touch it and the metal terminals, it gives an electric shock and knocks out the RCD, which is located on the power cable. If this RCD did not exist, the water heater would be very dangerous to operate, since its body is not grounded.
The bad thing is that there is no grounding bolt, and all grounding is done on the third connection pin, and this is often unreliable.
I rang the supply wires to the housing, and immediately realized that I needed to change the heating element, since there was an obvious breakdown to the housing (1-2 Ohms).
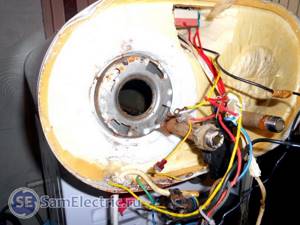
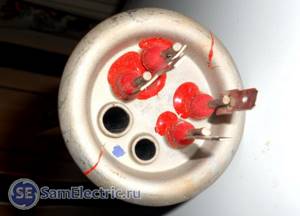
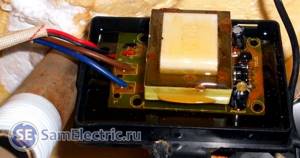
We open the bottom cover of the boiler, and we see that things are bad:
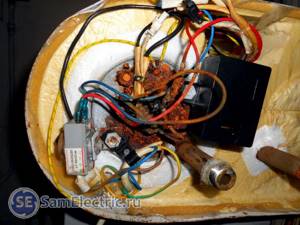
View from below.
It can be seen that due to water leakage from the tank, everything has rusted. Either the gasket between the heating element and the tank is leaking, or the heating element was initially poorly screwed on...

Everything was rusty, including the wires and terminals.
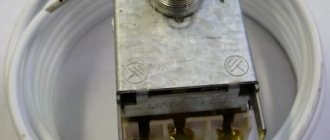
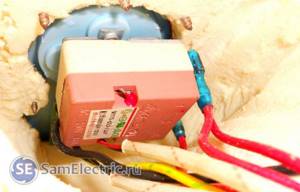
Below is an emergency thermal contact (temperature limiter). It is bipolar, and in case of overheating (more than 90 degrees), it opens the zero and power phases. Its temperature sensor is inserted directly into the heating element, photo will come later. Here's a closer look at his model:
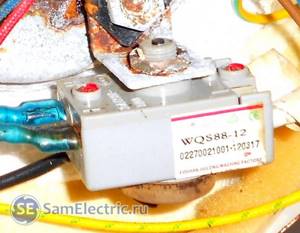
Emergency thermal contact (temperature limiter)
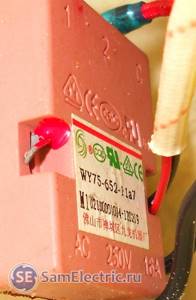
Here is the thermal limiter from the capillary sensor side:
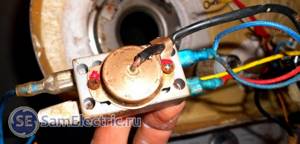
Phase and zero inputs, and temperature sensor input
How to check if the heating element in a water heater needs to be replaced
The manufacturer of any electrical device must indicate a certain warranty period in the instruction manual. After its completion, some parts of the water heater require replacement. Most often, the heating element stops working. To determine the condition of the heating element, it is necessary to conduct a preliminary check.
How to remove and check a water heater
When the heating element in the boiler stops working normally, the storage device stops responding to the switch-on signal, and the RCD is constantly knocked out. To accurately determine what is happening, first check the electrical wiring of the room, as well as the socket for connecting the water heater. If no damage is found, the internal electrical system of the device must be checked. It is performed in a certain technological sequence:
- First, the device is de-energized.
- Unscrew the bolts securing the housing cover to check the electrical unit.
- Visual contact may not always reveal a fault. If everything is visually in order, the heating element is diagnosed.
- First, the condition of the thermostat is checked. If it overheats, it may simply turn off. For it to start working normally again, just press the button.
- The water heater must be emptied of water. To ensure quick draining, technicians advise disconnecting the liquid supply pipes. Don't forget to place a basin to collect water
- Sometimes a standard drain is included in the installation diagram. To use it, you need to fully open the special taps and wait until the water is completely discharged.
- When installed vertically, the storage tank is disconnected from the water supply. The heating element is attached to the bottom of the housing. To dismantle it, you do not need to change the working position. It is easy to remove without removing the boiler from the brackets.
- With a different design, it is better to perform operations with the water heater by disconnecting the boiler from the wall.
Note! If the product is designed for 50 -100 liters, it is better to dismantle it with a partner. It is very difficult for one person to maintain such weight.
How to get heating element
Before you start disassembling the boiler, you need to draw on a piece of paper or take a photograph of the electrical wire connections. This will help you avoid making mistakes when reconnecting.
Then the terminals are removed from the heating element. Sometimes you have to remove other parts to remove the heater. Often the thermostat prevents its removal. Many boiler models feature this design.
Use a wrench to unscrew the nuts securing the body of the water heater with the heating element. The released heater is carefully pulled out.
If, upon visual inspection, a layer of scale is visible on the surface of the heating element, or the insulation is damaged, then replacement will be required. It makes no sense to use an old part with such errors. It is not possible to return it to its original state.
Changing the heating element
At this stage, the most difficult and time-consuming thing is to drain the water from the boiler tank. Considering that in my case the drain valve did not work (for more details, see the instructions at the end of the article), this was a long and difficult task. We adapted a hose from a vacuum cleaner and drained water from the “cold” hole into a nearby sink.
You can regulate the drain by opening the hot water tap on the sink, through which air enters the tank instead of the water coming out.
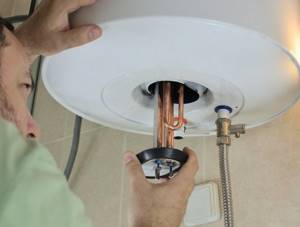
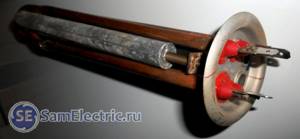
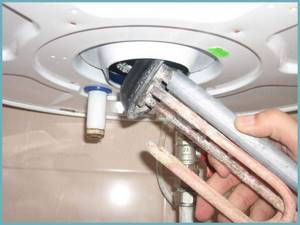
Unscrew the heating element and remove it from the tank:
The hole in the tank where the heating element (heating element) is inserted
It is in very poor condition, you can immediately see that the heating coil is exposed and touches the body, directly or through wet limescale:
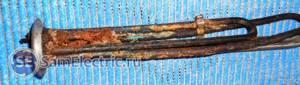
Old rusty heating element, worked for 6 years.
The magnesium anode was almost completely rotted and crumbled. This is not surprising, because it takes the brunt of the impact and extends the service life of the heating element.
By the way, what a heating element is and how a heating element works is described in detail in the article about an electric heated towel rail.

Old rusty heating element, worked for 6 years. The magnesium anode has rotted.
I already wrote about replacing the heating element in an article about repairing a combi oven, there were similar pictures.
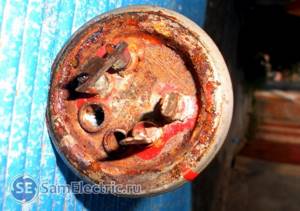
Old rusty heating element, worked for 6 years. Contacts for connection
There is a lot of scale inside the tank, and you need to take the time to wash everything out, otherwise the new heating element will have a hard time.
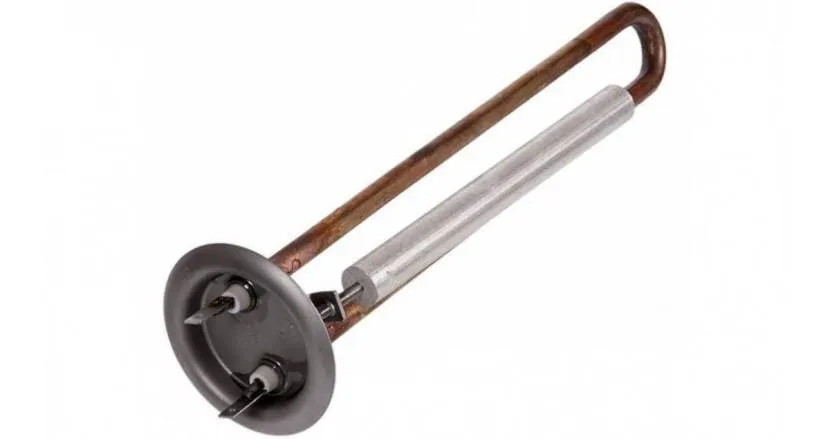
Here, by the way, is the new heating element:
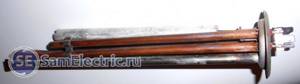
New heating element 2000 W. At the top is a magnesium anode.
The owner of the boiler went to the market and bought it there (1000 rubles, for Taganrozh residents - the Rainbow market, the 1000 little things pavilion). And it brings it without a magnesium anode. In response to my question, where is the magnesium, he said - the seller dissuaded me from buying it, he said, what for is it needed, and without it everything will work...
I sent him to the market again, he bought an anode for 100 rubles.
In general, the magnesium anode is a consumable material; it needs to be changed about once a year, at the same time cleaning the heating element and tank from dirt and scale. But who does it?
New heating element 2000 W. Contacts for connection
Despite the fact that there are two independent parts of the 1 kW heater (they only have one common output), both parts of the heating element are turned on simultaneously. Apparently, this was done to reduce the cost of the boiler circuit.
I can advise those who have poor electrical wiring, and at the same time have nowhere to rush, to use one half of the heating element. And then, when it fails in a few years, switch to another.
New heating element 2000 W. In the foreground is a magnesium anode, a consumable material.
At the same time, a gasket and a drain valve (drain valve) were purchased.
I washed everything with WD-40 at the dismantling stage, and before installation, I wiped everything off rust and coated the parts with silicone grease for long-term protection of the parts.
There are no photos after editing, but take my word for it, everything was like in the movies:
After replacing the heating element it started to get warm!
I also replaced the electrical contacts that connected the heating element; the old ones were completely useless.
Required tools and materials
The design of all water heaters is similar, so to replace the heating element you will need a standard set of tools and materials:
- Phillips and straight screwdrivers;
- spanners;
- pliers;
- rags to collect moisture;
- new heating element in accordance with the water heater model;
- magnesium anode.
The magnesium anode does not always require replacement when the heating element fails. But if obvious signs of corrosion are visible on the part, technicians advise installing a new one so as not to disassemble the water heater twice.
A little more about the design of a storage water heater
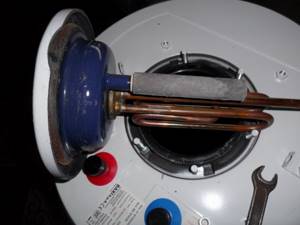
There are two holes in the heating element, which are visible in the photo above.
Three temperature sensors are inserted into these two holes:
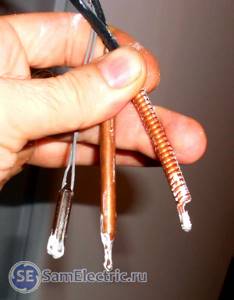
Thermal sensors for the operation of a water heating tank
The white substance on the sensors is thermal paste; it must be used so that the sensor “feels” the temperature better and measures it with less delay and error.
I wrote in more detail about the operation of sensors and thermal paste in temperature control systems in the article about the Diagram of a pneumatic press on a thermal controller.
We have already talked about one sensor above (emergency), another capillary (copper tube) - for the operation of the temperature controller, here is its rear view:
Manual temperature controller in the tank
Closer so you can see the name:
Manual temperature controller in the tank. Model name
And also a resistive sensor, which is needed to operate the indicator of the real current water temperature. Here is the front panel of the water heater, showing the indicator and regulator:
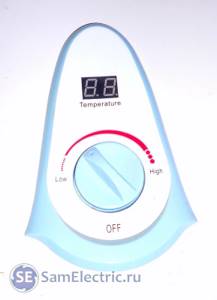
Front panel of storage water heater Oasis 50l
The indicator requires a separate DC power supply, filled with varnish:
This is where the description of the repair can end. If you have any questions or want to share your experience - as always, please comment!
Preparation for heating element repair
The heating element heats water in a similar way to how boiling occurs in a regular electric kettle. The cause of the breakdown may be switching on when there is no water in the container, resource depletion, poor quality water, etc. Determining the truth is not easy, because the heating element is hidden inside. You need to disconnect the boiler from the network, remove the lid and check the heater itself, and before that, prepare auxiliary materials and tools:
- spanners;
- screwdrivers;
- pliers;
- probe-phase meter;
- a bucket and a rag - for quickly cleaning up spilled water.
Of course, you must have a new heating element available. To prepare the water heater itself for repair, be sure to follow these steps:
- Shut off the water supply: it can be on the way to the boiler itself (the tap is usually located nearby), or it can be completely in the house, on the riser.
- Block the outlet of heated water on the boiler. The crane is also located somewhere near the installation.
- Drain the device.
- Unplug it.
- Remove the protective cover.
Dismantling the heating element - Measure the voltage at the input terminals. The phase meter should show its absence.
- If access to the device is difficult, remove the water heater from the wall.
- Draw or photograph the electrical circuit and disconnect the wires.
- Unscrew the locking nuts. Be careful: water may leak.
Boiler design features
The design of the heating apparatus is similar to an electric kettle. Only here the lid is equipped with a safety valve to control the fullness of the tank. The functional components of the equipment are considered:
- Frame . This is the outer shell of the product, which has insulation to prevent heat loss. For this, polyurethane foam, basalt wool or other analogues with a minimum thermal conductivity coefficient can be used.
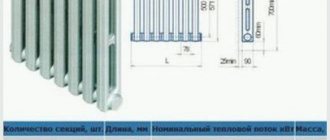
- Buck . Internal sealed water tank. The volume, depending on the model, can reach 15-200 liters. For production, stainless steel or steel coated with a protective alloy with high corrosion resistance is used.
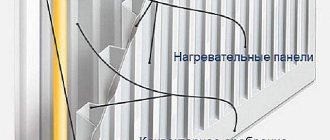
- heating element . Heating element in open or protected by a ceramic shell. Installed inside the tank, in direct contact with the liquid.
- Magnesium anode . It is made of steel in the form of a rod 14-66 cm long, has an outer shell of magnesium about 10 mm thick. An element for electrochemical protection of the tank and heating element from corrosion processes and the appearance of scale. The part also helps reduce water hardness levels.
Magnesium anode with heater included Source samodelkin34.ru
- Pad . The sealing seal is located at the junction of the heating element and the tank.
There is also a boiler control unit and a thermostat. A sensor is needed to adjust the temperature and maintain the water in the desired thermal state. The recommended value is +60 degrees Celsius. Once a month you need to change the installation for a one-time disinfection of the internal walls of the tank.
For long-term proper operation of the device, periodic cleaning and updating of the heater and anode is required. These elements, compared to other components, fail faster due to direct contact with water and the principle of operation. Let's figure out how to change the heating element in a water heater, what you need to know for this.
Draining water and disassembling the water heater
And so, when you decide that you still need to open it, the first thing you do is turn off the power by unplugging the plug from the socket. Then drain the water from the titanium. To do this, turn off the hot and cold water supply taps.
Unscrew the cold water hose, placing a suitable container for drainage.
If water does not flow from the removed hose, this indicates an air lock. We need to remove it. To do this, just slightly loosen the nut at the point where the hot water pipe connects to the pipe.
Next, open the safety valve and release water through it. If the valve suddenly becomes clogged, you will have to twist the entire valve. Water will flow out of the boiler in a continuous stream.
After draining, completely unscrew both valves from the titanium (hot + cold) to open the bottom cover and gain access to the heating elements.
There are modern models where the bottom cover is collapsible and to remove it, it is not necessary to touch the valve. It comes in the form of a plastic insert secured with several screws.
Disconnect the power wires, first remembering or marking with a marker which one is connected where. Better yet, draw a diagram. As a rule, all wires are colored and this will be easy to do. Otherwise, you can get confused in such a pile of wiring.
If you don’t want to draw anything, then just take a couple of photos on your cell phone. You will know exactly the location of all elements and wires.
After this, unscrew the nuts or screws securing the heating element itself around the perimeter.
You can unscrew them in any order, but you need to screw them in the same way as the engine head or the wheels on a car, that is, crosswise.
If you immediately tighten a nut all the way, this will cause the flange to bend and there will not be the required tightness. Consequently, the gasket will not hold and will leak.
Carefully pull the heating element out. It will be all covered in rust, and from the magnesium anode, except for a thin burnt piece of iron, there may be nothing left at all.
Starting the water heater
Before full operation of the unit, you need to test the work performed. First you need to reinstall the taps and connect the equipment to the water supply. Then the tank is filled with cold water. In this case, the “hot” tap must be left open to expel air from the enclosed space of the tank. When the liquid begins to flow out, the tap can be closed. If the walls have not been washed, it is better to run some water for cleaning.
The first thing you need to monitor at this stage is leaks. This will take about an hour. Here you need to wait for the evaporation of condensate, which appears in any case. If there is no leak, you can test run the boiler. The absence of failures in the usual work indicates a high-quality repair. The water heater can be used as usual.
Checking the functionality of the heating element
In order for the water heater to work properly, it is necessary to check the serviceability of the heater during regular inspection. This can be done using one of 3 methods:
Heating element device.
- The first method is suitable if there is a spare element. If the boiler does not work, you will have to disassemble it, drain the water, and replace the heating element with a new one. If, after assembling the heater, the water is heated to the required temperature, no failure is observed, then the cause of the breakdown, i.e. lack of heating of water or too slow operation, was the old heating element. If the boiler refuses to work, then the reason is not in the heating element, then you will have to call a technician.
- The heating element can be checked using a special test lamp. To do this, the heating element and the lamp are connected in series, connected to an electrical circuit, after which current is supplied. If the lamp lights up, then the heater is working; you need to look for a breakdown elsewhere.
- The heating element in a water heater can also be checked using a multimeter, i.e., “ring” it. If the device shows “infinity”, then there is a short circuit.
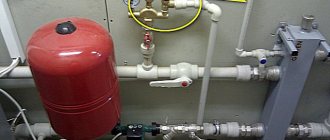
Examination
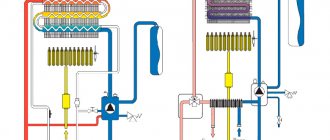
Storage water heater piping. (Click to enlarge)
Any danger has one amazing property - it appears as if out of nothing. Everything was so wonderful and suddenly there was a problem.
If it is as expected, it means something was done wrong.
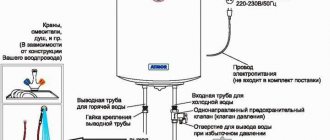
Let's do everything right with the boiler:
- We check the presence of grounding. An RCD (residual current device) wouldn’t hurt either – life is more valuable;
- We install a safety valve against unacceptable pressure in the internal tank. It is also useful for draining water;
- We install a protective reducer against fluctuations in cold water pressure;
- We check the presence of a check valve on the cold side. It will help preserve heating elements in the event of a water supply cutoff, preventing water from draining back from the tank.
When purchasing storage type water heating equipment, you should check the availability of the above devices. Not all of them are fully equipped. The Ariston AM 50 SH2.0 Ei3 FE model takes into account all the tips in the article, including child protection.
Following these completely simple rules and advice will prolong the already flawless operation of Ariston equipment for many years.
Watch detailed video instructions for cleaning or replacing the heating element in an Ariston storage water heater: