It is difficult for a modern person to imagine his life without household appliances. There are devices that we could do without, and there are those that we simply cannot do without. One of these vital items is the refrigerator. Do you agree?
Repairing household appliances yourself is a good help for the family budget. If desired, you can master even quite complex repair operations. For example, replacing a refrigerator thermostat is not that difficult. You just have to understand the operating features and design of this device.
In this article we will tell you how to detect a faulty thermostat. Also, we will talk in detail about replacing the thermostat using the example of a Stinol refrigerator. The material contains a thematic selection of photo and video materials with advice from experienced experts.
Design features and operating principle
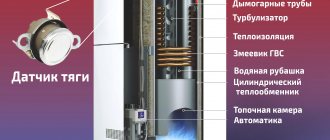
The thermostat or thermostat is one of the main elements without which normal operation of the refrigerator is impossible. It records the readings of temperature sensors in the refrigerator and freezer compartments and sends a signal to the compressor start relay.
In accordance with these signals, the compressor turns on if the chamber is not cold enough and turns off when the temperature reaches a set level.
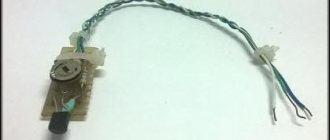
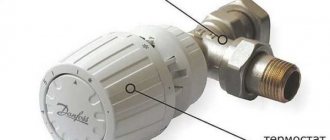
Technically, the thermostat is a relay, at one end of which there is a sealed tube filled with freon.
On the other side there are contacts, the opening and connection of which sends a signal to the compressor. The end of the tube with freon, also called a capillary tube, is fixed to the evaporator.
The refrigerant placed inside reacts sensitively to heating and cooling. When the temperature decreases or increases, the pressure level inside the tube changes, causing the relay contacts to connect or open.
The movement of the contacts is controlled by a small spring. It is used to set the temperature level that should be inside the refrigerator compartment.
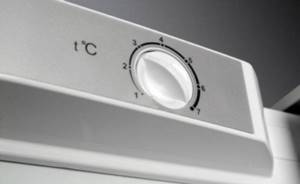
A temperature adjustment knob is attached to the spring. Turning this knob changes the tension of the spring.
As a result, more or less force must be applied to close and open the contacts. This affects the level of pressure in the capillary tube at which the contacts are triggered.
A thermostat is a small device that is equipped with a sealed tube with a sensor filled with refrigerant. Based on changes in evaporator temperature, the relay turns the compressor on or off
This regulates the degree of cooling of the air in the refrigerator. When using an electronic regulator, this process is carried out slightly differently, but the principle remains approximately the same: the desired temperature level is set based on the actual indicators recorded by the capillary tube.
But such models use an electronic control module that can simultaneously manage data from several sensors.
It is not always possible to repair or replace such a thermostat at home. Handling complex electronics requires knowledge and special equipment.
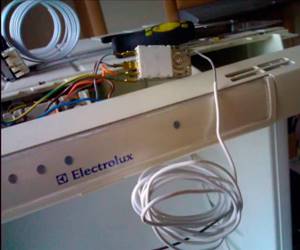
Typically, the thermostat is installed inside or outside the refrigerator compartment. Before starting repairs, it would not hurt to study the technical data sheet and instructions of the device; there may be a lot of useful information on the design of a specific thermostat model, as well as on its location.
Usually the thermostat is located next to the handle for setting the temperature. The internal arrangement is typical for relatively old models. Inside the camera, the element is usually enclosed in a plastic protective housing.
The adjustment knob is located directly on it. To remove the thermal relay, you need to remove this handle and unscrew the mounting screws to remove the housing.
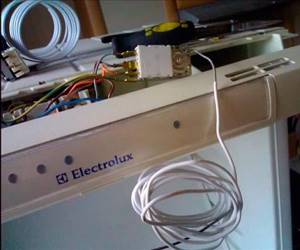
In more modern models, the thermal relay is placed outside the chamber in order to save precious cubic centimeters of internal space and not spoil the design with additional elements
But you also need to look for the thermostat near the control knob, usually under the refrigerator body somewhere at the top. The handle is removed in the same way, the fasteners are unscrewed and what you are looking for is found behind the protective panel.
How the thermostat works and works
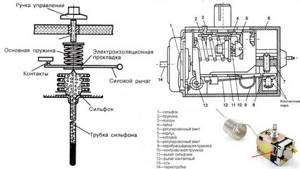
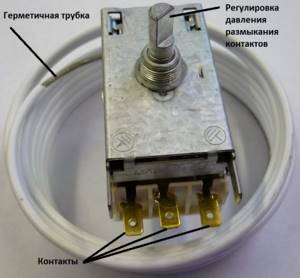
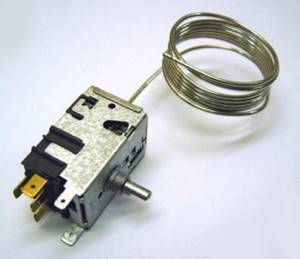
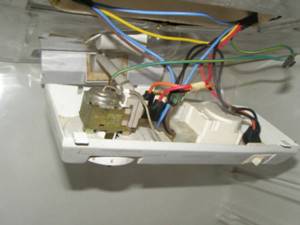
The thermostat is a mechanism with a lever and contacts . This is a small box with a handle. On one side it has a bellows tube, which is filled with refrigerant (freon), on the other there are contacts for connecting to the electrical circuit (from 2 to 6 pieces). The length of the sealed tube varies from 0.8 to 2.5 m. It is usually twisted into a spiral, which ensures a tight fit to the evaporator wall.

The end of the capillary tube of the refrigerator regulator is located in the cooling zone and is attached to the evaporator. When the temperature decreases, the pressure inside it decreases. Under the influence of the spring, the bellows corrugations are compressed, the power lever rotates along its axis and the contacts open. If the temperature rises, the pressure increases. In this case, the bellows corrugations expand, overcoming the resistance of the spring, the lever turns in the opposite direction, and the contacts close.
The specified temperature regime depends on the spring force. If the force is high, the contacts will close and the temperature will be high; if the force is low, the temperature will be low. The force depends on the handle; when you turn it, the degree of tension of the spring changes.
The principle of operation in refrigerators with electronic regulators is approximately the same. The capillary tube records the actual readings and sets the desired temperature level. The electronic module manages data from several sensors.
Reference. Repairing or replacing such a thermostat requires special equipment and knowledge in the field of electronics. It is difficult to do this on your own.
Ways to detect the problem
If the thermostat breaks, this does not mean that the entire refrigeration unit will immediately stop working. But the lack of correct information about the current temperature will affect its operation.
Option #1 - check the functioning of the equipment
Symptoms of incorrect operation of refrigeration equipment may be as follows:
- the compressor operates without interruptions or with very short and rare interruptions;
- the temperature inside the refrigerator chamber drops to zero, and sometimes even lower;
- a large amount of frost or even ice appears on the walls;
- It's too warm inside the refrigerator;
- The refrigerator does not turn on after being turned off, etc.
Of course, these signs can be associated not only with breakdowns of the thermal relay, but also with malfunctions of other elements.

In order to correctly determine the cause of problems identified during the operation of a household refrigerator, you will need to carry out a little diagnostics. You can do this yourself
Option #2 - diagnostics using a thermometer
To do this, you need to completely disconnect the refrigerator from the power supply, and then completely defrost it in accordance with the instructions. Of course, the contents will have to be removed.
After this, you need to turn on the device and move the thermostat knob to the position that will allow you to get the lowest possible temperature. If your refrigerator model has a freezing mode, it is recommended to use it.

To test the operation of the thermostat, you need to empty the refrigerator of all food, place a thermometer inside the chamber and check its readings after a few hours
In the refrigerator compartment, approximately in the middle, you need to place a thermometer designed to measure air temperature.
It is better to use a device that allows you to take measurements below zero. The refrigerator is left in this mode for about two hours. After this, you need to check the thermometer readings.
If the temperature in the refrigerator compartment has dropped to about six degrees by this time, there is no problem with the thermostat. But when the inside becomes noticeably warmer or colder than this level, the thermostat will have to be replaced.
Option #3 - visual inspection of the refrigerator chamber
If, after defrosting, a so-called snow cap forms inside the chamber very quickly, the initial diagnosis of the health of the thermostat can be performed very simply.
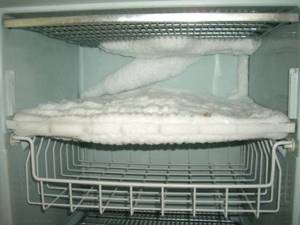
The appearance of a snow coat in the refrigerator compartment almost always means that the thermostat is not working correctly; you need to diagnose its condition
To do this, when the compressor is operating, the adjustment knob begins to be turned in the direction of increasing the temperature inside the chamber.
If the relay is working properly, at a certain moment the sensors will record the desired temperature level, after which the compressor motor will turn off. If the engine continues to run, the thermostat needs to be changed.
After such diagnostics and if the thermal relay is working, it is recommended to remove all contents from the chamber and allow the device to run idle for about six hours. During this period, you need to pay attention to the duration of breaks in the operation of the compressor.
If it is about 40 minutes, everything is fine, you can use the refrigerator as usual.
When the compressor turns on too often or infrequently, you need to try to regulate this moment using the relay settings. If this fails, you will most likely have to install a new thermostat.
Signs of a faulty thermostat
Serviceability can be determined by the continuous operation of the cooling system; the device cannot turn off on its own .
There are several signs that indicate a possible failure of the thermostat:
- rapid growth of a layer of snow in the freezer and ice in the refrigerator compartment;
- violation of cyclicity in the operation of the device;
- inability to turn on the refrigerator.
In these situations, the first thing to do is determine what state the thermostat is in. More accurate diagnostics are carried out by specialists.
Ice formation on the walls of the unit
To check the serviceability of the thermostat, the adjustment knob must be turned in the direction of increasing temperature while the compressor is running. If the thermostat is working, the sensor will mark the required temperature level and the compressor will turn off . If the engine continues to run, the part is replaced.
When the relay is working properly after diagnosing, food is removed from the refrigerator, it should work for 6 hours. You need to see how long the compressor will be idle. If the approximate time is 40 minutes, then the device can be used. Frequent switching on and off is controlled using thermostat settings . If this cannot be done, it is changed.
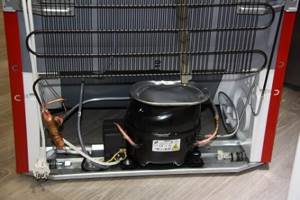
Refrigerator won't turn on
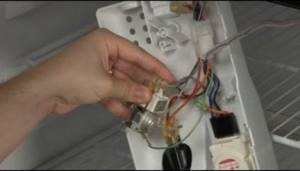
In order to check whether the thermostat is working properly, disconnect the device from the network, remove the casing and inspect the wires. In old refrigerators, two pieces fit to the terminals. They must be removed and connected to each other with a piece of wire . If the compressor starts, then the relay is faulty, and if it doesn’t work, then most likely the motor burned out or the start-protection relay broke.
In modern models, the thermostat is connected to 4 wires of different colors , which differ depending on the purpose. For grounding, use yellow with a green stripe; you do not need to touch it. The rest are disconnected and connected to each other. The refrigerator is turned on, if it does not work, it means that the relay is working, the reason must be sought in the start-up relay or the compressor. And if the device turns on, then you should install a new thermostat.
It is important not to mix up the wires when installing the part.
Rules for dismantling the thermal relay
If the refrigerator does not turn on at all, it will be impossible to carry out the diagnostics described above. The probable cause of the breakdown is an electrical failure of this element.
But a problem can also be a compressor malfunction, for example, a burnt out motor winding. To determine whether the thermostat needs to be replaced, it will have to be removed from the refrigerator for examination.

Typically, the thermostat is located next to the control knob, which is used to set the air temperature in the refrigerator compartment. Double-chamber models are equipped with a set of two such handles
First you need to unplug the refrigerator. Now you should find the place where it is located, as described earlier. Usually you need to remove the adjustment knob, remove the fasteners and remove the protective elements.
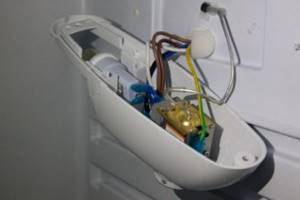
Then you need to carefully inspect the device, paying close attention to the wires through which the power is supplied.
All of them have different color markings depending on their purpose. Typically, a yellow wire with a green stripe is used for grounding. This cable should be left alone, but all the others should be disconnected and shorted together.
Now the refrigerator is plugged in again. If the device still does not turn on, the thermostat is probably working properly, but there are serious problems with the compressor.
If the refrigerator does not turn on at all, the cause may be not only a malfunction of the thermostat, but also a breakdown of the compressor, for example, a burnt-out motor winding
If the engine starts working, we can clearly conclude that the relay needs to be replaced. Before starting work, it doesn’t hurt to arm yourself with a smartphone or camera in order to consistently record all operations.
When installing a new thermostat, these pictures can be very helpful, especially for beginners.
You need to clearly remember which cable core was used for what purpose. Typically, a black, orange or red wire is used to connect the thermal relay to the electric motor.
A brown wire leads to zero, a yellow-green wire provides grounding, and a pure yellow, white or green wire is connected to an indicator light.
To connect the thermal relay, wires with different color markings are used; you need to remember the purpose of each wire so as not to get confused during reassembly
Sometimes removing a damaged regulator can be difficult, especially when it is placed outdoors. For example, in some Atlant refrigerator models you have to completely remove the chamber door from its hinges.
To do this, you need to remove the trim that is installed above the top hinge and unscrew the bolts hidden under it.
Before removing the adjustment knob, you also have to remove the plugs and unscrew the fasteners. All these operations must be done carefully.
It is better to store fasteners and linings in a small container so that they do not get lost. The thermostat itself is usually screwed to the bracket; it must be carefully removed, unfastened and removed.
If the thermostat is located inside the refrigerator compartment, it is usually hidden under a plastic casing, where a lamp for illumination can also be mounted
A new thermostat is installed in its place, following the reverse assembly order. Sometimes the breakdown of the thermostat is associated with a malfunction of the so-called capillary tube or bellows. If you replace only this element, the relay can be left.
To perform this procedure, you will have to remove the thermal relay, following the method described above. The bellows must be disconnected from the evaporator and carefully removed from the device body.
Now a new capillary tube is installed, connected to the evaporator, and the relay is mounted in its original place, and the disconnected wires are connected.
Safety rules to follow when checking
A refrigerator is a large household appliance that requires high voltage to operate. There are three main threats that potentially exist if you decide to repair your refrigerator:
- electric shock (high voltage appears on the contacts of the relay, thermostat, on the compressor windings);
- electric shock (short circuit inside the electrical wiring of the refrigeration device, due to exposed parts of the wiring getting into contact with the metal body);
- frostbite due to refrigerant contact with the skin.
Anyone who decides to repair the thermostat (or any other refrigerator component) must take serious precautions. You should not carry out work while the refrigerator is plugged in: be sure to turn off the power to the device.
As a result (or in the process) of repair work, wiring contacts are formed that should be connected to each other. All connections must be properly insulated. It is necessary to continuously check the presence of voltage on all surfaces capable of conducting current - the body, internal elements of the refrigerator compartment, etc.).
All tools (screwdrivers, pliers, multimeter terminals) must have insulated handles.
Replacement using the example of a Stinol refrigerator
For Stinol-101/103 refrigerators, relay failure is a fairly common occurrence, especially after five to seven years of operation.
Most often, the bellows tube fails here, since this is the resource provided by the manufacturer of this element. The Stinol-101 model has only one compressor, but the Stinol-103 has two: separately for the refrigeration and freezer compartments.
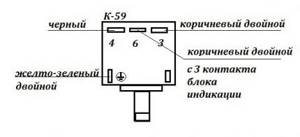
This is a contact diagram for a K-59 type thermal relay, which allows you to get an idea of which wires should be connected where. Color markings may vary; a photo on your phone will help you save the information; you can also draw a similar diagram yourself
The automation of different models is slightly different, which is reflected in the corresponding electrical diagrams, but otherwise these refrigerators are very similar, so it makes sense to consider the procedure for repairing them at the same time.
To understand that the Stinol refrigerator needs repair or replacement of the thermostat, you need to pay attention to the following signs:
- the compressor runs non-stop and does not respond when the regulator is set to OFF;
- when moving the adjustment knob to the OFF mark, there is no characteristic click;
- the temperature in the refrigerator chambers noticeably exceeds the parameters set during adjustment.
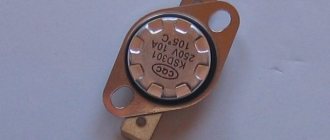
The Stinol-103 refrigeration chamber uses a K-59 thermal relay; it is easy to check the markings, they are indicated on the body.
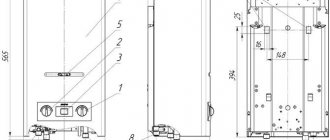
To remove the adjustment knobs, you need to use a thin awl. You just need to pry them up and remove them. The Stinol-101 model has only one adjustment knob, while the Stinol-103 has two, one for each compressor.
To remove the adjustment knob of the Stinol refrigerator (1), you need to use some sharp object, for example an awl. Then remove the decorative trim (2), which is held in place by four protrusions
After the handle is removed, you need to remove the decorative trim, which has six protrusions. This is a fragile item and must be handled with care to avoid damaging it.
There are nuts under the cover that need to be unscrewed. After this, you need to unscrew the screws that secure the control panel.
Under the decorative trim there are mounting screws (1) that hold the thermal relay in the correct position; they must be unscrewed to continue dismantling the element
It is best to remove the screws holding the refrigerator door hinge last. To avoid possible damage, the door must be held. Now you can lift the panel and remove the door from its hinges.
The next step is to remove the top cover of the refrigerator.
The fasteners that secure the control panel and door hinge (1) of the Stinol refrigerator must be unscrewed, moving towards the door, and not away from it
The necessary fasteners are located on the rear side. They are unscrewed and the cover is removed. This will give you free access to the thermostat.
First you need to disconnect the relay contact connectors, after which you can remove the element from the refrigerator control panel.
After the doors and top panel of the Stinol refrigerator have been removed, you can carefully remove the thermal relay for inspection and diagnostics
At this stage, you need to remember or write down the color coding of the individual wires. To remove a worn capillary tube, remove the plastic cover.
Now you need to unscrew the fixing screw and remove the lighting unit. The tube is removed through the hole provided for this purpose.
To continue replacing the thermostat in the Stinol refrigerator, you need to remove the cover (1) in the refrigerator compartment and remove the capillary tube (2)
The new element is installed in such a way that the uninsulated area in its lower part is securely hidden under the overlay. The hole is closed with a plastic plug to restore the seal of the chamber.
Typically the capillary tube protrudes beyond the thermostat. It must be carefully placed under the top lid of the refrigerator; there is enough space there.
To remove the capillary tube (2) and replace it, you first need to disconnect the lighting unit, which is secured with a screw recessed into its housing
Now you need to reassemble the thermostat and the refrigerator: connect all the necessary connections, install and secure the refrigerator lid, and hang the door.
And again, screwing the door hinge fasteners is done last, when other similar screws are already installed.
The hole that appears on the rear panel during repair work should be sealed with plastic to restore the tightness of the refrigerator compartment
To check the condition of the Stinol refrigerator thermostat at home, you can use simple diagnostics. Contacts 3 and 4 of such a device should remain closed at room temperature.
If, after connecting them with a jumper, the compressor turns on, the thermal relay is faulty and needs to be replaced.
If the thermostat settings are lost, they can be corrected by turning the adjusting screws, but this should be done in a service center that has the necessary equipment.
The process of replacing the thermostat is clearly demonstrated in the following video, where the master shares the nuances of repairing Stinol-type refrigeration equipment:
Replacing the refrigerator temperature sensor
A faulty thermostat requires replacement. Replacing a broken thermostat yourself is quite simple if you get to the place where it is installed. This is where difficulties arise.
In modern refrigerators, the thermostat adjustment is usually located on the front panel and is located at the top of the refrigerator, but it can also be located inside. The refrigerator cooling module (evaporator) is hidden under the plastic casing and is located in the rear.
To install a new thermostat yourself, you need to remove the broken thermostat.
To do this, you need to turn off the power to the refrigerator by unplugging the power cord. Depending on the refrigerator model, remove the plastic casing cover that contains the broken thermostat.
Mark the wiring diagram with a marker. Remove the capillary tube of the broken thermostat from the place of attachment (placement).
Install the new thermostat in reverse order. Do not confuse different thermostats that look similar to each other. Some can only work at positive temperatures, others are intended only for freezers. Using a thermostat that is not designed to operate a refrigerator (freezer) can lead to incorrect operation of the equipment and failure of expensive components (compressor).
Therefore, be sure to check the wires connected to the thermostat. It’s one thing if you found your own replacement thermostat, from the same manufacturer or brand, but another thing if you use an analogue.
By the way, the wires suitable for the thermostat have the following purpose:
- orange, red or black - connects the thermostat to the compressor;
- brown - phase wire leading to the socket;
- white, yellow or green - leads to a light indicating that the refrigerator is on;
- striped yellow-green - grounding.
Starting from the size of the contacts (the width of flat conductive contacts has 2 standards - 4.8 and 6.3 mm), location, thermostats can differ in the settings of the contact groups (power or low-current) and purpose (medium-temperature or freezing). For example, using an externally similar temperature sensor K57-2.5 instead of K59-2.5 will lead to freezing in the rear wall of the refrigerator and a change in the temperature regime of the refrigerator.
All thermostats have a so-called operating temperature range (for example, for the RANCO K-59 thermostat it is -32/+6), which the thermostat is actually designed to maintain.
Thermostats on the outside of the housing or inside have 2 adjusting screws that are responsible for the adjustable temperature range within the operating range (this is approximately 4-18 degrees) and for the response differential (usually 2-8 degrees). Be careful - simply adjusting one screw shifts the operating on/off temperature range. For example, the normal factory thermostat adjustment in the extreme minimum position (in the extreme position when rotating counterclockwise) is set to response thresholds of minus 10 / plus 3.5 degrees Celsius.
Rotating the adjusting screw responsible for the temperature range shifts these settings -> for example, to the position minus 5 / plus 8.5 degrees or minus 15 / minus 1.5. As a result, increased or decreased temperature in the refrigerator and spoiled food, etc. And if the second screw is additionally adjusted, then it is very difficult to restore the factory settings after the intervention - often, it is necessary to replace the thermostat with a new one.
Carefully. Twisting is not recommended. The thread stroke of the adjusting screw in the thermostat may not be structurally limited (especially with Chinese analogues); as a result, the screw may fall out of the thread during adjustment - it will not be possible to reinsert the screw without disassembling the entire thermostat.
Conclusions and useful video on the topic
The process of replacing a thermostat using the example of an ATLANT refrigerator is shown here in detail:
Interesting tips for diagnosing the condition of the relay and replacing it using the example of two models of refrigerators are contained in this video:
The procedure for replacing a thermostat cannot be called too complicated. However, if you mishandle this element, you can only worsen the situation. A detailed study of the repair procedure and attention to detail will help restore the functionality of the refrigerator .
When replacing the thermostat in the refrigerator, minor changes may occur in the operation of the thermostat, namely, the refrigerator or freezer may produce insufficient cold . The reason for the poor operation of the refrigerator here can be only one thing - the thermostat is not adjusted.
Tips from repair experts
- Before replacing the relay (removing panels, casing and housing, disconnecting wires and other operations), remember, write down the sequence of actions or photograph each stage of dismantling - this will be useful when assembling a household appliance.
- Be extremely careful and careful when handling the bellows tube: this part is easy to damage, and incorrect position of the element or kinks will lead to incorrect operation of the refrigerator.
- It is unacceptable to solder relay wires to the terminals - this can lead to failure of the element, breakdown of insulation, or short circuit to the metal body of the household appliance.
The operating mode of the refrigerator compressor depends on the correct operation of the thermostat. A malfunction of the temperature relay leads to rapid failure of the equipment, so at the first sign of a breakdown of a functional unit, it must be repaired or replaced.
Refrigerator thermostat operation
The principle of operation of thermostats for outdated models of refrigerators and improved, modern refrigerators remains the same. That is, any master can answer you that the essence itself has not changed, both in the regulation itself and in the principle of the design of thermostats.
But such a problem with insufficient cold can arise not only when replacing the thermostat, but during the operation of the refrigerator itself. Of course, you should adjust the thermostat after the warranty period for your refrigerator.
Adjusting the refrigerator thermostat itself is labor-intensive and time-consuming. This is explained by the fact that the cycle between turning the thermostat on and off takes a certain time and the gradual stabilization of the temperature in the chamber occurs slowly.
Determining where the thermostat is located in the refrigerator
First, look where the temperature control knob on your refrigerator is located. Yeah, we found it. In our example, it is located above the refrigerator door. Remove the thermostat knob:
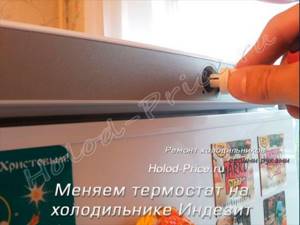
Unscrew the two screws under the plastic cover. Use a screwdriver to pry the plastic cover in the center from the top side and pull it towards you. It may not work the first time, but try again, everything should work out:

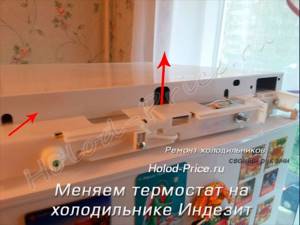
Then unscrew the screws behind the refrigerator lid:
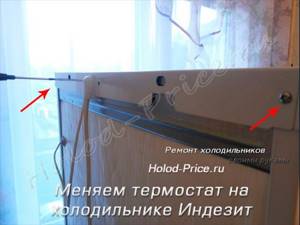
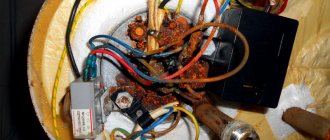
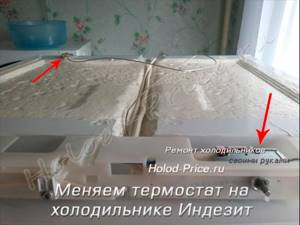
And he lifts the iron cover to get to the thermostat:
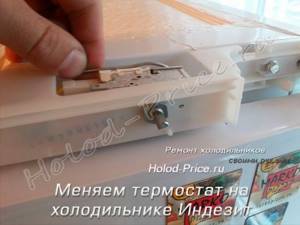
We got to the thermostat. Note that the end of the thermostat tube goes into the refrigerator body and is sealed with a small Velcro strip.
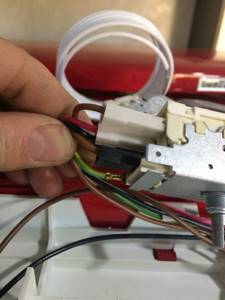
We remove the tube from the housing. Unscrew the thermostat from the plastic holder. We remember where and which wires are connected, i.e. look at the contact numbers on the thermostat; there are three of them: 3, 6 and 4.
You need to reassemble in reverse order.
Be careful that you do this at your own risk. If you are in doubt and do not know how to properly change the refrigerator thermostat, entrust it to a specialist. This article is not a complete repair guide!
Source
Adjusting the refrigerator thermostat
To achieve quick results, the thermostat must be adjusted while measuring the temperature on the evaporator shelf of the freezer. Any need to adjust for ambient temperature during adjustment is eliminated and eliminated.
To establish the required temperature on the evaporator shelf, it is necessary to adjust the power spring of the thermostat - by tightening or loosening the tension.
What do you need to know when adjusting the thermostat? To do this, you need to know:
- location of the power spring adjusting screw;
- direction of rotation of the adjusting screw in order to increase or decrease the temperature;
- the relationship between the speed of the adjusting screw and what change occurs with the temperature on the evaporator shelf.
How to properly adjust the refrigerator
But before proceeding with such an adjustment, you first need to make sure that the doorway of the refrigerator cabinet is well sealed. That is, the door seal must be in proper condition in order to prevent heat from penetrating into the refrigerator chambers.
Also, you need to make sure that the bellows tube is pressed against the evaporator wall. If there is a gasket between the tube and the evaporator wall, this gasket must be saved and installed in the same position when replacing the thermostat.
In former modifications of refrigerators, condensate flowed into the pan; when defrosting or cleaning the refrigerator, the water was removed from the refrigerator along with the pan. The window in the tray for such refrigerators had to be open or closed, as indicated in the instructions for using the refrigerator. In modern modifications of refrigerators, liquid drains and then evaporates.
How to properly adjust the thermostat.
Measuring the temperature in the refrigerator
When adjusting the thermostat, the temperature is measured with a thermometer in the freezer compartment. The thermometer, as already mentioned, is placed on the evaporator shelf, the motor-compressor is turned on, and the thermostat knob is set to the middle position.
After three to four hours of operation of the motor-compressor, the temperature is measured and, after comparison with the required temperature, the thermostat is adjusted. But here we should not forget that before making adjustments, you need to turn off the power to the refrigerator and disconnect the refrigerator plug from the socket.
To adjust the TPX-2K thermostat, for example, outdated modifications of refrigerators, it was necessary to remove the housing cover from the side opposite the output terminals. The lid is pryed off with the blade of a penknife. To lower the temperature, the adjusting screw is rotated counterclockwise with a screwdriver; to increase the temperature, the screw is rotated in the opposite direction. A full turn of the adjusting screw in one direction or another corresponds to a temperature of approximately two degrees Celsius.
To adjust the ART-2 thermostat, adjustment is carried out with a screw, access to which is possible through the central hole located in the axis of the handle. This hole is closed with a pin and for adjustment this pin is removed. The thermostat of this model is regulated as follows:
- the handle is initially removed;
- if there is a pin, the pin is removed; adjustment is made with a screwdriver with a diameter of 2.5 mm;
- The screwdriver is inserted into the screw slot, the position of the screwdriver handle is remembered, and then the screw rotates.
By rotating the screw clockwise, the temperature will increase; by rotating the screw counterclockwise, the temperature will decrease. The temperature with one full revolution of the screw corresponds to approximately 5-6 degrees Celsius on the evaporator shelf.
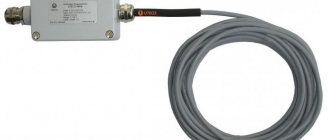
The photographs show modern modifications of temperature regulators of the K 59 type, the difference of which is the length of the capillary tube, the length of the tube is designated by the letter “L”
Types of thermostats - for refrigerators
thermostat K 59 - L 1037
K 59 - L 1275
Adjustment of the given thermostats for modern models of refrigerators is carried out in the same way as in the description of this topic. The external device of the thermostat is shown in the following photograph.
Before attaching the handle to the axle, make sure that the handle is properly mated with the limit spring and the shank of the moving contact lever. The “Melting” mode is adjusted after adjusting the operating modes; the thermostat device is first removed for free access to the adjustment screw.
The temperature of the “Melting” mode is measured when the motor-compressor is turned on after the third, fourth cycle for this mode.
Quite a lot of questions arise when repairing refrigerators, and the next topic will contain a detailed description of:
- replacing the start-protection relay;
- connecting a start-protection relay;
- connecting wires coming from feed-through contacts to relay sockets
and questions regarding the relay connection diagram will be directly addressed.
Not every user knows that repairs to home appliances, including refrigerators, can be done with their own hands, without turning to a service center for help. Even a novice master can cope with simple breakdowns. Today we will try to understand the question of how to repair a refrigerator thermostat, as well as what kind of device it is, what its purpose and parameters are.
Thermostat location
The location of the regulator depends on the refrigerator model. Information about its structure and location is contained in the operating instructions for the household appliance . It is usually located next to the temperature control knob. In old household appliances, the thermostat is installed inside the chamber, under the light bulb, and covered with a protective housing. To remove the part, remove the handle by pulling it towards you. Then unscrew the screws and dismantle the housing.
In modern models, the thermostat is located outside, usually above the door. If it needs to be removed, first also remove the adjustment knob. Then unscrew the bolts and remove the panel with the light bulb, after which the regulator is removed.
What is a thermostat and why is it needed?
First, let's figure out what it is. A thermostat, or thermostat, is a device that controls the temperature in your refrigerator and then sends signals to the compressor, causing it to turn on and off depending on the level of cooling inside the refrigerator.
It works quite simply. The thermostat is a relay:
- On one of its sides there is a special hermetically sealed tube, which is filled with freon.
- On the other hand, there are electrical circuit contacts, and with the help of them the compressor is controlled.
Operating principle
It all works quite simply:
- The end of the capillary tube is attached to the evaporator. Based on the fact that it is filled with freon refrigerant, as the temperature inside the refrigeration chamber increases, the pressure in it increases.
- Thanks to this, the corresponding relay contacts are closed and the compressor is turned on.
- After some time, the temperature in the refrigeration compartment drops, the pressure in the tube drops, and the contacts open, then the compressor turns off.
Another fairly important component of the thermostat is the spring, which compresses and releases its contacts. It depends on her how and at what time they will work. For example, to open contacts with low pressure in the system, less effort is required, for high pressure - more. The spring tension is adjusted using the thermostat switch knob.
Sometimes an electronic thermostat is installed in refrigerators, which consists of a control module and a temperature sensor. In new models, several sensors may well be installed at once, for each of the cooling zones. If your refrigerator has an electronic temperature control mode, it may require special knowledge to repair it.
Signs of a bad thermostat
The malfunction of the thermostat is caused by a malfunction or failure of important parts of the refrigeration cabinet. It is necessary to start checking the functionality of the device if:
- food began to quickly deteriorate;
- The refrigerator compartment freezes all food.
If the refrigerator begins to freeze poorly or, on the contrary, freezes food, the reason is in the thermostat.
There is an alternation of failures, that is, the temperature in the chamber constantly changes from negative to high positive. If this happens, it means the temperature sensor has failed. In this case, you need to immediately check for a malfunction. All found non-functional elements must be replaced.
The temperature sensor requires replacement if there is any temperature failure.
Where should I look for a refrigerator thermostat?
The thermostat is always connected to the temperature setting button or knob in the chamber. Depending on the refrigerator, the thermostat may be located:
- inside the refrigeration chamber itself;
- outside the refrigerator.
Inside
This arrangement is typical for earlier models of refrigerators of the “Nord” brand and others. If you open the refrigerator compartment, you will be able to see a small plastic box located on one of the panels. This is exactly what a thermostat is.
Outside
New refrigeration units are designed slightly differently. In them, the device you need is located outside the refrigerator compartments; as a rule, it is located in the upper section of the refrigerator, above the door itself. But it can also be located in another place.
Important! In any case, the principle is the same: the temperature regulator is located where the switch handle is. To get to it, you need to remove all protective elements.
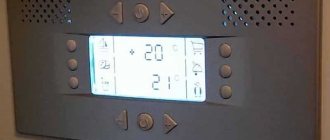
Optimal temperature in the refrigerator
The optimal temperature in the refrigerator compartment is from +4 to +6°C. Since the unit has a large volume, heat is distributed unevenly in it. The closer to the compressor, the colder it is.
So, on the top and bottom shelves (depending on the location of the freezer) the temperature is maintained from +8 to +9°C, on the central one - from +2 to +6°C, in the door - up to +10°C.
The temperature in the freezer is maintained from -6 to -24°C, the optimal temperature is -18°C.
Signs of a broken temperature relay:
- The refrigerator runs continuously and does not turn off on its own.
- The unit begins to freeze quite strongly inside the refrigeration compartment - where in normal mode there should be a low, but still above-zero temperature.
- The refrigerator turns off spontaneously and then no longer makes sounds.
Important! Any compartment of the refrigerator compartment must be in good condition and perform its functions well. If you notice a malfunction, then follow the link to understand how to solve the problem when the top chamber does not work in a Samsung refrigerator.
Let us now consider each of these situations separately to understand how the refrigerator thermostat is repaired.
The refrigerator does not turn off on its own
To make sure that the cause of the refrigerator breakdown is the temperature controller itself, do this:
- Disconnect the refrigerator from the power supply.
- Remove food from it and defrost thoroughly.
- Move the thermostat knob to the “Max” position or turn on the freeze, if available.
- Place a thermometer on the middle shelf of the refrigerator, but not the freezer - it will be better if it also has a negative measurement scale.
- Turn on the refrigeration unit, empty, without food.
- Wait approximately 2 hours, then quickly remove the thermometer and evaluate its readings.
Blacked out and fell silent
There could be as many as 3 reasons:
- The thermostat is broken;
- the engine start relay is burned out;
- The refrigeration unit motor has burnt out.
The last two reasons are, of course, incredibly serious. But at the moment we are interested in the first one. In order to make sure that you need to replace the thermal relay itself, you need to check it:
- Turn off the refrigerator's power supply.
- Locate the thermostat and then remove the protective covers.
- Inspect the device carefully.
Important! As a standard, the temperature controller has three to four multi-colored wires. One of them is usually yellow along with a longitudinal green stripe. This is the ground wire. We won't need it, so put it aside so you don't accidentally catch it. Absolutely all wires that supply the thermal relay are connected directly to each other. If, after connecting the refrigerator to power, you hear a smooth sound (humming) of the engine, this means that the temperature controller itself has failed, and you will be forced to replace it with a new one.
How to replace the thermostat?
If the thermostat can no longer be adjusted, then there is only one option left - replace the device. You can also do this if you want to install a different thermostat model (for example, replace a regular one with an electronic one).
Sometimes it happens that there is no need to change the entire relay. This can happen, for example, if only the siphon is faulty. In this case, you can replace only this part of the thermostat and leave it the same, after making sure that there is no other damage. If the damage is significant, it is necessary to properly remove and install a new one.
When making any repairs, you should follow certain safety rules - work only with a de-energized device, use well-insulated tools. If such measures are met, replacement can begin.
The replacement itself is not particularly difficult, being only somewhat labor-intensive - in some models, for example, the Atlant refrigerator, you will need to completely remove the front door.
In addition, you need to know which thermostat models are interchangeable. For example, models T-110, T-111, T-112 (presented in single-chamber refrigerators) can be replaced with TAM-112, TAM-113. In two-chamber ones, instead of TAM-125 and TAM-133, you can install models K56-L1955, K59, Danfoss 077B6. Often, replacing with analogues is less expensive, and this makes it worthwhile. This information may also be useful if the original thermostat models are not on sale or are not immediately available.
In general, the replacement algorithm does not require great skill - even a beginner in the repair business can carry it out. The only recommendation for completely inexperienced craftsmen would be to capture the disassembly process step by step in a photo (this will also be useful for those who are making repairs to a new refrigerator model). This precaution will help you avoid getting confused during the reassembly process and not mix anything up.
First of all, you need, as previously said, to de-energize the device, and then find it according to the instructions given above. Sometimes removing the thermostat is not too easy; in the Atlant refrigerator, for example, you will have to remove the chamber door from its hinges. In most modern models, such overlays do not occur; you only need to remove the handle and the protective overlay. Try to allocate a separate container for all fasteners, this way you will save yourself from the risk of not having a couple of necessary screws at the most inopportune moment and also spending money on their selection and purchase.
The next step is to unfasten the thermostat from the bracket, if suddenly the relay is fixed that way. Carefully unscrew and remove it.
Then you will need to disconnect the capillary tube fixed on it from the evaporator (this is also the name for the refrigerant tube), carefully remove the thermostat from the housing and disconnect all the wires. Everyone must capture this moment in a photo - analog thermostats may have different wire colors, the photo will help you figure out which one was attached where.

You need to start connecting the new device in the reverse order, starting with attaching the tube to the evaporator. Next, you need to connect the wires in accordance with the photo taken. It is important to note that in older models of refrigerators there may be only two wires instead of four, this simplifies the work.
The next step is to attach the thermostat, put the protective cover on it, secure the panels and reinstall the control knob. Now you can turn on the device and check the functionality of the new thermostat. This completes the replacement.
This algorithm is universal for all types of refrigerators, but do not neglect the technical information about the refrigerator. In some cases, this can greatly simplify the work.
If you were unable to determine the cause of the breakdown, remove or adjust the relay yourself, you will have to contact a specialist.
Procedure for replacing the temperature relay
Repairing the refrigerator thermostat yourself will not take much time. For example, let’s take the “Nord” refrigerator:
- Remove the top hinge cover and unscrew the existing bolts.
- Remove the refrigerator door.
- After this, remove the plug directly in the roof of the refrigerator and unscrew one screw - as a rule, it has a built-in hexagon.
- Unscrew the screws that hold the roof in place and remove it.
- Remove the temperature control knob.
- Pull out the temperature regulator, first unscrewing the 2 screws that secure the bracket.
- Replace the unit with a new one and perform all the steps, but in reverse order.
Important! Sometimes the freezer can malfunction and the operation of the entire system is disrupted, which leads to food spoilage. Find out some useful tips on how to get out of the situation if the upper chamber of the Indesit No Frost refrigerator does not freeze.
By and large, no matter where the thermostat is located, its repair looks approximately the same:
- Get right down to the detail itself.
- Disconnect the capillary tube from the evaporator body itself.
- Carefully pull it directly out of the housing.
- Disconnect the relay.
- Repairs: Carefully insert the new bellows tube, and then securely fasten it to the evaporator itself.
- Connect all the necessary wires and attach the relay in place.
After the replacement repair work is completed, it is necessary to check the serviceability of the equipment. Read on our website about how to set the temperature in a Samsung No Frost refrigerator.
How to replace a temperature sensor yourself?
To accurately determine whether a thermostat malfunction is the cause of the problems, you need to conduct a small diagnostic and only after that proceed to replacing the unit; the process of identifying the breakdown and repairing the refrigerator can be done with your own hands.
Diagnostics and adjustment
If the walls of the freezer are significantly frozen, use this method to check the functionality of the functional unit:
- While the motor is running, slowly turn the control knob, increasing the temperature inside the compartment.
- After some time, when the level of the set value coincides with the temperature level in the compartment, the sensors will record the set parameter, and the compressor will receive a shutdown signal. Stopping the motor will mean that the relay is working properly.
- Remove all food items from the compartment and leave the refrigerator on for 5–6 hours. During this time, carefully monitor the duration of breaks in the operation of the motor: if it is at least 30–40 minutes, the household appliance can be operated as usual. Otherwise, adjust the cyclicity of the compressor by changing the thermostat settings.
Attention
Continuing to operate the engine while turning the relay knob and increasing the temperature in the chamber means that the regulator is faulty and requires replacement.
You can determine that the “culprit” for not turning off the refrigerator is the thermostat in this way:
- disconnect the refrigerator from the power supply;
- remove all products and place them in a cool place while checking the functional unit;
- set the regulator knob to the lowest possible temperature or turn on the freezing mode;
- place a thermometer on the middle shelf of the refrigerator compartment that can measure air temperatures below 0 ⁰C;
- connect the refrigerator to the power supply;
- after 2 hours, evaluate the thermometer readings: if the air in the refrigerator compartment has heated up to more than 6 ⁰C above zero, the relay is faulty.
If the household unit does not start working for a long time after being turned off, follow these steps:
- Turn off the power supply to the refrigerator, remove the thermostat casing.
In older refrigerator models, two wires connect to the terminals of the functional unit. Disconnect them and connect them directly to each other (with a small piece of wire or a straightened paper clip). If at the moment of closing the contacts the compressor begins to work, the relay is unsuitable for use. If the motor does not start, the cause of the problem may be a breakdown of the start-protection relay or the motor. - In more modern models of household refrigerators, 4 wires are connected to the thermostat:
- yellow with green stripe – grounding;
- brown – “zero”, leads to the fork;
- white (or yellow, green) is connected to a light bulb in the refrigerator compartment.
orange (or red, black) connects the unit to the compressor;
To identify a thermostat malfunction, short-circuit all wires except ground. If the motor turns on, the regulator is faulty.
Attention
More accurately, you can check the unit with a digital multimeter: remove the relay, place the end of its bellows tube in cold water for 1-2 minutes, set the switch to resistance measurement mode (to the “200” position) and take readings. If the number “1” appears on the tester screen, the thermostat needs to be replaced.
Read about how to diagnose a refrigerator yourself here.
Tools
To repair the refrigerator yourself (replace the regulator), you will need:
- flat and Phillips screwdrivers;
- knife;
- round nose pliers;
- spare element of suitable modification.
Rules for dismantling the thermal relay
In older refrigerator models, the thermostat is located inside the appliance. To remove the element, it is necessary to remove the temperature control knob and the protective plastic casing. In more modern refrigerators, the thermostat is usually located outside the chamber and can be located in the upper part, directly above the door.
Removing the faulty part:
- Remove the element protective cover.
- Disconnect the capillary tube from the evaporator and carefully remove it from the housing.
- Unscrew the fixing bolts and remove the relay. The block with contacts and regulator can be mounted either with screws or with latches.
- Disconnect all wire terminals that are connected to the thermostat. To avoid confusion with the connection when installing a new part, write down the color coding of all wires.
- Remove the faulty element from the refrigerator.
Before replacing a functional unit, disconnect the power from the household appliance.
Replacement
- Carefully, so as not to damage the part, insert the new bellows tube into the body and attach it to the evaporator. The part must be pressed against the wall of the element.
- Connect the relay wires.
- Reinstall the working thermostat.
- Secure the protective cover and all panels and components that were removed when dismantling the assembly.
- Connect the refrigerator to power.
Attention
Within 2–3 days after replacing the relay, monitor the operation of the refrigerator: if the temperature conditions do not correspond to the specified parameters, make additional adjustments to the power spring of the thermostat (by tightening or loosening it).
This is interesting: Connecting a washing machine yourself