You can control the heating operation in one of several ways. For this, various equipment is used, namely:
- automation for timely replenishment;
- mixing units;
- security groups.
However, each type of device has temperature sensors. You can learn about the functional features and types of these devices by reading the information below. It will be especially useful for those who plan to install a heating system.
Purpose of the temperature sensor
Any heating system must operate under human control. The operator should know what the temperature of the coolant is. To determine these indicators, a temperature sensor for heating is required; it will allow you to monitor the expansion of the water volume. Using it, you can monitor current data, taking appropriate action if the parameters begin to deviate from the norm.
The temperature sensor has a fairly wide range of uses. It allows you to visually view the heating of the coolant in individual areas where data is recorded outdoors and indoors. Sometimes this device becomes part of a system that guarantees automatic stabilization of parameters.
Thermostats for heated floors
| Case colors: 4421 RUR | 5…45 °C 230 V external R10-3 3,000 VA 16 A 75 × 75 × 39 mm PDF instructions |
| Case colors: 4531 RUR | 5…45 °C 230 V external R10-3 3,000 VA 16 A 75 × 75 × 39 mm PDF instructions |
| Case colors: 5137 RUR | 5…45 °C 230 V external R10-3 3,000 VA 16 A 75 × 75 × 39 mm PDF instructions |
| Case colors: 5247 RUR | 5…45 °C 230 V external R10-3 3,000 VA 16 A 75 × 75 × 39 mm PDF instructions |
| Case colors: 3882 RUR | 5…60 °C 230 V external R10-3 3,000 VA 16 A 75 × 75 × 38 mm PDF instructions |
| Case colors: 3992 RUR | 5…60 °C 230 V external R10-3 3,000 VA 16 A 75 × 75 × 38 mm PDF instructions |
| Case colors: 2685 RUR | 5…40 °C 230 V external R10-3 3,000 VA 16 A 75 × 75 × 35 mm PDF instructions |
| Case colors: 2795 RUR | 5…40 °C 230 V external R10-3 3,000 VA 16 A 75 × 75 × 35 mm PDF instructions |
| Top sales Case colors: 2338 RUR | 5…40 °C 230 V external R10-3 3000 VA 16 A 75 × 75 × 39 mm PDF instructions |
| Case colors: 2448 RUR | 5…40 °C 230 V external R10-3 3000 VA 16 A 75 × 75 × 39 mm PDF instructions |
| Case colors: 2092 RUR | 10…40 °C 230 V external R10-3 3,000 VA 16 A 75 × 75 × 43 mm PDF instructions |
| Case colors: 2202 RUR | 10…40 °C 230 V external R10-3 3,000 VA 16 A 75 × 75 × 43 mm PDF instructions |
| Case colors: 1969 RUR | 10…40 °C 230 V external R10-3 3,000 VA 16 A 75 × 75 × 43 mm PDF instructions |
| Case colors: 2079 RUR | 10…40 °C 230 V external R10-3 3,000 VA 16 A 75 × 75 × 43 mm PDF instructions |
| RUB 3,759 | −9…+99 °С 230 V two D18-4 in heat shrink 2 x 3000 VA 2 x 16 A 80 × 90 × 54 mm PDF instructions |
| New 5434 RUR | 5…45 °C 230 V R10-4 7,000 VA 32 A 70 × 85 × 53 mm PDF instructions |
| 2897 RUR | 5…40 °C 230 V R10-4 7,000 VA 32 A 70 × 85 × 53 mm PDF instructions |
Related Posts
- Houses made of kiln-dried profiled timber
- Features of installing a wooden door with a frame
- Air conditioning system maintenance
- Remote control of the boiler: gsm, internet and other automation options
- Aermec nrb
- Precision air conditioner
- Mcquay: air conditioners, rooftops, chillers, fan coils
- Alarm with motion sensor for room security
- Construction of private houses using new technologies
- How to properly weld swing gates onto a fence from a profile pipe with your own hands
- At what temperature of the coolant is the heating system turned off and turned on in an apartment building according to GOST
- Covering the roof of a house
- Dismantling of heating systems
- Selecting a machine by power
- Heater control panel planar 44d24 (pu-8m, pu-22)
- Thermal relay with remote temperature sensor: operating principle
- A supply of hot water that is always at hand: how does an electric water heater for heating work?
- Overview of the model range and types of temperature relays
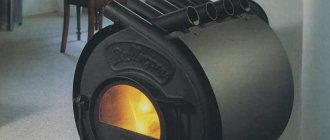
- Buleryan oven: do it yourself
- How to install a bathtub with your own hands
- Inductive sensors, position sensors
- How to make steam heating
- Ventilation control panel: device, purpose + how to assemble correctly
- Leningrad heating system for a private house
- Thermal unit
Read with this
- Houses made of kiln-dried profiled timber
- Features of installing a wooden door with a frame
- Air conditioning system maintenance
- Remote control of the boiler: gsm, internet and other automation options
- Aermec nrb
- Precision air conditioner
- Mcquay: air conditioners, rooftops, chillers, fan coils
- Alarm with motion sensor for room security
- Construction of private houses using new technologies
- How to properly weld swing gates onto a fence from a profile pipe with your own hands
Types of temperature sensors
At the design stage of a heating system, it is important to choose the right heat sensor. In this case, the characteristics and types of the device are taken into account. They are classified by installation location, and the device can be placed in the system or at a certain distance so that the device has the ability to control other temperature parameters. The latter are used in tandem with room thermostats.
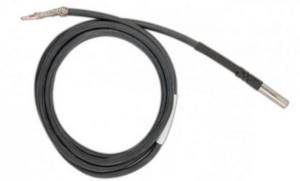
An immersion temperature sensor for heating is used to determine the temperature of water in pipes. The device is installed on one of the sections of the system. A number of solid fuel boiler models do not have such sensors, so they are installed additionally. The remote temperature sensor for heating must be located outside the system. It can be connected to a programmer or boiler.
Kinds
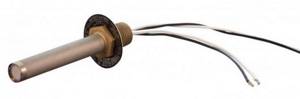
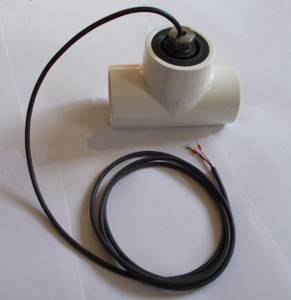
- Submersible
Such meters are used in places where they can be directly immersed inside local water storage facilities. They are connected by wires to the head processors, to which the read data is transmitted. The processor decrypts the received data and sends signals to appropriately heat or cool the liquid according to predetermined operating parameters.
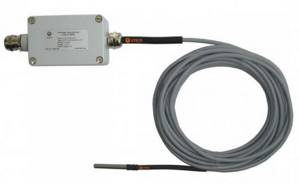
Immersion temperature sensor TeS-W31
For example, this is how the Zota Lux heating device works. The device can be connected not only to heating radiators and batteries, but can also heat underfloor heating elements. The Zota 1 3 6 water temperature sensor is used to measure the water inside itself, preventing the Zota Lux from boiling above a user-specified parameter. In addition, when heating large rooms, external heat meters can also be used.
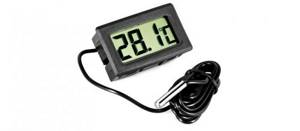
- Overhead
Such sensors are attached directly to the pipe from the outside using a clamp. They take measurements of the water inside the pipe. Such a water temperature sensor can be used in a large boiler room to compare the outgoing water temperature and the incoming water temperature.
However, it is customary to use a submersible boiler.
Invoices are often used at home to measure the quality of heating in a home. And also in other pipes spread over a long distance, to take high-quality readings from each section of its length.
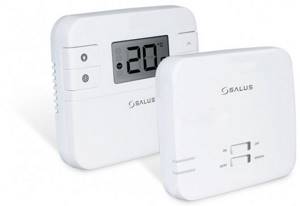
Wireless sensors
Recently, wireless models have become the most common, with the help of which you can receive information through auxiliary electronics. This allows you to install the device almost anywhere, even outdoors or in a separate room.
Among the main characteristics of such sensors:
- measurement error;
- availability of batteries;
- signal range.
How to choose?
The choice of heat detectors should be approached extremely scrupulously
These devices are of equal importance to smoke detectors. To install a fire alarm, you will need to invite specialists, since it is very difficult to install it yourself
Installation of the alarm system and all peripherals is carried out on the basis of diagrams that differ by type of device.
Explosion-proof heat detectors have a metal housing. Such modifications are used in industrial areas. When installing fire alarms in warehouse areas, you should use models with a thermal cable that connects point detectors into one circuit.
Wired models
If we are talking about a simple circuit, then you can use a wired sensor. In this case, the signal will be transmitted to the thermometer control device via wires. The chance of error or incorrect data is much less compared to wireless options. In order to ensure better communication between remote thermometers and other equipment, it is recommended to purchase models from the same manufacturer.
Types of sensors according to the method of taking readings
A temperature sensor for heating can be classified according to the method of taking readings; devices can be:
- bimetallic;
- alcohol.
The first of the listed designs assumes the presence of two metal plates and a dial indicator; the plates are made of different metals. One of them deforms when heated, creating pressure on the arrow. This technique is highly accurate, but has the disadvantage of high inertness. The average cost of such sensors is from 600 to 900 rubles.
About the alcohol variety
Temperature sensors for heating boilers can be alcohol-based. If we compare them with the above, then in this case there is almost no inertia in displaying values. In many ways, the operating principle is similar to a traditional thermometer. An alcohol-containing composition is placed in a sealed flask, which expands when heated. The marks on the flask indicate the water heating value. The design is quite simple, but it is not very convenient for monitoring readings. You will have to pay approximately 1900 rubles for an alcohol sensor.
Before installing such temperature sensors for heating boilers, you must read the instructions. From it you can find out the installation dimensions for connection to the pipe, operating recommendations and temperature limits. When purchasing an immersion sensor, you must also take into account the length of the sleeve; it can vary from 120 to 160 mm.
Usage
Currently, VSP immersion sensors are popular for measuring ventilation, heating and air conditioning temperatures. What makes VSP very popular is its long experience in the domestic market, as well as the fact that it is a Russian-made meter.
It also follows that all factors that can affect their work in the vastness of the country are taken into account. Defects have been eliminated. A nice addition is the fact that VSP is much cheaper than most competitors in its segment.
For a clear example, let's look at the main technical data of the VSP-3:
- sleeve material – stainless steel;
- connection range from minus 5 to plus 180 degrees;
- proper operation at humidity up to 95%;
- insulation resistance greater than 100 MΩ at 20 degrees Celsius;
- protection class IP54;
- cable length 1.5 meters;
- fastening thread – G1/2”;
- connection type: two-wire terminal.
VSP-3
Preparing to install the sensor: how many devices will be needed
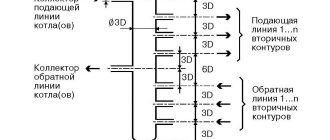
Only one temperature sensor is required for the heating system. This is true if we are talking about the usual scheme. But if a collector heating circuit is used, then there may be several sensors. The temperature control in this case is individual for each room. Devices from each room will send information to the controller, which, using the control unit, will adjust the supply of coolant to the desired room to maintain the temperature.
Homemade temperature controller
Creating a functional thermostat with your own hands is not too difficult. However, you need to be realistic about your own capabilities. The following instructions will help you make the right decision.
The simplest scheme
To eliminate unnecessary difficulties, use a circuit with a power supply without a transformer. To rectify the supply voltage, a conventional diode bridge is used. The required level of the constant component is maintained by a zener diode. The capacitor eliminates surges.
A typical divider is suitable for voltage control. A resistor is installed in one arm, which responds to temperature changes. A relay is suitable to control the actuator.
Indoor device
This device can be used to maintain temperature conditions in a mini-greenhouse or other limited volume. The main element is an operational amplifier chip, which is turned on in voltage comparison mode. Fine and coarse adjustment of the response threshold is performed using resistors R5 and R4, respectively.
On the LM 311 chip
This option is designed for connecting electric heated floors and other powerful loads
You should pay attention to the increased reliability of the product, which is ensured by galvanic isolation of circuits with weak and strong currents
Types of thermostats for boilers and reviews about them
Thermostat for a heating boiler is a temperature regulator, which is divided into several types, among them:
- central thermostat;
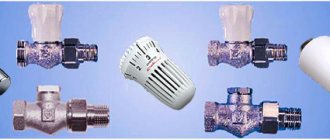
- thermostat for radiator;
- local thermostat;
- room thermostat.
The central thermostat, according to consumers, helps ensure the safety of the entire boiler room. It is installed together with the boiler, and the device transmits information using wires. It is powered by electricity, but is characterized by autonomy from the boiler. Consumers emphasize that a central thermostat is necessary to adjust the operation of boiler equipment.
Thermostat for a heating boiler is a temperature regulator that can be room or local. With the help of such devices, according to buyers, you can adjust the temperature in each room, creating your own microclimate there. The device should be located next to the boiler, but away from doors and windows, so that the temperature readings are not distorted.
A thermostat for a radiator, as home craftsmen emphasize, allows you to control the temperature of each heating device separately. The design of such regulators is quite simple. The equipment consists of a valve that reduces or increases water flow. The unit also has a thermostat that controls this process.
Types of remote heating control systems
There are two types of remote monitoring systems for heating an object, differing in the method of transmitting information and commands:
- via the Internet;
- via GSM.
Let's look at these types in more detail.
Control via GSM
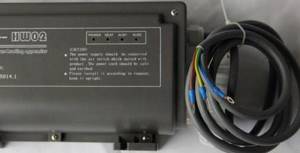
This is the simplest type of remote control of a heating system. Its main element is the GSM thermostat (also called the GSM module). Essentially, it is a computer that provides:
- Maintaining the values of indoor air parameters programmed into its memory, depending on the day of the week and the current time.
- Transmitting information about the temperature and breakdowns of the heating system via SMS messages or calls to the user’s phone.
- Reception of SMS commands to change the heating operating mode and their execution.
A GSM thermostat has a controller that actually controls the heating equipment with connectors for connecting temperature sensors in rooms and outside the house and a boiler to it (usually the portable sensors themselves are included in the delivery of the thermostat) and one or more slots for SIM cards. Expensive models have a socket for connecting an Internet cable to the thermostat to expand the capabilities of the system. For example, organize dispatching, connect additional heating devices. To strengthen the signal, the thermostat also has a GSM antenna.
Remote control of the temperature of a country house via GSM is a common type of remote heating control. Its advantage is its affordable price and operation without wired Internet in the house.
Flaws:
- limited functionality;
- You need to pay for mobile phone service.
Internet control
The standard system configuration is as follows:
- an Internet gateway that connects to your home router;
- thermostat with programmer;
- radio control unit for the boiler.
The owner of a country house (dacha, etc.) uses a thermostat with a programmer to set the heating operating mode for the week. The same thermostat, via a Wi-Fi network, transmits information about the current temperature through a router to an Internet gateway, which sends it via WIRED Internet to a computer (tablet, smartphone) to the home owner. He can use commands (installation of software is required) to adjust the set operating mode of the thermostat, which controls the boiler through its radio unit.
In the extended version, you can control the operation of several heating devices via the Internet - boiler, radiators, “Heated floor” system, etc. To do this, it is necessary to install the appropriate radio units on this equipment. To work, you need to install a special application on your PC, tablet or smartphone.
The advantage of such a system is the widest possible functionality:
- control several heating devices;
- provide individual parameters for each room;
- providing complete information about heating operation;
- convenient reporting;
- dispatching capability.
Minus two:
- Technical - wired Internet is required, which in many cases is problematic for country cottages and houses. You also need a router.
- Financial – the system is more expensive than the control option via GSM.
Reviews of the relay with temperature sensor RDD-2X-4R
A relay with a temperature sensor for heating, the model of which was mentioned above, according to buyers, is characterized by a high load capacity. This allows the device to be used to control the operation of compressors and other actuators. The use of additional devices is not required.
The equipment has minimal weight and dimensions, as well as an optimal quality-price ratio. The maximum pressure is 1.2 MPa. This temperature sensor for turning off the heating pump has an analogue - DEM 202. As an example, consumers are advised to consider another temperature sensor of the TAM-102C brand, which is used for on-off temperature control of gaseous and liquid media, as well as for signaling. The scope of application, according to users, is quite wide; working environments can be:
- oils;
- freons;
- air;
- fresh water.
Other media can be used in conjunction with the device, but they should not be aggressive to copper alloys, copper, steel and silver solders. Such electric temperature sensors for heating weigh no more than 1.2 kg, their dimensions are 92 x 110 x 62 mm. They can be installed at a distance ranging from 1.5 to 4 m. The ambient temperature can vary from -50 to +60 °C.
Installation of frequency converters
Installation, configuration and servicing of the inverter should only be performed by qualified technical personnel. Rough handling may damage the inverter. Do not throw the inverter or subject it to shock or vibration when carrying it.
Safety instructions for installing the frequency converter (the instructions for the DANFOSS frequency converter were used):
1. Touching live parts can cause death, even if the equipment is unplugged. When working with live parts, make sure that the voltage inputs are disconnected: both the mains supply and any others (DC intermediate circuit connection), and the motor cable is disconnected (if the motor is rotating).
Be aware that the high DC voltage may remain high even if the LEDs have gone out. Wait at least 4 minutes before touching potentially dangerous live parts of drives up to and including 7.5 kW. Wait at least 15 minutes before operating drives over 7.5 kW.
2. The frequency converter must be properly grounded. Ground leakage current exceeds 3.5 mA. It is prohibited to use the neutral wire as grounding.
3. The [OFF] button on the operator panel does not function as a safety switch. It does not disconnect the frequency converter from the network and does not guarantee a voltage loss between the converter and the motor.
Check the suitability of components before installation.
1. Check the code number of the converter with what you ordered.
2. Make sure that the input voltage indicated on the frequency converter matches the voltage of the supply network to which you plan to connect. If the supply voltage is lower than the input voltage of the frequency converter, the device will operate with reduced performance or will operate with an error. Connecting the device to a power supply with a voltage exceeding the input voltage of the converter indicated on the information plate is not allowed!
3. Check that the rated voltage of the motor is not higher than the output voltage of the frequency converter. The rated voltage of an electric motor is in most cases determined by the wiring diagram, so check whether the motor is connected in star or delta and what voltages correspond to this wiring diagram (indicated on the motor nameplate).
4. The rated current of the motor in most cases should not exceed the rated output current of the frequency converter, otherwise the drive will not be able to develop the rated torque.
Checking the installation conditions of the frequency converter.
1. External conditions must correspond to the degree of protection of the housing - standard design of the converter - IP20 does not protect against dust or liquid drops entering the device. The IP54 housing design protects from dust and moisture provided that installation requirements are met (using seals, cable glands, etc. Make sure that the area around the fans is clean and free of dust and dirt.
2. The installation location must be dry (maximum relative humidity 95%, no condensation).
3. Operating ambient temperature 0–40 °C. At temperatures from -10 to 0 °C and above +40 °C, operation will occur with reduced performance. It is not recommended to operate the frequency converter at temperatures below -10 and above +50 °C, as this may lead to a reduction in the service life of the product.
4. The maximum installation height of the device above sea level for operation without derating is 1000 m.
5. Check that the frequency converter can be ventilated. Wall-to-wall installation of converters is allowed (IP 20 and 54 enclosures), but an air space of 100 mm must be provided at the top/bottom of the device for a frequency converter with a power of up to 30 kW, 200 mm for a frequency converter with a power of 30 to 90 kW and 225 mm for power 90 kW.
The inverter becomes hot during operation, so there should be at least 10 cm of free space around the inverter to ensure air circulation and cooling. The surface on which the inverter is installed must be made of non-flammable material and have sufficient mechanical strength to support the weight of the inverter.
When installing the inverter in a cabinet, pay attention to the cooling efficiency. Make sure that the air flow from the cabinet fan is as close to the inverter as possible. An example of the location of the converter in the cabinet is shown in Figure 3.1.
The inverter must be located so that it does not interfere with the air flow of other inverters and heat generating elements of other equipment, including braking resistors. It is advisable to avoid placing one converter on top of another or to maintain a minimum distance between units of 300 mm. An example of the arrangement of several converters in a cabinet is shown in Figure 1.
Figure 1 – Examples of placement in a cabinet: a) one converter; b) several converters
The forced cooling fan of the cabinet must be installed so as to obtain maximum airflow to the inverter. To prevent recirculation of heated air outside and inside the cabinet, it is recommended to install reflective shields.
Electrical connections
1. The frequency converter can be connected to mains/motor cables with the maximum cross-section specified in the inverter technical characteristics table.
2. Each drive should be individually grounded, and the length of the grounding line should be as short as possible. The recommended cross-section of grounding cables should be the same cross-section as the mains conductors. When installing, first of all connect the ground wire.
3. Input fast-blow fuses must be installed (check the design manuals for fuse brands). Fuse ratings can be found in the technical specifications table.
4. Separate cable ducts should be used for input power cables, output power cables and control cables.
5. To meet EMC requirements, use shielded cables. Protect control cables from electromagnetic interference.
6. Check the correct connection of the input (terminals L, N for 1-phase network and L1, L2, L3 for three-phase) and output power wires (terminals U, V, W).
7. Connection to the PE terminal of the converter is made with a ground wire. Do not use the neutral as a grounding wire. The combination of grounding and neutral can only occur at the point of physical grounding.
Check that the motor is connected correctly.
1. The maximum non-EMC length of unshielded motor cable is up to 50 m. Desired EMC limits can be achieved by using built-in or external filters and shielded cable. Please refer to the design guides for the maximum cable length depending on the environment category.
2. According to the standards adopted in the Russian Federation, a frequency converter, as an independent product, can have a different EMC class. However, GOST 51524-99 for an electric drive (electric drive - the entire product - the combination of the frequency converter, electric motor and load) prescribes class A1/B, which is achieved only when using shielded cables and an improved RF filter (for Danfoss converters built into the inverter)
3. No capacitor banks should be connected to the power circuit between the drive and the engine to compensate for reactive power.
4. Two-speed motors, wound-rotor motors and motors that were previously started in a star or delta configuration must be constantly operated in one operating pattern and at one speed.
5. If there is a contactor or switch in the circuit between the drive and the motor, then the drive must receive a matching signal about its position. It is not allowed to break the circuit with a contactor when the motor is running from a frequency converter or a magnetized motor. If the motor is equipped with a brake, a control signal must be provided that coordinates its operation with the converter. The brake must not be powered from the inverter power supply.
6. If the engine is equipped with forced ventilation, provision must be made for its activation when the engine is running.
7. If the engine is equipped with a temperature sensor (thermistor), then it is advisable to connect this signal to the frequency converter to enable emergency shutdown of the electric motor in case of overheating.
Our website on Facebook:
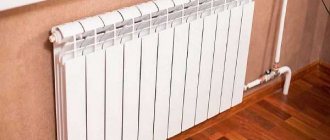
Connecting a temperature sensor to a radiator
The sensor should not be installed on all heating devices. It is important to follow the rules that state: a temperature sensor is installed on the battery if its total power is 50% or more of all those in the room.
Thus, when there are two heaters in a room, the thermostat should be installed only on one of them, whose power is greater. The first part of the device - the valve - must be installed on the inlet supply pipeline, in the place where the radiator is connected to the heating system. If it needs to be inserted into the assembled system, the supply line must be dismantled. This can cause some difficulties, especially when connecting to steel pipes.
To do this, use a pipe cutting tool. Once the sensor is installed, the thermal head should be mounted without tools. It is important to align the marks on the body and secure the head with gentle pressure.
Installing an air temperature sensor
The air temperature sensor for heating must be installed in a residential area. If installation is carried out in the hall, kitchen or boiler room, this will cause a malfunction of the system. It is recommended to choose the coldest room, it can be a corner one. There should be no radiators or heaters near the device. The device should not be exposed to direct sunlight. It is impossible to call the best place for installation a room where there are frequent drafts.
The device is connected using the terminals on the boiler or the thermostat cable, which is included in the kit. Connection of additional equipment is carried out based on the rules that you can find in the technical data sheet. If a heated floor is used as a heating system, the temperature sensor is sometimes located deep in the concrete screed.
For protection in this case, a corrugated pipe with a closed end is used. The bend of the pipe should be gentle so that if the sensor breaks, it can be removed and replaced with a new one. To begin with, a recess is prepared in the wall for mounting a wall-mounted thermostat. The front panel is removed from the device, and after that the device can be installed in the chosen location. Next, the heating cable is connected to the contacts, and the sensors are connected to the terminals. Pay attention to the packaging and connect the power cable. The front panel is finally installed in place.
Types of sensors for measuring temperature
The indoor air temperature sensor can have different designs, which determine its operating procedure, service life and cost. Before giving preference to a certain option, it is worth familiarizing yourself with the existing ones.
Sensors come in different types
Remote temperature sensors
Most thermostats are equipped with built-in sensors that allow you to determine the air temperature directly in the room where the heating equipment is installed. Using thermostats with a remote air temperature sensor, you can determine the temperature outside the room in which the control unit is located. In this case, the device performs the same function - it receives data to adjust the degree of air heating.
Most often, thermostats with remote sensors are installed directly near the boiler, and a location in the heated room is chosen for the sensitive element. Installation outside the home is also possible to adapt heating systems to external conditions. In this case, they act as additional indicators, and the main ones are the devices located inside.
Devices with remote sensors allow you to measure air temperature from a distance
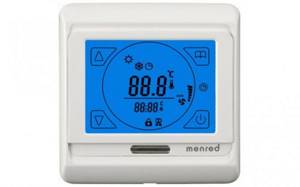
Electronic temperature sensors
Electronic devices are equipped with semiconductor parts that measure temperature changes. Allows you to automate the process. Electronic temperature sensors are installed on boilers and other heating equipment. They are distinguished by wide functionality.
They come with open and closed control systems. The first type has a large set of functions. Such devices can be programmed by performing fine tuning. However, a complex design makes certain demands on the consumer’s knowledge.
Sensors with a closed system operate according to a strictly specified algorithm. A limited number of programs and settings can be changed. Due to their ease of maintenance, they are most often purchased to equip household systems. Electric current is required to power the sensors. They are connected to an outlet, installed on a DIN rail, or use batteries.
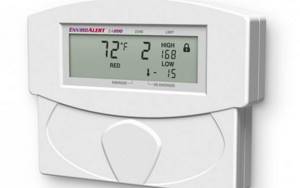
Electronic models are controlled using special buttons or a touch panel. With their help, the user can change the temperature settings. The monitors additionally display the date and time.
Modern devices are capable of operating in day/night, weekend/weekday mode. There may be other functions that increase the cost of the thermostat. Before purchasing, you should compare the need for the listed capabilities with the costs of purchasing a specific model.
Electronic models can operate in various modes
Others
Thermal relays with a remote temperature sensor are usually divided into different types depending on the material used in manufacturing, functionality, and installation features. The temperature control method allows you to divide the device into devices:
- with control by air sensor;
- with control by floor sensor;
- combined. Take into account data from various sources.
The first type is most widespread if you need to automate the operation of a heating boiler or radiator. The second is relevant when installing a “warm floor” system, which significantly reduces the possible scope of use.
Depending on the material used, sensors can be:
- bimetallic, in the manufacture of which reinforced plastic is used;
- electronic thermistors;
- electronic thermocouples.
The last two types are used as a thermostat for heating equipment. Can be mechanical or electronic. The operation of mechanical devices is based on the principle of changing the volume of bimetallic plates with subsequent transmission of data to the control unit.

Mechanical devices have some inertia