The design and principle of operation of the thermostat
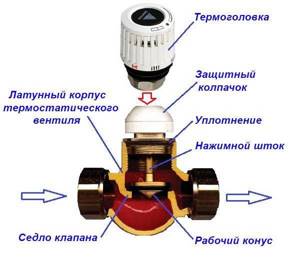
The design of a standard thermostat for a heating radiator consists of a valve and a special thermostatic head. In the device under consideration, the valve is the so-called executive device. The thermostatic head includes a special cylinder with a working substance. This substance is sensitive to temperature changes and it is thanks to it that the thermostat can perform its main function.
Thermostat for radiator
With increasing temperature, the volume of the substance in question increases. Reducing the temperature leads to the opposite reaction. With such changes in the volume of the substance, the pressure rod associated with the cylinder moves.
The thermostat head is mounted on the valve. With constant expansion and compression of the substance, the rod compresses or releases a special locking spring-loaded cone, which opens or closes the passage hole, controlling the supply of the main coolant.
DANFOSS radiator thermostat valves
The radiator thermostat can operate using gas and liquid working substances. In accordance with this parameter, existing devices are divided into gas-filled and liquid. Thermostats with gas working fluid respond more quickly to temperature changes. Liquid ones react more accurately to pressure differences in the cylinder, which allows for the most accurate temperature control.
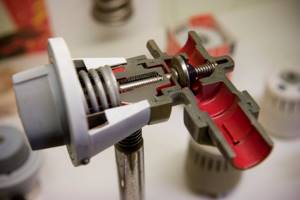
Thermostat
The thermostat operates on the same principle in both simple one-pipe and two-pipe heating systems. The difference lies only in the value of the valve resistance: in one-pipe heating systems this parameter is noticeably lower than in two-pipe heating.
A suitable thermostat should be selected at the stage of design and development of engineering systems. If the device is installed on already installed and connected heating batteries, its operating efficiency will be significantly reduced.
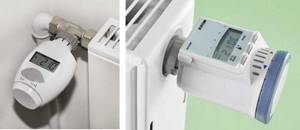
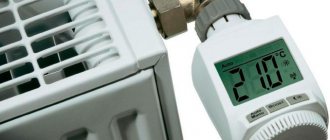
Electronic thermostat
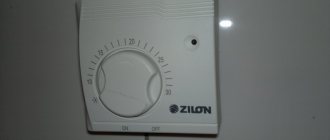
Thermostats with manual and automatic program control are available for sale. Software models are more convenient. Their design is such that they allow you to control the temperature in the heated room, adjusting to a variety of additional factors, for example, the time of day. Electromechanical devices are only capable of maintaining the temperature at one set level.
Corner radiator thermostat
A mechanical thermostat works on the principle of an iron: after heating the room to a set temperature, the device turns off, and as soon as the air cools a couple of degrees, it turns on again.
Control valves for radiators
To manually regulate the operation of heating devices, special valves are used. Such taps are sold with straight or angular connections. The procedure for regulating heating batteries using these devices manually is as follows.
When the valve is turned, the shut-off cone lowers or rises. In the closed position, the coolant flow is completely blocked. Moving up or down, the cone regulates to a greater or lesser extent the amount of circulating water.
Due to this operating principle, such valves are also called “mechanical temperature controllers”. They are installed on batteries with threads, and connected to pipes with fittings, most often of the crimp type.
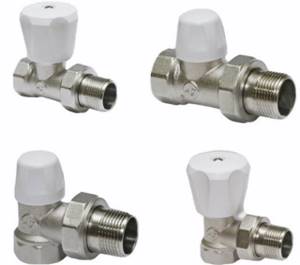
The control valve used for heating devices has the following advantages:
- the device is reliable, it is not dangerous from blockages and fine abrasive particles present in the coolant - this applies exclusively to high-quality products in which the valve cone is made of metal and carefully processed;
- the product has an affordable price.
Control valves also have disadvantages - each time you use the device, its position has to be changed manually and for this reason it is quite problematic to maintain a stable temperature regime.
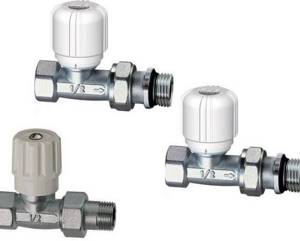
For those who are not satisfied with this procedure and are thinking about how to regulate the temperature of the radiator using another method, the use of automatic products that allow them to control the degree of heating of the radiators is more suitable.
Installation and adjustment
The thermostat works well when its installation is carried out according to all the rules and taking into account some nuances. In order for its operation to be effective, durable, and correct, it is necessary to initially ensure free access, especially if these are mechanical control devices. The automatic thermostatic element must not be covered with curtains or radiator screens. As a result, the analysis of temperature fluctuations may have errors.

Before directly installing the thermostat, all water is drained from the heating system. Prepare the necessary equipment and installation kit for connection, not forgetting the components. The device must be installed perpendicular to the location of the radiator panel. It is worth remembering that the direction of the heat supply flow must coincide with the direction of the thermostat arrow.
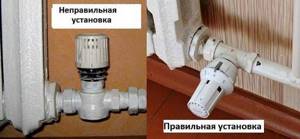
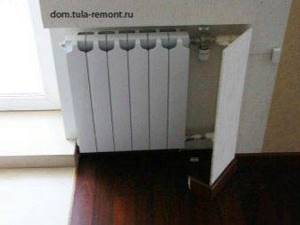
If the position of the thermal head after installation is vertical, this will affect the correct operation of the bellows. However, this nuance does not apply to devices with a remote sensor or an external control unit. You cannot install the thermostat where it will be constantly exposed to sunlight. In addition, the device does not always operate correctly if its location is near large household appliances that generate thermal radiation. The same rule applies to hidden-type options that are hidden inside niches to increase the aesthetic appeal of the interior of the room.
How to do?
If there is no heating in the apartment or house when connecting, you need to open the thermostat completely. This will save the valve from deformation and the regulator from clogging. If the installation is carried out in a private house with two or more floors, work starts from the top, since warm air always rises
It is important to take into account rooms where temperature fluctuations are more pronounced. These include the kitchen, rooms filled with sun, and rooms where household members often gather
Regardless of the circuit, the thermostat is always installed on the supply pipe. Until the valve is ready, the thermal head is not removed from the packaging. The horizontal line pipes are cut at the required distance from the battery. If a tap was previously installed on the battery, it is disconnected. The shanks with nuts are unscrewed from the valve, as well as the locking element. They are fixed into the heating radiator plugs.
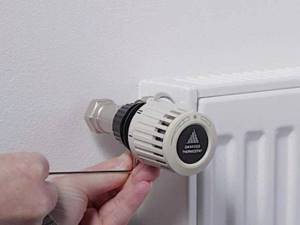
After assembly, the piping in the selected location is attached to the horizontal pipes of the riser supply. The valve is screwed to the battery inlet, ensuring that its position is horizontal. You can install a ball valve in front of it in the system
This will make it easier to replace the thermostat if necessary, and will prevent increased load, which is important when using the valve as a shut-off valve
The valve is connected to the line supplying coolant
After this, open the water, fill the system with it and check the tightness of the connections, which is especially important when you need to install the device on old batteries. There should be no leaks or seepage of water.
This must be eliminated by tightening the fastening points. Preset the valve as necessary. To do this, pull out the locking ring, then align the mark with the required division. After this, the ring is locked.
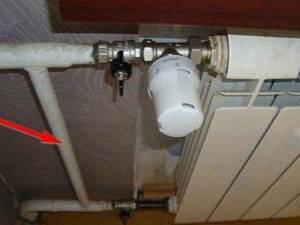
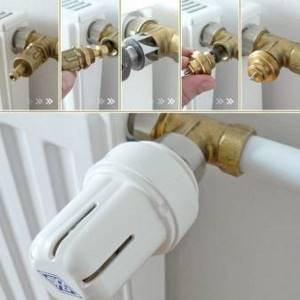
All that remains is to install the thermal head on the valve. In this case, it can be secured using a union nut or a snap mechanism. It is possible to install a thermostat on a battery if the material of its manufacture is aluminum or steel, and also if the radiator design is bimetallic. Cast iron ones are characterized by high thermal inertia, so there is no point in installing these devices for such batteries.
How to setup?
If you need to adjust the thermostat to avoid confusion in the operation of the sensor, you must initially create the correct conditions in a particular room.
The work can be carried out according to the following scheme:
- close windows, doors, turn off existing air conditioners or fans;
- a thermometer is placed in the room;
- the coolant supply valve is opened completely, turning to the left until it stops;
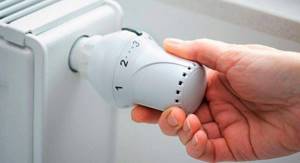
- after 7-8 minutes, close the radiator by turning the valve all the way to the right;
- wait until the decreasing temperature becomes comfortable;
- smoothly open the valve until the noise of the coolant is clearly heard, indicating the most comfortable temperature conditions in the room;
- rotation is stopped, leaving the valve in this position;
- if you need to change the comfort of the temperature, use the thermohead regulator.
How to install and configure a thermostat on a heating radiator, see the video below.
Shut-off and control valves and their features
Any heating system must be equipped with heat supply control devices; this allows not only to maintain a certain temperature range, but also to solve safety problems. In an emergency, in case of a leak or replacement of the battery , the latter can be removed without turning off the entire heating circuit. To adjust the coolant supply intensity, the following parts are used:
Ball valve
Shut-off valves of this type are only suitable for completely shutting off the radiator, since they operate in the “open and closed” mode . This device is not the best option for adjusting temperature values. Theoretically, yes, it can perform this function, but practically, it will quickly fail and require repair or complete replacement. The fact is that solid microparticles of iron and other debris that travel through the pipes along with water inevitably leave damage, in the form of scratches, on the smoothly polished ball mechanism. As a result, the valve, which is in an intermediate state, loses its tightness.
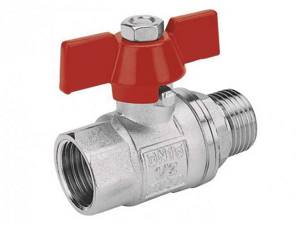
Ball valve
Cone valve
A good and inexpensive way to solve the problem of adjusting the battery temperature. It copes well with the task of changing the intensity of the coolant supply, but its downside is that all such operations will have to be done manually . There are no markings on this device, so the optimal position of the valve will need to be selected experimentally. As a result, constantly “turning” the tap, in the hope of bringing the temperature readings back to normal, will not go unnoticed - very often the protective cap of the device fails .
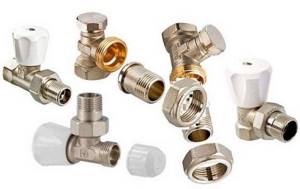
Adjustment valves
Automatic thermostat
For the most efficient transfer of thermal energy from heating devices, innovative technological solutions in the form of thermostatic valves, also called thermostats. They enable the consumer of energy resources to create ideal microclimate conditions in the house and set the desired range of average daily temperatures in the rooms. With such a device, the owner of the premises can configure the heating equipment in such a way as to minimize his energy costs.
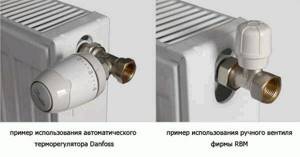
Types of thermostats
All three types of components change the temperature by the quantitative volume of hot liquid in the batteries - with an increase in the flow rate of the latter, the temperature in the battery increases, and with the opposite effect, it decreases.
Benefits of using a thermostat
Modern thermostats have many advantages. One of them is extreme ease of use. Such devices are easy to install and further use, and it’s not difficult to understand. Modern devices help create the most favorable and comfortable indoor environment. They allow you to significantly save on heating and use resources as rationally as possible.
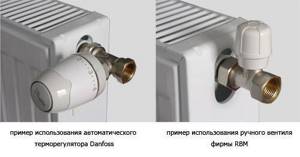
Benefits of using a thermostat
In addition to maintaining the required temperature and creating a comfortable microclimate, saving thermal energy is very important. So, for example, in apartments that are heated by centralized heating, for additional savings it is necessary to install thermostats and a heat energy meter, but in the case of individual heating, all savings come down to a reduction in the amount of energy consumed, which is achieved with the help of thermostats.
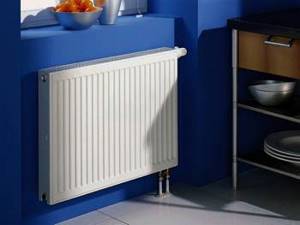
Radiators with thermostats
If heating is only at the planning and development stage, it is best to buy radiators with already built-in thermostats. However, installing a thermostat will not cause any difficulties even in the case of ready-made systems. You just need to get ready for work and prepare the necessary tools for this.
Thermostat connection kit
- Grinder, hacksaw or jigsaw.
- Set of wrenches.
- Pipe clamps.
- Plumbing paste.
Prepare everything you need in advance so as not to be distracted by searching for missing elements in the future.
Installation of the device
The equipment installation process is simple, but if you don’t want to carry it out yourself, you can always turn to professionals.
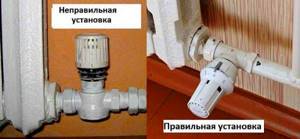
Correct position of the device
Instructions:
- Disconnect the battery from the system. To do this, close the ball valve or shut-off valve. Then drain the water from the battery and vent the radiator.
- Remove the adapter. Before doing this, lay a lot of rags on the floor to absorb the liquid. Secure the valve body with an adjustable wrench, and use the second to remove the nut from the adapter pipe. Next, remove the adapter from the device body.
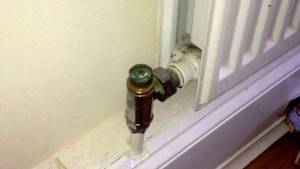
Installation location
- Installing the adapter. Screw on the union nut and collar. In this case, first clean the thread and wrap it with locking tape. You should wrap it clockwise, doing it 3-5 times, then smooth the tape. Assemble the adapter, heatsink and corner nuts together.
- Mount the new collar. Install the collar and blind nut on the pipe. All actions are performed with a screwdriver.
- Installation of thermostat. Secure the device in the directions of the arrows. Tighten the nut between the regulator and the valve, fixing it with an adjustable wrench. At the same time, tighten the nut. Do all actions carefully. After installation, make sure the fastening is secure.
- Fill the battery with water.
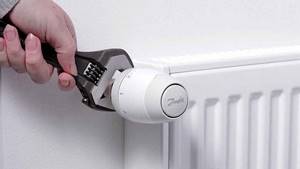
Fixing the thermostat
Valves and taps
Such fittings are a heat exchanger of a shut-off device. This means that the radiator is adjusted by turning the tap/valve in the desired direction. If you turn the fittings 90° all the way, the flow of water into the battery will no longer flow. To change the heating level of the heating device, the locking mechanism is set to the half position. However, not every fitting has this opportunity. Some faucets may leak after a short period of use in this position.
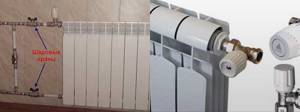
Installing shut-off valves allows you to manually regulate the heating system. The valve is inexpensive. This is the main advantage of such fittings. In addition, it is easy to operate, and changing the microclimate does not require special knowledge. However, there are also disadvantages to locking mechanisms, for example, they are characterized by a low level of efficiency. The battery cooling rate is slow.
Stopcocks
A ball design is used. First of all, it is customary to install them on a heating radiator in order to protect housing from coolant leakage. This type of valve has only two positions: open and closed. Its main task is to turn off the battery if such a need arises, for example, if there is a risk of flooding of the apartment. For this reason, shut-off valves are cut into the pipe in front of the radiator.
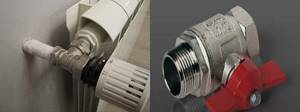
If the valve is in the open position, the coolant circulates freely throughout the heating system and inside the battery. Such taps are used if the room is hot. The batteries can be turned off periodically, which will reduce the air temperature in the room.
However, ball locking mechanisms must not be installed in the half position. With prolonged use, the risk of leakage in the area where the ball valve is located increases. This is due to gradual damage to the locking element in the form of a ball, which is located inside the mechanism.
Manual valves
This group includes two types of fittings:
- Needle valve. Its advantage is the possibility of half installation. Such fittings can be located in any convenient position: completely opens/closes the access of coolant to the radiator, significantly or slightly reduces the volume of water in heating devices. However, there is a drawback to needle valves. Thus, they are characterized by reduced throughput. This means that after installing such fittings, even in a fully open position, the amount of coolant in the pipe at the battery inlet will be significantly reduced.
- Control valves. They are designed specifically to change the heating temperature of batteries. The advantages include the ability to change position at the user’s discretion. In addition, such fittings are reliable. There is no need to frequently repair the valve if the structural elements are made of durable metal. There is a shut-off cone inside the valve. When you turn the handle in different directions, it rises or falls, which helps to increase/decrease the flow area.
Why do you need to make adjustments?
Setting the optimal temperature of the heating radiators allows you to create the most comfortable living conditions indoors. In addition, adjustment allows:
- Remove the effect of air in the batteries, allow the coolant to move freely through the pipeline of the heating system, effectively transferring its heat to the interior of the room.
- Reduce heat consumption costs by up to 25%.
- Do not keep windows constantly open if the air in the room is excessively overheated.
It is advisable to set up heating and adjust batteries before the start of the heating season. This is necessary so that later you do not experience discomfort in the apartment and do not adjust the heating temperature of the batteries in emergency mode. Before setting up and adjusting the radiators, initially in the summer you need to thermally insulate all windows. In addition, you need to take into account the specific location of the apartment:
- In the middle or corner of the house.
- Lower or upper floor.
After analyzing the situation, it is advisable to use energy-saving technologies to maximize heat conservation inside the apartment:
- Insulate walls, corners, floors.
- Carry out hydro and thermal insulation of the seams between the concrete joints of the panel house.
Without this work, it will be useless to regulate the temperature of the radiators, since the lion's share of the heat will heat the street.
Types and selection of thermostats
Based on their design, radiator valves are divided into 3 groups:
- straight;
- corner;
- as part of a set for connecting heating devices.
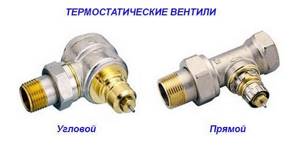
If everything is clear with straight and angular thermostats, then we should say something about the headset separately. It allows you to simultaneously install a thermostat on the radiator and connect it to pipes coming directly from the floor. Although the price of such a headset will be more than traditional pipe connections, such a connection will look much more aesthetically pleasing.
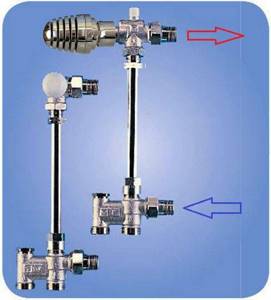
Radiator connection set with built-in thermostat
For two-pipe systems with a heating circulation pump, any of the valves listed is suitable; the only question is how to connect the heating device, and from a technical point of view, they are all the same. Another thing is a single-pipe circuit; for it it is better to buy a special battery temperature regulator with an increased flow area of the seat. Such thermostats have less hydraulic resistance, which is clearly visible in the diagram:
In addition to valves, you should also choose thermal heads for batteries, and here is an immediate recommendation: the valve and head must be from the same manufacturer, and the connecting threads must match. The standard thread on the valve is M28 and M30. In general, the choice of head designs is not too wide - in addition to conventional elements with a built-in bellows, there are also products with an electronic control unit and display. These thermostats are programmable and can be set to maintain different room temperatures throughout the day.
Advice. When choosing a programmable thermostatic head, remember that it requires power from batteries or mains. In order for the thermostat to work correctly, you will have to monitor the availability of power.
In cases where it is planned to install heating devices behind screens or the windows of the room are intended to be covered with thick curtains, conventional thermocouples may not function correctly. Due to weak air movement in the radiator area, the temperature behind the screen and in front of it may differ by a couple of degrees, so in addition to the thermostat, it is worth buying a remote sensor with a capillary tube.
The sensor behind the screen will control the thermostat via a capillary tube, focusing on the correct temperature in the room. There is also a more advanced version in the form of a remote regulator, which is also connected by a capillary tube. But here you need to be more careful: not all valves are suitable for such thermal heads, so when choosing a thermostat you need to consult with the seller.
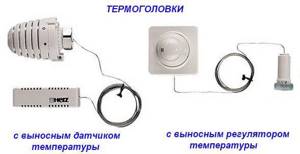
Finally, a few words about radiator valve manufacturers. Quite a lot of them have appeared, especially Chinese ones, whose quality is more than doubtful. The following brands of thermostats are definitely recommended for use; their reliability is beyond doubt:
Advice. You should not buy and install thermostats on all radiators in the house. The rule is this: in order to ensure normal regulation, in each room it is necessary to equip with thermostats only those batteries whose total power is 50% of the total or more. In simple words: with 2 heaters in the room, the valve must be installed on one (which is larger), with 3 - on two radiators, and so on.
How to regulate radiators
To understand how temperature regulation occurs, let’s remember how a heating radiator works. It is a labyrinth of pipes with different types of fins to increase heat transfer. Hot water enters the radiator inlet, passing through the labyrinth, it heats the metal. This, in turn, heats the air around it. Due to the fact that modern radiators have specially shaped fins that improve air movement (convection), hot air spreads very quickly. During active heating, there is a noticeable flow of heat from the radiators.
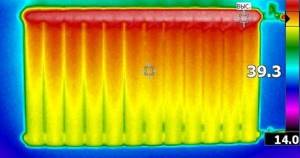
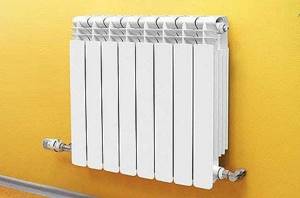
This battery is very hot. In this case, the regulator needs to be installed
From all this it follows that by changing the amount of coolant passing through the battery, you can change the temperature in the room (within certain limits). This is what the corresponding fittings do - control valves and thermostats.
Let's say right away that no regulators can increase heat transfer. They only lower it. If the room is hot, install it; if it’s cold, this is not your option.
How effectively the temperature of the batteries changes depends, firstly, on how the system is designed, whether there is a reserve power of the heating devices, and secondly, on how correctly the regulators themselves are selected and installed. The inertia of the system as a whole, and the heating devices themselves, plays a significant role. For example, aluminum heats up and cools down quickly, while cast iron, which has a large mass, changes temperature very slowly. So there is no point in changing anything with cast iron: it takes too long to wait for the result.
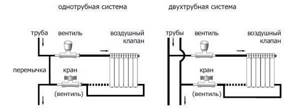
Options for connecting and installing control valves. But to be able to repair the radiator without stopping the system, you need to install a ball valve before the regulator (click on the picture to enlarge its size)
Main types of thermostats
Despite the fact that many components of different types of thermostats are identical and serve the same purpose, it is worth noting the four most common types today:
- Mechanical type thermostat
. This device has a valve on which certain divisions are applied, displaying the heating parameter. Wanting to set one or another heating mode. You just need to turn the valve to the desired position. - Mechanical-electric thermostat
, in which you can set a certain temperature by turning the wheel. Once the desired temperature is reached, another mechanism of the device comes into action, which is responsible for either opening or closing the valve. - Shut-off and control valves equipped with an electrical servo drive
. The second component plays the role of a motor, mounted on the thermostat in the place where the valve is usually located, and then functions in the mode specified by the owner. This means that if the room temperature is detected to be too high, the servo will react by opening some part of the thermostat. - Electronic thermostat
. According to the principle of operation, these products resemble mechanical samples, with the only difference being that you can set the heating mode by pressing the necessary buttons and seeing all the required values on the display built into the device. Of course, in terms of its cost, this thermostat is the most expensive of all of the above, however, the accuracy of its readings is maximum. In addition, on electronic devices you can regulate the temperature not only for a few hours, but also for a much longer period, which is especially convenient, for example, for those owners who are at home only during the day or only at night. This function guarantees significant fuel savings and allows you to heat the room exactly when it is needed.
Types of thermostats
Heating regulators for batteries can be classified according to the principle of operation:
- Mechanical;
- Electronic.
Each variety has its pros and cons.
Mechanical
The advantages include the absence of the need for external power. The work is based on the physical ability of substances to expand when heated. In appearance they resemble a valve with markings on the upper part, on which the temperature is marked from +14 to +28°C. It must be mounted in a horizontal position.

Mechanical option
A mechanical thermostat for a heating radiator will give you the following advantages:
- Save on the device's power supply and the cost itself.
- Easy to use.
- Works completely autonomously.
- There is no need to change the temperature regime in your absence.
Due to its advantages, the device is in great demand.
Electronic
An automatic thermostat for a heating radiator controls the flow of coolant without external participation. The device has a screen or panel with buttons built into it.

With LCD display
The thermostat is equipped with a built-in or remote remote control sensor that can record data on changes in air temperature. It can be controlled from a distance of up to four meters.
Helpful information! The electronic thermostat has the ability to program the temperature for specific hours depending on the time of day.
The adjustment process itself occurs due to a bellows and an electromagnetic relay. Additional functions significantly increase the cost of the device. At the same time, the thermostat itself is capable of not only reducing or increasing the temperature in the room, but also limiting the flow of liquid, that is, acting as an automatic shut-off valve.

Electronic with keypad
Electric thermal valves for heating will give you the following advantages in the operation of the entire chain:
- Even in your absence, it will independently regulate the temperature.
- You can set the minimum temperature for non-residential premises, which will be sufficient for the life of flowers.
- Setting comfortable modes for different times of the day.
And also all automatic units are divided into:
- With closed logic
- With open.
In the first case, the indicators are set. It is good for regulating your home temperature.
In the second case, with open logic, the equipment is able to adapt to any system independently. Only setting up such a unit requires special skills and abilities, therefore it is used on an industrial scale.
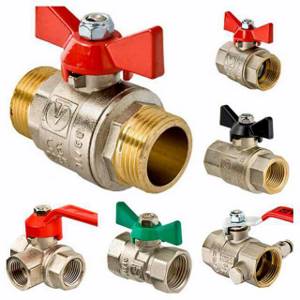
Ball Valves
Valves are cheap, but at the same time ineffective control devices. Ball valves are often installed at the entrance to the radiator, with the help of which they regulate the flow of water.
But this equipment also has another functionality - shut-off valves. Valves are used to completely shut off the flow of coolant into the system. For example, in the event of a leak in a heating device, ball valves located at the inlet and outlet of the radiator allow repairs to be made without stopping the heat supply and draining the liquid.
Heating radiators in the apartment cannot be adjusted using ball valves. They have only two positions - completely closed and open. An intermediate position only brings harm.
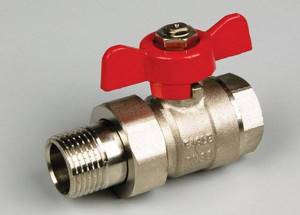
The fact is that inside such a faucet there is a ball with a hole, which in its normal position is not in danger, but in all other situations the solid particles present in the coolant grind it down and pieces break off from it. As a result, the tap will not be sealed and in the “closed” position, water will continue to flow into the battery, which can lead to big troubles if the device leaks.
If one of the property owners decides to control the radiators using ball valves, you must remember that they should be installed correctly.
This method is usually used in apartment buildings. If the wiring is single-pipe vertical, then the hot water pipe enters the room through the ceiling and a radiator is connected to it (read: “Correct adjustment of heating radiators in an apartment - comfort in the home and saving money”). The pipeline departs from the second entrance to the device and is directed through the floor to the room below.
In this case, it is necessary to install the taps correctly, since the installation of a bypass is mandatory. The bypass pipe is needed so that when the liquid flow to the radiator is closed, the coolant continues to circulate in the general house system.
In some situations, the tap is placed on the bypass to change the amount of water passing through it and thereby adjust the heat transfer of the battery. To ensure greater reliability of the heating system, at least three valves are installed: two will be shut-off valves on the radiator and function normally, and the third will become a regulating valve.
But here we must not forget what position the devices are in. Otherwise, you can completely block the riser and you will not be able to avoid the cold in the apartment, as well as unpleasant showdowns with neighbors and representatives of the management company.
How to regulate a heating battery?
How to adjust the battery? General recommendations
Perhaps you don’t know how to adjust the radiator in your apartment. Then the tips below will help you. To do this correctly, just closing/opening the control valve on the radiator is not enough. Depending on the number of radiators connected to the system, you need to open a certain number of them by a certain number of revolutions. For example, there are four batteries installed that are connected to the central heating system. To distribute the pressure over it, the first battery opens several turns, the next - three, another - four, and so on. Now you know how to adjust the radiator manually. And, as it becomes clear, this is easy to do, and your rooms in the apartment will heat up very quickly to the temperature you need.
The answer to the question of how to regulate batteries takes on a different meaning if there is an option for forced pumping of liquid. Then you have the opportunity to install three-way valves on all batteries. Then it will not be difficult to regulate the temperature in the radiators. So, in order to significantly simplify the setup, each battery should be equipped with special valves that allow you to control the flow of heat and the rational consumption of heating equipment. If the room is hot or it is closed and not in use, the valve allows you to reduce or close the flow of hot water into the battery.
How to regulate batteries using a valve
In multi-apartment buildings, valves are most often installed at the exit/input from the elevator unit of the heating system. These devices in their own housing have 2 rings made of steel, protected from corrosion. They encircle the coolant passage. Several more of these rings are located on the surface of the valve, in particular in its moving part, which is very convenient.
Next you will read how to regulate the temperature of a radiator. If the valve is located at the bottom and lowers, then it impedes the movement of liquid, and if it is moved upward, it goes beyond the circulating flow. To close it, the user must rotate the handwheel, which drives a screw-threaded rod. For hot liquids and heating systems, it is best to use a graphite valve. There is no alternative to it if the pipe diameter is over 50mm.
Installation of a thermostat taking into account the heating system. Diagram, instructions, nuances
It is best to install the thermostat directly on the radiator - in the place where the coolant is supplied to the heating system. The device must be located at a distance of at least 0.8 m from the floor, preferably in a horizontal position, in order to exclude the influence of warm air currents emanating from the battery. It must be taken into account that the thermostat should not be in a niche, covered with curtains, grilles, etc. All this will affect the correct operation of the device. Therefore, if it is not possible to provide suitable conditions, it is better to choose a thermostat with a remote sensor.
Owners of a single-pipe heating system should take care of installing a special pipe - a bypass. This jumper connects the forward and return pipes, so the diameter should be 1 size smaller than them. Otherwise, the thermostat installation algorithm is the same for any system. You need:
- Close the corresponding riser and remove water from the radiators.
- At a short distance from the battery, cut off the horizontal supply pipes.
- Disconnect the pipes and shut-off valves from the radiator.
- Screw the shanks with the nuts of the new valve and thermostat into the battery plugs. Regardless of the heating system, the device is installed on the upper pipe, the valve on the lower pipe. At the same stage, a bypass should be installed - if necessary.
- Assemble the pipework and place it in the chosen location.
- Connect the piping to the horizontal supply pipes.
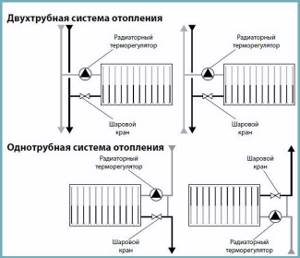
Diagram: connecting a thermostat for a battery
How to properly connect a bimetallic radiator?
Very often, and in the fall almost every day, on the most popular forum in RuNet on the topic of installation, mastergrad.com, topics or messages appear asking about problems connecting bimetallic radiators in apartments, and I am very sorry that in our time, when there is access to any information in networks, many people are faced with this problem when turning to “specialists” to replace radiators who do not have the slightest idea how this installation is performed. And the question is not only that the radiators do not warm up completely or completely, which casts doubt on the feasibility of such a replacement, but also that installation is also often carried out with serious violations of the design conditions of the heating system, which seriously affect its reliability, thereby The life and health of residents is in serious danger. In this topic, by posting photos of my work, I will try to give simple advice on how to connect radiators so that all building codes are observed and new heating devices are fully heated.
Which pipes should I choose for installing radiators?
Firstly, I would like to immediately decide on the type of pipeline material with which the new radiator is connected: if in the house according to the project the risers of the heating system are made of black steel pipe, then the inlets to the radiator should also be made of steel. Options made of plastic pipes (polypropylene, metal-plastic) are significantly inferior in reliability to steel pipes and are categorically unacceptable in systems designed from steel, especially with open installation, which is unacceptable according to SNiP requirements; connecting a radiator with copper pipes and stainless steel pipes, I personally consider inappropriate for economic and aesthetic reasons, as well as due to decreased reliability of the pipe due to the significantly smaller wall thickness.
Secondly, it’s worth determining the type of connection for the pipeline; it’s hard to argue that gas welding is optimal, both for reasons of reliability (with threaded connections there is always a weak point - a snag) and from an aesthetic point of view due to the absence of threaded fittings
It is also important that risers installed by house builders rarely have the correct geometry relative to the walls and floor, but with gas welding, installers can easily correct all the unevenness left by the builders
How to choose a thermostat for heating radiators
In the countries of the post-Soviet space, up to 40% of energy resources are spent on the needs of heating and ventilation of buildings, this is several times more than in advanced European countries. The issue of energy saving is more pressing than ever, especially against the backdrop of the constant increase in energy costs. One of the devices that allows you to save thermal energy in the house is a battery thermostat, whose installation can reduce heat consumption by up to 20%. But to do this, it is necessary to correctly select the regulators for the heating system and install them, which will be discussed in this article.
Adjusting heating flow or return
In some cases, hydraulic balancing—adjustment of flow and return—will help to effectively redistribute heat throughout the heating system. In this case, the coolant is directed from places of its excess to areas experiencing a deficiency.
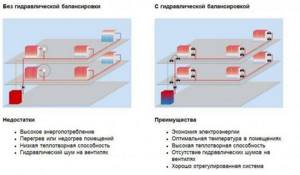
In apartment buildings, the procedure is carried out in accordance with the state energy saving program. In a private cottage, this is the task of the owner himself. In addition to equalizing the temperature on all branches of the system, hydraulic balancing helps reduce energy consumption and, consequently, heating costs.
The work is performed by qualified specialists. In pipes with a length of 10 meters or more, and in areas remote from the circulation pump, balancing valves are installed. It is possible to divide the system into autonomous modules with individual settings, which is appropriate for obtaining different heat transfer in each room.
Features of installation and maintenance of regulators
Thermostat installation diagram
After choosing the optimal model of thermostat or tap for regulating the heating temperature, you should install them correctly. The location of the fittings directly depends on its function and design.
Most often, the adjustment components are mounted in the trim of a specific heating radiator. They are installed on the supply pipe or on the bypass. In order to comfortably adjust the temperature of the radiators, it is recommended to adhere to the following rules:
- The device should not be covered with decorative panels or other interior items;
- The service life of thermostats largely depends on the quality of the coolant. Therefore, a mesh filter should be installed in front of it, which will protect the valve seat from limescale;
- When installing the heating temperature control valve, you must follow the installation diagram. On the body of the device, arrows indicate the direction of movement of the coolant;
- Many thermostats and servos are connected to the electrical network. Therefore, it is necessary to provide power supply to them.
Before installing and further adjusting heating batteries in an apartment, you must read the manufacturer's instructions. It specifies the installation conditions for the operation of a specific adjusting element.
One of the important indicators of apartment heating control valves is the maximum and minimum throughput. They must match the current system parameters.
Maintenance of regulators and valves
Pressure testing is carried out only after installing the control valves
After installation, preliminary adjustment of the taps on the heating radiators should be carried out. To do this, the operating temperature and pressure in the system must be normal. Then, by changing the degree of heating of the coolant, the operation of the control valves is checked. The system is tested in several modes. Alas, it will not be possible to independently adjust the heating in an apartment building using this scheme, since consumers do not have the opportunity to change the degree of heating of the coolant.
In fact, it is possible to check the performance of a specific element only when starting up the central heating supply. Those. Correct adjustment of heating radiators in the apartment is carried out during the heating season.
During the startup of the heating system, the heating system of a private house must be fully adjusted. It should include the following steps:
- Checking the functionality of taps and thermostats;
- Compliance of their actual parameters with passport data;
- If, during the control adjustment of the degree of heating of the heating batteries, a faulty element is detected, it must be replaced.
In addition, you need to remember that the operation of the system is influenced by a number of external factors: the degree of thermal insulation of the house, the climatic features of a particular region. This should also be taken into account when adjusting the temperature of the heating radiator.
The video shows an example of organizing the adjustment of heating radiators in a house:
If the batteries are too hot
In this case, the question arises of how to adjust the heating radiators in the apartment. The user cannot change the network temperature; all that remains is to reduce the fluid flow rate in the heating devices. For this purpose, special manual or automatic devices are used.
A manually operated valve is the simplest and long-known method. By reducing the available cross-section of the pipe using a rod, we reduce the flow of heated liquid into the radiator and thereby reduce its heat transfer. In this case, you should check whether such “heat adjustment” will not be an unprofitable enterprise: when all batteries are connected in parallel, a decrease in the flow in the first one automatically causes cooling of the others. Thus, if the first radiator in the chain is located in the bedroom and it is too hot, you can reduce its heating. But then the last radiator - for example, in the kitchen - will turn out to be almost cold and the heating in the room will be insufficient.
Important: if it is hot in the apartment, but the heating system is single-pipe, adjustment can only be made if there are bypasses (jumpers). Otherwise, by “screwing on” the batteries at home, you can get into trouble with neighbors living “further down the riser” or with utility employees
With a two-pipe scheme, such problems do not arise.
To regulate heating radiators, install either a valve and a ball valve on the inlet and outlet pipes, respectively, or a thermostat on the heating radiator.
Important: a valve must be installed on the supply pipe, not a ball valve! The valve is a purely shut-off valve with two operating positions - “open” and “closed”. Intermediate positions of the ball lead to its gradual destruction by solid particles of the coolant, therefore the “lifetime” of such a valve is much shorter than that of a valve
The valve is considered a shut-off control valve for heating and has a wider range of operating positions between the extremes.
To manually adjust the heating system in an apartment, special control valves with direct or angular connections are used.
The choice of the desired position of the rod in this case depends on the outside temperature, the heating of the water supplied to the heating system and the wishes of the users. How to regulate radiators with a regulator? Carefully monitor the temperature in the apartment (house) and “tighten” the valve to the desired result. Interestingly, manual valves have a built-in thermal valve and you can relatively easily turn a device for manual adjustment into an automatic one by purchasing and attaching a thermal head to it.
Automatic regulators
Automatic devices consist of a thermal valve and a thermal head.
The valve allows you to change the cross-section in the supply pipe; the thermal head, based on remote or built-in temperature sensors, as well as additional controllers, gives a command to change the position of the rod in the valve.
The simplest (and cheapest) version of the device contains a capsule of gas or liquid, which expands and contracts under the influence of temperature changes. The rod piston located next to this capsule moves towards decreasing or increasing the flow area of the pipe. More complex devices are powered by a battery or accumulator and transmit force to the rod using electric current. Some options connect to the home electrical network, for example, thermostats built into the overall smart home system.
The question of how to regulate the temperature of a heating battery using a thermostat - in a fully automated mode or with the control of the homeowner - is decided depending on the general scheme of the smart home system and the features of its operation.
An important nuance: for normal operation of a device with a remote temperature sensor, it is necessary to ensure constant and free air circulation near the thermometer. If the sensor is located directly in the thermal head, it is better to mount it horizontally (perpendicular to the main plane of the radiator), since it is in this position that the heating elements have the least effect on the thermometer.
The quality of operation of remote temperature sensors is also affected by:
- thick curtains covering it;
- the distance between the window sill and the sensor is too small;
- installation of a heating device in a niche.
