Thermostat for heating radiator
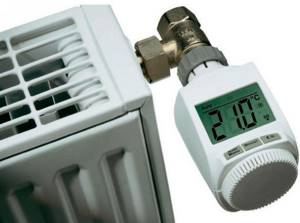
The realities of the modern world are related to the fact that strict control over the use of various, especially non-renewable, energy sources, including thermal, is required. Gone are the days when people thoughtlessly spent thermal energy. Saving thermal energy is impossible without regulating its consumption, without having a negative impact on living conditions. In modern conditions, it is necessary to regulate the temperature for each room, which is carried out by installing special thermostats on heating radiators.
Manual temperature controllers for radiators

This type of regulator is the simplest and is a valve mechanism with a rotatable cover, which, when rotated, leads to the raising or lowering of the valve and thereby reducing or increasing the fluid supply.
Therefore, without human manipulation, manual temperature controllers for radiators will not work. When the temperature decreases or increases, it needs to be adjusted. But such a regulator has a universal valve, which, if desired, can be replaced with an automatic one.
Why do you need a thermostat?
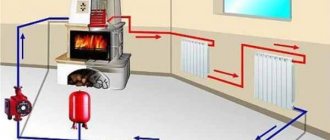
Correctly selected and installed thermostatic valves not only save energy, but also greatly simplify the life of the homeowner in terms of regulating the temperature in the premises. After all, with the help of heating boilers, you can change the heating of all rooms at the same time, increasing or decreasing the temperature of the coolant. But radiator regulators make it possible to heat rooms differently depending on their purpose, which brings considerable energy savings.
For reference. Most modern boilers can be connected to an external heating thermostat to control heating automatically. But this does not solve the issue, since coolant with a certain temperature will still flow to all rooms at once.
The task of the thermostatic valve is to regulate the amount of coolant entering the radiator depending on the air temperature in the room, automatically maintaining it at the level set by the user. The main thing is that a sufficient amount of heated water comes from the heat generator, because a thermostat for a radiator can only reduce its flow, but not increase it.
The purpose of radiator thermal valves is clearly described in the following video:
Design
An automatic thermostat for a heating radiator is a thermostatic valve that, without additional human effort, regulates the degree of heating of the room over a fairly large temperature range. It lowers it if it’s warm and sunny outside and gradually raises it when the outside temperature drops.
The design of the thermostat for the heating radiator depends on the type of heating system. There are two of them:
- single-pipe;
- two-pipe.
Thermostats, in turn, come in two types: electronic and mechanical.
An electronic thermostat for a heating radiator is an automatic device that regulates the temperature in various heating systems. It is equipped with a temperature sensor, built-in or remote. The latter is installed in an area inaccessible to direct influence of thermal installations. Electronic thermostats are divided into digital and analog. The first ones are the most popular.
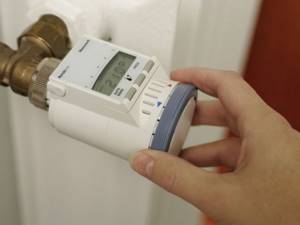
Electronic thermostat for heating radiator
Let’s use our skills and read the article on ordering a Swedish stove. Let's learn how to solder polypropylene pipes with your own hands here.
What is Energoflex insulation suitable for? See the article at the link: https://prootoplenie.com/otopitelnoe-oborudovanie/truby/ehnergofleks-dlya-trub.html
Digital regulators, in turn, are divided into:
- with closed logic.
- with open logic.
The first option is distinguished by a rigid, well-functioning system that operates without external changes. Only a number of programmable parameters can be changed.
The second option involves an abundance of customizable parameters and functions; everything can be changed, configured and programmed here, to suit any environmental conditions. It should be noted, however, that handling open logic devices is more difficult - a fairly high level of knowledge is required, which is more typical for an industry worker than for an ordinary person. Using a thermostat will require significant effort precisely due to the lack of special knowledge.
Now about the mechanical ones. Simply put, the mechanism is a valve and a thermal head connected to each other. The latter includes:
- liquid element (in some cases elastic or gas);
- drive unit;
- regulator
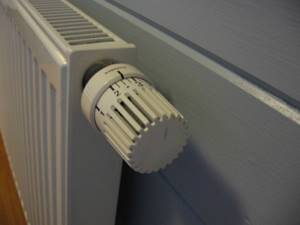
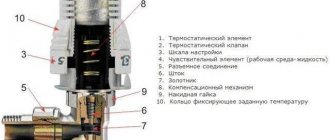
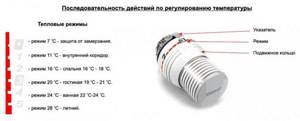
A mechanical thermostat consists of the following elements : a thermal cylinder with a corrugated inner surface (or bellows); thermal valve; sensitive element; scales; compensatory mechanism; union nut; fixing ring; connector; transmitting rod and spool valve.
The secret of operation is that in an automatic thermostat the valve is in contact with the thermal head - an element that is sensitive to any changes in temperature in the room, even minor ones.
We quickly and efficiently insulate the ceiling in a wooden house. We install wall-mounted gas boilers here.
A detailed diagram of water heating is available at the link: https://prootoplenie.com/sistemy-otopleniya/chastnyjj-dom/vodyanoe-otoplenie-v-chastnom-dome.html
If it gets colder, the contents of the thermal cylinder narrow, the valve stem retracts - thus, the coolant flow increases, and accordingly, the temperature in the home also increases. If the room, on the contrary, is too hot, the contents of the can will expand, and accordingly, the heat transfer from the radiator becomes less.
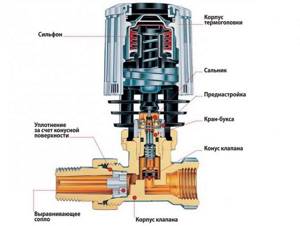
Mechanical thermostat device for heating radiators
How to remove the thermostat from the battery - step-by-step instructions
The manufacturers whose products we use are leaders in their field, having proven themselves well over a long period of time. All distributors we work with are official representatives of manufacturing plants and carry out additional quality control.
In some cases, it becomes necessary to remove the thermostat from the heating radiator. For what? If the riser passing through your apartment heats up normally, but the radiators remain completely cold, then first you should try to bleed out the air (perhaps it is because of the airlock that this problem arose).
If bleeding the air does not help, there is nothing left to do but remove the thermostat from the battery: there is a high probability that the problem lies with it.
The fact is that if the thermostat has an electronic head, then it carries out “decalcification” once a week. But thermostats with a regular head cannot perform this procedure, and, as a result of contamination of the water used as a coolant, the valve gradually becomes “overgrown” with scale and sediment. Over time, it simply stops opening normally.
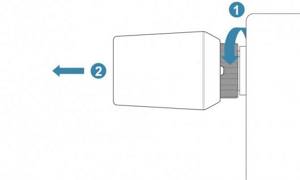
Removal Features
The structure of the thermostat is shown
The temperature regulator consists of two parts: a valve and a thermostatic element.
Tips before installation
In addition, we would like to give you some useful tips before installing the equipment:
- Be sure to read the instructions from the manufacturer, since the installation and configuration of each device may have its own characteristics, without knowing which you can damage the equipment.
- Seal all connections well, do not overtighten the nuts to avoid damaging the parts.
- Look in which direction the arrows on the thermostat body point - they will correspond to the direction of coolant flow in the system.
- If the installation will take place with a single-pipe heating system, we must provide bypasses, otherwise your thermostat will disrupt all its operation.
- Choose a place to install the thermostat so that it is not exposed to direct sunlight and there are no other heat sources nearby, such as household appliances. This will allow the devices to work more accurately. Drafts are also contraindicated for them.
- In the coldest rooms, give preference to electronic devices, as they are more sensitive.
Valve installed on tee
The rules are quite simple, but despite this, they are very effective and will help you save on heating, reducing not only the cost of the regulators themselves, but also making them a plus over time.
Thermostats for radiators: varieties
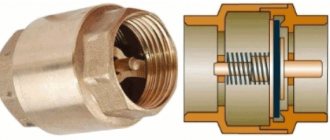
The valve represents the bottom element of the structure. Regulating mechanisms are produced for various systems. Products for two-pipe structures have significantly higher resistance than single-pipe ones. There are thermal valves for heating such circuits. It is prohibited to use devices for a single-pipe structure in a two-pipe structure.
Thermostat installation diagram
Depending on the installation method, control devices are of angular or straight type. If the line is connected at the side, then a straight valve is installed, and if from below, then an angular valve.
The designs also differ according to the type of materials. Metals are used that are resistant to corrosion. Some models are coated with a special coating: chrome or nickel plating. Valves can be made of brass, bronze or stainless steel.
Differences between installing two circuit options
Typical questions
How to insulate a heating radiator so that it does not overheat?
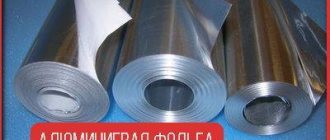
To reduce the level of heating of the room from a radiator without adjustment devices, you should use thermal insulation materials. First you need to prevent air circulation near the heated surfaces of the heating radiators. For this purpose, you can use ordinary foil and wrap it around the radiator. A layer of heat-insulating material must be laid on top of the foil covering.
In residential premises, you should not use materials such as asbestos fabric and asbestos sheets, mineral wool and fiberglass, as they emit toxic substances into the air that can be harmful to health.
For thermal insulation, it is advisable to use woolen fabric with good heat resistance.
Which thermostats are better?
You should choose a thermostat taking into account the type of heating system, personal preferences and the allocated budget.
The best option is a thermostat.
This device has sensors that analyze the temperature and automatically adjust the heating level of the heating radiator based on the set settings. A more budget-friendly option is to install a control valve, with which you will have to manually regulate the heating temperature.
Installing a thermostat on a heating radiator
Installing a temperature controller on a battery is not a very difficult task, but it is necessary to carry out preparatory measures and strictly follow some rules.
What you need to know before installation

We recommend installing thermostats at the top input of the battery, this facilitates easier control and correct temperature conditions.
So, before you start attaching the thermostat, first read some rules:
- Do not install the thermostat on cast iron models, as this alloy is inert. The best choice is aluminum or bimetallic radiators .
- Install the temperature controller no lower than 0.8 m from the floor.
- Position the regulator so that it is convenient to adjust it.
- Do not install automatic models behind radiator screens or draperies, otherwise the sensor will not work properly.
- If the device is installed in a private house, the thermostat must be mounted on a radiator in the kitchen, living room or rooms on the upper floors.
Installation process
Immediately before installation, be sure to shut off the supply riser and drain the water from the batteries. Only after this can you proceed to installation. The latter is carried out according to the following plan:
- First, cut off the pipe connections a short distance from the battery.
- Disconnect the cut line and tap (if present) from the heater.
- When using a single-pipe heating system, you need to weld a jumper between the return and supply lines.
- You need to remove the shanks and nuts from the temperature regulator tap and shut-off valve, then screw them into the battery plugs.
- Assemble the piping and secure it to the desired (selected) location.
Installation algorithm
To install a thermostat on a radiator, you will need to perform several sequential steps. First, water is drained from the system. If there are shut-off valves, only one radiator can be removed. Next, determine the location for installing the thermostat.
If there are no shut-off valves, after draining the water from the entire system, you will need to cut the pipe. For a one-pipe system, you will need to connect an additional jumper, called a bypass. The valve will need to be installed on the top pipe. Shut-off valves are also installed on the upper and lower supply lines. They will definitely come in handy in the future. These can be ordinary ball valves with two positions.
If the system is two-pipe, shut-off valves are installed at the outlet and inlet of the battery.
The ends of each pipe will need to be threaded. The device body is installed in the prepared place for installing the thermostat. Using locknuts, it is securely fixed to the pipe. This procedure is carried out on both sides, using the created thread.
Tow, treated with laundry soap, is wound around the joints. You can also use a special fum tape. Both options provide a strong connection. They are wound against the direction of the thread.
You will need to install a thermostat in the housing. It must be in a horizontal position.
If the thermostat has a remote sensor, even before installation you need to select a suitable installation location for it. Usually it is fixed on the wall, like a regular switch. Only after this can installation be carried out using the described technology.
Danfoss products
Danfoss is particularly popular among manufacturers.
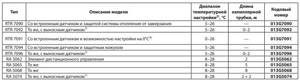
The most popular Danfoss models
It is worth noting that some RA series and RTD series devices have been converted to RTR series.
Therefore, if you are looking for a specific model, for example to replace an old thermostat with a similar one, it is worth visiting the official Danfoss website, where you can find complete correspondence tables. We will present only the most popular models.

Thermocouple correspondence table
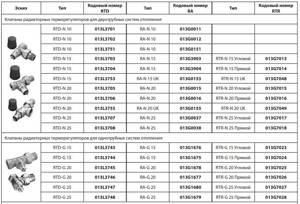
Valve correspondence table
It is worth remembering: in order for the thermostat to last for a long period of time, it is recommended to clean the equipment and remove the thermal head after each heating season.
Advantages and disadvantages of a thermostatic mixer
In the kitchen, this mixer is not always appropriate and convenient. This is due to the frequent need to use only cold water for cooking. In such cases, the problem is solved by installing a special tap for drinking water with a filter.
A bathroom faucet with a thermostat is a convenient, necessary thing and has no drawbacks from a technical point of view. The main disadvantages are the higher price and possible additional hassle during installation. However, they are more than offset by the advantages:
- safety: any likelihood of any unpleasant sensations when taking a shower, and most importantly, burns, is eliminated. This is important in a house where old people and children live. This is convenient when arranging showers and cramped bathtubs, when even jumping away from the hot jet will not be possible.
- efficiency: the mechanism does not need to be adjusted each time, passing streams of water until the desired pressure and temperature are found. In addition, the device is initially configured for water saving mode.
- convenience and comfort: one press of the lever turns the water on and off, using two hands, which is important when washing yourself, and when caring for children, and when performing any other multifunctional actions in the bathroom.
Thermostatic electronic mixer with touch sensors
Where is the best place to install the thermostat?
A thermostat can be equipped with a kitchen sink, sink, and bidet. In the kitchen, a thermostat is not necessary - the water temperature has to be constantly changed. It is not recommended to frequently reconfigure the thermocouple. It is most important to use a thermostat in a bath/shower or in a shower stall. Especially when there are outlets from the same supply pipe to the shower, washing machine and kitchen. And if the washing machine or dishwasher turns on the cold water intake and the pressure in the pipe drops, the thermostat will respond to the temperature change and equalize the flow ratio.
Thermostats are produced in different modifications. The thermostat model for the shower cabin is distinguished by the absence of a spout.
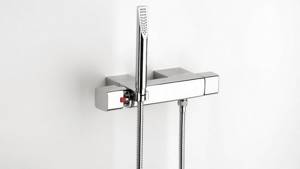
Photo: Roca Shower thermostat: model AquaHeat SS3 (RUB 11,042).
Where is the device installed?
The operation of the device is influenced by 4 factors:
- exposure to sunlight on the body;
- temperature outside the room;
- air circulation in the room;
- additional heating sources.
In apartment buildings, thermostats are placed high up, near the roof , as heat rises. This helps balance the temperature differences in the building. In single-story ones, on the contrary, they are mounted near the heater.
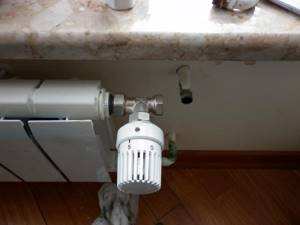
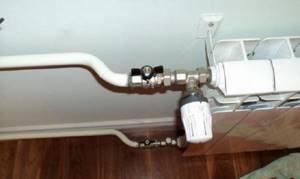
Photo 2. Electronic thermostat installed on the heating radiator. The device is connected to the coolant supply circuit.
It is considered most favorable to place a highly sensitive device on the feed. This principle has a limitation: the strapping elements should not be covered with anything. The thermostat is placed in front of the battery, after the branch from the main line. This allows it to regulate the temperature of the room without affecting the neighbors below.
Important! Otherwise, you must use a device with a remote sensor.
Installing a thermostatic regulator yourself
To install a mechanical or electrical thermostat for heating radiators, no special skills are required. The only difficulty can be caused by installing a bypass in a heating system made of metal pipes.
The thermostat is installed in the coolant supply section in front of the battery
What you need for work
To install a thermostat on a heating battery with your own hands you will need:
- mechanical or electrical thermostat;
- shut-off valves;
- a piece of pipe and fittings or a welding machine for arranging a bypass in a single-pipe heating circuit;
- adjustable and plumbing wrenches.
In addition, you need to stock up on tow and a special paste for sealing joints.
Preparatory activities and installation
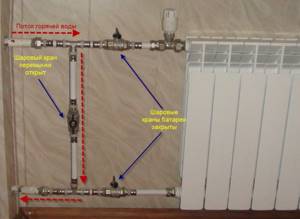
In a one-pipe heating system, a bypass must be installed in front of the thermostat
Before proceeding with installation, it is necessary to drain water or other coolant from the heating system. To do this, turn off the taps at the entrance to the apartment from the heating riser.
It is better to do this work during the period when the heating season has not yet begun.
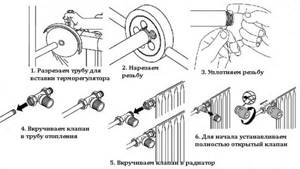
After all the coolant has been drained, proceed to installing the taps on the radiators. To do this, the horizontal supply pipes are cut at a short distance from the battery, after which the sections of the line are disconnected from the radiator. Next, the sequence of work looks like this:
- Depending on the material, a jumper is welded or installed between the supply and return pipelines in a one-pipe heating system.
- Remove the shanks with nuts from the shut-off valve and thermostat and screw them into the heating radiator plugs.
- Connect the shut-off and thermostatic devices.
- Assemble the battery piping.
- The heating system is filled with coolant.
After turning on the heating, it is necessary to inspect all areas for leaks and, if necessary, eliminate or repair defective areas.
When installing a thermostat, be sure to think about the possibility of convenient adjustment of the device. To do this, ensure sufficient free space and orient the adjusting knob correctly.
Thermal valve for heating radiator: classification
Now let's talk about the lower part of the thermostat - the valve (valve). First of all, you need to know that the industry produces control devices for different systems. And you only need to use devices for your system.
Devices for two-pipe systems have at least twice the hydraulic resistance than for single-pipe systems. This was done on purpose, since balancing in this case occurs due to the pressure drop across the valves. That is why devices with a small flow area are installed. If you put such a device in a single-pipe system, you will probably freeze. Therefore, be careful.
Installing a thermostatic regulator yourself
To install a mechanical or electrical thermostat for heating radiators, no special skills are required. The only difficulty can be caused by installing a bypass in a heating system made of metal pipes.
The thermostat is installed in the coolant supply section in front of the battery
What you need for work
To install a thermostat on a heating battery with your own hands you will need:
- mechanical or electrical thermostat;
- shut-off valves;
- a piece of pipe and fittings or a welding machine for arranging a bypass in a single-pipe heating circuit;
- adjustable and plumbing wrenches.
In addition, you need to stock up on tow and a special paste for sealing joints.
Preparatory activities and installation
In a one-pipe heating system, a bypass must be installed in front of the thermostat
Before proceeding with installation, it is necessary to drain water or other coolant from the heating system. To do this, turn off the taps at the entrance to the apartment from the heating riser.
It is better to do this work during the period when the heating season has not yet begun.
After all the coolant has been drained, proceed to installing the taps on the radiators. To do this, the horizontal supply pipes are cut at a short distance from the battery, after which the sections of the line are disconnected from the radiator. Next, the sequence of work looks like this:
- Depending on the material, a jumper is welded or installed between the supply and return pipelines in a one-pipe heating system.
- Remove the shanks with nuts from the shut-off valve and thermostat and screw them into the heating radiator plugs.
- Connect the shut-off and thermostatic devices.
- Assemble the battery piping.
- The heating system is filled with coolant.
After turning on the heating, it is necessary to inspect all areas for leaks and, if necessary, eliminate or repair defective areas.
When installing a thermostat, be sure to think about the possibility of convenient adjustment of the device. To do this, ensure sufficient free space and orient the adjusting knob correctly.