Laying a heated floor in a screed is a responsible process that requires a high-quality approach. It is on the correct execution of all actions that the final result depends, expressed in the uniformity of heat distribution, reliability and safety of the structure, as well as in saving consumed resources. Despite the difficulties, all the work can be done with your own hands, without the involvement of specialists.
Functions and features of screed for heated floors
The screed for heated floors has numerous functions, among which the following stand out:
- Complete protection of the heating system from various types of influences that can lead to damage to the structure.
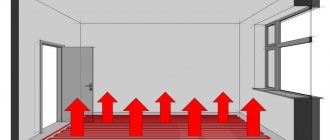
- Proper distribution of the generated heat over the surface, as well as increasing the efficiency of heating the entire room.
- Obtaining the required level of base for laying decorative facing materials.
- There is no need to use bulky heating elements, which significantly reduce the area of the object or spoil the appearance.
Types of compositions for laying the system
To install heated floors in screeds, various types of compounds are used, which are used in different situations, based on their characteristics.
The most popular options:
- Concrete with the addition of fine filler. This solution is suitable for installing a subfloor or for pouring thermal systems using water heating.
- Cement-sand compositions. They allow you to install electric heated floors. To give the solution additional properties, special plasticizers are added.
- Mixtures with a self-leveling effect. They are used to obtain a thin coating, which is necessary for low room heights, as well as when installing a screed on a fairly level base.
- To simplify the process, special products for heated floors have been developed. Such mixtures have all the necessary characteristics and qualities.
Features of installing an electric floor
Laying an electric heated floor directly depends on the characteristics of the selected elements.
Cable technology
This option is a system where a cable laid according to a specific pattern is used as a heating element.
Principle of work:
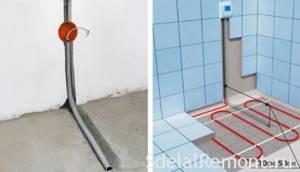
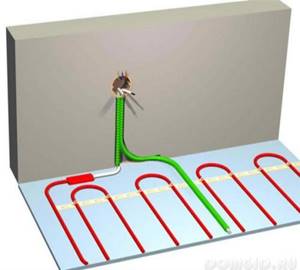
- The location for installing the thermostat is determined in advance. To install it, remove 30–40 cm from the level of the future flooring. Installation can be done in various ways, but the hidden option is most preferable; it allows you to recess all the wires and the sensor into the wall. Laying heating mats
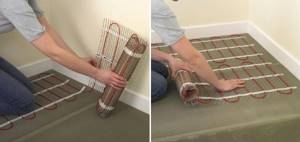
The technology of laying heated floors on heating mats is a simpler procedure that does not require precise cable placement. This is due to the fact that they are already fixed into a single structure, which must be correctly spread on the surface.
Installation features: rolls of mesh are rolled out on a prepared base; to rotate the cells, they are carefully trimmed so as not to damage the cable. If it is necessary to bypass an obstacle, the mesh is cut off and the heating elements are placed at the required distance from each other. The thermostat is connected and the system is checked.
It is the mats that make it possible to fill the screed with a minimum thickness, which significantly reduces the height of the floor.
On a note! Currently, there are infrared electrical systems that are located not deep in the screed, but directly on its surface, under the decorative cladding.
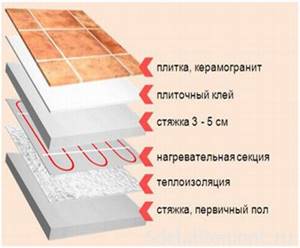
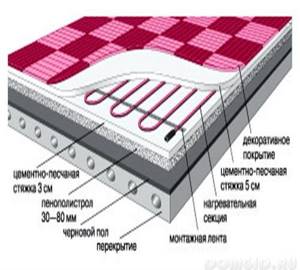
“Pie” and screed thickness
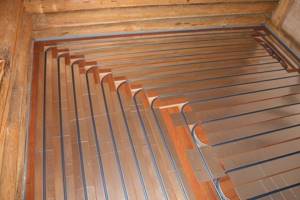
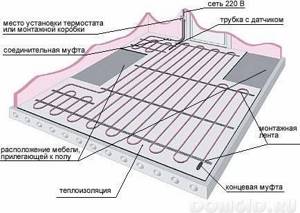
In the standard version, the underfloor heating system is installed on top of the old concrete base. It is enough to lay a heat insulator on it, which can be penofol. This material additionally performs a soundproofing function. After this, a heating cable is laid over the surface. Finally, the concrete screed is poured. The result of all this is a “pie” of a warm electric floor.
Since the entire structure is laid on a relatively soft base, it is impossible to say about excess strength. This indicates the need to make a hole on every square meter of the area of the heat insulator used. Additionally, you should leave a distance of 10-15 cm along the walls in the room so that the upper screed rests on the lower base. It is impossible to do without this in those rooms that have a small area.
It’s worth dwelling a little on the screed itself. Its usual thickness is 30-50 mm. This guarantees uniform heating of the subfloor over the entire surface. In this case, they will not collide with areas (strips) of warm and hot air. In exceptional cases, it is possible to arrange a correct underfloor heating screed up to 30 mm. But in this case, you should think about adding an additional plasticizer to the solution in the required amount. Every 100 kg of the finished mixture will require about 1 liter of additive.
“Pie” of heated floor
General procedure for installing heated floors
There is a traditional scheme for laying an electric heated floor and pouring a screed. When carrying out work on an unprepared base, the process is divided into three stages:
- First of all, the base is leveled with all the necessary procedures, which allows you to create a flat surface for laying a layer of thermal insulation. It is advisable to carry out this stage even when installing a dry screed.
The middle layer is not always an appropriate solution, so sometimes it is skipped and the insulation is covered with waterproofing. But be sure to place the heating system at a distance, securing it to the fittings.
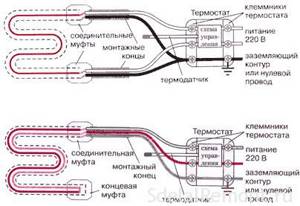
Temperature sensor and thermostat
After this, the temperature sensor is installed. It is placed in a corrugated pipe, installed together with the supply end of the heating cable. To prevent solution from getting into the tube with the thermostat during the pouring process, a special plug is made. In this case, there will be no problems with replacing the sensor during operation and its failure.
The sensor is laid on the floor so as not to cross the lines of the heating cable. The best fixation option is in the middle of the cable lines, directly on the mounting tape.
The thermostat can only be installed if three main cables are connected to the junction box:
- The wire of the temperature sensor itself.
- Network cable with a voltage of 220 V.
- Heating cable wire.
If the room has a high level of humidity, then it is prohibited to install a thermostat in it. This is contrary to all safety requirements.
When all the above steps have been completed, you can think about preparing the solution and pouring a concrete screed, which has its own characteristics and installation subtleties.
Pouring the screed and installing the system
The full range of installation work is a sequence of actions depending on the specific situation.
Technology for pouring screed and laying heated floors into it:
On a note! Be sure to stick damper tape around the entire perimeter of the room.
Thus, the general technology of laying the structure is not very difficult if the stages are correctly developed.
Laying heating elements
When you have a plan for laying the heating elements in hand, you can begin all the steps. Particular attention should be paid to the installation step. Before unwinding the cable, you should check its resistance. This data is written down in the warranty card. It is worth noting that they must fully comply with the data on the label. Differences in indicators are allowed, but not more than 10 percent.
The cold end of the heating cable should be placed in a corrugation, and then installed in the groove made. The beginning of the cable should be secured to the mounting tape at the base of the floor. It is from this section that the cable laying will begin. Subsequently, the coupling must be completely covered with concrete screed.
All heating cable lines must not connect or cross each other. Throughout the entire area of the room, the laying step that has been selected in advance must be maintained. In those areas where it is necessary to bend the cable, its radius must be more than 50 mm. Both subfloor heating cables must be attached to the installed thermostat.
Some nuances
To obtain a high-quality result, it is advisable to adhere to some rules:
- reinforcement is a mandatory procedure to avoid subsequent cracking;
- heated floors require careful preparation of the base; they are placed exclusively on a flat surface;
- the thickness of the screed is affected by the diameter of the cable used for the electrical system; the optimal parameter is a layer from 30 to 50 mm;
- large rooms are separated by special expansion joints;
- When pouring the cement mixture, you must wait for it to dry completely, after which you can carry out other work and use a heated floor.
If all rules and recommendations are followed, the coating with the heating system embedded in the screed will serve for many years, providing proper comfort.
To lay an electric heated floor, it is important to perform the screed correctly, since the uniformity of heat distribution in the room, structural strength and heating efficiency depend on it. Arrangement of the screed is the most labor-intensive stage of laying a heated floor.
Laying screed for heated floors
Its functions are as follows:
- protection of heating elements from mechanical influences and the negative influence of air;
- uniform heat distribution over the surface of the floor radiator to heat the entire space of the room;
- creating a level base for the finishing coat.
Please note the following during installation:
- the thickness of the entire screed, as well as the upper and lower layers around the heating element;
- what manufacturing method to choose;
- taking into account the specifics of solution preparation and cable casting technology.
How to prepare the mixture
To prepare high-quality concrete mortar, it is better to use coarse sand. Small grains of sand contribute to the formation of cracks in the screed under the influence of constantly changing temperatures. Such a defect is practically irreparable, while the heat transfer of the system decreases and the temperature in the room drops.
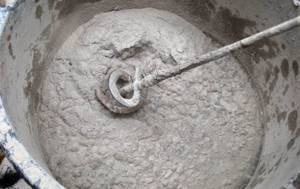
In order for the screed to be done efficiently, it is necessary to properly prepare the solution. To do this, you need to combine dry sand and cement, mix them thoroughly, and then add water. The liquid is added to the dry mixture for screeding a heated floor in small portions, mixing the composition well after each addition. The amount of water depends on the consistency of the solution required. It is very important that it does not spread over the floor surface, but has sufficient plasticity. You can start pouring the screed only after achieving the required plasticity and homogeneity of the solution.
Wet screed is popular among private and professional builders. During operation, not only the advantages of such a solution for screeding a heated floor began to emerge, but also its disadvantages. In particular, the following became known:
- The screed takes a very long time to dry, complete drying is achieved in 28 days. This is because the solution contains a large amount of water.
- During the process of pouring the screed, it is possible that voids may form, which are practically impossible to remove, since compaction can damage the heating elements of the heated floor.
- Drying of the screed is always accompanied by the formation of cracks. Reinforcement using a metal or polymer mesh helps to partially solve the problem. However, small cracks are always present on the surface.
- Leveling the screed is a labor-intensive process; for this it is necessary to install beacons and use a rule. After the mortar for screeding a warm water floor has dried a little, be sure to rub in the indentations and cut off the excess mortar.
Types of screeds
The most common is wet screed, although dry screed is beginning to be widely used, which allows you to avoid wasting time on drying the solution, during which time the heating cannot be turned on.
Despite the apparent simplicity of the composition, the screed is made in several versions:
- Sand-cement mortar with a component ratio of 3:1 is suitable for electric heated floors.
- Concrete based on fine-grained filler is used in water floor systems. The slab is durable and does not crack.
- Self-leveling mixture is well suited for pouring electric heated floors when it is necessary to obtain a thin layer.
- Mixtures for heated floors, produced in a wide range.
- Tile adhesive is used as a thin screed for electric heated floors.
The strength of the screed increases significantly if you use reinforcement mesh or microfiber.
Compositions are obtained with high durability and plasticity if plasticizers are added to them.
Possible solution compositions
It is difficult to indicate exactly what composition of the solution should be when installing an electric heated floor. Everything will depend on the supporting structure of the floor. Thus, a concrete base can withstand a load of 230-250 kg per square meter of room area. A reinforced concrete slab can withstand loads of up to 1.3 tons. If we take into account the standard thickness of the screed, it creates a load of up to 180 kg per square meter.
Compositions can be of the following form:
- Concrete mixture.
- Cement-sand mortar.
- Semi-dry composition.
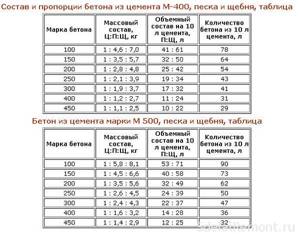
The solution must be prepared in compliance with the following proportions:
The grade of cement for the leveling layer is taken to be no lower than M400. Here you can take the proportions of sand and cement as 3 to 1. In addition, the sand must have a fine fraction. Instead of reinforcement or as additional reinforcement, microfiber acts, which has even better qualities and properties. The addition of plasticizers helps protect the concrete solution from exposure to elevated temperatures.
Within five minutes, all possible dry ingredients are mixed with each other. The plasticizer is mixed separately with water. Each bag of cement used requires about 5-6 liters of water. In this case, you will need about 200 grams of additives. In the future, you just need to add all the dry ingredients to the water.
The concrete solution that is poured onto the heating elements has slightly different components and proportions: to 2 parts sand you will need to add 3.8 parts crushed stone. This is all mixed with one part of cement of a grade not lower than M300.
Thermal insulation
To prevent heat loss through the ceilings, thermal insulation is used. When choosing it, take into account the heat-shielding properties, on which the overall thickness of the screed depends. On the ground floor, slabs 5 cm thick are used as thermal insulation; if there is an apartment below with heating, insulating layers no more than 2-3 cm can be used.
The heat insulator is taken with a metallized coating. Aluminum foil does not withstand prolonged contact with the screed and is destroyed. It is necessary to use metallized coatings in the form of spraying with lavsan, etc.
The slabs are laid without gaps. The resulting cracks are filled with polyurethane foam, all joints are sealed with adhesive tape.
Advantages of ready-made mixtures
In order not to waste time preparing the solution, you can purchase ready-made dry mixtures. They have a number of positive qualities, among which it is worth highlighting:
- There is no need to maintain the proportions of all components.
- The packaging displays detailed instructions for preparing the mixture and subsequent pouring.
- The weight of the finished mixture is slightly lower than preparing the solution yourself. This reduces transportation costs and installation work.
- Technologies allow you to choose the most optimal composition of ready-made mixtures. They can be suitable for any room where a heated floor is installed, as well as for any type of floor covering. There are no restrictions here.
- Dry mixtures are lighter in weight, which reduces the pressure on the floor slabs.
- The thickness of the screed can be made in a thin layer from 5 to 30 mm.
- When making screeds on a warm electric floor yourself, it is best to use ready-made dry mixtures, which save not only time, but also, to some extent, money.
Laying heated floors
The best way to install an electric heated floor depends on the type of heating elements. For any underfloor heating, it is important to ensure that the heating elements do not touch the insulation. To do this, they are separated from it by reinforcing mesh.
Cabling
The location of the thermostat is selected. It is mounted at a height of more than 30 cm from the floor. If the device is a hidden type, grooves are made in the wall for it, as well as for the power and temperature sensor wires. Thermostats are not installed in places with high humidity. They are taken to adjacent rooms.
Mounting tape is attached to the base at intervals of 50-100 cm and at a distance of 30 cm from the walls. Markings are made on the floor, taking into account the distances from the furniture. The distance from the walls is 10 cm, and from pipes and radiators - 15 cm. Then the heating cable is connected to the power cable using a coupling, and then attached to the mounting tape.
The power cable is routed through a groove prepared in the wall to the thermostat, and the heating cable is laid according to the diagram. In this case, the radius at the bends should not be less than 5 cm. The bends are made smooth, without unnecessary tension. Fixation is done with staples or mounting tape. Contacting or crossing of turns is not allowed. The convergence should not be less than 8 cm. All indents are strictly observed according to the scheme, which is developed in advance.
Laying cable heated floors with indentations
The temperature sensor fits freely inside the corrugated pipe along with the supply wires. The corrugation at one end is hermetically sealed with a plug to prevent cement mortar from getting inside. The pipe with the temperature sensor is located between the turns of the cable at a distance of at least 50 cm from the wall and is placed in the prepared groove, after which the wires are connected to the thermostat.
After installation and connections, the electrical resistance of the heating cable and sensor is checked. The values must differ from the passport values by less than 10%.
The grooves are sealed with mortar or putty, and after hardening, the functionality of the heated floor system is checked.
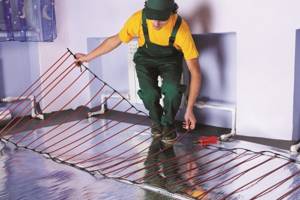
Laying the heating mat
Heating mats are easier to install because the cable is already attached to a mesh base, which only needs to be spread on the base. At turning points, the mesh is carefully cut without compromising the integrity of the cable. Where obstacles are located, the mesh is removed and the cable is laid maintaining a distance of 6-8 cm from adjacent turns.
Rotating the heating mat during installation
An important advantage of the heating mat is its small thickness, which makes it possible to pour a thin screed or lay heating elements in a layer of tile adhesive. Then the thickness of the fill will be only 8-10 cm, which will allow you not to take up excess space in the room.
Laying the core floor
Rod infrared heaters look like a rope ladder. They contain transverse heaters and 2 longitudinal connecting wires through which power is supplied.
The core roll rolls out across the floor, starting from the thermostat. At the turning points, the connecting wire is cut, after which it is necessary to reconnect the ends with a piece of wire. This reduces the reliability of the heated floor. It is advisable to select rolls of suitable length. Then you won't have to cut anything.
Rod heated floor
After laying the insulation, windows are cut out in a checkerboard pattern for better adhesion of the screed to the base. All connections must be carefully insulated.
Laying pipes and pouring mixture
The installation of the screed can begin immediately after all preparatory measures have been completed and the insulating materials have been laid.
Basic methods of laying water pipes in residential premises
Screed for a warm water floor is performed in the following sequence:
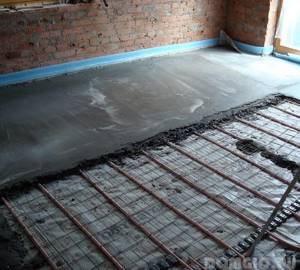
- A reinforcing mesh with cells of 8-10 cm and a cross-section of 4 mm is laid on the surface of the heat-insulating coating. It is better to lay the mesh on special stands. The height of the stand is selected based on the thickness of the screed. Areas where pipes are not planned to be laid are marked on the floor surface. Typically, these are the locations of large furniture, a sofa or a bed.
- The layout and laying of pipes is carried out according to the basic rules - the laying step of adjacent rows should be in the range of 10-30 cm, the distance from the wall to the pipes should be at least 10-15 cm, the maximum length of the contour should not be more than 100-120 cm.
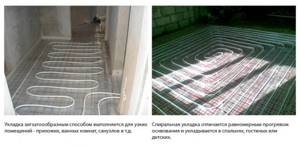
- Pipe laying can be done in a coil or in a spiral. The second method is the most preferable, since the flows will alternate, thereby ensuring uniform heating of the surface.
- Before installation, it is recommended to make a drawing on a reduced scale. After completing the drawing and calculating the distances, the pipes are laid and secured with a clip or clamps. Pipes are connected to nodes and distribution manifolds. Check the system at elevated pressure.
Installation of semi-dry and concrete screed on a water floor
Install linear guides. To do this, use a T-shaped profile, which is set according to the level of the screed
It is important to remember that the maximum thickness of the screed over a water-heated floor should not be more than 10 cm. To fix the profile, a cement-sand mortar with the addition of alabaster is used. The solution is prepared in the required proportions
Before pouring the solution, another layer of reinforcing mesh is laid on top of the pipes. Supply and distribution is carried out from the far corner of the room. When pouring a heated floor over an area of more than 35-40 m2, expansion joints should be provided. To do this, you can use a damper tape or a special T-shaped seam made of foamed styrene, which is laid between two sections of the screed. Pipes crossing the expansion joint are protected by a corrugated casing. After distributing and leveling the screed over the entire floor area, the surface is covered with polyethylene or other dense material. The next day, it is necessary to dismantle the linear guides. During drying, the surface is periodically moistened with water.
After the leveling layer has dried, the excess damper tape is cut off. They go over the surface with a metal rule and a spatula. This is done to remove solution build-up. At the final stage, the surface is generously spilled and rubbed with a wooden float.
A semi-dry screed for a warm water floor is performed in a similar way. It is best to prepare the solution at the work site, in a specially equipped box.
For semi-dry mortar reinforcement, it is preferable to use fiberglass instead of traditional mesh reinforcement, so the overall structure will not put as much pressure on the concrete floor.
Compositions and types of screed
A concrete screed for an electric heated floor will turn out to be of high quality if you select the correct proportions of materials and mix them thoroughly.
Cement and sand alone are not enough to prepare a screed. It requires plasticizers and additives that increase the plasticity and uniformity of the mass.
Dry screed
Advantages of dry screed over wet screed:
- no special equipment is required: mixers, containers for solution, etc.;
- less effort is spent on delivering the material;
- speed of work completion (in 1-2 days);
- there is no need to wait for the screed to mature;
- the possibility of stage-by-stage installation of heated floors divided into zones;
- absence of dirt and excess moisture;
- low specific gravity of the screed;
- the floor acquires sound absorption and thermal insulation properties without the use of special materials, the price of which is sometimes high;
- the possibility of laying communications in the thickness of the material;
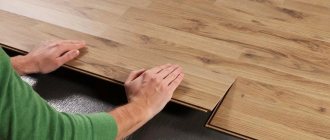
- the surface is smooth and ready for finishing floor coverings.
With all the advantages, the coating is quite light and durable. It will not withstand the load from an interior partition made of gypsum boards or bricks, but frame structures made of plasterboard can be installed on it.
Dry screed is not used in the following cases:
- if there is a slope in the room;
- in the presence of large dynamic loads (vibration effects or high intensity of human flow);
- in rooms with high humidity or the possibility of water spills on the floor;
- in cramped spaces where it is not possible to compact and level the composition efficiently.
When preparing dry screed, the following materials are used:
- Waterproofing film.
- Damper tape around the perimeter to compensate for temperature deformation.
- Dry backfill made of fine gravel, expanded clay, slag pumice, perlite. Instead, high-density insulation boards can be used, for example, extruded polystyrene foam, etc.
- The top layer is sheets of moisture-resistant plywood, asbestos cement, chipboard, OSB. They are also used for large thicknesses. The best option is to use waterproof gypsum fiber sheets that are suitable for any floor finish.
Manufacturers of building materials produce special complete and balanced dry floor systems. A whole line of Knayf dry screeds is produced for different types of premises. Among them, two-layer gypsum fiber boards with the possibility of assembly with locks are popular. For housing, “Vega” compositions are produced based on small expanded clay screenings in bags and other components.
When using industrial waste, for example, solid expanded clay or slag, for dry screed, the fraction size should not exceed 5 mm. Otherwise, the floor will begin to sag and creak.
The thickness of the backfill must be more than 30 mm, otherwise the required quality cannot be achieved. If the upper limit is higher than 60 mm, intermediate spacer sheets will be required. The top of the screed is additionally covered with a sheet covering, the thickness of which is about 20 mm.
The base for backfilling must be level.
Semi-dry screed
The screed is a cement-sand mixture with the addition of fiber fiber and plasticizers, but with a low water content. A distinctive feature is the large layer thickness of 70-100 mm. If the thickness is less, the layer may crack.
The advantages of semi-dry screed are its heat and sound insulation properties due to its porous structure.
The disadvantage is the need to use construction equipment, but in small rooms the screed can be laid manually.
The ratio of components, which include cement, sand and water, is 1:3:0.4, respectively. Fiber fiber is added to them in an amount of 600-800 g/m 3.
The screed is laid using beacons, similar to the wet method. A special machine is used for grouting, which can be rented. It is difficult to compact the screed manually.

Seal semi-dry screed
Wet screed
A screed is a layer of mortar or concrete applied to the surface of the base.
It is laid in several layers, the functions of which differ:
- Leveling the base. The first layer is always used for uneven surfaces. It is necessary even when a dry screed is placed on top.
- A layer on top of thermal insulation for laying heating elements. If the cable touches the insulation, it may overheat at this point.
- The third layer covers the heated floor, evens out the temperature field and holds the floor covering in place. It is often combined with a second layer, if the thermal insulation is covered with a waterproofing film on top.
In all cases, it is advisable to reinforce the layers to prevent them from cracking and maintain the integrity of the heated floor. At the same time, the thickness of the floor increases significantly, which leads to a decrease in the height of the premises. It can be reduced through the use of leveling compounds.
The classic screed is cement-sand. But the composition is not limited to just two components. Plasticizers are added to it, as well as crushed stone or expanded clay. A mixture of 3 parts sand, 1 part cement and PVA glue, added in an amount of 1 kg per bag of cement, works well.
Cement-sand screed for heated floors
When using ready-made mixtures, high quality screed is achieved. Each composition has its own preparation instructions.
Any heated floor must be installed on a flat surface. To obtain a level base, a regular cement-sand mortar is used, and leveling compounds are most often placed under the finishing coating. Their cost is high, but the filling is perfect.
The thickness of the tie depends on the diameter of the cable and is 3-5 cm. If it is made smaller, the required strength of the slab and uniform heating will not be ensured.
When cracks appear in the screed, the reliability of the heated floor decreases sharply. Due to the violation of the integrity of the layer, the heating of the floor becomes uneven. Areas with high temperatures appear, as a result of which the cable overheats and its service life is reduced.
The technology for laying the screed must be performed correctly. The strength of the cement takes 4 weeks; no work can be carried out during this period. It is important to ensure uniform fixation of the layer. To do this, cover it with film and keep the surface damp.
The main screed is installed after leveling the base and laying the cable. First, a damper tape 10 cm wide is rolled out along the perimeter of the walls from below and secured with tape in places adjacent to the subfloor. It is also placed in places of transition to other rooms.
Cracks will not form in rooms with an area of more than 40 m2 if they are divided into rectangular zones and T-shaped strips of porous material are laid between them. Damper tape is not suitable here because it is flexible. Thin foam sheets are usually used. Where the cable passes through expansion joints, a short corrugated hose is put on the cable so that it does not break due to temperature deformations.
The service life of a heated floor directly depends on the quality of the screed and the installation of the electric heated floor under the screed. Even a slight deviation from the rules can lead to the failure of the heated floor, which will entail additional costs for its complete replacement.
Content
- Advantages and disadvantages of heated floors under screed
- Preparing the base for laying heated floors
- Cable selection
- Installation of electric underfloor heating using resistive cable video
- stages of installation work
- underfloor heating screed thickness
- checking the functionality of the heated floor
- Consequences of uneven drying of the screed
Advantages and disadvantages of heated floors under screed
In relation to various methods of primary or additional heating, a heated floor under a screed has a number of characteristic advantages:
- Reliability. The service life is about 50 years, provided that all components are installed correctly. In addition, the device does not require maintenance.
- The presence of a screed provides a high level of protection from external influences.
- The heated floor system guarantees the absence of drafts, which has a beneficial effect on health.
- Economical. Possibility of adjusting the room temperature using a thermostat.
A significant disadvantage of this type of heated floor is the need to create a screed, as a result of which the height of the room is reduced by 3-15 cm.
Preparing the base for laying heated floors
All work related to the installation of electric floor heating is carried out in a room cleared of furniture. If necessary:
- old flooring is dismantled;
- construction waste is removed;
- Deep cracks are filled with putty.
After the putty areas have completely dried, you can move on to the direct screed under the heated floor, which is a combination of layers of different materials.
- Floor base. To lay a heated floor, you only need a flat surface, since any unevenness can lead to failure of the heating cable. To level the floor, you can use cement, gypsum, or self-leveling mixture.
- Waterproofing. The waterproofing layer becomes especially important when there is ordinary soil under the ceiling, or an unheated basement, since condensation forms under the ceiling. In the absence of waterproofing, condensation falls on the thermal insulation layer, contributing to a decrease in thermal insulation properties and heat loss. A suitable waterproofing material is a polyethylene film laid overlapping 8-10 cm over a rough concrete screed. For better sealing, the joints of the seams are taped with tape, and the edges of the film are wrapped on the wall, 4 cm.
- Thermal insulation. The thermal insulation layer is aimed at preventing heat loss. The feasibility of thermal insulation especially increases if work is carried out on the ground floor. Extruded polystyrene and penofol are suitable as thermal insulation materials. The top of these slabs is covered with foil, so there is no need to lay an additional heat-reflecting screen to promote uniform heat distribution over the concrete screed.
- Damper tape. A damper tape is glued along the perimeter of the lower part of the room, compensating for the expansion of the screed when the heated floor is heated. The top of the tape should protrude 2 cm above the level of the intended floor covering. In this case, the apron of the tape, located below, must cover the seam between the heat-insulating layer and the tape to prevent the screed from getting on the thermal insulation layer. The absence of a damper tape will inevitably lead to cracking of the screed after several cycles.
- Metal grid. By means of the mesh, better adhesion of the concrete screed is achieved, and in the absence of a screed, it prevents overheating of the cable.
- The cement-sand screed is made at least 3 cm thick, since a thinner layer may crack. This stage completes the preparatory work before laying the heated floor.
Following the step-by-step description, installing a heated floor screed will not cause any difficulties even for an unqualified specialist.
Cable selection
Based on the type of heat generation, the cable is divided into:
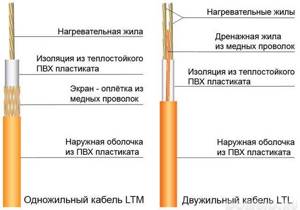
1.Resistive cable is characterized by a heating element covered with an insulating layer and a metal braid. Based on the number of cores and the method of laying, there are two types:
- Single-core cable - the presence of one heating core. Compared to a two-core cable, it has higher electromagnetic radiation and more complex installation, although it is an order of magnitude cheaper. The optimal use of such a cable comes down to the corridor, balcony, bathroom.
- Twin-core. In addition to the heating core, the cable is equipped with a current-carrying core, which reduces the level of electromagnetic radiation and simplifies laying the cable on the surface. Significantly exceeds the cost of a single-core cable. More suitable for bedroom, kitchen.
The main advantage and, at the same time, disadvantage of a resistive cable is the uniform release of heat along its entire length, so you cannot lay the cable under furniture.
2. The self-regulating cable is equipped with two conductive cores with a polymer located in the center, which acts as a heating element. When a certain area is overheated, due to the resistance that arises, the heat release of the overheated area decreases.
Regarding resistive, self-regulating cable does not have the disadvantage of the first, extending the service life of the heated floor. Although this advantage is much more expensive than installing a resistive cable.
Installation of electric underfloor heating using resistive cable
Since the cable should not run under furniture, it is necessary to determine the area intended for laying the cable. Based on the free area indicator, the step-by-step distance between the cables is calculated = area x 100 / cable length.
stages of installation work
Draw up a drawing with a detailed location of the temperature sensor, cable, connection, end coupling, as well as the location of connection to the electrical network. During the process of laying the floor covering, damage to the heating cable may occur, then the drawing will make it easier to find the damaged area.
- A groove is made in the wall to connect the cable wires to the thermostat.
- A 50 cm long recess is also made in the concrete screed adjacent to this wall, intended for laying a temperature sensor.
- The mounting tape is fastened to the screed using dowel-nails every 50-100 cm.
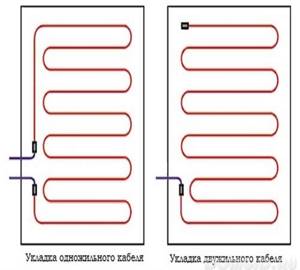
- The cable must be laid in even loops through the distance calculated above, starting from the location of the thermostat. In this case, the heating cable should not touch each other.
- The temperature sensor is placed in a corrugated tube that has a plug on one side that prevents the screed from getting into it. The tube is placed in a pre-prepared groove located between the cable lines.
- The cable resistance is measured using a tester. If the obtained data coincides with the indicators declared by the manufacturer, you can connect the system to the thermostat via connecting couplings, while the thermostat must be disconnected from the network.
- Pouring a heated floor with cement-sand mortar should be done very carefully to avoid the formation of air pockets.
underfloor heating screed thickness
The optimal thickness of the last screed layer varies between 4-6 cm, since the entire electric floor heating device must “drown” in the solution.
After pouring the floor, the room must be darkened and drafts avoided. Such conditions promote uniform drying around the perimeter of the room. After 24 hours, the screed is covered with a film until the solution dries completely, which takes 30-35 days.
checking the functionality of the heated floor
The functionality of the installed electric floor can only be checked after the concrete screed has completely cured. A solution that has not hardened can cause the underfloor heating system to fail, lead to cracks or short circuits in the wires.
Consequences of uneven drying of the screed
If even minor cracks are detected in the concrete screed, it is necessary to immediately take measures to eliminate the problem. Otherwise, this will result in unwanted problems:
- Uneven heating of the floor and, accordingly, the room.
- The emergence of areas with higher than normal temperatures, leading to overheating of the heating cable, resulting in failure of the floor system.
A well-made screed of a heated floor + with your own hands will have a positive effect not only on reducing energy costs, but also on quickly warming up the room.
Author: Sergey and Svetlana Khudentsov
10
Video: installation of heating cable
Screed is an important element of a heated floor, on which its quality depends. When installed correctly, it will ensure comfortable conditions and durability of the heating system. The thickness of the screed is of great importance. If the surface is uneven, it can be improved with a leveling layer. The base must be strong and durable, since it is subject to constant alternating temperature influences. It should be erected according to certain rules, maintaining the thickness, ratio of screed components and the time of its maturation.
The heating cable is a universal system, which, depending on the installed power, can be used under any floor covering . The difference between the cable and all other underfloor heating systems is the ability to install different power per sq/m area.
It is mounted on a prepared concrete base, usually at the stage of major repairs. Requires pouring a 3-5 cm cement-sand screed.
Pre-screed
Before laying the heated floor heating elements, a rough screed should be poured. Usually a cement-sand screed is used. This layer will prevent overheating of the heating cable. In addition, the base will become much stronger for the subsequent creation of the entire “pie” of the heated floor. If it is not possible to create a preliminary screed, a metal mesh is laid on top of the heat-insulating layer, to which the heated floor heating element is attached. During subsequent pouring, the screed becomes strong and homogeneous.
As soon as the cement-sand screed for an electric heated floor gains the necessary strength, you can cover it with foil thermal insulation, which is the mounting foil. It covers the entire base of the floor, the concrete surface. It is worth remembering that installation should be done with a margin. The edges and joints should be glued together with foil-based tape. These actions are carried out so that during the installation of the heating cable the thermal insulation does not twist.
The foil screen is created with one main purpose - uniform heat distribution during the operation of the electric floor under the screed.
To ensure that the floor heating cable is securely fixed, mounting tape is most often used. It is laid on the surface in increments of 50 cm. Subsequently, final fixation is carried out using self-tapping screws or ordinary nails.
The cable must be properly secured to the mounting tape. For this purpose, special brackets are used, which are located at the same distance from each other. Typically this distance is about 25 mm. The brackets also allow you to select the required step for laying the heating element and follow it during the installation process.
Feature of a floor without screed
Based on practice, electric heated floors without screed are real. When installing the cable, grooves up to 2 cm deep are made in the base where the wires will run. All that is required is pouring a solution that contains fiberglass or installing a tile floor.
Heating elements do not require screed if the work is carried out using special mats or infrared strips. This is the simplest option, down to the usual laying of the material and connecting the system to an outlet. Of course, the procedure is somewhat more complicated, but still simpler when compared with arranging a screed.