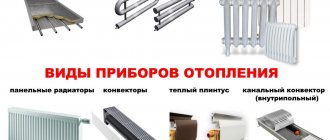
Ensuring a comfortable temperature for people living in a private house or apartment in winter is a priority task for every owner. When organizing individual heating or heat supply in an apartment building, all elements are important, starting with what should be the distance from the floor to the heating radiator, and ending with the fluid pressure in the system. Before starting work, you should study the building codes and regulations (SNiP) relating to the organization of heat supply, and also find out at what distance experts recommend hanging the heating device.
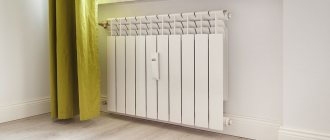
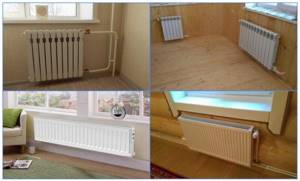
In the living room
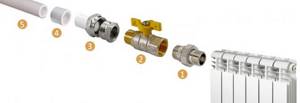
What is needed for installation
Installation of heating radiators of any type requires devices and consumables. The set of necessary materials is almost the same, but for cast iron batteries, for example, the plugs are large, and they do not install a Mayevsky valve, but instead, somewhere at the highest point of the system, they install an automatic air vent. But the installation of aluminum and bimetallic heating radiators is absolutely the same.
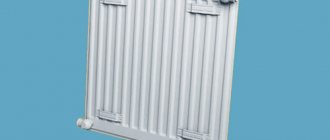
Steel panel ones also have some differences, but only in terms of hanging - they come with brackets, and on the back panel there are special arms cast from metal, with which the heater clings to the hooks of the brackets.
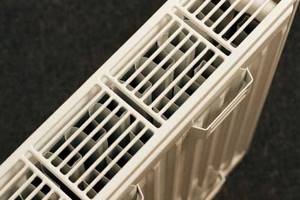
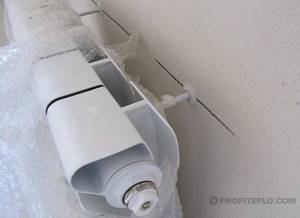
These are the arms that hook the hooks
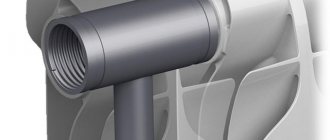
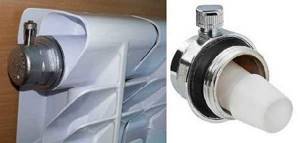
Mayevsky crane or automatic air vent
This is a small device for releasing air that may accumulate in the radiator. Placed on the free upper outlet (collector). It must be on every heating device when installing aluminum and bimetallic radiators. The size of this device is significantly smaller than the diameter of the manifold, so you will also need an adapter, but Mayevsky taps usually come complete with adapters, you just need to know the diameter of the manifold (connection dimensions).
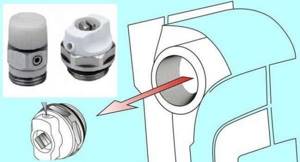
Mayevsky crane and method of its installation
In addition to the Mayevsky crane, there are also automatic air vents. They can also be installed on radiators, but they are slightly larger in size and for some reason are only available in a brass or nickel-plated case. Not in white enamel. In general, the picture is unattractive and, although they deflate automatically, they are rarely installed.
This is what a compact automatic air vent looks like (there are more bulky models)
Stub
The side-connected radiator has four outputs. Two of them are occupied by the supply and return pipelines, on the third they install a Mayevsky valve. The fourth entrance is closed with a plug. It, like most modern batteries, is most often painted with white enamel and does not spoil the appearance at all.
Where to install the Mayevsky plug and tap for different connection methods
Shut-off valves
You will need two more ball valves or shut-off valves that can be adjusted. They are placed on each battery at the input and output. If these are ordinary ball valves, they are needed so that, if necessary, you can turn off the radiator and remove it (emergency repairs, replacement during the heating season). In this case, even if something happens to the radiator, you will cut it off, and the rest of the system will work. The advantage of this solution is the low price of ball valves, the disadvantage is the impossibility of adjusting heat transfer.
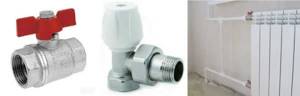
Radiator taps
Almost the same tasks, but with the ability to change the intensity of the coolant flow, are performed by shut-off control valves. They are more expensive, but they also allow you to adjust the heat transfer (make it less), and they look better externally; they are available in straight and angular versions, so the piping itself is more accurate.
If desired, you can install a thermostat on the coolant supply after the ball valve. This is a relatively small device that allows you to change the heat output of a heating device. If the radiator does not heat well, you cannot install them - it will be even worse, since they can only reduce the flow. There are different thermostats for batteries - automatic electronic ones, but more often they use the simplest one - mechanical.
Related materials and tools
You will also need hooks or brackets for hanging on walls. Their number depends on the size of the batteries:
- if there are no more than 8 sections or the length of the radiator is no more than 1.2 m, two mounting points on top and one on the bottom are sufficient;
- For every next 50 cm or 5-6 sections, add one fastener at the top and bottom.
You also need fum tape or linen winding and plumbing paste to seal the joints. You will also need a drill with drills, a level (preferably a level, but a regular bubble one will do), and a number of dowels. You will also need equipment for connecting pipes and fittings, but it depends on the type of pipes. That's all.
Features of installation of in-floor radiators
These include:
- pressure in the heating system. In-floor water batteries are among the most popular solutions for heating private households, since the pressure in an autonomous radiator heating structure is relatively low and almost never exceeds 2.5 atmospheres. It should be noted that experts do not recommend using such floor radiators for centralized systems, since the coolant supply standards in them require a pressure of 6-12 atmospheres and for this reason the floor heating system will quickly become unusable. In cases where it is impossible to do without built-in radiators, copper batteries should be installed that can withstand a working pressure of 10-15 atmospheres;
- room height. The thermal power of radiators built into the floor, and accordingly the cost of heating equipment, directly depends on how high the ceilings are. The larger the cubic capacity of the room, the greater the volume of air that requires heating. Heat transfer efficiency is calculated in the ratio of 1 kW per 10 “squares” of area;
- When installing underfloor water heating, it is necessary to ensure the supply of all power supply systems. These works should be included in the construction estimate at the design stage of the house or when planning repairs, otherwise it is impossible to ensure the normal functioning of the heating system. The only solution will be to install an electric convector;
- selection of equipment. Currently, choosing heating equipment built into the floor depending on your wishes is not a problem. The assortment is large and the system is chosen based on the materials of the radiators, their shape and size. As a rule, water radiators have a standard design solution, and the instructions for their operation are not much different. Some models are equipped with powerful fans, thanks to which the heat transfer of heated air from the radiators into the room is significantly increased, since the circulation of air masses improves, which means the heating system works more efficiently;
- when radiators are installed in the floor, the dimensions of the channels are determined depending on the parameters of the housing. Experts recommend making them 110 millimeters deep and 190 to 400 millimeters wide. Depending on which installation method is used, the distance from the floor to the radiator can be from 10 to 80 centimeters.
Connection diagrams
The radiator has holes at the ends for connecting pipes supplying coolant to the radiator and discharging it (return). exist :
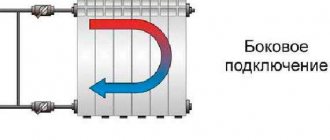
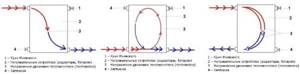
Lateral
The coolant supply pipe is connected to the upper hole at the end of the radiator . The coolant passes through all sections from top to bottom and is discharged through a return line connected to the lower hole at the same end.
is installed in the upper hole at the other end to bleed off excess air . A plug is placed in the remaining lower hole.
- It is used in apartments with a single-pipe coolant supply system.
- The length of the radiator is no more than 1 m (heat loss increases with the number of sections).
Diagonal
The coolant supply is through the upper hole on one side, the return outlet is through the lower hole on the other side of the radiator. The coolant flows diagonally from top to bottom.
- Effective heat transfer with any number of sections.
- Allows you to connect several radiators in series.
Lower and saddle
The supply pipe enters the lower hole on one side, the return pipe exits through the lower hole on the other side of the heating device.
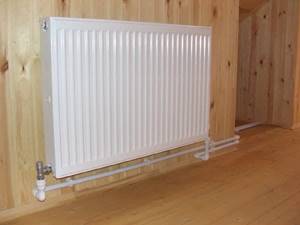
Photo 1. Bottom heating radiator connection diagram: pipes pass between the floor and the radiator.
- Used for hidden pipes in the floor.
- Thermal efficiency is 30% lower than diagonal (coolant stagnation in the upper part of the radiator).
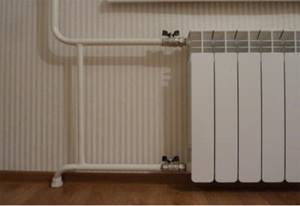
Reference! Most often in private homes, heating pipes are laid along the wall between the radiator and the floor. Near the radiator, upward bends are made with a diagonal connection.
The importance of maintaining an air gap between the wall and the battery
Home craftsmen do not always understand the need to maintain a certain gap between the wall, window sill and floor. But if there is no space, this will lead to increased maintenance costs for heating devices.
There are several reasons for following battery installation rules:
- To reduce heating of the outer wall. This structure is in constant contact with the external environment, the temperature of which drops to maximum sub-zero values in winter. If there is no gap, the heat from the rear wall of the radiator will go to warm the wall, not the room.
- The low thermal insulation properties of concrete and plaster do not provide a comfortable temperature in the room. The material literally “sucks” heat from the premises. Therefore, it is important to calculate the required distance from the wall to the radiator and additionally insulate the wall.
- Condensation accumulation. When securing the battery without observing the size of the air gap, warm air will not flow around the radiator and rise, drying the glass. This will lead to the formation of moisture drops on the window, increasing humidity and reducing the thermal efficiency of the heating device.
By maintaining the required distance from the battery to the wall, the owner provides the necessary ventilation, which cuts off cold air flows from the wall and window and reduces heating costs.
Replacing heating pipes in an apartment and how to hide them
Installation process
The installation process is nothing overly complicated if it is carried out according to plan step by step and without errors.
- First, you need to turn off the heating system and drain the water from it. In a private house, this can be done using a pump; in an apartment building, you will have to contact the housing office. Then you need to dismantle the used radiators.
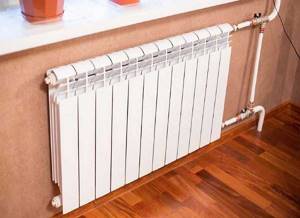
- Mark the wall for mounting new heating devices. In this case, it is advisable to use a level to install the battery as level as possible, eliminating distortions. It is important that the battery is installed strictly horizontally or with minimal deviation towards the pipe. This will allow the water to drain completely by the end of the heating season.
- Install the brackets, check their strength by pressing on them with all your weight. If they can stand it, hang up the battery. For cast iron and aluminum batteries, two fasteners are usually sufficient; for plastic pipes, a larger number is required. Before installing the fasteners, the walls should first be cleaned, leveled and plastered.
- Install shut-off valves, paying special attention to the reliability and water tightness of threaded connections. Connect the pipeline.
Important! To prevent the battery from leaking, it is advisable to use appropriate torque wrenches. Especially if you are installing an aluminum radiator, you will inevitably need to install an air valve with it, through which air will be released
The force of the torque wrench used during installation should not exceed 12 kg.
Choosing a location for installing heating batteries in a private house
To hang the device with your own hands, it is worth remembering that the supply pipes to the batteries are mounted with a slight slope towards the coolant. When skewed and placed strictly vertically, air may accumulate in the batteries.
Small deviations of a couple of centimeters are allowed. Visually everything should be smooth. But this is not a necessary condition to install a radiator.
Recommendations for determining location:
- The slope of the supply pipes should be 0.005-0.01. This means that each linear meter of the pipeline tilts half a centimeter.
- An interval of 6-10 cm is maintained from the floor to the radiator, 5-10 cm from the window sill, and 2-5 cm from the wall.
- Horizontal and vertical directions must be observed.
To increase the heat transfer of the device, you can carry out some manipulations before installation. This is how a shield made of heat-reflecting material is installed. Or coat it with a product with similar properties.
How to organize a connection
The next step in the process is choosing the connection type. The following methods are most effective:
- Lateral one-sided - the inlet is connected to the upper branch pipe, and the outlet is on the same side of the battery, but to the lower branch pipe. The option provides excellent heat dissipation, but is suitable for batteries consisting of 12 sections.
- Bottom - both directions are connected to the lower pipes of the heating device from different sides. The method is ideal for hidden pipe laying.
- Diagonal - the inlet is carried out through the upper pipe, and the outlet is carried out on the other side through the lower pipe. The method is used to connect devices with more than 12 sections.
Connection to polypropylene pipes
To properly install radiators with propylene heating pipes, you will need to acquire a special soldering iron. The connection is implemented using two technologies:
- In the case where the radiator valve is propylene, the connection is made by soldering directly to the liner. Next, you should unscrew the American metal end cap from the tap and screw it into the radiator sleeve. For tightness, FUM tape or linen winding is used. As a result, reassemble the “American” and tighten the union nut with a wrench.
- If the radiator valve is made of metal, then a split-type combined coupling with internal thread is used to connect to the plastic liner. It is similar in principle to the “American” one, but the union nut is adapted for soldering. Through the connecting fitting, the plastic part of the coupling is soldered to the underwater pipe. After this, the coupling must be disassembled, and the metal part with the winding must be screwed onto the valve. Assemble the coupling and tighten the union nut.
Connecting the battery to the metal connection
Many homeowners who want to know how to properly install a heating radiator are worried that when working with metal pipes, they may need a welding machine and related skills in its use. We hasten to reassure you - nothing like that is needed here, everything is done using threaded connections. To do this, a thread is cut on the newly cut section of the eyeliner using a die. The process technology looks like this:
- Cut the supply pipes using a grinder so that the cut line is clearly perpendicular to the center line of the pipe.
- Clean the end of the pipe from corrosion or paint and make a chamfer with a file.
- Apply lubricant to the clamp cutters and pipe section.
- Place the head on the chamfer and center it.
- Using a gas wrench, turn the head clockwise.
- For a high-quality connection, you should get a threaded section equal to the long part of the drive.
As a result, you need to screw a locknut and a coupling onto the finished thread, and aligning the axes of the ball valve and the connection, move the coupling from the connection to the valve body. The process uses rewinding or FUM tape. Next, you should screw the winder onto the thread near the coupling and move the locknut. After final fixation of the stopcock or temperature regulator, it is connected to the radiator liner through the “American” connection.
How to choose a UPS for a heating pump
The most important thing in a country house is a reliable heating system. If it fails in winter, irreparable damage may be caused to the building. In order not to depend on problems in the power grid, it is advisable to use an uninterruptible power supply for the boiler pump. Such a pump ensures the circulation of liquid through the pipes and prevents it from stagnating in one place. It is vital for cottages and country houses. And together with a good UPS, your boiler and pump will be protected from sudden changes or complete power outages. This is your chance to extend the life of your equipment several times.
Why UPS
In some houses, instead of an uninterruptible power supply, a diesel or gasoline generator is installed. However, the UPS is actually more convenient. Its advantages include:
- no need for maintenance - you do not have to periodically add fuel and monitor its consumption rate;
- complete silent operation;
- almost instantaneous switching to battery power – which guarantees continuous operation of the pump;
- simple installation - uninterruptible units for the heating pump take up very little space, they do not require a separate room and systems for exhaust gases.
How to choose
When selecting a suitable uninterruptible power supply for circulation pumps, two points should be taken into account: the time that the device must operate autonomously, as well as the electrical power of the pumps and boiler. Calculating the latter is not as easy as it seems. Circulation pumps have high starting currents, so the power indicated in their passport should be multiplied by three. Stark Country 1000 and higher UPS models should be suitable for all, even the most powerful household pumps. More advanced devices are required only for industrial devices.
The autonomy time depends on the power of your load and the battery capacity of the uninterruptible power supply. It is advisable that the UPS for the heating pump be able to operate for at least 12 hours. During this time, most network problems are resolved. A convenient option is to get yourself a UPS, the batteries to which are connected separately. Even if the load at your home increases, you can simply take an additional battery. Stark Country uninterruptible power supplies can be connected in series from 3 to 20 batteries.
An important factor influencing the quality of operation of circulation pumps is the type of voltage. In order for the boiler and ignition system to function optimally, you need to have an alternating voltage with a pure sine wave at the input. Only On-Line UPS can guarantee it. Devices of the Line-Interactive class do not demonstrate such high efficiency when operated with pumps.
Advantages of Stark Country products
Eaton, N-Power, Bres, Energia, NELT and others offer their uninterruptible power supply solutions for heating pumps. However, this highly specialized task is best solved by devices from the Stark Country brand. Their advantages include:
- Instant switching of the pump to battery power (delay less than 10 ms).
- Pure sine wave output.
- Automatic input voltage stabilization.
- Scalability – due to the ability to connect additional batteries.
- Quiet and environmentally friendly. Stark Country UPS can be installed in residential premises.
- Low operating cost, long service life.
- Ability to work with high starting currents.
Features of installing heating radiators for different types of window structures
Correct installation of the heating radiator depends on the type and design of the windows. For window units of different designs, batteries are used, the dimensions of which correspond to the dimensions of the space underneath them.
Based on this, we can distinguish several main options for how to place a convector under a window:
- Standard placement relative to the battery window.
- Installation of convectors near the walls in balcony blocks with a doorway.
- Flat plate convectors for panoramic windows.
- Convector in the floor under the stained glass window.
- Hidden installation of a radiator under the window sill.
- Floor batteries under the panoramic block.
Most of these methods are not clearly regulated in SNiP, so in order to hang a heating radiator correctly, it is necessary to take into account the recommendations of manufacturers and builders.
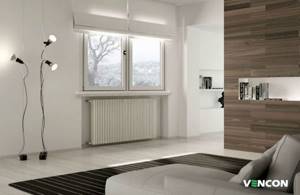
Standard battery placement
The correct location relative to the battery window is determined by building codes. However, professionals recommend hanging the radiator so that it protrudes beyond the window sill by ¼ of its width. This will create the most effective thermal shield around the window.
In addition, it is recommended to choose a convector for a large window opening with internal fins so that the convection process is maximized.
In balcony blocks
It is recommended to install the convector under the double-glazed window of the balcony block across the entire width of the window sill. It is recommended to place the edge of the battery facing the unit door at a distance of 3-4 cm from it. It is not recommended to install shut-off valves or temperature controllers in this location. For installation, a device is selected whose power is 10-15% greater than the calculated one for this room.
Special convectors for panoramic windows
Heating radiators for panoramic windows are selected based on the size of the space under the window. It often happens that a panoramic window starts at floor level, without a window sill. In this case, it is recommended to install the battery near the window in a floor-standing version. If the floor arrangement of the radiator does not fit into the interior concept, you can install a convector under the floor, covering it with a decorative grille.
Securing the batteries
Manufacturers of heating devices offer a wide range of products that differ in material of manufacture and type of execution:
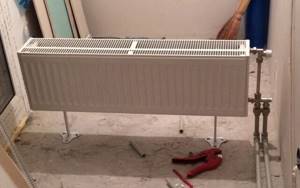
- Floor-standing. These are units designed to be installed on the floor, for which they are equipped with supports or legs. The supports can be on wheels or without them. This option is easy to install and allows you to ensure the required distance from the window sill to the radiator while maintaining the gap between the lower collector and the floor.
- Mounted. Mounted on the wall, mounted on metal brackets that are screwed into the wall itself. There are adjustable brackets on sale that can be used to adjust the width of the gap not only to the window sill, but also to the wall, and also to level the horizontal level of the installation.
On a note! Radiators can only be hung on the wall if the base is solid. If there is a gypsum board finish or decorative cladding, then the cladding is disassembled. If there is a niche under the window sill, the battery is selected so that the dimensions of the air gaps are respected.
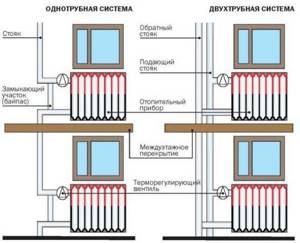
Types of heating systems
There are three options for radiator connection systems - serial, single-pipe, two-pipe and collector (parallel). They differ in the wiring diagram. Depending on what system is installed, it is necessary to select the type of batteries. It is important to remember that incorrect connection of heating radiators leads to a decrease in the actual thermal power of the batteries.
Serial connection
This is the simplest option for connecting radiators. From the heating device the pipe passes to the first radiator, from it to the second, etc. This connection option has become obsolete, since the water cools quickly and the heating level drops sharply with distance. There is no option to turn off an individual battery - you have to shut off the entire system.
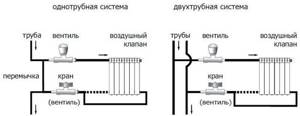
Single pipe system
A single-pipe system uses one main pipe through which heated water or other coolant flows from a heating device (heat pump, boiler, boiler, etc.). Each battery is connected in such a way that the liquid passing through it returns to the main line.
The radiator can be turned off using a valve or shut-off valve without shutting off the main pipe. The water temperature in each subsequent radiator drops, but not as significantly as with a series connection.
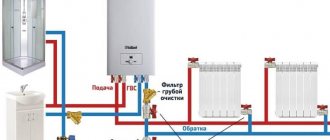
Two-pipe system
The supply of heated water and the discharge of cooled water in the system occurs through different mains. Each radiator is connected to both pipes. In such a system, the temperature of the liquid at the inlet of each radiator is almost the same; it decreases slightly due to heat loss in the pipes.
Collector (parallel) system
In this system, all batteries are connected in parallel. One line comes out of the heating device, which is connected to the collector (popularly called a comb). In the collector, water is distributed through several pipes, each of which leads to a separate radiator. The shut-off valves are located on the manifold.
The collector system can work in conjunction with any other. For example, several radiators connected to each other in parallel using a single-pipe or two-pipe system can be connected to the main line with warm water leaving the collector. The number of heating radiator sections depends on the selected system and type of connection. You can calculate them using an online calculator.
Is it worth using a one-pipe heating system?
When laying pipes, a 2-pipe heating system is often used. Schematically, it can be represented in the form of 2 circuits, one is responsible for supplying hot water to the radiators, and the second is responsible for removing the cooled coolant and supplying it to the boiler. This approach allows you to organize the circulation of water of the same temperature in all batteries.
A significant disadvantage of this method of organizing heating is the financial cost of pipes (the price of installing such heating will be approximately 1.5-2 times more than single-pipe heating), and the labor intensity increases. In addition, the pipes will be more difficult to disguise.
The single-pipe scheme does not imply the presence of a separate riser for the removal of cooled coolant, that is, approximately half as many pipes will be required. Schematically, it can be represented as a closed loop, and the connection of radiators with a single-pipe heating system is made in series.
Comparison of one- and two-pipe heating systems
Such a system began to be widely used during the construction boom during the USSR, and then its significant shortcomings were discovered:
the main thing can be considered that the last batteries in the circuit receive a coolant with a temperature approximately 30-50% lower than those closest to the boiler, this leads to the fact that the rooms are heated extremely unevenly;
Note! This drawback can be easily solved by increasing the number of sections of the latest radiators. But when constructing a large number of objects, this will lead to an increase in calculations, which is not very convenient
- You will need a fairly powerful pump; it will not be possible to organize the movement of coolant by gravity;
- it is characterized by large heat losses;
- startup of the system takes longer than in the case of a two-pipe system;
- When doing work with your own hands, the risk of air locks occurring during operation is especially high. It’s just that quite often it is not possible to maintain the required slopes along the entire length of the pipes.
The listed list of disadvantages is typical for a conventional one-pipe heating system. Nowadays, most of the listed shortcomings are successfully eliminated by installing simple devices. For example, it is already possible to regulate the temperature in individual batteries, and installing balancing valves will make it possible to achieve almost identical operating conditions for all batteries in the circuit.
Considering the significant savings on materials, such a heating system design definitely deserves attention.
Installation instructions
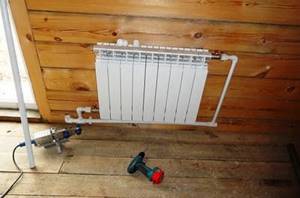
To hang and connect the battery to the heating pipes, prepare the following components and materials:
- hooks with plastic dowels for attaching the radiator to the wall - at least 3 pcs.;
- 2 fittings (side plugs) with right-hand pipe threads, marked with the Latin letter D;
- 2 fittings with left-hand thread, marking – S;
- 1 manual air vent (Maevsky valve) with a key;
- 1 plug;
- sealing silicone thread or flax;
- faucet, balancing valve, thermostatic valve, fittings - according to the diagram;
- polypropylene, metal-plastic or polyethylene pipes with an internal diameter of 10-15 mm for connections.
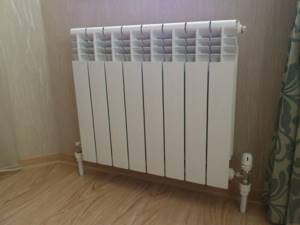
The number of fasteners depends on the size of the heating device. An aluminum battery of up to 10 sections must be mounted on 3 hooks or special brackets - 2 on top, 1 on bottom. In other cases, 4 fastenings are used.
Steel panels are sold assembled, hanging brackets are included. Heavy cast iron radiators for floor mounting are equipped with legs.
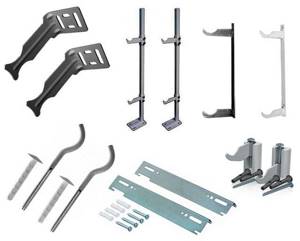
Types of wall and floor brackets used for mounting batteries
Tools you will need:
- electric drill and drill corresponding to the hardness of the wall;
- screwdriver or screwdriver;
- construction level;
- gas key;
- tape measure, pencil.
Pre-assembly
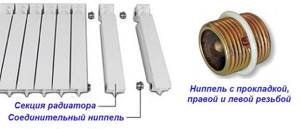
The radiator sections are pulled together by nipples - metal clamps on which left and right threads are cut (half the length). To connect, you need a long wrench with a nipple attachment; this is not available in the household. Hence the advice: ask to twist the sections right in the store.
Assemble the sectional battery in this order:
- Clean the areas around the side holes.
- Screw in 4 fittings from the ends and carefully tighten them with a gas wrench. Please note: plugs with regular threads must be screwed into the right ends of the radiator, with left-hand threads - into the left ones (if you look at the front side of the product).
- Close the unused lower outlet with the plug included in the kit.
- Using sealing material, pack and screw the Mayevsky tap into the upper channel.
- In the remaining 2 holes, install the mating part of the American females, disconnected from the taps.
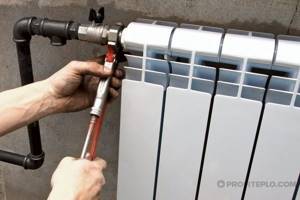
Important point. The American element with a union nut does not need to be screwed into the fitting until it stops. Otherwise, the nut will not move away from the edge and will not allow you to attach the valve itself. To screw it in, you will need a special internal key, but if you wish, you can get by with powerful pliers.
After installing the American ones, screw on the valves and tighten (by hand for now). Panel heaters do not require assembly, except that you will have to install an air vent. Do not remove the film from the case - it will protect the coating from accidental damage.
Rules and installation procedure
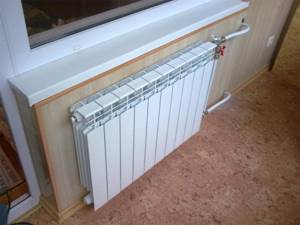
As a rule, a heating device is installed under the window, since the rising heated air cuts off the cold coming from the opening. To prevent glass fogging, the width of the radiator must be chosen to be 70–75% of the width of the window.
Basic installation rules
SNiP recommends the following rules for installing heating radiators to indentations:
- The heating radiator is installed exactly in the middle of the window opening. Before installation, the width is divided by two, then the distances to the points of location of fasteners are set aside on the right and left sides.
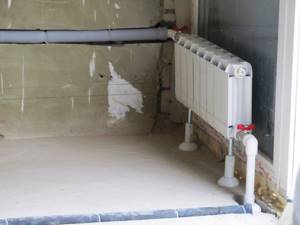
- The radiator should retreat from the floor level to a height of 8–14 cm. A smaller interval will lead to difficulties during cleaning, and a larger interval will lead to the formation of zones of unheated air.
- Radiators should be hung at a distance of 10–12 cm from the windowsill. If you place the device closer, convection will worsen and heat transfer will decrease.
- The distance from the wall to the radiator should be about 3–5 cm; this is the gap size that can ensure unhindered heat distribution and normal convection. If the location is too close to the walls, dust will accumulate on the back surface of the batteries, which is quite difficult to remove.
Taking into account the requirements of SNiP, it is possible to determine the optimal length of the battery and select a model that corresponds to specific conditions.
The above rules are the same for all types of radiators. Individual manufacturers set their own standards, which must be followed. Therefore, before purchasing, it is necessary to study the installation requirements and make sure that they can be met in specific conditions.
Work order
Installing a heating radiator with your own hands requires careful attention to each stage of work, taking into account every detail. To hang sections, experts recommend using three attachment points: two upper and one lower.
Any sectional battery is hung on holders through the upper collector. Thus, the mount located at the top bears the main load, and the holder located at the bottom serves as a guide and fixing element.
Features of the work
The process of installing heating batteries is carried out in several stages
:
- Marking and installing holders.
- Installation of components on the battery. Modern heating systems require the installation of an automatic or manual air vent. The device is screwed into the adapter and placed on the upper manifold opposite the connection point of the supply pipe. Unused collectors must have plugs installed. If the diameters of the supply and return pipes differ from the cross-section of the collectors, adapters supplied as part of the standard kit should be installed.
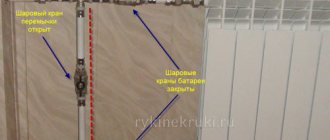
- Installation of regulating and locking devices. Regardless of the accepted connection diagram, in any system, shut-off valves in the form of full-bore ball valves are installed at the battery input and output points, allowing the battery to be dismantled without stopping the system in case of repair work or maintenance. The only condition is the presence of a bypass when installing the battery in apartments with a vertical type of wiring.
According to expert recommendations, an automatic or manual thermostat should be installed as a control device. The standards for installing heating radiators do not classify these devices as mandatory; they are required to maintain a temperature in the room that is comfortable for the owners.
When filling the system with coolant yourself, the taps should be opened little by little. Rapidly opening the taps will lead to water hammer, which can damage the battery and destroy the fittings.
Subtleties of attaching to the wall
Each battery manufacturer provides its own instructions, which outline requirements and installation tips. But one requirement is the same: the radiator should be mounted on a pre-leveled and cleaned wall.
Wall mount
Correct fastening of the brackets affects the efficiency of the heating system. Too much slope or skew in any direction can lead to incomplete heating of the battery, to eliminate which you will have to rehang the device. Therefore, when preparing the surface and making markings, the vertical and horizontal positions should be strictly observed. The battery must be hung evenly relative to all planes.
It is allowed to lift it by 1 cm from the side where the air vent is installed, which will cause air to accumulate in this area and make it easier to remove. Sloping in the opposite direction is not allowed.
When installing bimetallic radiators and other types of batteries with low mass, hanging should be done on a pair of hooks located on top. If the length of the device is short, they should be placed between the last two sections. The location of the third bracket must be selected in the middle from the bottom. The hooks can be sealed with mortar after installation.

Hooks for fastening aluminum and bimetallic sections
When placing the brackets yourself, holes are drilled at the designated points and wooden plugs or dowels are installed. The holders are fastened with self-tapping screws with a length of 35 mm and a diameter of at least 6 mm. Such requirements are standard; the norm for a specific battery model is indicated in the technical data sheet.
Panel radiators are installed a little differently. Such devices are supplied with special fastening elements, the number of which depends on the size of the device.
To hang the heating radiator on its rear surface there are special brackets. To install fasteners, you need to know the distance from the center of the battery to the brackets and transfer it as marks on the wall. Next, applying fasteners, holes for dowels are marked. The steps are simple: drilling, installing dowels, securing the brackets with self-tapping screws.
Calculation of required power
The rated power of one section is based on the standard values of coolant temperatures at the inlet and outlet of the heating device, and the air temperature in the room.
In a private home, these values differ from the standard ones. Therefore, when calculating, the passport value is reduced by 15%.
An exact calculation is carried out in any online calculator, taking into account all heat losses through the elements of the house structure.
Roughly we can assume that:
- for a room with one external wall and a window, 100 V / m² is required;
- for a room with two external walls and one window, 120 V / m² is required;
- for a room with two external walls and two windows, 130 V/m² is required.
Recommendations for placing radiators
Experts pay great attention to the correct location of heating devices. In this case, the room will be heated with the greatest efficiency.
Basic recommendations for choosing a location for installing batteries:
- For high-quality air circulation near the battery, it is necessary to maintain a distance of 3-4 cm between the thermal insulation layer and the heating device. When this gap decreases, air exchange becomes difficult and the efficiency of the system decreases.
- If it is impossible to create insulation, the inner surface of the wall is covered with a layer of foil. It serves as a heat reflector that directs flows into the room.
For decorative purposes, radiators can be protected with special screens. They must block the radiator, therefore they reduce the efficiency of the system, since they prevent the flow of thermal energy into the room. For this reason, it is important to pay special attention to the choice of decorative grilles for batteries.
Installation work:
- Before installing the battery, aluminum foil is glued to the wall surface. This must be done to increase the efficiency of the device and improve heat transfer.
- After this, you can mark the fasteners.
Important! When installing a radiator, it is necessary to control both planes - vertical and horizontal. The quality of heating largely depends on how vertical and horizontal are observed.
- A medium-sized heater is hung on 2 brackets located under the outer sections.
- If the battery is large, an additional bracket is needed strictly in the central opening.
- Another necessary condition is a jumper (bypass) for single-pipe distribution, which makes it possible to independently regulate the required amount of heat in the room. The advantage of the bypass is that its installation does not require the prior receipt of special permits. It is possible to install the jumper yourself.
Important! The rules for installing heating batteries are the same for both central and individual heating. To install new batteries, you need to coordinate this point with the housing office or management company.
Depending on the design of the selected equipment and the progress of the repair work, you may also find our following tips useful:
How to calculate the thermal power of a radiator?
It is best to involve specialists to perform such calculations - for a person far from the intricacies of designing heating systems, it will not be easy to understand all the parameters and criteria that need to be taken into account. But you can navigate the heating appliance market.
It is believed that the optimal thermal power is 100 W per square meter of room area. Based on this, we can conclude that for approximate calculations it is enough to find the product of the area and the specified thermal power.
In professional calculations, the formula takes into account:
- number of external walls;
- orientation of the room relative to the cardinal directions;
- degree of wall insulation;
- features of climatic indicators in a particular region;
- ceiling height;
- type of room (basement, attic, floor number);
- type of windows (different double-glazed windows have different heat loss rates);
- dimensions of the glazed area;
- type of radiator connection.
We recommend the product
Heating radiator Korado 11-VK 500×700 (11050070-60-0010)
In stock
Width, mm: 700 | Height, mm: 500 | Connection: bottom | Radiator type: panel | Radiator material: steel | Warranty, months: 120 |
conclusions
It is always necessary to maintain the correct distance from the wall to the heating radiator, regardless of the design of the product, its shape or other operational characteristics.
It does not matter what kind of heating system in a house or apartment: single-pipe or two-pipe, central or autonomous heating. In any case, space is needed for heat exchange between the air and the radiator.
If this rule is not followed, the energy efficiency of the heating system will be significantly reduced and the radiators will have a shorter service life. As a result, costs for energy resources, repairs or replacement of heating system components will increase.