Purpose and technical characteristics of the product
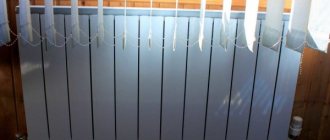
Cast iron stove plates, also called cooking floors, are mounted directly on the upper horizontal plane of the stove. They are used for cooking and heating the room. This element has inertial heat transfer: the hot cast-iron surface cools down for a long time, while evenly heating the room and at the same time performing the function of a hob.
The product is produced by casting. The material used is gray cast iron grade SCh 15-20. This metal is a compound of iron and carbon (more than 2%) and is characterized by high strength and fire-resistant properties. Gray cast iron also contains silicon, phosphorus, manganese and sulfur. The presence of such impurities significantly improves the physical and chemical characteristics of the metal.
The cast iron stove plate is resistant to temperature changes, does not deform during operation and maintains its integrity throughout its entire service life.
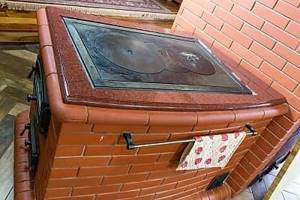
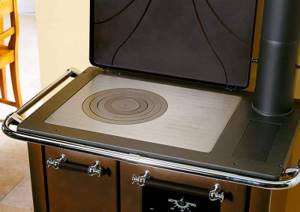
Cast iron hob on a modern fireplace stove
For your information! Any products made of gray cast iron are immune to corrosion, since their surface is covered with a layer of rust immediately after casting. It is this “protective” layer that prevents corrosion from penetrating deep into the metal.
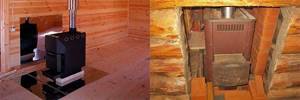
Ceiling and wall protection in the form of sheathing
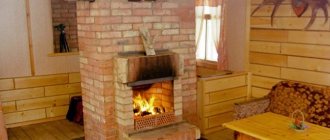
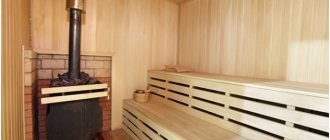
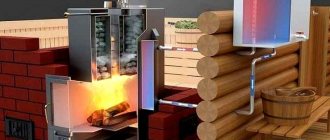
In addition to treating elements of wooden structures with fire retardants and mastics, they can be protected from the hot parts of metal furnaces by covering them with fire-resistant materials. When preparing for this procedure, it should be taken into account that the ceiling lining in the area of the roof outlet is carried out only with non-combustible materials that do not spoil the interior of the room.
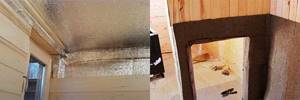
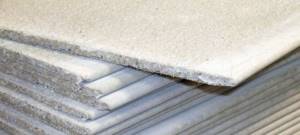
The optimal cladding option is gypsum fiber boards treated with fire-resistant putty. To protect the walls, basalt cardboard can be used, covered with steel sheets on top. Most often, special decorative screens made of stainless steel are used. They not only protect surfaces well from burning, but also look quite aesthetically pleasing.
Another option for protecting walls from hot stove parts involves covering them with bricks placed on edge.
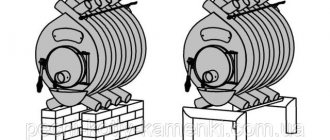
Two types of cast iron stoves
The material for them is gray cast iron grade SCh . It molds well and has a sufficient margin of strength and elasticity. To improve performance, silicon, sulfur and manganese additives are added to the composition, and the carbon content is about 2% .
Cast iron is not afraid of high temperatures and retains its shape at any degree of heating. The surface does not oxidize or rust over time due to the durable oxide film formed during the casting process.
The slabs are either solid or collapsible . Collapsible ones consist of several rings with a small thermal gap. It is necessary for proper temperature compensation.
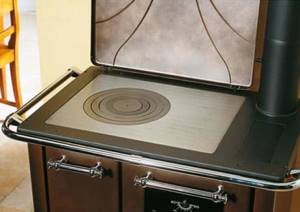
Monolithic surface with burners
This is a solid sheet of metal with a thickness of at least 8 mm. It can be equipped with fixed-sized burners (recesses or protrusions in food preparation areas). Blind slabs do not have recesses. Hobs of this type are the easiest to install and have a low cost , therefore they are very popular in inexpensive ovens.
Important! Due to the fact that there are no open burners, in order to heat a kettle or pan, you have to heat up the entire stove, and this is an extra waste of fuel.
Disadvantages of solid slabs:
- the inability to regulate the temperature in the burner, you have to heat the entire surface;
- the lack of gaps makes the stove very sensitive to strong heat .
Collapsible cast iron construction

A special feature of the design is several rings of different diameters , which fit into each other like a puzzle. By removing the rings, you can select the optimal caliber of the burner for a specific pot or frying pan.
This scheme provides many advantages over the traditional one:
- High reliability and surface rigidity. It is not afraid of heating due to the gaps between the parts of the burner, which protect the metal from deformation.
- Possibility to regulate the heating intensity by opening individual sections. Cooking takes place over an open fire and does not require complete heating of the entire surface. This saves time and wood.
Important! The cookware must be suitable for use over an open fire. Cast iron and aluminum cookware are best suited for this .
Chimney installation
Due to the strong heating of the furnace, the temperature in the chimney area can reach 300 °C. If there is a large accumulation of soot in it and it ignites, this figure rises even higher. When installing steel chimney pipes with your own hands, you need to take into account a number of points regarding the order of their installation.
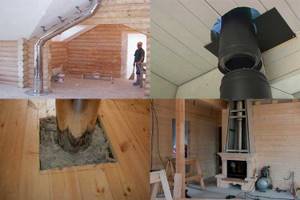
Firstly, the chimney can be laid not only inside the building, but also along the outer surface of the wall (in the attic). Secondly, in the internal spaces of the house it will be necessary to reliably insulate the pipe in the areas where it passes through the ceiling and roof. Finally, the outside of the chimney should be carefully secured to the wall of the building.
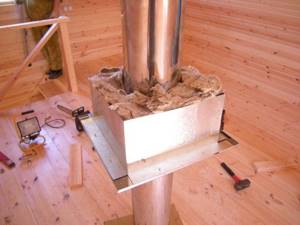
In the process of arranging a diversion channel, it is necessary to be guided by the following requirements of the PPB:
- near the walls, the drain pipe should be laid at a distance of approximately 25 cm;
- the surfaces of the walls are first lined with basalt cardboard, and then sheathed with galvanized or stainless steel sheets;
- the holes in the ceiling must be large enough to maintain 25 cm gaps on the sides (they are subsequently filled with basalt insulation).
To install a chimney, it is preferable to use a sandwich pipe made of ceramic and stainless steel, protected by a layer of thermal insulation. If you have available funds, you can install a branded ceiling trim.
How to choose?
Choosing a cast iron deck for your stove is not difficult. To buy a quality product, the installation of which will not require much effort, it is enough to take into account several nuances.
What are the sizes of cast iron sheets?
Cast iron sheets can be square or rectangular. The most popular are rectangular slabs. The surface dimensions directly depend on the size of the oven.
The standard dimensions of a cast iron stove for a stove are:
- 34 by 41 cm,
- 71 by 41 cm,
- 66 by 41 cm,
- 51 by 34 cm.
For a non-standard stove, you can order the service of manufacturing a cast iron sheet with individual parameters in a specialized store. But it will cost significantly more than standard products.
Number of burners in different models
Typically ovens have two burners. But their number can vary from one to six (it all depends on the surface area). Solid cast iron sheets may have no holes at all. But the cooking time on this type of stove can be long due to the slow heating of the cookware.
Other criteria for choosing a quality product
You should pay attention to the quality and composition of the material from which the stove is made. If you find chips, scratches and other various defects on the surface, then it is better to refuse the purchase. A high-quality product has a smooth surface and its weight is quite large. There are no lightweight cast iron stoves.
It is worth taking the time to study the composition of cast iron. Cast iron, which is used for smelting, is a combination of 2% carbon with iron. But if it contains any components unknown to you, be sure to ask the seller about them. After all, some chemical elements are not environmentally friendly and can harm your health.
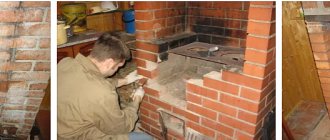
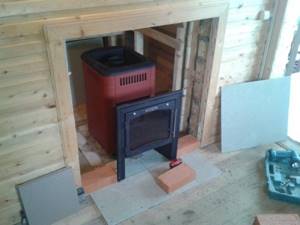
How to build with your own hands, site preparation
Before laying out such a structure in the house, you need to prepare:
- Special tiles are laid on the floor in the place where the stove will stand. For better grip, you need to use a primer called Betokontakt. The first row of tiles is laid perfectly evenly, since the quality of the entire work depends on this. The grout is applied one day after installation.
- You can start tiling the walls with special tiles. For better adhesion, the same primer is used as in the first stage. Heat-resistant adhesive mastic is used. Grout also needs to be applied one day after laying the tiles in full.
- Let's start preparing the ceiling area. It is necessary to make a hole for the chimney so that its internal diameter matches the individual characteristics of the stove. You need to screw a special flange to the hole using self-tapping screws.
The procedure is carried out taking into account the following algorithm:
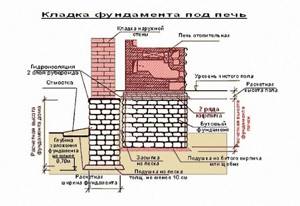
- The foundation is being laid. To do this, they find out what depth the soil freezes in a certain area. If the foundation is laid in an already finished house, the depth of the trench can reach half a meter. Measures are being taken to prevent freezing of the structure.
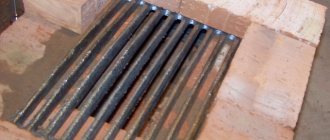
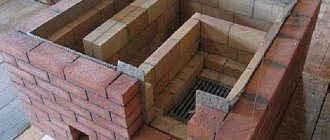
- Walls are being built. It must be remembered that the dimensions of the ash pan must correspond to the dimensions of the furnace itself and ensure the flow of oxygen necessary for combustion. The grate should be square in shape and installed at an angle to the firebox door.
- Final finishing is being carried out. If the owner is more concerned about the efficiency of the structure than its appearance, he plasters the walls with a clay solution. After such treatment, you need to apply a special mixture consisting of chalk, water and milk to the structure.
If you adhere to the described algorithm, you can get an excellent stove that effectively heats the room.
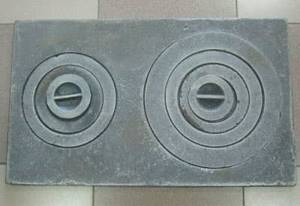
Types of cast iron cooking floors
Regardless of the configuration, all tiles perform an excellent heat transfer function and you can cook food on them. Cooking decks come in two types – prefabricated and solid. The difference between the former is in the thermal gaps between the parts, due to which the expansion of the heated metal is compensated. But each type also has additional features.
Prefabricated slabs
Structurally, they look like metal panels with several rings of different diameters that are installed into each other. The result is a single plane. Prefabricated stove stoves can have from one to six burners, and their size can be varied for specific cookware by removing and putting on the rings.
Cast iron prefabricated stove slabs are characterized by a long service life and resistance to temperature changes. Due to the inter-ring gaps, cast iron, which expands when heated, is not deformed or damaged.
To make the products more durable, they are equipped with stiffening ribs on the inside. A significant advantage of such an addition is an increase in panel temperature and increased efficiency.
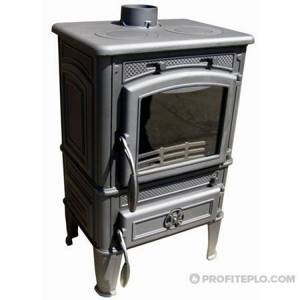
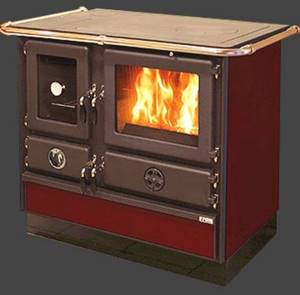
Features of cooking ovens
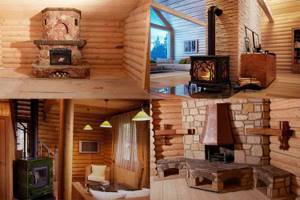
Depending on the model, cooking stoves combine a real oven, stove and oven, differing in fairly compact dimensions. Most cooking stoves are no larger than a standard gas stove. In addition, manufacturers of cooking stoves place great emphasis on the design of this equipment, which makes them a real decoration of the interior. Installing the stove is quite simple and does not take much time, but it should be entrusted to professionals, this will guarantee long and correct operation of the equipment. A modern cooking and heating unit is mobile and, if necessary, transporting it to another place will not be difficult.
Main manufacturers of cooking floors
Cast iron slabs are produced by both foreign and domestic companies. Among foreign slabs, the most popular and in demand slabs are brands of Finnish origin - Pisla and HTT .
We can proudly note that domestic manufacturers are not lagging behind and produce products no worse.
Among the range of stove surfaces produced in Russia, NMK, Litkom, and SibStalShar slabs stand out. In addition to the quality characteristics, along with strength and temperature resistance, one can note the aesthetic appearance of the cooking floors. Thanks to the desire to surprise and win over the buyer, manufacturers have done a great job of creating a competitive product of the highest level.
All stoves on the market are divided into two categories: prefabricated and solid cast iron stoves.
Cooking floors "Litkom"
Main advantages:
- Beautiful appearance in an elegant embodiment.
- Thermal stability – resistance to high temperatures up to 1000 °C;
- Environmentally friendly - manufactured using materials that are harmless to the life and health of users.
Below is the range of Litkom stove surfaces
| Name | Bookmark size | Average weight | price, rub. |
| Stove with one hole for burners for a cauldron up to 20 l. P1 – 5 | 512x512x10 | 21.3 kg. | 3 755.40 |
| Stove with one hole for burners for a cauldron up to 40 l. P1 – 6 | 600x600x16.5 | 46.16 kg. | 8622.70 |
| Stove stove “Warm Potok” P1–7 | 413x340x8 | 9.32 kg. | 1229,60 |
| Stove with one hole for burners PS2–3/2 | 362.5x410x8 | 10.04 kg. | 1 314,98 |
| One-piece stove with two holes for burners P2–3 | 710x410x12 | 24.56 kg | 3140.25 |
| Prefabricated stove with two holes for burners PS2–3 | 710x410x8 | 19.98 kg. | 2260.11 |
| Stove flooring | 410x245x15 | 10.5 kg. | 1 053,92 |
| A stove with one hole for burners for a cauldron up to 20 liters. Art.D–440 | 640*640*10 | 54.3 kg. | 12526.26 |
Let's consider two more popular models of stove stoves from the Balezinsky Foundry and Mechanical Plant:
- Single-burner cast iron stove stove P 1–2 (710*410): dimensions 710*410 mm, material – cast iron, price – 2180 rubles.
- Cast iron stove stove PS (710*410): dimensions 710*410 mm, material – cast iron, price – 2260 rubles.
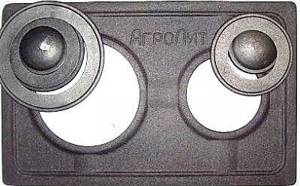
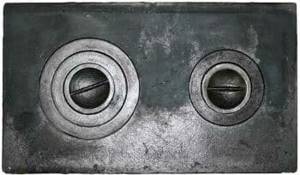
Cast iron stove for stove P 1-2
Cast iron stove for P 1-2 stove Cast iron stove for PS stove
Overview of cast iron decking
The most popular are Finnish models. But domestic production also produces decent and high-quality goods.
- Pilsa (HTT) Plate 3A. Material: cast iron. Black color. Size: 985 x 650. Diameter of burners: Ø 32, 393 mm. Weight: 51 kg. Price – from 49 thousand rubles.
- 2-burner stove “Russian casting”. Cast iron stove 710x410. Weight: 25.08 kg. Price – from 3000 rub.
- 2-burner stove "R". "Furnace casting Russia". Cast iron stove for oven 700 cm by 400 cm. Weight: 25 kg. Price from 3 thousand rubles.
- Cast iron stove for cauldron H2521 “HALMAT stove casting”. Dimensions: 505×455. Weight: 21 kg. Price from 15,000 rub.
- PLATE 5A SVT 301. Manufacturer: SVT. Dimensions: 460 x 700. Price 0t 17,000 rub.
Subtleties of installing the stove on the stove
First of all, it is necessary to take into account the characteristics of thermal expansion of various materials. For example, brick and cast iron behave completely differently under the influence of high temperatures, and if you wall the hob end-to-end in the masonry, then such a stove will not last long. It will simply collapse due to the expansion of the metal.
Correct installation of the stove requires a 5 mm gap around the entire perimeter, without coating. Thus, when heated, the stove element will have sufficient free space for expansion, and the brickwork will maintain its integrity.
The top row is laid out “dry” (without mortar) in order to correctly lay the future expansion gap
During installation, a clay-asbestos solution of liquid consistency is used. It is used to fix the cast iron stove on the stove. The solution is prepared as follows: crushed asbestos is added to clay diluted with water, and then, gradually adding liquid, the compound is brought to the state of “liquid sour cream.”
The stove plate is always laid level. And the burner with the largest diameter is located directly above the firebox.
The top row of the stove masonry is secured with a steel angle along the entire perimeter of the stove, thus increasing the strength of the entire structure.
For your information! After installing a new cast iron cooking floor, the first firebox is carried out according to a special scheme. Slowly, over 8 hours, heat the oven to a temperature of about 600°C. This means that every hour the temperature of the heat-releasing surfaces should increase by 75-85°C. This gradual annealing eliminates the internal stress of cast iron, which significantly enhances its strength characteristics.
Installing a cast iron stove on a stove is no joke. The length of operation of the product directly depends on the accuracy of installation, so such important work should be entrusted to professionals.
Choosing a location for the oven
Any metal or brick stove in a wooden house is installed based on the following considerations:
- the possibility of arranging a chimney in relation to the design features of the floor and roof;
- free access to the stove for the purpose of its maintenance;
- compliance with fire safety clearances ensuring its distance from flammable surfaces.
Such types of stove devices as potbelly stove or buleryan are subject to special requirements related to the possibility of free movement of convection air flows.
The installation of a stove in a wooden house must be tied to the location of the designed chimney. It is not enough to simply move it as close as possible to the combustion products exhaust channel. Correct installation of a heating stove for a wooden house should ensure ease of connection to the chimney, as well as the possibility of servicing both.

This requirement is explained by the design features of furnaces, from which it is necessary to constantly remove accumulations of ash, clean the combustion chamber, and also clean the walls of the chimney. During installation, some distance should be left in the direction of opening the firebox door.
According to SNiP requirements, the distance from the stove to the walls must be at least 110–125 cm. The same gap is left on the side of the stove combustion chamber door. The stove should be located within the house so that maximum heat transfer can be obtained from it.
Instructions for use and care
Careful handling of the product will increase its service life.
- The correct first firebox is the key to the durability of the flooring. It is necessary to gradually light the firebox (shavings and small logs first) and allow it to cool for several hours.
- Mechanical damage should be excluded: chips, scratches.
- Rust may appear during storage of the stove. You should not rip it off or try to remove it in other ways. It will disappear during use.
- Do not overload the device.
- It is necessary to ensure that moisture does not fall on the heated flooring.
With proper use and proper care, your stove will last for many years.
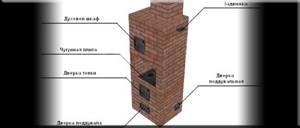
Installation of cleanout and blower doors
Before installing the doors, check the tight fit of the door leaf to the frame. Attention should also be paid to checking the rotation of the blade, to eliminate distortions, etc. If there are some defects, we eliminate them.
Installation of the doors begins directly with screwing the wire, which is inserted into the holes of the doors. The recommended wire length is fifty to sixty centimeters.
Where the door will be installed, apply a portion of the solution and insert the element, securing it with bricks and checking the horizontal and vertical level. Finally, the wire is inserted into the masonry seams.
The firebox door is installed similarly to the blower door, but it is wrapped with asbestos cord. At the installation stage, the device must be checked using a building level and fixed with bricks.
The door is covered with one half of a brick
or a brick “into the castle”
If the opening is more than twenty-five centimeters, then the overlap should be made in the form of a wedge lintel.
What should it be
It would seem that there is nothing easier than replacing the suitable surface of a brick oven with a metal insert with your own hands, getting a stove for cooking. In reality, everything is much more complicated. A stove is a complex device, and the thermophysical processes occurring in it depend on the correct arrangement of its elements.
There are special requirements for furnaces of this type. On the one hand, it must effectively accumulate heat in the thickness of the brickwork, on the other hand, it must take a significant part of the heat to heat the hob . In the summer, when heating the house is not required, the hob should warm up quickly with economical fuel consumption.
Requirements
Theoretically, the hob can be made from any material that can heat up to high temperatures when the stove is fired. In practice, they use cast iron plates with holes covered with a removable lid.
This design allows you to create zones with different temperatures on the stove. The thermal conductivity of cast iron, unlike steel, is not very high, so you can heat food on the plane of the stove, as well as cook or stew it over low heat. And by opening the lid, you can achieve direct heating of the cookware with an open flame, which allows you to quickly boil water or fry food in a frying pan.
The most practical are burners . shown in the photo, consisting of concentric rings of different diameters - they can be selected to fit the size of the bottom of the dish. In addition, the gaps between the rings compensate for the thermal expansion of cast iron that occurs when overheated, and the plate can withstand multiple heating and cooling cycles without damage. Solid cast iron stoves are less reliable and require more careful firing.
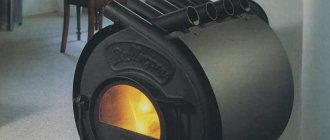
Criteria for choosing a heater
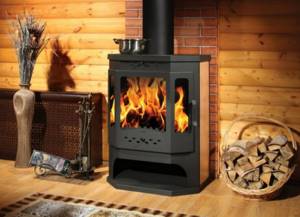
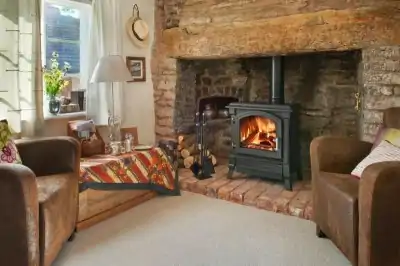
- Fuel requirements. Convection stoves, including those with a hob, can operate on almost any solid fuel - this is their great advantage, since it simplifies the search for an inexpensive and accessible energy source. In fireplaces and long-burning stoves, only wood can be burned; in rare cases, fuel briquettes are allowed, while wet fuel sharply reduces the efficiency of the unit.
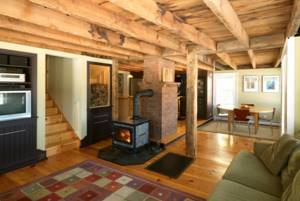
- Purpose and dimensions. A unit with a hob is ideal for installation in the kitchen; a fireplace will decorate and warm the living room of a country house. A heating stove with a water circuit will provide heat to several rooms if you install a radiator system. Compact and collapsible units are suitable for small country houses - their dimensions are so small that the stove can be transported in a passenger car.
- Power. Having decided on the type and size of the heater, select a model of suitable power. The product data sheet indicates how much area the unit is capable of heating. If we are talking about conventional models that heat the air, the unit of measurement is the volume of the room.
- Additional functions, finishing. The variety of wood stoves for heating a country house allows you to choose a model with a finish that matches the interior of the room. Additionally, the unit can be equipped with an oven and drawers.
Cast iron heating element with hob
How to make a choice
You can buy an imported cast iron hob, for example, Finnish Pisla and HTT . Among domestic brands, products from NMK, SibStalShar, Litkom, and Balezinsky LMZ .
All of them have a beautiful appearance, heat resistance up to 1000°C and are environmentally friendly, without emitting harmful substances when heated.
For stove slabs, standard dimensions for laying are accepted: 710x410 mm, 340x410 mm, 660x410 mm, 585x340 mm and others. The number of burners in a typical section is one or two .
The thickness of cast iron in expensive slabs reaches 12 mm , and the structure itself has stiffening ribs on the reverse side. Weight is about 20 - 25 kg .
Types of heating cables for water supply
There are two types of heating cables - resistive and self-regulating. Resistive ones use the property of metals to heat up when passing an electric current. In this type of heating cables, a metal conductor is heated. Their characteristic feature is that they always emit the same amount of heat
It doesn’t matter whether it’s +3°C or -20°C outside, they will heat up the same way - at full power, therefore, they will consume the same amount of electricity. To reduce costs in relatively warm times, temperature sensors and a thermostat are installed in the system (the same as those used for electric heated floors)
Structure of a resistive cable
When laid, resistive heating wires should not intersect or be located next to each other (close to each other). In this case, they overheat and quickly fail. Pay close attention to this point during the installation process.
It is also worth saying that resistive heating cables for water supply (and not only) can be single-core or double-core. Two-core ones are more often used, although they are more expensive. The difference is in the connection: for single-core ones, both ends must be connected to the mains, which is not always convenient. The two-core ones have a plug at one end, and at the other end there is a fixed ordinary electrical cord with a plug, which is connected to a 220 V network. What else do you need to know? Resistive conductors cannot be cut - they will not work. If you bought a coil with a section longer than necessary, lay it in its entirety.
This is approximately how heating cables for plumbing are sold.
Self-regulating cables are made of a metal-polymer matrix. In this system, the wires only conduct current, and the polymer, which is located between the two conductors, heats up. This polymer has an interesting property - the higher its temperature, the less heat it releases, and vice versa, as it cools down, it begins to release more heat. These changes occur regardless of the condition of adjacent sections of the cable. So it turns out that it regulates its own temperature, which is why it is called self-regulating.
Structure of a self-regulating cable
Self-regulating (self-heating) cables have many advantages:
- they can intersect and will not burn out;
- they can be cut (there are markings with cutting lines), but then you need to make an end coupling.
They have one drawback - the high price, but the service life (subject to the operating rules) is about 10 years. So these expenses are reasonable.
When using a heating cable for any type of water supply system, it is advisable to insulate the pipeline. Otherwise, heating will require too much power, which means high costs, and it’s not a fact that heating will cope with particularly severe frosts.
Tips for increasing the life of cast iron stoves
To ensure that your stove hob lasts as long as possible, you should follow these simple rules:
- to lay the slab, use liquid cement mortar, maintaining a distance of 5–6 mm from the upper edge of the oven;
- The largest burner should always be located above the firebox;
- the brickwork of the top row must be strengthened with a steel angle;
- Do not forget that there should be gaps of up to 2 mm along the entire perimeter of the slab to prevent deformation and cracking of the metal;
- correctly load the stove for the first time and heat it, gradually warming it up for about 8
hours, and increasing the temperature by 70–80 degrees every hour. For proper heating, you need to start heating with shavings and wood chips, and then add larger firewood. After heating the stove for 8 hours, it must be left to cool until the firewood is completely extinguished.
Compliance with all operating and installation rules will not only extend the life of the stove and hob, but also guarantee the safety of the buyer and his loved ones.
If the buyer himself is not confident in his competence in installing cast iron slabs, then it is better to seek the help of professionals. Thanks to their special knowledge and many years of experience, they will help you save your time and nerves. This is the case when it is better to give way to a specialist, so that later you do not have to pay for your own inexperience.
And then, when you have at your disposal a beautiful stove with a properly installed cast-iron stove on the surface, you can fully enjoy the warmth and comfort emitted by such a design.
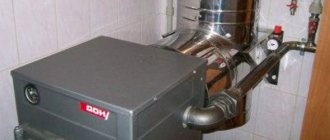
Installation of a metal furnace
When considering the features of the placement of metal and brick stoves, approaches to their installation are somewhat different. Iron stoves may not weigh too much, so during installation they do not need a foundation.
With a lower weight indicator, such a product is installed on a substrate made of refractory material directly on the floor. Once the location has been chosen and the issue with the foundation has been resolved, you can proceed to the procedure for installing a metal furnace. When installing a heating device, all requirements specified in the section on the protection of wooden structural elements of the house must be met.
For this purpose, a metal stove with a water boiler is sometimes simply lined around the entire perimeter with ordinary bricks. In all other respects, its installation comes down to installation in an already prepared place
The only thing you should pay attention to is compliance with the rules for venting the chimney outside
Related Posts
- Wood-burning stoves and their variety of designs
- Homemade Russian stove on the street under a canopy
- Fire-battery 7b (thermophor)
- Buleryan oven: do it yourself
- How to choose a stove for an Ermak sauna: top 7 models with descriptions of technical characteristics and customer reviews
- How to fold a Swedish oven with a stove
- Cast iron stove for bath Vesuvius
- Types of Kuznetsov furnaces and their order
- How to make a long-burning stove yourself
- How to install a stove in the house?
- Types and sizes of Russian stoves: types, sizes, 5 construction recommendations
- Fast and correct furnace repair
- How to weld a metal sauna stove
- 9 types of heat-resistant tiles for fireplaces and stoves: choosing the best
- DIY metal rocket oven
- Secrets of stove makers: brick stove for a bath
- A stove with a water circuit for heating a house: features of stove heating + choosing the optimal option
- Installing a stove in a steam room: location, fencing, protective screen
- Manufacturing and connecting a sauna stove with a water heat exchanger
- How to make a Buleryan oven with your own hands: description and drawings
- Types of stoves for the home: classification and review of equipment from the best manufacturers
- Do-it-yourself stove-fireplace
- How to plaster a stove to prevent it from cracking: types of putty for stoves and execution technology
- Stove heating in a private house
- Do-it-yourself gas heater: options for the best homemade products
Read with this
- Wood-burning stoves and their variety of designs
- Homemade Russian stove on the street under a canopy
- Fire-battery 7b (thermophor)
- Buleryan oven: do it yourself
- How to choose a stove for an Ermak sauna: top 7 models with descriptions of technical characteristics and customer reviews
- How to fold a Swedish oven with a stove
- Cast iron stove for bath Vesuvius
- Types of Kuznetsov furnaces and their order
- How to make a long-burning stove yourself
- How to install a stove in the house?
Advantages of wood stoves
Wood-burning stoves have many advantages that make these designs popular both in the past and now. Among the advantages of such equipment:
- autonomy; wood-burning appliances do not require a mains connection - heat generation is possible at any time; This is probably the main advantage of such stoves;
- financial savings; firewood in Russia is available to anyone, and those who live in rural areas are doubly lucky - the savings are even more significant;
- the ability to build a stove yourself; this is both a chance to test yourself, and, again, savings, and the reason for the exclusive design; autonomy results in the possibility of absolute adjustment to the characteristics of the room in which the stove will be installed;
- the ability to connect the device to the heating system of the house;
- environmental friendliness of stoves and fuel; both the stove and the firewood are completely safe for health; the materials from which the stoves are made are harmless, and combustion products are completely removed through air draft in the chimney.
A disadvantage of wood-burning equipment is the need for fuel replenishment. But if the stove is of high quality, and, moreover, designed for long-term burning of wood, the frequency of adding fuel is small. In addition, the advantages clearly outweigh the disadvantages.
How to use a home wood stove correctly and safely
The stove must not be left unattended. When opening the door, embers and sparks should not fall outside the pre-furnace area.
If the sandwich pipe has a damper, it is not closed until the fuel is completely burned. For combustion, use the fuel specified by the stove manufacturer.
You should not leave hot ash removed from the ash pan at home, as it emits deadly carbon monoxide.
The cast iron body and parts of the device do not like sudden temperature changes. Do not allow cold water to come into contact with cast iron surfaces, as this can lead to cracks. It is forbidden to move an already installed stove, this will cause depressurization of the chimney.
Swedish stove laying
Laying a Swedish stove
The Swedish stove is one of the most popular and most convenient to use stove options. The laying of such a stove is carried out in several simple stages.
Foundation diagram for a homemade Swedish stove
First step. Prepare the brick for laying. To do this, just dip it in clean water and leave it there for about a day. The material will be saturated with moisture and will not absorb it from the masonry mortar.
Second step. Prepare a masonry solution from clay, water and sifted sand. You should get a plastic homogeneous mixture. Laying 100 bricks takes about 20 liters of mortar.
Third step. Lay out the starting row of bricks, making sure to check the perpendicularity of the corners, verticals and horizontals. The row must be continuous. You can use half-bricks to lay out the interior space.
Fourth step. Lay out the second row. This row should be the same as the first.
Arrangement of the Shvedka stove
Fifth step. Lay out the third and fourth rows. Start forming the ash pan compartment. Install a door for this chamber and three cleaning doors and one blower door. Place smoke vents on the back of the stove. They must be vertical and communicate with the combustion chamber through a hole.
Sixth step. Install the grate and mount the oven chamber. Cover the blower door and cleanout holes.
Seventh step. Lay out rows 6 to 10. At this stage you should form the combustion chamber. Between the firebox and the oven chamber, lay the bricks on edge. Install the walls of the combustion chamber and oven. Between them there should be a partition one row taller than the camera.
After laying the 10th row, lay a steel angle and cast iron tile on the front side. Secure the corner with wire and mortar.
Eighth step. Lay out the 11th row. At this stage you should completely block the channel between the tile and the right wall.
Ninth step. Lay out rows 12 to 16. Form a brewing compartment and three vertical flues. Lay out chimney openings using fireclay bricks.
Tenth step. Lay out rows 17 and 18. Arrange the ceiling of the cooking chamber.
Eleventh step. Lay out rows 19 and 20. At this stage, you need to place two cleaning gas duct doors on the front of the stove.
Twelfth step. Lay out rows 21 to 28. Form smoke channels in accordance with the chosen ordering scheme. Observe correct ligation of stitches. When laying out the 27th row, install a chimney damper. Leave a hole above it through which the flue ducts will connect to the ventilation ducts.
Thirteenth step. Lay out rows 29-30. Close the upper chimneys. At this stage, the masonry must be expanded by 50 mm around the perimeter. Due to this, a cornice will be formed.
Fourteenth step. Lay out the 31st row. At this stage, the dimensions of the overlap must be brought to the dimensions of the 27th row.
Fifteenth step. Lay out the 32nd row. At this stage, start laying out a chimney pipe measuring 130x250 mm.
Lay out the chimney to the required height, and your Swedish stove will be completely ready. Finally, it will need to be covered with ceramics or painted.
Fireplace stove design
A fireplace stove combines a combustion chamber, covered with glass ceramics, with an oven or hob, often with both together. At the bottom of the stove there is most often an open or closed firewood box, which greatly simplifies the task of storing fuel wood. Burners usually have removable rings in case of cooking over an open fire. The oven of a fireplace stove is usually located at the top - in the firebox area, and in stoves with a hob - next to the combustion chamber.

The firebox of the fireplace slab can be made of cast iron or high-temperature steel, and furred from the inside with chamon bricks or cast iron tiles to improve the performance of the device. The same purpose is served by the “double afterburning” technology, which allows you to lengthen the combustion process by re-igniting unburned wood residues.
The cladding of a kitchen wood-burning stove can be very different: from expensive majolica to polished steel or artificial/natural stone.
Conclusion
A cast iron stove stove is an excellent option for cooking and heating the room. A large selection of these products will satisfy even the most fastidious buyer.
Cast iron material is characterized by heat resistance, durability, and ease of use. A high-quality cast iron stove will serve you reliably for several decades.
But its purchase should be made in a specialized store. Experienced consultants will help you choose between a prefabricated or solid slab, and will also select the right size at an affordable price.
Attention must be paid to the quality, absence of defects and weight of the product. You can even install this flooring yourself. To do this, it is worth considering only a few nuances.
When melted and used, cast iron decking will remain in its original condition throughout its entire use. It will become not only a functional item, but also a decoration for your interior.
pechnoy.guru
Important points in the correct operation of stoves:
- Cast iron stoves are designed to work on household stoves that burn solid fuel.
- Before installing the slabs in the furnace surface, it is necessary to leave thermal gaps of 2 mm on each side in advance.
- After installing the stove, gradually warm it up to 640 °C over 8 hours, increasing by 70–80 °C per hour. Having reached the desired temperature, the furnace is cooled until the fuel is completely burned out. This procedure has a beneficial effect on the future operation of the furnace, preventing distortion and cracks.
- During storage of the stove, a layer of rust may appear on it, which quickly disappears when the stove is used.
- It is very important to prevent moisture from getting on the hot surface of the stove.
- Protect the stove from mechanical damage and shock loads during transportation or during operation.