Since time immemorial, our ancestors have built adobe ovens. They were usually built in villages and, due to the lack of a chimney, the first versions of such structures were called “black-style” stoves. Accordingly, the house where there was a clay stove of this type was called a “chicken” hut. This name directly depended on the design of the stove, since at first the smoke filled the home, and only over time it came out through a small hole (top) under the ceiling to the outside. It is clear that the entire hut was filled with smoke, and through the window, which was specially built for this purpose, not only gases and smoke escaped, but almost all the heat.
The sequence of building a house using clay pot technology
For an eco-house made of chocks, it is most convenient to construct a strip foundation.
It can be not only rectangular, but also round, because such houses are distinguished by their unusualness. They are often made in round or oval shape, which eliminates the need to build supporting structures at the corners due to their absence. The round shape is ideal because it is the most stable and provides the best grip for the entire structure. There are no special requirements for the construction of the foundation. It is only necessary to make a layer of horizontal coating waterproofing along its upper surface. When building a rectangular or square house, you will need to construct a supporting frame for lashing in the corners. To do this, install beams of logs or timber in the corners, selecting longitudinal spikes in them on the sides located in relation to each other at 90 degrees. The space between the load-bearing posts is filled with walls.
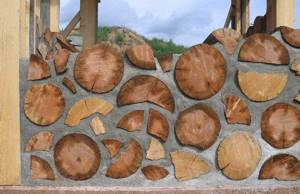
A wall between two load-bearing posts.
To do this, a layer of mortar is applied to the foundation, and lumps are placed on it at a short distance from each other. Then all the distances between the firewood are filled with a new portion of the solution. This layer is made just above the chocks and a second layer of blanks is placed. The operation is repeated until the wall is completely ready. You need to ensure that the edges of the chocks protrude 1 - 2 cm beyond the edges of the clay. When laying walls, you must not forget to install window and door openings.
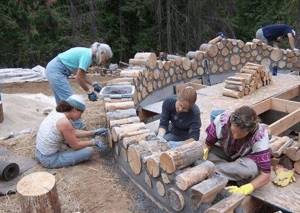
Laying round walls layer by layer.
When the walls are completely erected, they must be covered with a temporary lightweight roof made of tarpaulin or durable film. At the same time, good ventilation of the walls themselves must be maintained. They will dry completely only after six months. For this reason, it is better to start construction in the spring, at the beginning of May. In regions with cold climates, it is best to place the edges of the logs on the mortar, and create a layer of sawdust or straw between them.
DIY construction
the work on making the stove with an experienced craftsman. This type of construction is somewhat complex, but with careful attention it can be done on your own. The choice of materials for making a stove must be approached responsibly; the quality of heating largely depends on this.
Materials
For walls and fireboxes, you need those types of stone that are resistant to heat and will not crack from temperature changes - volcanic rocks are usually used. Rubble stone, limestone, and granite are widely used. Fireclay or ceramic bricks are also used, followed by decorative stone cladding.
Reference.
In addition to the usual materials, there are their little-known analogues - for example,
soapstone , otherwise called “soap stone” .
The successful use of this rock for construction and lining of furnaces is due to its properties - soapstone heats up 10 times faster than brick , is easy to process, and surprisingly durable.
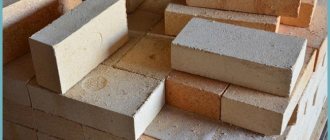
Photo 1. A small pile of soapstone. The material is gray in color and, due to its properties, is well suited for the construction of stoves.
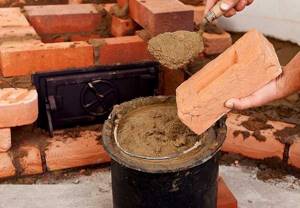
Mortar for laying a stove traditionally consists of a mixture of clay with fine-grained river sand as a filler. Refractory clays can withstand even high temperatures of the combustion chamber well, but experts recommend using professional building compounds . For laying the foundation and those fragments that are not subject to heating, a conventional mixture based on cement or lime is suitable.
Tools
The set of tools required for laying a stove is standard:
- ruler, square;
- plumb lines, building level;
- furnace hammer;
- hammer-pick;
- Bulgarian;
- container for the mixture;
- trowel for laying mortar.
fabric or rubber gloves and safety glasses for using an angle grinder will make the work easier
Selecting a location
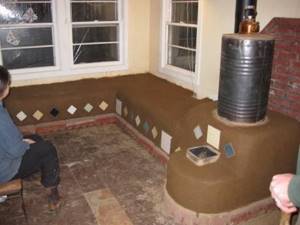
Stone devices have a dramatic appearance and are often placed to decorate a room or living room, but there are also simple placement rules that can improve the performance and safety of the device.
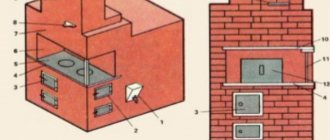
Photo 2. Schematic representation of the location of the stone stove in the house. The device is installed in the living room against an interior wall.
It is better to install the stove in the center of the room , then the heat spreads evenly in all directions. If this cannot be done, it is recommended to choose a place for installation near an internal rather than an external wall - then the heat will not escape to the street.
Attention! When installing a stove near walls, they must be insulated to prevent fire, especially for appliances operating on solid fuel. The distance to the walls and ceiling is at least 25-30 cm. Thermal insulation of the chimney is also required.
Operating procedure
The construction of the furnace begins by pouring a concrete foundation - for this, a pit is dug at least half a meter , and crushed stone is poured to the bottom.
Formwork is installed on the compacted layer of crushed stone and filled with concrete. Waterproofing must be laid on the surface of the dried foundation.
Next comes the work of laying the furnace itself.
- Laying the base from fire-resistant bricks - the first row is laid out on the foundation without using mortar.
- When laying the first rows of the stove, it is recommended to constantly use a level and plumb lines - due to the special uneven shape of the stones, it is very difficult to track the correctness of the laying.
- An ash pit, a combustion chamber, and a tank for heating water are installed.
- When installing metal elements - firebox, doors, chimney, all resulting gaps are immediately filled with mortar.
- It is better to first lay each new row on dry ground , and only then use the solution.
- If necessary, bends of smoke channels are laid out in the planned quantity.
- The chimney is laid out last , while insulation is installed for it, and the internal walls are not plastered so as not to reduce heat transfer.
Do-it-yourself manufacturing technology or how to make an adobe oven
To create an adobe stove with your own hands, you must adhere to certain instructions, follow them step by step without disturbing the order. The first thing you need to do is learn how to properly mix the clay solution, so that you can immediately start working instead of wasting time correcting mistakes. Next, a reliable foundation is created, and then the formwork is installed.
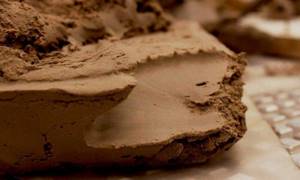
Making a solution
To make a clay oven, it requires a large amount of clay mortar, which is mixed by hand. The main thing is not to violate the proportions, which will affect the fat content of the clay, and accordingly the quality of the resulting aggregate. That is why you will need to conduct small experiments to independently select the desired consistency. There are no universal proportions.
To prepare the solution, the following components are needed:
- Water.
- Sand.
- Clay.
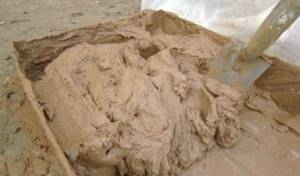
To prepare the solution you need clay
The more sand you add to the solution, the lower the degree of shrinkage, but the strength of the structure will also decrease. The solution after mixing should be obtained with minimal shrinkage, but maximum strength
That is why it is important to correctly combine all components
To begin with, it is advisable to mix a small amount of the solution to obtain a kind of sample. You will need to find the right combination, and only then begin constructing the structure to its full size.
There is one important note - a very small amount of water needs to be added to reduce shrinkage. Once the required combination has been found, the clay will need to be mixed well with water and the required amount of sand added to create the required consistency, reminiscent of stiff dough.
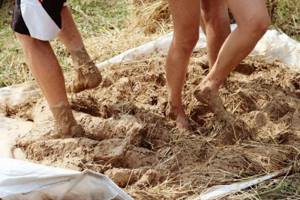
You can do it the old fashioned way, using your feet - pour the solution into a large basin and stomp it until it's ready - if you don't have the necessary mixing tool at hand.
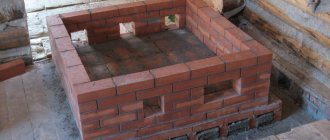
Laying the foundation
The algorithm for constructing a furnace is not much different from the original Russian method, invented in ancient times. First you need to build a high-quality foundation. To make it you will need to do the following:
- Remove topsoil and turf to a depth of 25 cm.
- After making the pit, it is filled with clay mortar, and then boulders are laid. After this, the clay solution is poured on top again.
Installing formwork
The formwork is being made. The masonry rises approximately 20 cm from the ground. The top layer will need to be laid out with a thick clay solution, and then covered with waterproofing material - roofing felt or ordinary bags. It all depends on the budget that the master has.
Finally, you need to lay the boards on top, laying them crosswise. You will need to make several layers. Boards must be taken with a thickness of 25 cm.
Furnace assembly
After the foundation and formwork have hardened, you can begin constructing the main part of the Russian stove. It is necessary to place stones on the foundation and bind them with clay. The height should be approximately 20 cm, and the top 5 cm are made only from clay. This is a very important point.
External and internal formwork is installed on the pole. The outer part is walls made of boards, which are knocked together into a durable box. The dimensions should be as follows: 0.6 by 1.2 by 1.4 m.
When constructing the inner part of the formwork, it is necessary to leave a small hole measuring 20 by 20 cm, which is necessary in order to subsequently burn out the formwork. Now you can return to the outer part and wedge the boards with stakes to prevent deformation.
The resulting space between the sticks is filled with a liquid clay solution. But care must be taken to ensure that the hole is protected from the solution.
To compact the product, the clay is compacted as best as possible and laid out in layers of about 10 cm. The corners are reinforced with good reinforcement having a diameter of 10 mm. The rods are placed 10 cm higher than the internal formwork.
After erecting the structure, it is necessary to give the clay time to harden. To do this, it is advisable to wait about 3 days, and then carefully remove the front wall of the formwork to cut out the mouth: width - 38 cm, height - 32 cm. It is advisable to create an arch shape. The protective board is removed through the hole made. You can also try to get rid of the remaining formwork walls, but this must be done very carefully, since the oven may collapse if it is not formed well. For this reason, it is advisable not to rush.
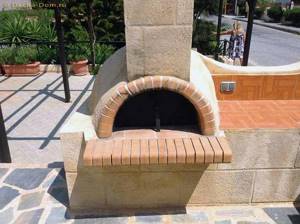
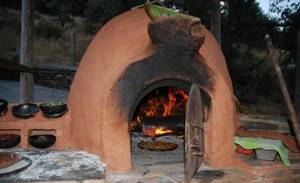
Construction of a summer stove
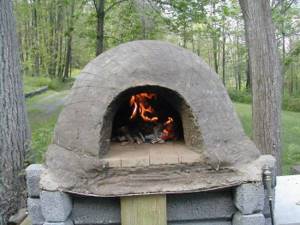
Indoor structures are most often built from adobe bricks or blocks. But with the help of layers of adobe you can make, for example, a summer stove or, as it is also called, an outdoor stove with your own hands.
The algorithm for constructing a street structure from adobe is as follows:
- Prepare the foundation for the future furnace structure. To do this, you can use an ordinary whole brick, which must be laid out in a semicircle, and the inside must be filled with broken brick, glass or other material. For the hearth you need to use fireclay bricks.
- Knead the clay with straw (preferably chopped) and sand in a large container (you can use a used bathtub). It is best to do this with bare feet, making sure that the resulting mixture is viscous and homogeneous.
- On the finished base, using wet sand, create a mold for the future structure, on which to mark the entrance. Usually, it is built hemispherical, and wet sand is ideal for creating this shape.
Place adobe on, under, or around the form. After this, the building material is gradually placed on the previous layer and slowly moved towards the top. It must be remembered that the higher the sand dome, the thinner the masonry must be, otherwise the structure may “float”.
That's it, the structure is done, and you need to wait until it dries, after which you need to smooth it out a little with a trowel. This technique will protect the structure from dry grass, leaves and other debris sticking to it. If the structure becomes more or less dry, then you need to remove sand from its inside, which has already played its role. It is also recommended to light small fires inside the dome to help the structure dry out faster. You can build a stove from adobe with a chimney, or it is possible without it.
Thus, an adobe oven is not just a building structure, but, one might say, part of our history, one of the oldest Russian traditions, if you like. And this is really true. Therefore, let's respect our history, our customs, multiply our traditions and then everything will be fine with us. We are convinced of this! published econet.ru
If you have any questions on this topic, ask them to the experts and readers of our project here.
Tips for use
Before you start using the equipment, the internal formwork must be set on fire - otherwise it will not be accessible. This operation should be carried out extremely carefully so that the structure does not collapse and cracks do not appear. If cracks cannot be avoided, they are covered with a clay solution, but they must be widened before filling. Only after completing all the steps in the stove can you light a fire.
Before you start baking baked goods or similar foods, you must thoroughly heat the oven for 2 hours using dry wood. As soon as the firebrands appear, they are removed with a poker. The oven closes tightly. You will need to wait 15 minutes. During this time, the temperature inside will even out, and the bread will be baked well on all sides.
Before baking, the oven must be heated; this process takes about 2 hours using dry wood. As soon as only firewood remains, they must be removed using a poker. Afterwards, close the oven with a damper and wait about 15 minutes so that the temperature has time to even out and the bread can bake evenly.
In order to determine readiness, you can use a torch. Place a dry splinter in the oven for a couple of minutes, and then look at it. If the splinter is completely charred, then you still have to wait, but if it just changed its color and turned brown, then you can start cooking. After all, this means that the temperature inside is about 200 degrees.
Operating rules
The formwork inside the furnace must be set on fire. If this is not done, then there is no way to extract it. Such actions must be carried out carefully, since due to careless handling the structure may crack or even collapse. If defective areas still appear, you can repair the adobe stove. As a rule, to do this, the cracks need to be opened and simply covered with mortar. If all the steps described are done correctly, then you can safely light the fire.
Initially, the structure needs to be heated for about 2 hours. Dry firewood can be used as raw material. The stove should be cleaned of burnt firebrands using a poker. Afterwards, you need to close the device tightly and wait 20 minutes. During this time, the temperature inside the structure stabilizes, so you can put food in it, which will warm up evenly on all sides.
Clay mortar for laying a furnace
To lay the base of the furnace, it is allowed to use ordinary red clay, which can be found in any quarry. In the firebox and chimney, the bricks are held together with heat-resistant fireclay clay, a high-density white kaolin sedimentary rock that is fired in kilns to increase its strength characteristics. Under the influence of high temperatures, it acquires a cream or gray-brown tint, and after firing it is not inferior in strength even to stone.
The classic composition for laying a stove consists only of clay and sand. If necessary, other ingredients are added to improve the composition.
Manufacturers offer the following fireproof fireclay mixtures:
- “Terracotta”: made using classic furnace technology.
- “Plitonit”: with reinforcing heat-resistant fibers.
- "Pechnik": in the form of ground fireclay powder.
- “Makarovs’ stove house”: fireclay mortar (unmolded mass), the composition includes clay and ground refractory brick.
- "SPO": based on chamotte and sand.
In addition to masonry and plaster mixtures for stoves and fireplaces, construction stores also sell reinforced clay compositions used for fireclay fireboxes. There are also special compositions on sale for laying sauna stoves operated in conditions of high humidity.
Expert opinion Sergey Shablovsky Plasterer
If you want to master the stove business professionally or build a stove in your home yourself, I recommend that you watch video courses from Alexander Zalutsky:
- DIY brick ovens;
- Laying fireplaces;
- 3D design of hearths in SketchUp.
A stove maker with twenty years of experience explains in detail how to do everything yourself step by step.
Ingredients: clay, sand, additives
Masonry mortar
To perform furnace work, the following types of solutions are used:
- Based on red clay: able to withstand an average temperature of 1100°C, used for laying the body of the furnace.
- Fireclay fireclay: for fastening bricks in a firebox or chimney.
- Limestone: fire resistance is below average, can withstand temperatures of only 450-500 °; used for laying the base of the furnace and pipes located above the roof level.
- Sand-cement and cement-lime: used only for the upper part of the chimney and foundation laying. Cement-lime is stronger than ordinary lime, but can withstand temperatures only up to 200-250°C.
- Clay-lime: used for plastering.
Proportions and preparation of masonry mortar
The material must be pre-crushed and soaked for at least a day. You can soak it immediately in the container in which the solution will be prepared. After this, the required amount of sifted sand is added to it, and everything is thoroughly mixed. This can be done with a construction mixer, drill or wooden spatula.
The proportions of clay and sand may vary depending on the fat content of the former. For 1 part of clay, 2 to 5 parts of sand can be added.
Expert opinion Alexander Guryanov Plasterer and master of decorative finishing
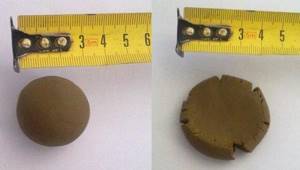
To find the correct ratio, prepare several samples of mortar with different amounts of sand. Roll balls with a diameter of 5 cm from each and throw them from a height of 1 m onto a hard surface. After falling, a ball made from the “correct” clay solution should not change shape or crack. If it flattens, the mixture is too fatty. Add sand. If it is cracked, add more clay.
How to prepare the mixture for masonry is shown in the video.
Materials, tools for solution
First of all, the master needs to prepare a small set of tools and all the necessary materials. First, “a few words” about the latter.
Solution components
As already noted, the classic solution for adobe stoves consists of only three components: clay, sand and water. If a master is afraid to search for the ideal mixture on his own, then it makes sense for him to think about purchasing ready-made mixtures. Fire-resistant masonry mixtures are the best choice. They contain kaolin, fireclay and sand. All that remains is to add water and mix the ingredients thoroughly. In this case, after drying, the structure will be as strong as possible, with the same fire resistance as brick.
The second simple alternative, which does not require long preparation of the clay, is to purchase all the materials separately. If the master prefers this option, then he needs to remember that he will have to make and test several samples. The sand must be fine-grained, clean, and sifted. The ideal material is white quartz. Water is needed clean, without impurities and large amounts of salts, so it is collected in advance so that the liquid has time to settle.
Tools and proportions
To build a furnace (work with solution), you will need the following tools:
- wooden board, shovel;
- container for making a solution;
- electric drill and mixer attachment.
Before mixing, pour the dry ingredients into a container, then pour in water in small portions. There are two ratios for clay and sand: 1:1 and 1:2. The choice of proportion depends on the fat content of the main building material. If it is large, then it is better to use an additional portion of sand. If you have no experience in preparing solutions, then it is better to experiment with samples first.
Drying and finishing the oven
Setting up a clay oven takes a lot of time - after drying, you will also need to properly finish it. The structure dries in about a week, or even more. It all depends on the material prepared for modeling, as well as the amount of water that was used for the construction.
To shorten this period, light a weak fire in the crucible for half an hour, but in no case more. This procedure is repeated three times a day. The oven must be kept warm. But stove makers claim that the longer the stove dries, the longer it can be used. So the choice is up to the master. If it is necessary to speed up, then the fire is lit. If you have time to wait, then let the structure harden without outside help.
Setting up a clay oven takes a lot of time - after drying, you will also need to properly finish it
The shovel board must be at least 25 mm thick. The remaining parameters are selected individually.
To make the stove look as aesthetically pleasing as possible, it is advisable to whitewash it. There is no need to use expensive materials; it is enough to use chalk whitewash and skim milk. The advantage of such whitewashing is that it will not stain people passing by the equipment. Whitewash is applied in several layers, and after drying, you can use watercolor paints for additional patterns. Thus, it is possible to get an individual item with a unique design.
After all the manipulations, the clay oven is ready.
Most of all, setting up an adobe oven will take you more time than effort or resources. The oven should dry for at least a week, or even a week and a half or two. It all depends on the quality of the source material and humidity. But the period can be significantly reduced if you are in such a hurry to launch bread production.
In order for the stove to dry out in a week, light a weak fire in the furnace for about half an hour, no more. This procedure must be repeated 3 times a day, thereby maintaining the oven barely warm. True, stove makers say that the longer the stove dries, the longer it will last, so decide for yourself whether you need to speed up.
To give a more aesthetic appearance, the stove can be whitewashed. There is no need to look for expensive materials; chalk whitewash mixed with skim milk is quite suitable. The advantages of such whitewashing are that it does not get dirty at all and will not stain everyone at home. The whitewash is applied in two layers, and after everything has dried, the body of the stove can be painted with watercolors at your discretion. This way you will receive not only an original and functional item, but also an item with a unique design.
Start of operation
After all the work is completed, the masonry needs to “settle” and dry completely - lighting a device that is not dry will lead to cracking of the seams.
To dry, the oven is kept for at least a week with the doors and valves open . After a week, you can gradually heat the device - daily burning of fuel, starting with small chips in a layer of several centimeters up to 6-7 kg of firewood.
The entire process of drying the oven takes about 2-3 weeks . The quality of drying is checked by a simple method - the combustion door and valves are kept closed for 3 hours after the fuel burns out; if there is no condensation on them, the equipment is ready for full use.
Previously, clay stoves were found in almost all peasant houses. They were made from available materials and were large in size. Modern designs are very different from their predecessors. They have an attractive appearance and compact size.
Solution: general information
To create a Russian adobe stove, you will have to mix the solution by hand. All that is required to complete this process is to strictly follow the instructions, with the help of which you can obtain the desired consistency. If this condition is violated, the fat content of the clay will not correspond to the characteristics necessary to create the structure. The only thing that is known for sure is that there is no ideal proportion, so you will have to experiment a little.
To prepare a clay solution you will need the following components:
- sand;
- clay;
- water.
The finished solution should be durable and with minimal shrinkage. As a rule, the more sand you add, the higher the degree of shrinkage of the clay composition and the lower the durability of the finished kiln. Therefore, it is necessary to correctly combine all the components to obtain the optimal mixture.
Experts recommend first making a small test solution for building an adobe oven. If the resulting mixture produces a reliable temporary structure, then construction of the full-size equipment can begin.
However, you need to know: to reduce shrinkage, you need to add as little water as possible.
Project selection
The design of a stone stove is in many ways similar to similar devices made of brick and metal - the main thing will be the location of the chimney and the tank for heating water, in the case of a bathhouse - the installation of a closed or open heater.
The dimensions of the stove directly depend on its functions - the device used for heating the room, cooking food and heating water takes up a large space, about 2.5m x 1.5m , bath equipment will be more compact 1m x 1.5m.
The fuel for the stove can be used both traditionally - firewood, pieces of dry peat, coal , and modern options with a gas pipeline or electricity.
The combustion chamber plays a decisive role in the design of any solid fuel device; laying it out from uneven layers of stone and mortar can have a bad effect on the quality of heating and its intensity.
Therefore, it is better to install a ready-made version made of stainless steel, cast iron , or lay out the furnace firebox from refractory fireclay bricks with a special mortar based on heat-resistant cement.
Technology for creating an adobe oven
The simplicity of the device does not mean that any master will quickly cope with the job and will definitely do it well. There are also plenty of nuances here.
Main material
Almost the most important stage is the preparation of clay. It is its quality that determines how reliable the future oven will be. The main requirement in clay is the ability to sinter even at relatively low temperatures. Craftsmen who are very familiar with this material (stove makers, potters) tend to mix several types of clay. In this case, it is possible to achieve the ideal mixture: both in quality and consistency.
There is one more requirement: clay prepared independently must sit for some time. And we are not talking about weeks and months. You need to store it outdoors for several years so that it freezes in winter and “fries” in the sun in summer. After this, the clay prepared in this way is ground and then passed through a sieve.
Now about the solution. It consists of sand, clay and water. However, there is no exact recipe with proportions, since in each area the clay has slightly different characteristics. The best clay is oily clay, which has a reddish tint. The ratio of components depends on the properties of the material used. Therefore, you have to create several samples, and then choose the best option from them.
If “lean” raw materials are used, then the amount of sand is reduced. For a fatty product, a larger proportion is required. In some regions, sand is not added at all. There should be a minimum amount of water in the mixture: you need to add just enough to get a thick, dense, homogeneous solution that is suitable for installation and does not immediately crumble.
Furnace technology
The structure is constructed using conventional formwork. In this case, the main requirement is dense laying followed by compaction. Decorative elements are sculpted by hand. The traditional material for reinforcement is rods, but for reliability, classic metal reinforcement is recommended.
This method is not the only option used. An alternative to this is making homemade bricks, which are dried in the open air, and then connected “the old fashioned way” - using a similar (clay) masonry mortar. This method is not much different from making a brick kiln, so it is up to the future author to decide which technology to choose.
Drying the structure
This stage is more extended than others in time. The reason is the need for natural drying at normal temperatures. The longer this process takes, the stronger the device will be. The minimum is defined: it is 2 weeks. But it is better to let the stove stand without operation longer.
After this period ends, the structure begins to gradually warm up. On the first day, a minimum amount of fuel is added to it so that the temperature remains low. In subsequent days, portions of “food” are gradually increased. It is recommended to carry out this preparatory procedure for a week or 5-6 days.
Brick making techniques
Bricks can be made in two ways: semi-dry and dry pressing and by plastic molding. The difference between these methods is not great and lies only in the unequal amount of moisture contained in the raw material mass.
The second manufacturing method has become more widespread, but there is a tendency that semi-dry and dry pressing may eventually replace the plastic forming method.
Using the plastic formation method, it is possible to obtain both solid and hollow bricks. The technologies for their manufacture are almost the same, but for hollow bricks the clay is prepared more carefully.
Brick making can be divided into the following stages:
- Preparation of raw materials.
- Formation of raw brick.
- Pre-drying of bricks.
- Firing at high temperature.
Each technological stage requires compliance with certain requirements. Before you start firing bricks, you should carefully prepare it: starting from the preparation of raw materials and ending with natural drying, otherwise defects cannot be avoided.
Attention: Defects are also possible at the final, very important stage of brick manufacturing - firing, if you avoid temperature conditions.
Advantages and disadvantages
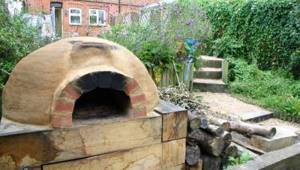
Today, interest in adobe stoves is beginning to increase. They are built not only by rural residents, but also by the urban population. They can be erected both indoors and outdoors. Therefore, today clay ovens, which are built in the garden or on a summer cottage, are very popular.
The great popularity of adobe stoves today is explained by their obvious advantages. They are characterized by:
- ease of creation;
- compactness;
- environmental friendliness;
- low cost;
- practicality.
In addition, this design can be used for:
- heating the room;
- preparing unusually tasty, aromatic and healthy food;
- baking bread, including hearth bread, which does not go stale for a long time and has a specific pleasant taste.
In modern days, people have again begun to show interest in the original Russian adobe oven. They are built not only in rural villages, but also by people living in the city. The equipment can be erected on the street or directly in the house.
Clay stoves are used not only as a heating unit, but also as a decorative element that can be used to decorate a garden, a country house and similar buildings. The design is very simple, so it won’t be difficult to recreate it in any room. To make it, you only need to have a great desire to build, as well as clay.
The stove is gaining great popularity due to its obvious advantages:
- Maximum ease of construction - there is no need to spend money on expensive materials and tools. The design is created by hand and you don’t even have to use electricity.
- Compact sizes.
- Completely environmentally friendly - only natural materials that do not pollute the environment are used for combustion and manufacturing.
- Low cost. You won't have to buy anything from hardware stores. Even on sand, there is an option to save money - go to the nearest beach and collect the required amount there.
- Great practicality. The oven is used not only for heating, but also for cooking and drying clothes. It is also a good decorative element.
An adobe stove is used not only for heating, but also for cooking and drying clothes. It is also a good decorative element
Despite the large number of advantages, any device also has disadvantages. The only downside is that you will need a lot of building material – clay. It needs to be mixed properly to get the right consistency. But if you conduct several experiments and practice mixing small quantities, then difficulties will not arise in this situation.
Alternative - adobe oven
Since a do-it-yourself adobe stove is a topic that should be considered by those who have already chosen a favorite design for themselves, you should get acquainted with all types of clay stoves. Self-made adobe devices can rightfully be classified as such structures.
What is adobe?
This material is the second longest-living material; it has also been used almost everywhere for construction since ancient times. The composition of adobe includes clay, sand and straw. Reasons to choose this option:
- nice looking products;
- relative simplicity of technology;
- good performance characteristics;
- minimal costs for manufacturing the device.
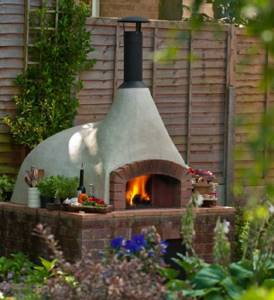
The adobe stove is also versatile. It can be built indoors or outdoors, but in the latter case the device needs protection from precipitation - a reliable canopy. This is one of the popular options for summer cottages, where they prefer to build such devices in the fresh air.
The advantage of adobe construction is the possibility of quick construction in field conditions, if all the raw materials are “at hand” and travelers are in no hurry to “get off the ground.” Another plus is the speed of work.
Clay oven construction techniques
There are two technologies for clay stove construction. In the first case, formwork is used, and in the second, an adobe oven is formed with your own hands from pre-prepared blocks. The first option is complex and is more suitable for small fires intended for baking bread and preparing baked dishes, while the second can be used to build a functional Russian oven.
Preparation of clay solution
To prepare the solution you will need clay, sand and water. In many regions, all this can be found absolutely free. Oily clay of a reddish hue is best suited for construction. Red granular clay is not suitable for kilns. If independent extraction of raw materials is difficult, then you can buy it in construction stores. It’s more profitable to buy in large packaging - it’s cheaper.
There is no exact recipe for the solution - the proportions depend on the fat content of the clay. In some areas, sand is not added at all, while in others it is required twice as much as the main raw material. The output should be a very dense and thick homogeneous solution.
Baking in formwork
It was no coincidence that the name of the adobe oven was given - the construction technology involves beating the mortar that fills the formwork with special wooden hammers. One end of the tool is flat - it is used to compact and level the surface, and the second has a wedge shape and is used for beating clay between the formwork. It will not be possible to build such a hearth alone - in the old days, neighbors were involved in the work, assembling teams of 15-16 people.
Formwork for baking
Making formwork is not an easy process; it is assembled from wood during the formation of the furnace, but all the details are prepared in advance. The most difficult thing is to correctly make the “work” for the firebox. The firebox blank has the shape of half a barrel, while the arc of the arch starts from the base and does not have straight walls - this enhances draft and provides good heat. The boards are sawn from the inside and tied to the parts with ropes so that after drying it is easy to remove the shape.
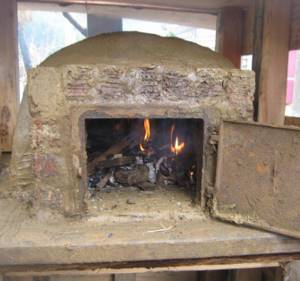
Modern adobe oven
Before placing the clay solution in a wooden “shirt,” the clay is beaten in small portions on the floor to get rid of lumps and voids. After filling the mold, cover the top layer with pieces of clay measuring 30*40 cm and cover the top. After three days, the spacers are removed, the mouth is cut out with a knife, and the front boards of the mortar are knocked out. The top formwork is carefully removed and covered with the error solution. If desired, stoves are cut out on the walls, which collect heat and decorate the hearth. You can think about the first firebox no earlier than in 2 weeks.
Construction of a clay block oven
To build a clay oven with your own hands using blocks, first make homemade bricks. To do this, the solution is kneaded for a long time, achieving a uniform composition and a dense layer. In the old days, this was done with feet and with the help of horses, later they pressed the clay with a tractor, and now they use all kinds of devices.
A well-compacted clay layer is chopped with an ax into blocks of the required size, without waiting for it to dry. A stove is built from the blocks, but no mortar is used to bind the bricks together, but the joints are compacted with hammers. To obtain a firebox of the desired shape, wooden formwork is made, which can not be removed, but burned during operation.
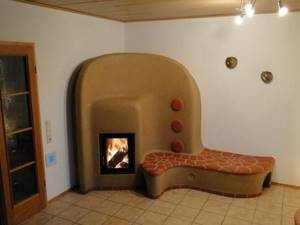
Stylish clay stove in a modern interior
It is allowed to start a fire only after final drying - after two weeks. In the first few days, small portions of brushwood are burned to dry the clay and give it strength. Over time, a clay oven only becomes stronger - the raw materials are baked and transformed into a monolithic structure.
Making an adobe oven
Adobe stoves - decoration of modern interiors
*
Many people want to build their own adobe oven. For those who don’t know what it is, let’s say that adobe is an environmentally friendly building material, the main ingredient of which is clay mixed with straw, hay, wood shavings, manure or other substances that increase its strength. To reduce shrinkage during the drying process, add a little more sand to the mixture. Depending on the purpose of the furnace structure, it can be of different shapes.
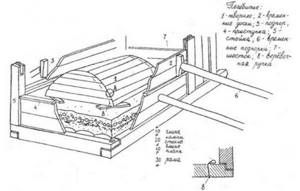
Method three. Making a vertical muffle furnace
Despite the fact that we do not recommend making this kiln for firing clay with your own hands, we will still briefly consider its design. The design diagram is shown in the image below. It consists of a ready-made muffle (1) and a burner (3) from a regular tile. The volume of the muffle will be 3 liters, it will warm up to eight hundred degrees. The ratio should be approximately the same as in the diagram, although minor deviations are still acceptable.
We purchase the burner separately and, installing it on a sheet of steel, we power it from a cylinder equipped with a reducer. Using a jet, we adjust the heating intensity (the same as in a regular stove). The body (2) may not be as strong as the muffle, for this reason we make it ourselves. To do this, you will need fluffed asbestos and fireproof clay.
Step 1. First of all, we ferment the clay to create a box: pour the clay powder into the prepared container, add water along the filling line, and then forget about it for about 24 hours. After a day, we begin mixing the solution to the consistency of plasticine, add 1/4 of the refractory sand.
Step 2. Next, add one or two parts of fluffed asbestos, mix the solution thoroughly. At the same time, we prepare a wax blank for the inner cone in the body. All external elements are made by hand or using a pottery wheel. We leave holes for the steel legs (although these legs can be made from the same composition).
Note! In this case, there is no need to check the clay for fat content. The natural fat content of this material is quite sufficient for this design.
Step 3. Then we dry the structure for two weeks at a temperature of 25-27 degrees. After this time, we melt the wax using a household hair dryer, since it is no longer suitable for further use.
Step 4. We continue to make a kiln for firing clay with our own hands. Now we need to burn the dried body. We lay it out of dry bricks and enclose it with a metal mesh about 75 centimeters high (this is necessary so that the coals do not crumble, but oxygen flows to them). We place the structure on the floor, cover it with a ceramic container and fill it with firewood to the level of the top of the fence.
Step 5. Light the fuel from below. We add firewood until the hot coals completely hide our workpiece. After this, continuing to gradually feed the flame, we maintain the combustion for another five to six hours. And then, when the ash has cooled, we remove the workpiece.
Note! The firing procedure must be carried out under some kind of canopy. Drops of moisture are not allowed! Step 6
The final firing is carried out in a finished furnace (that is, in the shell), between the cheeks of which thermal insulating material is laid. We install an empty muffle in the appropriate place. We activate the burner (at minimum power), then gradually increase the flame to maximum (in about half an hour). We warm up the stove for another 1.5 hours, after which we can proceed directly to its operation.
Step 6. The final firing is carried out in a finished furnace (that is, in the shell), between the cheeks of which thermal insulating material is laid. We install an empty muffle in the appropriate place. We activate the burner (at minimum power), then gradually increase the flame to maximum (in about half an hour). We warm up the stove for another 1.5 hours, after which we can proceed directly to its operation.
As you can see, if desired, and also if you have certain knowledge, making a kiln is not difficult. But follow safety rules - both when working and when using the structure! That's all, good work and warm winters to you!
Furnace assembly
The main part of the device can begin to be erected when the base and formwork are completely strengthened. First, you need to lay stones on the foundation, which must be bound with clay mortar. The recommended height of this structural part of the oven is about 20 cm. An important point: the upper 5 cm should be made only of the mixture.
The next step is to install on the pole the outer part of the formwork from boards knocked down into a strong box, the dimensions of which should be 60 x 120 x 140 cm. After this, you need to build the inner side, leaving a hole measuring 20 x 20 cm. This will be needed later for burning out formwork. When this work is completed, you need to wedge the outer boards with stakes so that the structure does not deform during use.
The space between the sticks must be filled with clay mortar, but before this you need to protect the hole from the mixture. To obtain a dense layer, it must be compacted thoroughly. It is better to strengthen the corners with reinforcement, which must be placed 10 cm above the internal formwork. The diameter of the metal rods must be at least 10 mm.
The prepared structure should harden in a week. This time is enough to result in a strong adobe oven. However, after three days it is necessary to remove the outer part of the formwork, and then cut out the mouth of the structure with the following dimensions:
- height - 32 cm;
- width - 38 cm.
Then you need to remove the protective board through the resulting hole, which should be made in the shape of an arch.
Classification of furnaces
People have long noticed that when strongly heated, clay turns from a soft material into an impenetrable stone. No one now even remembers when the first kiln for firing clay products appeared. Over thousands of years of human activity, not only pottery, but also the kilns necessary for it, have constantly developed and improved.
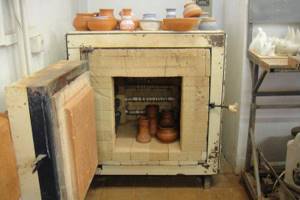
This kiln will help you make handmade ceramics
There are several main categories of kilns:
- by type of fuel or energy source on which the unit operates. This section distinguishes gas, electric and solid fuel;
- according to the location of the heater. There are two main types: muffle, when the heaters are placed around the muffle, and chamber - the heater is inside the firing chamber;
- difference in the type of chamber environment. This classification is divided into three types: vacuum, when air is pumped out of the chamber, air - conventional furnaces, and with a protective gas environment, when auxiliary gas is pumped in for better processing of products;
- differences depending on the type of loading. Three categories: tubular - loading from above, for uniform firing of art products, bell-shaped - the same loading, but for large objects, horizontal - when loading from the front;
- by power and maximum heating temperature. The final quality and color of the product depend on the firing temperature, so this category is of great importance for those who experiment in these directions.
Overview of ceramic kilns:
Excursion into history
The Russian clay stove has been known to mankind since ancient times. Previously, in villages they built just such stoves, which were also called “black” stoves because they did not have a chimney. Even houses with such stoves had their own unique name - “smoking” huts. This name was explained by the fact that the smoke did not escape through the chimney to freedom, but first entered the room, and only then gradually ventilated through a small window under the ceiling, which was created specifically for these purposes. Needless to say, there was a lot of smoke, and the window greatly undermined the thermal insulation of the room in the cold winter? But with all this, the smoke did not spoil the ceiling, did not pollute it with soot. And all because people managed to achieve absolutely complete combustion of firewood, so all the soot settled only around the “top”. How did they do it? The whole point is to heat the house with hardwood logs. They had to be placed in the oven so that there was free access to fresh air, and a few aspen logs were placed on top. (See also: Clay for stoves)
Later, the Russian adobe stove acquired a chimney (a wooden pipe that originated from the ceiling) and there was less smoke, but the risk of burning, on the contrary, was reduced. The dimensions of such a device (a stove with a chimney) were not small; it could occupy a good quarter of the entire room, but modern adobe stoves are much more compact.
The closest “sister” of such a Russian stove was the Pompeii clay stove, but, unlike the more patriotic version, it always had a pipe and was made of brick, and it was better to use refractory brick inside. Needless to say that such a stove, then and now, is an expensive pleasure?
The initial stage is preparing the solution
Builders recommend using components in a 2:1 ratio to create the mixture, where the first indicator is the content of fine-grained sand, and the second is clay. Before preparing the solution, you need to know exactly how much composition is needed to make the stove. As a rule, for laying a medium-sized structure you need approximately 3.5 m 3 of clay-sand mixture.
The solution must be prepared in a special wooden container, lined with tin, in which the clay must be soaked for two days. After this time, sand must be added to the solution. The resulting mixture will have to be stirred with your feet until you get a thick mixture without lumps of clay. Large fragments can be chopped using a shovel or hoe. If, as a result, large clots remain in the solution, they will have to be pulled out and broken by hand.
To prepare the solution, add an amount of water equal to ¼ of the volume of clay. The main thing is to use high-quality liquid. This can be river or rain water. The result should be a plastic mixture from which the adobe oven will be built.
Date: September 25, 2020
Wood-burning stone stove for home
For the manufacture of stoves, rocks that are resistant to high temperatures are selected - such as granite or sandstone .
The laying of stoves from flat, elongated or stones of different volumes and shapes is a rather impressive design that can decorate the living room of a country house.
In addition to its unusual appearance, such a device has a number of advantages:
- gradual uniform heating of the room;
- long-term heat retention;
- safety, no release of toxins and odors;
- availability of materials.
The disadvantages include the difficulty of building a stove - the technique of laying a stove from stones of various sizes differs significantly from an ordinary brick one, so it can cause difficulties even for an experienced craftsman. The disadvantage will also be the massiveness and heavy weight of the resulting structure. Such stoves necessarily require a separate foundation, so construction is planned even before the construction of a house or bathhouse.
Types and characteristics of furnaces
All furnaces according to construction technology are divided into:
- adobe;
- Komi-Permyak;
- round.
They differ not only in appearance, but also in characteristics, construction technologies and scope of operation.
Samannaya
Adobe refers to an ancient building material consisting of: sand, clay, straw. The advantages of such construction include:
- minimum costs;
- aesthetic appearance;
- high performance;
- simple construction technology.
It is a one-piece monolithic structure that can be placed in a country house or in a house.
If you are building a stove outside, make a canopy over it to protect the structure from various precipitation.
Miniature adobe structures can also be made on a long hike. To build it, you need to use plastic clay with a low moisture content.
The construction of adobe structures should be carried out in dry and sunny weather.
Under good weather conditions and with all the necessary materials and tools, you can build such a structure on your own in just one day.
So, to build an adobe stove you will need to prepare the following tools:
- beaters;
- large wooden hammers;
- tamper;
- knife;
- grater;
- scraper.
The construction technology itself is quite simple:
- The formwork is built and the prepared mortar is placed into it.
- The solution forms the firebox and chimneys.
- The oven is molded as if from plasticine until the first stage.
- Next, the overlap of the hogs is formed.
- The clay is laid in a layer of 10 cm and compacted.
- At this stage, the furnace and sub-furnace doors are bricked up.
- Next, using a spatula, the firebox is cut out.
To prevent the walls of the product from starting to deform, a small formwork is made inside and spacers are inserted.
- Next, we cut out the ash pit, combustion chamber, and chimney.
- After this, we install the grates and cast iron plate.
- The finished product must be smoothed with a grater and leveled with a scraper.
You can heat the stove for the first time without removing it from the formwork. When it is completely dry, carefully remove the formwork and carry out additional work: cutting through the doors and whitewashing.
Komi-Permyak
The Komi-Permyak clay oven was built in houses. It was built either on a foundation or simply on the floor:
- First, formwork from boards is laid, then it is filled with clay.
- All this is compacted, crushed stone is poured on top and again a layer of clay.
- When it comes to forming the bed, you need to make a fairly thick layer of clay.
- Next, we install the chimneys and cut out niches in the side walls.
- After heating, it is necessary to carefully remove the formwork and cut out the mouth in the shape of a semicircular arch. That's all, the product is ready for use.
It is best to let the structure dry at natural temperature. But you can also heat it, and if cracks appear after heating, they need to be puttied and can be whitewashed for an aesthetic appearance.
Round
The round clay oven is small in size. It can be built both indoors and outdoors. It is convenient because you can bake bread, pizza, cakes, and prepare various dishes in it.
You can also build a stove from other materials: brick, metal. But it is clay structures that are considered the most practical, functional and affordable.