Set of socks, Omsa socks
349 ₽ More details
Set of socks, Omsa socks
349 ₽ More details
City Wallpaper
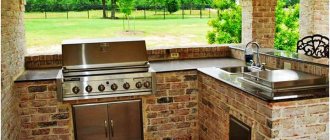
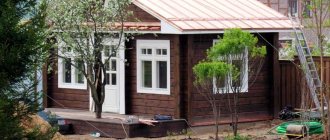
A summer kitchen in a country house or in a private house is an ideal place for preparing food in the warm season. For this building to be fully functional, a stove for the summer kitchen is a must. In this article we will tell you how to build such a stove yourself with minimal construction skills.
Material selection
At the very beginning of construction, it is necessary to decide which material is best to choose for the future structure.
There are two options here - aerated concrete blocks or refractory bricks. They do not burn out, can withstand exposure to high temperatures for a long time, and retain heat.
Aerated concrete for a summer stove will cost less. However, outwardly it looks worse and after construction the stove necessarily requires cladding (plaster, tiles, etc.). This is necessary not just for an aesthetic appearance, but also to minimize heat loss and protect the concrete from moisture.
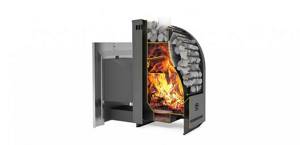
First you need to choose the material
At the same time, brick will be the more preferable material, despite its high cost. It is moisture resistant, does not require additional cladding, and has a longer service life.
In order to accurately determine the future scope of work and correctly calculate the amount of materials required, it is necessary to develop a construction project.
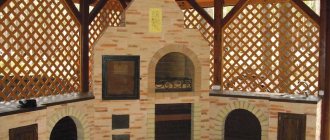
Features of gazebos with a stove
A summer kitchen with a barbecue or barbecue can be either closed or open. The advantage of the first is the possibility of year-round stay. This is advisable if the owners often visit their dacha or live in a private house. Otherwise, it is better to give preference to a summer open kitchen. It costs less, is easier to build, looks more compact and does not require special permits.
Kitchens can also vary in the choice of materials. The most common materials are the following.
Tree
Environmentally friendly, natural material that will never lose its relevance. The design of such gazebos is always pleasing to the eye, looks natural and light, fits well into the natural landscape and is in harmony with the surrounding nature. You can install the summer structure yourself, since there is no need for a heavy-duty foundation, and the wood is easily fastened with metal corners.
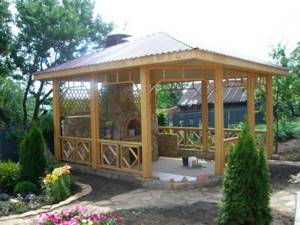
However, such gazebos also have a lot of disadvantages. Every 5–6 years, the facade needs to be updated, since the wood is deformed due to moisture, precipitation, and sudden temperature changes. Cracks and unevenness may form on the surface, and the wall may become askew. The wood must be treated with a special solution to protect against pests. Varnishing will provide protection from the negative influence of external factors.
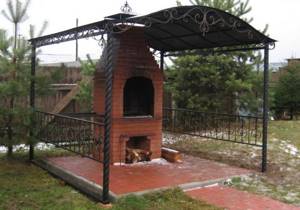
Brick
This is a durable and very wear-resistant material. It costs more than all the others, but its service life is much longer. It withstands temperature changes, cold and heat, does not deform or lose shape. Unlike wood, it does not ignite, does not form fungus or mold, and is not attractive to pests. Brick is also thermally insulating, so it retains heat in cold weather and, on the contrary, cools in hot weather.
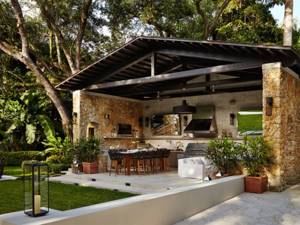
As for installation, it is impossible to build such a gazebo yourself without similar construction experience. Here you will need to install a strip-type foundation, strong and reliable, so that the building does not sink into the ground and is firmly fixed, despite its impressive weight. But, having invested money once, you will no longer have to think about restorations and return to repairs.
Metal
The material itself is used to create frames and as a base. Monolithic structures are not made of metal, since it quickly heats up in the summer and becomes icy in the cold of winter. But forged elements for an open summer gazebo with a kitchen or barbecue are very suitable and will make the interior elegant and expensive. It is imperative to treat the surfaces with an anti-corrosion solution so that the metal retains its attractive appearance. Metal elements go well with stone, brick and wood, so the design can be played out in different styles. If we are simply talking about a metal frame with a roof, it is recommended to exclude plastic furniture, since it does not fit into such an interior.
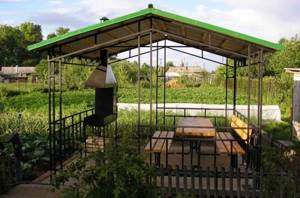
A summer kitchen gazebo made of metal is usually designed in the form of a light canopy based on profile pipes
For those who are planning to install a stove in a ready-made gazebo, additional costs and possible changes in the appearance of the structure should be considered. Installation of the structure is a complex and time-consuming process that will require the help of professional specialists, since in some cases it is necessary to remove the floor covering to strengthen the foundation. To save the family budget, you can replace the stationary model with a portable one. Such a kitchen with a barbecue will be better in functionality, but the costs will be lower.
How to make a calculation
Before starting construction, you need to decide on the location of the furnace.
If the site already has an open or partially open kitchen, then it is most rational to build the oven as a functional extension of the building. It’s best to be close to where you’re cooking. It can also be erected remotely from the kitchen, as a separate device on the site. Then you need to set up a place nearby where you can conveniently process food before sending it to the oven. For example, it would be suitable to install a gazebo with a table or stretch an awning.
See also: types and installation of a gazebo.
When choosing a place for the stove, you must also take into account the distance from the water source and cesspool, safe proximity to the eating and rest area, etc. This way you will make the building as convenient and safe as possible.
Today, summer stove designs are presented in a wide variety. You just need to choose the option that suits you best. However, creating a design and drawing of a furnace yourself will be difficult and time-consuming, especially if you do not have the necessary experience. If you have never done anything like this before, then it is best to follow ready-made “recipes” for construction.
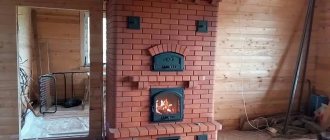
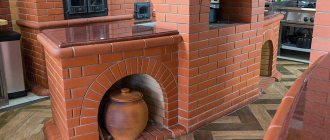
Our article will show the step-by-step construction of one of the simplest building options, which does not require special skills. This will be a stove with a barbecue and a removable cauldron (installed on the hob), stylized as a classic Russian one.
For such a construction you will need:
- 750 pcs. fire-resistant brick;
- 650 kg of special masonry mixture;
- 600 kg of broken brick or crushed stone;
- 300 kg of cement;
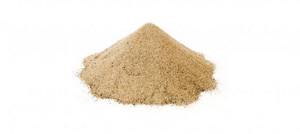
- 900 kg of sand;
- 1 roll of roofing material;
- 2 pcs. grate;
- 2 pcs. furnace doors;
- 2 pcs. closing iron doors;
- 1 furnace valve;
- 3 pcs. blower dampers;
- 1 hob;
- 1 barbecue grill.
This is a list of the main required materials. If you want to add something else to the design or plan to expand it, then you will need to draw up your own drawing.
Don't forget about the relevant material
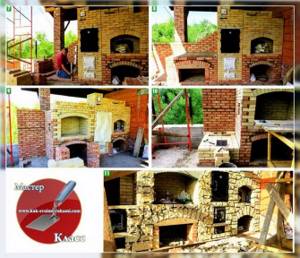
DIY summer kitchen - photo of work
1. Alexander began the work by laying out the zero row immediately under the entire complex.
2.In the lower part of the Russian stove there is quite a spacious storage for firewood.
3. The firebox of the Russian stove, about 90 cm deep, was designed and laid out in strict accordance with all canons and standards.
4.After completing the laying of the Russian stove, the master immediately began building the smokehouse.
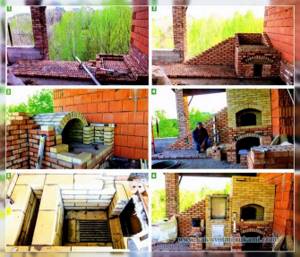
5. The combustion chamber of the smokehouse is lined.
6.Alexander installed a smoking cabinet on top of the chamber.
7. At the bottom of the grill there is a niche for firewood.
6.A ceiling and chimney with cleaning and damper are made above the smoking cabinet.
9. The width of the opening of the open firebox of the barbecue is 1 m.
10.Construction of the last, fourth part of the complex - the stove for the cauldron.
11. Natural limestone was used for decorative cladding of the entire complex.
Pouring the foundation
The stove requires a solid foundation, since the total weight of the structure will be large - more than 750 kg. Before starting to lay the foundation, it is necessary to calculate that the dimensions of the foundation will be 100–150 mm larger than the dimensions of the building itself.
The foundation itself is poured like this:
- At the site of the future foundation, we dig a pit 40–50 cm deep.
- A sand substrate 10–20 cm thick is placed in the resulting recess. The substrate is well compacted until a dense structure is formed.
- We lay crushed stone on top of the sand base. The thickness of the crushed stone cushion should be at least 3 cm. But you can save on crushed stone if you first lay 2 cm of broken brick on the sand, and add crushed stone on top of the remaining 1 cm.
- After laying the crushed stone cushion, you can proceed to pouring the foundation. To do this, mix the cement mortar and pour it into the pit. The surface of the poured solution should completely cover the pit and extend to the floor level.
Now you need to let the base dry and harden.
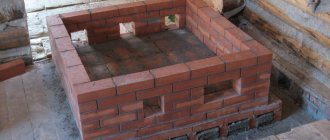
Construction of the foundation
Before laying bricks, the foundation surface must be additionally waterproofed. To do this, cover the base with a roll of roofing material, and cover it with plastic film on top.
Now that the foundation is protected from moisture, you can proceed to the construction of the brick base:
- Sprinkle the film with a small layer of sand and place the first row of masonry on it. It is laid dry, without mortar. Only the joints of the masonry need to be treated with the bonding mixture.
- Now you need to determine the location of the future blower. We select the location that suits you on the first row and mark it with a door. To do this, we wrap the door around with a mounting cord and install it on a brick coated with mortar in the place where the future vent will be. During construction, the door is additionally secured with wire.
- We lay out the next three rows on the mortar so that the bricks and mortar fit tightly to the frame of the blower damper. In this case, you need to carefully monitor the evenness of the corner of the building. Be sure to use a level.
- When the masonry overlaps and goes above the blower, we form special protrusions in the base of the mortar and install grate bars. It cannot be completely built into the walls. The grate is made of cast iron, and it tends to expand when heated. Because of this, there is a risk that the wall will begin to collapse over time.
- The fifth, sixth and seventh row of bricks are laid out alternately - on edge, flat, on edge.
- In the seventh row we select a place to install the furnace door. We attach it in the same way as the blower damper.
- We prepare three quarters of brick and begin laying the eighth row with them, which is laid out flat.
- The ninth row is laid out edgewise and a hob can be installed on it. You can install only after the row is completely dry.
- The tenth row is intended for laying out the base of the firebox pipe.
- A valve is installed in the eleventh row. It is fixed in the same way as the blower and the combustion door. The only difference is that it needs to be well coated with clay before installation.
- Next, recesses are created directly in the pipe for a removable grill or barbecue grate.
- All subsequent rows of masonry gradually narrow to form a full-fledged chimney. When laying out the pipe, be especially careful that the center of gravity of the furnace does not deviate from the specified direction. Check the level regularly to avoid mistakes.
At this point we can assume that the summer stove is ready.
Design dimensions
Any dacha area has its own area and landscape, so everyone individually chooses the design of the barbecue. When drawing up a diagram, please note that the height used for the grille should be comfortable. For people with short stature, the grill and work surface are installed at the level of the 9th or 10th row of bricks. The tray or grid is placed on metal rods.
Important: It is best to make all additional attributes removable, so it will be easier to care for them. And in winter they can be removed completely so that the metal does not rust.
You can take a 1500x7500 mm drawing as a basis, supplementing it with all the necessary elements, you will get a design with a huge number of functions that will meet all your requirements and wishes. If desired, you can change the proportions.
A popular option is to build a barbecue with a gazebo. This design will allow you to make barbecue or fish and immediately serve it on the table. Outdoor dining with a dazzling menu will lift everyone's spirits.
General Tips
Construction of a furnace is a labor-intensive process with many nuances. Here are the main ones:
- if the foundation is poured in excessively hot weather, then it must be moistened from time to time so that the screed does not crack;
- the first row is laid out dry, so it needs to be formed from even bricks that can be tightly fitted to one another;
- to achieve the desired plane surface of the brick, it can be trimmed with a grinder;
- hewn or chipped bricks cannot be placed with the damaged surface inside the furnace, since on this side the material is less refractory;
- Any cast iron elements cannot be installed flush with the masonry, so that it does not collapse; make a layer of mortar or clay.
If you follow these rules, they will help you create a durable structure that will last for many years.
Baking in a summer kitchen is not only convenient, but also delicious. With a barbecue you can easily cook meat over coals, and a cauldron will help you prepare wonderful soups or porridges over a live fire. And it always adds piquancy to any dish.