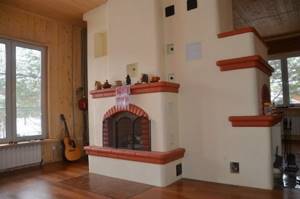
What types of stoves are there?
Before you properly install a stove in your home, you need to determine its functions.
There are three types of similar structures for a private home:
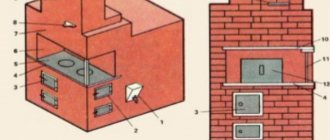
- For heating . The structure includes a firebox and a large chimney with many branches. The resulting flue gases give off their heat to the surrounding space through the walls of the chimney. Such stoves, which are heated mainly in winter, are usually equipped in houses with electric or gas stoves.
- For cooking . This appliance is intended exclusively for cooking. It is distinguished by the presence of a short straight chimney that immediately goes out onto the roof. A cast iron stove is mounted on top of the firebox for cooking. In the space between the firebox and the chimney there is also room for an oven (it provides a cooking mode, like in a Russian stove). Summer kitchens and private houses with centralized and gas heating are usually equipped in a similar way.
- Heating and cooking . With the help of such a stove you can simultaneously cook food and heat your home. Its design consists of a hob, an oven and a massive chimney with a developed heat exchange system. The heating and cooking variety is most widespread. With its help, both private residential cottages and small country houses are equipped.
Design selection
Before you finally settle on any design, you need to clearly localize the range of tasks facing the future furnace system. What is expected from it, how often they plan to use it and for what purpose. And then make a choice.
Traditionally, all stoves are divided into two main classes based on functionality. The design can be:
- heating;
- heating and cooking.
The difference is clear from the name of each class. Heating stoves are highly specialized and can only heat. True, everything in their design is subordinated to the fact that they perform their task as efficiently as possible.
The heating and cooking design is already considered universal. You can still cook food on it. It doesn’t matter what exactly is added to the ability to heat the home: oven, bread chamber, stove, smokehouse. The important thing is that the stove has become dual-purpose.
In the dacha sector, heating and cooking stoves are the most popular because they are simple and practical - as a rule, this is the only stove in the house, and therefore versatility does not interfere with it.
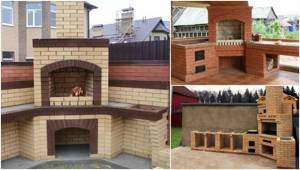
Also, the increased popularity of suburban areas, if not created, then revived a class of stoves, rare to this day, intended only for cooking. They are now united under the very vague and widely interpreted name “barbecue”.
Although it would be more correct to classify them as a group of stove complexes, since they can include not only a primitive barbecue, but also an additional set of services, limited only by the desires and capabilities of the owner. And they cannot be classified as any single furnace organism - this is really a complex created from a unique set of furnace modules.
Accordingly, a country stove can equally well be placed on the street (a garden grill stove) or designed exclusively for the home, so there is simply no universal step-by-step instruction - the indoor and outdoor varieties of stoves are only partly related, but structurally they are completely different types. Therefore, their masonry technology is slightly different - one of them requires increased moisture resistance, for which cement is added to the masonry mortar, which slightly reduces the fire resistance of the massif.
How to choose a place
Before you make a stove, you need to choose a place for it. In order for the stove to be effective, convenient and safe, it must be positioned as correctly as possible inside the home. Drawings on how to build a stove with your own hands are freely available on numerous resources.
There are certain rules governing the placement of stoves:
- The optimal place to install a heating stove is the central part of the house or the largest room. This will make heat exchange as efficient as possible, because the heated air will spread evenly throughout the house. Due to the massiveness of the building, a natural zoning of the room into separate local areas is carried out. The construction of a heating furnace near one of the external walls will significantly reduce the heating efficiency: part of the heat will be wasted outside.
- The cooking stove is usually built outdoors under a canopy, or in the kitchen, close to the outer wall. Thanks to this arrangement, even in the summer, the room will not be very hot, because the heat will partially go outside. For the same reason, it is advisable to install a chimney in the corner of the kitchen, between two external walls.
- The heating and cooking stove has a specific location. The part where the hob and oven are located is installed in the kitchen area. The chimney is made slightly offset inside the interior partitions between the kitchen and other rooms. Such instructions on how to properly assemble a stove with your own hands ensure simultaneous cooking and heating of the house.
When the stove is located close to a wall or interior partition, its body must be additionally insulated with heat-resistant, non-combustible material. This can be done using asbestos sheets or rigid mineral wool slabs.
Swedish oven
There are a lot of Swedish women. Every stove maker has at least one variation of such a stove in his arsenal. The differences between most of them lie in small, insignificant details, but each author tends to attribute a lot of originality and innovation to his own vision of the issue.
In fact, it's not like that. Everything is almost the same. Therefore, the debate that it would be correct to arrange the chimneys this way, and that any interference in their relative position is akin to desecration of sacred objects, is fundamentally wrong. The Swedish stove is a stove that allows for a free approach to layout without loss of efficiency.
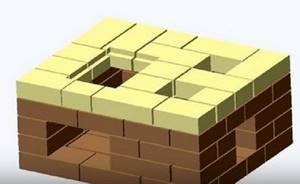
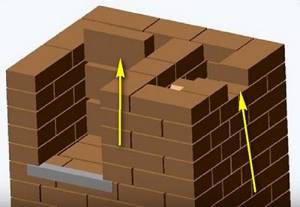
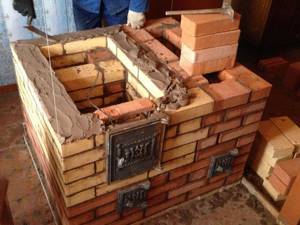
In the first rows, the Swedes display an ash pan, a channel under the oven and a passage connecting the lower and lift channels. They install cleaning doors and one blower.
It is better to bevel the corners of the brick protruding into the internal channels so that the resistance to gases is minimal and less turbulence is created.
The oven is placed one row below the firebox. The oven cabinet is made independently - the industry does not produce the required size.
The firebox must be lined with edge-on masonry or longitudinal brick halves. This will help even out the heating of the array.
The partition between the firebox and the oven is a row below the stove - through this layer, gases from the firebox escape under the stove above the oven, and then go around it, and already under the oven they are directed into the vertical smoke circulation system.
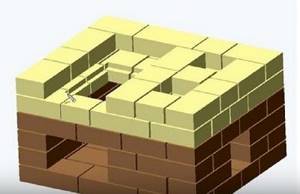
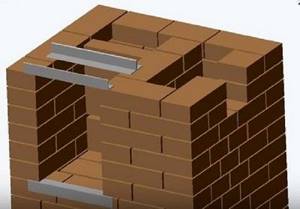
When laying the side walls of the chamber above the stove, make sure that they do not pinch the cooking floor plate - otherwise, the expanding metal will either burst or tear the brickwork.
The niche above the stove is covered with steel corners. It is worth saying that sometimes doors are installed in it. It’s very convenient, because it not only allows you to isolate the chamber from the kitchen space, but also creates some semblance of an oven, only a large one. Although such a step is possible, it is not required.
Before exiting into the pipe, the gases in the chamber above the stove are forced to pass through dividers, which also act as racks supporting the ceiling. At the same time, they increase the heat storage capacity of the furnace.
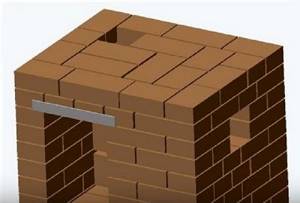
The stove is covered with three rows of masonry - this is the standard safe overlap thickness for household stoves.

The stove can be slightly adjusted to the parameters of the room in which it is installed. Simply add or remove rows of the same type above or below the slab.
To support the thesis about the existence of a large number of Swedish women, we show a video where the basic scheme is approximately the same, but implemented a little differently.
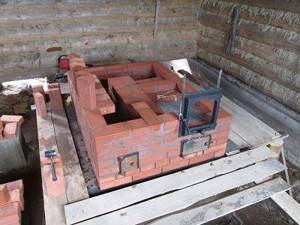
Heating and cooking stove "Shvedka"
Necessary materials
Before you build a stove for your home yourself, you need to prepare the necessary materials and tools for this.
The following materials will be required:
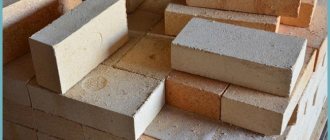
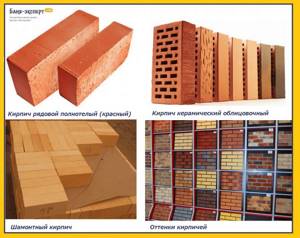
- Construction bricks. They are needed in two varieties - fired solid and fireclay fireproof. The raw material for the first variety, intended for the construction of the outer part of the body and the chimney, is red clay. Inside, the firebox and chimney duct are lined with fireclay bricks: it has a lighter shade and can withstand heating up to +1200 degrees.
- Concrete mortar for the foundation. It is prepared independently from cement (grade M400 or M500), sifted sand (quarry or river), granite crushed stone (fraction size 25-35 mm) and cold clean water. The foundation cushion is covered with granite rubble stones measuring 150-250 mm.
- Clay-sand mortar for masonry. It consists of red clay without impurities, sifted sand (river or quarry) and clean water. Clay can be dug up in a nearby ravine or purchased in powder form at a hardware store.
- Metal stove elements. We are talking about a cast iron grate, metal cleaning doors, cast iron ash doors, cast iron firebox doors, a chimney damper, a steel reinforcing mesh for the foundation, a cast iron hob with round burners.
- Mineral wool in slabs 20-50 mm thick.
- Asbestos sheets (8-10 mm).
- Asbestos cord (3-10 mm).
- Reinforcing bars made of steel (8-12 mm).
- Ruberoid (it can be replaced with polyethylene construction film).

The use of white silicate or fired hollow bricks for the construction of furnaces is prohibited. This also applies to decorative facing elements, since it will not be possible to correctly build a stove made of this type of brick.
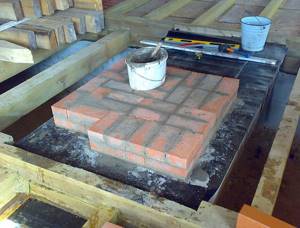
Preparing the base
When erecting a brick screen, it is necessary to fulfill all the conditions specified in SNiP 21-01-97 (Fire safety of buildings and structures).
SNiP 21-01-97. FIRE SAFETY OF BUILDINGS AND STRUCTURES. File for download
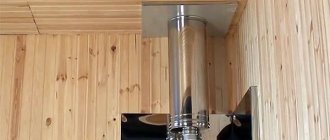
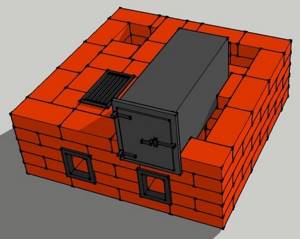
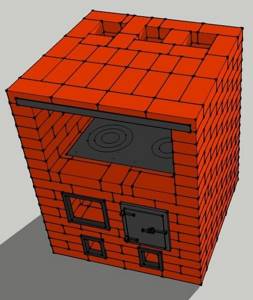
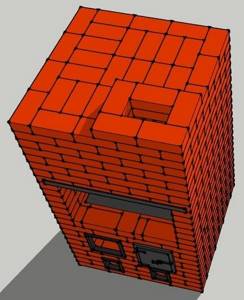
Installation of a sauna stove in a brick case
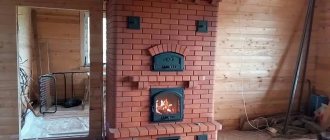
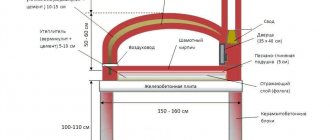
Although brick does not heat up as much as metal, it should not be laid close to the wooden walls of a bathhouse or on unprotected floorboards. It is also necessary to leave a gap between the walls of the stove and the brick, 5 to 10 cm wide. If there is no gap, the stove will overheat and, as a result, its service life will noticeably decrease. If the distance is made more than 10 cm, heating of the steam room will slow down and fuel consumption will increase.

When constructing a brick screen, remember the necessary clearances
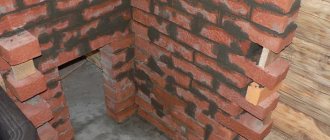
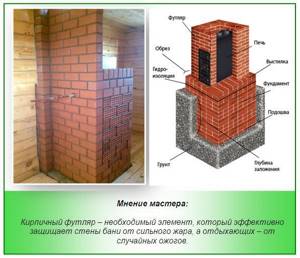
The base for the stove and the brick screen must be common, otherwise uneven distribution of the load will cause subsidence of individual elements. If, when installing the furnace, the heat-resistant base was made with a margin of area, additional preparation for the brickwork is not required. If there is no such reserve, and the edges of the platform protrude from under the stove body no more than 2-3 cm, it is necessary to disconnect the chimney pipe, dismantle the stove, and carefully and according to all the rules prepare a new base.
Base for stove and screen
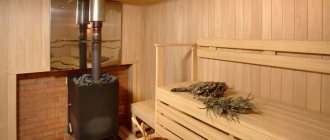
For the lining of stoves, solid red brick is usually used, which is characterized by heat resistance and durability. Fireclay brick is also suitable for these purposes, but it is more difficult to process and is more expensive. There is a ceramic refractory brick with a decorative surface, which has the same properties as ordinary bricks, but it looks much more impressive. With its help, you can not only improve heat transfer and protect yourself from harsh radiation, but also make the stove a decoration for your steam room.
Bricks for lining a metal sauna stove
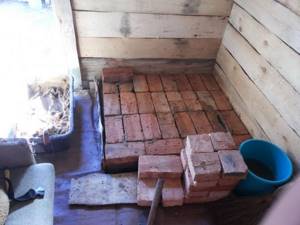
It is also acceptable to use hollow red brick, especially if you want to reduce the load on the base. It just holds the temperature worse and cools down faster. And the most budget option is to use used red brick, you just need to thoroughly clean it of the remnants of the old mortar.
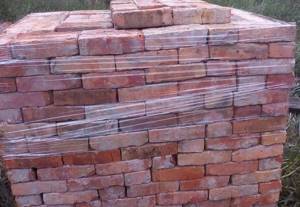
Used red brick
Please note that building material must be taken in reserve, since brick waste is inevitable during the laying process.
First you need to calculate the total weight of the stove and brickwork. The easiest way to find out how many bricks are needed for one row of screen is to lay them around the stove at a distance of 4-5 cm. Usually you get a square of 3x3 or 4x4 bricks, that is, from 9 to 16 pieces in one row. To calculate the number of rows, the height of the stove must be divided by the height of the brick - 65 mm. On average, this is 11-12 rows of masonry. Next, we multiply the number of bricks in a row by the number of rows and the weight of one brick, and we get the weight of the screen. Now all that remains is to add the weight of the stove and the water tank to this value.
Tools and equipment
List of required tools:
- A pair of eraser or metal buckets with a volume of 8-10 liters.
- Grinder with diamond cutting disc.
- Construction trowel or trowel.
- Level.
- Mallet made of plastic or rubber.
- Roulette.
- Pickaxe, furnace hammer.
- Joining devices for finishing masonry joints.
- The rule is 1 meter long.
- Square made of metal or wood.
- Construction plumb.
- Wide container made of plastic or metal with a volume of 40 liters or more.
- A drill or hammer drill of sufficient power.
- Mixing attachment for preparing a solution.
- Shovel;
- Large metal sieve for sifting sand.
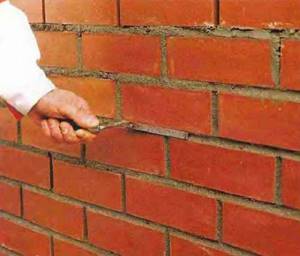
How to properly build a brick oven: instructions for the progress of work
To build a stove with your own hands, prepare a clay solution in advance. 30-40 minutes before starting masonry, you need to soak several bricks in water (the porous material will take moisture away from the mortar, and the masonry will not be strong). Bricks must be constantly added to a container of water as they are used.
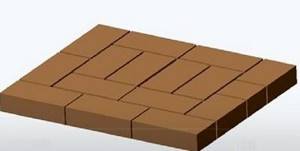
The first row is laid out first without mortar, guided by the order and determining how the material will lie. Then all the parts are removed from the foundation, beds of mortar are applied to it and work begins.
Furnace layout diagrams
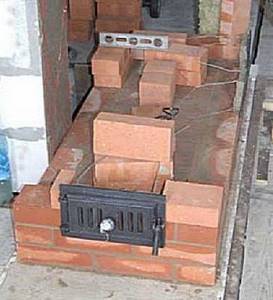
The lower tier of the oven is made solid. There are no notches on it. In different orders, 1-2 rows of bricks are laid out. Once completed, the surface of the tier should be completely horizontal and the corners vertical. When laying the first levels, it is necessary to monitor these indicators using a level and plumb line. In the future, these tools will also be required, but the laying can already be carried out along the cord.
The doors must be secured immediately when starting work on this tier. To ensure that the frame is firmly held in the masonry, wire is threaded into the holes at its corners, twisted 2-3 turns, and the remaining ends (at least 15 cm) are placed in a layer of mortar between the bricks.
The order of each level has its own number. If grates or ceilings are installed on this tier, there is a narrowing of the hole, this is reflected in the drawing. Looking at the diagram, even a novice master will be able to correctly assemble the stove and its heating system, and repair brick stoves with his own hands.
Briefly about the installation of the oven and heat exchange register
The oven in most home ovens is placed just below the chimney exit from the firebox. In some cases, an additional gap is left between the wall of the firebox and the metal cabinet. Hot gases will flow evenly around the oven on 4 sides. In this case, a door is made under it to remove ash and soot. After passing the perimeter of the oven, the 2 chimney channels unite and go into the heater revolutions.
When installing a heat exchange register (if the furnace device contains a water heating boiler), pipes or other structures are placed in the firebox, above it or around 2 walls. If the pipes pass inside the firebox, between them and the stove, the walls of the firebox leave a gap to compensate for the expansion of the metal (5-15 mm). The installed unit should not interfere with the circulation of gases inside the furnace or interfere with loading fuel. If there is no ready-made scheme, all these parameters must be carefully calculated in advance.
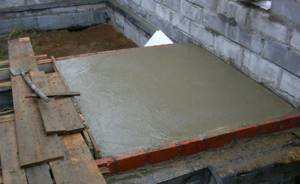
Construction of the furnace foundation
Before you build the stove yourself in the country, you will need to first lay the foundation. It is installed separately on the ground, without connecting it to the main foundation of the house.
We lay the base of the oven with our own hands step by step in the following sequence of operations:
- Preparation of concrete mortar grade M200 . 3.5 buckets of sand and one bucket of cement are mixed in a mortar vessel. After diluting the dry mixture with water, thoroughly knead until a slightly fluid homogeneous mass is formed. Crushed stone in the amount of 5-6 buckets is poured into the resulting slurry, after which it is brought to the state of a homogeneous thick solution. To make the concrete more flexible, you can add a little liquid soap or dishwashing liquid to it.
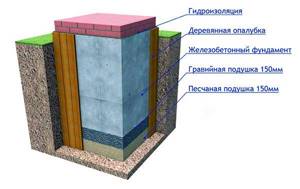
- Digging a pit . For the foundation, you need to dig a pit 45-60 cm deep. Its dimensions on each side should be larger than the dimensions of the furnace. The bottom of the trench is compacted, and the side walls are reinforced with board or plywood formwork. Next, a sand cushion 10-15 cm high is poured, and rubble stone is placed on top of it in a layer of 15-25 cm. Sometimes the walls are reinforced not with formwork, but with pieces of roofing felt.
- Pouring the solution . Reinforcing lining is installed at the bottom of the trench, for which reinforcing lining made from welded reinforcing bars or steel pipes is used. Concrete is poured in several portions. To achieve good density, the solution is pierced to the bottom with a wooden strip or piece of reinforcement: this allows the air accumulated inside to escape out. The upper part of the base is reinforced with a steel reinforcing mesh. A finishing layer of concrete 2-4 cm thick is placed on top of it.
- Leveling and hardening of the foundation . A rule is used to level the poured concrete solution. It is necessary to achieve strict horizontality of the upper surface of the base: it should be inferior to the level of the finished floor by 8-12 cm. After this, the foundation is covered with a polyethylene film, leaving in this position for about 7 days, until the solution has completely hardened.
In houses with already laid flooring, it is temporarily dismantled before assembling the stove with your own hands. Another option is to cut an opening to the size of the structure being constructed, leaving a margin of 20 cm on each side.
How to build a stove with your own hands - drawings and construction technology: step-by-step instructions, video
Despite the fact that many private houses today are equipped with one or another heating system, brick heating structures do not lose their popularity. On the contrary, engineers and craftsmen are developing more and more new models of stoves, more compact, including various functions. Indeed, stove heating will never be superfluous for a private home, as it can help out the owners in different situations. For example, in autumn or spring, when the nights are cold, but it seems too early to turn on the autonomous heating, a heated stove will create a cozy atmosphere in the rooms and relieve them of excess humidity. The stove will help maintain an optimally favorable atmosphere and temperature balance in the house that is comfortable for humans.
How to build a stove with your own hands drawings
Therefore, the search query about how to build a stove with your own hands, the drawings of which will tell in detail about the correct sequence of masonry work, does not leave the pages of the Internet. Today, even those people who have no experience as a stove maker at all show a desire to try their hand at this craft. If you decide to install a stove in your house on your own, then beginners are advised to choose a simple version of this structure with a clear procedure.
In addition to the availability of the design, when choosing a stove model, you should pay attention to its heat capacity, that is, how much area it is designed to heat. It is important to take into account the functionality of the structure and decide what you would like to get from it.
Types of brick kilns
There are several main types of stoves - some of them perform only one main task - heating the house, others are used only for cooking, and others include several functions at once in their “set of capabilities”. Therefore, in order to decide on the right model, you need to know what each of the varieties is.
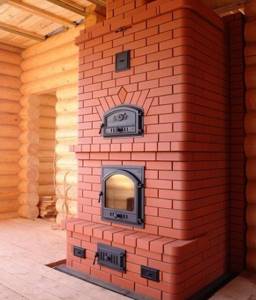
- A heating and cooking structure can not only heat one or two rooms, but also help cook food and boil water. If the model is equipped with an oven and a drying niche, then it becomes possible to bake bread and dry vegetables and fruits for the winter.
The most versatile are heating and cooking stoves.
A heating and cooking stove is often built into a wall or acts as a wall itself - for this, it is turned with the stove and firebox towards the kitchen, and with the back wall towards the living area of the house. You can solve two problems at once - heating the premises and making it possible to cook food in a separate room.
If the structure is additionally equipped with a fireplace, then the stove will work not only as a functional structure, but will also become a decorative decoration of the house.
- The heating type of stoves is designed only for heating the premises of the house. Some models have not only a combustion chamber, but also a fireplace. Thus, the oven can operate in two modes - when only one of the functions is used, or they are both activated simultaneously. Most often, heating stoves are built into the wall between rooms or installed in the middle of one large room, dividing it into zones.
Heating stove
A similar structure is erected both for the main heating of the house and as an additional one, which is used in the spring and autumn to maintain normal temperature and humidity in the rooms. Heating stoves are usually installed when the kitchen has already realized its own cooking capabilities, or in a house with a large total area, where several stoves are being built that perform different functions.
On a summer cottage in a small house, it is better to install a multifunctional structure that can help out in several situations at once.
- The cooking stove is built in the kitchen, and its design is designed specifically for quick cooking. However, this function does not deprive it of its heating capabilities, since its entire body, back wall and cast iron stove are well heated, releasing heat into the room.
The main function of this stove is cooking.
The cooking stove is usually compact, so it is perfect for installing it in a country house or in a small kitchen of a private house.
Having such a compact but functional unit, you can eliminate the risk of freezing or being left without dinner and hot tea even if the electricity and gas supply is turned off.
Many different models of all listed types of furnaces have been developed. They can be very miniature and occupy a large area. Therefore, having settled on one of the models, before stocking up on materials for its construction, you need to measure and draw its base on the floor of the room in which it is planned to be installed. This way you can visually determine how much free space will remain in the room.
How to choose the right place to install the stove?
In order for the stove to work efficiently and transfer maximum heat to the premises of the house, and also be fireproof, it is necessary to choose the right location for it.
It is especially important to think through this point if the stove is built into a finished building, since the chimney pipe must pass between the ceiling beams and not accidentally bump into them, so the installation option must be calculated as accurately as possible.
A brick stove structure can be installed in different places in a room or between two rooms. Which place is better to choose will be discussed further.
- To get the maximum effect from the stove, you should not install it near the outside wall of the building, as it will cool down quickly and is unlikely to heat more than one room.
- Some stove models are installed in the center of the room or offset from it to one side or the other. This location is chosen if the room needs to be divided into separate zones. Moreover, different sides of the stove structure may have different decorative finishes, made in a style that matches the design of a specific area of the room.
- Quite often, the stove is built into a wall between two or even three rooms, which allows for the most efficient use of the generated heat. In this case, for fire safety purposes, it is very important to provide reliable insulation of the walls, ceiling and attic floor where the chimney pipe passes.
- When choosing an installation location, it is also necessary to ensure that each side of the foundation for the furnace should be 100÷150 mm larger than the base of the furnace itself.
- To accurately determine the size of the base and height of the stove, it is recommended to always choose a model that comes with an order diagram.
Having chosen the stove model and the place for its installation, you can purchase all the necessary materials and prepare the necessary tools. The amount of materials will depend on the size and functional features of the stove model, and the tools for masonry are always the same.
Tools required for masonry work
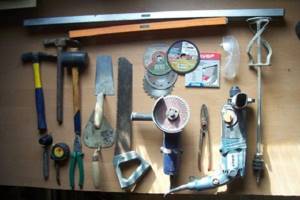
To work you will need to prepare a very “solid” set of tools
Tools for laying bricks and pouring the foundation will require:
- Rule - This tool is used to level the surface of a concrete foundation.
- A hammer-pick is necessary for splitting and trimming bricks.
- Veselka is a wooden spatula that is used for grinding clay and lime mortar.
- A stove hammer is used to split bricks and remove dried mortar that has protruded beyond the masonry.
- A broom made from sponge is intended for cleaning the internal channels of the furnace from sand and solution that has got into them.
- A lead scriber is needed for markings if the stove is finished with tiles.
- A building level is necessary to control the evenness of the rows and the surface of the walls.
- A scriber is a rod used for markings.
- A plumb line is a cord with a weight designed to check the verticality of the output surfaces.
- A construction angle with a ruler to check the correctness of external and internal angles, as they must be perfectly straight.
- Pliers are used for bending and biting off wire to secure cast iron stove elements in masonry seams.
- Rasp - this tool is used to remove beads and grind in lumps in dried masonry.
- The chisel is used for splitting bricks and dismantling old masonry.
- A rubber hammer is necessary to level the bricks laid on the mortar using the tapping method.
- Trowels (trowels) of different sizes are used to apply mortar when laying bricks and remove the mixture protruding from the seams.
- Joining is a tool for leveling mortar in masonry joints. It is used if the masonry is done “for jointing”, without further cladding.
- Manual tamping will be required to compact the soil and backfill layers into the foundation pit.
- Containers for mixing solution and clean water.
- A sieve with a metal mesh for sifting sand.
Goats will make it easier to lay out the top rows
- A stand for the convenience of working at heights, called “goats”. The surface of this device is of sufficient size not only for comfortable movement of the master, but also for installing a container filled with solution.
Arrangement of the foundation for a brick stove
The foundation for the stove is usually prepared together with the foundation of the house, but they should not be in contact with each other, much less be combined into a single structure. New foundations tend to shrink, which can lead to deformation of one of them, which will lead to damage to the other. That is why they must be installed separately from each other.
If you are building a stove in an already built house with a wooden floor, you will have to do quite a lot of work. In the place where the stove will be installed, the floor boards will have to be removed by cutting a hole to the size of the future foundation.
If the foundation under the house is monolithic, and the selected stove model is not too massive, then the structure can be erected on it, having previously laid waterproofing material on the installation site.
The foundation should have the shape of the base of the furnace, however, as mentioned above, each of its sides is made larger than the side of the furnace by 100 ÷ 150 mm.
- If the floor in the house is wooden, markings are made on it along which the boards will be cut.
- Then a pit is dug in the subfloor soil according to the shape of the future foundation, the depth of which can vary from 450 to 700 mm, depending on the composition of the soil.
- The bottom of the pit is compacted, and its walls are lined with plastic film or roofing felt.
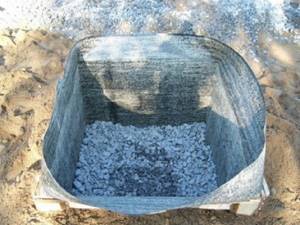
A pit with a layer of waterproofing on the walls and a sand and gravel cushion at the bottom
- Then, a sand cushion 100÷150 mm thick is laid on the bottom, depending on the depth of the pit, and compacted well using a hand tamper.
- The next layer, on top of the sand, is filled with crushed stone, which is also compacted, if possible. This layer can be from 150 to 200 mm.
- Next, wooden formwork in the form of a box is installed along the perimeter of the pit. Moreover, polyethylene or roofing felt remains inside it, and then is fixed to the walls using a stapler and staples. This waterproof material will preserve the mortar poured into the formwork, preventing moisture from leaving it, which will give the slab the opportunity to dry and harden evenly.
- The foundation should have a height of approximately 250 mm below the level of the “clean” floor, that is, two rows of bricks will need to be laid on the finished foundation so that it rises flush with the floor surface.
- Some craftsmen, on the contrary, raise the foundation above the floor by 80÷100 mm in order to save bricks. The convenience of this solution also lies in the simpler joining of the side walls of the foundation with the surface of the floor covering.
- The next step is to install a reinforcement grid made of steel reinforcement 4÷6 mm thick into the formwork, to its entire height. The rods are tied together with wire twists.
- Next, in the lower part of the formwork, to a thickness of 250÷300 mm, you can pour a coarse concrete solution mixed with cement and gravel in the proportions 1: 3, or cement, crushed stone of the middle fraction with the addition of sand, in the ratio 1: 2: 1. But, in principle, you can use a regular concrete solution of sand and cement.
- If a coarse mixture is poured down, then immediately, without waiting for it to set, a finely mixed solution is laid out on top.
- The poured concrete mixture is leveled according to the rule along the upper edges of the formwork boards, after which it is recommended to lay and sink 15÷20 mm into the solution a reinforcing mesh with cells of 50 mm.
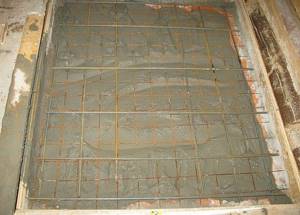
The upper reinforcing belt can simply be sunk into freshly poured concrete mortar
- The surface of the foundation is leveled again, and if necessary, concrete mortar is added to the formwork, on top of the mesh.
- Next, the foundation is left to harden and gain strength - this process will take from three weeks to a month, depending on the thickness of the layers of the poured mortar. To make the concrete more durable, it is recommended to spray it with water every day during the first week, starting from the second day.
- Waterproofing is laid on top of the frozen foundation, consisting of two or three sheets of roofing material, which are laid one on top of the other.
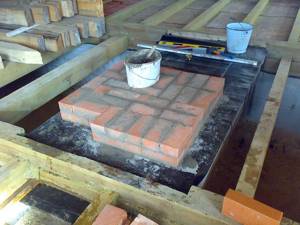
Laying will be carried out only on the layer of laid waterproofing (roofing felt)
- To begin laying the first row, it is recommended to make markings on the waterproofing material, indicating the location of the stove base. Thanks to the outlined perimeter of the base, it will be much easier to install the first row of bricks and maintain the evenness of the sides and corners.
After these preparatory works, you can proceed to the masonry.
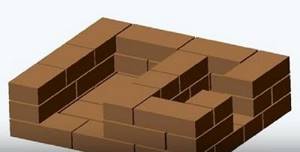
Dry masonry
Even experienced craftsmen, when starting to lay a previously unfamiliar structure, first do it dry, that is, without mortar. This process helps to understand the intricacies of the internal channels of the furnace and not make mistakes during the main masonry. The entire structure is raised dry, and each of the rows must be laid out in accordance with the order applied to the stove model.
When performing dry masonry, it is necessary to maintain the thickness of the horizontal and vertical rows. To keep this parameter the same throughout the entire masonry, you can use slats 5 mm thick. Of course, it will be difficult to measure vertical seams with small pieces of slats when laying dry, so they will have to be determined visually, but for horizontal seams, slats must be used. By applying them, after laying out the last row of the structure, you can see the actual height of the stove.
As an example of using slats, you can consider this photo.
Maintaining the width of horizontal and vertical seams using calibration slats
It is especially important to adhere to a uniform thickness of the seams if the masonry is being made for jointing and will not be finished with additional decorative materials in the future.
When making dry masonry, it is important to understand the configuration of the channel through which the smoke will leave the firebox and rise to the chimney. If a mistake is made when laying out this passage, then you will have to reposition part or even the entire structure of the stove, since backdraft may form and smoke will flow into the room during kindling.
Having raised the stove dry before laying the chimney pipe, the structure is dismantled. Moreover, if not only whole bricks were used in the rows, but also their small fragments, then when disassembling each of the rows can be folded into a separate stack, putting the row number on one of the bricks. Sometimes, in addition, the number of the brick in each row is also indicated. Such a system will speed up the work, since all the material will be adjusted and laid out in the required order, and all that remains is to soak it one by one and place it in the rows of the oven, but already on the solution.
When performing the main laying, two slats are installed on the edges of the previous row, between which a solution 60÷70 mm thick is applied. Then the brick of the top row is placed on it, leveled and tapped until it rests against the slats. It is necessary to have such calibration devices for three rows, since it can be pulled out of the seam only after the solution has set. So, having laid out three rows, the slats are pulled out from the lowest seam, cleaned and laid on the fourth - and so on. If you are not sure that the vertical seams will be the same thickness, you can also prepare a short strip for them, which will be rearranged into the next seam immediately after leveling the two adjacent bricks.
It is optimal to have a set of calibration slats for three rows
After pulling the calibration strips out of the seam, there will be a fairly deep gap between the bricks. It is filled with mortar, the excess of which is removed with a trowel, and then put in order using jointing.
Processing seams for jointing
If the calibration slats were laid on both edges of the brick, then on the inside of the wall there will also be recesses between the seams. They also need to be carefully sealed, since the seams must be sealed, filled with mortar across the entire width of the brick.
It is very important, when laying on mortar, to check each of the laid rows with a building level so that the entire structure does not warp.
Such simple auxiliary devices as calibration slats will help to carry out the laying accurately with the same width of the seams. Therefore, the entire surface of the stove will look as if the design was made by a professional craftsman.
These nuances will help simplify the process of constructing a furnace structure and avoid mistakes that may lead to the need to redo the entire work.
Schemes for the construction of brick kilns
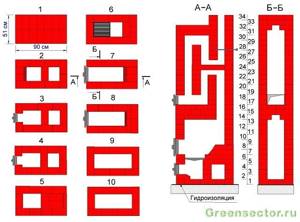
Yu. Proskurin's stove with heating and cooking functions and a drying chamber
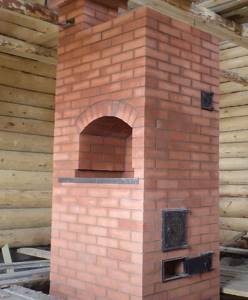
The model developed by engineer Yu. Proskurin can be called one of the simplest designs of heating and cooking stoves, which even a novice master can easily master. Despite the compact size of the structure, the stove is capable of performing all the functions necessary for a small house, as it is equipped with a hob and a drying chamber, which, if desired, can be replaced with a water heating tank.
Compact but very functional stove by Yu. Proskurin
Such a stove is capable of heating one or two rooms with a total area of 17÷20 m², so it can be built into the wall between the kitchen and one of the small rooms of the house. At the same time, it certainly needs to be oriented in such a way that the structure faces the kitchen area with the slab.
The dimensions of this heating structure, excluding the height of the chimney, are 750x630x2070 mm. The stove has two operating modes - winter and summer, which allows you to use only the hob during the warm season, without unnecessary heating of the entire house. The heat transfer from the stove when it is fully fired is 1700 kcal/h.
To construct this heating structure, the following materials will be required:
| Name of materials and elements | Quantity (pcs.) | Element dimensions (mm) |
| Red brick M-200 (excluding pipe laying) | 281÷285 | 250×120×65 |
| Fire-resistant fireclay brick, grade Ш-8 | 82÷85 | 250×120×65 |
| Fire door | 1 | 210×250 |
| Doors for cleaning channels | 2 | 140×140 |
| Blower door | 1 | 140×250 |
| Summer damper for chimney | 1 | 130×130 |
| Fire valve | 1 | 130×130 |
| Stove valve | 1 | 130×130 |
| grate | 1 | 200×300 |
| Single burner hob | 1 | 410×340 |
| Steel strip | 1 | 40×260×5 |
| 1 | 40×350×5 | |
| 1 | 40×360×5 | |
| Steel corner | 1 | 40×40×635 |
| 3 | 40×40×510 | |
| 4 | 40×40×350 | |
| Roofing iron | 1 | 380×310 |
| Pre-furnace metal sheet | 1 | 500×700 |
To fill the foundation, it will be necessary to prepare cement, crushed stone, sand, gravel, roofing felt, reinforcing rod or steel wire 5-6 mm thick. If you decide to replace the drying chamber with a hot water tank, you will have to purchase or manufacture one as well.
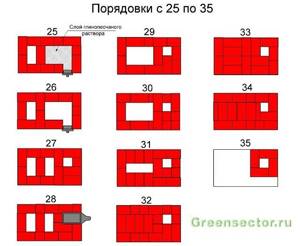
In order for the work to be successful, before starting it, it is strongly recommended that you study the order very carefully, and during the laying process, keep this diagram always at hand.

Diagram of the Proskurina furnace with sections
This illustration shows this furnace schematically in several sections. Here you can clearly see how the chimney channels run inside the structure and trace the movement of smoke from the firebox to the chimney.
| Illustration (order) | Brief description of the operation performed |
| The first row is continuous, it is laid out according to the configuration shown in the diagram. The row must be perfectly even, since the reliability and durability of the entire structure will depend on its correct laying. A row consists of 15 bricks. |
| Second row. At this stage, the shape of the ash pit (ash chamber) and the bottom of two channels that will run vertically are laid. When laying out a row, openings are left for installing the doors of the blower and cleaning chambers. They are installed on the same row. A row is laid out of 13 bricks. | |
| To secure them in the masonry, cast iron doors are equipped with special lugs into which prepared pieces of wire are inserted. Next, their ends are twisted together and embedded in the seams between the rows of side walls. To prevent the door from moving from its installation location until it is completely fixed, it is temporarily supported with bricks. |
| The third row is laid out according to the diagram. The walls of the blower and cleaning chamber are raised in it, and the ends of the wire are fixed in the seams between the rows of bricks, with the help of which the doors are fixed. To lay a row you will need 13 red bricks. |
| Fourth row. The chamber of vertical channels is divided into two, since later they will be laid out separately. The cross-section of the channels along their entire height will be 80×120 mm. In addition, the installed doors overlap in this row. You need to prepare 13 red bricks. | |
| The fifth row is laid with refractory fireclay bricks, as the lower part of the firebox is formed. In the bricks that determine the location of the grate, a cut-out is made at a right angle from their inner edge. The cutout size should be approximately 10x10mm ± 1mm. The prepared bricks are laid above the blower chamber. To lay a row you will need 16 fireclay bricks. |
| After this, on the fifth row, a grate is installed in the prepared recesses in the bricks. It is sometimes mounted on a clay mortar, but often without any mortar at all. In the latter case, the gaps between the grate and the brick, which should be about 3÷5 mm, are filled with sand. | |
| Sixth row. The walls of the two vertical channels continue to form, and the walls of the firebox begin to be built. Masonry is carried out only with fireclay bricks. The row consists of 12 fireclay bricks. |
| Next, on the sixth row, a combustion door is mounted, which, like the blower door, is fixed with wire in the seams of the side walls. However, before installation, the firebox door is equipped not only with wire fastenings, but is also wrapped around the perimeter with asbestos cord. This process must be carried out to create a thermal gap that will allow the metal to expand when it is very hot. |
| The seventh and eighth rows are laid out from 12 refractory bricks each and correspond to the ordering pattern. During their laying, the walls of the firebox continue to rise and vertical channels are formed. It is clear that the bricklaying in the rows is intertwined. | |
| When laying the ninth row, the combustion chamber door is closed. To remove the load from the cast-iron door, the edges turned towards the combustion chamber are cut off from the bricks installed on the side walls at the same angle of 30˚. These cuts will serve as a kind of support for the middle brick, cut on both sides at an angle of 60˚, that is, it should fit perfectly between the two outer bricks. You will need 12 fireclay bricks per row. | |
| On the tenth row, the fuel chamber is combined with the outermost vertical channel, since the smoke generated in the firebox was directed into this hole. In order to ensure the smooth flow of hot air, a protruding corner is cut off on the middle brick separating the combustion hole and the closed channel. This row will require 11 fireclay bricks. |
| On the eleventh row, the masonry going around the combustion chamber is different in that it uses bricks with a cutout to a brick depth of 10 × 20 mm. This step is intended for laying the hob. For masonry you will need 11 fireclay bricks. | |
| After the 11th row is laid out, the step on the bricks is lined with asbestos strips or a layer of clay, 3÷4 mm thick (assuming a hob thickness of 5 mm). These spacers will serve as a cushion and thermal gap for the hob. Then, the hob is installed in the place prepared for it. On the side where the cooking chamber will be formed, the corner part of the masonry is reinforced with a metal corner. |
| From the twelfth row, masonry will be made only with red brick. At this stage, the walls of the cooking chamber are laid, and the previously open vertical channel is again closed with a jumper. To lay this row you need to prepare 10 bricks. | |
| The 13th row is laid out according to the diagram, but in the outer part of the first vertical channel a place is formed for installing a valve designed to switch the furnace modes to winter or summer operation. To do this, cutouts are made in the brick to deepen the metal element. Next, the stationary part of the chimney valve is fixed to the prepared area using a clay-sand mortar. A row is laid out from 10 bricks. |
| 14th ÷ 18th rows - each of them will require 10 bricks. The masonry on these rows has the same configuration, taking into account the dressing, and forms vertical channels and a cooking chamber. | |
| On the 18th row, the cooking chamber is covered with three steel corners, which form the basis for laying the next rows. One of these elements is installed on the edge of the “ceiling” of the cooking chamber, the second is rotated towards the first and installed at a distance of 250 mm from it (the size of a brick), and the third corner is pressed with its back side against the second. Looking at this design, it is quite possible to understand how the bricks should be laid. | |
| 19th row. When laying it out, 12 bricks cover the cooking chamber, but above it a steam exhaust hole is formed into which the valve will be installed. To install this element, cutouts are made in the edges of the bricks installed on three sides, and a layer is removed from the outer brick, making its thickness smaller. Next, a valve is secured to the prepared site using clay mortar. | |
| The 20th row is laid out according to the presented diagram. At this stage, the installed valve is closed and channel openings are formed. The side brick in the first vertical channel is cramped for a smooth flow of heated air. A row will require 15 bricks. |
| On the 21st row, the first vertical channel and the hole for removing steam from the cooking chamber are combined into a common space. The masonry is carried out around the perimeter of the furnace, the brick is installed in the form of walls, and the second vertical channel is also framed. Moreover, the corner inner brick is cut off to ensure smooth escape of steam into the chimney. For laying you need to prepare 11 bricks. |
| Next, on the same row, the resulting space is covered with steel strips, which will provide the basis for installing a metal plate and laying the next rows. | |
| The next step, which is carried out on the same row, is the installation of a roofing iron plate. With its help, a chimney hole is formed, located on the opposite side of the window for steam to escape from the hob. |
| On the 22nd row, the brickwork is covered with a metal plate. Next, the laying is carried out according to the scheme. Only the channel openings remain open. Then a metal corner is installed on the outside of the oven, which will strengthen the front part of the bottom of the drying chamber. Laying a row will require 15 bricks. | |
| 23rd row - the walls of the drying chamber are formed. Its back wall is made of brick, installed on its side - it will separate the chamber from the opening of the chimney duct. 12 bricks are used. | |
| On the 24th row of 11 bricks, the walls of the chimney and two vertical channels, as well as the drying chamber, are formed. |
| 25th row - work continues according to the diagram, the masonry is made of 12 bricks. The second brick of the back wall of the drying chamber is installed in the same way as the first, on the side. | |
| 26th row. At this stage, the vertical channels are prepared to be combined into one space, therefore, to direct the smoke in the desired direction, the bricks in the vertical channels are cut at a slight angle. To lay a row you will need 11 bricks. |
| On the 27th row, two vertical channels are combined using masonry, and a cleaning door is installed on this common chamber. The back wall of the drying chamber is raised by another brick, which is installed on the side. A row consists of 11 bricks. |
| On the 28th row, consisting of 10 bricks, masonry is performed according to a pattern similar to the 27th row. And then three metal corners cover the space of the drying chamber. |
| On the 29th row, almost the entire area is covered with brickwork, which is installed in accordance with the diagram. Only the hole above the drying chamber is left open, where the valve will be installed in the cuts made on the bricks framing this opening. The outer brick is cut off, making its thickness smaller. A valve is installed in the prepared “nest” on the clay mortar. The row consists of 17 bricks. | |
| The 30th row, consisting of 16 bricks, completely covers the surface of the oven. The only exception is the chimney hole, the size of which is equal to half a brick. |
| On the 31÷32nd rows, a chimney begins to form. |


If you decide to install the stove yourself, then the work should be carried out slowly, approaching each stage of the process with all responsibility and maximum accuracy. Provided you follow all the recommendations and the provided ordering diagram, even a novice master will be able to cope with this work and gain experience for new creations.
And at the end of the article - another example of laying a miniature brick oven for a country house.
Video: compact brick oven for a small kitchen
Brick laying - step by step instructions
The procedure for how to assemble a simple stove with a stove of any type consists of two stages:
- Dry masonry . At this stage, the bricks are laid out without using mortar. This approach allows you to better understand how to move the stove, understand the design of its smoke channels, and identify possible problem areas. When carrying out dry masonry, gaps of the same size are left between the bricks: inside them there will be a masonry mixture. For these purposes, you can use plywood or wooden spacers 5 mm thick. Dry laying is carried out to the point where the chimney begins. Next, each of the rows needs to be numbered and dismantled.
- Main masonry . If the first stage did not cause any difficulties, proceed to the main procedure, how to build a small stove with your own hands. To implement this you will need a clay solution. The reference point here is the order scheme and numbered brick rows.
The following step-by-step do-it-yourself oven instructions are offered:
- Preparation of masonry mixture . Dry clay powder must be soaked in water for a day. After this, the soaked material is mixed with small portions of sand: it is more convenient to knead the solution manually until the lumps and compactions completely disappear. The volume of sand added directly depends on the fat content of the clay, and can reach 100% of the total mass of the mixture. A sign of good quality clay mortar is that it slides off the shovel without sticking to its surface. Factory-prepared dry clay powders do not require pre-soaking.
- Laying the bottom rows . Its effectiveness depends on how you lay a brick oven. The upper surface of the base must be waterproofed. For these purposes, bitumen mastic or a couple of layers of roofing material are suitable. The outline of the base of the future structure is marked on top of the roofing material. The first two rows of bricks are laid completely on top of the roofing felt. The second row is mounted in such a way that its joints do not coincide with the joints of the first.
- Arrangement of blower and cleaning channels . Using the third and fourth rows of bricks, a niche is laid out for the ash pan and the cleaning cavities of the chimney.
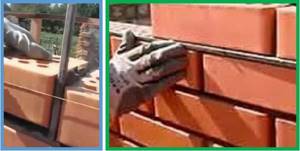
- Door installation . To secure cast iron doors in brickwork, they must be equipped with holes in the corner area of the frames. A soft steel wire of such a size is inserted into the holes made so that a piece 30-40 cm long peeks out from each edge. To seal, an asbestos cord must be fixed to each frame. Having installed the doors in the desired position, pieces of wire are placed in the joint solution of the upper and lower brick row.
About home stoves
They don’t just put stoves in the house. This is a tool. And the main requirement for it is this: to compensate for heat loss at home. Accordingly, the size of the stove must correspond to the living space it heats.
In theory, hoping that the dacha will be used only in the warm season and very slightly in the off-season (late spring-early autumn), you can slightly reduce the required indicator and build a smaller stove than would be required according to theoretical calculations. But practice shows that in 99% of such cases there is a temptation to visit a house in the middle of nowhere at least once a year. As a result of trying to heat too large an area, the small stove cracks - its power is initially insufficient.
And almost always a small furnace structure is operated with constant overload - often such forcing occurs involuntarily, unconsciously. They are simply trying to create comfortable living conditions, at least for a while. So the result is quite natural: the masonry cracks and collapses quite quickly.
The point here is not the depravity of the chosen design or violations in construction technology. The reason is that the dimensions of the furnace do not correspond to the tasks assigned to it.
In villages today you can find many different stoves, including outdated, archaic designs. And it is important to understand that the age of a circuit does not always indicate its quality. Unfortunately, many ancient stove fantasies are not suitable for repetition in modern realities in a number of ways.
An article about how to properly fit a stove into the style of your home.
For example, the once popular Dutch woman was once (in the 17th century) a truly revolutionary idea. But a lot of time has passed since then, and this scheme today is very inconvenient from the point of view of safety and ease of use. The large length and total number of successive smoke circulations lead to intense soot precipitation and the appearance of cracks in the furnace mass - the difference (gradient) of heating of different parts of the structure body is too large.
The traditional Russian stove also does not always meet the conditions of a country house - first of all, because it takes up too much space. In addition, a body of this design, even if we are talking about an improved one, is too massive. As a result, there is a large thermal inertia.
That is, the stove will have to be heated for a long time to warm up. Although it will take a long time to cool down. But this may turn out to be pleasant and necessary if you live permanently, but with irregular visits it will only get in the way and irritate.
Probably, the optimal choice for a summer resident will be the so-called Swede - a simple universal brick stove with a hob for one or two burners, limited by a cooking chamber and an oven powered by a firebox connected to the stove. Structurally, the Swede is a slightly modified standard kitchen hearth with a heating panel.
What distinguishes the Swedish from the basic idea is the cooking chamber - a niche above the stove. Accordingly, a certain volume is formed above the cooking chamber (the so-called niche in which the stove is enclosed), which can also be used somehow. Sometimes stove makers place a dryer there, but it is more practical to include this array in an active unit involved in heat transfer.
It is precisely this scheme that will be discussed below. Moreover, the order is not so complicated and is quite understandable for a beginner.
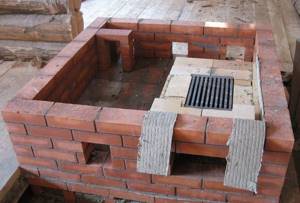
Construction of the firebox base
Before making a firebox for the stove, it is necessary to build a foundation for it: for this, the fourth row of bricks is used. The lower fireclay elements are equipped with a quarter-brick sample for laying the grate. Its function is to separate the firebox and the blower. The fifth row serves as a support for the side walls of the firebox and the separators of the vertical air ducts.
Features of a brick kiln
As a rule, the masonry of almost any brick oven is built from a natural and environmentally friendly material, this is clay, which can withstand very high temperatures and retain heat for a long time.
At the same time, during heating, the brick does not emit any harmful or hazardous compounds to human health. Clay bricks have high thermal conductivity, resistance to high temperature loads, and are also resistant to open flames.
It should be noted that an ordinary standard brick kiln has several important elements that must be erected in stages according to a special scheme:
- foundation;
- firebox or combustion chamber;
- grate;
- ash chamber;
- chimney.
Of course, a brick oven has a number of specific advantages, including:
- rapid heating of the oven;
- Can use different types of fuel;
- minimal operating costs;
- the warmth of the walls does not allow you to get burned if you touch the surface of the stove with your hand;
- The oven heats up quite quickly;
- the stove can perform a decorative function;
- does not require constant cleaning; it is enough to clean the vent once a week;
However, at the same time, a stove of this type also has several important disadvantages, among which are:
- if you operate the stove incorrectly, it can lead to carbon monoxide poisoning, which is very dangerous;
- the furnace has significant technical dimensions;
So, first of all, you need to decide on the installation location of the furnace structure; this is a very important criterion. The fact is that the heating of the room, as well as the practical and rational use of space in the room, depends on the location of the stove.
At the same time, the location of the stove must be indicated in a special drawing of a brick stove with your own hands.
As a rule, most homeowners give their preference to installing a Russian stove, which is one of the most practical and reliable stoves among other types.
Top of the firebox
After the firebox in the stove is folded, another row of bricks is laid on top of the firebox door. Inside the firebox around the perimeter, a quarter 12-15 mm deep is selected for laying the asbestos cord. A liquid clay solution is used to impregnate it. A cast-iron hob is mounted on top of the cord: you need to ensure that its upper surface is flush with the upper brick row.
Which one to build?
First, let's see what kind of stove it is possible to build outdoors, taking into account the fact that it will not be heated intensively and irregularly, but will be exposed to climatic influences, freeze in winter, and it will be difficult to provide it with a high chimney. But the danger from the spread of carbon monoxide from an outdoor stove is reduced to the minimum possible, although it is not completely eliminated, especially in a gazebo, under a canopy and in calm weather. Don't forget about this: there is no stove that can be heated at random without fear of fumes. You can get burned just sitting by the fire.
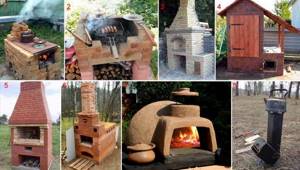
Keeping these circumstances in mind, the choice of outdoor stove design is not so wide. The simplest garden stove is the well-known rough or rough stove. She can look terrifying, pos. 1 in Fig., but it can be heated with any fuel and it works properly, almost regardless of the quality of the materials used and the work: when building a rough structure, you can use broken simple red working bricks or stones from the surrounding area using ordinary cement-sand masonry mortar, i.e. .To. microcracks in the masonry have almost no effect on the technical performance of this stove. See, for example, the video below of how a 5-year-old child built a rough stove, which his family successfully uses and which can also be used for smoking. Which, by the way, not every oven allows, see below.
Video: a simple stove, a rough one, a design accessible to a child
An outdoor oven at a weekend cottage is often a barbecue roaster, pos. 2. Although, as we will see later, in fact this is not a barbecue at all. Such a stove takes about the same amount or less bricks as a rough one (about 200 pcs.), and you can use red working brick in the same way, but masonry mortar, due to the, so to speak, subtlety of the structure, is already needed for the stove for the street (see .further, about technology and materials).
Based on the brazier, the so-called. Finnish outdoor brick oven, which is a hearth, brazier or barbecue attached to a rough stove, pos. 3. In fact, the only Finnish thing about such a stove is that the Finns were the first to think of producing them in the form of a set - construction instructions with detailed instructions and procedures, dry mixture for preparing masonry mortar, embedded parts, fittings. Now domestic kits for building an outdoor brick oven are sold in the Russian Federation. Sometimes the set also includes bricks; if necessary, hemmed/trimmed and numbered. A kit for an outdoor Finnish stove is inexpensive, and even a completely inexperienced person can build a stove from it, which is why the Finnish outdoor stoves from the kit are very popular, see for example. track. video clip.
Video: Finnish outdoor stove
https://youtube.com/watch?v=1qCvXhB7jSk
Even less common in areas is an outdoor fireplace, pos. 5. The reason is limited functionality: you can admire the flames and cook something as if on a simple fireplace, although the material and labor intensity of an outdoor fireplace is quite high. A Russian stove is built on the street (item 6) even less often. The culinary qualities of products and dishes from a Russian oven are well known, but a small Russian oven requires 2500 bricks, a large one - 3500, the design is very complex and it is not easy to protect it from bad weather. For the same reasons, Neapolitan (item 7) and Sicilian ovens for pizza and pastries are not very common in private households; In addition, these are quite highly specialized devices.
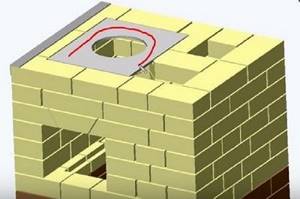
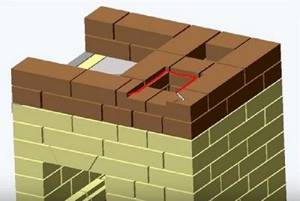
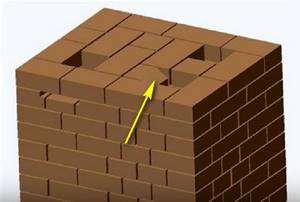
Smoke channels
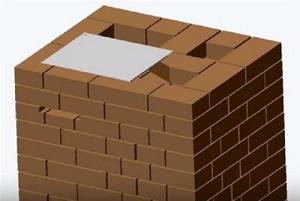
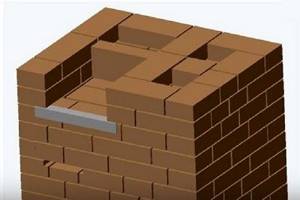
The top of the chimneys above the canopy is laid out at a height of 9 brick rows. In this case, the upper part of the partition (3 rows), from the first to the second channel, is not fully closed. Flue gases will subsequently circulate inside this niche. The third smoke channel between the last and penultimate brick row is decorated with a gate valve.
Useful video on the topic
Scheme for creating a small heating and cooking stove:
Construction of a furnace equipped with a drying chamber according to Proskurin’s drawings:
Laying a stove does not tolerate fuss and haste. It is necessary to think through and carefully carry out each stage of work in order to obtain the desired result. It's better to start with a small design, as described above. Having gained experience, you can move on to building more complex ovens: with an oven, drying chamber, arched openings, etc.
Do you have experience building a stove with a stove? Please tell readers about the technical nuances of arranging the foundation and laying the solid fuel unit. Comment on the post, participate in discussions and add photos of your homemade products. The feedback block is located below.
Exterior design
After a simple stove has been assembled with your own hands, its external design is carried out. If the masonry is done carefully, additional finishing is usually not carried out. To do this, it is important to embroider the brick seams efficiently and beautifully, for which special tools are used. In some cases, plaster of stove walls can be used if the interior of the room requires it. For these purposes, the same material is used as for laying bricks (it is recommended to give preference to industrially prepared clay mixtures).
Procurement of materials and components
The main building material from which a do-it-yourself stove is built is red ceramic brick. It must be of high quality and must be solid; stones with voids inside are not used in the stove business, except perhaps for the construction of outdoor grills and barbecues.
To assemble a small-sized Dutch oven, you need to prepare the following materials and fittings:
- red burnt brick – minimum 390 pcs.;
- grate size 25 x 25 cm;
- loading door 25 x 21 cm;
- small cleaning and blower doors 14 x 14 cm;
- metal flap 13 x 13 cm.
List of components and building materials for the hob:
- solid ceramic brick – 190 pcs.;
- grate 25 x 5 cm;
- two-burner cast iron stove measuring 53 x 18 cm with disks;
- fuel chamber door 25 x 21 cm;
- metal tank - boiler with dimensions 35 x 45 x 15 cm;
- oven 32 x 27 x 40 cm;
- cleaning doors 13 x 14 cm – 2 pcs.;
- chimney valve;
- steel corner 30 x 30 x 4 mm – 4 m.
To save money, you can take on the manufacture of a tank for heating water yourself - simply weld it from metal 3, or better yet, 4 mm thick. There is another option: instead of a tank, place a coil inside the furnace, welded with your own hands from a steel pipe with a diameter of 25-32 mm. But we must remember that in such a water circuit it is necessary to organize constant circulation using a pump, otherwise the metal will quickly burn out.
To build a Swedish heating and cooking stove, you will need the same set of materials as for a stove. Just take a larger corner - 50 x 50 mm, buy a steel strip 40 x 4 mm and prepare fireproof (fireclay) bricks for laying the firebox. To install fittings, find soft steel wire with a diameter of up to 2 mm.
How to build a stove correctly
In the vast majority of cases, construction begins with the construction of a foundation for a future heat source. An exception may be outdoor mini-ovens, which due to their low weight are sometimes placed directly on the concrete screed of the yard. All others, regardless of location, must be built on a solid foundation. Moreover, it is not allowed for the foundation of the stove to be connected to the base of the house or placed close to it; it is necessary to leave a gap of at least 5 cm, and preferably 10.
Important. Failure to comply with this requirement may lead to the fact that after a year or two the stove may crack and even deviate from the vertical
If the house has a good foundation in the form of a cement screed, and the total weight of the stove does not exceed 750 kg, then a foundation is not required; masonry can begin directly from the screed, having previously laid sheets of asbestos and roofing steel. The structures presented in the previous section weigh over 750 kg, and therefore it is necessary to provide a reliable foundation for them. There are 2 types of foundations for the furnace: rubble and reinforced concrete.
Regardless of the type of base, you first need to dig a hole whose dimensions exceed the area of the stove by 10 cm in each direction. The depth depends on the thickness of the upper layer of chernozem or other subsidence soil, while the base of the foundation should rest on a denser layer. In the first case, the pit is laid with rubble stone and dressing, using a solution of the following components:
All voids between the stones are also filled with this solution, and the upper part, located at a depth of 80 mm from the floor, is also leveled with it. The reinforced concrete base is poured with formwork and reinforcing mesh, having previously poured a 10 cm thick cushion of crushed stone onto the bottom of the pit.
Important. After the mortar or concrete has hardened, a waterproofing barrier made of roofing felt in 2 layers must be laid on top of the foundation
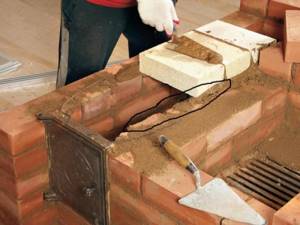
The furnace is laid according to the procedures, observing the thickness of the seams within the range of 3-5 mm. After laying each row, it is necessary to control compliance with the vertical and horizontal using a plumb line and a building level. The mortar can be applied to the brick with a trowel or by hand; light tapping of the stone after placing it in place is allowed.
The remaining mortar is removed from both sides of the wall, and the inside is wiped with a wet rag to create a smoother surface. This is necessary to ensure the least resistance to flue gases.
When installing fittings and water tanks, it is important to ensure that there are no gaps between the masonry and the metal surface; the joints must be carefully filled with a solution, otherwise the stove will begin to smoke. Upon completion of construction, it is necessary to wait 2 days until the solution dries completely, after which you can test fire the stove starting with a small amount of firewood
How to build a small stove at home is described in detail in the video:
Heating stove
Now let’s see how to build a brick stove with your own hands, designed to heat a small country house.
Its dimensions:
For construction you will need the following materials and accessories:
Sequence of work
The first row is the base of the oven. It should be laid out especially carefully, checking the horizontality using a level.
The corners are the hardest part for beginners. To ensure that they are even, we recommend immediately installing four template posts on the edges of the masonry. They can be made from planed boards, knocking them down in pairs at right angles.
By installing such “formwork” from floor to ceiling, you can easily create ideal angles.
On the second row, two bricks with a beveled edge facing into the ash chamber are laid at the end of the furnace. The laying of the third row begins with the installation of a blower door, fixed with wire in the seams of the side bricks.
Rows 4 and 5 continue to form the walls of the ash chamber. In the sixth row, they begin laying the walls of the fuel chamber and install a grate in it.
At the level of the 7th and 8th rows, a combustion door is installed. At the back of the chamber, beveled bricks are placed to improve traction. The ninth row covers the firebox door.
From rows 10 to 16, the fuel chamber and vertical smoke exhaust duct are being laid. On the seventeenth, a cleaning door is installed in the oven.
Rows 18-30 form smoke circulation channels. They need to be laid out as evenly as possible, rubbing the inner walls with a wet cloth.
Rows 31-32 form a vault covering the oven.
33 and 34 form the chimney.
Having finished laying, the stove is left for a week with the doors and pipe open to dry. After this, a test fire is made, burning small portions of wood chips, branches or straw.
Source
How to make a simple but effective stove?
This option can serve as an alternative to the simplest metal heating devices - for example, a potbelly stove. With the help of this stove you can heat the room, cook food, and even admire the flames.
The structure occupies just over half a square meter. Unlike full-fledged brick ovens, this one does not require a foundation. The weight of the structure is not so great as to make a strong base - it is enough to lay a strong board.
The oven can be made in just a day. One of the advantages of this option is that starting heating is possible in the evening. Certain skills are necessary, but they do not go beyond the skills of the average male.
On a note! No qualifications are required to build stoves. But it is necessary to maintain order - this will make the design as effective as possible in the context of its potential.
What will you need for the job?
This is not only a simple, but also a budget option. To build the structure you will need:
Clay solution is used as a binder. In total you will need about 20-25 liters of the mixture.
It will also be interesting: barbecue oven - types and characteristics.
Preparation
The first step is to decide on the location of the stove. Since the mass of the structure is small, there are no limitations inherent in traditional brick solutions. By securing strong boards or a suitable alternative material, the “foundation” is thermally and waterproofed.
The role of an insulator can be played by a non-flammable material - for example, basalt wool. Polyethylene or roofing felt is placed on top of the base. The size of the latter corresponds to the dimensions of the base plus a small allowance.
A layer of sand 1-2 cm thick is poured on top. The bedding is leveled. It is important to make the base level - the quality of the design and the convenience of subsequent work depend on this.
Masonry scheme
The oven order is as follows:
After this, those bricks that were laid “dry” on the 4th row are removed. At the same stage, the smoke exhaust duct and the surface of the stove are cleaned of construction debris.
Final works
The simplest stove does not require serious decorations. The only decoration is whitewashing. It is recommended to add a little blue and milk to the composition - this will protect the coating from the formation of a yellow coating and bleaching.
Important! Brick and metal should be protected before work. If this is not done (for example, using film), you will not be able to get rid of the stains.
It is necessary to coat the seams between the brick and the metal of the chimney very well, as well as the seams between the ceramics and cast iron.
It is imperative to close the joint between the stove brick and the floor. This will prevent oven sand from getting into the room. It is advisable to cover the joint with an L-shaped sheet. Then they make a plinth edging, which serves both as decoration and as an additional element that prevents the “foundation” bedding from spilling out.
Figure 3. Functioning oven
The stove is ready. The entire process took no more than one working day. Now you can try making low-power kindling. You cannot use logs - only wood chips or paper. Wood burning will create too high a temperature and the structure will crack. For the mixture to fully set, you need to give it a week or two. After this, you can already heat it “like an adult.”
An even simpler version of the stove
If the previous option seemed complicated to someone (although it is not), we can offer an extremely simplified heating design. You can lay out this oven with your own hands in literally an hour, even if your hands are far from being called golden.
Figure 4. The simplest version of a brick oven
The operating principle of the structure is simple. Solid fuel burns below, and settles here under the influence of its own mass. Temperature changes create a draft that carries hot air currents upward. In this case, the firewood burns almost without a residue - the smoke is minimal.
For masonry you will need only two dozen whole bricks and two halves. The stove consists of five rows. The design is so simple that there is no point in describing the order. The procedure is clearly shown in the illustration.
Figure 5. Order of the simplest brick structure
If you lay the bricks correctly (and it is very difficult to do otherwise), the result will be similar to that shown in the photo. It is recommended to bind the bricks with clay mortar. But in field conditions, you can do without binding material - just put the components on top of each other according to the order. In this case, the stove is built in five minutes.
Figure 6. Laying process Figure 7. Finished mobile brick oven
For those who want an intermediate option, we can recommend a slightly more complicated option.
Figure 8. Diagram of a simple stove
According to this diagram, the output is an L-shaped three-section stove. The first compartment is designed for loading firewood. The second is a chamber in which the logs are burned. The third compartment is the chimney duct.
Figure 9. L-shaped stove
To create this structure you will also need 20-30 bricks. This option can be completed by yourself in a couple of hours, if the skills of a mason are completely absent. A specialist will complete the construction in a matter of minutes.
Advantages of the simplest furnace designs
Place for the furnace
Choose the optimal location for the heating stove. For example, a stove installed in the center of the room will distribute heat as efficiently and evenly as possible. However, such placement of the stove is not always convenient.
Stove in the center of the room
If the stove structure is placed against the wall (this option is the most popular and frequently used), cold will flow across the floor of the house.
Select in advance the location of the combustion chamber door. Design the stove so that in the future you do not have to carry fuel throughout the room, spreading dirt around the room.
The heating stove is located against the wall
The best option is to install a firebox in a room that is rarely visited.
Recommendations regarding the foundation are standard - an individual concrete foundation is installed. It cannot be connected to the main foundation.
Calculate the design of the foundation in such a way that it is able to withstand the load not only of the furnace itself, but also of the smoke exhaust structure, which is also strongly recommended to be built of brick.
The process of laying the Radonezh stove
First step. Cut a hole in the wall for the stove. Drive reinforcing dowels into the ends of the beam (if the wall is made of this material).
Second step. Pour the foundation.
Start laying 1-1.5 months after laying the foundation. It is during this period that the concrete will gain the required strength.
Third step. Cover the dried foundation with waterproofing material.
Fourth step. Lay out the first row of the oven. Check the evenness of the masonry using a level. Make seams no wider than 3 mm.
Continue laying the stove in accordance with the order.

The grate and ash pit are installed in the combustion chamber. The width of the furnace vent must be sufficient to allow the required amount of air to flow to the loaded fuel during operation of the heating unit.
Lay out the furnace combustion chamber and sew the channels. Trim off excess mortar.
When laying the 26th row, make a 20 mm overlap on each side.
Complete the laying of the main part of the stove in order and begin laying out the chimney.
Continue installing the chimney in accordance with the previously prepared project.
Dry the finished oven. To save time, install a fan in the combustion chamber.
After the masonry has dried, make several test runs. Don't make the first fires too intense.
If everything is done in accordance with the instructions, order and basic requirements, after an average of 30-40 minutes, the side of the stove facing the room will heat up. After about 1.5 hours, the unit will warm up evenly and begin to fully heat the room.
Building a heating stove with your own hands is a rather complex and lengthy process, but if you wish, you can cope with such an event. You just need to follow proven technology, use only high-quality building materials and adhere to the chosen masonry scheme in everything.
As a result, the heating unit will serve as long as possible, reliably and efficiently, and you will additionally save on arranging the heating system for your home by refusing the services of third-party stove makers and doing everything yourself.
Video - Do-it-yourself heating stoves
Video - Do-it-yourself heating stoves
Everything is very well written. I’ll add on my own that there is no need to look for fireproof clay. Now ready-made mixtures for laying stoves and fireplaces are sold on the building materials market. Everything is already mixed there in the right proportion. There is one more point about drying the oven. Make the first launch using exclusively paper and cardboard as fuel. Firewood is highly undesirable. Then you will get the required temperature. Warm it this way for no longer than an hour. When drying, the clay may smoke a little. That is, there will be smoke in the room. Don't be scared by this. The clay will dry very quickly and the oven will work as it should.
I would like to suggest one interesting idea that I myself have experienced. Inside the oven you can lay out “Gabrodiabase”. This stone is a type of granite and is used to make monuments. You can ask for trimmings at funeral services, after making sure that it is really gabrodiabase and not simple granite. You can buy it, but this stone is very expensive because it can withstand high temperatures! Good luck!
At the dacha, I twice made stoves in the house and in the bathhouse on my own. In the latter, the second option turned out to be relatively successful, but the design itself is simple. In the house, the basis was metal stoves lined with bricks. I immediately rather modestly assessed my capabilities in constructing a more complex structure, and I still think so, having already had experience. That is, for the construction of a good stove and, especially, a fireplace, it is best to turn to good stove makers. By the way, my sister did just that and until they installed the boiler, it worked great for them.
Have we answered your question?
Scheme for laying a stove for a home
A diagram for laying a stove for a home is the first thing that a person who decides to install heating in his home using a stove will need. In this material we will look at what layout schemes for home brick ovens exist, what are their features and differences.

Laying a stone stove can be done in the following ways:
When arranging a stove using the first method, plastering the stove is not required, since all seams are filled with mortar. The thickness of the kiln walls determines the way in which the bricks are laid. The walls are laid out with a thickness of one brick and half a brick. Sometimes you can find a masonry of 3.4 bricks. For work on the installation of a stove, it is imperative to use stove bricks. It is also called “red brick”, solid. Under no circumstances should you use bricks that have been taken from a dismantled building, expanded clay blocks or slotted bricks.
The first row is laid simply with bricks, without using mortar. The brick is leveled, the front wall and the places where all the doors will be located are determined. These operations can be called the last "estimate". When these actions are completed, the bricks are laid with mortar.
After this, they begin to lay the corners. The next stage, according to the advice of experts, is the arrangement of the contour of the entire stove. Using plumb lines, string is stretched from the ceiling to the corners of the stove. With the help of these vertical lines, you can easily navigate while working.
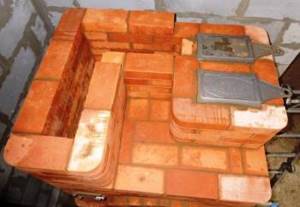
Considering the model of the stove you have chosen, you should determine the areas in which the following will be located: the ash pan, the combustion chamber, and the ash pan. The door under the ash pit is installed when the third row of bricks is laid, and after one row the ash pit is laid out.
After this, the firebox is arranged. Each door is attached with burnt wire. When you get to laying out the vault, you will need to cut the bricks. A calculation will be required to ensure good joining of the bricks with each other. The laying of the vault begins after the second row of bricks is laid after the firebox door.
To line the combustion chamber, special refractory bricks are used. Since facing bricks and masonry bricks have different temperature characteristics, installation of the lining to the furnace itself should not be done rigidly. When installing a chimney pipe, care should be taken to install a special valve, the adjustment of which should be smooth and easy.