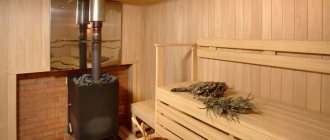
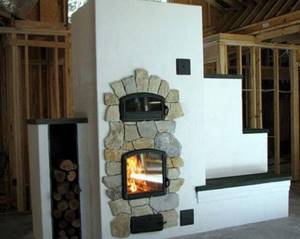
Decorative design
The versatility of plaster makes it very flexible when it comes to decorative work. Since ancient times, stoves have been decorated with paintings, which can still be done by covering the walls with whitewash, as well as using water-based paints. Moreover, a damp, unbleached coating is an excellent opportunity to decorate the interior with frescoes.
Many types of decorative plaster can imitate noble stone chips. Special tools or the use of improvised means in the form of brushes, washcloths and even plastic bags will allow you to create a unique surface texture for every taste.
In addition, plaster goes well with decorative tiles, from which you can lay out interesting patterns, and, if desired, mosaics. Also, the presence of corner elements will make the creative process a little easier, and the appearance of the stove much more impressive.
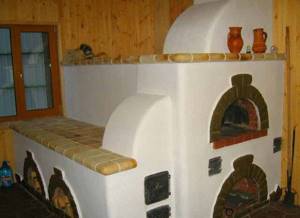
Decorative finishing
The decorative design of the stove walls is carried out in accordance with the taste preferences of the owner. An evenly plastered surface can simply be whitewashed; by the way, whitewashing is a traditional finishing method that has been used since ancient times. The whitewashed surface was often painted with imported paints, giving the room originality and emphasizing national traditions. In most cases, the ornament was selected according to local traditions.
Modern technologies and materials make it possible to create an imitation of natural stone or a uniform relief structure on the surface of the stove wall.
Quite often, craftsmen with a wide imagination decorate stoves with elements of three-dimensional designs, using various available means for this purpose. In particular, we are talking about plastic film, brushes, brushes and other materials and objects.
Creative people create relief compositions from decorative plaster, allowing them to protrude slightly beyond the stove walls. Subsequently, all this is covered with paints. Moreover, applying the coloring composition to wet decorative plaster promotes deeper penetration and increases the service life of the decorative finish.
In some cases, the dried surface is additionally painted, which allows for a brighter design.
Terracotta or ceramic tiles can be used as decorative finishing for stove walls. The additional purchase of corner finishing elements makes the installation of tiles and decoration simpler and more convenient, allowing you to obtain neat and aesthetic corners. The tiles are installed using a special cement-based adhesive composition, which is resistant to temperature changes.
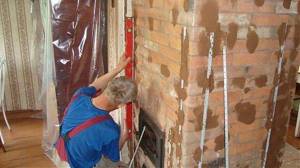
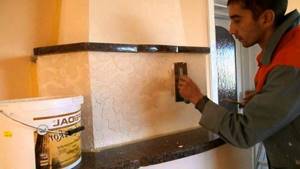
Stage 3: plastering the stove
Plastering a stove with your own hands.
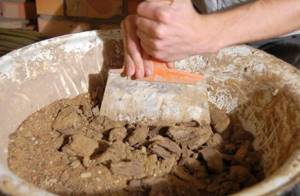
Plastering stoves is done in a special way. There is a technology here that must be adhered to. So, you need to start with the first layer, which is called spray. Here the solution is taken and applied to the hot walls of the oven. Its thickness should not be more than 7 mm. Be sure to level the plaster layer with a spatula to get a smooth surface without any defects. In this case, it is necessary to use a more liquid solution for spraying. Then you will need to prepare a new one, but with a thick consistency. It must be applied when the first layer has dried a little. Its thickness should be approximately 5-6 mm. After this, you need to leave the oven for several hours so that the plaster dries a little.
Next, take a grater and grout the surface with it. Here you can use plastic or metal equipment. You will need to take a brush in the other hand; if necessary, you will need to moisten it in water, and then moisten with it those areas of the plaster that have dried out too much. During this work, it is necessary to achieve the most even surface possible. If any defects are found on it, for example, cracks or potholes, then you need to prepare a little solution and cover it with it. As soon as it dries, it will need to be rubbed down.
Then you need to do the finishing plaster. Here you need to take a different solution. It must be prepared from the following ingredients: lime whitewash, water, salt. The first step is to dilute the salt. Take 100 g of salt and 1 liter of water. Then the finished mixture is poured into whitewash (10 l). All this is thoroughly mixed and, if necessary, additionally diluted with water. After this, the solution is directly applied to the surface of the oven. It will be enough to cover everything in one layer to avoid further cracking of the finished coating. This completes the plastering of the stove with your own hands. You can enjoy its attractive appearance.
Useful tips from professionals
When making mortars, be sure to monitor the proportion of sand; if it is exceeded, the plaster will lose its elasticity.
It is necessary to carry out external finishing of the stove only after the brickwork has become completely solid, otherwise cracks will appear on the plastered surface.
To get the highest quality solution, be sure to sift the sand before preparing it and soak the clay in water for a day. Thanks to this, the plaster will be very durable, and in the end there will be no need to carry out finishing work again.
After plastering is completed, do not forget to hang decorative elements on the stove.
Plastering with clay: how to properly plaster a stove
Plastering brick and stone stoves is required to prepare the outer surface of the walls for decorative cladding and increase the tightness of the masonry. Proper plastering of the stove will avoid possible cracking of the finish and will extend the life of the finished device. Even a novice master can carry out such a procedure independently; the main thing in this matter is to properly prepare and apply the plaster mixture.
Heat-resistant and practical materials are used for cladding heating stoves: ceramic and fireclay tiles, tiles, artificial stone and plasterboard. Plaster is especially in demand - an affordable finishing material that can be prepared from cheap consumable components. In addition, you can plaster surfaces yourself in the shortest possible time without outside help.
Plastering the stove is carried out for the following purposes:
- Leveling brick or masonry surfaces.
- Restoration of the old plaster layer (in case of deformation, cracking, chipping).
- Restoration of masonry mixture in connecting seams.
- Antiseptic treatment of seams to prevent the development of pathogenic microorganisms and insects.
- Increased thermal inertia of equipment.
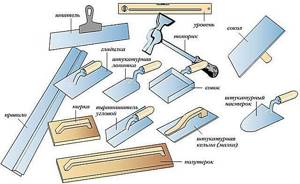
To plaster a heating stove in a private house or bathhouse, you need to prepare the following set of tools and materials:
- Spatulas of various widths for taking out plaster composition and treating surfaces.
- Trowel (trowel) for distributing the composition on brick and stone walls.
- Grater (grater) for leveling treated surfaces.
- Hammer for driving nails. Nails are used to secure the mesh.
- Wire mesh with cells measuring 10×10 mm to strengthen the treated surface.
- Scissors for cutting mesh.
- Hammer (fist) for use together with a trojan, gear and chisel.
- A trowel for leveling the surface after plastering.
- Chisel for applying notches that increase the adhesion of the composition to the surface.
- Brushes of various sizes.
- An electric drill with a mixing attachment for preparing the plaster mixture.
- Volume container for kneading.
- A wire brush for cleaning surfaces and joints.
- Dry mixtures for mixing plaster.
- Deep penetration antifungal primer.
- Asbestos to increase the stability of the composition.
- Lime for whitewashing.
- Level, rule and staff for leveling corners.
- Personal protective equipment – rubber gloves, goggles.
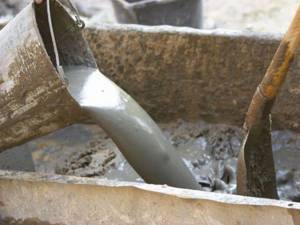
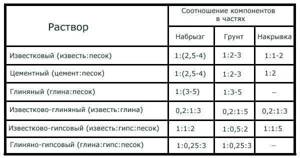
For plastering heating stoves, heat-resistant solutions based on clay, sand, asbestos and gypsum are used. You can prepare a wear-resistant mortar for plastering the stove using one of the following recipes:
- Mixing components: 1 part clay, 2 parts sand, 1 part lime paste and 1/10 part asbestos. Everything is thoroughly mixed with the gradual addition of water to obtain a viscous solution.
- Mixing components: 1 part clay, 2 parts sand and ½ part water. 1 part of cement (M 300, 400) and 1/10 part of asbestos are added to the resulting mass. All components are thoroughly mixed again, and if necessary, some water is added to obtain a thick, creamy solution. They can be used to plaster surfaces within 60 minutes after preparation.
- Combination of components: 2 parts lime paste and 1 part sand. Next, 1 part of gypsum, 1 part of water and 2/10 parts of asbestos are added to the resulting mass. Everything is thoroughly mixed until a viscous solution is obtained. Ready-made oven plaster is used to treat the surface for the first 15 minutes.
- Composition of components: 1 part clay, 2 parts sand and 1/10 part asbestos. Water is added to the resulting mixture to obtain a thick solution.
Important! To obtain high-quality plaster for a heating stove made of brick and stone, it is recommended to follow the proposed proportions of the main components.
If you follow all stages of the technological process, you can properly plaster the stove yourself so that the decorative finish does not crack.
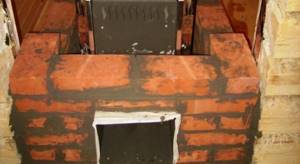
At this stage, the surfaces are completely cleaned of old mortar, dirt and dust. The seams between bricks or stone are cleared with a trowel and hammer to a depth of 150 mm. This will ensure reliable adhesion of the surface to the plaster composition.
Important! Plastering of a new stove is carried out 3 weeks after completion of masonry work and complete drying of the stove mortar. Failure to comply with the established deadlines may result in the decorative layer beginning to crack and deform.
After dismantling the old cladding, the surfaces are cleaned with a wire brush and a clean dry rag to avoid dirty stains that may appear through the fresh plaster layer.
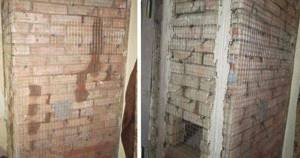
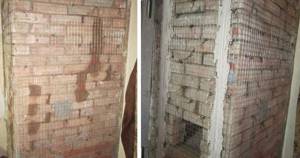
The prepared surfaces are treated with an antifungal primer. 10 cm nails are driven into the cleaned seams at an angle with the heads raised above the surface up to 0.5 cm. The horizontal step between nails should be 15 cm, the vertical step - every 2 rows. A wire is fixed to the nails, and a metal mesh is placed on top. The reinforced base will ensure good adhesion of the plaster to the surface being treated.
To align the outer corners of the structure, steel corners are used, fixed with an adhesive mixture.
You can plaster the stove with ready-made store-bought or homemade solutions.
We suggest you familiarize yourself with How to fill a floor evenly without beacons
If a ready-made dry composition is used for work, then the kneading is carried out according to the instructions:
- Water is poured into the container. Next, dry mass is added in the proportions indicated on the package.
- Kneading is carried out with a construction mixer until a viscous homogeneous mass is obtained.
- The finished mixture is kept for a quarter of an hour, mixed again, and then used for surface treatment.
To independently mix a solution for plastering surfaces, traditional components are used, which are mixed in the required proportions. Recipes for homemade compositions are given above.
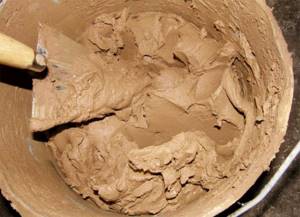
The finished solution should be plastic and viscous, without air bubbles, lumps and dry inclusions.
Depending on the condition of the surfaces, the stove structure can be plastered in one of two ways.
Method No. 1
It is provided in cases where the surfaces have slight deformations and therefore require leveling using a plaster layer with a thickness of 5 to 8 cm.
- Installation of guide beacons according to the level and checking verticality.
- Thoroughly warm up the oven and wet the surfaces with a brush or soft roller. This will remove any remaining dust.
- Treating surfaces with a primer to prevent peeling of the plaster.
- Apply the first layer 4 mm thick by spraying over the entire surface of the wall to ensure maximum distribution of the mortar in the connecting joints of the brickwork.
- After the initial layer has dried, a second layer 5 mm thick is applied. First, the solution is distributed along the wall from bottom to top to a height of 40 cm and leveled using the rule. Next, the surface is carefully sanded to eliminate possible irregularities.
- At the corners, the solution is applied with an angle spatula and carefully leveled.
- Finally, a third layer of mortar 2.5 mm thick is applied using a trowel to eliminate minor defects and irregularities. In addition, it is applied if final painting or whitewashing of surfaces is provided.
Method number 2
It is effective provided that plastering of surfaces is carried out on a pre-installed metal mesh.
- Similar to the previous method, the first layer of plaster is applied, moving from top to bottom. The metal mesh will provide the necessary rigidity to the finish.
- After treatment, the surface is thoroughly dried, after which a second layer is applied.
- The final layer is leveled and sanded to eliminate minor visual defects.
- The next step is the decorative lining of the stove.
Violation of the technology for applying the plaster composition can lead to the appearance of defects on the surface of the furnace. If the solution was applied to dry brickwork, this could result in peeling and cracking of the finish. On an excessively moistened surface, chips and bubbles may appear, which must be eliminated after thoroughly drying the structure.
Using poorly slaked lime can result in small blisters that are prone to peeling and crumbling.
Small cracks and chips appear as a result of improper mixing of the plaster solution or failure to comply with the proportions of the main components. Also, large thickness of layers or insufficient drying can lead to cracking.
(15.00 out of 5)
about preparing mortar for laying stoves
It is advisable to treat the stoves after the brickwork has completely hardened and the possibility of its shrinkage has been eliminated. As a rule, the masonry dries in about 5-8 weeks.
Remember that plaster will last you a long time only if you prepare the solution correctly. As a rule, they are plastered with a regular clay mixture. However, nowadays lime-gypsum mortars have gained wide popularity.
You can also use a cement-clay-sand or lime-clay-sand composition. You can easily purchase all these materials at any hardware store in the form of a dry mixture or prepare them yourself.
A high-quality plaster mixture should be easy to apply and smooth on the surface. The amount of sand that needs to be mixed into the clay solution depends on the degree of fat content of your mixture.
If you use fatty clay, then the ratio of the main components in the resulting mixture should be approximately 1:3-1:4. To increase the density of clay-based plaster, you can add approximately 0.1-0.2 parts of crushed fiberglass or asbestos.
We figured out what solution should be used to treat the surface so that the finish does not crack. Now let's look at how to apply plaster correctly.
Before you begin plastering your fireplace, you should thoroughly clean the surface to remove dust, mortar residue, and other debris.
It is advisable to heat the stove before plastering and apply the solution to warm walls.
- To improve adhesion to the masonry, you should clear all the seams between the laid bricks to a depth of approximately 0.5-1 cm.
- Plastering the stove must begin from the top.
- It is advisable to thoroughly moisten the brickwork with water.
- Then, using a special grater or trowel, apply a liquid layer of solution.
- After it dries a little, you can begin to apply a thick layer.
- To ensure that the plaster dries evenly, try to apply it in an even layer.
- Once it has set sufficiently but is slightly soft, rub it in using a wooden grater.
Choosing the composition of the plaster
The question of how to plaster brick stove walls is the most important one when planning such an event. It should be said right away that the usual cement-sand mortar used for plastering the walls of a building is not suitable for stoves. It will simply crack in a very short time. For plaster, you can use a ready-made mixture intended specifically for this purpose, or prepare it yourself, but according to a special recipe.
If you decide to use ready-made materials, then you need to purchase a stove or fireplace plaster mixture. All the necessary ingredients have already been added to it, and preparation for application consists of diluting it with water in the proportion specified in the instructions. When using them, one caveat should be taken into account: their long-term storage is undesirable, since atmospheric moisture can lead to premature hardening of the mixture in the form of poorly soluble lumps.
Most often, homemade solutions for plastering stoves are prepared of the following types:
- clay;
- lime-clay;
- calcareous-sandy-clayey,
- lime-gypsum;
- cement-sand-clay.
The practice of furnace construction shows that it is precisely such compositions that are least susceptible to cracking when heated. Other additives are also introduced to improve properties.
When preparing the solution, it is important to choose the correct proportions of ingredients. The precisely selected composition allows you to easily and evenly apply a thin layer to the stove wall. In particular, a certain consistency of the composition is used as grout
The viscosity of the solution is regulated by the proportions of water, plasticity largely depends on the amount of sand, and the more of it, the less elasticity of the mass
In particular, a certain consistency of the composition is used as grout. The viscosity of the solution is regulated by the proportions of water, the plasticity largely depends on the amount of sand, and the more sand there is, the less elasticity of the mass.
Preparation of the solution
There are many recipes for plaster solutions in the world. You need to know how to make your own plaster. Below is the composition of the highest quality and most popular of them (proportions in parts):
- Sand – 2, cement – 1, clay – 1, asbestos – 0.1;
- Clay – 1, sand – 2, asbestos – 0.1;
- Gypsum - 1, lime - 2, sand - 1, asbestos - 0.2 (in this case, asbestos can be replaced with fiberglass in the same proportion).
Now in more detail about each component:
Clay is an important part of any plaster; some stove makers soak it in water the day before finishing work so that it can swell and become saturated with liquid.
Preparation of the solution
It is best to use river sand. Before use, you should clean it of debris (shells, stones, etc.), if any, and dry it to accurately determine the proportions of the future solution.
Lime is an excellent component of such a mixture, because... ensures its secure grip on the surface. However, do not forget that a solution containing lime will take longer to harden than usual.
The same goes for cement. If you are going to use it, be prepared that setting will take at least 12 hours to complete, and final strength will not be achieved until 20-30 days later. A high-quality plaster solution should be easily applied to the oven walls.
How to plaster a stove - step by step diagram
Step 1: Heat the stove
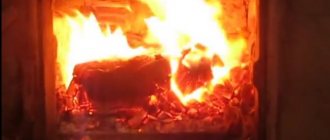
Before preparing the solution for plastering the stove, heat it thoroughly so that it crackles where it should and warms up the walls. This rule cannot be broken even in the summer, despite the heat.
Step 2: Prepare the surface
Carefully go over the surface of the oven with a broom and brush to remove accumulated dust and remaining installation solution. To improve adhesion, it is better to clean and slightly deepen the cracks in the brickwork, but not more than half a centimeter.
Step 4: Reinforcement
If you decide to use burlap for reinforcement, this step is for you! The fabric, pre-cut into the required pieces, should be soaked in a liquid clay-sand solution and glued to the stove from top to bottom, just like wallpaper is glued. You can combine the pieces end-to-end, but it is better to overlap by at least 5 cm.
Step 5: Apply plaster
Remember that the thickness of each layer of plaster should be no more than 5 mm, and the total thickness of the facing layer should not be more than 1 cm. The solution must be applied from top to bottom, in an even layer, so that the facing dries evenly. As soon as the plaster has set well, it should be rubbed with a wooden float using circular movements. If the composition has hardened too much, moisten it with water. At the end of applying the plaster, people used to smooth it out with a rag soaked in a liquid solution of the same composition.
After completing the process, do not rush to heat the stove; let the layer of plaster dry completely. If cracks form during drying, they should be slightly widened with an ordinary knife, moistened with water and rubbed with the same solution. If over time you notice new cracks on the surface of the stove, analyze your actions - the stove may peel off and crack due to shrinkage, excessive layer thickness, or improper ligation of rows of bricks. In addition, cracks can also appear due to overheating.
Is it necessary to apply plaster to the stove?
Why is the stove structure plastered? The procedure is needed for a reason; the stove must turn out durable and airtight. Unfinished structures are a rare occurrence.
Why is it necessary to finish the furnace device?
- Due to the finishing material used, the fireplace becomes attractive in appearance, and the interior of the house also changes.
- To plaster the stove, a clay composition is used. The solution is also insurance. After covering with the mixture, the masonry becomes airtight and durable. This is important, because if there are significant differences in temperature, the masonry will crack in certain places. Then the smoke will penetrate directly into the room, which negatively affects the health and interior of the room.
When visiting construction markets, you may notice that the price of heat-resistant products is higher than that of mixtures for plastering ovens with a clay base.
Thus, the composition of the mortar for plastering a stove can be prepared from sand and clay. Cement and lime can be added to it. Mixtures based on gypsum and lime are considered popular. Clay plaster is often purchased. The plaster must withstand serious temperature changes and other negative impacts.
In addition, it is important to plaster the stove by mixing the solution, observing the proportions. The volumes are determined by the fat content of the clay, because it is the main component. If the work will be carried out with high fat content of clay, then a composition of 4 measures of sand and 1 measure of clay is prepared. To increase the elasticity of raw materials, fiberglass and asbestos are used. They are added to the finished mixture.
Is it possible to plaster with Rotband?
Experts answer this question categorically - no. Such protection will quickly turn yellow and crack. The basis of this plaster is gypsum, which goes into a semi-aqueous state when the temperature reaches 1300. Such a layer will simply fall off the wall.
Therefore, it is better to use a proven method of preparing a solution from clay and sand, even if it takes several days to prepare it, than to end up with cracked walls.
In general, the most worthy option is to line the stove with ceramic tiles, which will serve for a long time and reliably. The main thing is to choose a good glue or solution and do the job well.
But it all depends on the choice of the home master
It is important for us to answer the main question of the article - what mortar should I use to plaster the stove? The TOP 10 mixtures from leading manufacturers of heat-resistant plaster will help you solve the problem of choice
Mantel
If facing work is planned after masonry, it is necessary to wait until the structure has completely dried, and only then begin to transform it.
Final work - finishing the erected fireplace
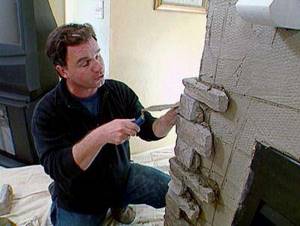
- The first thing they do when starting this process is to apply a special plaster to the masonry, perfectly leveling the walls. When they dry, mark them and only then begin cladding.
- Surface finishing starts from the corners. If possible, it is better to purchase special corner tiles for these areas, which will make the work easier and faster. In addition to marking on the planes of the fireplace walls, for the evenness of the rows and maintaining the thickness of the seams between brick-shaped tiles, special calibration devices are used in the form of crosses or tubes of the required thickness.
- A special adhesive is used to lay the tiles. It is applied in such a way that after pressing the tile it does not protrude on the sides.
- When the glue dries, the seams are sealed with a special mixture intended for this (heat-resistant fugue). This must be done very carefully, trying not to get the solution on the surface of the tile. If this happens, it should be wiped off immediately with a soft cloth.
For greater clarity, a video about building a fireplace with your own hands
This is not to say that folding a fireplace is completely simple, and a beginner will not encounter difficulties during the process. But with a strong desire and a detailed ordering scheme, this can be done. Cladding a structure is a more creative work, after which the building will be transformed and acquire its own “face.” This is what makes it interesting - after finishing laying the tiles, you can admire your work of art.
How and what to grout the stove after plastering
You can start grouting when the solution has already set to the surface, but has not yet completely dried.
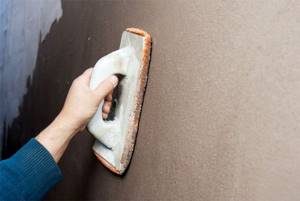
It’s even better to do it with a wooden grater or a plastic one with a soft cloth attachment. One hand holds the grout, the other holds the brush with which the surface is wetted.
The movements are circular, but if there are depressions or bumps, they can be modeled in order to carefully eliminate defects. The pressure on the tool is greater on convex areas and less on depressions.
The result of grouting is a smooth, even surface.
Process Features
So, when you have decided on the choice of plaster, and the necessary tools are already at the ready, all that remains is to start creating. However, in order to properly plaster the stove, you need to follow a certain technology and sequence of processing steps.
Surface preparation
Preparatory work is an important process that ensures the quality and durability of plastering. So that all your work does not turn out to be in vain, first of all, you need to perform the following actions:
- Remove old layers of cladding using a hammer and chisel, and then clean the surface of dirt and remaining substances with a brush.
- If the stove is new, you should also clean the masonry.
- Deepen all seams by 0.5–1 cm and remove dust from them.
- Prime the walls, including the seams.
It is very important not to start cladding a structure if it has just been built. You need to wait at least 3 months for the stove to “settle” and for the materials from which it consists to adapt to operating conditions
Preparing the mixture
The solution must be prepared after all the preparatory measures have been completed, otherwise the plaster may harden and become unusable.
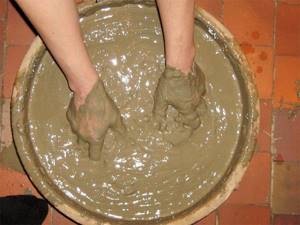
Before mixing all the ingredients, the sand must be sifted and cleaned of foreign impurities. The same applies to clay - it is crushed and all debris in the form of particles of rocks and plants is removed. Next, the clay is soaked in water until the liquid covers it by 10–15 cm. On average, this process takes 2–3 days. When the base is ready, it is combined with the remaining components and stirred with a mixer. In some cases, it is permissible to add water, since the consistency of the finished solution should be similar to sour cream.
Warp finishing
Sometimes old age, damage or unscrupulous work of builders can cause distortions in the walls of the stove. You can fix this this way:
- focusing on the building level, set up beacons for alignment;
- heat the stove so that it is warm;
- moisten the slanting wall with a roller or brush;
- the surface is primed and left to dry;
- the first layer of plaster is applied using the “spray” method so that the mixture covers all the seams;
- after the first layer has dried, apply the second - it should protrude about 1 cm above the beacons. Start work from the bottom, leveling the rule every half meter of the layer;
- the wet solution is polished with grout;
- To level the corners, use a special corner spatula.
Application of mesh
The use of this mesh in cladding allows not only to level and hide surface defects, but also makes the plaster coating more uniform and durable. To plaster the stove, you need:
- install the mesh near the work surface at a distance of no more than 2.5 cm;
- “spray” apply the plaster and wait for it to harden;
- cover everything with the next leveling layer;
- rub out;
- decorate.
Light plaster
The need for such work usually arises if the stove has no obvious defects or distortions, but needs cosmetic repairs. Plaster it like this:
- guide elements are fixed on a previously prepared surface so that the coating is uniform;
- apply the solution from bottom to top with a wide spatula, which is immediately leveled using the rule;
- the corners of the structure are plastered with an angle spatula;
- the result is neatly erased.
Composition of the solution
The first solution option is the most popular.
It consists of clay, asbestos, sand and lime in the following proportions: 1:0.1:2:1. All this needs to be thoroughly mixed, and then brought to the desired state with the help of water, which we need to gradually add to the solution, stirring it.
As a result, we will get something similar to sour cream: the resulting solution should not be too liquid or thick.
Composition of the solution
In another option, the plaster solution includes clay, sand, M400 or M500 cement and asbestos in the following proportions: 1:2:1:0.1.
First you need to mix the clay with water to make a thick dough. After this, add asbestos, cement and a little water to the resulting mixture so that the solution resembles sour cream in thickness.
It is worth noting that the disadvantage of this recipe is that the solution must be developed within 60 minutes: such substances quickly set and soon become unsuitable for use.
Wall panels made from modern materials appeared relatively recently and quickly gained popularity. Here is all about sheet wall panels for interior decoration.
A screed is a special layer of a mixture of sand and cement, which is used to make a good base for the floor. By clicking on the link, you will become familiar with dry floor screed.
The modern building materials market offers panels for every taste and for any request; in addition to cost, moisture-resistant sheets are much easier to install. Sheet moisture resistant wall panels are the best of all panels.
Any plaster solution must be homogeneous and elastic. To achieve this effect, you need to thoroughly stir the mixture during its preparation until it becomes homogeneous.
To save your money, you need to know the consumption of components per 1 m2. You can see how to calculate consumption using the example of bark beetle plaster.
How to prepare a mixture for plastering stoves
The main materials for preparing stove plaster are clay and lime, the most popular solutions are lime-clay, lime-gypsum, cement-clay sand. To strengthen the plaster, some kind of reinforcing material is usually added to the solution: asbestos, fiberglass, straw, hemp. For some reason, salt is popular because it supposedly gives strength to plaster - but its usefulness has not been proven by anyone, so many craftsmen are skeptical about this method. On the other hand, the danger of asbestos to human health is widely known. In general, the question of the best reinforcing material still remains open.
The process of filling cracks in a furnace
How to choose clay for the oven
All places where there are cracks must be carefully cleared of old clay and debris, and then moistened generously with water. Before applying clay to problem areas, experienced people advise downloading a ball from the solution, by which you can determine the presence of liquid in the solution: if you press down the ball and it starts to crack, then you need to add water to the solution.
The solution, unlike cement, can be applied and smeared with your hands - there will be no harm from this. The solution needs to be pushed into the cracks, and then just spread. It is advisable to heat the oven before sealing the cracks so that its surface is warm. A good result is obtained if the solution is applied in two steps, with the next (second) layer applied to the first, which has not yet hardened. After finishing the work, you need to give the solution time to set well, which will take a week. And if everything is done correctly, you will forget about the cracks for a long time.
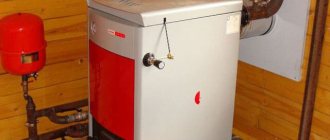
Sooner or later, owners of country houses and private houses will have to solve the problem - how to cover the stove? A failed heating device poses a threat to the life and health of the inhabitants of the house. It is no coincidence that fire safety regulations prohibit the operation of a faulty stove. The work of a master stove maker is not cheap. However, if necessary, you can repair the “heart of the house” yourself.
The oven can fail for various reasons. Sometimes it’s easier not to cover up any defects that appear, but to rebuild the stove. However, such drastic measures are rarely required. As a rule, the main reasons for the emergency condition are shrinkage, poor-quality materials and errors made when laying out the fireplace.
Heating systems require regular maintenance. According to SNiP standards, heating devices in a dacha must be inspected twice a year. And in a private house at least once a quarter. Unfortunately, most homeowners neglect these requirements.
Only a complete oven can be used
The main danger for the residents of the house is not a collapsed fireplace, but the cracks that appear in it. The explanation is simple - no one will heat a stove that is obviously in emergency condition, but cracks cannot always be noticed in time. Carbon smoke leaking through them is a serious danger for the inhabitants of the house. According to statistics provided by the Ministry of Emergency Situations, in a fire, 70% of people die from smoke, and of those who survive, 42% end up in hospital with carbon monoxide poisoning.
Therefore, timely repairs are the key to the safety of your family. Most stove makers, when asked: “how to cover the stove so that it does not crack from the heat?”, will advise using clay. However, there is a nuance here. There are several types of mixtures and almost all of them use clay.
Clay is the main component in the manufacture of masonry stove mixtures. This is explained by its unique quality - when heated, it turns into stone. The clay solution can withstand high temperatures and ensures the reliability of the entire structure. But other ingredients are also used for production. Clay is divided into two types: dry and oily. When heated, the first one crumbles, and the second one cracks and dries out.
The need to plaster the stove
A stove without external decoration has a number of negative qualities:
- The appearance of the structure cannot be called pleasant;
- Dust and various debris gradually accumulate in the gaps of the brickwork;
- The oven is very difficult to clean;
- A working stove emits a rather unpleasant odor;
- Through microcracks present in insufficiently high-quality masonry, smoke and carbon dioxide will leak into the room - a mixture quite harmful to human health.
Furnace finishing is used to level out these problems. The choice of finishing materials is purely individual - tiles, concrete coating or a suitable plaster mixture for the stove will be equally effective. However, preference is often given to plaster - it is much cheaper.
To decide how to plaster the stove in the house, you need to choose a finishing coating, which can be made of:
- Evenly laid ordinary brick;
- Facing brick.
Both materials, with proper quality of work and competently carried out jointing, make it possible to achieve a good appearance of the stove even without plaster. To enhance the visual quality of the structure, you can use a water-based varnish that creates the effect of wet stone. All this will prevent peeling of the plaster, which sometimes occurs over time.
The situation is much more complicated with an existing stove, especially if it is laid out crookedly and from uneven bricks. In this case, you will have to decide very carefully what is the best way to plaster the stove, because a mistake will certainly lead to cracking of the coating.
Before plastering a Russian stove, you need to understand the main reasons for peeling of the coating, which come down to the following list:
- Incorrect choice of thickness of masonry joints;
- Violations of the furnace order;
- Regular overheating of the oven.
To prevent these problems, you can use a reinforcing metal mesh with a cell size of no more than 1 centimeter. This mesh is laid on top of the stove and attached to it with 3 mm wire, which is inserted into each row of brickwork during the construction of the structure.
How to plaster a brick stove with your own hands
You can finish the stove using plaster mortar yourself; you need to know how to properly plaster the stove and follow the sequence of actions.
Preparatory stage
The quality of plastering in most cases depends on how correctly the preparatory work on the surface is done. Good preparation of the stove walls is the key to better adhesion of the plaster mortar to the surface.
The preparation process involves performing the following actions:
- To reconstruct a stove or fireplace, it is necessary to remove old plaster from the surface using a chisel and hammer. Then the wall is cleaned of dust using a regular or iron brush.
- The newly built stove is cleaned of any remaining masonry mortar. Neglecting this step may cause poor adhesion of the plaster to the working surface. As a result, after some time the plaster will begin to lag behind the walls of the oven.
- After cleaning the surface, it is necessary to deepen the masonry joints. Moreover, this step is necessary both for the structure being restored and for a new stove. It is also recommended to remove dust from the seams.
- The next step is to apply a primer to the stove walls. It is best to work with a thin brush so that the buried seams are not left untreated.
- The process of plastering uneven walls should always be accompanied by surface reinforcement. To strengthen the furnace walls, a metal or fiberglass mesh with cells of 1.5 * 1.5 or 2 * 2 mm is used. Reinforcement helps strengthen the plaster on the surface, making it more resistant to temperature changes. The use of reinforcing materials makes it possible to apply a thick layer of plaster, thereby increasing the heat capacity of the furnace. To fix the metal mesh, use nails with a wide head. When using fiberglass mesh, you need to apply a thin layer of plaster to the wall, embed the mesh in it, apply additional mortar and level it. It is recommended to use fiberglass on walls with slight unevenness.
- To preserve or restore corners, it is recommended to use steel or perforated aluminum corners, which are attached to an adhesive solution.
- For large differences, surface evenness is achieved by installing beacons. They are fixed to a gypsum mortar, which allows you to carry out work almost without stopping. If you have enough free time, you can attach the beacons to the clay solution, but it is better to do this with the reinforcing mesh in close contact with the wall.
- The preparatory layer of plaster can be perfectly smooth or rough. The first option is used for whitewashing or painting, the second – for decorative relief plaster. It should be remembered that ceramic tiles and decorative plaster do not require a very thick preparatory layer.
Plastering a stove with clay - making the solution stronger!
Reinforcement of stove plaster is a separate topic for discussion. And again, traditional methods are by no means inferior to modern ones, the only question is what will be at hand during the plastering process or what will be easier to get. Reinforcement is carried out both by adding components to the solution itself, and with the help of foreign materials, for example, burlap. In the first case, people often added crushed flax fibers, straw, and horse manure. Today, asbestos is added to the clay solution - at least one tenth.
Burlap is still used by many craftsmen to reinforce stove plaster. This method has its pros and cons - such a stove cannot be overheated, but burlap is the simplest, environmentally friendly and affordable way to strengthen plaster. The burlap can be replaced with a thin mesh made of steel wire, the mesh size of which is no more than 1*1 cm. However, the fastening wire must be inserted into the masonry when constructing the stove. If you missed this point, you will have to use additives in the solution or burlap.
Tools - how to plaster a stove in the house
The service life of a plastered surface largely depends on the adhesion of materials, and for this it is necessary to correctly apply the plaster and distribute it evenly on the surface of the stove.
You can solve the question of how to plaster a stove without cracking using special tools, which include the following:
- Putty knife. Several types of spatulas are used; with the help of some tools the solution is collected from a container, while with others it is applied to the surface.
- Plastering hammer. This tool is used to drive plaster nails.
- Trowel. Using this tool, the solution is evenly distributed on the stove wall.
- A hammer-cam is necessary for working with a chisel or a trojan.
- Scissors are ordinary and for cutting metal. If you use fiberglass mesh in the process, you will need ordinary scissors; you need to cut the chain-link mesh with metal scissors.
- A grater is necessary for leveling and smoothing a plastered stove wall.
- Using a smoother, the surface is brought to perfect smoothness.
- A chisel is used to make notches on the surface of the stove, this promotes better adhesion of the plaster and the working surface.
- Brushes. It is necessary to purchase several types of this tool, since some are used to apply primer, while others can be used to apply textured plaster.
- Using a building level, check the vertical and horizontal level of the working surface.
- Using a plumb line, the evenness of the walls and the applied plaster solution is controlled.
- As a rule, the mixture is distributed between beacons, which are installed on the walls for even plastering of the surface.
Manufacturers and brands
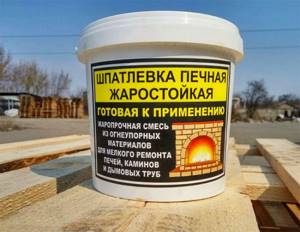
| Brand of solution | Description | average price |
| Heat-resistant plaster for “Terracotta” stoves. Package weight 5 kg. |
Made from fireclay and kaolin clay, with the addition of binders and heat-resistant additives. The material is environmentally friendly and does not contain harmful substances. It is easy to apply and hardens quickly and has a high level of adhesion to surfaces. The solution retains its properties for 1 hour after mixing with water. Work is carried out from 5 0 to 35 0. The thickness of one layer is up to 10 mm.
From 140
Fireproof plaster from. Packaging 10 kg. Can be used for laying stoves. Made from refractory clays. Mineral and heat-resistant additives are added to the solution. The mixture hardens quickly and does not shrink the layer much. Easy to apply and remove from surfaces for possible repairs. Withstands high heating temperatures. Can be applied to old and new stoves. The plasticity of the mixture allows it to be smoothed and not destroyed during shrinkage of the seams and the foundation of the furnace. Fire resistance level – 600 0.
White thermal plaster "Plitonit SuperKamin Thermo". Packaging 25 kg.
Can be applied to fireclay or ceramic blocks. Thanks to its properties and easy application of an even layer, it can add attractiveness to the stove. Subsequent painting and finishing with all kinds of finishing elements, including tiles and ceramic tiles, is possible. Reinforcing elements have been added to the composition; they can be used for preliminary sealing of wide cracks and leveling of surfaces. The thickness of 1 layer is up to 30 mm while maintaining all properties. When sealing cracks, the layer can be made up to 50 mm.
Clay mortar for plastering the Kalina Master stove. Package weight 25 kg.
Portland cement has been added to the composition. This mixture has high strength, ductility and is able to withstand high temperatures when leveling surfaces in fireplaces. A layer of plaster increases heat transfer by 15%. Good adhesion makes the plaster resistant to mechanical stress.
265
Mixture for plastering fireplaces and stoves from. Bag weight – 20 kg. Made from red refractory clay with the addition of fire-resistant fillers and reinforcing heat-resistant glass fibers. This composition guarantees a high level of resistance to high temperatures while maintaining physical properties and adds strength to the composition layer. Produced in St. Petersburg. Can be used in the construction of fireplaces and exhaust pipes. It will last a long time if you follow the operating rules of the stoves and their protective layer.
Dry plaster for “Parad” stoves Made in Belarus. The base is cement with the addition of thermal insulation materials and fiberglass reinforcement. Such additives increase the heating temperature while maintaining the qualities and characteristics of strength, ductility and protects against cracking. Can be used for laying stoves and fireplaces.
Dry mixture for stoves and fireplaces "Real". 5 kg bag.
Can be used for laying ceramic facing bricks and constructing chimneys. The maximum heating level for the plaster layer is up to 1200 0 . Operating temperature – 500 0 with a layer thickness of up to 5 mm.
Ready-made mixtures for plastering RusGips stove No. 15. This mixture can be applied in slightly frosty conditions. It consists of a mineral mixture, which is obtained by intensive mixing of screened sand of a certain fraction with Portland cement and a complex of mineral additives that enhance the properties.
256
Fire-resistant plaster "ByProc TFS-170". Packaging 3 kg. Used for application to the internal and external surfaces of stoves and chimneys. Serves to level out uneven surfaces and subsequently apply an even protective layer of mortar. Operating temperature 500 0, while maintaining strength and elasticity.
Mixtures "ByProc" MMW-070. Package weight 3 kg. All data is the same as for the previous mixture. The only difference is the maximum temperature while maintaining high performance qualities. For this solution, it is 1100 0.
Algorithm of actions when applying plaster
Good finishing of furnace equipment is within the power of inexperienced craftsmen. It is important to understand the process and use quality products. Then the stove structure will retain its original appearance for a long time.
Required Tools
You should figure out how to plaster a stove and prepare all the required tools and raw materials in advance.
For the workflow you need to acquire:
- trowel, trowel;
- grater;
- hammer;
- spatula, chisel;
- pliers;
- spray bottle for wetting walls;
- scissors for cutting fabric, metal;
- a coarse type of sieve to sift raw materials;
- container for material, liquid;
- scoop for composition;
- with a broom.
The list of tools also includes finishing for the furnace structure, reinforcing mesh with 10x10 mm cells, lime, and cement raw materials.
Mixing mortar and do-it-yourself beacons
There are different types of plasters for mixing yourself, which can be used to plaster the walls of furnace equipment.
- Made from clay.
- Made from fireclay clay.
- With the introduction of cement.
To mix a clay solution, the raw material is initially soaked in warm water until it swells. No stirring is required; straining before adding sand is enough. The material is prepared from 1 part clay and 2-2.5 measures of sand. The readiness of the mixture is determined by the appearance of clots that stick to the stick. An increase in adhesive properties and surface hardening are achieved by introducing 10% asbestos and fiberglass into the composition.
The ready-made clay mortar for plastering the stove has the following features:
- easy to apply;
- has great flexibility;
- the material is endowed with high strength when dry.
Fireclay clay (kaloin) is a cracking raw material, since fireclay loses its elasticity when exposed to elevated temperatures. Elimination of the defect is carried out by introducing quartz sand into the composition - a special adhesive with fiberglass crumbs for strengthening.
There are different recipes for preparing a mixture of fireclay clay.
- Fireclay clay 1 part + 2-4 measures of fireclay sand, crushed stone.
- Fireclay clay 1 part + 3-5 measures of quartz sand.
The volume of liquid is taken according to the instructions from the fireclay manufacturer. After mixing all the ingredients, the container is closed to prevent excessive evaporation of the liquid and left for 3 days. The paste is then mixed and can be used.
Using a clay mixture, it is possible to mix a cement composition for furnace equipment. Clay with sand and cement are taken in a ratio of 1:2:1. The main volume of the solution is combined in small volumes, determined by the speed of drying of the plastic composition. After an hour, this mixture will harden and will be unusable. No need to skimp on strength. Cement grade 400 or more is used as the base.
Beacons for plastering are taken at a lower height relative to the size of the ground cover. They are pressed into the stamps. The ridge of the beacon should become level with the flat tops of the marks. The set marks are smeared on the sides with a spatula. Beacons are placed one by one, up to 3 pieces.
Stripping and pinning
Finishing of new furnace equipment is permitted no earlier than 30 days after installation. During this period, the stove will dry completely and the shrinkage procedure of the building will end.
Before the plastering procedure, the external walls are cleaned of remaining material using a spatula or chisel. Sandpaper is used to smooth out minor irregularities. Dust is removed with a dry cloth.
The seam areas are deepened to 10 mm to improve the adhesion of the masonry to the material. The pinning and chipping is carried out by making blows using the blade of a hatchet. The holes are made up to 3 mm deep, with an interval of 2-3 cm. Then the walls of the stove are cleaned of dust with a stiff brush.
Before plastering begins, the oven is heated well, then cooled halfway and immediately moistened. To moisten the surface, use a spray bottle with liquid or liquid lime milk.
It is recommended to cover a brick or stone wall with a reinforcing mesh, which will increase the strength of the plaster coating, impart adhesion, and prevent the appearance of cracks. The mesh is necessary if the plans later cover the structure with tiles.
Applying plaster
The finishing procedure is carried out in stages, during each stage 1 layer of the composition is applied.
- Spray - is a primary thin coating, involves throwing without leveling. The spray mixture is diluted with liquid to thick sour cream. The purpose of the coating is to fill uneven areas and prepare the walls for the main coatings.
- Soil is the second coating. Place it after the spray has adhered, not allowing it to dry out. The thick composition is placed on the plane with a trowel and leveled with a grater. The soil is applied at a thickness of 3-4 mm.
- The final stage is the application of a small layer of very liquid plaster composition. The thin composition eliminates defects. The last layer, the covering, is placed in a thickness of no more than 2 mm.
The covering is replaced using decorative plastering as painting or cladding. Then the finishing coating involves the use of compounds made of stone, terrazite, lime and sand with the introduction of heat-resistant pigments.
Conclusion
What is the best way to plaster a stove? No specialist can answer this question for you. Each stove maker has his own secrets and mortar compositions for plastering the surfaces of brick heaters at home.
You can make it from a mixture of clay and sand or knead a ready-made dry solution. This is a purely individual question. The main thing is to properly mix and apply a layer of plaster on the surface of the stoves.
Classification of plaster for stoves and fireplaces and requirements for it
During combustion, a significant temperature difference is formed outside and inside the product. It disappears only after it has completely cooled down.
To avoid cracks in the brickwork, purchased or homemade plaster must meet a number of conditions:
- Be resistant to high temperatures, be heat resistant.
- Have an elastic structure. This will simplify the application process. The mixture will not begin to crumble from drying out.
- All components in the composition must be environmentally friendly and, when heated, safe for health.
- Be fire-resistant, not exposed to flames, maintain working properties.
- Adhere well to the surface.
Regardless of whether it is purchased thermal plaster or made at home, it must meet the requirements.
Ready-made factory mixtures are sold in dry form, so you need to dilute them with water in the correct ratio.
Based on the composition of the mixture, they are classified into two types.
Simple
Simple plaster is called plaster, which contains only two components: clay and sand.
Before making the solution, sand is passed through a sieve, clay through a metal mesh with small cells. This way the raw materials are clean, powdery, without any debris.
Stove makers recommend choosing fatty clay, since this way the adhesion to the surface will be much better. With increased fat content, simply increase the proportion of sand in the mixture.
Before mixing the solution, the coarse clay must be filled with water and allowed to soak as much as possible for 2–3 hours. This will make the mixture plastic, and over time the coating will not begin to burst.
Complex
A complex composition involves the combination of three or more components at the same time. There are several mixture options:
- lime, clay, sand;
- asbestos, clay, sand;
- clay, cement, asbestos, sand;
- fiberglass, sand, gypsum, lime, clay.
The basis throughout is heat-resistant clay.
It is important to maintain the correct proportions of the mixture and mix to the desired consistency, otherwise the solution will become too hard and may crack.
The composition of the purchased putty includes fireproof kaolin clay. After being fired (at a temperature of 1500 degrees), it is crushed to powder.