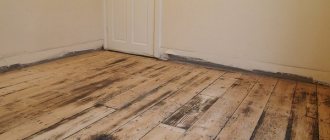
A metal stove, depending on the combustion modes, heats up to 450-600 degrees on the outer walls. While the maximum temperature of the outer walls of a brick kiln in normal mode does not reach 90 degrees.
Therefore, the radiant component of heating a steel or cast iron stove should be used as much as possible when firing it. There should be no screens between the stove and all surfaces in the heated room. Sometimes a metal stove is lined with brick walls, supposedly for better heat accumulation. However, this is wrong.
The installation of metal heating stoves, as well as brick ones, should be done after the main openings of windows and doors in the house are equipped. Then it becomes clear how the cold air flows in the heated room will be directed.
Before installing a stove in the house, you should draw a diagram of the distribution and movement of air flows, and indicate possible drafts on it. And also simulate situations when the window vents are open or the door to the street or to a cold vestibule is ajar.
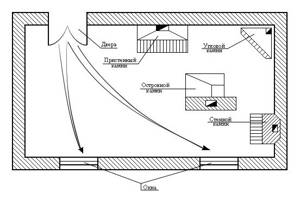
As you can see, the question of where to install the stove in the house is resolved by itself after studying the preliminary diagram of air flows in the heated room.
What should you do if you plan to install a fireplace or stove, for example, in a large hall, but you also need to heat a couple of rooms on the floor - the kitchen and the library?
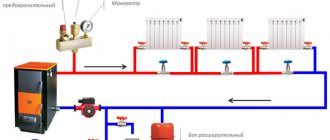
In this case, the installation of a fireplace-stove must be accompanied by the installation of air ducts from it. Before installing a heating furnace, you draw a diagram of the distribution of air ducts from it to two or three additional rooms. Next, install the air duct system. They can be made from ordinary metal corrugated pipe.
Correct installation of stoves and fireplaces also involves preliminary planning of the working space in front of the stove and the fuel supply paths. It doesn’t matter whether it’s chopped wood or Euro briquettes. The important thing is that somehow they will need to be brought and stored somewhere in front of the firebox.
Installation of otter and head
The procedure for installing a chimney, installing an otter and a cap:
- The otter's perimeter should be between 10 and 16 centimeters;
- The neck of the main pipe is installed on the otter;
- The cross-section of the neck must be equal to the diameter of the chimney;
- The head is made of brick or stainless steel;
- It can be of any shape and size;
- The chimney should rise above the roof by approximately 700-900 millimeters;
- Smoke ducts must be treated with a special solution after installation is completed.
Required materials and tools
To build a fireplace stove, you do not need any special equipment. All the tools necessary for this can be found at every owner:
- Bayonet and shovel.
- Big crowbar.
- Hand-held circular saw.
- Hacksaw.
- Building level.
- Yardstick.
- Plumb.
- Large square.
- Rule for leveling a concrete base.
- Containers for water and masonry mixture.
- Deep vibrator.
- Trowel.
- Mallet with a rubber striker.
- Pliers.
- Hammer.
To fill the foundation you will need the following materials:
- Material for waterproofing. You can use roofing felt or thick polyethylene.
- To make a reinforcing grid, use reinforcing bars with a cross section of 0.8 cm.
- Sand.
- Fine-grained (from 20 to 30 mm) crushed stone or large granite screenings.
- For the manufacture of formwork - edged boards, plywood or OSB boards.
- Concrete mixture grade M 300 or M 400.
- Nails and screws for strengthening formwork.
- Wire or plastic clamps for fastening reinforcing bars.
- Fireclay brick of SHA brand 8 standard parameters.
- Red refractory brick grade M 150 in regular sizes.
- Facing material.
- Cement.
- Clay.
- Metal corners made of steel with a shelf width of 50x50 or 60x60 mm.
- Metal gate valve.
- Insulating heat-resistant material made of asbestos or basalt.
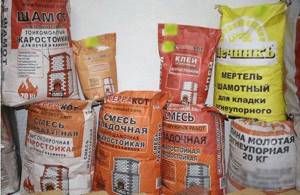
It is convenient to use ready-made material from hardware stores as a masonry mixture. Such mixtures are specialized for the construction of such structures.
Large selection
Date: September 25, 2021
Making a simple chimney
This type is very easy to implement. Such a device does not have an otter and fluff.
- In order for the structure to be as strong and stable as possible, it is necessary to first make a frame, which can be knocked down from simple wooden blocks;
- It is fixed and fixed directly at the ceiling level;
- Metal sheets are used for sealing;
- Protective aprons must be laid out in the ditch, having first bent them;
- All edges and crevices are treated with sealant;
- The internal channel is plastered and rubbed. The surface should be as smooth as possible;
- The masonry is carried out according to the standard scheme without extensions.
Photos of chimneys from the facade and the house, as well as detailed diagrams of examples, you can view in this article.
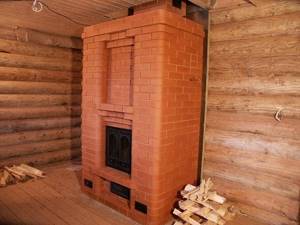
Brick oven
Full ceramic brick is the best option for laying a stove in a wooden house with your own hands
Pay attention to the quality of the material. High-quality bricks have approximately the same burning color and have no defects, and the geometric shapes should not differ
Features of laying a brick oven
The masonry of the furnace has a strict pattern, violation of which is fraught with consequences such as destruction of the finished structure or an asymmetrical result.
The first row requires especially careful laying; this will be the key to perfectly right angles and long service life of the unit. Before starting work, it is recommended to soak the bricks in a ladle of water. When starting work, take care of purchasing the necessary materials and accessories. Cast iron elements are the best option for a brick oven: for the oven, stove, firebox door, ash door, cleanout, ladle, grate and valve. The ladle can be used as a tool in the construction of a furnace. Professional stove makers also have their own kits for laying stoves. You can rent them or buy them at hardware stores.
Everyone chooses a clay solution or a solution from manufacturers for themselves, but experts recommend taking ready-made solutions because of their improved qualities. Clay mortar is made from sand and clay with water.
Stove makers share a trick: they get the same thickness of the seam by using two thin wires as a spacer between the bricks.
Here are some more tips to know:
- Compliance with bandaging of seams will increase the strength of the masonry.
- Before laying bricks in the mortar, it is exposed and adjusted dry.
- It is better to round off turns for the release of gases for a smooth exit.
After laying 2-3 rows of corners, vertical guides are installed in the form of ropes or wooden slats. The ropes are tied to the nails on the four sides of the stove and to the ceiling.
The grate must be cast iron so that the fallen coals burn out there. Therefore, this element is installed with a gap and sometimes with a bevel. It is safe to burn coals in such a place. Then the combustion door is installed on a mounting wire, which is placed in the seams so that it does not melt during prolonged combustion of the fuel. For the rest, bricks, boards and other devices will help.
The last row on which the slab will be installed is first laid without mortar to outline the location of the slab. We select a groove, put an asbestos cord in it, and only then place it on the solution. Cooking stoves at this stage can additionally be equipped with full-fledged ovens and even a tank for heating water. In the absence of an electronic oven, a stove oven can perform its functions.
When working on laying the chimney, do not forget about the need to install a valve on the summer flow channel. It is located in the inner corner of the cooking compartment.
The walls of the hood are laid out up to the opening in the ceiling. The stove is covered with several bricks, and the gap between them is filled with mineral wool. This is done in order to provide additional thermal insulation and increase heating.
Next, you should lay out a decorative brick band along the top of the finished structure, and begin constructing the chimney pipe. The brick version is more durable compared to asbestos and metal.
Ready! You were able to install a stove in a wooden house! Now all that remains is to carry out the exterior finishing in accordance with your individual preferences and tastes.
Thus, through the centuries, the wood-burning type of heating still remains the main type of fuel in the country.
And when choosing the type of stove, you should pay the most important attention to fire safety. Despite the fact that the masonry process is not an easy and time-consuming job, you can do it yourself and be satisfied with it
DIY metal hood
Features of assembly and installation:
- All seams and joints must be treated with sealant;
- The structure is assembled from individual elements, starting from the bottom and up. The planting depth of the pipes must be at least half the outer diameter;
- For roofs made of flammable materials, it is necessary to install a spark arrester;
- The head is installed at a height of more than one meter above the roof;
- The joints must be secured with special clamps;
- Using brackets, the pipe or each turn after 1.5-2 meters is additionally fixed;
- A special nozzle is installed at the bottom. It is necessary to clean the hood from dirt and soot. The diameter of the nozzle hole should be at least 10-12 millimeters;
- To make it more convenient to drain condensate, the nozzle can be additionally equipped with a special cone;
- When installed on a flat roof, the hood should rise above it by at least 500-600 millimeters;
- It is advisable to avoid installing horizontal sections. If necessary, its length should not exceed one meter;
- Additionally, the roof and walls are treated with fire retardants.
Chimney installation - insulation
Chimney installation - insulation
Installation of a chimney from the facade
Installation of a chimney from the facade
Installation of a chimney on the second floor
Installation of a chimney on the second floor
Facing
To give the fireplace a decent look and style, its firebox is lined with tiles or asbestos-based plaster.
When constructing fireplaces with a closed firebox, cladding is a necessary condition. For this, brick, tile, marble, wood and other materials are used.
Plastering the surface of fireplaces is often used.
This method is very common due to its accessibility and simplicity. Important!!! Plastering is carried out in two passes, the thickness of the final layer of plaster should not exceed 50 mm.
After drying, the plaster is covered with a layer of paint. Heat-resistant plasterboard or ceramic tiles are also used for cladding fireplaces.
Insulation materials
For high-quality insulation, preference is given to materials with the following characteristics:
- Low thermal conductivity. This will allow you to maintain a certain temperature in the chimney;
- Environmental safety;
- Durability and resistance to external influences;
- Long service life.
Professional installation of a chimney will ensure high-quality operation of any heating unit, good ventilation, complete tightness and proper draft.
How to increase the efficiency of a brick fireplace
By carefully calculating all the parameters of the firebox and laying out the masonry correctly, the efficiency of a fireplace with an open firebox can be increased to 35%. Alas, this is the limit. To double the efficiency of the fireplace, you will have to partially turn it into a stove - equip it with a door. If the door is large and glass, this will not prevent us from admiring the flame. A brick fireplace with a door can have a “stove” firebox shape: not wide and high, but rather long and relatively narrow. This will change the nature of heat transfer towards reducing the amount of radiant heat, but the massive masonry will heat up more. This “reserve” of heat will be transferred into the room for a long time after the fire in the fireplace goes out.
The brick can be replaced with durable, heat-intensive stone, and the firebox can be equipped with glass doors; doors with adjustable air flow can be installed on the ash pan. This type of fireplace is approximately three times more economical than a traditional one.
The second way to increase the efficiency of burning wood is to install a fireplace insert in the brickwork. To avoid overheating, the metal case should not be covered with bricks; a small distance should be left between the steel and ceramics for ventilation. Functionally, this combination is already a closed fireplace insert with a heat-intensive brick casing.
Manufacturing
It just so happens that even with any degree of availability of different models of fireplaces in the store, we are interested in the question of how to make a metal fireplace with our own hands. Moreover, this interest is driven not only by the desire to save money. Here you can realize all your ideas about the location, shape and decoration of a living hearth. After all the work done, relax into a soft chair and listen to the crackling of firewood in the firebox with a feeling of satisfaction.
Before you start constructing a metal fireplace with your own hands, you need to familiarize yourself with a number of aspects that will not only help improve the efficiency of its operation, but are also necessary to ensure the required level of fire safety.
- The walls of the fireplace body become very hot when wood burns. By the way, this fact should be taken into account when choosing a room for installation. Under no circumstances should this be done in children's bedrooms. Closely located surfaces must be insulated on all sides, this applies to walls and floors.
- The chimney, which ensures the removal of combustion products, must be led through the roof to the street, therefore, despite the mobility of the fireplace, you should carefully consider its location.
A homemade fireplace can be made from any material: copper, iron, steel, cast iron. As a rule, iron fireplaces are cheaper in cost, but are inferior in performance to copper or cast iron ones. The thickness of the metal for the main firebox should be 3-5 mm. Having prepared the required number of sheets, as well as the corners for making the frame, you can begin to act.
To make it easier to start constructing a metal fireplace with your own hands, you need to prepare the necessary drawings, according to which the sheets will be cut and assembled. There are ready-made designs for different types of fireplaces, but you can use your own artistic skills. Moreover, there are no special requirements for the design, so modeling and drawings are made taking into account the required geometric shapes and sizes.
You need to start assembling with the fireplace stand. It performs a dual function: on the one hand, the stand insulates the firebox from the floor at a decent distance, and on the other, it provides access to cold air, which is necessary for combustion and is a coolant. The stand will be a rectangular frame that needs to be welded from corners and legs, providing an elevation of 15-20 cm above the floor. The resulting frame is sewn up with a sheet of iron.
The body is made of metal sheets in the shape of a parallelepiped. At the top there is a hole for the chimney. On the front side, hinges are welded to the wall and the door is installed. All these manipulations require skills in working with a welding machine. If the original appearance does not have aesthetics, then you should not forget about surface finishing, with which you can veil all the flaws.
The firebox must be divided into two parts, but not a blank wall is used as a partition, but a valve capable of adjusting the gap between the sections.
- One part will serve for direct combustion of wood.
- The second is used as a smoke collector before it enters the chimney.
Functional purpose of individual parts
Fuel is loaded into the firebox and ignited. The combustion activity and intensity of heat release are directly related to the damper - with a larger opening, maximum air enters the firebox and the wood burns better. If the design involves an open firebox, the intensity of the fire does not need to be adjusted.
To regulate the air supply you need a grate. An important point is the timely removal of ash, which collects through the grate into the ash pan. Usually it is raked out or shaken out, depending on the presence of a built-in or retractable system.
The fireplace chimney removes the accumulated combustion products to the street. To prevent gases from spreading inside the house, the chimney is often equipped with forced draft force. It is a fan. For the construction of a chimney, it is allowed to use only heat-resistant bases: brick, ceramics, heat-resistant steel.
Installation features
Installing a fireplace and future installation of a chimney is quite a troublesome task for one person, take care of helpers. Let's look at some features that are identical for absolutely any type of duct, regardless of stoves or fireplaces.
So, important installation aspects:
- The distance from the combustion part to the nearest wall is at least 150 mm.
- Calculate the angle of inclination correctly.
- Provide the ability to adjust the combustion level, regardless of the chimney.
- Pipe installation should begin only after measuring all planes.
- Remember to apply a double coat of sealing compound.
- Remember, the upper contour of the next section of pipe must fit into the lower one. This is the only way to achieve protection against moisture ingress.
- Use special clamps and rivets to securely secure the connections.
- Provide for technological expansion depending on temperature; in other words, there needs to be some play at the bottom where the pipe enters the firebox. This will avoid depressurization when heated. You need to use a special adapter.
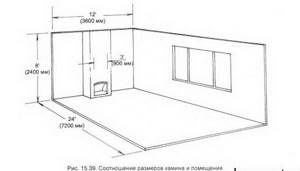
Dimensions and location of the hearth in the room
When choosing the design and drawings of the fireplace, pay attention to the dimensions of the portal, fuel chamber and chimney. The indicated dimensions are selected according to the area of the heated room and are related to each other by the following ratios:
- cross-sectional area of the chimney pipe - 1/9 of the portal quadrature;
- the depth of the firebox is made 1.5-2 times less than the height of the portal opening;
- the area of the open opening is 1/50 of the square footage of the room.
If you make a large fireplace in a small room, the chimney draft will not have enough air flow. The fireplace will begin to smoke into the room or “suck” air from neighboring rooms, along with the heat. It is permissible to build a small structure in a spacious room, but the heating will be minimal - the fireplace will decorate the living room and play the role of a barbecue.
For the convenience of determining the size of the firebox and smoke exhaust duct, depending on the square footage of the room, there is a ready-made table:
According to their shape, fireplaces are divided into 2 types - wall-mounted and corner. In the publication we provide a description of the first type - it is relatively simple. To build corner-type home fires, you need to gain experience in the stove business. Having decided on the dimensions of the heater, select a place for installation, taking into account our recommendations:
- Place the fireplace in the central part of the interior partition. If a private house is under redevelopment, renovation or construction, the rear wall can be brought into the adjacent room by making an opening inside the partition.
- It is not advisable to build a fireplace near the outer wall - some of the heat will go outside.
- Think about convenience - do not place the structure near interior doors and do not place furniture close to each other.
- Carefully study the design of the ceilings and rafter system so that the chimney pipe does not fall into the load-bearing beam or onto the edge of the reinforced concrete floor slab. The minimum distance from the wall of the flue to the rafters is 10 cm (taking into account fire-resistant furnace cutting).
When choosing a site for a fireplace, do not forget about the foundation. In a residential area, you will have to dismantle the floors, dismantle the screed and dig a pit without affecting the existing foundation of the building. Remember if there are house utilities installed in the selected location - sewerage, water supply or heated floors. The basement under the room is also a problem; not every ceiling can withstand the weight of the masonry.
Placement of firebox and chimney
Before installing a fireplace and chimney, make a floor plan, which must take into account the size of the house, the height of the chimney, the material of construction and the type of fuel. Metal and steel pipes are suitable for liquid or gaseous fuel; brick and ceramic chimneys can cope better with pressed and solid “firewood”. Builders place great emphasis on pipe placement:
With an external location, the fireplace could be located inside the house near the outer wall, and part of the chimney was “outside”. In an internal (wall) position, the chimney passes through the house, the smoke in the pipe cools gradually, without forming condensation. The chimney and fireplace take up a lot of space, so it is recommended to place the firebox near the inside wall of the house. This way it is possible not only to solve design problems, but also to use all the heat
It is necessary to take into account the load on the supporting structures and pay attention to the insulation of heating parts and the tightness of the pipe. The mounted pipes are located directly above the firebox, forming a single vertical structure; Main or free-standing chimneys require a separate foundation, because they are located on the side of the firebox.
Whatever type of fireplace and chimney location you choose, think about the ventilation system and fire protection and thermal insulation.
The best long-burning fireplace stoves with a water circuit
MBS Thermo Vesta plus
Intended for heat supply to premises equipped with water heating systems. The stove can be connected to the system in tandem with a solid fuel boiler or in independent mode.
The maximum possible water temperature inside the heat exchanger is 90°C.
The stove is made of high quality cast iron and steel. The outer enamel coating is particularly aesthetic and retains its attractive appearance for a long time.
There is a continuous cooking surface made of cast iron.
Rapid heating of the room is ensured by convection. The ash drawer can be pulled out directly during lighting, which simplifies maintenance.
Characteristics:
- power: 11 kW;
- Efficiency - 83%;
- hob - yes;
- location: wall;
- heating area - up to 110m2;
- chimney: 150mm, ;
- material: steel, cast iron, ceramic tiles, fireclay;
- glass type: straight;
- dimensions: 90*46*44cm;
- weight: 91.5 kg.
Advantages:
- design;
- build quality;
- high efficiency and long-term heat retention.
Flaws:
The internal surface of the firebox may require replacement after just a couple of years of use.
MBS VULKAN
A wood-burning stove-fireplace can heat large rooms while having compact dimensions. Perfect for use in a country house outside the city.
It will help organize autonomous heating or supplement the existing one.
The firebox is voluminous, and fuel is consumed in economy mode.
With the MBS Vulcan Thermo stove, your home will not only have a unique atmosphere, but also be more comfortable. There are modes of intense heating or smoldering.
Characteristics:
- power: 24 kW;
- Efficiency - 83%;
- hob - yes;
- location: wall;
- heating area - up to 140m2;
- chimney: 120mm, ;
- material: steel, cast iron;
- glass type: straight;
- dimensions: 65*78*64.5cm;
- weight: 151kg.
Advantages:
- ease of kindling and maintenance;
- high reliability;
- room heating rate;
- fuel economy.
Flaws:
none.
Romotop GRANADA
The stove has a modern appearance, high quality workmanship and uses an innovative method of burning wood.
The body is made of steel covered with decorative tiles. Steel stoves heat the air faster - already 15 minutes after lighting.
The combustion chamber is equipped with chamotte that can withstand up to 1300 degrees. The combustion chamber is separated from the body to reduce the risk of fire and extend the life of the stove itself.
Characteristics:
- power: 13 kW;
- location: wall;
- heating area - up to 130m2;
- chimney: 150mm, ;
- material: steel, ceramics;
- glass type: straight;
- dimensions: 125*50*56cm;
- weight: 254kg.
Advantages:
- modern design;
- wide choice of body colors;
- heating efficiency.
Flaws:
high price.
META Pechora Aqua
Pechora is one of the most efficient fireplace stoves that can effectively heat a large house. The installation is connected to heating radiators.
The stove warms up in a matter of minutes, and the fireplace itself is made of non-combustible materials, the main one being stainless steel. If you need to heat a small room, this model is suitable for that.
Then it does not need to be connected to the water heating circuit; the air heating power will be sufficient. You cannot connect the stove to heating radiators if there is no water in the radiators.
Characteristics:
- power: 9 kW;
- location: wall;
- heating area - up to 90m2;
- chimney: 150mm, ;
- material: steel, ceramics;
- glass type: straight;
- dimensions: 104*75*49cm;
- weight:155kg.
Advantages:
- does not take up much space;
- economical consumption of firewood;
- smoldering mode.
Flaws:
cools down quickly.
EdilKamin Warm CS
The stove belongs to a new generation. Depending on the area of the room, you can choose the Warm Base or Warm Scaldavivande configuration.
This stove can not only heat your home, but also provide hot water.
The design is in a classic rustic style, but will also fit into a modern interior. The ends, facade and base are cast iron, the hearth is made of steel, the cladding is made of ceramics.
Characteristics:
- power: 14 kW;
- location: wall;
- heating area - up to 140m2;
- chimney: 150mm, ;
- material: cast iron, steel, ceramics;
- glass type: straight;
- dimensions: 108*56*51.5cm;
- weight: 253kg.
Advantages:
- efficiency;
- heating and hot water;
- reliable components;
- perfect assembly.
Flaws:
Types of fireplaces: which models can be installed in wooden houses
The installation of fireplaces in a wooden house is allowed, but with strict installation requirements. There are many different models on the market. The complexity of installation depends on the materials used to make the firebox, the type of fuel, and the structural features of the house.
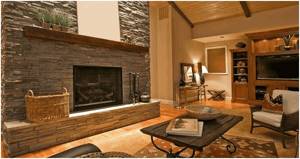
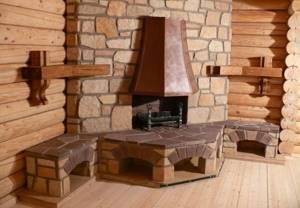
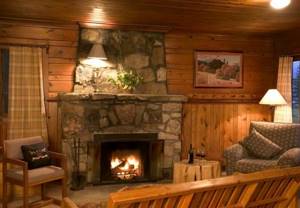
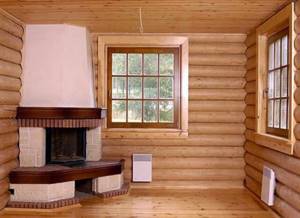
Classic hearth in a log house
Classification by type of construction and installation location
Based on the shape of the body there are:
Corner fireplaces. Such fireboxes are installed in the corners of rooms.
Corner hearth
Straight wall. Direct designs include built-in and wall-mounted ones. Built-in fireplaces are mounted inside walls and are often used when installing heating fireplaces to heat two adjacent rooms. Wall-mounted – installed near the walls.
Built-in model
Isolated. Round, rectangular, square, with an open and closed firebox - free-standing fireplaces are placed in a free area, at a distance from the walls, often in the center of the living room.
Fireplace stylized as an antique stove in a wooden hut
Types of fireplace inserts by type of fuel consumed
In a house with wooden walls and ceilings, you need to be especially careful when choosing the type of fireplace. Some designs with an open hearth are prohibited for installation in wooden houses. There are many alternative fuel fireboxes on the market that can be installed in any room without a chimney.
According to the type of fuel, fireplaces that are suitable for wooden houses are classified:
Classic, solid fuel. Standard chimney structures, the fireboxes of which are designed for the use of firewood or coal. Such fireplaces are installed in wooden houses with the obligatory installation of a separate foundation, insulation of adjacent surfaces, and ceilings.
Classic fireplace
Electrical. The most reliable structures from a fire safety point of view. Instead of an open fire, the air is heated using electricity. And the imitation of live fire is created by the illumination of the interior decoration. Electric fireplaces are easy to install; it is not necessary to form a foundation for installation; a chimney is not provided. This is an ideal design for installation on the upper floors of wooden houses, in attics. The main thing is proper wiring in reliable insulation that will withstand the load.
Electric fireplace: easy installation and safety
Biofireplaces. A relatively new type of fireplace, which is optimal for installation in wooden houses, is decorative fireplaces powered by ethanol. Inside the firebox there is a fuel container and a ceramic burner. The advantage of a biofireplace is the complete absence of ash, soot and harmful substances. Such a fireplace is not enough to heat a room; its main function is decorative. There are several types of structures: wall-mounted, suspended, floor-mounted and table-top. A special feature is the release of steam during fuel combustion, which moisturizes the air. A chimney is optional.
Suspended model with bioethanol
Gas. A gas burner is installed inside the chamber. Instead of firewood, liquefied or natural gas is used. Installation requirements do not differ from the requirements for installing classic fireplaces. Installation of a chimney is mandatory.
Fireplace materials
Classic open-flame wood-burning hearths can be made of metal or cast iron. Such fireboxes are built into decorative fireplace structures made of stone, wood, artificial stone, and brick. Fireplace groups are equipped with chimneys, which are covered with plasterboard sheathing. Open fireboxes in wooden houses must be equipped with protective screens made of glass or steel.
Cast iron firebox lined with ceramic tiles
A brick fireplace in a wooden house is a prefabricated structure on a separate foundation. Ordinary bricks are used for masonry. The firebox is lined with fireclay (fireproof) bricks. There are two design options for the chimney: a metal pipe or brickwork.
Brick fireplace with stone surround
Bio- and electric fireplaces are made of steel and fire-resistant glass.
Built-in biofireplace
Installation technology
Installation of a factory fireplace kit is carried out using the following technology:
- Connection to the chimney. Since the weight of the finished structure is much less than a capital fireplace, it can therefore be installed even on the top floor of a building. The fireplace simply crashes into an existing chimney using conventional technology, more details about which can be found in the corresponding article.
- Installation of the base. The same tiles or porcelain stoneware are used as the base. The base material is secured using heat-resistant mastic.
- Dry assembly. Before installing the fireplace, it is worth checking the kit for completeness, for which you just need to assemble all the elements without using a solution.
- Leveling the firebox. In order for the design to work correctly, you need to think in advance about how to install the fireplace correctly. The firebox in factory fireplace kits is usually installed on legs equipped with adjusting bolts that allow the structure to be adjusted according to its level.
- Taping the blocks with tape. When assembling the structure dry, it is advisable to seal them with tape around the perimeter. This operation allows you to quickly and painlessly remove all traces of mastic from the floor after installation.
- Installation of fireplace blocks. First, the ends of the blocks are coated with mastic using a narrow spatula. In this case, you need to use a little mastic so that it does not protrude beyond the edges of the blocks. The supporting elements are also smeared and installed in their place, after which the external blocks can be installed. The installed blocks must be checked for alignment before the mastic hardens. During installation, it is worth taking masking tape and using it to secure the blocks so that they do not fall apart while the mastic is in a fresh state.
- Decoration. Since the standard factory kit does not include finishing elements, they will need to be purchased separately. Cladding a cast iron fireplace can easily be done with artificial stone, which is easy to install and looks good.
- Assembling the chimney duct. The technology for creating a chimney duct looks the same as in the previous case, but thanks to fusing the chimney into the wall, you can get by with a single-chamber duct that does not require division into sections. At the end of installation, openings are cut in the surfaces of the box for installing ventilation grilles.
Conclusion
There are many types of fireplace designs, and the complexity of their arrangement varies over a fairly wide range. The described installation technologies are quite simple, so you can safely use them when assembling a fireplace yourself. In any case, before installing a fireplace with your own hands, you need to carefully and in detail study each stage of this work, so as not to encounter unexpected difficulties in the process.
Choosing a fireplace stove for a wooden house
In a wooden house, you can install any ready-made, factory-assembled stove-fireplace - there are no strict restrictions. However, some models are suitable unconditionally, while the installation of others requires serious preparatory work.
Recommended models:
- steel fireplace stoves weighing up to 150 kg, if the house has wooden floors;
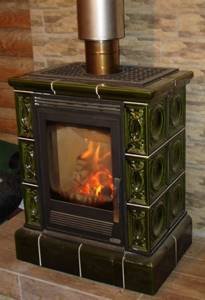
- convection stoves-fireplaces, models with a body lined with ceramics or tiles (the surface heats up less);
- with a combustion chamber raised above the floor (fireplace stoves on legs, models with a wood burner below).
Stoves and fireplaces that may cause difficulties:
- massive products with a cast iron body or stone cladding - the floors may have to be strengthened;
- high heating devices (surface temperature >90 °C).
Otherwise, when choosing a fireplace stove, you need to focus on the volume of the room and the power of the device (1 kW of power is needed to heat 20-25 m3), the necessary functionality (the presence of a water circuit, hob, oven), design and budget.
How to build a stove correctly
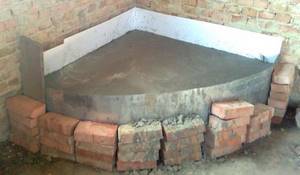
In the vast majority of cases, construction begins with the construction of a foundation for a future heat source. An exception may be outdoor mini-ovens, which due to their low weight are sometimes placed directly on the concrete screed of the yard. All others, regardless of location, must be built on a solid foundation. Moreover, it is not allowed for the foundation of the stove to be connected to the base of the house or placed close to it; it is necessary to leave a gap of at least 5 cm, and preferably 10.
If the house has a good foundation in the form of a cement screed, and the total weight of the stove does not exceed 750 kg, then a foundation is not required; masonry can begin directly from the screed, having previously laid sheets of asbestos and roofing steel. The structures presented in the previous section weigh over 750 kg, and therefore it is necessary to provide a reliable foundation for them. There are 2 types of foundations for the furnace: rubble and reinforced concrete.
Regardless of the type of base, you first need to dig a hole whose dimensions exceed the area of the stove by 10 cm in each direction. The depth depends on the thickness of the upper layer of chernozem or other subsidence soil, while the base of the foundation should rest on a denser layer. In the first case, the pit is laid with rubble stone and dressing, using a solution of the following components:
- sand – 6 parts;
- cement – 1 part;
- lime mixed with water - 1 part.
All voids between the stones are also filled with this solution, and the upper part, located at a depth of 80 mm from the floor, is also leveled with it. The reinforced concrete base is poured with formwork and reinforcing mesh, having previously poured a 10 cm thick cushion of crushed stone onto the bottom of the pit.
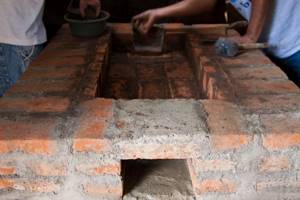
The furnace is laid according to the procedures, observing the thickness of the joints within 3...5 mm. A few recommendations:
After laying each row, it is necessary to control compliance with the vertical and horizontal using a plumb line and a building level. The mortar can be applied to the brick with a trowel or by hand; light tapping of the stone after placing it in place is allowed.
The remaining mortar is removed from both sides of the wall, and the inside is wiped with a wet rag to create a smoother surface.
This is necessary to ensure the least resistance to flue gases. When installing fittings and water tanks, it is important to ensure that there are no gaps between the masonry and the metal surface; the joints must be carefully filled with a solution, otherwise the stove will begin to smoke. Upon completion of construction, it is necessary to wait 2 days until the solution dries completely, after which you can test fire the stove, starting with a small amount of firewood. How to build a small stove at home is described in detail in the video:
How to build a small stove at home is described in detail in the video:
Installation requirements and types of fireplaces
Due to the fact that wooden buildings are at risk of fires, fireplaces and stoves are subject to special safety requirements. However, this does not narrow the list of models that can be used.
Installation of a fireplace in a wooden house at each stage is accompanied by verification of the work performed with the rules of industrial safety regulations and construction norms and regulations. To give a complete picture of models suitable for wooden houses, permitted fireplaces and stoves should be classified according to several criteria.
By location
In a log house, it is allowed, subject to insulation of combustible materials, to install and orient the fireplace in an almost arbitrary manner. The ban is introduced solely for reasons of rational use of space.
Massive building
- Corner fireplace models have the property of saving space. They are installed at the junction of two walls, hiding the demarcation line. This is why there is a visual effect of increasing space.
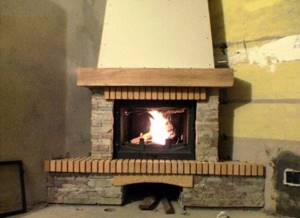
- Built-in fireplaces, oddly enough, are quite often used in wooden buildings. To partially zone the room, a brick wall with a niche for the fireplace is erected. The thickness of the wall is comparable to the size of the firebox. Inside this wall there is a channel for the chimney. As can be seen from the description, the fireplace walls and combustible materials have no common elements.
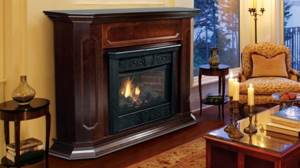
- Wall-mounted models necessarily imply the presence of a portal. It is made of different materials, depending on what functions the future fireplace combines. If this is a purely decorative device, then a portal is made of plasterboard. If a fireplace in a wooden house is installed for heating, then the portal is made of refractory brick.
Wall-mounted option with a beautiful portal
Island or isolated models are distinguished by the fact that they do not have common boundaries with the walls of the house. The only difficulty in the arrangement is the suspended chimney, which is not so easy to install while maintaining safety.
By fuel type
This section is very important for those who decide to build a stove in a wooden house. After all, many people tend to think that some types of fuel are strictly prohibited for use. Note that these thoughts have a basis in the case of a design with an open firebox. However, modern models with a hermetically sealed door provide the consumer with many options that will be safe in terms of fire.
- Provided that the wooden house is properly insulated, the fireplace is provided with a proper foundation, a chimney is erected, and all installation rules are followed in general, you can use classic fireplaces made of brick and designed to use firewood or other types of solid fuel (briquettes, coal).
- Electric fireplaces have earned the right to bear the title of the safest devices. In wooden buildings they can be used without restrictions, because instead of a living flame there is a well-designed imitation system. However, do not forget about the rules for operating heating elements.
Home electric hearth assembly
- Another option that is not subject to strict rules is a biofireplace. These models are characterized by the absence of a chimney, although the flame in the firebox is natural. Alcohol or compositions based on it were used as fuel. This is why this type of device got its name.
- Gas fireplaces are simple to install, as they have only a few structural elements. The requirements for such fireplaces would coincide with the requirements for solid fuel models, if not for the danger when operating any gas equipment. Thus, the gas fireplace is the leader in the number of restrictive installation conditions in log houses.
According to the material used in production
Solid fuel fireplaces can be made entirely of refractory bricks. The word “completely” means that even the firebox in which the fuel is burned is made of fireclay bricks. The masonry is carried out using the ordering method. This method involves a specific algorithm for forming each row. The chimney for such a stove is necessarily made of brick, which is dictated by safety considerations.

Cassette type fireplace
There are ready-made metal or cast iron fireboxes that need to be built into a specially prepared niche. Portals for ready-made fireboxes can be built with your own hands from brick, plasterboard, stone, wood. Such a fireplace design does not impose requirements on the chimney material, but if it is made of a metal pipe, then they try to veil it under a decorative frame.
Furnace laying technique
The technical requirements for the construction of stoves differ significantly from the brickwork of building elements, so even the most skilled stove-makers, before starting to lay a brick stove, lay the first row dry, without mortar. If necessary, the bricks are trimmed to achieve maximum density. (See also: Plastering stoves with your own hands)
This bookmark allows you to:
- check the equality of the diagonals of the base of the future heating medium. A similar measurement is made every 3-4 rows;
correct dimensions, seams are also taken into account here;
evenness of bricks horizontally.
It is the first row that is the basis and prerequisite for correct laying of subsequent rows, so there is no need to save time on leveling out minor errors in the first row. This will save you from difficulties that may arise if you do not take this process seriously.
Dry brick is a porous material, so it can absorb a lot of moisture from the mortar. This negatively affects the adhesion properties of the solution. Therefore, experienced craftsmen who value their name soak the bricks for a short time before starting to lay the stove. Fireclay brick does not have a highly porous structure, so it is wetted only to remove dust. (See also: How to tile a stove)
When preparing materials for building a furnace, you need to buy several types of bricks. Brick laying also plays an important role. If a brick has a protective edge with a high density, then when laying this edge is directed inside the firebox. There the temperature is high, and the dense side is more durable and can come into contact with fire. If the outside is ugly, then it is processed and given an attractive appearance. If you don’t want to process bricks, line the firebox with fireclay bricks; all its edges have the same density.
Since most often the stove is laid from different bricks, different mortars are used. The refractory brick with which the firebox is lined is in no case combined with red ceramic or any other brick that is used to lay the structure itself. There remains a dry seam of several mm between them. This is necessary because different bricks have different coefficients of expansion under the influence of thermal energy.
Installation features
The construction and installation of a smoke exhaust structure, its installation, and then assembly and fastening are considered individually for each chimney.
For a brick chimney - this is the foundation, the correct location of the rows of masonry, the composition of the mortar for the masonry, mopping, the head and, if necessary, the chimney; for a ceramic chimney - foundation, fastening of modular elements, as well as an inspection with a tee for connection; for a stainless steel chimney - fastenings and brackets, internal pipes “for condensate” or external “for smoke”, the use of bends to divert the channel from the vertical, the arrangement of passages through the ceilings and roof, plus a head and a chimney.
The construction and installation of the chimney is carried out taking into account the thermal expansion of the material during operation. It is necessary to exclude the possibility of violating the tightness of the smoke duct and adhere to fire safety rules, especially in cases where the chimney is located in close proximity to flammable structures. The height and cross-section of the chimney, the compliance of the component elements, as well as the order of its installation are calculated at the design stage of the fireplace structure.
Installation instructions
The high-quality construction of a fireplace in a house made of timber depends on the competent choice of building materials. Heat-resistant fireclay bricks are selected for the firebox. To build the building, you will need red brick. For the construction of the structure, special heat-resistant mixtures are used.
Foundation and walls
During the construction of wall-mounted fireplaces, the wall connecting to the heating equipment must be made of heat-resistant materials. Metal sheets are used for the smoke exhaust device. The dimensions of the brick wall should be 50 cm larger than the dimensions of the fireplace.
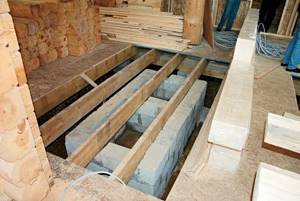
It is best to make a base for the hearth that is independent of the building. This will make it possible to prevent shrinkage and the formation of cracks. During operation, wooden elements begin to gradually deform due to the evaporation of excess moisture.
To organize the safety of the heating system, it is necessary to correctly organize the units in which the chimney passes through the roof and ceilings. The holes must be insulated with heat-resistant materials.
https://youtube.com/watch?v=f6ZylrT8Hto
To create a foundation you will need to dig a pit. Its dimensions should be 20 cm larger than the dimensions of the structure. The depth is approximately 80-100 cm, this will depend on the size of the fireplace. Broken bricks and crushed stone are poured into the pit. Next, you need to pour concrete mortar into the base. To fully gain strength, this foundation must stand for at least a month, only after which can the construction of the fireplace begin.
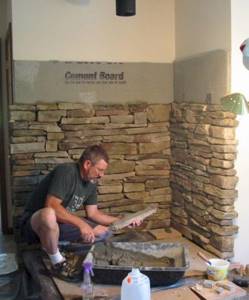
Brick construction
The laying should be carried out strictly taking into account the scheme. Solid brick is used for the frame, fire-resistant brick is used when laying the internal combustion chamber, and a special heat-resistant composition must also be used. There are certain rules for installing a fireplace in a log house:
- When laying a new brick row, you need to control the horizontal plane using a level.
- Laying is done using a trowel and trowel.
- The solution layer is 3-4 mm.
- The building composition should not extend beyond the edges of the brick.
- During the construction of the firebox, it is necessary to ensure its horizontal position. The combustion chamber in open fireplaces is made using brick, and in closed ones the inner surface is lined with metal. For cast iron fireplaces, it is advisable to install a window made of heat-resistant glass. Closed fireboxes are considered the most effective, since they make it possible to control the combustion in the hearth.
- The masonry is made at positive temperatures, this ensures better strength of the entire structure.
Installation of a chimney
A universal chimney is considered to be a design made of ceramic pipes. To carry out installation correctly, you need to adhere to certain rules:
- The installation of the chimney is carried out with control of the verticality of the pipes and the straightness of the entire system.
- The internal surfaces of the chimney walls must be treated with liquid clay.
- A cement-sand mortar is used to construct the chimney.
- When arranging the chimney, non-combustible materials are used, and foil wool is placed inside.
To build a safe fireplace, it is recommended to install a three-layer chimney. If there is not enough free space, then a double-circuit stainless steel chimney is used. Wooden parts must not touch the pipe.
This is interesting: a do-it-yourself chimney.
Floors and external cladding
The covering on the floor near the fireplace must be made of non-combustible materials. For the area in front of the combustion chamber, you can use fire-resistant stone. The floor covering can be made of stone or tiles. The simplest method is laying sheet metal.
If the firebox is not equipped with a glass door, you can additionally install a metal grill. To give the home a unique style and original appearance, tile or plaster finishing is used. Finishing is especially important for fireplaces with a closed combustion chamber. The use of brick, marble or tiles is allowed.
Design features and technical characteristics of wood-burning fireplaces
The access of smoke to the room is blocked with a heat-resistant glass door. This solution increases the level of security.
Swing and lifting structures are used
External surfaces are decorated taking into account the design features of the room. In front of a fireplace with an open firebox, part of the floor is covered with ceramic tiles or other non-combustible material.
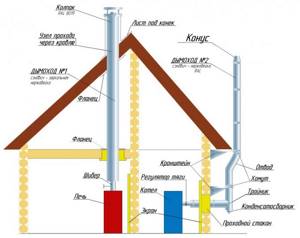
This figure highlights details that should be given special attention to in the development of design documentation:
- At the point where the pipe exits, a slot (1) is made with a size of 5-10 cm square. for sufficient ventilation of the channel.
- Passages (2) through interfloor ceilings are isolated (the distance between adjacent elements is increased). It is necessary to exclude excessive heating of parts of the building structure made of wood and other flammable materials.
- Ventilation grilles (3) are installed in the decompression compartment. This chamber is necessary to protect the adjacent ceiling from high temperatures.
- The outlets (4) are made in the convection compartment, where the temperature reaches +200°C or more. Through them, heated air enters the room.
- In this example, a shelf made of wooden beams is installed. It is protected from the inside with special thermal insulation (5).
- The firebox (6) is installed on height-adjustable supports. Gaps (7) are left between it and parts of the cladding for free air circulation.
- Before the firebox, a covering (9) is made of non-combustible materials, the foundation (10) is calculated for the corresponding loads.
- To prevent the entry of precipitation and pollution, the chimney outlet is closed with a “fungus” (11).
- This part (12) of the pipe is made above the level of the ridge, or at a remote distance from it.
- If the chimney passes through an unheated attic space, thermal insulation (13) is installed outside.
- The tightness of the joints (14) will prevent combustion products from penetrating outward along with condensate.
- An outlet (15) is installed in this part for control and cleaning.
- The marked connection (16) is created using a special element that compensates for temperature deformations.
- In the lower part install: another hole for cleaning (17); entrance (18) ventilation slot (area 15-20 cm2); drain (19) for condensate with storage tank and tap.
- An independent channel (20) with insulation will ensure the flow of fresh air in the amount necessary for the normal functioning of the wood-burning fireplace.

The chimney can be moved outside the outline of the main building if the fireplace, as in the photo, is installed in a wooden house
Project No. 1 – compact mini-fireplace
This hearth is suitable for heating a room of 16-20 m² in a country house or a small country house. Another option for using the structure is as an outdoor barbecue built in a garden gazebo. A special feature of the fireplace is the side convection channels that heat the air in the room. The size of the building is 102 x 51 cm.
To lay out a mini-fireplace, you will need the following materials:
- solid ceramic brick – 240 pcs. (chimney pipe is not taken into account);
- inspection door 24 x 14 cm – 1 pc.;
- cast iron grates 18 x 14 cm;
- valve 25 x 14 cm;
- stainless steel sheet 1 mm thick, size 500 x 1000 mm;
- sheet of black or galvanized metal, laid in front of the firebox, dimensions - 70 x 50 cm.
Sectional drawing of a mini-fireplace.
There are outlets for convection channels on the side walls. The mini-fireplace shown in the drawing is laid out in the following order:
- The first tier is solid. On the second, 3 air channels are laid - 2 side and one in the middle, located under the grate.
- On the third row, the bottom part and the grate nest are formed (made 5 mm wider than the product). Then the grill itself is installed.
- From the 4th to the 10th tiers a fireplace insert is built. On row V, 2 metal rods Ø5 mm are laid for mounting a stainless steel sheet.
- In the 10th row, the rear brick protrudes a quarter into the firebox, the side stones move outward by 40 mm. The width of the firebox in this place is 49 cm.
- The ends of the side stones of the 11th tier are filed at an angle of 28° to the vertical line. You will get the supporting platforms of the arched vault. 2 stones in the depths of the firebox are placed on edge.
- The vault is built from 9 stones, cut in the form of a trapezoid with base sizes of 65 and 52 mm, as indicated in the order. The circle radius is 51 cm.
- On the 12th tier, the formation of the vault is completed, the upper steel rods are installed and a stainless screen is installed.
- Tier 13-14 forms the outlet openings of the convection channels. An inspection door is installed here.
- 15th row - the ceiling is being built, 16-18 - the beginning of the chimney.
The master will tell you in detail the algorithm for laying a mini-fireplace in his video:
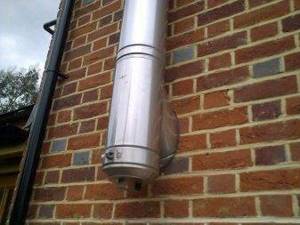
Brick chimney
Today there are many modern materials, but most often the chimney device in a wooden house is made of brick. When installing it yourself, you need to consider some nuances:
- The installation of the pipe must be carried out with the binding of lime mortar indoors and cement mortar on the roof.
- According to the developed regulations, the chimney pipe must be made of red brick. The inner surface of the pipe must not be plastered.
- Preparing a foundation that can support a large mass.
To avoid structural destruction and soot accumulation, it is recommended to build an asbestos-cement pipe into the channel, and fill the space between it and the brick with concrete mortar.
Interfloor overlap
- The distance between the wooden ceiling and the chimney should be at least 25 cm. If asbestos is used as an insulating material, the gap should be approximately 38 cm.
- If the house is made of logs, then it is necessary to make a board panel that is attached to the surface of the wall. This is necessary in order to compensate for shrinkage of the house.
- It is necessary to make holes on the walls below and above to ensure normal air flow.
- Wooden floors should be covered with bricks, tiles or other fire-resistant materials.
Output through the roof
- According to the regulations, the distance between wooden rafters and a brick pipe should not be less than 13 cm.
- The gap should be filled with stone wool without using adhesives.
- If the roof is covered with highly flammable materials, then in this case the distance must be doubled.
- The exit point of the chimney pipe must be covered with fireproof materials 50 cm from the chimney.
Location above the roof
- The height must be at least 50 cm if the pipe was installed near the ridge on a plane or slope.
- The height should be at least 50 cm above the ridge, if the axis of the pipe is located at a distance of 150 cm from it.
- If the axis at the exit of the pipe is 300 cm, then it is not lower than the ridge.
Chimney design and outlet
You can remove the chimney in one of two ways:
- inside through the ceiling and outlet to the roof;
- with exit outside.
When arranging an internal outlet, you need to form an opening in the ceiling so that there is a free space of up to 15 centimeters between it and the edge of the chimney. To assemble the chimney structure, two pipes of different diameters are used, using rolled heat-resistant material to insulate them.

When another method is chosen, a chimney with an indentation is mounted along the outer wall. This pipe should be sealed.
To protect the floor around the firebox from fire, it is necessary to line the floor surface. It is partially laid out with non-flammable material with a radius of up to 150 centimeters from the firebox, for example, a sheet of metal or stainless steel. A floor that is lined with ceramic tiles, natural stone or marble will look better.
A brick unit is more preferable than a metal fireplace in a wooden house because it is less fire hazardous. To create a heating structure in a country house, it is advisable to invite an experienced stove maker or bricklayer, however, their services are expensive.
How to choose a stove with a fireplace for a wooden house
In order for the stove to serve for a long time and not cause problems, you need to follow certain rules when choosing. Safety directly depends on which stove model is chosen for a house made of timber, and whether it has brick or other type of insulation from the walls of the house.
When choosing a stove with a fireplace, you need to take into account its quality, characteristics and interior of the room
Naturally, the threat of fire is taken into account first, and there are a number of the most popular and suitable models:
- Russian stoves are a traditional option with which you can heat your home and at the same time cook food. Previously, such structures were used as a place to sleep, which is still acceptable today. The disadvantage of such a structure is quite significant, and it is large dimensions, but if you take into account the fact that such a stove is capable of heating a large area in a minimum amount of time, it retains heat for a long time, then the disadvantage can be reduced to nothing.
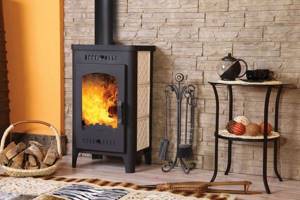
- A fireplace stove is a popular model, as it combines several functions at once. The product is completely safe, since the firebox is covered with special heat-resistant glass.
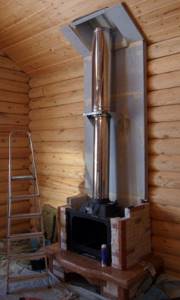
- Stoves made of cast iron and steel can be another option to choose from for installation in a wooden house. More practical models are those that are equipped with all kinds of elements and do not need to be connected to the chimney pipe.
Experts do not recommend installing open-type stoves in wooden houses, as they most often become the cause of fires. To properly build a stove in a wooden house, you need to take into account the parameters of the room and the stove, as well as the properties of the combustion chamber.
A lot depends on what material will be used as fuel. For firewood, you should use fireboxes made of refractory bricks. For hard coal, the firebox can be made of red fireclay bricks. For peat fuel, a chamber made of 2 metal grates is suitable.
Installing a fireplace in a wooden house
Without the appropriate skills and the help of professionals, installing a fireplace in a wooden house with your own hands is only permissible if these are ready-made factory units.
If you want to build a real brick structure, you need to use the services of a master. The fireplace must be calculated accurately. First of all, they build a foundation - it is made isolated from the foundation of the household. Therefore, a brick fireplace in a wooden house is installed on a separate base.
It is considered optimal to select the installation location before the construction of the building begins. In this case, along with pouring the foundation of the house, the foundation for the fireplace is laid. If installation is planned in a residential building, then the ceiling at the installation site is partially dismantled and the floor covering is removed.
Next, dig a pit for the foundation until the soil freezes. Rubble, broken bricks or small stones are poured onto its bottom. Formwork is assembled to the entire height of the base with an elevation above the floor of up to 10 centimeters. Be sure to use reinforcement in the form of a mesh made of steel rods.
The solution is poured into the formwork. The very last, top layer is carefully leveled - it should be horizontal. While the base acquires the required hardness, begin covering the walls with insulating materials.
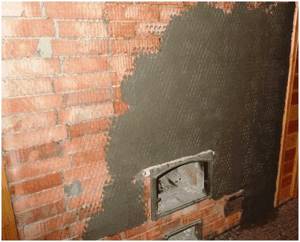
When a brick fireplace is built in a log house, it is necessary to make multi-layer protection. Markings are made at the site where the insulation is to be installed. It is required to cover the surface from the floor to the ceiling.
You need to retreat 50–100 centimeters from the edge of the fireplace in all directions. This area should be thermally insulated. A metal profile is fixed to the wall and the first layer of insulation is mounted.
The top of the mineral wool is covered with sheets of plasterboard. Profiles for insulating material are mounted on top of them. Then foil plates are fixed on them, while the gaps between adjacent elements are glued with narrow electrical tape with foil having an adhesive base.
Another option for fire insulation is brickwork. Using a solid brick, a wall is laid out from wood close to the wall.
To build a brick fireplace, you will need:
- row and refractory bricks;
- grate;
- dampers;
- door with glass.
The laying is carried out in accordance with the diagram. Solid brick is used, and the inner surface of the precision chamber is made using fireproof brick. To build a fireplace, a special heat-resistant mortar is used.
Each laid out row is certainly checked with a level. To make an arch, use templates. In the process of laying an insulated, straight wall or corner fireplace in a wooden house, elements such as a firebox door and grate are installed. A gap of at least 20 centimeters should be left between the insulation material and the brick wall.
Chimney in a wooden house
After installing the foundation, you can think about installing a chimney. This work can also be done with your own hands. The chimney must function smoothly and remove combustion products. Its dimensions are calculated in accordance with strict rules. Therefore, when choosing a chimney, you need to take into account the size of the fireplace and the type of fuel.
The diameter of the chimney and the smoke outlet pipe must match. Otherwise, this may lead to poor-quality removal of combustion products. The system will begin to smoke, and soot will quickly form in the chimney.
The chimney should have a round cross-section, since in pipes with a square or rectangular cross-section, turbulence can form, which also contributes to the formation of soot.
Fireplace requirements
In addition to decorative functions, a number of additional requirements are imposed on the fireplace, such as:
- do not create smoke in the room;
- warm up the air;
- look proportionate to the interior of the room.
If all these conditions are met, we can assume that the fireplace was installed correctly.
You need to build a fireplace structure in order. This is a detailed diagram that indicates where each brick of the future fireplace should be located. There are no trifles in this important matter.
Useful tips
When installing a stove with your own hands, you need to consider and take into account the rules used by experienced stove makers
- Before you begin, carefully sort the bricks so that they can be easily matched to each other when laying. All necessary bricks are purchased in one batch.
The density and quantity of the mortar should be such that it completely fills the joints between the bricks, both horizontal and vertical.
In addition to the fact that the masonry seams must be uniform, they must also be thin, no more than 0.5 cm, and even less for fireclay (fireproof).
If the brick is not stacked evenly, it cannot be moved; it must be removed, the mortar removed, lubricated with a new one, and only then put back in place.
When you lay the chimney and fireboxes: parts that require ideal smoothness and evenness, you will have to level the mortar by hand, this will help you feel the unevenness and remove solid particles.
Depending on the design, the seams can be straight, convex or concave. Convexity and concavity are created with special tools.
Sometimes, the design requires plastering. If solid plastering is planned in the future, the seams are not leveled, leaving them as they are - unfilled.
In modern rural life, the stove has retained its functions; it is used for heating and cooking; it has also retained its functions in dachas where there is no centralized heating. Fireplaces, in modern cottages where there is central heating, are rather interior details and are the center of the relaxation area in the house. Some interiors are suitable for buildings lined with tiles, but tiles are quite expensive and only a highly qualified craftsman can install a stove with tiles.
If you decide to build a heating unit with your own hands, it is better to thoroughly study all the details and nuances of this work. You will have to learn to read diagrams that show the sequential laying of the furnace. If earlier structures were built with a channel gas exhaust system, modern craftsmen prefer to install more efficient bell-shaped structures, in which smoke removal occurs somewhat differently. Many owners prefer to install combined structures with a fireplace and hob. This is required by fashion trends and the greater functionality of such hybrids.
Many sites have appeared on the Internet where visitors are offered the order of the stove. Since some of them are not reliable, let a qualified professional give you helpful tips on furnace installation and sizing.
Only after serious preparation will you be able to build a heating device that will delight you for many years.
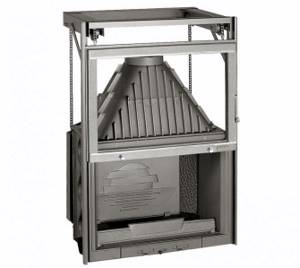
Fireplace insert made of steel or cast iron - high efficiency
A steel or cast iron fireplace insert with a glass door is a hybrid of a fireplace and stove. The shape of the firebox is closer to a classic fireplace, which allows for maximum thermal radiation to be directed into the room. Dampers and a door that allows you to see a living flame make it possible to accurately dose the amount of air required for combustion. A metal body with developed fins and a large heat transfer area allows for a significant increase in convective heat transfer into the room compared to a brick fireplace. Thanks to these solutions, the efficiency of modern fireboxes has been increased to 80%. Efficiency, reasonable price, attractive design, compactness and light weight are the undeniable advantages of such fireboxes. It is not surprising that steel fireplaces for wooden houses are the most popular. Their only serious drawback is that they cool quickly. But they warm up a cold room just as quickly; they burn for a long time on one stack of firewood.
Based on a steel fireplace, you can build a full-fledged heating system if you purchase a model with a “water jacket” or a system for supplying warm air through channels
The metal surface of the firebox heats up much more than a brick fireplace with thick walls. Therefore, it cannot be placed as close to the walls. The minimum distance to combustible wooden structures is specified in the firebox installation instructions. If this is not the case, building codes should be followed. They do not specify the conditions for fireplaces, so we focus on the data for steel stoves. It is not allowed to place an unlined iron stove closer than a meter from a “bare” wooden wall. Installing a fireplace closer to the walls in a wooden house is allowed only if they are protected by fireproof heat-insulating screens. There are many protection options; this is a topic for a separate article. One of the inexpensive and simple solutions: basalt wool 50 mm thick, two gypsum fiber sheets and an air gap of 20 mm. Thus, the total distance from the rear or side surfaces of the metal firebox to the wall, taking into account protection, will be 10 cm.
This steel fireplace has thermally insulated back and side surfaces, which allows it to be placed quite close, but not close to wooden walls
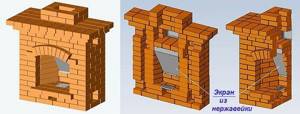
Features of the box design and lining of the metal firebox
It is especially important to take into account the specifics of a wooden house if the firebox is placed in a box:
- The wooden wall inside the box should be protected from the heat of the fireplace no less than when it is installed openly, the required distances should be maintained, and heat-reflecting screens should be installed.
- There should be ventilation holes at the top and bottom of the box to prevent overheating. There can be several gratings, preferably on three or at least two opposite sides of the box. If their total area is not indicated in the instructions, we take 0.15 m2 for both the lower and upper holes.
- It is necessary to protect the wooden ceiling from overheating. A simple solution is not to raise the fireplace box directly to the ceiling; it is enough to leave a free space of 35-40 cm. At the same time, the problem of shrinkage and seasonal deformation is eliminated. The box must be closed at the top, and its horizontal “lid” must be thermally insulated no worse than the vertical walls.
The box cap is not brought to the ceiling, which reduces its heating
- If the design solution includes a box up to the ceiling, you will have to divide it by height. In the upper part there is a separate section with a height of at least 30 cm. It must be separated from the main box by thermal insulation material, and also have its own ventilation vents with a total area of at least 0.02 m2. It should be taken into account that due to possible subsidence of the frame, the box cannot be mounted close to the ceiling. Calculating the required gap size is not easy; only an experienced specialist can do this. The resulting gap can be closed with a cornice attached to the ceiling.
The outer walls of the box have not yet been mounted, but we can see its internal structure. The steel fireplace is separated from the wooden walls by an air gap, a sheet of gypsum fiber board and a layer of foiled basalt wool. A gap is left between the box and the ceiling for shrinkage. The box itself has an additional “cooling” section at the top, the horizontal surfaces of which will also be thermally insulated. Flexible steel pipes coming out of the fireplace body - air heating ducts, the chimney has not yet been installed