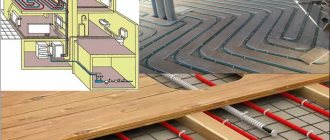
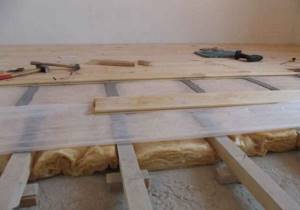
Modern heating systems are built in such a way as to achieve maximum operating efficiency and create harmony and comfort in the home. This can be achieved by using heated floors based on water pipes, which today can be installed even in wooden houses made of logs and timber, as well as glued materials. There is no significant difference in the arrangement of floors, since the standards for compliance with technology are the same for all types of structures.
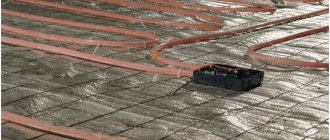
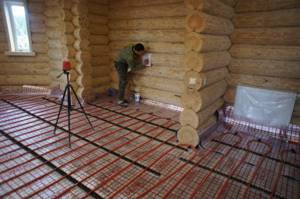
An example of laying underfloor heating pipes in a wooden house
Preparing the base
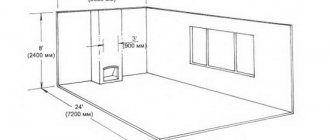
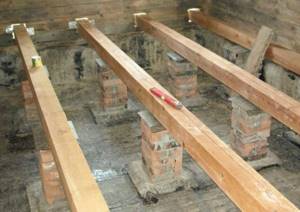
Installing a water heated floor with your own hands in a wooden house begins with preparation. At this stage it is necessary to level the base. Usually, the soil that was obtained when digging a strip foundation is filled in and space is left for a sand cushion. The cushion, on average, occupies 5 cm of the base, and is a shock-absorbing layer, and also prevents direct contact of concrete with the ground, which is detrimental to the screed. Ideally, a value of 22 cm should remain on top of the sand cushion.
After the pillow is compacted, waterproofing is placed on top of it using roofing felt or film. The waterproofing is overlapped 10 cm on top of each other and taped with special tape.
Material equipment
What is needed to install a floor?
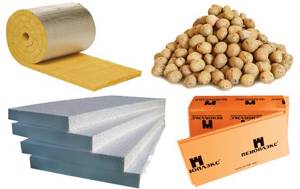
So, if we need to install a heating system with our own hands, we should start by purchasing materials. I will give a minimum list of what we need in the table:
| Illustration | Material |
| Materials for thermal insulation for underground space:
|
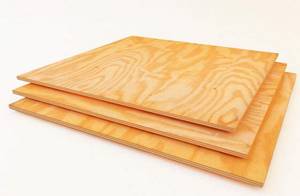
| Subfloor materials:
|
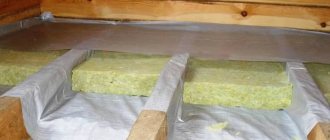
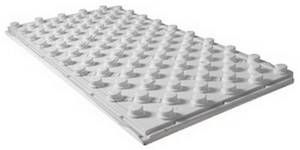
| Mats for heated floors. |
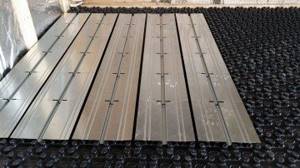
| Metal heat-reflecting plates. |
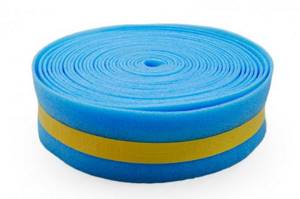
| Damper tape. |
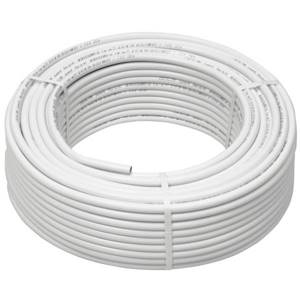
| Plastic pipes for heated floors:
|
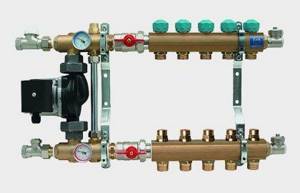
| Collector. |
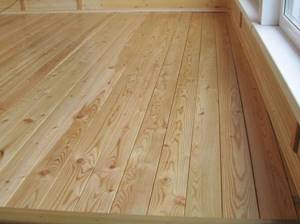
| Flooring. |
Keep in mind that heated floors under wooden boards, linoleum, laminate, tiles, etc. can be laid according to different patterns. Accordingly, the set of materials may differ from those given here. It all depends on what will be used as the finishing layer.
Tools for work

Since the floor will be made of wood, then you can’t do without a set of carpentry tools
Preparing the room for installation of the heating system and actually laying the heated floor is done using the following tools:
- Saw on wood.
- Drill with a set of drills.
- Screwdriver.
- Knife for cutting heat and waterproofing.
- Brushes for applying waterproofing impregnations.
- Saw or special tool for cutting pipes.
A crimping tool for metal-plastic products seriously speeds up the process
- Tool for installing fittings (crimping pliers for metal-plastic, soldering iron for polyethylene, etc.).
- Level.
- Roulette.

Pipe system installation kit. Probably every plumber has such tools.
Rough screed for the future heated floor
The base for laying the pipe must be strong. If something happens, the ground under the floor subsides, the pipe will burst under the weight of the finishing screed and start leaking. Such repairs are difficult to repair. Therefore, experts recommend setting up a full-fledged “pie” of the future floor, consisting of a black and a finishing screed, respectively.
Attention! The rough screed should be filled as level as possible. To do this, you should mark off the general floor horizon based on the fact that the minimum level of the screed should be 7 cm.
*
It is recommended to use a reinforcement mesh for the floor, which is laid on top of the waterproofing and tied together with knitting wire. It is enough if the mesh has a cell measuring 10 by 10 cm. A plaster beacon is set at the level (as the cheapest option), placing cement mortar and other substrates under it to maintain the distance. Leave the floor until the morning, until the beacons dry, after which they begin pouring.
The next day the screed will be ready. According to the technology, concrete hardens within 28 design days. All this time it must be watered to achieve greater strength.
Installation technology
Stage 1. Preliminary work
The installation of a water heated floor can be carried out both at the stage of building a house and in an already used room. Naturally, the amount of work in these cases will be radically different, so here I will describe the ideal situation, that is, I will list the main requirements for the foundation:
The most effective comprehensive waterproofing, with backfilling and laying of rolled materials
- Waterproofing the subfloor. To cut off moisture coming from the ground, we must waterproof the underground space between the joists. To do this, we first tamp the soil under the room, then fill it with a layer of sand up to 15 cm thick and tamp it again. For maximum effective protection, a thin concrete screed can be placed on top of the bedding or a waterproof membrane (polyethylene, roofing felt) can be laid.
Insulation is necessary, otherwise the heat from the heating system pipes will go down
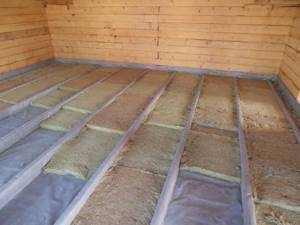
- Thermal insulation of the underground space. We lay insulation on top of the waterproofing layer - bulk or slab. When laying inelastic board materials (high-density mineral wool, polystyrene), all gaps between them are filled with self-expanding foam.
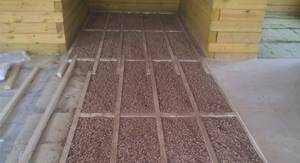
Expanded clay as insulation will be effective only when backfilled with a sufficiently thick layer
Expanded clay is effective only if the thickness of the thermal insulation layer is from 30–40 cm. In this case, it is advisable to fill it with a very liquid cement mortar to reduce permeability to moisture and obtain improvised expanded clay concrete.
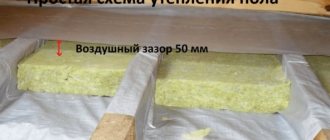
- Vapor barrier of the insulated layer . On top of the insulation under the subfloor, be sure to lay a layer of vapor barrier material (glassine, polyethylene, membrane). We place the vapor barrier in such a way that it almost completely covers the joists. We leave free areas of about 50 mm long at the edges of the joists to evaporate moisture from the wood.
Be sure to lay a vapor barrier on top of the insulation with a gap for air circulation
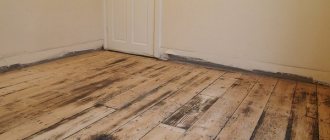
- Laying the subfloor . We make the subfloor for water heating either from plywood, or from boards, or from chipboard panels with milling. We attach the flooring to the joists, and in such a way that between it and the thermal insulation layer there remains a gap of 30–50 mm for ventilation and condensate removal.
This sequence of actions is suitable for a new building. If we are installing underfloor heating in a house that is already in use, then it is enough to check and strengthen the subfloor.
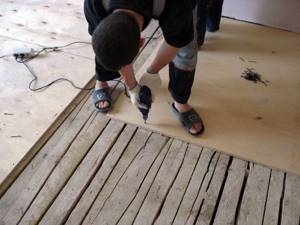
It is advisable to install a plywood flooring on top of the old plank floor - this way we will get a fairly reliable base
As a last resort, the flooring is opened and, after laying additional thermal insulation/vapor barrier into the underground space, it is reinstalled.
Stage 2. Preparing the base for installation
A warm water floor on wooden floors is installed on a specially prepared base. It must provide the required load-bearing capacity, hydro- and thermal insulation, and also protect all structural elements from excessive deformations.
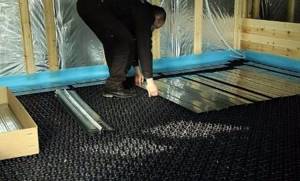
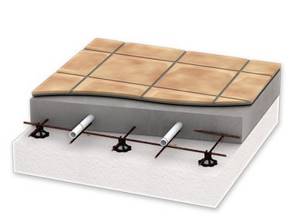
The base of thermal insulating polymer mats is made as follows:
| Illustration | Work stage |
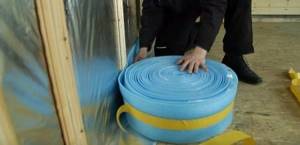
| Gluing damper tape. We glue a damper tape made of foamed polyethylene to the walls around the perimeter of the room. Such a tape is a mandatory element of the design of any heated floor, since it compensates for temperature deformations. |
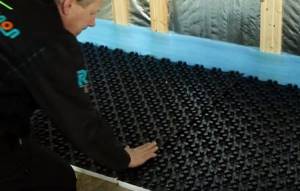
| Laying mats with grooves. We lay mats with grooves for pipes and heat-insulating elements on top of the base. In this case, two-layer mats are used. Their bottom layer is made of porous foam, the top layer is made of fairly dense PVC, which ensures strength and reliability of fixation. We lay out the mats close to the walls. We connect the individual elements using side latches, laying them without gaps or joints. |
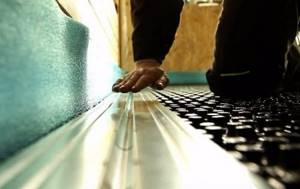
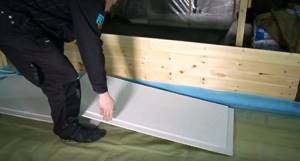
| Adjustment of thermal insulation plates. We remove the metal heat-insulating plates from the packaging and adjust them to length. As a rule, the products have special slots that allow them to be shortened without the use of tools. When adjusting, simply bend the plate along the desired slot and break off a fragment. |
| Laying thermal insulation plates. We distribute the heat-insulating plates over the surface of the base in such a way that the configuration of the grooves corresponds to the planned layout of the underfloor heating pipes. Standard products are designed for a laying step of about 20 cm, so they need to be placed closely. If laid out correctly, the metal parts should cover 80 to 90% of the entire area. |
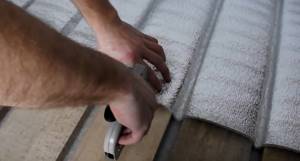
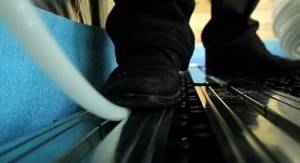
| Fixation of metal plates. We fix each plate on the base, pressing it into the groove of the heat-insulating mat along its entire length. In this case, the recess in the middle part of the plate, intended for laying the pipe, should snap onto the mat fasteners. You can fix it either by hand or by stepping on the plates with your foot. In the second case, we use shoes with soles without metal elements, so as not to damage the anti-corrosion coating of the metal. |

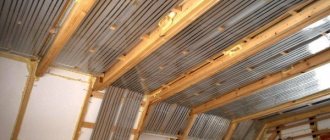
When laying heated floors on a wooden floor, be sure to use reflective thermal insulation - either prefabricated or rolled
In principle, the instructions given are universal - it is suitable for milled chipboard, and even for slatted floors. If you want to save money, then steel plates can be replaced with roll insulation with a foil layer. We attach the insulation to the slats placed on the base using a stapler, but do not stretch it, but form grooves for laying pipes.
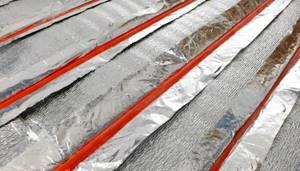
Pipes in the grooves between the slats. We lay a separate heat-reflecting substrate under each pipe
Stage 3. Installation and connection of heating pipes
Now we need to lay the pipes and connect them to the heating system:
| Illustration | Work stage |
| Installation of a collector cabinet. In the corner of the room we install a cabinet with a manifold for heated floors. The cabinet can be mounted both in a wall niche and on the wall surface. We connect pipes to the collector through which hot water will flow into the heated floor circuits. When using a separate heater, we connect the manifold to it using hoses or pipes. | |
| Pipe layout. We unwind a coil with a pipe with a diameter of 16 mm, gradually laying the pipe into the grooves of the heat-insulating plates. When performing this operation, we strictly observe the laying step, trying to avoid twisting and creasing of the pipeline. It is advisable to make each circuit from a single pipe, without joints in the thickness of the heated floor - this way the reliability will be maximum. |
| Fixing pipes. We fix the pipes on the floor in the same way as we fixed the heat-insulating plates: we put the product into the groove and press it with our hand or foot. With the correct selection of pipes and mounting elements, the circuit is securely fixed due to the elasticity of the material and the configuration of the grooves in the plates. |
| Connection to the collector. We connect the pipes to the inlets and outlets of the underfloor heating manifold. For fastening we use fittings that ensure maximum tightness. |
| Filling the contours. Both water and antifreeze can be used in a floor heating system. First, the circuits are filled by gravity until liquid begins to drip from the control pipe. After this, air is removed from the system, and then the circulation pump is turned on (if its presence is provided for by the design). When the pump is turned on, the circuits are completely filled. |
| System testing. If possible, we set the required coolant temperature in the pipes. We check the functionality of the system, its tightness and uniform heating of the circuits. If there are no leaks or other problems, you can proceed to complete the installation. |
| Installation of heat distribution film. For more efficient heat transfer, we lay a film based on heat-resistant polyethylene on top of the heating circuit. We install the rolls overlapping, gluing the joints with reinforced tape. |
| Laying flooring or subflooring. On top of the heated floor we install either a finished floor (laminate, floorboard) or lay rough gypsum fiber boards. |
Floor insulation
As a rule, no one waits 28 days, since there is no time for this during the construction phase. Start laying the insulation with your own hands. Extruded foam is used as a proven material for insulating floors in a wooden house. This is a light, but very dense and warm material, which is often placed under the floorboards in a wooden house. Calculations show that the thickness of the foam for CFO should be at least 3 cm (usually 5 cm is used).
The insulation is spread over the entire area of the house, after which a heat-reflecting film is laid. Actually, the film is a foil base that will reflect heat from the pipe and direct it upward.
On top of the insulation lies a reflective metallized film, on which the contours of the heated floor are laid, directed into the collector
There are two types of film - regular and more expensive. The more expensive option is metallized foil, the cheaper option is regular foil. Metallized foil can be placed on top of the insulation without additional protection. Conventional foil requires polyethylene protection, since concrete can corrode it when exposed to an aggressive environment. Since the foil is 5 mm thick, you can get the effect of the screed sagging by this amount. The result is falling tiles, cracks in the grout and other nuances.
After the reflective foil is laid and covered with film, proceed to laying the damper tape. The floor screed will deform when heated. Thus, it will put pressure on the walls or foundation, which can lead to cracks and deformation. The damper tape is laid around the perimeter of all walls in a private house, protruding slightly beyond the future finishing screed. The excess is cut off at the end of the work.
Tiles as flooring
The physical characteristics of wood do not allow it to adequately retain the heat received from the heating system, so the best flooring option for horizontal water heating is tiles made of natural or artificial stone.
Tile screed
To obtain an independent screed for “warm floors” for laying tiles on wooden beams in a private house, the following work must be done:
- A “floating” screed is installed using the technology described earlier. The only exception is the thickness of the concrete solution. It should be 3-4 cm.
- After the screed has completely hardened, it is treated with a soil solution.
- Next, the floor covering is installed using tile adhesive.
Despite the possibility of installing tiled flooring on wooden logs, this technique has a significant disadvantage: the service life of wood is lower than that of porcelain stoneware and other tiled materials. To replace wooden blocks that have become unusable, you will have to carry out serious dismantling of the floor covering.
The advantages include:
- Significant cost savings due to lower wood costs.
- The total weight of the floor “pie” and the load on the supporting structure are reduced.
- The installation speed increases.
- The heating system is put into operation faster due to faster drying of the thin layer of concrete.
Despite some limitations, tiling a bathroom, swimming pool and other rooms with high humidity, together with a “warm floor” system, can significantly increase comfort and increase the durability of wooden structural elements.
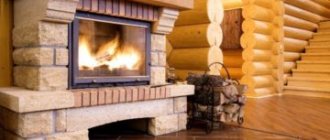
“Warm floor” is maximum comfort in your home
Screed is an indispensable attribute of underfloor heating. It protects pipes from load and mechanical damage, allows you to obtain a perfectly flat surface of the floor covering, which has a beneficial effect on the comfort of residents. Its only drawback is that installing the screed “raises” the floor level, reducing the total volume of the room. If in rooms with high ceilings this will not have a significant effect, then in low ceilings it may interfere a little.
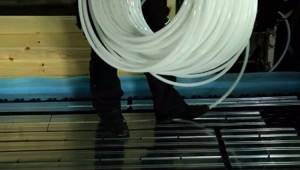
Laying a heated floor pipe
Next is the installation of a modern heated water floor in a wooden house. An important condition for laying the pipe is that the kennel must be intact. There should be no cuts or kinks, since excess pressure in the circuit will squeeze out this place and water will leak. Therefore, when laying the floor, you will have to roll a coil, which starts from the furnace room and is returned there.
Attention! Experts recommend laying a heated floor pipe so that the length of the circuit does not go beyond 80 m. A maximum of 100 m in length is allowed, but it is better not to do this. The way out is to divide the room into two or more circuits.
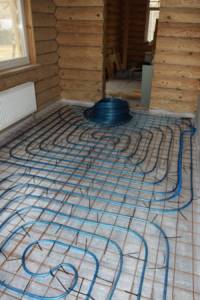
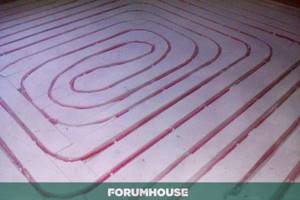
The room is divided into two heating circuits, the pipes of which are laid in a “snail” pattern
*
Choosing a pipe laying scheme is an important point in the work. The “snail” circuit is most often used, since it has the highest efficiency. It will take twice as much material, but ultimately it will be more comfortable, since the floor warms up evenly. The principle of laying with this scheme is that the pipe is, conditionally, twisted in a spiral, where you set the distance between the pipes in advance for a 180-degree turn.
It is believed that a pipe 20 mm in diameter heats 15-20 cm around itself. To avoid cold zones, it is recommended to place the supply pipes at a distance of no more than 30 cm from each other, and the return pipe will pass between them when the pipe is turned. There will be a cooled liquid base here, which, under the action of a circulation pump, will be supplied to the boiler for heating.
Attention! The “snail” circuit is convenient in that the water supplied to the boiler is slightly cooled, which means that less resources will be spent on heating the water than on heating it from scratch. Hence, there are lower utility costs, despite the high costs of materials at the beginning of work.
Variations on a theme
In our country, based on Finnish technology, which facilitates the design and allows one to abandon monolithic casting, its variations have appeared - the principle remains, but the materials have been increased:
- Gypsum fiber sheets (GVL) - compared to plasterboard, they are denser, more resistant to bending and deformation, and contain cellulose fibers and other additives that increase their technical characteristics. For wet rooms, a moisture-resistant variety (GVLV) is used;
ТishinForumHouse Member
In such a floor, instead of plasterboard, it is better to use gypsum fiber sheets (GVL). I myself am now considering a dry screed for implementation in my home, I will only replace the bottom layer with OSB. I will assemble the middle part from two layers of gypsum fiber board.
- Chipboard, OSB, plywood - in terms of heat transfer, this design is worse, since wood and its derivatives act as an insulator. Ready-made sets of heated floors on a dry screed made of chipboard sheets, with grooves selected for hinges, are sold, but not everyone can handle their cost.
boatmasterFORUMHOUSE Member
Logs, with a pitch of 60 cm, plus insulation - 35 cm, OSB base, then a 20 mm pipe, plus a 5 mm clip, it turns out 25 mm, three layers of GVLV between the pipes 12x3 = 26 mm.
- Cement particle board (CSP);
- EPPS - pipes are laid directly into the insulation, and the voids are covered with glue. To increase the heat transfer of the elements, foil or similar material is used;
The thickness of the sheets for the middle layer with the main is selected based on the diameter of the pipe, so that after filling with glue, a flat surface is obtained, and the final layer does not put pressure on the pipe. As an option, two sheets are glued together if the thickness of one is not enough.
Forum users are actively organizing their underfloor heating systems on wooden floors.
Serg177FORUMHOUSE Member
If something happens to the pipe (today, tomorrow or in 25 years), you won’t have to break the screed. I will buy 50 sheets of plywood, 18 mm thick, for 200 m², cut it into strips, 16 mm pipe in between, and cover 200 sheets of ten sheets with laminate on top.
One of the options for making a dry screed with your own hands is laying pipes in special aluminum plates with grooves. They fit the pipes tightly and increase heat transfer. The disadvantage of this configuration is the high cost of these metal gaskets; their use increases the cost of the entire system.
Vladimir TallinForumHouse Member
There are not enough special aluminum sheets that are placed under the pipe and remove heat to the top. I have them, they “hug” the pipe, the size is about 30 cm per meter, there is a groove for the pipe with rare spikes to hold the pipe.
Sheets on a gypsum base are one of the most popular, as an optimal material in all respects.
- Reasonably priced;
- Easily cut into segments;
- Eco-friendly (does not contain synthetic binders like wood-filled boards) and suitable for home use;
- Non-flammable;
How to secure pipes
Everyone who reads this material and comprehends the moment of installation wonders about fixing the pipes. Actually, the simplest option would be to use clips that go around the pipe and are driven into the insulation.

General view of the pipe, which is attached to the insulation using clips
To ensure accuracy of work, first draw the outline of the laying, then one pulls and rolls out the pipe, and the other nails it to the foam with light blows of a hammer. This method turns out to be quite reliable, since it easily withstands the constant movements of workers through the pipes.
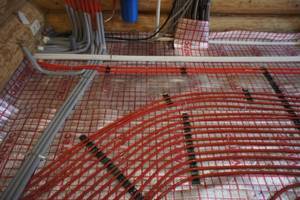
The pipe is laid, the floor level is being knocked out for finishing the screed
Another option is a little more expensive, but allows you to additionally reinforce the finishing screed. Here a mesh with a fine mesh of 10 cm is placed, to which a pipe is fastened with ties or knitting wire. If the house has an intermediate room through which pipes pass in transit to other rooms, then lay the circuit in such a way as to save material. True, by turning off some circuits, for example, the hall or kitchen, cold areas will form in the intermediate room, which will be uncomfortable. If you want to avoid this, then place the transit pipes next to each other and use thermal insulation.
In the boiler room, the pipe is cut with a margin of about half a meter, for ease of installation of the collector. As soon as the last pipe is installed and secured to the floor, it is necessary to fix the pipe in the furnace to the wall. After this, it is advisable to check the system, but quite often a finishing screed is poured. Semi-dry screed is often used as a finishing floor screed. It is the most successful in its class, which allows you to get a safe, durable, dry and economical water-heated floor in a wooden house.
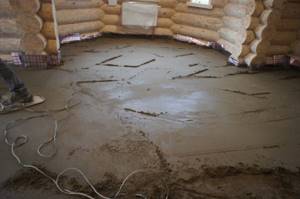
Finish semi-dry floor screed in a log house
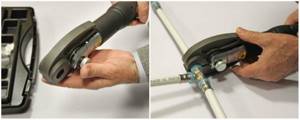
During installation, metal-plastic pipes for heated floors must be rotated not only 90 degrees, but also 360. To avoid creases in the system, use a special corrugated tool. A pipe is passed through it and pulled along the entire circuit. If you need to turn, the corrugated pipe helps to balance your efforts and not do too much.
Key points in choosing underfloor heating
When deciding to install heated floors in a bathhouse, or when choosing a floor heating system for a log house, you need to consider the following points:
- Configuration, area and height of the room where installation is intended.
- The system will be used as main or additional heating; in both cases, the power of the structure is calculated differently.
- Loading of the room with furniture. All types of heating floors except infrared cannot withstand overheating; furniture puts pressure on the structure, which causes an increase in temperature.
We have given only the main guidelines by which it is necessary to choose heated floors; in fact, there are much more criteria.
When arranging a floor system in a log house, it is necessary to take into account the operating features of a wooden house. All this can only be done by professionals. Warm floors are a complex structure; if installed incorrectly, they will not function effectively and can cause many problems for home owners.
your assistant in insulating your home. Our specialists will select the optimal design based on the characteristics of your structure, make the correct calculations and carry out competent installation of the underfloor heating system. The installation will be carried out in full accordance with the technology and taking into account the behavior of the wooden structure.
You will find all the information on how to contact us in the “Contacts” section.
Calculate the cost of painting and insulating your home right now
Select types of work:
Select materials:
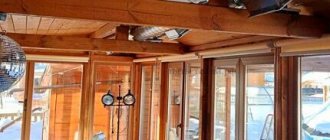
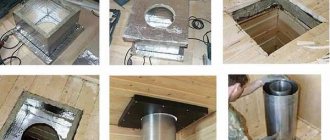
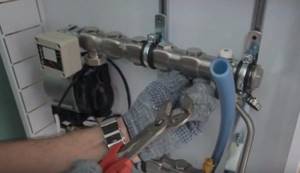
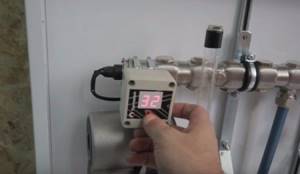
What does a boiler room look like in a wooden house with heated floors?
*
So, the pipes have been started, it’s time to install the collector. What kind of collector it will be - decide for yourself. The main thing is that the number of its leads corresponds to the contours of the water-heated floor of your wooden house. The collector is mounted on the wall in a special box or without it. Then, using flaring for underfloor heating pipes, a connection is made to the supply and return circuits.
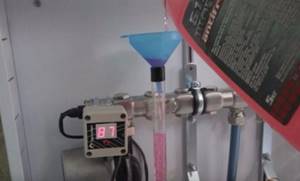
The collector necessarily includes air vents, a bypass in case it is necessary to loop the system, a circulation pump and a mixture. The latter will allow you to adjust the temperature of only the heated floor circuits, and the temperature of the radiators, if there are any in the house, will remain unchanged. Taps are required in front of each branch. It is clear that they require additional investments, transitions from plastic to metal, cause difficulties and take up installation time. Ultimately, they allow you to cover the problem area in case of repair.
Attention! It is recommended to seal all transitions from plastic to metal with a special tape or linen thread using a sealing paste. This will prevent system leaks.
System design
- A boiler used for heating. If the choice fell on water floors, then it is possible to use a solid fuel, electric or gas equipped boiler. They are practical and quite comfortable. Their use implies the absence of a constant supply of fuel, which is used in wood and solid fuel boilers.
- If you plan to create a truly warm house, then it is recommended to use combined systems that will allow you to heat both the radiators and the floor layer. Its temperature regime may differ, since the temperature in radiators can reach 60°C, but for wooden coverings the maximum is 30°C. If this condition is not met, the tree will crack quite quickly.
AdminAuthor of the article
Did you like the article?
Share with your friends:
Installation of film heating on wooden floors
When preparing the base for installation of the film system, there is no need to dismantle the old coating. It is only necessary in case of significant physical wear.
Required materials and tools
When installing an infrared heated floor, you will need the following tools and materials:
- Heating film.
- Polyethylene film.
- Thermal insulating substrate.
- Thermostat and temperature sensor.
- Wire (cross-section - from 2.5 sq. mm).
- Tools: scissors, knife (can be a stationery knife), indicator screwdriver, tape measure, pliers.
Installation technology
Sheets of infrared film should be placed evenly on the floor, but in no case overlap each other
Self-installation and connection of the infrared floor is carried out according to the following algorithm:
- Cleaning the floor from dust and other contaminants. Work takes place on a dry, clean surface.
- When the rough layer is wet, the thermal film is waterproofed. For this, polyethylene film up to 50 microns thick is used.
- A film made of polypropylene or metallized lavsan is used as a heat reflector (aluminum foil cannot be used for these purposes). First you need to cut the material. If a warm floor is installed in a large room, you need to ensure that the length of the film is no more than 10 meters.
- The material is laid at a distance of 25–30 cm from each wall. The thermal film is laid out on the floor with the copper bars down. It is forbidden to step on the film or drop tools. It is also not allowed to overlap two sheets of paper on top of each other. Before installation, you should mark out the room, determine where heavy furniture and equipment will be placed, and avoid these places. Otherwise, due to constant pressure, the thermal film will deteriorate.
It is better to invite a competent electrician to connect the system to the electrical network. If you want to do this yourself, then the work should be organized as follows:
- Strip the wire (8–10 mm) and insert the end into the contact clamp.
- The contact is established on a sheet of film. The connection points and cut lines are insulated with vinyl mastic tape.
- After connecting all the sheets, the resistance is measured at the ends of the wires connected to the thermostat.
- Next, the load is calculated. To do this, use the formula W=V2/R, where V is the network voltage, R is the resistance. The final figure should be about 20-25% lower than what is indicated on the thermostat. After this, you can connect the device.
- Thermal film strips are connected to the thermostat in parallel. To avoid possible damage to the wiring, individual sections are hidden under thermal insulation.
- Then the temperature sensor is placed. The device is included with the thermostat. The installation location depends on what material is planned to be used as the finishing coating: if it is soft, then the sensor is installed in a place with minimal load.
- Connecting the thermostat to the network and testing the system for contact overheating, sparking, and so on.
After all work on installing the film floor is completed, the finishing coating is laid. If you plan to use ceramic or porcelain tiles, a mounting grid is first laid out on the floor and attached in places where there is no thermal film. After laying, the adhesive solution used to install the tiles must dry. This will take about a month. It is not recommended to turn on the heated floor until this moment.
Video: How to make film heating on a wooden base
https://youtube.com/watch?v=Bh2vxdQV2rw
An ideal indoor microclimate is achieved using heating devices. To obtain the optimal temperature in the room, you need to follow the rules for selecting and installing heated floors on a wooden base, which allow any homeowner to easily install the chosen system.
Installation procedure
Installing a warm water floor on a wooden floor with your own hands is practically no different from the structures used in other buildings. The exception is special safety measures necessary to protect wooden surfaces from moisture.
Practice has shown that the best option would be to use polypropylene pipes.
Installation work is carried out as follows:
- Floor design - it is with drawing up a diagram that the installation of the heating system begins. A hydraulic calculation is performed, the efficiency of the water circuit is calculated, and a decision is made to ensure an increase in heat transfer efficiency. Flooring designs are developed individually, or ready-made solutions are selected.
- The base is prepared - the floor is leveled with plywood. You can lay soft thermal insulation under the layer on the rough field. Correctly make reliable waterproofing. Traditionally, roll fused materials are used for this, but for better results, you can also apply a special waterproofing mastic in several layers.
- Further actions depend on the choice of heating system. If you plan to pour a concrete screed, then a reinforcing layer must be laid. A water circuit is attached to the top of the mesh using clamps. The entire structure is filled with mortar. Filling of laid pipes is carried out exclusively with solutions intended for use with heated floors.
- If special mats are selected, installation on a wooden floor is carried out as follows. Polystyrene systems are laid on a leveled surface. The mats have ready-made recesses and latches for pipe installation, or grooves into which heat-reflecting plates are inserted. A water circuit spreads over the top.
- Floor covering - the efficiency of floor heating largely depends on the correct choice of finishing material. A sheet of fiberboard or plywood is laid on the mats. The remaining work is carried out depending on the choice of flooring.
The maximum length of the water circuit should not exceed 70 m. If this is not enough for the heated area, so-called water floor laying areas are created. To ensure uniform supply to each heating circuit, a water manifold is installed.
Wet method
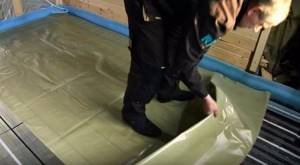
- Waterproofing material is laid on the floorboards over the entire base area. It could even be a plastic film with a thickness of at least 0.2 mm. The waterproofing should rise up the walls, covering them to a height of 10-15 cm. If multi-strip insulation is used, the strips are laid overlapping with an offset of 10 cm, and the joints are covered with construction tape.
- Next, pipes are laid out along the floor according to the pattern you have chosen, which are attached to the wooden floor with special dowel clamps.
- Don't forget to lay damper tape around the entire perimeter of the room along the walls near the floor. It will restrain the pressure on the concrete screed wall as it expands under the influence of the temperature of the underfloor heating pipeline.
- The screed is poured. Its thickness varies from 5 to 7 cm, which depends on the loads to which the floor will be subjected.