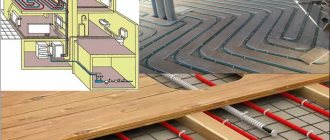
Warmth in the house is one of the important indicators of comfort. I recently renovated my apartment and installed heated floors. Not with your own hands, of course. I invited specialists, and they did everything.
Now, even in the absence of heating, the rooms are not cold. There is no need to wrap yourself in a blanket in the morning or quickly put on warm clothes. A simple fairy tale. But I wonder how floors were insulated in the old days?
I remember from school that the main principle of heating a room at all times is to direct the heat directly to the flooring.
The heat was already spreading from the floor, providing a comfortable temperature throughout the room.
How floors were insulated in ancient human settlements
In Scandinavia, people lived in huts. I remember with what interest I listened at the University about their life. The teacher was Artem Nikolaevich, young and I really liked him.
That’s why, probably, when I think about heated floors, I remember his classes. In order to provide warmth, the Scandinavians built dwellings over the pit. The pit was heated by a fire, and with it the floor of the room.
Thus, the living space was warm even in cold weather. Fire is the main source of heat at all times in human history.
In the ancient Amur settlements, as far as I remember, the heating system was more cunning. Special dies were made from wood and coated with clay. Smoke from the fire was driven through these dies, heating the room.
Heating plates were placed directly on the floor. The fire is the most important source of heat in ancient Amur settlements.
Antique plank floors
Sometimes a floorboard (pine, larch, oak) is just a board. And this somehow doesn’t suit us. It so happened that for a long time the floors of “decent apartments” were finished only with parquet. And the renovations in the municipal finishing consisted of the same linoleum or creaky floorboards covered with red paint. Here is a village house or a dacha - this is understandable, there the parquet is inappropriate, it does not fit in with anything stylistically, it breaks the pattern: for such interiors a floorboard is more suitable. Prejudice 1 Too simple, not to say banal: without unnecessary pathos and very accessible (but We are not rich enough to buy cheap things). Is there something wrong with the merbau veneer? And our feet themselves carry us towards the section of exotic floor coverings. But these are all prejudices. The floorboard can be decorated and made to look like a millionaire. Most likely, you just don’t know how to work with it. Or you simply don’t want to deal with “refinement” of the material - after all, most offers of parquet boards and parquet blocks (assembled into panels for laying parquet) are even sold varnished, that is, completely ready for installation on the floor. Floorboards are the decorator’s adrenaline: starting with installation floorboards on the floor, the floorboards find a second life on the walls and even on the ceiling. However, not everyone dares to make such decorative experiments. Prejudice 2 - “The floorboard will dry out” While the appearance of exotic materials is always at its best. Unfortunately, neither exoticism nor the fact that a parquet block was produced in some distant country guarantees that natural wood floors will not dry out and monstrous gaps will not appear between the floorboards (they are always monstrous, because you paid so much for it - it’s just must be perfect). The behavior of the laid floor depends largely on the microclimate in your particular interior. if you buy a new board, it cannot be dried well because this requires at least several months, but it is unlikely that the manufacturer can afford it. Prejudice 3 - “wood creaks” The high cost of parquet boards will not insure you against creaking floorboards (creaking does not apply to wood problems, this is a problem in laying the floorboard). Most likely, the installers made a mistake: they laid the plywood incorrectly or installed the joists unevenly. CONCLUSION - all the misfortunes of solid wood (whatever the type of wood) are present in any case and almost in full. And a high price is not a guarantee against anything. The prejudice is that a floorboard is only pine. You will probably be very surprised by the results - but if you enter “floorboard” into a search engine, you will see a huge list of sites selling different materials. Floors are made of natural wood - in addition to pine, there are also larch, oak, and even ash and cedar. But the most interesting floorboard that surpasses the quality of any other is a hewn antique board. It will never dry out or form cracks because almost all moisture-containing fibers disappeared over time. It is incredibly beautiful because it has traces of time and existence. And it was created using a completely different technology, which makes it especially durable. In the old days, in the 17-18-19 centuries, they did not saw boards, but chopped the log was cut in half and cut out from the half-length along the board; The board was obtained using an ax or plank, cutting the tree along or at an angle (not across) the layers, thus removing the excess layer. It is important that such boards are stronger than sawn ones and warp less. In addition, the boards obtained in this way had a characteristic textured pattern that resembled a herringbone or the ribs of a fish skeleton - these ax marks look very impressive. On the longitudinal section of these boards one can observe wavy marks, which are comparable in texture to a washboard. A remarkable feature of such a board is that it is impossible to splinter on it, because the surface is not smooth, not flat, and chips will not break off from such a surface. Since we are offering an antique board that has already been in use for many years, it will be important for our customers to know that the surface treated in this way has been much less exposed to moisture and rot all these years, because rainwater was removed from it faster and easier. For In order to get such a result, Russian carpenters in the old days hewed boards in a special way, looking at the surface being processed slightly from the side, through an ax. Around the middle of the 19th century, in the North of Russia, a complete modernization of both all carpentry tools and the methods of working with this tool was carried out, so that in later buildings the surface of the board does not have the characteristic reliefs described by us. hewn floorboards from the Russian North, a material with a rich history and an exclusive, centuries-old texture.
How the floor was insulated in ancient Rome
In Ancient Rome, a special hypocaust system was used to insulate the floor. I saw her in person on a tour when I was there a few years ago. And I can say that she looks impressive.
The hypocaust was set up quite simply: the stove was installed outside, and the smoke from it was driven through special air channels in the floor. Thus, the stone slabs were heated, providing warmth to the entire room.
It is the hypocaust that is considered the progenitor of modern heated floors.
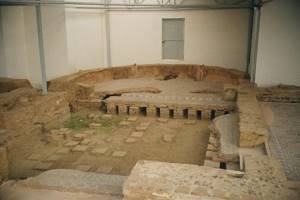
Not everyone in ancient Rome could afford such warm floors. They were considered a luxury because they required a lot of wood to light the stoves.
Only the homes of wealthy people, politicians, and successful traders were heated using hypocaust.
Insulation with other materials
In earlier times, wood was usually used for construction. During the construction of the house it was necessary to ensure:
- multi-layer attic floor;
- installation of double window frames.
Cotton wool was used to insulate the windows. The most common method of thermal insulation was the use of hay or straw. The material was stored in the attic.
To protect the house from the outside, woodpiles were made. There was a double calculation here. The logs were needed to heat the stove in the winter; in addition, they acted as an insulating barrier that prevented cold air and wind from entering the house. Turf was also often used.
How the floor was insulated in the Middle Ages
Yesterday my son came home from school indignant and said: “How unfair, mom! Just imagine, in the Middle Ages palaces were heated, but the houses of ordinary people were not. It’s hard to imagine how cold they were.”
I signed up for some kind of elective on foreign history, it’s called.
We Googled with him why this is so. They found out that heating was easier in palaces than in the homes of ordinary residents.
Large fireplace stoves were installed in the palace premises, which heated all the air efficiently - from floor to ceiling. The smoke was removed through the roof through special pipes.
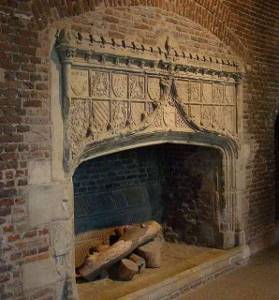
To maintain the fire, it was no longer pure wood that was used, but coal.
Ordinary residents did not have the opportunity to use such a heating system, not because it was unaffordable. The issue is fire safety, since simple buildings were built of wood.
Installing a fireplace near a wooden wall was dangerous for the integrity of the structure itself.
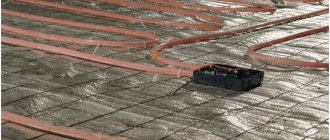
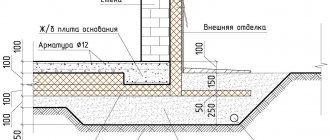
Modern insulation of foundations
Technologies have come a long way, but even now foundation insulation is in great demand. Moreover, the space inside the foundation is often used for technical and even residential premises. Often the boiler room, sauna and other rooms are located in the basement. Cold, uninsulated walls (aka the foundation of the house) are unacceptable in such rooms - condensation will constantly accumulate, fungus will form, etc.
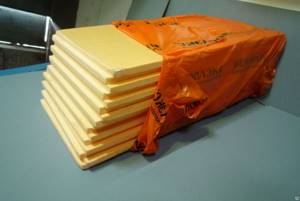
Experts advise using Penoplex insulation to insulate foundations. The slabs are easily mounted on a ready-made foundation, do not absorb or conduct moisture, and are resistant to damage by biological organisms. Environmentally friendly and durable material.
Insulation slabs are attached to the surface of the foundation using bitumen-based adhesives that do not contain solvents. In fact, glue will be needed only until the moment of filling with soil. Backfilling is done in layers, with compaction.
After insulating the foundation with penoplex, the concrete is not only thermally insulated against frozen soil in the winter, but also moisture insulated, because the material does not allow water and moisture to pass through.
A warm room in winter is much cozier and more comfortable. Despite the fact that wooden beams and logs have excellent thermal insulation properties, there are vulnerable spots that require additional thermal insulation.
The construction of wooden houses has its own specific features, one of which is the insulation of walls, floors and ceilings.
Secrets of insulation: the experience of older generations
Our ancestors also knew that the best insulation is air, naturally, “properly packaged.” Therefore, in the old days, they acted wisely by erecting a gable roof on buildings and leaving the attic cold. This roof format allows it to accumulate a certain amount of snow, which becomes insulation. With the correct implementation of this idea, you will be able to achieve zero temperature in the attic when the temperature outside is as low as -25 degrees.
What's the trick? This is where one of nature's best insulators comes into play - trapped air in the attic. By the way, it can be controlled depending on the time of year by closing or opening the windows installed in the gables. Naturally, to be on the safe side, the attic floor was covered with bulk insulation materials, for example, sawdust, sand, and earth. With this technology, inside the hut even in the most severe frosts it was at least +20 degrees. Well, now you know how to insulate a wooden ceiling in a private house without any costs, however, you will have to think about it even before the start of construction, adding the construction of a gable roof to the work plan. But let's look at modern insulation techniques.
This is important to know! If you suddenly decide, adhering to the technology described above, to improve it and insulate the roof slopes, then you will bitterly regret it. The snow will not stay on the roof, but will begin to melt and flow off, turning into huge icicles. In addition, it will be difficult for you to reach the roof covering if repairs are necessary.
Methods
The easiest way
Insulation with clay begins with covering the ceiling with boards. Their minimum thickness should be 4 cm, but it is better if it is 6 cm. Before carrying out work, the boards must be thoroughly dried. In no case should you paint or varnish boards, because many paints and varnishes are simply not adapted to high temperatures and, under its influence, can begin to release toxic resins and polyesters into the space.
In general , it is better not to use chemicals in the bathhouse.
, unless you intend to constantly inhale its destructive fumes.
After completing the sheathing, you must carefully and carefully cover the gaps between the boards with clay and wait for it to dry completely.
The next stage begins with preparing a mixture of sand and clay, which should be quite thick. All boards laid on the ceiling are covered with this mixture. The thickness of the layer should be at least 5-7 cm. Next, you should wait until the layer is completely dry, and this can take quite a lot of time. A thick layer of sand is laid on the dried clay.
Then the ceiling is impregnated first with liquid steam and then with dry steam. The clay, accordingly, first gets wet, and then finally dries and acquires the ability to retain the heat of your bath for many years.
To ensure that the insulated ceiling retains its heat-insulating properties for as long as possible
, there must be ventilation in the attic. The simplest and at the same time reliable way to create ventilation is two windows opposite each other.
Another way
consists of insulation with several layers of clay with intermediate layers of sawdust or expanded clay. In order to prepare the clay, it is slightly moistened and thoroughly mixed with straw until smooth. The straw is pre-chopped. The final consistency should be similar to soft plasticine or mortar, which is used in laying brick walls.
The clay layer will again be 5-8 cm. After application, it must be carefully smoothed. Seal the perimeter of the ceiling requires special care. The clay will dry in 20-30 days, provided that the outside temperature is above zero. After drying, cracks may appear. This is normal. You can apply another thinner clay layer to the cracks, and cover it with sawdust, expanded clay or wood chips on top.
Insulating foundations prolongs their life for a long time, since it reduces the impact of negative temperatures, and waterproof insulation also acts as waterproofing. It so happens that in some houses the floors are warm all winter without any heating, in others they are cold, despite a fair layer of thermal insulation underneath. Practice shows that insulating foundations helps solve this issue. The temperature in the underground is much higher than outside, and the floors cool more slowly.
Choice of insulation
The first thing you need to do is decide how best to insulate the bathhouse ceiling. You should never take the word of manufacturers who claim that their insulation is the best. When choosing a heat insulator for a bath top, pay attention to the following characteristics:
- moisture absorption coefficient (the lower, the better);
- thermal conductivity coefficient (the lower, the better);
- resistance to temperature changes;
- environmental cleanliness;
- resistance against damage by rodents;
- resistance against fungus and mold;
- compatibility with ceiling material and finishing materials;
- ease of installation.
There is no ideal material for insulating a bathhouse ceiling, but there are a number of materials that meet most of the listed requirements. A good choice would be mineral wool - an insulation that meets most of the listed requirements. The main disadvantage of this material is the sudden loss of thermal insulation properties when wet. And mice can easily make their moves in it. But with high-quality waterproofing, insulating the bathhouse ceiling with mineral wool is considered one of the best options.
Ecowool
Ecowool is a heat-insulating material produced on the basis of cellulose. With all its positive qualities: low thermal conductivity, environmental friendliness, resistance against rodents, fungus and mold, it has a high (up to 20%) water absorption coefficient. For a constantly used bathhouse, this is a very large indicator, but if you heat it once a week, or even two, then you can use ecowool to insulate the ceiling space in the bathhouse.
Izover
Isover is a relatively new insulation material that also has a mineral base. In fact, this is an improved version of glass wool, which has retained its good thermal insulation properties and is devoid of its disadvantages. To insulate the ceiling of a bathhouse, it is better to take an isover equipped with a foil coating for better heat reflection.
The debate about whether it is possible to insulate the ceiling of a bathhouse with foam plastic has been going on for a long time. On the one hand, polystyrene foam has excellent thermal insulation qualities, but on the other hand, over time it begins to disintegrate and release toxic substances.
Expanded clay
Expanded clay is an old, proven material that has been successfully used for insulating bathhouses for a long time. Expanded clay granules made from clay are a good heat insulator and successfully withstand almost all the problems encountered when thermally insulating a bathhouse ceiling. The only “but” is that expanded clay easily absorbs moisture - up to 25% of its mass. If expanded clay is a fairly light material when dry, when wet it becomes heavier and puts pressure on the ceiling. If we are insulating the ceiling of a permanently built bathhouse, then we can use expanded clay, but it is not suitable for insulating light buildings without equipped ceilings.
The same situation applies to available materials: a mixture of clay with sawdust or straw. In the old days, this insulation for bathhouse ceilings was practiced in village bathhouses almost everywhere, but today it is almost never used - there are many problems with it. But, if you need a budget option for thermal insulation, you won’t find it cheaper.
Stupidity.
As we are increasingly noticing, stupidity in our world is being cultivated more and more. All these flat comedy films and meaningless never-ending series. A lot is done to make a stupid person feel comfortable.
It's simple, stupid people are easier to manipulate. As one joke goes, “Smile more often, bosses love idiots.”
Stupidity is made fashionable, and therefore in demand! By the way, the main and most delicious victims of various sects are housewives who watch television series and “Shopping on the Couch” from morning to evening. Since such a pastime in life dulls critical thinking, it is they who most often fall for the tricks of scammers or the tricks of preachers of Jehovah's Witnesses, for example.
In general, a stupid person can be persuaded to do anything, under any of the most absurd and far-fetched pretexts.
Specifics of bathhouse ceiling thermal insulation
Having finally decided on the choice of how to insulate the ceiling in the bathhouse, you can proceed directly to insulation. But first you still need to figure out how to properly insulate the ceiling in a bathhouse. The specificity of bath rooms is such that for high-quality thermal insulation, in addition to the insulation itself, it is necessary to equip two more layers: vapor barrier and waterproofing. These two layers are necessary to protect the thermal insulator from getting wet, thereby maintaining its thermal insulation characteristics and protecting it from mold.
Brief characteristics of a wooden floor for a log house
Wooden floors can be divided into 2 types: single-layer and double-layer.
The best way to lay a single-layer floor in a log house is to use joists.
The installation of a single-layer floor, in turn, is divided into methods using logs or without their participation. The choice will depend on the thickness of the board you will use. And in this case, the step between the beams is important. When building a house whose floors are built on joists, the boards are laid directly on the beams. And the interbeam step in this case should not exceed 0.6 m.
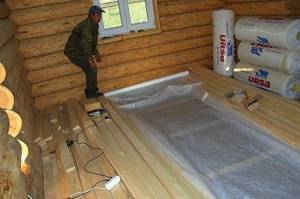
The two-layer version of the floor in a log house implies the presence of a subfloor in its design. It is carried out simultaneously with the fastening of beams on rough boards. A layer of thermal insulation is laid on top of the rough boards. You can use any sheet heat-insulating material or expanded clay as it. Professionals recommend not to exceed the thickness of this layer; the maximum possible option is 80 mm.
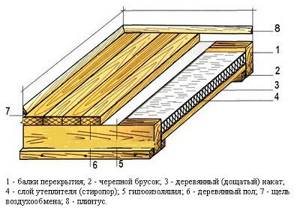
Wooden floor insulation scheme.
It is necessary to insulate the floors of a log house regardless of what it is made of. Both wooden and concrete options require this procedure. Various types of modern insulation materials can be used as thermal insulation. These include: mineral wool, polyurethane material.
And some builders also use methods that are considered outdated today. This is the use of shavings or sawdust as a heat-insulating material; there are even options with dry leaves.