The feeling of comfort in a home depends primarily on cleanliness, ambient temperature, fresh air and light level. And if the first can be ensured by regular cleaning, then other factors depend on the design features of the building and its technical development. Moreover, the issue of heat occupies the main place. Why? Because a comfortable temperature gives a person the opportunity to relax and feel freedom.
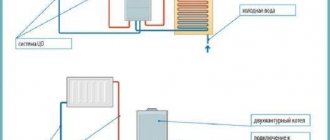
The modern market offers us many options for heating a home, from traditional radiators to innovative air systems. They all promise to create equally wonderful living conditions, sometimes at a fairly competitive price. But if we think deeper, is it possible for such different heat transfer technologies as infrared radiation and hydronic heating to produce the same effect? Of course not, the sensations will be completely different. To achieve a truly high degree of comfort, you need to take into account many different nuances.
History of the idea
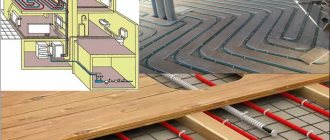
Has anyone noticed that even at a high temperature in the room, if there is a draft across the floor, it is still cold. Or intuitively you don’t want to touch the ice walls. Maybe that’s why all houses with wooden interiors feel unusually cozy. The point, of course, is not the material, it’s just that the wood is warm to the touch, and the body feels it. Having noticed such points, the designers developed a heating system “warm walls for the house” and “warm floor”.
The idea, of course, is not new, and in all old houses that had stoves, rough heating technology was used - a heated wall passing through the rooms of the building. This was possible by creating a complex chimney system with many channels inside this wall. Later, in the 60s, they developed a project for the construction of multi-storey panel houses from concrete elements with channels inside. It was supposed to release coolant in the form of hot air through them (and there were actually operating objects).
The project was not widely adopted due to the complexity of installing the panels, which had to be precisely aligned and the joints between them well sealed. But the principle itself became the founder of modern technologies for organizing warm walls.
Which electric heaters are better for apartments and houses?
How to decide among such abundance?
Everyone’s selection criteria are different, so first you need to decide what is key:
- price;
- heating rate;
- environmental friendliness;
- durability and practicality.
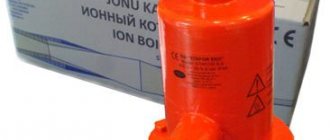
It’s better not to think about efficiency, since absolutely all electric heaters consume the same amount of electricity. Even economical induction heaters for the home (aka boilers) obey this rule. According to the principle of energy conservation, it passes from one state to another without loss. Economical electric heaters are a marketing ploy, nothing more. Which electric heaters are best for an apartment?
Great as a temporary measure. It’s another matter when you need a heater in the room on an ongoing basis and as the only source of heat. For example, at the dacha, when you need to somehow warm up for several days. Then the question arises about what are the best electric heaters for the home. Here environmental friendliness and practicality come to the fore.
The choice will most likely be between an oil radiator and a convector
Their prices are approximately the same, but you need to look at the heating element of the convector, because it is important that it does not burn oxygen and creates the most comfortable conditions. Of the three types of heating elements (heating element, spiral, spiral in a housing), only spirals enclosed in a sealed housing do not burn oxygen at all
By increasing the heat exchange area, the temperature of the plate is distributed evenly, and there are no overly hot areas. How to choose an electric heater for your home? The answer is obvious - to carry out a comparative analysis.
Undoubted advantages of the convector:
- low heating inertia;
- high accuracy of temperature settings;
- faster air heating.
Let's say you set the oil radiator and convector to the setting that the room temperature should be 23 degrees. The oil heater takes a long time to heat up, heats the room to 23 and turns off. However, it remains hot and continues to increase the temperature in the room. The same thing happens when it cools down. The temperature drops to 22 degrees, the unit turns on, but while it warms up, the temperature in the room will drop another couple of degrees. The inertia of such a device is too high.
Modern electric convector-type home heaters intensively pass air through them and heat up very quickly, in a few seconds. In addition, due to active circulation, the air warms up in all corners of the room approximately equally. At the same time, the oil heater overheats the air around it, and heat reaches remote corners of the room with a long delay. Due to the precision of the automation, convectors operate more stably and do not overuse electricity.
https://youtube.com/watch?v=lGkbqaeK5j0
Wall heating as a heating element
The device of modern wall heating is somewhat different from its prototype. Thus, hollow structural elements for the passage of hot air are no longer made. And you can heat almost any surface by installing coolant channels. Such channels include polypropylene pipes for circulating hot water and special heating wires powered by electricity.
Another feature is the creation of a thermal insulation layer that does not allow heat to pass out if the external wall is heated. The very essence of the project is to create a thermal barrier between the interior and the street. Plus, the large area of the heated surface ensures rapid heating of the air.
Positive and negative aspects of the system
The “warm walls” system is deservedly considered one of the most effective because:
- Creates an excellent thermal effect at a lower coolant temperature than traditional convection systems. This is due to the large area of the thermal panel.
- Causes pleasant tactile sensations.
- It does not dry out the air, since it does not have open oxygen-burning elements.
- Distributes heat more evenly in space because it immediately heats a large volume of air.
- Does not cause positive ionization of air, like any metal heating element. This prevents the accumulation of dust and pathogenic bacteria.
- Requires less powerful circulation pumps, which saves energy.
- Easy to install. Does not require the use of welding or metal-cutting tools.
The inconvenience of such heating is that warm walls should not be covered with furniture. It is not advisable to drill them, because it is difficult to determine where the channel may pass. If a system violation occurs, this can result in serious repairs.
Where is this type of heating applicable?
The “warm walls” system is designed in such a way that it can be technically feasible in any room. It is easy to install on any wall, of course, not after major repairs and finishing. The question is, will this type of heating be effective in a particular room? There are a number of preferences here:
- Ideal spaces are those where there is a minimum of equipment and furniture blocking the wall plane: classrooms, office spaces, bedrooms and corridors.
- Places with high humidity: saunas, laundries, baths, showers. This heating promotes good drying.
- Areas that are difficult to equip with other heating systems: garages, warehouses, hangars, bathrooms, swimming pools, workshops.
- As an additional type of heating to the existing one, but the power of which is not enough for full heating.
- In vestibules to create a thermal barrier.
Advantages of wall insulation
Let us note several main advantages, which usually play an important role and influence the choice of certain materials for insulating your home.
- Sufficiently high efficiency. Wall heating provides high heat transfer. Radiators, for example, give 50-60 percent, but water walls are much higher - 85%. You can maintain a comfortable temperature by significantly reducing the use of coolants. Result: gas savings of 10% compared to radiator batteries.
- The convective flow decreases significantly. The warm wall heating system has a unique pattern of air flow distribution in the room. In this regard, the circulation of dust disappears, which makes it possible to breathe freely, which is important in a closed room during the cold season.
- It becomes possible to compensate for heat losses. Such walls can work for the “smart home” concept, reducing heat losses by using the temperature difference between the main and return heating lines. This is achieved using a thermal barrier.
- Dryness, which will prevent mold from forming.
- Width of choice and the opportunity to create a new creative interior.
Wide possibilities are provided by the Knauf Warm Wall external insulation system.
What types of coolant are used
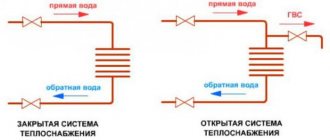
Two types of coolant are typically used:
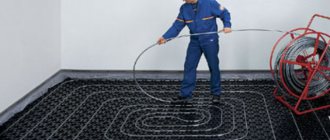
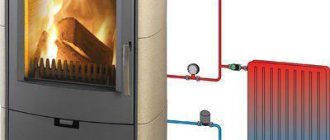
- Liquid. Ordinary water, which, as in any water heating, circulates in pipes under a certain pressure.
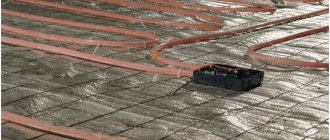
- Electrical cable. It works on the principle of a warm floor.
Warm water walls gradually heat the surface and, importantly, are environmentally friendly. But it is not always possible to install such a system in multi-storey buildings, or rather, to obtain permission for this. After all, a violation of the tightness of the channels and leakage of liquid can lead to the destruction of not only the internal covering of the room, but also the structure of the building.
Warm electric walls are more expensive to install and 20% less economical than water ones. Partially operating costs are reduced by using thermostats, but with large lengths of wire this is not particularly noticeable. Heating based on electricity does not destroy the structure of the box, but it is not so harmless to humans. Each wire creates electromagnetic radiation, which can adversely affect health.
Materials for organizing warm walls
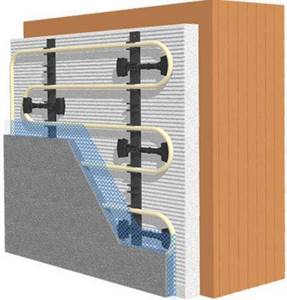
Warm wall - heating, which is a complex multi-layer system. Basically, it is placed on external load-bearing elements to create a barrier and reduce heat loss from the building. The correct pie looks like this:
- External wall insulation. Provides protection for the frame from freezing.
- Building structure wall.
- Internal insulation. Prevents the penetration of coolant energy into the unusable area of the load-bearing wall.
- A system of channels with coolant and fasteners.
- The outer layer covering the system. It can be made of plaster or drywall. This is a useful heated plane, the heat from which is transferred to the room.
Internal insulation of warm walls is installed only if there is external wall insulation. Otherwise, the wall left without heating will freeze, become damp, and fungus will appear. All fastening elements of the system are made from materials that are not subject to oxidation, such as stainless screws and plastic clips. Coolant channels are installed from polypropylene pipes or electrical wire in a plastic braid. The layer of plaster is fixed on a special mesh. Plaster can be cement, gypsum or lime mortar based.
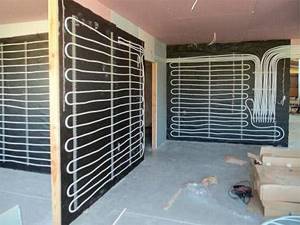
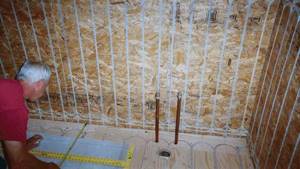
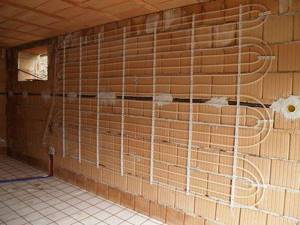
Installation of warm walls
There are rules for organizing water-type wall heating:
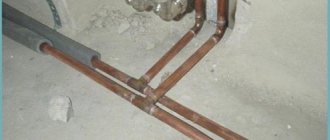
- It is better to place the pipes in a horizontal direction. It is easier to ventilate such a circuit if a plug suddenly forms.
- The pipes are laid according to the snake principle, with hot water supplied from the bottom and return from the upper end. This is dictated by the law of physics, because hot air rises, gradually warming the entire room.
- The horizontal line spacing is increased towards the ceiling to save materials. It makes no sense to intensively heat the space in the upper layers - a person simply will not feel this heat, and the energy consumption will be noticeable.
- It is advisable to install de-aeration devices at the top point of each circuit.
- If the pipe is covered with plaster, then the latter is applied in two stages using reinforcing mesh - metal for the first layer and fiberglass for the finish. In this way, the possibility of cracking of the wall due to temperature changes during heating and cooling is eliminated.
- When installing systems on a stone base: brick, concrete, cinder block; Internal insulation is used only if external insulation is available. Under no circumstances should the wall freeze, otherwise such heating will do more harm than good.
- All fastening elements are fixed to the load-bearing wall, and not to the insulation.
- To heat thin interior walls, there is no need to put thermal insulation under the pipe; the surface will be heated on both sides.
- If the pipe is covered with plasterboard (dry installation), then it is necessary to install heat reflectors under it, and keep the thickness of the air layer to a minimum. Otherwise, the heated air inside will rise upward, and you will get “warm ceilings”; the walls will not warm up well. This nuance must be taken into account.
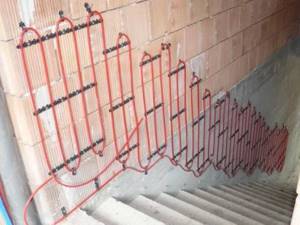
When installing a “warm wall” system, it is necessary to carefully work out the installation diagram. To do this, right on the spot, you can draw the location of the heating pipes and their connection points to the main line. It is important to remember that the longer the horizontal section in the coil, the more likely it is that air will appear in it. Therefore, it is more expedient to divide a long section into several smaller ones, and the entire system into as many circuits as possible, in each of which a circulation pump is installed. All supply pipes are covered with thermal insulation so as not to lose useful power.
Construction technologies to protect heat
Despite the vast experience in low-rise construction, the debate about which house is the warmest still does not subside. Because there is no clear answer to this question. As soon as any technology or material establishes itself in the market, it is replaced by another, with more advanced characteristics and performance. And in combination with the already accumulated experience, he generally brings about a revolution in the professional environment.
Today, there are several basic proven materials and technologies for the construction of low-rise buildings.
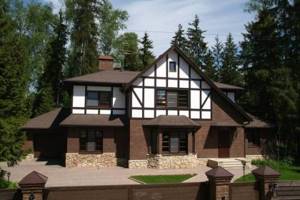
Brick house
Warm but expensive option. Monowall technology is practically not used in construction in its pure form (the entire area is completely laid out from brick). The end result is too much consumption of expensive material and inefficient use of space. The recommended wall thickness of a residential building depends on climatic conditions. In Russia, this figure ranges from 300-400 mm in southern cities and up to 800-1500 mm in temperate and northern latitudes (Ural, Siberia).
Warm brick laying in section
In most cases, a brick house requires additional external insulation. Suitable exclusively for the construction of buildings for permanent residence, since the microclimate inside must be constantly maintained. Long-term conservation of an object has a detrimental effect on the brickwork: the material begins to absorb moisture and deteriorate. And in winter it will not be possible to quickly warm up such a house; to achieve the final result, the process must last at least 72 hours.
House made of aerated concrete blocks
An excellent option for building a house. Suitable for both those who are planning to build a seasonal dacha and those who are choosing a house project for permanent residence. If the main criterion for you is the heat capacity of the future home, then aerated concrete and its derivatives are one of the best options.

Construction from modern aerated concrete blocks
Calculations by specialists and the practice of using this material have proven that such a block is suitable for the construction of a single-layer wall, which does not have to be additionally insulated from the outside. There are savings in time and money.
Unlike brick, aerated concrete walls are made up to half a meter thick, which allows the house to be used comfortably even in the northern regions of the country.
To build a country house with the possibility of winter visits, it is enough to build walls only 230 mm thick.
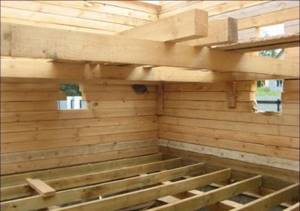
Wooden house
Another favorite in the construction market is a wooden house. Along with the brick one, it has its own army of followers. But there is a split among them, and there is constant debate about which wooden house is warmer.
House made of timber
The wall thickness should be from 150 to 240 mm wide. This is again determined based on the climatic characteristics of the territory where the house will be built. The timber has a large area of contact with each other, so the walls can be made thinner than when building a house from logs. A simpler and more practical option for wooden houses. Despite good heat-saving characteristics, houses made of timber are still recommended to be additionally insulated.
Log house
The diameter of the logs used to build a house for permanent residence is 240-280 mm. For country options, the figure may be less. It is better to build a house located in the northern corners of the country from thicker logs. The important role is played not by the diameter of the log itself, but by the area of contact between them, that is, the width of the lock groove. It is this place that is the weak link in such a house. It is possible to insulate a log house, but it is irrational. Firstly, all the natural beauty of the log house is hidden behind a layer of insulation. Secondly, it is quite difficult to professionally insulate a log house, but it is possible.
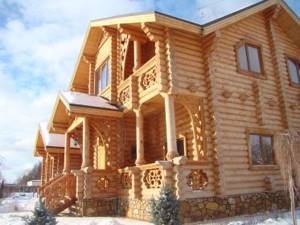
Meanwhile, natural wood is an excellent material for building houses for permanent and seasonal use.
It is easy to warm up such a house in a matter of hours, even if no one has been in it for a long time, and there is severe frost outside.
Frame house
Construction technology, time-tested in the foreign construction market. It is gaining popularity in Russia, but still meets a lot of skeptics and adherents of classical methods of building houses.
Fast, simple and inexpensive are the main advantages that characterize the construction of frame houses. Using this technology, houses can be built in regions with a hot climate, as well as on the northern outskirts of the country.
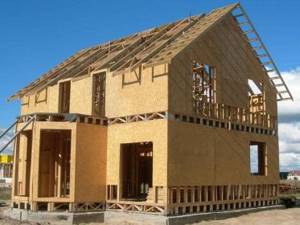
Frame construction technology
The base is a wooden frame made of timber, and the walls are multi-layer sandwiches, assembled according to the needs of a specific climate. The required layer of insulation - from 50 to several hundred millimeters - is laid in horizontal and vertical sheathing, covered with vapor and waterproofing films, covered inside and outside with the material chosen by the customer: board, lining, gypsum, OSB boards and other available items. There is no need to additionally insulate such a house. If you have doubts whether it will be warm enough, you can add an additional layer of insulation to the walls of the house during the construction stage.
Modern combined technologies
They allow you to build a house from the desired materials with minimal wall thickness, while making it as warm as possible. For this, the principle of multilayering is used. When at the construction stage a layer of structural material is insulated, and then the facade is laid out.
- This technology is used to build a brick house without maintaining the minimum permissible wall width. Assembling a sandwich from support bricks, insulation and finishing bricks.
- They also save on the construction of houses made of aerated concrete, when for a house in northern latitudes they build walls in one block, but then additionally insulate it and cover it with a facade.
- It is possible to build a house from timber, with walls less than the permissible width, closed facades, but additionally insulated on the outside.
- In addition, frame-fill construction is possible. In the first version, the frame is made of hollow foam blocks, into which reinforced concrete is poured. And in the second option, two brick walls are exposed - external and internal, and the space between them is filled with liquid insulation.
Warm floor on the wall
A rather convenient method of heating walls is using electrical “warm floor” systems. They are produced in three versions: electrical cable on the base, cable in coils and film material of infrared radiation.
Installing warm electric walls over water ones has a number of advantages. System:
- Not susceptible to air locks.
- Has a small thickness. Therefore, a thin layer of plaster is sufficient to hide it in the wall.
- The cable on a mesh base is easy to install to the load-bearing surface, and there is no need to use additional reinforcing material for the plaster mortar.
- For installation, lighter and cheaper fasteners are used.
- The insulation of the current-carrying heating cable is made of a material that can compress and expand under the influence of temperature. This, in turn, reduces the mechanical load when the element heats up and expands.
- It is structurally simpler, since it directly converts electricity into heat, without requiring additional equipment in the form of a boiler and pumps.
Although it is convenient to apply a heated floor to a wall, it is expensive and cannot be installed near plumbing elements. For greater efficiency, it requires a lining of thermal insulating foil material.
Insulate elements of the house
Measures for insulating houses include work on arranging thermal insulation for the walls, roof, floor, door and window openings of the building.
Below we will consider the structural elements that require insulation for maximum heat conservation at home.
Facade insulation
Load-bearing walls of houses require major insulation from the outside - this is especially true for buildings made of brick and foam concrete. Thermal insulation is performed using “wet” or ventilated facade technology. When arranging a “wet facade”, slab insulation is installed on the walls, after which decorative coatings are applied. The installation of a ventilated facade involves the installation of insulation followed by the installation of facing material fixed in the sheathing guides. A characteristic feature of ventilated facades is the presence of a ventilation gap and the use of moisture, wind and vapor barrier membranes that effectively remove condensate and prevent the thermal insulation layer from getting wet. Another material that can be used to make a house warm during the construction phase is facing bricks and porous ceramic blocks, laid with a ventilated gap around the perimeter of the house.
Wall insulation
In combination with facade insulation, the load-bearing walls of the house are additionally insulated from the inside, using roll or slab-type thermal insulation materials: polystyrene foam, expanded polystyrene, mineral wool. A vapor barrier, lathing or reinforcing mesh is installed on top of the insulator, after which the premises are finished with decorative coatings.
Roof insulation
Roof insulation is carried out taking into account the type of roofing and involves the use of mineral wool, polystyrene or sprayed thermal insulation of the ecowool type. The roofing “pie” must include hydro- and vapor barrier films, for example, type Ondutis B (R70). Optimal heat saving can be achieved by installing steam and heat shielding film with a foil layer Ondutis R Termo.
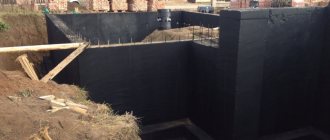
Foundation insulation
A warm foundation for a house is poured onto a sand-garvey bed with mandatory drainage and is characterized by slight depth. Further insulation of the foundation is carried out from inside the building.
Floor insulation
The type of floor insulation is selected depending on what serves as the load-bearing base: a concrete slab or wooden flooring on joists. Unlike walls and under-roof space, the floor can be insulated not only with mineral wool, polymer boards and sprayed thermal insulation. Foamed concrete, expanded clay, shavings and peat mats are also widely used. At the final stage of floor insulation, a vapor barrier is installed and the finishing coating is laid.
Window insulation
Insulating windows usually involves installing sealing strips around the perimeter of the frames and covering the plane of the glass with heat-shielding films - these processes do not require special professional skills and can be done with your own hands.
Door insulation
The heat-saving parameters of doorways in most cases depend on the professionalism of the installation of the frame and door leaves: without distortions and gaps. A layer of thermal insulation in the thickness of the door leaf in combination with several sealing contours prevents heat loss through the entrance doors of the house.
Maintenance
All heating systems require monitoring and maintenance. Warm water walls differ from conventional water heating due to their large volume of liquid content. As a rule, the water in standard radiators is rarely changed, but they are located only in a few places in the room. A system of warm wall channels penetrates large areas. Considering the latest discoveries of scientists in the field of energy, radiation from dirty water can depress biological organisms, weakening their immunity. Therefore, it is advisable to change the water in the system every season.
During operation, automatic ventilation devices must be checked periodically. They may leak. It is also necessary to monitor the pressure in the system and control the return temperature. If it does not warm up enough, turn on the highest speed on the circulation pump, expelling air pockets. It is advisable to do the same during prolonged power outages.
We level the floors and install thermal insulation
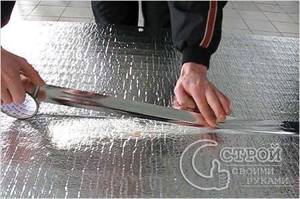
If the heated floor will be the main heating, be sure to use a thermal insulation layer, it is best to use 35-density polystyrene foam. Its thickness depends on what is located directly under the floor slab. For rooms not on the first floor, when there is a heated room below, insulation with a thickness of 20 mm is sufficient; for rooms on the first floor with a warm, heated basement - 30 mm. For balconies, first-floor apartments with unheated basements, rooms located above through arched spans, the thickness of such a layer should be at least 50 mm, and for houses where the concrete pad lies on the ground - 100 mm. The insulation can be laid with special glue or attached with special dowels (this can be done in the second stage of work, fixing the mesh). The floors must be level, without obvious distortions, holes and large cracks, otherwise all defects must be repaired with cement mortar, and if there is significant distortion, a rough screed must be made and the floor leveled. Before laying the thermal insulation, the surface is treated with a primer that prevents the development of mold, and in the case of gluing, simultaneously increasing the adhesion of the materials.
The plates are glued or secured in several places with dowels. A plaster mesh is fixed over the surface using plastic clips or dowels with washers equal in length to double the thickness of the thermal insulation. This fastener will additionally secure the slabs to the floor.