Installation of aluminum heating radiators: from purchase to launch
Greetings, comrades! Do you know which heating systems are suitable for aluminum radiators? How to dismantle an old cast iron battery and install an aluminum radiator? Today I will answer these questions.
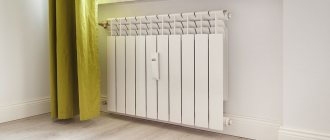
Aluminum batteries are a popular solution for private houses with autonomous heating.
Types of heating radiators
To choose a good radiator that is suitable for your heating system, you need to answer the question where your future radiator will be used (an apartment in a high-rise building or a private house). This will largely determine which type is best for you.
Before you go to the store to make a purchase, find out from the management company of your home what pressure is used in the heating system. Add 2-3 points to the obtained value and you will get the pressure below which you should not buy radiators. Do not buy radiators for a high-rise apartment with values below 7 atmospheres; the best option would be 14 atmospheres.
In private houses, the pressure in the heating system is several times lower - 2-4 atmospheres.
Cast iron radiators
This is the oldest, most reliable and cheapest type of radiator. It is not afraid of dirty and rusty water, it is excellent for any heating systems (apartments in high-rise buildings and private houses), and it has a long service life.
Modern radiators have become more attractive and several options can be found in the design spirit. The only disadvantage of such a radiator is its relatively low thermal conductivity, unlike its aluminum and steel counterparts.
Cast iron radiators are suitable for use both in apartments in multi-storey buildings and in cottages. In order for heat to flow into the room in the required volume, it is necessary to correctly calculate the number of radiator sections and the low thermal conductivity of this type of radiator will not be a hindrance for you.
Why aluminum
Why are aluminum radiators attractive?
They have two advantages:
- High heat transfer (up to 210 watts per section);
Manufacturers indicate heat flow values for a coolant temperature of 90 °C at +20 °C in a heated room. If the temperature difference between the battery and the air is smaller, the heat transfer decreases proportionally.
- Low price . A standard size section (500 mm along the nipple axes) can be purchased for less than 200 rubles.
The ten-section Monlan 500/70 radiator is sold in online stores at prices starting from 1,960 rubles.
In terms of the ratio of cost and heat transfer, only a steel register can compete with aluminum batteries. But its appearance is more appropriate in a workshop or garage than in a living room.
Heating system compatibility
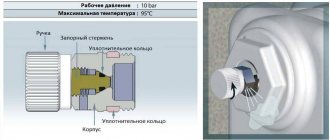
For a typical aluminum heating device, manufacturers recommend an operating pressure of 10-20 atmospheres at a temperature not exceeding 130 degrees. What are the real parameters of different heating systems in normal mode?
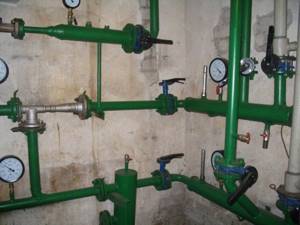
Elevator unit of an apartment building. Pressure gauges show pressure in megapascals at the heating supply and return. 1 MPa is approximately equal to 10 atmospheres.
As is easy to see, the operating pressure of the batteries fits into the operating parameters of heating systems with a fair margin.
Therefore, they can be used without restrictions in both private and apartment buildings? Don't rush to conclusions, comrades.
In autonomous circuits - it is possible. Their parameters are completely under the control of the owner and, with a properly designed heating system (that is, with a sufficient volume of the expansion tank and a working safety valve), will never go beyond the values I specified.
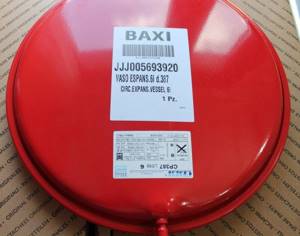
The membrane expansion tank compensates for the expansion of the coolant when heated and prevents pressure growth.
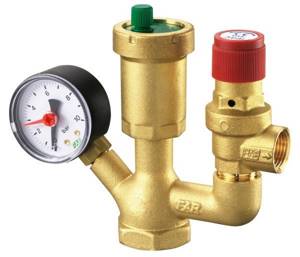
Heating boiler safety group. The pressure gauge (left) is used to visually monitor the pressure in the circuit. The safety valve (right) releases the coolant into the drain when pressure rises dangerously.
But in the heating systems of apartment buildings, emergency situations are possible, leading to pressure surges.
Let me give you a couple of examples:
- Water hammer . It occurs if you quickly fill a riser or the entire circuit that was discarded during repair work with water. Water is practically incompressible, therefore, at the moment when it completely displaces the air through the vent or vent, the pressure at the flow front can briefly increase to 25-30 atmospheres;

Consequences of water hammer. The aluminum section cracked along the fins.
- Annual tests of heating mains for density . They are carried out after the end of the heating season and are designed to identify weak points in worn-out pipelines: cold water is pumped into the heating main with a pressure of 12 kgf/cm2 or more. During testing, the inlet valves of the elevator unit must be closed and the discharges open. Now imagine what will happen if for any reason (mechanic error, failure of one of the valves) the elevator is not cut off from the route. The result is not difficult to predict: batteries designed for 10 atmospheres will burst.

Rupture of the heating main during density tests. An aluminum radiator will clearly suffer at test pressure.
I strongly advise you to install aluminum heating radiators only in autonomous heating systems (in a private house or in apartments with their own boiler). For central heating systems, there are much more durable bimetallic batteries.
Bimetallic heatsink: A durable steel core is surrounded by a finned shell made of highly thermally conductive aluminum.
Choice
What to look for when choosing radiators?
Two parameters are important for us:
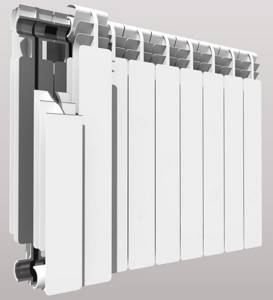
- Heat flow per section. The bigger, the better. An increase in thermal power is achieved by increasing the area of the section fins;
Heat transfer increases with the surface area of the heating device. That is why aluminum batteries are characterized by developed fins.
- Center distance between section collectors (it is directly related to the height of the radiator). If you are replacing a cast-iron battery with an aluminum one, you should choose a radiator with a center distance of 500 mm: it will fit in the place of the old one without major modifications to the liner. Low radiators (200 and 350 mm) are mounted under low window sills or panoramic windows, creating a thermal curtain in front of them. Tall batteries (800-1200 mm) provide maximum heat transfer with a short length.
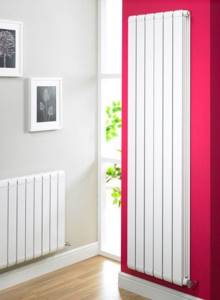
Tall aluminum radiator: maximum heat with minimum width.
If, contrary to my advice, you want to purchase aluminum radiators for a central heating system, choose devices with maximum operating pressure. The safety margin will provide you with at least some insurance against emergency situations.
Radiator selection
You should start by choosing a radiator, and the main criterion for choosing will be the operating pressure for which the radiator is designed. For a private house with its own heating system, a radiator with a working pressure of 6-7 atmospheres will be sufficient, but if you need to connect a radiator to the central heating system of an apartment building, it must withstand a pressure of at least 10 atmospheres.
Currently, the consumer is offered two options for aluminum radiators - standard or European and reinforced. The latter can operate under pressure reaching 12 atmospheres. When connecting to a central heating system, you must choose among reinforced radiators.
The number of sections plays a big role
Next you need to decide on the required number of sections. To do this, we determine the amount of heat. Necessary for heating the room and divide by the heat transfer of one section of the selected radiator.
The amount of heat required for a standard room can be taken equal to 1 kW per 10 m 2 of room area. For non-standard premises and more accurate calculations, we will use a ready-made table:
Radiator power table
It should be remembered that the connection diagram for a battery of more than 12 sections must be double-sided, diagonal or saddle. With a one-sided battery connection scheme consisting of a large number of sections, a “pocket” of cold water will form on the side of the radiator opposite the pipes. “Extra” sections simply won’t work; we end up with harmful ballast.
Using forced injection, the battery can be expanded to 24 sections, even with one-way supply, but the radiator in this case must be reinforced.
It should be remembered that coolant must be supplied to reinforced radiators under high pressure only through metal pipes. Metal-plastic may not withstand such pressure, and the consequences will be the most dire.
It should also be taken into account that the heat transfer of the radiator indicated in the documentation is relevant only for one-sided or diagonal supply of coolant to the radiator. When using bottom feed, feel free to subtract 10-15 percent.
If the heating system is installed in a private house, then it is possible to choose the general heating arrangement yourself - one- or two-pipe.
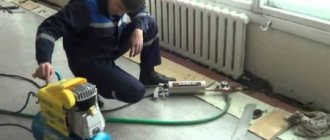
Removing a cast iron radiator
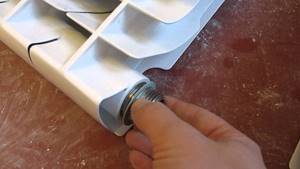
How to install an aluminum battery instead of a cast iron one? Obviously, you need to start by removing the old radiator.
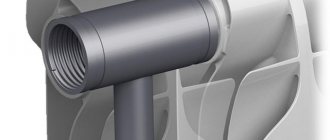
The typical method of installing cast iron batteries is on squeegees. A pipe with a long thread is screwed into the radiator plug; the thread is sealed with a wound locknut.
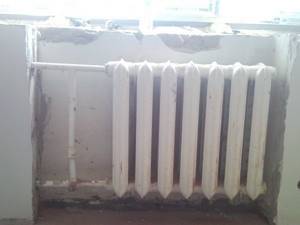
Connecting a cast-iron radiator to squeegees. Found in any Soviet-built house.
Installing an aluminum radiator on brackets is possible in principle, but is rarely practiced: American models greatly simplify both connecting the battery to the connections and dismantling it. And for the installation of American threads, you need not long threads, like on squeegees, but short threads.
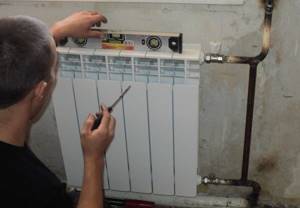
Battery Installation
Position
To ensure maximum heat transfer from the radiator, when installing it you need to follow a number of simple rules:
- The distance from the wall should not be less than 2 centimeters. The gap will ensure the unimpeded movement of convection air flows from the back of the battery;
- The distance to the window sill when installed in a window sill niche is no less than 8-10 cm. A closely located window sill will again limit convection;
- The minimum distance from the floor is 10-12 cm. The gap will provide an influx of cold air, replacing the heated air and displaced upwards.
Installation of aluminum radiators - what you need to know?
The trouble-free operation of an aluminum heating system largely depends on how the aluminum radiators are installed. You can make the connection yourself or invite specialists, in any case, all stages of the work - selection of components, calculation of radiators, connection of sections, etc. - must go as correctly as possible. Only then will you get a reliable heating system for many years.
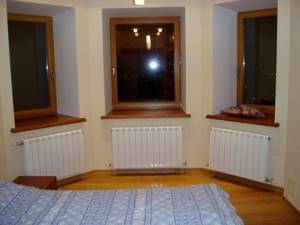
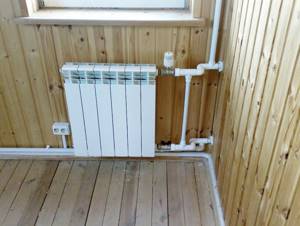
Installation of radiator sections under window openings
Nuances of installing aluminum radiators
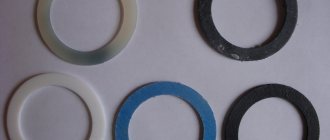
Before you begin installing aluminum radiators, you must thoroughly rinse all elements of the heating system. It is prohibited to use alkali as a cleaning agent. Also, you should not clean the surfaces in contact with the sealing gaskets when installing adapters and plugs in order to avoid further coolant leaks.
Each of the aluminum radiators must be equipped with an automatic device or a manual valve. This is necessary to remove air pockets from the heating device. When installing the valve, the tightening force cannot exceed 12 kg. If an automatic valve is installed, the air outlet part should be directed straight up.
It should also be noted that the installation of aluminum radiators must be carried out in strict accordance with the instructions supplied with the devices by the manufacturers.
The process of carrying out work related to the installation of aluminum batteries requires a careful and thoughtful approach, taking into account the fact that the installed equipment for heating your own home or apartment is prohibited from being subjected to shock loads.
Installation of aluminum heating radiators on video:
Source
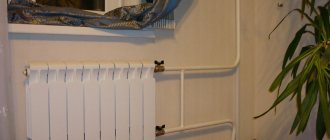
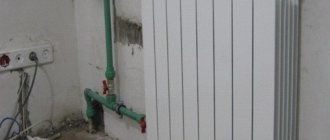
Where can aluminum radiators be installed?
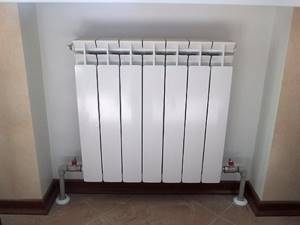
Aluminum heating radiators have high heat-transfer properties and low permissible coolant pressure, therefore they are usually installed in private low-rise buildings or when installing an autonomous system. In this case, they will be protected from water hammer, which is possible for central heating, and will be able to heat your home as much as possible.
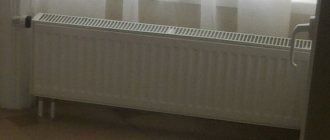
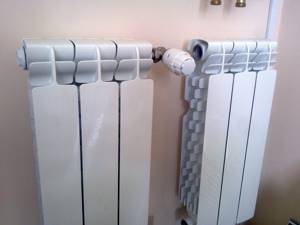
As a standard, radiators are installed under window sills. It is also possible to install aluminum batteries on racks near the wall or in other free parts of the room. In this case, the pipelines are connected from one or different sides, and the radiators themselves can be decorated with screens. For each installation method, it is necessary to take into account heat loss to nearby objects.
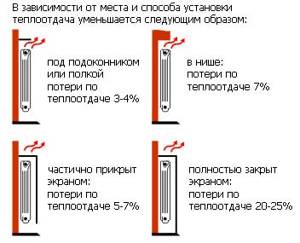
Remember! The best heat transfer will be achieved when the installation of devices takes place under standard conditions, without the presence of objects blocking it.
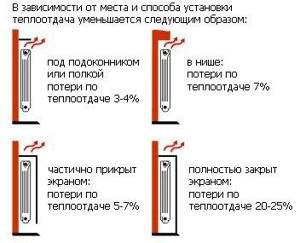
Reduction of heat transfer depending on the location and installation method
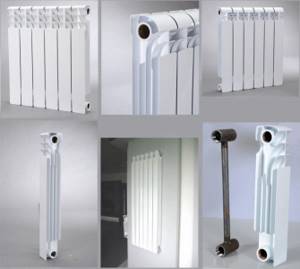
Features of aluminum radiators
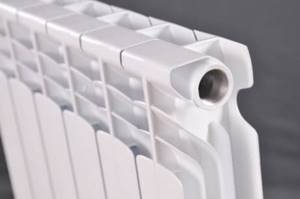
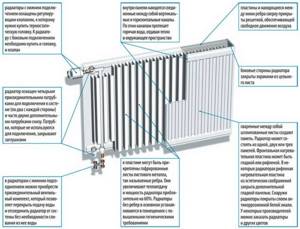
As a rule, the design of an aluminum heating radiator is similar to the design of devices made of cast iron or bimetal. Inside the unit there are upper and lower collectors, which are connected to each other by jumpers. The outside of the pipes is covered with an aluminum casing that has good heat dissipation.
The following types of aluminum radiators can be found on sale:
- Sectional batteries are manufactured by casting. An alloy of silicon and aluminum is poured into molds under high pressure. The best European radiators made of primary alloy. They are quite durable and not so susceptible to corrosion. Radiators from China are made from a secondary alloy or its primary variety, but of low quality. Because of this, Chinese devices have low heat transfer and low strength.
- Radiators made by extrusion also consist of separate sections, each of which is made on an extruder and then pressed into cast-type manifolds. In some cases, sections are connected using composite glue or welding, but this increases the likelihood of leakage. Extruded batteries differ from cast ones by the presence of seams on the inside of the ribs.
- The most expensive anodized devices. They are made from refined aluminum. After this, the surface is subjected to anodic oxidation. Thanks to this, the unit is protected from corrosion. Anodized appliances can operate in higher pressure systems. Their heat transfer is much higher.
Important! On the inside, all radiators are protected from deformation due to increased pressure by means of a polymer coating.
Aluminum heating device
In order for the installation of aluminum radiators to follow all the rules, you need to understand the design of the device. Sectional aluminum units have several sections, so they need to be assembled before installation. The aluminum heating radiator is assembled using threaded connections. Silicone gaskets are responsible for the tightness of all connections.
Technical characteristics of aluminum heating devices:
- the weight of one section is 1-6 kg;
- dimensions are within the following limits: width 80 cm, height from 38 to 59 cm, depth from 8 to 10 cm;
- maximum working pressure - 6-24 atm., but usually no more than 16 atm.;
- thermal power – from 80 to 210 Watts;
- amount of circulating coolant – 0.25-0.46 l;
- permissible coolant temperature – not higher than 110°C;
- service life – up to 20 years.
Selection of radiators and components
Radiators
When connecting radiators, the most important characteristics will be such characteristics as power and operating pressure. Power depends on various reasons (design, dimensions, etc.) and is included in the calculation of the required number of sections. And according to the permissible pressure, radiators are of two types:
- Standard ones, in which it is allowed to use coolant with water pressure up to 6 - 10 atm. They are designed for heating systems with autonomous water supply, as in private houses and cottages. For this type, it is not recommended to connect sections into a battery that is too wide.
- Reinforced, which can withstand pressure up to 16 - 20 atm. Such devices can also be installed in the central heating system of a high-rise building. In this case, you can connect up to 12 sections, and with artificial circulation, up to 24.
Attention! Before purchasing radiators, it is necessary to calculate their quantity. You can calculate the required number by dividing the power required for the room by the energy output of one section (the power of the radiator is in its passport, but for the room you need to calculate 1 kW per 10 m 2).
Pipes
In order for the installation of the radiator and its subsequent use to be convenient and reliable, you need to select the right pipes and other components. So, the heating scheme should provide that:
- Aluminum alloy should not come into contact with cast iron and steel that do not have appropriate anti-corrosion treatment.
- The use of copper pipes and accessories for aluminum radiators is generally unacceptable. This compound can react slowly, producing a gas that can build up and rupture the battery.
- It is better to supply coolant with high central pressure through metal pipes. It is better to use polypropylene and metal-plastic pipes in gentle conditions of individual heating systems.
Attention! Proper connection of aluminum radiators must be carried out with the obligatory installation of automatic valves for releasing excess air, regardless of the material of the pipes and components.
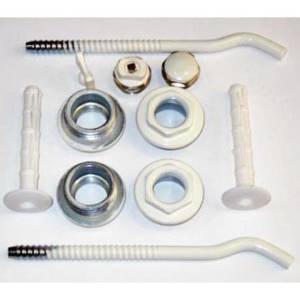
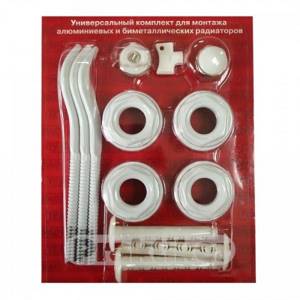
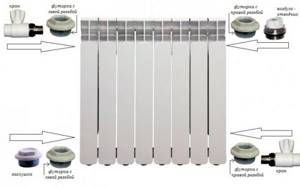
Accessories
The aluminum radiators are supplied with:
- A wall or floor bracket with which you will mount the device,
- Sealing gaskets, the installation of which in the connection of sections will prevent the formation of leaks,
- Air bleed valves, the installation of which will help remove excess air from the battery,
- End caps for end sections.
In addition, shut-off valves for thermoregulation are usually sold with an aluminum battery, which are recommended to be installed at the inlet and outlet of the radiator. With its help, you can not only regulate the temperature in the room, but also isolate the radiator from the rest of the system for replacement, maintenance and repair work.
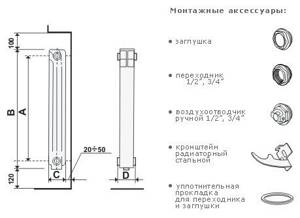
Mounting accessories included with the radiator
Installation of aluminum radiators and connection to the heating system
The shelf life of Soviet-made cast iron “accordions” is long over. Today, consumers are increasingly choosing aluminum batteries. The question arises: should you entrust the installation of aluminum radiators to specialists or install them yourself? The problem is that incorrect insertion of devices can lead to breakdown of the entire system.
General installation recommendations
Installation of aluminum radiators is usually carried out in the warm season. Before purchasing batteries, you need to calculate how many of them you will need. To do this, multiply the area of the room by 100 W and divide by the energy output of a separate section (indicated in the product passport). The resulting number indicates the number of sections required for the given area.
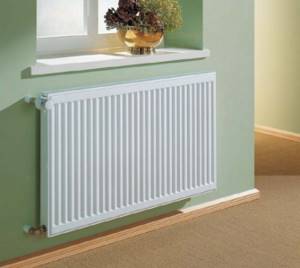
Types and configuration of aluminum radiators
Standard aluminum batteries are usually installed in a heating system with a low permitted coolant pressure (up to 18 atmospheres). These indicators are characteristic of autonomous systems in low-rise buildings, where water hammer and pressure testing with critical water pressure are excluded.
Attention! During operation, hydrogen accumulates in aluminum radiators. It is periodically vented through the air vent, otherwise sooner or later the battery will burst. You cannot test for hydrogen with a lit match.
Reinforced aluminum heating devices can withstand pressures of up to 25 atmospheres. Such products can be used in a central heating system. It is possible to increase the reinforced battery up to 12 sections, subject to artificial circulation - up to 24 sections.
Accessories (plugs, gaskets, valves, brackets, ball valves) are supplied in a package with the radiator. Shut-off valves for temperature control are also sold separately. With its help, they not only adjust the temperature in the room, but also shut off the radiator for repair or replacement.
Aluminum radiator pipes
The pipes to which aluminum batteries are connected must have a special anti-corrosion layer. If this is a local system, then the batteries are connected to it with metal-plastic pipes. It is better to connect to the centralized heating network through steel pipes.
The device must be placed on the wall in accordance with SNIP standards:
- The distance from the window sill to the upper plane of the radiator, as well as from the floor to the lower plane is 10 cm.
- The gap between the wall and the battery is 5 cm.
Following these directions will ensure proper circulation of warm air.
Installation of aluminum heating radiators
Assembling and adjusting a heating system is a responsible task, and it is best handled by professionals. But if you wish, you can install aluminum radiators yourself.
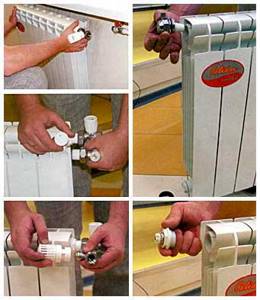
First you need to assemble the device:
- Screw in the supplied plugs and plugs.
- Assemble thermostats and connect shut-off valves at the inlet and outlet of the device.
- Check the nipples and secure the air valves.
A diagram for assembling and disassembling the device is included in the kit. It is better if the assembly is carried out by a specialist, then there will be a guarantee that all the taps are installed correctly. It is not allowed to clean aluminum with abrasives when installing adapters or extending sections - coolant may leak.
Attention! The air valves must be screwed in such a way that at the end of the process their outlet heads point upward.
Having marked the installation location of the battery under the window in accordance with the indicated indentations, brackets are attached to the wall. To do this, you need to drill holes with a hammer drill and insert plastic dowels, and screw the brackets into them. When screwing in the fasteners, from time to time you need to hang the radiator on them to maintain a distance of 5 cm from the wall.
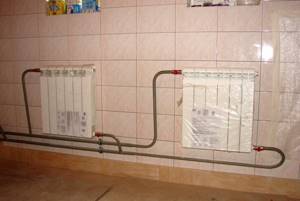
Battery connection diagrams
The device can be connected in several ways:
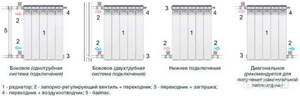
- Diagonal. Experts consider it the most energy efficient. The supply pipe is connected to the upper pipe, and the outlet pipe to the lower pipe, but on the opposite side of the radiator. With this scheme, the battery releases into space the maximum thermal energy received from hot water. The disadvantage of this method is that the pipes running on top do not fit well into the design of the room.
- Side. The pipe supplying the coolant is connected to the side fitting (right or left), the return – to the parallel bottom one. If the pipes are installed in the reverse order, the heat output of the device will drop by 50%. This scheme for connecting aluminum heating radiators does not work effectively if the sections have a non-standard size or their number exceeds 15.
- From a design point of view, aluminum radiators with bottom connections win. With such a layout, the pipes are not visible; they are hidden in the floor or wall. The batteries are connected to the system through pipes located at the bottom of the devices. Typically, bottom-connected radiators are installed on floor brackets. The battery is attached to the wall with one hook, only to maintain balance.
Important! Aluminum batteries have standard parameters for the pipes, so there is no need to buy any additional adapters from the radiator to the pipes. The device is also accompanied by a Mayevsky valve, designed to bleed air.
Connection and commissioning
Before installing aluminum appliances, the autonomous system is washed with water. Alkaline solutions cannot be used.
Important! Aluminum is easily dented and scratched by tools, so it is better to mount the battery in the original plastic packaging. Once connected, the polyethylene can be removed.
In an effort to connect aluminum heating radiators without high costs, some homeowners use blind, non-separable connections between pipes and radiators. But heating a home in the northern hemisphere is not something you skimp on. It would be wiser to install “American” ones - quick-release threaded units, when the pipes are connected and disconnected using one union nut.
The procedure for connecting radiators to the heating system:
- Make sure that there is no water in the system or that it is shut off at the installation points.
- Hang the radiator and connect it to the pipeline using fittings.
- Seal all threaded connections using plumber's tape. 4-5 turns in the thread direction are enough.
- Carry out a pressure test of the system.

You can install an aluminum heating radiator yourself, but it would be wiser to entrust the job to specialists who have all the necessary permits to carry out such work. The slightest inaccuracy in installation can lead to leaks and inefficient functioning of the heating system.
Video: assembly and installation of an aluminum heating radiator
Installation
The installation of aluminum radiators can be ordered from a special organization or done by yourself. In this case, you need to know the sequence of actions and how to carry them out most correctly.
Preparatory work
Before you begin installing radiators with your own hands, you need to calculate their mounting locations and install the bracket. To do this, a calculation is made based on the building rules for installing a radiator:
- At least 10 cm from the window sills,
- About 12 cm from the floor,
- From 3 to 5 cm from the wall.
The bracket must be secured to the wall using dowels, sealing the holes drilled for them with cement mortar. The radiator can be floor-mounted, that is, it can be supplied with a floor holder - a stand. At the same time, it should be attached to the wall lightly, only to maintain balance.
Radiator assembly
Before connecting, the radiator itself needs to be assembled, that is, the necessary elements must be installed:
- Screw in the radiator caps and plugs,
- Connect the shut-off valves,
- Assemble thermostats
- Check the reliability of the nipples,
- Attach air valves
A diagram of how to disassemble an aluminum radiator and reassemble it should be included with the new device.
Attention! In order for the valves to do their job correctly, you need to immediately calculate that their outlet heads are facing up.
The radiator can then be secured to the bracket. In this case, the hooks must be located between the sections. The bracket is also involved in the process of adjusting the installation level of the radiator.
Heating system diagram
All other things being equal, a two-pipe system is more efficient, but it is also more complex and expensive. It makes sense to use it in a room with a large number of rooms.
Heating system diagram
Next, you need to mark the place where the radiator will be installed. To ensure normal air supply to the battery, it is necessary that it be at least 15 cm from the floor surface and at least 5 cm from the wall. Batteries are usually placed near windows, in areas free of furniture.
When choosing fittings for the battery, it is imperative to provide for the presence of a control valve, which will allow you to both “slow down”, avoiding excessive heat, and completely turn off the heating if necessary.
Boiling water under high pressure is a serious matter, it doesn’t like jokes, so it’s better to do everything right right away. Battery packaging is the process of assembling the battery from purchased sections and connecting the fittings. For packaging, in addition to naturally the battery sections, you will need a set of fittings, sealing flax, investment paste and a torque wrench. Under no circumstances should this useful tool be neglected: all connections must be tightened strictly to the torque specified in the documentation. If you don't tighten it enough, you'll end up with a geyser in your apartment; if you tighten it too much, you'll break the thread.
The control valve will help control the temperature
When packing, you need to connect taps to the battery depending on the chosen battery connection diagram - one-sided, diagonal, or bottom. Close the unused holes with a blind plug; do not forget to install a Mayevsky valve on one of the side holes to bleed air from the aluminum radiator. All joints are sealed with flax and investment paste.
The pipe is installed on brackets at a height corresponding to the above conditions. It is better to install the battery at a slight angle relative to the plane of the wall, this will prevent “airing”. The installed aluminum radiator is connected to the heating system by pipe fittings.
Heating is a high-risk system. When deciding to repair elements of the heating system yourself (especially in an apartment in an apartment building), you take on considerable responsibility. If in doubt, it is better to contact professionals.
Home » Heating » DIY installation and connection of heating radiators
Preparatory stage
Before installing an aluminum radiator with your own hands, you need to decide on several points:
- make sure that the heating power of the device is sufficient . A situation may arise that the purchased battery has insufficient heat transfer due to the low temperature of the coolant at the inlet. In this case, you will just need to add a few sections; how to do this is described below;
- check the size matches . Modern heating devices transfer heat to the room not only through radiation from the surface, but also through convection, so the window sill should not be located too close to it;
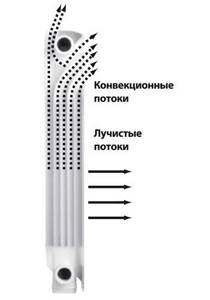
Aluminum battery operation diagram
Note! The shape of the aluminum fins is explained precisely by the fact that it is necessary to direct the air flow from bottom to top.
- decide on the type of fastener . In principle, the kit usually includes fastenings for simply hanging the heater on the wall. But sometimes it’s better to purchase separate brackets for floor mounting (especially since their price is cheap); this option is suitable if the battery is installed near a thin plasterboard partition or you simply don’t want to drill holes in the wall.
The photo shows a kit for installing an aluminum battery
Possibility of installing aluminum heating radiators
The features of such sources of room heating are the low, limited pressure of the liquid circulating in them and a high rate of heat transfer.
Thus, the installation of aluminum heating devices is often carried out in private houses with a small number of floors or when forming an autonomous system.
This is done to prevent the occurrence of water hammer and to obtain high-quality heating of the rooms.
Aluminum radiators are mainly mounted under window sills or in any free area of the room, including on racks near the wall. The latter option provides for the supply of pipelines on both sides.
Important! , the rate of heat loss to objects located near it must be taken into account
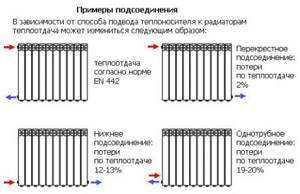
Selecting a connection type
Before installing aluminum radiators, the issue with the type of connection must already be resolved. The heat transfer of the heating device directly depends on this.
The following options for connecting the heating device are possible:
- diagonal (also cross) - in this case, the coolant is supplied from the top of the heating device, and the cooled coolant comes out from the opposite side from the bottom. Thanks to this, the battery warms up evenly, and losses are no more than 2%;
- with a one-way connection, the losses are slightly higher, up to 5%;
Note! If the number of heater sections exceeds 12, then a one-way connection is ineffective. The fact is that the distant sections simply will not warm up with this connection method.
- with a bottom connection (supply and return from different sides), losses amount to 12-13%;
- the bottom one-sided connection is the most unfavorable from the point of view of battery heat transfer. Losses can be up to 20%, but the pipes can be hidden under the floor, so this connection method is also often used.

Heating battery connection options
Installation technology
The whole process can be divided into 2 stages - first, the fasteners for the battery are installed, and then it is simply hung on the brackets and connected to the supply and return. After this, all that remains is to check the tightness of the connections and do not forget to close the unnecessary holes on the sides. If it is necessary to add additional sections, then this procedure is performed before installing fasteners in the wall.
Adding a section
To add an additional section to the radiator, you will need 2 nipples with left and right threads on 2 sides; you also need heat-resistant gaskets for additional tightness.
Instructions for adding a section to the battery look like this:
- the heating device must be placed on the floor, table or any other horizontal surface;
- then the nipples are inserted into the holes on the radiator, while not forgetting about the gaskets;
- an additional section is attached to them and by turning the nipples the section is gradually pressed against the battery;
- in this case, you need to turn both nipples gradually, literally 1-2 turns at a time, this is necessary so that the section does not warp and the metal of the collector does not deform.
The photo shows a nipple with different threads
After adding the sections, all that remains is to check the tightness of the joints and you can proceed to installing the heating device.
Installation and connection of the radiator
Most often, only wall mounting is used for aluminum radiators; their weight is several times less than that of cast iron, so additional support from below is simply not needed.

Brackets for hanging the radiator
The number of fastenings depends on how many sections there are in the heating device; also fastenings are installed not only in the upper, but also in the lower part of the device. When the number of sections is up to 9, only 1 fastening is installed in the upper part of the device, and 2 in the lower part. More detailed data is in the table.
Dependence of the number of brackets on the number of radiator sections
As for how to properly install an aluminum heating radiator, the work begins with marking the holes for the fasteners. Despite the low weight of the heating device, it is best to use anchor fastenings. A hole is simply drilled for the mount, then a plastic part is inserted into it, and then a metal bracket is inserted into it with force.

The brackets are simply screwed into the prepared hole
At the same time, the plastic insert expands and is securely fixed due to friction. This is quite enough to withstand the load not only from an aluminum battery, but also from a heavier battery.
After this, all that remains is to decide how to hang the aluminum radiator. The only requirement at this stage is to level it to the building level. If there is a strong misalignment, the heating of the heating device will deteriorate significantly, which means the heat transfer will become less.
The horizontal position of the device must be checked
When connecting to the supply and return, it is recommended to use ball valves in order to be able to quickly shut off the coolant access to the radiator in the event of a leak. To ensure that the operation of the heating system is not disrupted, a bypass device (jumper) will be needed, which will allow the coolant to circulate bypassing the switched-off heating device.
Floor brackets
This type of fastening is used in cases where the wall does not have sufficient load-bearing capacity or, due to the size of the heating device, there is no point in hanging it (in the case of low radiators).
The design of brackets of this type is similar - it is a plastic or metal leg with a wide sole (for greater stability), in the upper part there is a recess for installing a radiator and a fixing bracket. Sometimes a small flexible chain (structurally similar to a chainsaw chain) is used instead of a bracket. Fixation is necessary to ensure that the radiator does not fall in case of accidental contact with it.
Installation, installation and replacement of aluminum heating radiators
Installation of aluminum radiators is carried out on an already prepared surface with an outer finishing layer on which there should be a floor height mark if it is not ready yet. Before installing heating devices, it is necessary to check the complete set of the system according to the project. Check the necessary availability of connecting fittings, plugs, valves, thermostats, shut-off valves, and so on.
assemble a heating device from separate sections at home using special equipment. When connecting, it is important not to allow the bottom side of the radiator to be attached to the top side and to use high-quality heat-resistant gasket materials. After assembly, it is necessary to perform a pressure test to check for tightness under pressure. If the equipment has withstood a certain time without the slightest loss of pressure in the radiator, then it is ready for installation.
Manufacturers of aluminum radiators assemble sections into radiators of the most popular sizes. It is better to use factory assembled radiators - this will improve the quality of assembly, speed of operation, and the warranty is retained by the manufacturer. The kit must contain fasteners that are suitable for the design of the radiator and capable of supporting the weight of the battery with coolant. At the time of acceptance, you should pay attention to the quality of the coating; it must be free of chips and mechanical damage. In order not to spoil the appearance until the completion of repair and installation work, it is advisable not to remove the packaging cover. The casing of the convector can be removed.
First, when installing an aluminum radiator, mark the location of the radiator. Places for installing mountings for heating devices. More often, brackets are used to mount radiators, which are attached to the wall with dowels. The number of brackets for reliable installation depends on the weight of the radiator, and therefore on the number of sections. The required number of brackets for installation is indicated in the table.
| Number of sections | 3-9 | 10-14 | 15-20 | 21-24 | 25-28 |
| Number of brackets at the top | 1 | 2 | 2 | 2 | 3 |
| Number of brackets below | 2 | 2 | 3 | 4 | 4 |
To achieve optimal heat transfer when installing radiators, the following minimum distances must be ensured:
About our store
is a group of heating professionals. Here you can familiarize yourself with, consult and purchase aluminum, bimetallic, steel, cast iron, copper-aluminum and in-floor heating radiators. Our specialists will help you choose radiators with the required parameters. cooperates with well-known manufacturers of heating radiators. Our partners are: Kermi, Purmo, VogelNote, ECA, Korado, Fondital, Global, Tenrad, Demrad, Verano, Regulus, Jaga. Decorative cast iron radiators can become not only a heating device, but also a decorative decoration for rooms. Vertical radiators can effectively heat rooms with narrow niches for radiators.
In conclusion
The installation process for aluminum models is practically no different from installing conventional cast iron or bimetallic batteries. The same types of fastenings are used, and the technology remains the same. In addition to standard wall brackets, floor mounts can also be used, sometimes this is the only possible installation option. The information provided will help not only install the battery correctly, but also choose the appropriate type of mount.
The video in this article shows the process of assembling and installing an aluminum radiator.
Instrument design
Aluminum heating panels consist of sections that are made of metal alloys with silicon additives. This composition makes the device much more resistant to mechanical damage and exposure to hot temperatures. The metal alloy is not subject to corrosion damage. Often, to enhance the protection of the inner surface from the effects of heating fluid, a thin polymer coating of approximately 50 microns is used.
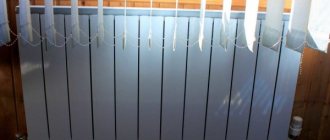
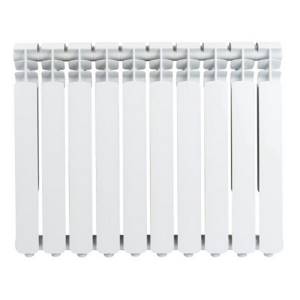
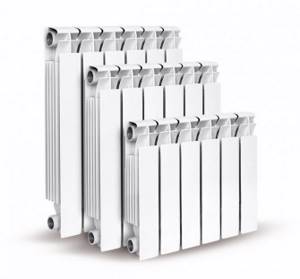
Radiator panels are usually produced in a standard white color. If desired, they can be repainted with enamel that can withstand high temperatures. Often the original photographic image is applied to the devices.
Also, most manufacturers produce equipment of any color and design upon personal order. In order to disguise them, you can use special decorative grilles.
Advantages of aluminum heating devices
The growing popularity of the devices is due to a number of advantages of their use in the design of a heating system:
- compact, take up little space;
- high heat transfer;
- light weight (does not complicate transportation, installation and connection of devices);
- rapid heating of equipment by coolant;
- the convection heating method prevents the accumulation of dust deposits between sections;
- favorable price-quality ratio;
- attractive appearance;
- the ability to select a custom radiator of any design;
- sections are powder coated to prevent corrosion.
Flaws
These devices, despite all their positive performance qualities, have their drawbacks. Poor quality coolant and water hammer resulting from increased pressure inside the heating system can lead to failure and rupture of the radiator. Also, low quality fluid causes metal corrosion.

Equipment is often connected to pipes made of metals that are antagonistic to aluminum - copper and steel. Their interaction provokes the formation of rust. To avoid this, experts recommend using pass-through plugs made of chrome-plated and nickel-plated metals when installing aluminum radiators indoors.
Installation diagrams
Aluminum radiators are suitable for both two-pipe and single-pipe wiring. In the first case, the connection of the supply pipe and the outlet pipe occurs in parallel; they are independent of each other and are connected through the final device of the heating system.
With single-pipe wiring, the coolant passes through one pipe sequentially through all radiators, gradually cooling down.
There are several schemes for connecting aluminum devices:
All schemes differ from each other not only in the installation method, but also in the quality of heat transfer.
Diagonal
The most effective and common installation method is a diagonal connection (heat loss is no more than 2%). The method is well suited for radiators with a large number of sections. The supply pipeline is connected to one of the upper pipes. The outlet pipe is connected to the bottom one on the opposite side.
This piping method is used mainly for two-pipe heating systems, because with a one-pipe system the coolant noticeably loses heat as it passes through each radiator.
The disadvantage of such a connection lies in its aesthetic unattractiveness, since the pipes run along the upper edge of the heating devices.
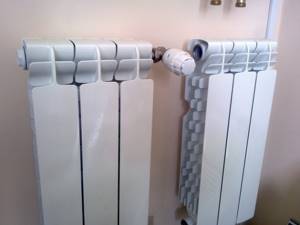
Lateral (unilateral)
The scheme is similar to a diagonal connection: the hot water supply pipe is on top, the outlet pipe is on the bottom, but the installation is made to pipes located on one side. It is important not to mix up the pipes or swap them.
This method is more often used in multi-storey buildings with small radiators. It is not suitable for devices with more than 15 sections, since with a larger number, the far (opposite to the connection point) side of the unit does not heat up well.
Lower
This connection is made to the pipes located at the bottom of the heating device. This installation scheme allows you to hide the heating system pipes under the floor, which is beneficial from a design point of view.

But the heat transfer with such an installation is much lower (about 15% less than the rated power of the radiator).
How to connect an aluminum radiator?
Design features of aluminum radiators
Aluminum radiators are used quite often as heating devices in private houses and apartments. The material of the device has high thermal conductivity, and they are produced in a wide range of overall dimensions and thermal power, respectively.
These heating devices have two types of design: cast and sectional. The former are more durable because they do not have welds that weaken the structure and allow the possibility of coolant leakage. The cost of such products is higher, which affects the price of finished products.
Sections of sectional-type aluminum radiators can be connected in several ways:
- Using glue;
- Welded connection;
- Special fasteners.
The disadvantages of sectional devices are poor resistance to water hammer and the ability to withstand relatively low pressures.
Aluminum alloy has increased sensitivity to the quality of the coolant in the network. The walls of the pipes become thinner when using a working substance with a pH value exceeding 7-8.
You can check this parameter for an autonomous heating system. If the radiator is connected to a centralized system, this option is not available.
Connection options
The type of heating system and the way the radiator is connected to it affect the amount of heat that the device will emit. Let's consider the types of systems and options for connecting heating devices to them.
Single-pipe connection diagram
In multi-storey buildings, single-pipe heating systems are most often used. Their installation requires less costs than two-pipe ones. The radiators are connected to each other in series, the coolant moves in one direction: from the output of the first device to the input of the second, etc.
The outlet pipe of the last radiator in the network is connected to the riser (in multi-storey buildings) or to the inlet of the heating boiler.
This connection method has the following disadvantages:
- Lack of ability to adjust device performance. If the regulator is installed on one of the devices in the network, it will regulate the thermal performance of the entire network.
- High heat loss of the working substance.
- Different value of the amount of heat given off by each of the radiators in the network. The last device in the chain receives cooled coolant.

Two-pipe connection diagram
Two-pipe heating systems have two pipelines: supply coolant and return. Each radiator is connected to two pipes at once. This connection scheme is also called parallel. The temperature of the coolant entering each device has the same value.
Adjustment of the amount of heat given off by radiators can be done separately without affecting the entire system as a whole. The resulting system is more balanced, but its installation requires more pipes, so its cost also increases.
Which coolant to choose
Most often, ordinary water is used in heating systems, but it leads to corrosion of the metal elements, blocking the passage with scale and sludge.
If the system needs to be shut down during the winter, the water must be drained from the system. During the transition from the liquid phase to the solid, this substance increases in volume, which leads to the destruction of the main elements of the heating system.
Therefore, when designing a heating system, attention is paid not only to the power of the radiators, but also to the type of coolant, which must be chemically neutral and have a low freezing point.
General connection requirements
Before installing the device, it must be assembled correctly. Detailed instructions are usually included with the equipment itself by the supplier.
Radiator assembly
The procedure for assembling the device is as follows:
- screw in the plugs and plugs in the radiator;
- attach shut-off valves;
- attach temperature regulators;
- inspect the nipples for reliability;
- Attach the air valves with their heads facing up.
Installation of the device
You can install aluminum radiators yourself. For proper installation, all requirements and rules must be strictly followed. Before starting work, calculations should be made. The device must be located at a distance of at least 10 cm from the window sill, at least 12 cm from the floor and at least 3 cm from the wall. Then you need to attach the brackets using dowels. The holes are covered with cement mixture. The radiator is attached to the wall.
After installing the aluminum device on the brackets, you can begin connecting. To do this you will need a pipe wrench. Before doing this, make sure that the heating system is turned off. Tighten the sections with FUM tape. Next, the radiator is attached to the pipes using clamps.
After all connection work has been completed, the device is tested. Each element must be filled with coolant gradually in order to avoid pressure shock inside the radiator. The packaging film is removed after the connection is completed. It protects the device from mechanical damage.
Aluminum radiators should be checked twice a year. It is also recommended to periodically drain the water completely for two weeks.
How to properly install an aluminum battery with your own hands?
This process takes place in stages.
Preparatory work
They begin with determining the location of the future installation of the radiator and fixing the brackets.
To correctly calculate the installation of the battery, the following construction indentation indicators must be taken into account:
The bracket is fixed to the wall using dowels . The holes left by the drill are filled with cement.
If the battery is a floor-standing type, then it is placed on a special stand and lightly attached to the wall, only to establish its stable balance.
Radiator assembly
Before directly starting the battery, you need to install it step by step:
Attention! For further correct operation of the valves, it is necessary to install their outlet heads so that they face up.
After completing all the steps, the radiator is fixed to the brackets.
Hooks are located between the sections. Detailed instructions for assembling an aluminum room heating source should come with it.
Source