The need for heating in a garage rarely causes controversy: motorists understand perfectly well how important it is to take care of the condition of the car, and they themselves do not want to freeze during inspections and repairs of equipment.
The main issue that needs to be resolved is the selection of the appropriate type of heating. A good option is a miracle diesel stove - the unit is easy to assemble and economical to operate. And these are important criteria for organizing garage heating.
Before you decide to assemble a stove, you need to understand its structure and operating principle, don’t you agree? In the article, we outlined the identified points in detail, and also provided several options for assembling a home-made unit. Step-by-step instructions will help you build a stove and organize efficient heating of your garage.
Advantages of diesel heat generators
— Installation of a light fuel heating device is the lowest among other options.
Installing a gas boiler, taking into account the chimney equipment, obtaining permits from firefighters, a sanitary station, and an architectural organization will cost you much more. An electric boiler is also low cost and easy to install, but the cost of its energy source, electricity, is extremely high. In addition, not every electrical line is able to withstand such a high load. — If the room in which the light fuel boiler is installed is not in contact with living rooms, then the chimney does not need to be equipped. In this case, a hole is made in the wall into which a sandwich - a piece of chimney pipe - is inserted so that the wall does not catch fire. No more devices are required. The burner turbine independently pushes out air.
— Working in automatic mode, the boiler itself maintains the required water temperature in the heating system. The burner automatically turns off when the required temperature in the system is reached and turns on when the coolant cools below the set thermal level. The burner is equipped with a whole system of safety devices that ensure its safe and reliable operation.
— If the system’s operation is properly organized, diesel fuel heaters will provide an almost ideal temperature regime in the room.
— Light heating oil is used as an energy carrier, which costs approximately 30% lower than automobile diesel fuel.
Disadvantages of heating using diesel fuel
— Despite the automation of the system, it requires human presence. The boiler can be left unattended during the working day, but it cannot be left to operate independently for example for a week. The reason for this is poor fuel quality, which can lead to the boiler stopping. In winter, this can lead to destruction of the heating system as a whole. This problem can be solved using an SMS notification system. This will allow you to be aware of the status of your heating system.
— The burner and boiler require constant maintenance.
— If the fuel is of poor quality, it may contain various impurities, which can lead to clogging of the nozzle and damage to the pump. This problem can be solved using a filter. It is more difficult to deal with paraffins and other substances with high viscosity.
— High noise level during operation.
— The burner is a volatile device that requires an uninterruptible device.
Be careful when purchasing fuel. If your reserve tank is located outside and is not insulated, then you need to purchase winter fuel, and if the barrel is thermally insulated, then you can use summer fuel.
When choosing a fuel to heat your home, you need to weigh the pros and cons and settle on the most affordable and effective option.
Diesel Sheet Metal Heater
Externally, diesel stoves for metal garages look like two disks joined together by a tube with many holes and an outlet pipe for combustion products on top. The device is assembled from two containers, which are connected to each other by a wick bowl, that is, a wide pipe with holes for air supply and smoke removal.
Diesel fuel enters the wick container from the fuel tank by gravity. In it, diesel fuel is heated and converted into a mixture of gas and air. It enters the combustion chamber, where it ignites. A spiral placed in the upper part of the combustion chamber acts as a heat exchanger. It can heat up to 800 ℃. The waste is discharged through a chimney.
This design is safe, economical and does not harm the environment. Assembly requires 2 sheets of 5 mm metal. The chimney is placed far from the door; it has two elbows nested inside each other. The container located below is the firebox and fuel tank. Fuel is poured into it through a hole. Capacity volume – from 2 to 12 liters.
Homemade garage heater
The main condition for high-quality assembly of a heater with your own hands is to follow the sequence of work and safety measures. The most popular scheme is a flameless combustion heater, the operating principle of which is based on the fact that gasoline/alcohol vapors are oxidized with oxygen using a catalyst. Thanks to this operating principle, thermal energy is produced through a chemical reaction rather than as a result of fuel combustion. Therefore, the heater does not burn oxygen and maintains a healthy microclimate in the room. Work order:
- Select a fuel tank with a cap and a neck (you can use an old car fuel tank).
- Assemble the heating element. First you need to prepare a gasket of asbestos wool and impregnate it with a catalyst, then equip it with two iron mesh with a frame (heating element).
- Place the heating element into the burner. When installing, it is recommended to install a wire gasket between the installation location and the frame and wrap it with corded asbestos.
- Make a wick through which gasoline will be supplied to the burner using asbestos wool or cloth.
- Install the wick: place the lower part on the bottom of the tank, and place the upper part evenly under the mesh.
- Fill all free space in the tank with cotton wool.
- Equip a homemade heater with a metal lid. The lid must be placed on the burner and stop the operation of the device.
- Pour gasoline (100 ml) onto the grid of the heating element and set it on fire. When the fire goes out, vapors will begin to leak from the tank to the heated surface. The vapors will begin to oxidize, increasing the temperature in the room.
To make a heating element, it is recommended to use long-fiber asbestos: impregnate the material with a cobalt-chrome catalyst and leave for 1 hour. The catalyst can be made independently from manganese, cobalt, concentrated ammonia and ammonium dichromate. Cobalt chromate, which will settle on the asbestos during impregnation, must be dried at high temperature (+120°), then loosened and calcined for three hours at t° +400. After this, the mass must be placed evenly between the meshes. The main condition for operating such a heater is to protect the unit from water, oil or dirt.
Effective heating of a room can be achieved in another proven way - using a do-it-yourself electric garage heater. The heater can be assembled at almost no cost from old spare parts: a pump with pipes, an electric motor with a torque of 1,500 rpm, a radiator and a fan. Work order:
- Weld a frame from a metal corner.
- Attach the motor with starter, radiator and pump to the frame.
- Install 3 heating elements with a power of 1 kW or triple with a common shank in the lower tank. First you need to cut a hole in the radiator tank, solder the threaded ring to the edge, then install the heating element.
- Install the car's V-belt and adjust the tension by moving the pump towards the frame. Installing a car belt will ensure rotation of the electric motor to the pump.
- Additional equipment for the heater is to connect the electric motor through a sensor (DTKB or similar). The sensor will ensure that the desired temperature level is maintained in the room.
The peculiarity of the heater is that the heating element is placed in a liquid and when heated does not come into contact with air, therefore it does not burn out the air in the room. It is recommended to use car antifreeze or transformer oil in the heater. The advantage of a homemade device is that the car enthusiast will be able to regulate the temperature by changing the air flow that passes through the tank. To achieve the greatest efficiency of the heater, it is necessary to install an expansion tank and select the diameters of the pulleys so that the liquid is heated to 80°.
Assembling a homemade structure
If you wish, you can find a suitable model in a store or buy it online, but if you have a few hours of time, a desire to save money and get a useful item from old unnecessary parts, then you should make a stove yourself. Let's look at popular designs.
Option 1: stove from an old gas cylinder
If you have a 50-liter used gas cylinder, then half of the structure is already ready. The main thing is that the thickness of its walls does not exceed 1.5 mm. Now you need to find a pipe for the chimney. A piece with a diameter of 10 cm or more is suitable. Its length should be at least 4 m. The desired thickness of the metal walls is 2 mm.
The fuel tank can be made from a tank. The optimal volume is no more than 15 liters and no less than 8. The remaining parts can be purchased in the store. You will need 20 cm steel corners (future legs) and a copper burner. Tools include a grinder, a drill, a welding machine, as well as a tape measure and a level.
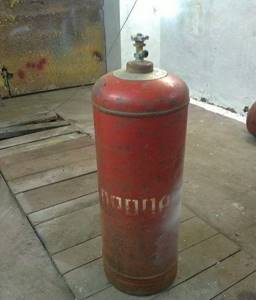
It is worth paying special attention to the thickness of the walls of the cylinder. The miracle stove uses diesel vapor as fuel. To get them, you need to bring the liquid to a boil. This is very difficult if the thickness of the walls of the structure exceeds 1.5 mm
The gas cylinder is freed from condensate and rinsed from the odorant. Now you need to cut off the top part with the valve. To make it more convenient, you can fill the container with water and bury it in the ground. After the cut, water will appear. You should wait until it drains completely and then finish the job.
The lower part of the cylinder is used as a chamber (stable legs made of steel corners are welded to it), and the upper part will serve as the lid of the structure. To regulate the fuel supply, a special valve is installed.
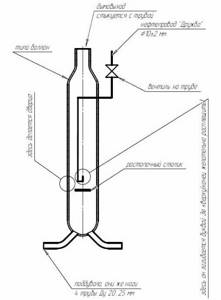
The cylinder can be positioned vertically or horizontally. In the first case, you can adapt the metal legs of the structure as air ducts (+)
After assembling and installing the stove, you will need to install a chimney. It must be strictly vertical. This point must be taken into account when choosing a place to install the stove: it should be placed only where the chimney pipe can be mounted without bends or slopes.
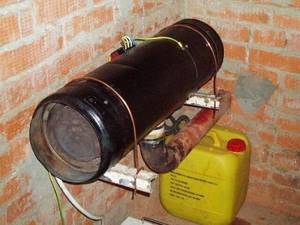
Lighting such a stove requires special attention. The cylinder is filled 2/3 full with diesel fuel, and a lit sheet of paper is placed on top. After this, lower the lid and wait for the fuel vapor to ignite. Do not add diesel fuel during operation.
If most models of homemade stoves can use almost any liquid fuel, then this design should be handled with care. It can only operate on diesel fuel or purified waste oil without water or alcohol. Gasoline and kerosene cannot be used.
Option 2: Sheet steel body
Instead of a gas cylinder, you can use heat-resistant steel with a thickness of 4 and 6 mm to make the furnace body. The only caveat: you will have to buy or rent a sheet bending machine. Other materials and tools are available. Some can be found at home, and the missing parts can be purchased.
You will need:
- steel corners for making legs;
- burner pipe;
- 4-meter chimney pipe with a diameter of 100 mm;
- measuring instruments;
- Bulgarian;
- welding machine;
- hammer;
- level.
The finished stove will be compact (70*50*35 cm) and relatively light (about 27 kg). The design will be stable, efficient, and easy to operate. If desired, it can be connected to water heating.
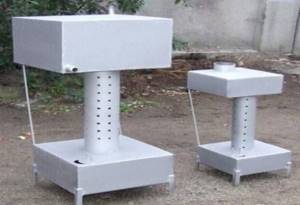
Structures made of heat-resistant steel are very durable. They are often made for garages and workshops. Such stoves can operate on diesel fuel, waste oil, diesel fuel (+)
The bottom of the firebox and the tank lid are made from a sheet of thicker steel (6 mm), and a steel sheet 4 mm thick will be used to make the tank itself. The parts are cut out according to the diagram, welded, and the seams are processed with a file.
To make a diesel fuel tank pipe, you need to cut a strip of metal 4 mm thick and 115 mm wide, bend it into a ring and weld it to the tank. The pipe will have a diameter of approximately 34-34.5 cm. You will need to make a lid for it. It is cut out of a sheet 6 mm thick and welded to the pipe. After this, the legs are made.
The fuel filling tank is made of 6 mm steel. A round piece with a diameter of 35.2 cm and a strip are cut out of it. The width of such a strip should be 6 mm. A hole for the chimney is prepared in the center of the circle (the diameter depends on the selected pipe, the optimal one is 10 mm).
Another hole is needed to fill the oil. It should be smaller (diameter 5-6 cm) and located at a distance of 4 cm from the chimney opening.
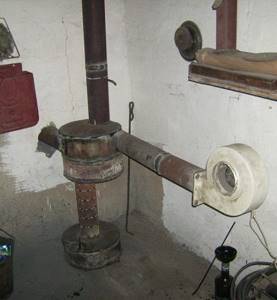
Bends are allowed in the chimney structure for such a stove, but they can only be located indoors. The outer part must be strictly vertical, otherwise the wind will rush through the chimney and interfere with the operation of the stove
For the lower part of the container, a circle of 35.2 cm is cut out of thicker steel. A round hole is prepared in it for a pipe with a diameter of 10 cm. The location is calculated so that there is 11 cm between the center of the part itself and the center of the hole.
A rectangular partition 7*33 cm is cut out of thick steel and welded onto a circle, moving it closer to the pipe. The exhaust pipe itself is made from a 13-centimeter section of chimney pipe.
To make the burner, 48 9mm holes are drilled in the pipe, spaced 6cm apart. You should get 6 rows, each with 8 holes.
The burner is installed tightly and evenly (but not welded) into the fuel tank lid, correcting the structure with a file. A 16-centimeter pipe is inserted into the tank for filling fuel, and the upper and lower parts of the stove are connected without welding.
A ring with a diameter of 35.4 cm is used for sealing. The structure is completely assembled and a sliding plate is installed.
Option 3: drip-type design
You will need a regular rubber heating pad with a hose (volume 2 l). A copper pipe 1-1.5 m long is connected to the rubber hose - it will need to be bent in the shape of the letter “L”.
After this, the rubber hose should be bent in half and secured with a clamp and screw. The heating pad itself is hung on the wall and fuel is poured into it, and the intensity of its supply is adjusted with a screw.

There are such heating pads in almost every home. You can even take a very old one, the main thing is that it’s whole. If you don’t find a suitable heating pad in your pantry, you can buy it at any pharmacy
Wicks are made from rags: they are formed using flexible metal wire, wrapped in rags and soaked in diesel fuel. The ideal option is to find an old mattress and chop it into fuel briquettes 20*10*4 cm.
Soaked in diesel fuel, they will burn perfectly. If the stove is large, then you will need to place a brick under the wicks.

If the household has an old mattress that has not yet been taken to the landfill, it will serve to heat the garage. By thoroughly soaking the pieces of the mattress with diesel fuel, you can get high-quality wicks
The stove itself can be anything. You can make it from part of an old barrel. The main thing is to attach the door and pipe to it. Don't worry too much about the door's seal. If air flows through the cracks, you won’t have to make a vent.
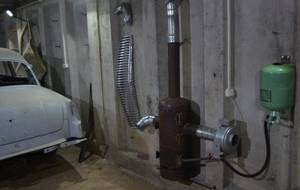
Such a design must be handled very carefully, because... it is a fire hazard. The door does not fit tightly, so combustion products enter the room during operation.
For fuel, a hole is made into which a copper tube coming from the heating pad is inserted. If this hole is drilled in the side of the barrel, the stove will not only heat the garage, but also serve as a cooking surface.
Step-by-step instructions for making a stove
Step 1. In our example, we use a simple 250-liter barrel with thick walls - ideal for making a stove. Cut off the top of the barrel, but do not throw it away.
The top of the barrel has been cut off
Step 2. Make a kind of lid from the top - a “pancake” for oxygen supply. Adjust it to the size of the barrel - as a result, when installed, there should be 2 mm between it and the walls around the entire circumference. Weld the neck of the lid. In its center, make a hole to install a pipe through which air will be supplied. Also weld 4 channels, as in the photo below.
“Pancake” for air supplyAnother photo of the element
Step 3. Stepping back a little from the top edge, cut another hole in the barrel wall for installing a chimney. In our example, the chimney will be a pipe with a diameter of 140 mm.
Hole for chimney installation
Step 4. Start making the lid. Make it from sheet metal 4 mm thick, and weld a sealing ring at the bottom corresponding to the diameter of the barrel. In the center of the lid, make a hole for the pipe that was welded to the “pancake”.
Cover for the ovenIn the middle of the cover there is a hole for the air duct from the “pancake”
Step 5. Make simple legs at the bottom of the barrel to make the structure stable. The legs must be metal, as well as all other elements.
Making legs for the stoveThe legs must be metal
Step 6. Install the stove in the desired location and begin creating the chimney. In our example, it is of a prefabricated type. First of all, make a clamp with which the chimney will be attached to the body.
A clamp that will allow you to attach the chimney to the stove
Step 7. Make guides in the chimney, thanks to which it can be easily fixed to the body.
Guides in the chimney
Step 8. Join the barrel with the pipe, making sure to lay all the joints with asbestos fabric. Place a clamp over the fabric and tighten it.
Asbestos fabricTightening the clamp over the fabricThe finished joint between the pipe and the barrel
Step 9. That's it, the structure is assembled, you can check its functionality. Load sawdust or firewood inside.
The stove is loaded with fuel
Step 10: Add used oil to the fuel, then install the cap. As for the “pancake”, don’t use it yet. After the fuel ignites, remove the lid and place the “pancake”. To fully warm up such a structure, it takes about 10 minutes; in the future, the firewood will burn for a long time. Although exactly how long the combustion will last largely depends on the quality of the fuel.
Photo of the finished stove for the garage
Video - Homemade potbelly stove for the garage
If you wish, you can modify the design described above, although it will already cope with its functions perfectly. For example, to increase efficiency, you can increase the surface area and thereby improve heat transfer. For this purpose, weld metal plates on the sides of the body.
In addition, you can make a grate with an ash pan: cut a circle from a sheet of metal along the inner diameter of the body, drill holes with a diameter of 60-80 cm and install from below. After this, the ash will be poured down through the holes - to where the ash pan is equipped. It is believed that this will cause the fuel to burn faster, remember this point and make sure that the ash pan is sealed as much as possible.
Making a diesel stove with your own hands
Most of the diesel stoves in garages of car enthusiasts are not purchased, but homemade. Below is an example of a drawing of two drip-type stoves operating on diesel fuel; the first version is made from a gas cylinder and is intended for heating liquid in a closed circuit, and the second, made from a piece of pipe, is for air heating of the room.

Drawings of a diesel stove for a garage
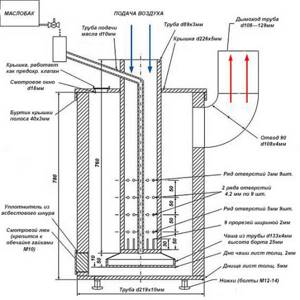
Description of structural elements
What will be needed for production?
The main materials will be steel sheets, angles, pipes for the air duct, fasteners (bolts), a cylinder or a piece of pipe - it all depends on the imagination and capabilities of the designer. The tools you will need are:
- Welding machine.
- Bulgarian.
- Spanners.
- Measuring and marking tool.
Main stages of manufacturing
- The first step is to make four legs from the corners, their length is 25 - 30 cm.
- By welding, attach them to the lower compartment of the future structure.
- Make two holes for pipes in the lower and upper parts of the stove; the diameter of the lower one should be smaller than that of the upper outlet.
- Weld the lower pipeline, as well as a small piece of the upper pipe under the air duct. It should be removable and make it possible to conveniently clean the furnace boiler.
- Install the lower and upper parts of the stove, as well as the pipe for the burner. The flame will burn in the lower compartment, fuel will be supplied through the tube, and the upper part will act as a radiator.
- 10 - 12 holes need to be made in the fuel pipe at a distance of 5 cm between them, the first and last holes should be located no closer than 10 cm from the body of the diesel stove.
- Make a round window with a diameter of 15 cm in the fuel compartment and attach a plug to it using bolts. With its help, during the combustion of hydrocarbons, you can regulate the oxygen supply and draft.
- Install the chimney on the top of the stove and take it outside the room.
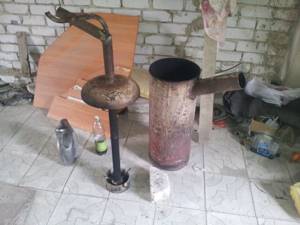
Design example
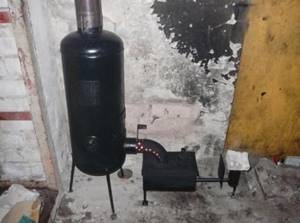
Another implementation option
In the video you can see various implementations of diesel fuel stoves:
Heating with drippers
If a drip stove is used for heating, it needs a power of at least 15-16 kW. This cannot be achieved only by increasing the drop frequency: due to the increased heat generation, the drops will evaporate while still in the supply tube. The stove (now a homemade liquid fuel boiler) will start burning with pops and then go out. Therefore, in a heating boiler using diesel fuel and exhaust, the dropper tube is connected to a flame bowl in a jacket, cooled by an air flow.
But that is not all. Due to the same greater heat release, the evaporation of fuel and combustion of vapors will be more intense. Some of the fuel vapor will be immediately thrown aside, will not burn and will begin to accumulate in the volume of the boiler, which can lead to an explosion. Therefore, a swirler is installed at the outlet of the fuel line, and the design of the deflector will be different than in a drip stove.
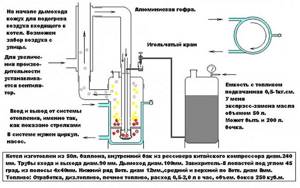
Diagram of a heating system with a diesel-powered drip boiler
Air supply at power up to approx. 12 kW thermoconvection energy-independent: the intake air is first heated in the air jacket of the chimney, and then cools somewhat in the aluminum corrugated hose, which provides the necessary “suction”. At higher power, a boost from the fan is required of approx. 60 W, for example, blowing the radiator of a VAZ-2109.
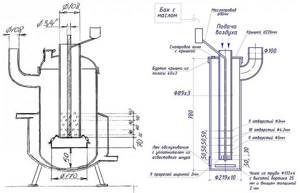
Drawings of diesel fuel drip boilers for water and air heating
A significant drawback of the described system is that in order to avoid burner extinguishing and the accumulation of explosive vapors in it, the water in the boiler jacket must flow countercurrent to natural thermosiphon circulation, i.e. top down. Therefore, the system requires a circulation pump with a non-volatile (thermomechanical) automatic emergency shutdown of the boiler in the event of a power failure. All this makes this system very complex and at the same time unreliable.
It is possible to build a drip boiler for a water heating system with natural thermosiphon circulation, but in this case its design becomes more complicated and it becomes necessary to force air into the cooling jacket of the fuel line. If you definitely want to heat yourself with diesel fuel or simply nothing else, then see the following for drawings of a drip heating boiler with natural circulation of coolant in the water jacket. rice.
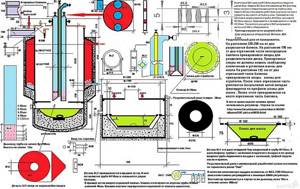
Drawings of a diesel fuel drip boiler for a water heating system with thermosiphon circulation
Also an option
There is another way to start a wood-coal stove using kerosene and diesel fuel: stick an ejection burner into its firebox. It is possible if there is a source of compressed air - the boost required is 1.5-2 ati. Provided that the fuel tank is located below the burner (this is absolutely necessary!), this method is as safe as possible: there is no pressurization - the burner goes out. An assembly drawing of the spray head of an ejection burner for gasoline, kerosene and diesel fuel is shown in Fig. Air is supplied to the annular gap (highlighted in color); the missing dimensions can be taken proportionally, because drawing to scale.
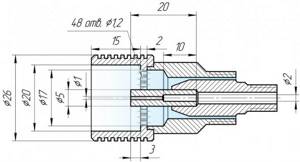
Drawing of the spray head of an ejection burner for liquid fuel
Rules for the safe use of heaters
It is known that the garage is a place of increased fire danger.
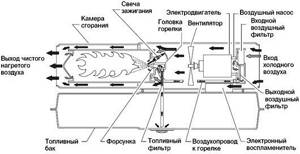
Drawing of a diesel heat gun.
And given that it is planned to be heated with liquid fuel equipment, it is worth taking the issue of placing the heating unit with full responsibility:
- The oven is located in a place where there are no drafts. Also, it should not be near flammable liquids and objects.
- There should be enough free space around the heating device - at least within a radius of 50 cm.
- The most optimal would be to place the structure on a sheet of asbestos, metal or other non-combustible material.
- Fuel, wicks and other consumables should be stored as far as possible from sources of fire.
In addition, the garage must have a working and complete fire extinguisher. The volume of the fire extinguisher should be selected with a margin exceeding the standard for the required cubic capacity of the room by 1.5 times. It would also be a good idea to equip the garage with a non-volatile automatic fire system.
Design features and operating principle
Diesel stoves for the home or garage have great advantages, especially in the conditions of the domestic winter. Since their main advantage is the rapid heating of air, even in an unheated room.
Heating boilers using diesel fuel
Today, consumers are offered heating boilers running on diesel fuel, which are completely similar in operation to turbocharged gas appliances. That is, the air pumped by an inflatable fan is mixed with diesel oil and thus forms a fuel-air mixture. After this, it enters the firebox and, together with the oxidizer, is ignited by the electronic ignition system. During the combustion process, the solarium gives off its energy to the heat exchanger, through which the coolant passes.
With traditional gas boilers, which are used as a heater for residential premises, diesel fuel appliances are also similar in that they are easily controlled electronically in automatic mode. The fan rotation speed, fuel supply process and ignition can be controlled by a specially programmed thermostat, maintaining the required temperature in the house.
Diesel stoves
Today, consumers can purchase compact heaters that run on diesel fuel. They are called potbelly stoves equipped with fans.
They can be presented in two varieties:
- Direct heating - the devices do not have a chimney, which makes them inconvenient for heating a garage or other small space.
- Indirect heating is a convenient device that has gained popularity among garage owners. The design of the fuel tank and combustion chamber works on a fairly simple principle - through the fuel tank nozzle, liquid enters the chamber, where it is then burned using air supplied by a fan. After passing through the heat exchanger, the air flows are directed through the nozzle into the room, heating it evenly and quickly.
The design of the potbelly stove includes:
- Removable fuel tank, which is equipped with a valve.
- Adjustment screw.
- Replaceable block with wick.
- Frame.
- Lattice.
- Burner.
- Reflector.
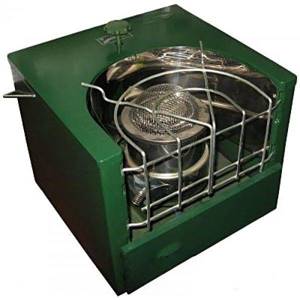
Liquid fuel heater As a rule, a modern diesel stove is equipped with a special flame control system that automatically turns off an overheated device. Such mobile devices are ideal for heating various rooms:
- Change houses, garages, construction sites or security posts.
- Shopping facilities.
- Country houses and other small residential premises.
Mobile potbelly stoves will become indispensable when it is necessary to heat a room that is in disrepair, as well as during a hike to organize heating in a tent when there is no desire to make a fire. Choosing such a stove will be the optimal solution for creating the necessary microclimate. Such a device can serve as an additional source of heating or as a main heater, which can also be used to heat food.
Features of operation
Before lighting a diesel stove, you need to install the tank in the right place and fill it with fuel. The next step is to remove the burner grate and install the wick into the block. After this, the burner and grate are reinstalled, the adjusting screw is opened and after 30 seconds the burner can be ignited. After intense combustion begins, you will need to tighten the adjusting screw all the way and wait a little for the flame to settle. Then open it back, setting the desired degree of heating.
The device is turned off by screwing in the screw until it stops. In this case, you need to make sure that the diesel fuel burns out completely and the fire goes out completely.
How the miracle stove works and works
A factory-made or home-made stove for a garage for mining or diesel fuel is multifunctional. It is suitable as a main, additional or alternative source of heat if a heating system is already installed in the room.
If necessary, the device can also be used as a hob: food is quickly heated on the stove and the kettle boils.
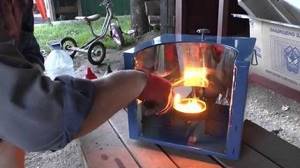
Miracle stoves cannot be installed in poorly ventilated areas. During operation of the device, practically no harmful substances are released into the atmosphere. But at the moments of ignition and extinguishing the flame, small amounts of smoke hazardous to health are released
Miracle stoves operate not only on diesel fuel, but also on other types of liquid fuel, with the best option being kerosene. However, in most cases, motorists use diesel fuel, because... it's inexpensive. The stove power is 1.8-5 W - the figure depends on the design and build quality of the model.
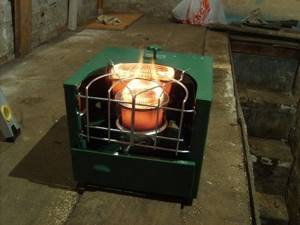
One refill of the fuel tank is enough for the miracle stove to continuously heat the room for 6-28 hours. This period is determined by the design of the model and the volume of the fuel tank.
The miracle stove consists of a fuel tank (usually removable) with a valve, a replaceable block with a wick, an adjustment screw, a reflector and a burner. All these components are placed in a common housing, which can be made from a barrel, sheets of heat-resistant steel or a used gas cylinder.

Using this drawing, you can make a furnace from steel sheets. Its dimensions may vary depending on the preferences of the garage owner. Most often, the height of the model is 3500-6000 mm, and the width and depth are 2500-4000 mm (+)
The burner is placed in the center of the structure. It receives fuel from a tank located at the rear wall of the housing. To achieve the desired temperature, use the adjusting screw. An important detail is the reflector. It provides quick and high-quality heating of the room.
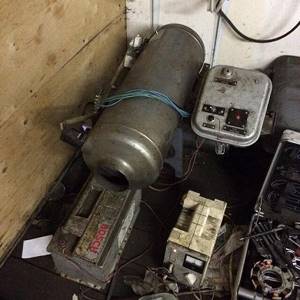
An old gas cylinder can still serve as a heating device. The main thing is that the metal is not rusty, and the body remains intact and durable
When choosing a design, it is better to choose a compact model weighing 10-20 kg. Such a stove will be easy to rearrange, carry and transport without outside help.
Advantages of using diesel boilers
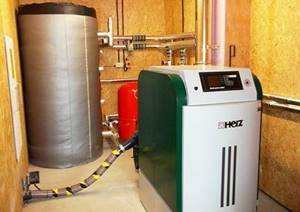
Affordable cost is one of the main advantages of diesel fuel-powered devices. The price of appliances for a private home is 30–100 thousand rubles. There are dozens of device models on sale.
The advantages also include:
- autonomy of the device;
- safety of use;
- high efficiency;
- availability of fuel.
Autonomy of the device
The device requires electricity to operate. If there is no connection to the network, the safety and control automation is powered by an electric generator, so the boiler is considered an autonomous heater.
All boilers of this type have automatic control of operating modes. The water in the heat exchangers is heated to a set temperature, and the burner is turned on and off automatically.
Safety of use
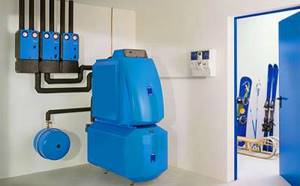
The device is not dangerous during operation. Automation stops fuel combustion if there is a power outage or short circuit of electrical appliances.
Diesel fuel is a relatively safe fuel (compared to natural gas or gasoline).
Proper operation prevents explosion or fire of the device.
Installation of the boiler does not require permission from regulatory authorities. The homeowner must only comply with the requirements for the room in which the boiler is installed and for the chimney.
High efficiency
When diesel fuel burns, a large amount of heat is released. The efficiency of domestic diesel boilers is 75–92%.
Thanks to the heat-insulating layer under the body, almost all the heat is transferred to heat exchangers and spent on heating water. The efficiency of boilers of this type is not much less than that of gas boilers.
Availability of diesel oil

Diesel fuel is usually sold at gas stations; it is poured into cans or a mobile container on a trailer.
Solar fuel is purchased in large quantities from wholesale suppliers.
Terms of delivery or pickup are negotiated separately.
What should the heating be like in a garage?
For many motorists, the garage is almost a second home. Here they delve into their hobby, take a break from the hustle and bustle and take care of the car. Therefore, first of all, you should think about the comfort of the person who spends hours indoors.
Heating is also necessary for the car, because... low temperatures negatively affect its technical condition and significantly reduce its service life.
When it gets cold, the garage becomes too humid. Condensation forms on metal parts, which provokes corrosion processes. In a cold room, the car body quickly rusts and becomes unusable.
To keep the garage dry, you should take care of good waterproofing and ensure the normal operation of the ventilation system. However, moisture still gets into the room on the wheels of the car. It evaporates and drops of water settle on surfaces. If there is no heating, moisture accumulates, causing fungus, mold, and rust to appear. To prevent this from happening, heating is necessary.
Low temperatures cause the oil to thicken and reduce battery capacity. This makes it difficult to start the engine and increases fuel consumption. Therefore, it makes sense to spend time and effort assembling a miracle stove
Features of garage operation determine the requirements for heating systems:
- Efficiency. The oven must heat the air quickly and maintain the desired temperature for several hours.
- Easy to use. When coming to the garage, its owner should spend a minimum of time and effort heating the room.
- Ease of maintenance. The stove must be inspected, cleaned, and repaired in a timely manner, so its design must be simple and understandable, and its parts must be easily replaceable.
- Availability of energy source. When choosing a heating system, fuel availability is of fundamental importance. A stove using diesel fuel, diesel fuel or waste oil is well suited for a garage.
- Safety. There is always some amount of flammable substances in the garage. Since these premises often serve as workshops and sheds, flammable materials will often be found here. Therefore, heating must comply with all fire safety standards.
- Cheapness. The costs of servicing a car and arranging a garage are already high, so saving on heating without compromising its quality is a pressing issue.
When choosing a suitable heating device, you should set priorities, because... the ideal is unattainable. The easiest to use are electric heaters. This energy source is available in almost any location. However, the price of heating with electricity is too high, so it is worth considering other options.
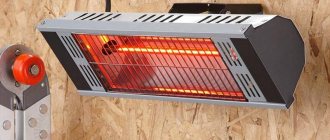
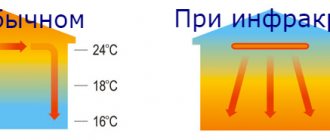
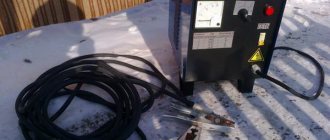
Image gallery Photos from This heating method is chosen by people who are willing to spend money on an infrared heater and pay electricity bills. Although the devices are very economical, they are still not cheap. The main advantage of infrared heating: objects are heated, not air (it warms up indirectly by coming into contact with warm surfaces). This allows you to create local thermal zones
Garage owners who have the opportunity to buy solid fuel inexpensively make good old potbelly stoves. Such heating is reliable, and its effectiveness has been proven over time. There are also disadvantages: you will have to install a chimney, and keep a supply of fuel in the garage, which takes up a lot of space
Heat guns are often purchased to heat garages, workshops, and utility rooms. There are many models powered by gas cylinders, electricity or diesel fuel. Every garage owner will definitely find a suitable option. The only negative is the high price of the device
Industrially produced models are compact, beautiful, easy to use, but not cheap. If you make a miracle stove yourself, you will get a completely functional and inexpensive design. The only negative: from a design point of view, it will not be able to compete with aesthetic industrial models
Heating with infrared heater
Homemade potbelly stove using solid fuel
Gas heat gun in the garage
Miracle diesel stove
Oven characteristics
This unit is small in size and light in weight. It has a fairly simple design. An open reservoir and a fuel tank are installed in the steel body, which are connected to each other like communicating vessels.
To limit the flow of flammable substances from the tank, the outlet pipe is equipped with a special valve. From the kerosene gas stove there was a burner powered by diesel fuel. This element is a reliable wick, the lower part of which is immersed in a tank of fuel.
After opening the valve, fuel will begin to flow into the working tank. A special cord, pre-wound on a cylinder-shaped base, quickly absorbs it. After a few minutes, you can ignite the stove. No equipment is required for this, because everything is done by hand.
In order for the diesel fuel device to warm up to the desired temperature, you will have to wait a little. The power of the unit is controlled by a valve. He is also her switch.
The downside of the device is that the burner goes out 10 minutes after the diesel fuel runs out. To somehow compensate for this drawback, many manufacturers install a metal grate directly above the burner, which, if necessary, will allow water to be heated in a container.
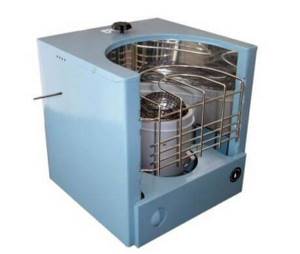
One of these miracle stoves is the Solarogaz PO-1.8 model, made in Russia. The maximum power of such a unit does not exceed 1.8 kW. In the photo below you can see this device.
Drip type oven
This design is suitable for small spaces, such as tents, and is quick and easy to assemble.
The build method is:
- Select a box of the appropriate size, for example 30x30x45 cm for a room of 3 m2.
- For the stove cabin, take a fire extinguisher body or a large 200 liter tank if a large heater is needed.
- For fuel, use a 2 liter medical burner. A thin copper tube 1 m long, bent at 90°, is attached to its rubber hose.
- The flexible hose is folded in half and a clamp is attached to the bend to secure the stove parts. The screw is mounted in such a way as to ensure a drip supply of fuel.
- A wick made of rags or old cotton briquettes soaked in diesel fuel is placed inside the body.
- Secure the door.
- In the center of the case or closer to the door, you need to drill a hole for the cross-section of the copper tube.
- At the end, the wick is set on fire, combustion is ensured by slowly dripping diesel fuel onto it.
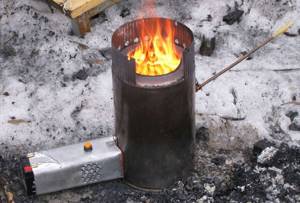
If you plan to cook food on such a stove, the tube is placed on the side and not on top.
