The process of heat transfer is heat exchange. The devices in which the process of heat transfer occurs are heat exchangers. There are surface recovery ones, where the process involves two agents separated by a partition, and mixing ones, in which the process of mixing warm and cold flows by contact occurs.
It is clear why a heat exchanger is needed in a domestic heating system. Which device is suitable for a particular circuit depends on the installation conditions. You can install a shell-and-tube (shell-and-tube or tubular) - it is unpretentious, can stand for 10 years without cleaning, only the bills for use will increase every year as thermal conductivity is impaired. You can install a plate one, but you will have to clean it every 3 years. The rating of the best heat exchangers of 2021 will help you choose which one is better, as well as understand the prices and characteristics.
| Category | Name | price, rub. | Briefly about the main thing |
| The best shell and tube heat exchanger | TNG-1.6-M8/20G-2-2-I | 9000 | A vertical refrigerator with fixed tube sheets and a temperature compensator on the casing. |
| TTAI heater | 7500 | They combine the advantages of shell-and-tube and plate heat exchangers without their disadvantages. | |
| Bowman 190 kW | 124000 | The ability to operate heat exchangers for both heating and cooling water. | |
| Best plate heat exchanger | R-012-10-19 PROMTECHSERVICE | 14000 | Among the entire range, there is minimal heat loss, pressure loss, and low energy consumption. |
| KAORI Z400 | 32400 | The innovative "Z" series is designed with a diagonal flow pattern that provides higher efficiency. | |
| Innovita | 4000 | Supply of hot water even at low water pressure (0.15 bar). | |
| The best recuperative heat exchanger | TsEEVT | 30000 | Heat exchange between the working media occurs through the wall, and the heat flow in each section maintains its direction. |
| The best heat exchanger for heating | For furnace, 10 (for pipe D 115 mm) | 2600 | A simple stainless steel device that provides quick heating of water and heat transfer. |
| Sibtermo ST 2.5 WITH IR burner | 11250 | Tent heater in the cold season. | |
| The best heat exchanger for hot water supply | GDP 08-114-4000 | 18300 | For heating network water in heating and hot water systems of residential and industrial premises. |
| Shell and tube boiler | 63500 | For heating water and heating systems operating according to common temperature control schedules. | |
| Danfoss XB 06L-1-8 - Tavago | 14800 | Accurate performance is ensured by selecting the required quantity via HEX. |
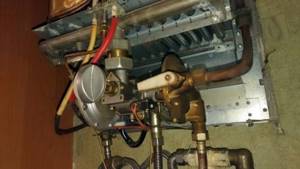
How does a heat exchanger work?
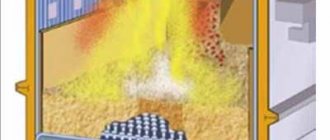
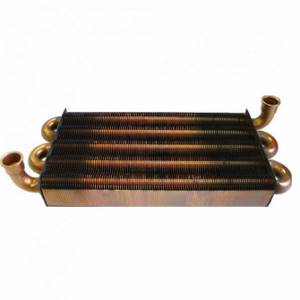
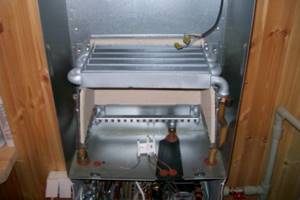
A heat exchanger, or radiator, is designed to heat water from the burner. The flow flows through the coil tubes, instantly warming up from the burning fuel. Most often the block is steel or copper. How much does the device weigh? Copper device - from 3 to 3.5 kg. The steel apparatus is much heavier, for this reason it has lower efficiency.
Features of steel product:
- Lower cost compared to copper.
- Due to the plasticity of the material, heating does not harm the surface.
- It is resistant to corrosion.
Copper device:
- It has high efficiency and fast heating.
- Products that contain additional impurities are cheaper.
- Corrosion resistance.
- Light weight if it is pure copper.
Trying to reduce the cost of production, manufacturing companies add impurities to copper. Because of this, the radiator heats up unevenly, which leads to burnout of individual parts. Some people coat the surface with heat-resistant paint, but this brings little results. The service life does not exceed 2-3 years.
Copper is more resistant to corrosion than steel. Most manufacturers do not indicate how much copper is used to produce the product, convincing them that the heat exchanger is made of a thick layer.
To extend the life of the device, install water filters. They soften and clean the liquid from impurities that settle on parts in the form of scale.
How much does it cost to replace a gas boiler radiator? If you take into account the purchase of a new device, delivery and installation, it will be cheaper to repair the heat exchanger.
The best heat exchanger for heating
It does not have its own heat source; functionality is provided by energy from the heating system. For example, a stove is not a heat exchanger, but a bed on it is, since it also provides heat to the room.
For furnace, 10 (for pipe D 115 mm)
A stainless steel container through which the smoke pipe passes. Models in this series are designed for additional heating and heating large amounts of water in individual bath rooms. They are used in the system together with containers (water tanks).
For furnace, 10 (for pipe D 115 mm)
Operating principle: water is heated in a heat exchanger under the influence of heat that is released when fuel is burned in a sauna stove, and then circulates through the system. Proper operation is only ensured if it is installed correctly.
Specifications:
| Volume, l | 8 |
| Chimney diameter, mm | 115 |
| Material of manufacture | Stainless steel |
| Weight, kg | 2,5 |
| Dimensions (height*diameter), cm | 60x25 |
This heat exchanger model for a sauna stove is designed for a chimney with a diameter of 115 mm.
Sibtermo ST 2.5 WITH IR burner
If you need a heat exchanger for winter fishing, hiking and traveling, you usually buy a Sibtermo ST 2.5 WITH IR burner for your tent. Can be used by hunters in ambushes and also by tourists.
Sibtermo ST 2.5 WITH IR burner
A new product in the fishing and tourism sector, they allow you to effectively heat rooms, fishing tents, etc. without harm to health. The air is heated by forced air supply by a fan to the heat exchanger. Intake of air from the room allows for a continuous flow of fresh air into the heated room and the effect of “dry heat” is obtained, as when using a wood stove.
Specifications:
| power, kWt | 2,5 |
| Weight without burner, kg | 3,5 |
| Height (folded/on legs), cm | 29/35 |
| Width, cm | 40 |
| Number of heat pipes | 17 |
| Diameter of outlet holes, cm | 4,5/8 |
| Number of fans | 2 |
| Current consumption of fans, Ah | 0,44 |
Fan current consumption: 0.44Ah
Classification of heat exchangers for boilers
Heat exchange elements for a gas boiler can differ significantly in design and use. The following devices are most often used in thermal equipment:
Primary
This category of devices is used to transfer thermal energy directly into the fuel combustion chamber.
Attention ! Primary heat exchangers are operated in very harsh conditions, so they must be made of very high quality materials.
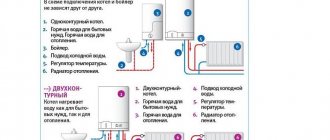
Secondary
The secondary heat exchanger is heated by transferring energy from the coolant to another liquid.
This device is ideal for meeting the need for hot water in the presence of a separate heating circuit.
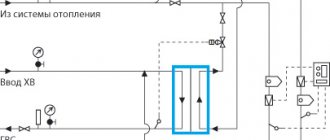
Bithermal
A bithermic heat exchanger is a modern and practical element of a heating boiler.
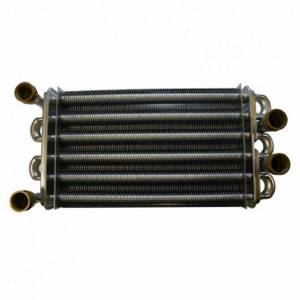
This design consists of 2 separate tubes installed one inside the other. Products of this type are used primarily for simultaneous heating of water for heating and domestic needs.
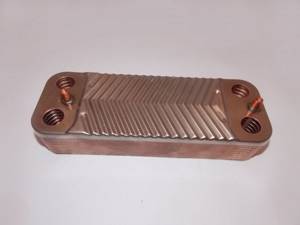
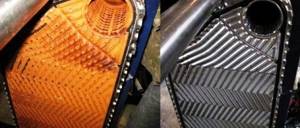
Best plate heat exchanger
A device in which heat transfer from a hot coolant to a heated medium occurs through steel, copper, graphite, titanium corrugated plates. Hot and cold layers move with each other, due to which the heating process occurs.
R-012-10-19 PROMTECHSERVICE
Consists of a package of corrugated plates made of stainless steel (titanium, SMO), 0.5-0.8 mm thick, with an area of 0.08-2.6 m. Each plate is equipped with a heat-resistant gasket that seals the connection and directs various coolant flows to the appropriate channels.
R-012-10-19 PROMTECHSERVICE
The corrugated surface of the plates provides greater flow turbulence and rigidity of the plate heat exchanger design. The plate pack is located between the support and pressure plates and is tightened with tie rods. The inlet and outlet pipes can be placed both on the support and on the pressure plates. The required type of thermal equipment and the number of plates are determined in accordance with the technical data for each specific object.
KAORI Z400
The soldered plate heat exchanger has a diagonal flow pattern of working media. It is designed to replace shell-and-tube analogues (double- and multi-pipe, spiral) in industry and production.
KAORI Z400
The special profile of the plates has an increased heat transfer area and reduces the risk of blockages and freezing. Kaori Z400 has high strength and is used as: evaporator, cooler, condenser, oil cooler. Suitable for use with refrigerants (freons): R32, R410a, R134a. The use of innovative developments in the production process reduces energy consumption and maintenance costs.
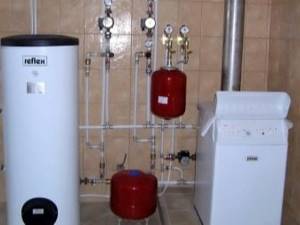
Innovita DHW
Designed to transfer heat from the heating fluid to the heated medium. Hot water is supplied to the heat exchanger circuit from the boiler or heating network, and cold water comes from the cold water supply system.
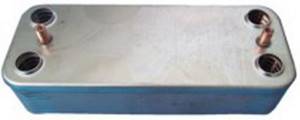
Innovita DHW
Installing heating equipment in a boiler room allows you to significantly save on the costs of heating building premises. Suitable for Innovita gas boilers, models 24Rsi, 24i.
Plate heat exchangers produced by Ridan and Neva are popular. Price from 8000 rub. All indicators are selected individually
Material of manufacture
The heat exchanger for the boiler is made from durable materials that conduct heat well, are not prone to corrosion and are sufficiently resistant to pressure. Since the cost of the material also has to be taken into account, the choice is limited.
Steel
A steel heat exchanger is cheaper in price, but less durable.
This is the most affordable material. Steel is very strong, but can be processed well. The price is low. The advantage of this option is resistance to high temperatures. Steel is plastic and does not crack when heated, and does not deform even in areas in contact with the burner.
A steel heat exchanger for a solid fuel or gas boiler is prone to corrosion. Water inside the tubes and combustion products in the boiler chamber have a destructive effect on the material. This affects durability. The steel model weighs a lot, which leads to additional fuel consumption for heating the element itself.
The stainless steel heat exchanger is resistant to corrosion and lasts for at least 50 years.
Cast iron
The material is much more resistant to corrosion than steel, and is not afraid of rust and the action of acid anhydrides. The service life reaches 50 years. However, cast iron is a brittle alloy and can crack under the influence of temperature. To avoid damage, the cast iron tubular heat exchanger must be washed: if ordinary water is used, then once a year; if antifreeze - then once every 2 years; if distilled liquid - once every 4 years.
The weight of a cast iron element is even greater, so more fuel and time have to be spent on heating.
Copper
Copper is a noble metal that is not susceptible to any type of corrosion. It is chemically inert and tolerates pressure well. Copper conducts heat better, so less fuel is required to heat the element itself and the flowing liquid. The weight of the copper model is small, the dimensions are compact with a very developed working surface.
The disadvantage is the high price. Also, the copper heat exchanger is too sensitive to heating to high temperatures. More often found in boilers from foreign manufacturers.
Plate or tubular heat exchanger. What to choose?
No more than 20 years ago the question: whether to choose a tubular or plate heat exchanger did not exist. In most cases, tubular heat exchangers were used. But nothing stands still; over time, more efficient heat exchange equipment has appeared. Plate heat exchangers began to be used to replace tubular heat exchangers. In this article we will try to understand the advantages and disadvantages of both types of heat exchangers.
engineer of Belgorod Heating Networks, Petr Mikhailovich Sizov, will help us . He kindly answered our questions, and we hope these answers will help our customers in choosing the heat exchange equipment they need.
How does the heat exchange process occur in a tubular heat exchanger?
— The heat exchange process in such heat exchangers occurs through the heat transfer surface (the surface of the tubes inside the heat exchanger). The media in the heat exchanger move in two spaces: pipe and inter-tube.
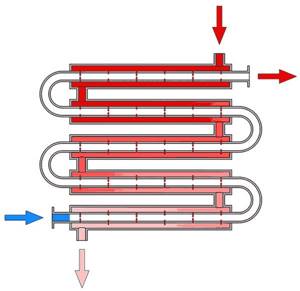
Let's look at an example of heating. The heating fluid from the heat source enters the inter-tube space in which the tubes are located (pipe space). Heated coolant flows through these tubes. The heating coolant passes through the inter-tube space and comes into contact with the surface of the tubes, thus heating the second medium. The media in such a heat exchanger move in countercurrent.
How does a plate heat exchanger work?
— In a plate heat exchanger, the media also exchange heat through a heat transfer surface, which is the heat exchanger plates. When assembled, the plates form a package containing channels. Heating and heated coolants flow through these channels.
Let's look at an example of heating. Conventionally, let’s take one plate as an example. On one side of this plate, heating coolant will flow through the channels. On the other side of the plate, heated coolant will flow. The media move through the channels in countercurrent. In this case, heat exchange occurs between the coolants - one medium heats the other.
What are the strengths and weaknesses of tubular heat exchangers?
Advantages: — Good resistance to water hammer. High pressure performance.
— A small difference in the temperatures of the heating and heated coolant (1C - 2C)
— Less demanding on water quality. But this point is controversial. Because a clogged heat exchanger sharply loses its heat transfer properties.
Flaws:
— Low heat transfer coefficient. The heating efficiency is worse than that of plate heat exchangers.
— Large overall dimensions. Heavy weight and metal consumption of the structure. Requires a large area for installation and a special foundation.
— During repairs, it is not uncommon to plug failed pipes. This reduces the heat transfer surface of the heat exchanger.
— A heat exchanger leak in the pipe space can only be detected when disassembling the heat exchanger
— Washing can only be done in-place. It is most difficult to remove deposits in the heat exchanger tubes, especially when they are heavily overgrown with scale.
— Thermal insulation of the structure is required
— It is impossible to increase the heat transfer surface.
What are the advantages and disadvantages of plate heat exchangers?
Advantages:
— Efficiency 80-85%.
— The heat transfer coefficient is higher than that of a tubular heat exchanger. The heating efficiency is better.
— Compact dimensions and pipes located on one side. This saves space and simplifies equipment installation.
— It is possible to increase the power of the heat exchanger. To do this, you simply need to add plates.
— Simplicity of service. The heat exchanger can be washed in a dismountable manner by 2 people.
- Does not require thermal insulation.
— Reduced pollution. When moving in channels, media reach a high degree of turbulence. This reduces the formation of deposits on the surface of the plates.
Flaws:
— Relatively high hydraulic losses.
— More demanding on water quality than tubular ones.
—
Which equipment is cheaper?
When comparing equipment operating for hot water supply and heating systems, i.e. when used in housing and communal services systems, tubular heat exchangers will be slightly cheaper than plate heat exchangers. But comparing only the purchase price is the wrong method. It is necessary to compare the price and cost of servicing the equipment.
If we compare according to the scheme: purchase price + equipment operating price, then plate heat exchangers clearly win.
Which heat exchangers are easier to maintain?
Due to their collapsible design, plate heat exchangers are easier to maintain. And the efficiency of washing is higher, because with dismountable washing we can visually control the quality of the work performed. All parts in collapsible heat exchangers are easy to replace during repairs.
What is the service life?
It would be more correct to use the term “overhaul period”, i.e. period before major repairs. According to manufacturers, for tubular heat exchangers this period is 5-10 years. Lamellar ones have 10-15 years.
What conclusions need to be drawn?
At the moment, the development of tubular heat exchangers is underway, which in their characteristics are close to plate ones. But the price and maintenance cost of such equipment are not yet known. Therefore, for work in housing and communal services systems, steam systems, and industry, the best choice would be a gasketed plate heat exchanger. If your equipment will operate under conditions of high pressure (more than 25 bar) or high temperature (more than 200C), then you need to pay attention to tubular heat exchangers.
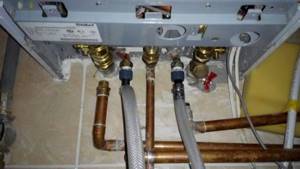
Correct operation
The heat exchanger is washed depending on the water hardness.
Transportation, installation and operation of the heat exchanger device are described in detail in the instructions:
- The heat exchanger is placed in the apparatus so that it has easy access for inspection and repair.
- Start-up is performed at stable pressure and temperature. Do not increase the temperature faster than 10 degrees per minute or increase the pressure more than 10 bar per hour.
- When filled with water, the air valves and valves behind the heat exchanger remain open. After the pump starts, they are closed. In this way, stable pressure is achieved.
- You need to change the heating parameters smoothly. The slower this happens, the longer the seals and the heat exchanger itself will last.
- The device needs to be cleaned periodically. The plate is cleaned directly in the frame, then the plates are removed and washed. Another method is possible: first removing and then cleaning the plates. It is not recommended to clean shell-and-tube machines. In case of complex blockages, the technician installs a plug.
- Before restarting, check the condition of all gaskets. Pressure and temperature are set as at 1st start.
To avoid salt deposits, a filter is placed on the water pipe in front of the boiler entrance.
terms of Use
Experts advise choosing this radiator for use with hard water. At the same time, precipitation forms at the bottom of the device, they cause “boiling”. This promotes the activation of sediment formation, which may result in device failure and pipes becoming clogged.
To avoid such problems, you should not use heating in such modes that “boiling” may occur in the lower part of the device. It is recommended to use filters for cleaning and devices to reduce water hardness.
It is prohibited to use ethylene glycol as a coolant in a radiator, because the salts and sediments that it forms cannot be removed. The disadvantage of this type of boiler is the low power in the DHW operating system.
Initially, in the first four days, the hot water will have a temperature in the panel (up to 90 degrees). For this reason, it is necessary to make 1-2 places of the hot water supply system from steel.
They should be replaced in the future. Heating with a bithermal radiator is inexpensive, and their system is durable, but not powerful. If the water is very hard, the operation of the entire heating system may be disrupted.
Primary heat exchanger repair
The exchanger deteriorates due to poor quality coolant or the materials from which it is made, as well as other factors. Pressure, high temperatures and their differences lead to cracks, which is why the element begins to work less powerfully and breaks down over time. The life of the heat exchanger can be extended if purified water is supplied and the boiler is not overloaded.
We recommend: Flushing the heat exchanger of a gas boiler: nuances of the procedure and review of cleaning products
It will be more difficult to eliminate cracks than clogs. The heat exchanger is soldered for this purpose. Select solder from the same material as the unit itself. Boiler heat exchangers are usually made of copper, less often cast iron or steel. Aluminum, silicon, manganese, nickel and zinc are added to the composition.
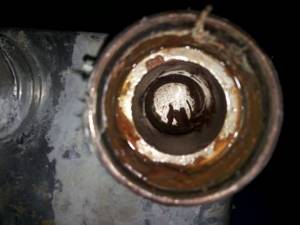
Leaks on the primary heat exchanger can occur due to exposure to flames, water hammer, and in some cases they are caused by corrosion
Additional solder requirements:
- melting point not lower than 700 °C;
- sufficient viscosity;
- fluidity is the same as that of a heat exchanger.
Copper-zinc solders are considered one of the best. They are used for soldering most non-ferrous metals with a higher melting point than the support material itself. Solders with inclusions of silicon or tin - up to half a percent - are safer for the human body.
It is better to avoid copper-phosphorus materials, and if exchangers are soldered with them, do so without any load such as shock or vibration. Well-chosen solder is half the battle.
Heat exchangers are soldered with gas burners and blowtorches. Before soldering, the desired area is cleaned with fine-grained sandpaper and wiped with a rag with a solvent, and then heated. The area is heated with a hairdryer or a weak burner/soldering iron. At this moment, the main thing is to get into the temperature corridor and take into account subsequent cooling. Barely noticeable damage is found by small greenish spots.
Before heating, the water is drained, and its remains are removed with a compressor or blown out through a flexible hose. The hose is fixed by thread if it has a union nut and the design features allow this. If you leave water, it will take away part of the thermal energy.
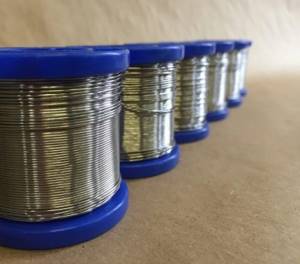
Solder spools: At high temperatures, the material wets the base and spreads across it, gets into the smallest gaps and stretches, resulting in an intermediate layer of base and solder combination
Solder is preferred in the form of a wire or rod: when soldering, the molten end will be well immersed in the flux, which will stick to it. If the wire lays on the exchanger itself too intermittently or loosely, the preheating was weak. After work, the soldering area is sometimes coated with heat-resistant paint for better insulation.
Over the next two weeks, the soldered area is checked daily for integrity. At the first detected leak, you should contact a specialist. If it appears in the first fortnight, it means the soldering was of poor quality.
The flux is suitable for universal use, as well as gel soldering flux. Avoid rosin, unusual options like aspirin and others.
Installing a heat exchanger on a sauna stove
Since all of the listed models differ significantly in their ability to withstand overheating, the installation location for a specific model is selected based on the design of the firebox and the material from which the heat exchanger is made.
Frame or register systems are typically used in brick sauna stoves. The device is embedded in the upper part of the firebox or in the roof of the furnace during its construction. In this case, the pipes for connecting to the tank are led out from the back or sides of the furnace body.
Flat coils made of copper and stainless steel are installed in the same way. They can be embedded either in the vault or in one of the vertical walls of the combustion chamber in a sauna stove.
Twisted copper coils are traditionally installed on the top chimney. Sometimes the coil is located directly under the top-mounted central hot water tank. The tank heats water for spraying the heater, and the copper heat exchanger heats water for the shower or washing compartment.
Disc and box heat exchangers are installed on one of the side walls in a sauna stove. They are usually used for steel or cast iron stoves. To install, just cut two holes in the wall. After that, spacer bushings are put on the outlet pipes, and the heat exchanger is installed inside the firebox using union nuts. This type of heat exchanger is also called dry, since water does not get inside the combustion chamber under any circumstances.
Important! Box and register heat exchangers are installed inside the sauna stove so as to reduce the contact of the metal surface with the hottest part of the combustion front.
The heat exchanger should receive most of the heat inside the stove not through convection and flow of hot gases, but in the form of infrared radiation from the walls and roof of the sauna stove. To avoid overheating, the heat exchange circuit pipes must be shielded with stainless steel sheets. As a result, the service life increases, and the water in the heat exchanger is heated more evenly, without boiling and steam fountains.
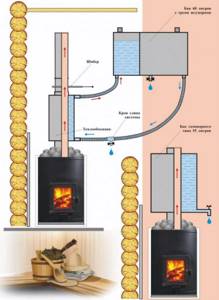
Connection diagram for a heat exchanger for a bath
Almost all models of heat exchange devices operate on the principle of gravity or natural convection of water in a semi-closed pipe system. Therefore, when developing an installation diagram for a heat extraction device, it is necessary to adhere to two rules:
- The inlet and outlet pipes of the heat exchanger must be located at different levels, the vertical distance between the lower and upper water supply points must be at least 20-25 cm. The lower pipe is used for supplying cold water, the upper pipe is used for discharging boiling water;
- Connection to the heating circuit pipes of the sauna stove must be made only using flexible connections, and the couplings must be sealed with heat-resistant silicone.
We are not talking about flexible rubber hoses in a metal braid; they are not suitable for these purposes, even if the label is marked “for hot water” or something similar.
Important! Due to the strong thermal radiation coming from the walls of the sauna stove, the rubber ages and burns out in a matter of weeks.
Experienced users recommend connecting the tank to the heat exchanger in the bath using flexible stainless steel gas hoses.
How to connect a heat exchanger to a sauna tank
The classic installation scheme is a remote tank for a bath with a heat exchanger. This means that a container with hot water for showering and cleaning the room is located either on the nearest wall or outside the steam room, closer to the shower stall.
It is important to ensure a certain height difference between the exit from the heat exchanger of the sauna stove and the bottom of the container with water. Typically this value is selected within the range of 50-70 cm
For box and register circuits, flat coils, the tank is located at a level of 120 cm above the floor level. This is convenient; you can scoop up hot water through the top hatch.
It’s another matter if the heat exchanger coil for the bath is installed on the chimney pipe. In this case, the tank will have to be raised to a height of 180-200 cm, so install a bronze hot water tap at the bottom or at the outlet of the circuit.
The pipelines leading from the heat exchange circuit of the furnace to the tank are usually located at a slope. The cold line from the lower pipe is supplied to the supply tank at a right angle, this ensures the maximum hydrostatic head in the circuit. The outgoing line is installed at an angle of 25-30°. This is done to separate air and steam bubbles formed in the water flow during heating.
On the cold main, be sure to make an elbow and install a drain ball valve, with which you can easily drain the water from the bath heat exchanger.
Repair of secondary heat exchanger
Secondary heaters often clog, especially models with narrow channels. Without cleaning, they break down over time and finally fail. A layer of scale inside the unit reduces heat transfer, causing the boiler to consume more gas.
Salt deposits, scale and rust form the bulk of the contamination: in addition to the secondary heat exchanger, it doesn’t hurt to also check the heating and hot water circuits
Problems with heat exchangers will be indicated by codes on the boiler display. There is an action plan for this case.
Let's take a closer look at the problem with the secondary heater:
- We take out the secondary heat exchanger.
- We look at the joints, internal and external threads. After the last cleaning, their condition may have worsened. This happens due to aggressive acids. We replace worn out removable elements.
- We check the integrity. The heat exchanger could experience a water hammer. Only a specialist will find a very small fistula (hole).
- We better inspect the exchanger, and for this we call a specialist. We replace a severely damaged unit.
- Even at the very beginning, contamination can be found. We look for plaque visually in the inlet openings. We blow air into the part and also focus on the sound. We clean it if the exchanger is clogged. Pieces of scale may fall out of it even after a slight knock.
- You need to choose 1 of 3 cleaning options: home remedies like detergents and solutions with citric acid, special mixtures, or professional cleaning.
First of all, rinse the exchanger with a stream of water from a cold tap. Then pour citric acid into the device and place it in a bucket of water. Afterwards, take out the heat exchanger and pour water into it to check the permeability.
If it comes in slowly or does not move, then prepare a saturated solution of vinegar in water and pour it there. Then rinse with hot water and blow off. If possible, use an air pump. Do several cycles with vinegar.
Among the arguments for professional cleaning, it is worth noting the inconvenience of the design for cleaning, difficulties in assessing contamination, and the risk of damage due to independent mechanical action
If the steps described do not help, try special cleaning solutions: cleaning gel or low-percentage adipic acid solution. If this method does not work, then call a specialist or order professional cleaning.
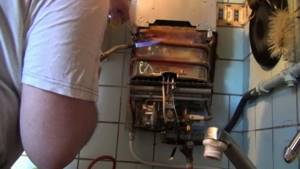
Disturbances in the operation of the column and their elimination
If your water heater suddenly leaks, sometimes the reason is worn out gaskets. When removing the casing, it becomes clear whether this assumption was justified. Having found a fistula in the heat exchanger, many consumers are interested in how to replace the problematic part. But the difficulty is that the price of spare parts reaches 30% of the price for a completely new heater.
It is much more practical to solder a mechanical defect using a soldering iron. Solder melts at about 200 degrees. The exact value is determined by the brand of the specific part. Even if the water boils for a long time, it will not damage the integrity of the “patch.” This solution is equally relevant for Russian and foreign speakers. After all, the risk of breakdown is present everywhere, only the service life differs, but defects will still appear in any model.
Reasons for heat exchanger failure
The period of operation is determined primarily by how the water in the city water supply is disinfected. In Russia, either pure chlorine or chlorine dioxide is used. When the water flowing through the copper tube heats up, it causes a violent chemical reaction. Copper chloride is inferior to pure metal in strength, and therefore fistulas appear quite quickly. The luckiest people are residents of cities where tap water is ozonated.
We recommend: Insulating walls from the outside: types of external insulation for a brick or concrete building, density of slabs and rating of materials
But there are still very few such settlements. The high cost of the modern solution does not allow us to count on the rapid spread of ozonation. Moreover, now manufacturers have begun to save in every possible way. And if previously troubles happened quite rarely with thick tubes of heat exchangers, now thin, low-quality copper is used everywhere. The service life of products has significantly decreased.
The process of replacing a heat exchanger with your own hands
To save money, many users decide to replace the heat exchanger in a gas boiler with their own hands. It’s worth noting right away that you shouldn’t try to solve the problem by soldering the hole that appears - this will extend the life of the heat exchanger by no more than 2-3 months. It is better to call a service center specialist or purchase a new circuit and perform the replacement yourself. The sequence of actions when carrying out repairs with your own hands is as follows:
- turn off the gas;
- disconnect the unit from electricity;
- disconnect the boiler from the water lines and prepare a bucket in case the remaining water leaks out;
- use a screwdriver to remove the unit cover;
- check according to the diagram in the instructions where the heat exchanger is located;
- disconnect the circuit and take it to the store to buy a new one, or immediately screw on a working element if available;
- connect the gas boiler to all previously disconnected communications;
- let in coolant to check the tightness of the system;
- If everything is normal, close the boiler body and screw in the removed bolts.
Replacing the circuit in a gas boiler with your own hands is quite possible, but it requires some accuracy and a clear sequence. If this manipulation seems too complicated, call a specialist - he will save you the unnecessary hassle of finding a suitable part, do everything quickly and provide a guarantee for his work.
Bath stove with water heat exchanger
To satisfy all the requirements of the modern bathhouse owner, a unique heating device was developed, designed simultaneously for several purposes - a bathhouse stove with a heat exchanger.
With the help of such a sauna stove you can not only heat water for a shower, but also heat the surrounding rooms. If you install a tank in which the water will be heated using a heat exchanger, then a shower will appear in the bathhouse.
If you install heating radiators in the dressing room connected to a heat exchanger, you will get a water heating system.
To make the right choice, you need to know what features sauna stoves with heat exchangers included in their design have
It is also important to choose the right design of the furnace with a heat exchanger and its required power
There are two types of stoves with heat exchangers used in baths:
- built-in container equipped with two pipes. Using pipes, the container is connected to a reservoir filled with water;
- an external container placed on the stove chimney. Usually this container is the reservoir in which the water for washing is heated.
If a factory-made structure is purchased, the manufacturers indicate in the instructions what power the structure has and for use in which room it is designed.
Those who make a sauna stove on their own should know that the power of the heat exchanger depends on its surface area per 1 square meter. meter of area, the power output will be about 9 kW.
Built-in heat exchanger
Built-in heat exchanger, which is a small tank (no more than 5 liters), installed between the stove casing and its firebox. It should not have direct contact with the flame.
Fittings must be welded into the lower and upper parts of the heat exchanger, through which the water heating device is connected to the remote tank.
When the furnace is operating, warm water from the heat exchanger rises up into the remote tank. At the same time, cold water flows through the lower pipe into the heat exchanger tank from the remote tank. According to the laws of physics, gradually the entire volume of water in the remote tank heats up.
This option is convenient in that it is possible to install a remote tank in an adjacent room, but provided that the total length of the connecting pipes is no more than 3 meters. Their diameter should be at least 3/4 inch.
For better water circulation, the pipes leading to the remote tank should have a slight slope (up to 5 degrees). To improve water circulation, an electric pump can be added to the system.
Important: sealing threaded connections in a sauna stove with a heat exchanger requires a material that can withstand high temperatures.
The main disadvantage of the built-in heat exchanger is the reduction in the amount of heat used to heat the room. For this reason, the heat exchanger power should be no more than 10 percent of the total power of the stove installed in the bathhouse.
It is also necessary to choose the optimal tank size. If its volume is too small, the water in it will boil quickly, and a large container will take a long time to heat up.
External heat exchanger
This type of heat exchanger is much more economical, since the water in it is heated by the heat released when fuel is burned through the chimney.
An external heat exchanger significantly reduces the heat loss of the furnace, which saves fuel consumption. The heat exchanger design is mounted on the chimney pipe, thereby resembling the device of a samovar.
External heat exchangers are made of any shape, but in each of them a metal pipe is inserted, passing through the lid and bottom of the device. This pipe, having a diameter slightly larger than the chimney pipe coming out of the stove, is put on it; the hot gases coming out of the firebox, passing through the chimney and, as a result, through the heat exchanger pipe, give up their heat to the water located inside the heat exchanger.
The advantage of this design is the ability to install a large heat exchanger, but at the same time it does not take power away from the furnace. The water in it retains heat, even when the stove is no longer heated.
Among the disadvantages is the difficulty of controlling the amount of water remaining in the heat exchanger. However, we have learned to successfully combat this drawback. For this purpose, a remote tank is connected to the heat exchanger, where a water meter glass is mounted.
Important: the joints between the heat exchanger and the chimney must be sealed. To do this, use a heat-resistant sealant or a solution of clay, lime and sand.
Cement mortar cannot be used as it cannot withstand the effects of temperature.
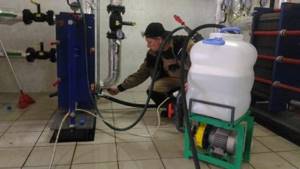
How to clean the heat exchanger of a gas boiler
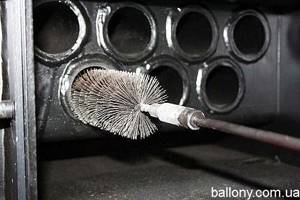
To clean the heat exchanger from scale, mechanical, chemical and magnetic cleaning methods are used. The first option is performed using a cleaning rod and scraper.
Tools can be manual or electric. The chemical option involves the use of crustacean chemicals that can loosen and dissolve contaminants.
To flush the heat exchanger using this method, use a special pump circuit and a flushing agent specified by the manufacturer, for example, for a Baxi gas boiler.
Algorithm for cleaning the heat exchanger from scale:
- Turn off the boiler.
- Prepare liquid for flushing heat exchangers of gas boilers according to the manufacturer’s recipe.
- After complete cooling, utility networks are disconnected from it and the water is drained.
- Remove the tie rods, move the pressure plate aside and then carefully remove each plate one by one. The work is carried out with gloves so as not to injure your hands.
- When working with acid, change gloves to rubber ones.
- Prepare a container for cleaning the plates so that they are completely covered with the working solution.
- The plates are immersed in the composition for 1 hour, after which the remaining deposits are removed under tap water using a brush.
- Assembly of the cleaned structure is carried out in the reverse order.
After washing the heat exchanger, check the tightness of the boiler under the operating pressure of the coolant. All utilities, gas and electricity are connected and the equipment is started for the first time after flushing.
If a leak is detected, it is necessary to tighten the nuts or install a new gasket on the heat exchanger.
Conclusions and useful video on the topic
How to remove the heat exchanger from the Baxi boiler, how to clean it:
Cleaning the primary exchanger using reagents, overview of the products and the final result:
Idea for repairing a broken primary heat exchanger inlet:
We talked about two types of heat exchangers. The primary one is above the burner of the combustion chamber and the secondary one is for heating running water. Now you have a better understanding of the design of gas boilers and understand the importance of heat exchangers in their operation. We also presented two partially similar algorithms for replacing exchangers.
If necessary, you can start soldering this part. You will be able to wash at home. Do not forget also about the quality of materials if you still have to buy a new part.
Sources
- https://remont-system.ru/kotly/remont-teploobmennika-gazovoy-kolonki-svoimi-rukami
- https://www.tproekt.com/teploobmennik-dla-kotla/
- https://StrojDvor.ru/otoplenie/tipy-i-svojstva-teploobmennikov-dlya-kotlov/
- https://sovet-ingenera.com/otoplenie/kotly/remont-teploobmennika-gazovogo-kotla-svoimi-rukami.html
- https://oteple.com/zamena-teploobmennika-v-gazovom-kotle-svoimi-rukami/
- https://kotle.ru/gazovye-kotly/teploobmennik-dlya-gazovogo-kotla
- https://laminatepol.ru/32846-chto-nuzhno-znat-o-teploobmennike-dlya-gazovogo-kotla-obychnomu-potrebitelyu.html
- https://ballony.com.ua/vtorichnyj-teploobmennik.html
Related Posts
- Manufacturing and connecting a sauna stove with a water heat exchanger
- The operating principle of a double-circuit gas boiler. classification and advantages
- Types and principle of operation of a gas boiler for heating a private house
- Do-it-yourself gas heater: options for the best homemade products
- Turbocharged or atmospheric gas boiler? which one should I take?
- How to correctly calculate the power of a gas boiler
- Flushing the heat exchanger of a gas boiler: cleaning methods and means of removing mineral deposits
- Review of baxi double-circuit gas boilers
- Ariston double-circuit gas heating boilers
- How to choose a wood-electricity combi boiler
- Combined heating boilers with wood and gas
- Review of Siberia gas boilers
- Connecting and calculating a buffer tank to a solid fuel boiler
- Wall-mounted, non-volatile gas boilers
- Characteristics of gas boilers Proterm Bear
- Setting up gas boiler power adjustment
- Characteristics and principle of operation of an induction heating boiler
- Review of the electrolux basic gas boiler
- The best electric boiler for heating a home according to customer reviews
- A supply of hot water that is always at hand: how does an electric water heater for heating work?
- Connection diagram for double-circuit gas boilers to the heating system
- Do-it-yourself gas boiler installation: design and instructions for use (125 photos)
- Mine boiler
- Heating boilers using diesel fuel. we buy correctly
- How is thermal energy for hot water calculated?
Read with this
- Manufacturing and connecting a sauna stove with a water heat exchanger
- The operating principle of a double-circuit gas boiler. classification and advantages
- Types and principle of operation of a gas boiler for heating a private house
- Do-it-yourself gas heater: options for the best homemade products
- Turbocharged or atmospheric gas boiler? which one should I take?
- How to correctly calculate the power of a gas boiler
- Flushing the heat exchanger of a gas boiler: cleaning methods and means of removing mineral deposits
- Review of baxi double-circuit gas boilers
- Ariston double-circuit gas heating boilers
- How to choose a wood-electricity combi boiler
How to extend the life of a heat exchanger?
In order for the heat exchanger to work as long as possible, a number of specific recommendations should be followed:
- Install a filter on the tap water supply - this will prevent the accumulation of lime deposits inside the circuit and minimize the effects of corrosion.
- Clean the heat exchanger in a timely manner, especially for units that are not equipped with water filters. The part must be cleaned regularly once every 2 years, if there is filtration - once every 4-5 years.
- Do not use the maximum operating mode of the burner all the time.
When choosing a gas boiler for a house or apartment, take into account the fact that heat exchangers made of cast iron or copper are considered the most durable.
Heat exchanger manufacturing
Tip for making a heat exchanger
You can make a heat exchanger from sheet steel, pipes bent in the form of a coil or horseshoe, an old cast-iron radiator, and even a heated towel rail.
Sheet steel heat exchanger
In the case of using sheet steel (thickness more than 2.5 mm), cutting is carried out, preliminary “grabbing” of the joined elements by welding, checking the geometry, and then final welding. The tank can be made either rectangular or cylindrical; in the latter case, you will need a metal bending machine.
Example of a heat exchanger for a brick sauna stove
Heat exchanger for brick oven
Sheet steel prices
Sheet steel
You should not use galvanized steel, because... At temperatures above 200 degrees, zinc begins to evaporate.
Nozzles are welded to the heat exchanger at the top and bottom to connect the coolant circulation pipes. It is desirable that the pipes have threads at their free ends, this will simplify installation.
A heat exchanger in the form of a register can be used in a brick kiln. It is made from copper or steel pipes, collecting them into a single “skeleton” through which water will circulate.
Heat exchanger - register
Video - Construction of a sauna stove with a heat exchanger
Ready-made internal type heat exchangers usually consist of a housing to which elongated leads are connected. The tank is hung on the front or any other wall of the furnace, and waste streams are discharged through holes in the wall. Fixation is carried out with spacer sleeves and clamping nuts.
Heat exchanger “Ermak”
Heat exchanger “Ermak”
When making a heat exchanger, it is important to know that pipes with a diameter of more than one inch must be connected to it, otherwise the movement of water to the “consumer” and back will be difficult. The best pipes for the manufacture of a heat exchanger and circuit are copper or stainless steel
Moreover, bending a copper tube will be much easier than a steel one, and the thermal conductivity of the former is 7.5 times higher
The best pipes for making a heat exchanger and circuit are copper or stainless steel. Moreover, it will be much easier to bend a copper tube than a steel one, and the thermal conductivity of the former is 7.5 times higher.
Malfunctions, repairs
Gas heaters have light indication. It is intended to notify of malfunctions. Each manufacturer creates its own character code contained in the passport. If you don’t have a passport, you can download it on the Internet. Malfunctions can be divided into two categories:
- those that can be eliminated on your own;
- requiring specialist intervention.
What you can fix yourself is not specified in the passport. Common heat exchanger failures:
- depressurization;
- blockage
Elimination of leaks is carried out with a soldering iron, welding, depending on the metal. The second malfunction occurs due to poor-quality coolant, scale. Eliminated by washing. To remove scale, you can use phosphoric acid or citric acid. The first one is more effective. How to do it is shown in the video:
Sometimes there is a manufacturing defect, but more often the malfunction occurs due to improper use of the devices. If you strictly follow the manufacturer's recommendations, the product will last a long time and with high quality. Boiler repair:
Washing methods
There are simple variations that practically do not involve any expenses, there are budget ones with minimal investments, and professional ones - they cost much more, but are highly effective.
How to flush the secondary heat exchanger of a gas boiler in one way or another? And when is it logical to use them. It all depends on the volume of deposits.
In the simplest situation, mechanical cleaning is sufficient. The outside of the VT ribs are cleaned. The work uses any hard brush, spatula, scraper or cable. It is very important here not to damage the plates.
The second method is washing with a special composition. In practice, it is combined with the first method and follows immediately after it.
The part is placed in a container with an acid mixture. Type of acid used: hydrochloric or citric. Suitable proportions: 100 grams per 10 liters. Water.
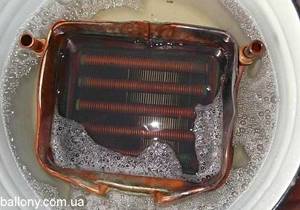
Acids can be replaced with any anti-scale preparations. After 30-40 minutes, the VT is removed from the container. The remaining scale is carefully wiped off.
At the same time, the coil is also cleaned. A special steel brush is used here.
The third method is chemical. More aggressive substances are pumped through the VT using a special pump. It attaches to the pipes of the part.
We recommend: Water heating convectors: types of selection rules and popular models
Suitable tools for the job are shown in this table:
| Facilities | Description | Proportion to water: grams: liter | Water temperature | Product price (RUB) |
| Lemon acid | Popular folk remedy | 100 : 10-12 | 50-70°C | 50 – 1 sachet. |
| Thermagent Active | A versatile liquid with a powerful effect | 1 : 9 | 40-50°C | 1500 – 10 kg canister. |
| STEELTEX Cooper | One of the most effective preparations, but suitable for working with light alloy parts | 1:6 to 1:10 | 40-60°C | 1300 – 5 kg capacity |
| Detex | Concentrate with effective biological substances. Excellent cleaning of steel, cast iron and copper parts | 200-500 :10 | 40-50°C | 4900 – 10 l canister. |
| Hydrochloric acid | Effectively removes heavy scale | 100 : 10 | 50-70°C | 50 – 1 kg |
A hose is placed in the container with the mixture almost to the very bottom, one side connected to the VT, and the other to the pump. This creates the necessary circulation. The procedure lasts 30-40 minutes. Then the part is thoroughly washed with plain water.
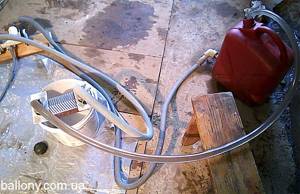
The fourth method does not involve extracting the component. This is a hydrodynamic flushing of the secondary heat exchanger of a gas boiler. But it is carried out only by professionals. This requires special technology and compliance with safety criteria.
Its principle is to run a special composition through the boiler system under powerful pressure (1.5-2 bar). The work is done by a booster. Abrasive elements are added to the cleaning liquid.
This is the most effective method, gently removing all deposits and cleaning the part to a commercial appearance.
If you doubt the success of self-cleaning, you can order this service. All operations are carried out within a day. Their price tag is determined by the following factors:
- region,
- power and boiler modification,
- company's markup,
- the equipment and chemicals used.
In Moscow and the central region, clients pay about 3,500-9,000 for services. In St. Petersburg - 3,000 - 7,000 rubles. In other regions: 1700 – 4500 rubles.
Securing the remote tank and installing the heat exchanger
Remote sauna tank
For a sauna stove, a tank with a volume of 80-120 liters is sufficient. This container must be hung on the wall of the bathhouse so that the level of the tank is higher than the stove.
Scheme for connecting the tank and installing the furnace with heat exchanger
Connection diagram
Step 1. Choose a place to mount the tank. This can be either a steam room or a shower room behind an adjacent wall. We determine the mounting height using recommendations for the slope of inlet/outlet pipes.
Layout of the furnace and tank
Step 2. Most experienced craftsmen do not recommend hanging the remote tank directly on the wooden wall of the bathhouse. Therefore, we measure the width of the tank, saw the rail into several sections of the appropriate size, and fasten the sections to the wall of the bathhouse with nails.
Step 3. The tank must have technological holes for attaching it to the wall. We secure the tank with self-tapping screws or dowels, checking horizontal and vertical. The structure can be further strengthened with brackets, fixing them under the bottom of the tank.
Brackets under the tank bottom
Step 4. The remote water tank has three or four pipes. Two of them are intended for connection to the heat exchanger, the third is for filling the tank with water (it may not be there), through the fourth hot water is supplied to consumers. A check valve is connected to the pipe through which the tank will be filled with water. If the system is open (water is added manually through an open tank lid), then a non-return safety valve is not needed.
A faucet with or without a shower hose is connected to the pipe from which heated water will flow.
Step 5. There are two pipes left, to which you should connect corrugated steel pipes or install a copper network. Connections are made using fittings. It is permissible to use metal-plastic pipes, connecting them with adapters to the pipes of the tank and heat exchanger. All threaded connections are sealed with thread sealant.
Flexible water supply
Prices for metal-plastic pipes
metal-plastic pipes
Step 6. A tap is connected to the pipeline that leads from the tank to the heat exchanger to drain water from the system. The operation of draining the liquid will need to be performed every time after completing bath procedures, otherwise during cold weather the water may freeze in the pipes.
Furnace heat exchanger installation diagram
Step 7. A heat exchanger is hung on the wall of the furnace (or its fittings are brought out through the technological openings of the furnace, and the coil is located inside so that in the future there is no contact of the body metal with an open flame). The fasteners are tightened. Flexible corrugated hoses or pipes are supplied and connected to the heat exchanger with fittings. If necessary, holes are drilled in the wall with a diameter slightly larger than the diameter of the pipes.
Drilling holes
Pulling liners through holes in the wall
Connecting the line to the heat exchanger
Step 8. The system must be tested for leaks by supplying water under pressure.
Sauna stove with heat exchanger connected
An example of connecting a remote tank to the heat exchanger of a sauna stove
An example of connecting a remote tank to the heat exchanger of a sauna stove
Step 9. If you have a metal stove, then you can put it into operation. The brick kiln will have to be completed, finishing, testing and other preparatory work must be done. However, metal stoves can also be lined with bricks (they are placed on edge) on two or three sides. Such a screen additionally accumulates heat, increasing the efficiency of the furnace.
Booster Summary
This is very rare and expensive equipment. If you intend to buy it, then you will expect expenses in the range of 40,000 - 90,000 rubles. And for everyday tasks this is a rather unprofitable solution.
The booster itself is a container with a built-in pump that provides a change in the flow vector. Because of this, the efficiency of washing increases significantly. The devices are resistant to any reagents.
The most popular models are presented below:
| Booster | A country | Productivity (liters per hour) | Tank volume (l) | Working pressure (bar) | Price tag (RUB) |
| PIPAL PUMP ELIMINATE 20 V4V | Italy | 2600 | 18 | 1 | 38 000 |
| BWT Cillit SEK 28 | Germany | 2400 | 20 | 1,5 | 57 000 |
| TM Aquamax | Italy | 5000 | 30 | 1,2 | 53 500 |
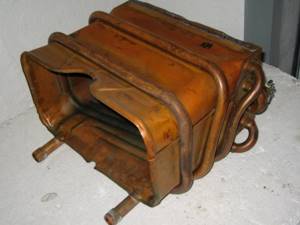
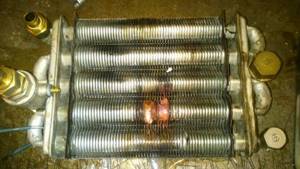
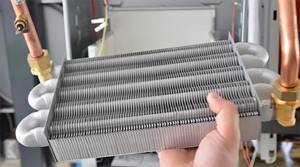
Heat exchangers with fins and their problems
The choice of material for the primary heat exchanger largely determines its design. In particular, the developers of heating equipment compensate for the low thermal conductivity of steel and cast iron by increasing the heat exchange surface. It was this idea that formed the basis of the most common tubular heat exchangers with fins in domestic boilers. There are many plates installed in vertical rows on a curved (S-shaped) pipe. This heat exchanger is located in the upper part of the combustion chamber. Flue gases pass through the narrow gaps between the plates from bottom to top, releasing energy to the coolant.
In addition to steel, copper is sometimes used to make such heat exchangers. In double-circuit boilers of some manufacturers, bithermic heat exchangers are still used: coolant circulates in an external copper pipe with fins, and the internal pipe serves to heat water for hot water supply.
To increase power and efficiency in heat exchangers of this type, the clearance between the fin plates can be only 1.5–2.5 mm. This significantly increases the rate of clogging of the lumen with soot and soot (natural gas combustion products), which prevents complete combustion of the gas and leads to increased fuel consumption.
The small internal cross-section of the pipes also increases the sensitivity of this unit to the accumulation of lime deposits in the lumen. The deposition of hardness salts and dirt inside the heat exchanger significantly reduces heat transfer due to a decrease in the thermal conductivity of the walls and disruption of coolant circulation.
It is estimated that just 1 mm of limescale deposits on the walls of the heat exchanger reduces boiler performance by an average of 5%. But what is much more dangerous, mineral deposits disrupt the cooling process of the thin walls of the heat exchanger, which can burn out because of this.
As a result, boilers of this type require more frequent and labor-intensive maintenance: cleaning the combustion chamber and descaling.
Actions for models of different brands
In general, there are few differences here. They relate to the disassembly of equipment and the use of one or another cleaning method. Available specifics regarding models of different brands are reflected below:
The first one is Navien. Any substances other than hydrochloric acid solution are suitable for washing VT. It greatly damages and even etches surfaces.
The second is Ariston. When flushing them, the maximum permissible pressure should be used, especially when working with a booster. In general, any drugs are suitable for the procedure. For light stains, acetic acid is recommended.
The third one is Baxi. There are no special criteria. This is a popular brand with service points in many cities. This way the service is cheaper.
The fourth is Vaillant. Here, as a rule, a copper VT is installed. For light contamination, use citric or acetic acid. In more severe cases, use the drug Aquamax.
Fifth - Beretta. In mild situations - hydrochloric acid. In extreme cases, the drugs Descalex and Remokal, as well as the Hydroflow cleaning system, effectively help.
Sixth – Ferroli. In many cases, adding hydrochloric acid helps. A more effective method: the same acid is heated in a booster to a temperature of 35-40 degrees. The cleansing process starts. This is a budget option. The more expensive one is associated with the use of special drugs.
Seventh - Junkers. Simple stains can be removed with hydrochloric or citric acid, or any anti-scale agent. In complex cases, pumping of the cleaning composition, heated to 50 degrees, with a circulation pump is required.
Eighth - Neva Lux. A citric acid solution is prepared according to the correct procedure, and the extracted VT is placed in it for 10-20 minutes. Then rinses thoroughly. In many cases, this method brings the desired effect. Difficult blockages are removed using a hydrochemical method using a booster.
The ninth is Viessmann Vitopend 100. For simple and complex solutions, any product that does not contain chlorides is suitable. Antox 75 E is particularly effective.
Tenth - Fondital Tahiti. For simple stains, any standard solutions are used (acids, descaling agents, special preparations). If standard solutions do not help, change the seal of the secondary heat exchanger of the Fondital Tahiti gas boiler. If the repeated result is negative, the VT itself changes.
There is a universal method for cleaning parts of all brands - hydrochemical. A booster and pumping system, and special reagents are required.