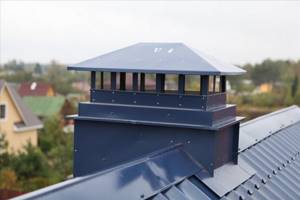
The chimney box is a structure that is mounted from different materials and serves as a heat insulator, as well as additional protection for the chimney pipe. In addition, such a case performs another function - aesthetic, giving the chimney a presentable appearance. If desired, it can be completely or partially dismantled, which is very convenient and functional.
The metal casing, placed on the chimney, performs a protective and thermal insulation function
Why do you need a pipe casing?
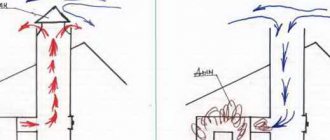
The chimney pipe on the roof is a very important part of the chimney structure. Its location, the material from which it is made, as well as additional devices on the chimney - all this affects the draft performance in the system. This part of the chimney structure is located outside the building, so it is affected year-round by various destructive environmental factors: precipitation, wind, temperature changes.
Regardless of what material the chimney is made of, these factors gradually destroy it, which inevitably leads to a deterioration in draft performance in the system. And as you know, traction is the main indicator that determines the performance characteristics of the system as a whole . Therefore, installing a protective casing on a chimney pipe not only provides its protection, but also extends the service life of the chimney structure.
Let's look at the main functions performed by the box covering the part of the chimney located above the roof:
- such cases protect the chimney from mechanical damage and pipe destruction under the influence of environmental factors;
- covers create an additional margin of safety (this function is especially useful for regions where the wind load exceeds the permissible level);
- thermal insulation of the chimney. Boxes installed on chimneys reduce heat loss, which has a positive effect on draft in the system.
The casing can be used to protect chimneys made of different materials; this element is placed on an already finished pipe
Note! The chimney cover is also a decorative element that can be used to hide an unpresentable structure.
The installation of such casings, as a rule, is carried out after installing the chimney structure, however, this measure is also relevant for old buildings, since it allows you to protect the old chimney from destruction.
How to install the most fire-hazardous section of a chimney: the passage unit
Search posts by tags: just click on the topic you are interested in!
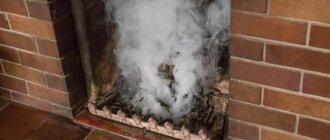
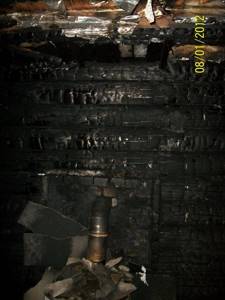
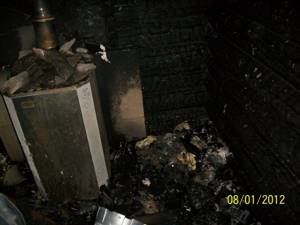
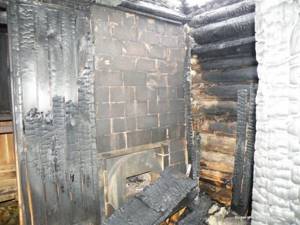
I will talk about the most fire-hazardous part of the chimney: the cutting of the wall - the cutting of the ceiling, aka the passage unit or passage box. Based on what I know from the Internet and from my own experience, illiterate cutting is the cause of most fires. Especially in the baths.
What does the problem look like?
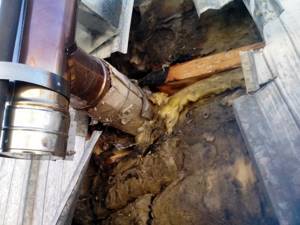
The chimney pipe passes through the wall or ceiling, heats the unit, the wood is charred and, on the second, third or hundred and third kindling, it ignites. Moreover, it flares up meanly - in the attic or from the street. That is, you are sitting in a room, and at this time a building is burning where you cannot see.
Now about why it turns out this way.
1) The passage unit is passed through not with a sandwich, but with a bare pipe
2) The passage box is filled with sand or earth, and not with expanded clay or mineral wool, or at worst with brick broken into small pieces. For those who don’t really understand why sand or soil is not suitable - a video of making coffee on sand
3) cutting was done without. boxes! Very thrifty fire victims like to do this kind of cutting.
So what? Wrap it in asbestos and ok!
4) Make all the mistakes from the first three points at the same time!
It was a good bathhouse, but the stove was expensive!
This is what the cause of the fire looks like - little by little, day after day, a charred beam, which one day bursts into flames
5) Lack of desire to understand how the tunneling is done.
There are 2 types of penetration: Homemade and industrial and 2 categories: Gost and non-Gost.
Determined by guests and snips. If you are interested in reading guest snips, then please do so
- SNiP 41-01-2003. Heating, ventilation and air conditioning.
- GOST R 53321-2009 - Heat generating devices operating
- SP 7.13130.2009 - Heating, ventilation and air conditioning
- SNiP 42-01-02 Gas distribution systems
The Internet is full of links to these materials.
What is the trick of the Gostov passage unit?
- The fact is that it measures one meter by one meter.
- That is, it is really a square in wood with sides 940mm by 940mm.
- You can make the penetration yourself, or you can buy a ready-made one.
- Ready-made Gost penetrations are made only by Teplodar and they are not in demand - it is difficult to cut a square meter by meter into the ceiling of a bathhouse or into the wall of a house without losing the strength of the building.
- Lags can get in the way.
Here is the link to the Gost guide.
Non-GOST ceiling passage for the chimney.
A box half a meter by half a meter with a hole. The bottom is stainless steel, and it itself is galvanized. There are 3 types (no preference).
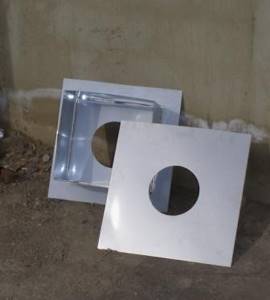
A box made of an oval is cut in exactly the same way as a regular box: a square is cut out on the sides not of the oval, but of the flat part, the device is inserted into it and secured with self-tapping screws.

Any of the non-GOST boxes can be mounted in the following ways:
A picture to attract attention: make sure to mount the unit so as not to burn out!

A) Take Minerite or flama and beat the passage, after which it is inserted into the cutout.
All distances are filled with mineral wool or expanded clay
B) A cutout in the ceiling or wall is lined with mineralite from the inside and only then is the passage inserted.
Well, all distances are filled with mineral wool or expanded clay.
Homemade chimney passages. There are Gost ones: a meter by a meter, and there are non-Gost ones - half a meter by half a meter.
Look up and you will see a homemade passage in the previous photo. Industrial inside - there purely for reinsurance.
It’s even easier to trim the cutout on all sides with mineralite or flama, and cover it with “lids” made of flama and mineralite, the main thing is to cut holes in the “lids” for the chimney.
Remember: it is better to go overboard with the installation of the unit than to underdo it.
If it seems that there is not enough thermal protection, definitely add it.
So now the most delicious thing is what you came here for: to see how the cutting unit is installed!
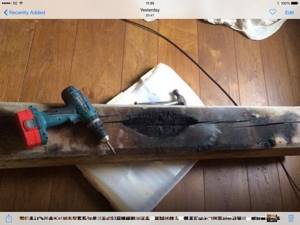
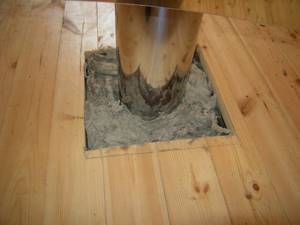
Please note that nowhere inside the wood is coated with thermal protection. But I disassembled my unit in the bathhouse and saw that, despite the expanded clay and mineral wool, there was a little charring of the wood, the penetration was half a meter by half a meter. So I beat it and now I’m calm.
What I advise you to do is line the inside of the cutout with thermal protection, and then insert the box.
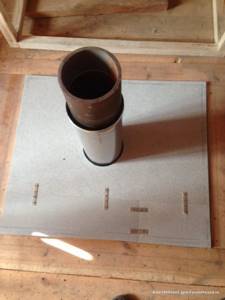
Installation of a Gost chimney - pay attention to how huge the hole is. But another passage would not have fit - the diameter of the fireplace is 200mm!
Installation of non-GOST pass-through.
Please note: the bend was necessary so that the wood would not catch fire, and also so that if the chimney stood in a straight line, it would vomit snow, because the angle of the roof is very sharp
Same thing in the photos:
Now let's see what not to do
You can’t just stuff mineral wool into a hole in the wall, like this:
Mineral wool sinteres, collapses and crumbles: see for yourself what happens to mineral wool
Here's a test video!
If you carefully read everything that is written above, then after watching the video you will find editing errors yourself.
If you haven’t found it, it’s better to re-read everything again, you’ll be safer.
I found a photo of a perfectly made, in my opinion, non-GOST pass-through unit bought in a store. I’m silent about the photo of the pipe, because it’s not related to the topic.
The passage is made on the basis of such a box
It is sewn up not with a stainless steel lid, but with a sheet of mineralite, this is probably at the request of the owner
Or maybe they put a lid on top.
In short, do what you saw, so do it.
Here’s another person who burned down due to a tunnel, as he himself writes
Types of casings for chimney pipes
Today, the most popular are two versions of such casings. Let's look at them:
- galvanized pipe casing;
- corrugated cover, which is made of stainless steel.
A chimney casing made of galvanized steel sheet is the most popular. Galvanization has high fire resistance, corrosion resistance and a long service life. The galvanized casing is easy to install, which is also a very important factor influencing the popularity of this product. Such products are made from galvanized steel sheet with a thickness of 0.45 mm.
A corrugated stainless steel case is also easy to install and has one very important advantage - the design of the corrugated box allows it to be bent and given the required shape, which is very convenient. This casing is resistant to corrosion and temperature changes.
It is best to use chimney casings that are made of corrosion-resistant metal
Protective cases can serve as thermal insulation for the chimney. Casings for thermal insulation of chimneys can be made from different materials yourself. Consider these materials:
- galvanizing;
- roofing iron;
- aluminum;
- plastic;
- profiled sheet;
- slate.
When insulating a chimney on a roof, it is necessary to use suitable thermal insulation material. The heat insulator is selected individually for a specific situation. When choosing a thermal insulation material, it is worth considering the following indicators:
- chimney pipe material;
- heating temperature of the chimney on the roof;
- temperature stability of thermal insulation material.
The thermal insulation material must be resistant to the heating temperature of the chimney to avoid ignition. You need to be especially careful when choosing a heat insulator if you are installing a casing made of polymer material. A plastic pipe box is easy to install, however, it is considered the least safe option, so you need to ensure the necessary thermal insulation of the chimney, taking into account all fire safety rules and regulations.

The protective structure can have a decorative finish
Features of furnace installation depending on the material
According to the shape and design of the furnace, there are:
- horizontal;
- vertical;
- cylindrical;
- rectangular.
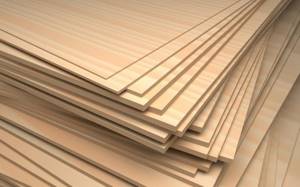
They are made from:
- cast iron;
- metal (steel, iron);
- bricks
Some models are equipped with a grid for stones and a tank for heating water.
Cast iron
Cast iron is an alloy of metal (iron, graphite, carbon). This is an environmentally friendly and safe raw material.
Advantages of a cast iron stove:
- Long service life - 30 years or more.
- The creation of the structure does not involve welding. The absence of seams has a positive effect on the quality and service life of the product.
- The material is highly resistant to temperature changes. He is not afraid of deformation.
- Heating rate. Cast iron heats up quickly and retains heat well. Such a stove can heat a large sauna in 2–3 hours. One load of fuel lasts up to 9 hours of heating.
- The device is assembled from individual elements connected to each other by locks. If one part breaks, it is easy to replace.
- A cast iron stove will fit perfectly into any room design.
Among the disadvantages of the unit:
- Heavy weight. It will not be possible to install such a structure alone. Its average weight is 200 kg.
- It is susceptible to corrosion, so it is not recommended to place such a stove directly in a steam room.
Any cracks or damage to the product must be repaired in a timely manner to prevent a fire.
The stove will look great in the dressing room or rest room.
Steel (iron)
Among owners of summer cottages and country houses, metal stoves are in great demand due to the availability and low price of the material compared to other types.
Advantages of metal stoves:
- Light weight of the finished product - from 80 kg.
- Many stove models do not require a separate concrete foundation to be poured.
- The oven will be easy to install. One person can handle this.
- Compact size - it won't take up much space.
- The metal heats up quickly, releasing heat, reducing fuel consumption.
- The housing is completely sealed. The risk of carbon monoxide leakage is minimal.
- Affordable price of finished products.
- You can make the oven yourself.
Among the disadvantages of the device:
- Rapid cooling of metal. To maintain a comfortable temperature in the premises, you will have to constantly heat in winter.
- Strong heating of the metal dries out the air.
- Hot surfaces not protected by partitions can cause burns.
- Steel and iron in conditions of constant humidity without additional protective treatment will quickly begin to rust.
In bathhouses with wooden floors, additional protection should be given to the areas around the stove by installing a covering made of non-combustible materials. The same applies to products with 4 legs. The floor underneath them, without protective flooring, will gradually collapse.
Brick
The furnace is laid with refractory bricks (fireclay), and the finished product is lined with ceramic.
Advantages of a classic heater:
- Long-term heat retention.
- Fire safety.
- Ability to heat large areas.
- Soft water vapor is produced.
- The building warms up evenly and gradually.
- The material is non-flammable and resistant to temperature changes.
- Durability. A properly laid stove will last for decades.
But this design also has disadvantages:
- Difficulty of masonry. Without knowledge of ordering technology, it is not worth taking on construction.
- High cost of materials and work.
- The large weight of the finished product requires pouring a reliable foundation.
This material will be useful:
- Installation of a foundation for a brick oven
- Which brick for the stove is better to choose?
Decor of a steel box for a chimney pipe
Pipe casings are not only functional structures, but also, as mentioned above, affect the exterior of the structure. Today you can easily order a product that will decorate your home and will delight the eye for many years. If we compare the metal box for the chimney pipe with casings made of other materials, then it is the least presentable.
However, this problem can be easily solved with the help of special decorative coatings, which can be purchased at any specialized store or ordered with home delivery using the Internet. Decorative coating for metal casings will give your box a presentable appearance. Today you can find a wide variety of colors and textures of such coatings, so everyone can choose the right option for themselves.
A decorative coating consisting of a polymer material must be applied to the metal. Polymer material imitates the structure of another material (wood, stone, etc.). The use of such decorative coatings allows you to create a brickwork pattern on a metal casing, while a real brick pipe will be reliably protected by this casing from environmental influences.
Tips and tricks for choosing
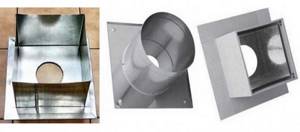
The choice of duct is determined by the type and size of the chimney. The main selection criterion is the diameter for the passage of the pipe.
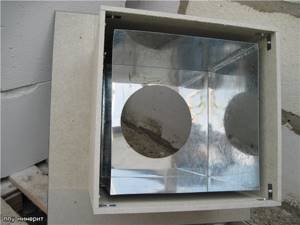
For the passage unit in the ceiling, a product is selected that consists of a stainless steel plate and a neck, the diameter of which is slightly larger than the chimney.
The design of the stainless steel platform is quite suitable for mounting on the ceiling of the house.
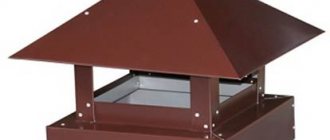
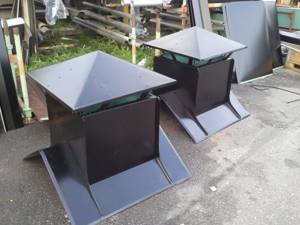
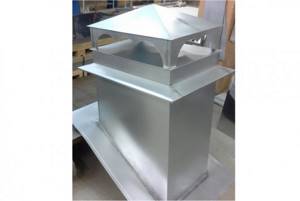
The photo shows the main configurations of manufactured boxes:
The roof box shown in the bottom photo can be purchased according to predetermined dimensions or ordered to be manufactured.
The cost of finished products varies from 550 to 1900 rubles and more.
Installation of the steel case
A steel case is the most common option for organizing a protective casing for a chimney. Let's consider the process of installing a steel casing on a chimney:
- The case can be purchased or made with your own hands using a steel sheet, profiles and ordinary self-tapping screws.
- The steel casing is installed on the main pipe.
- At the third stage, the space between the main pipe and the casing is filled with thermal insulation material, which must be selected based on the heating temperature of the chimney.
- Finally, the case (made of galvanized or stainless steel) must be painted with oil paint.
The casing can be secured with self-tapping screws, and to protect against rust it is recommended to paint the finished structure
Painting a steel case is necessary in order to give it a presentable appearance. As mentioned above, for this you can use a more expensive, but also more beautiful option - a polymer decorative coating.
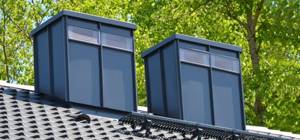
Elements of modular systems
To draw up an installation diagram, purchase components and subsequent assembly, you need to understand what parts are used in a double-circuit chimney. We list the main elements, accompanied by photographs:
- straight sections of sandwich pipes 25, 50, 100 cm long;
- tees at 45, 90°;
- elbows 90, 45, 30 and 15 degrees;
- transitions from a single-wall pipe to a double-wall pipe - “start sandwich”;
- rotary gates (flaps);
- condensate collectors and various heads;
- ceiling passage units (abbreviated PPU);
- support platforms, brackets;
- fastenings – crimp clamps for guy wires;
- pitched roof sealing elements called master flash or “kryza”;
- end caps, skirts.
Double-layer pipes are connected to other fragments using the socket-profile joining method. In a more accessible language, the connection is called “tenon-groove” or “male-male”, as you like. When manufacturing each shaped part (except for the end parts), a tenon is provided on one side and a groove on the other.
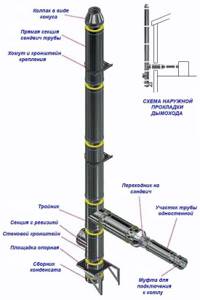
Scheme of installing a chimney along the outer wall of a country house
As an example, we suggest considering the assembly diagram of a wall-mounted sandwich chimney starting from the boiler:
- We connect a single-wall pipe to the output of the heat generator through a coupling, then mount the starting adapter onto the sandwich.
- We connect to the transition a straight section of a double-circuit pipe facing the street. There it is inserted into the tee.
- Below the tee we place an inspection section, then a support platform and a condensate collector. The structure is placed on a wall bracket.
- We rise from the tee in straight sections, fasten it to the wall every 2 meters with sliding brackets, and compress the joints of the elements with clamps.
- At the end of the chimney we install a cone without an umbrella (for a gas boiler), a simple cap or a deflector.
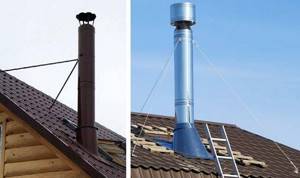
When you need to get around the roof overhang, we use 2 bends at 30 or 45 degrees. We secure the end of the chimney with guy ropes so that it does not sway in the wind, as was done above in the photo. Watch the video for professional installation of a sandwich pipe for a steel furnace:
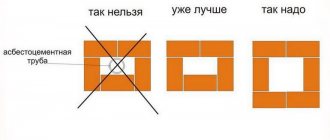
Installation of a duct for an asbestos-cement chimney
Let's look at how the casing is installed on an asbestos-cement chimney pipe:
- First of all, it is necessary to prepare the pipe for installation of heat-insulating material and duct. To do this, it is necessary to clean it from dust and dirt.
- At the second stage, you need to place the thermal insulation material in a case made of galvanized steel or roofing iron. Mineral wool can be used as a heat insulator. Thermal insulation material is located along the entire length between the casing and the pipe.
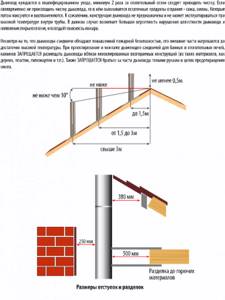
Helpful information! When choosing the cross-sectional indicator of the casing, one important factor must be taken into account, namely, the distance between the casing and the chimney pipe must be at least 6 cm. This space is necessary for the free placement of heat-insulating material.
- The upper part of the pipe is mounted with a slight slope.
- The niche between the asbestos-cement chimney and the pipe must be filled with cement mortar. Concrete grade M-150 is perfect for these purposes.
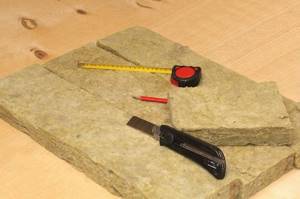
Mineral wool can be used to fill the space between the pipe and the casing
It is recommended to assemble such a case from several parts. This is a necessary measure to simplify the installation of the heat insulator.
Frequent errors and problems during installation
Violation of the standard dimensions for the placement of the duct and smoke ducts in the ceiling opening, which leads to conflict situations with the fire service.
An umbrella that is too large and installed on the top can cause brown streaks on the roof. Condensation formed on its cold surfaces all winter. The area of the umbrella must be reduced.
The same situation can arise with a metal box on the roof that immediately covers the smoke and exhaust ducts. Expanded clay poured to the edges of the channels in this casing will help.
A wide gap between the pipe and the penetration - as a result, the laid fine expanded clay falls down.
Using penetration without backfilling with thermal insulation material. There is practically no protection.
Box for brick chimney
For a brick pipe, you can choose a standard galvanized steel cover or another option. For example, plastering a brick chimney over a heat insulator. Let's look at this process step by step:
- First you need to clean the brickwork of the pipe from dirt and dust.
- Next, you need to install metal profiles on the chimney. For this, ordinary dowels are used. First of all, you need to fix the upper and lower profiles, and then insert the racks into them. The racks are fixed using self-tapping screws.
- At the third stage, the installation of thermal insulation material is carried out. It must be placed between the gratings and secured with special dowels with “skirts”. The heat insulator must completely cover the surface of the brick chimney.
- Then the thermal insulation material must be covered with a vapor barrier material, which is represented by a special film.
- At this stage, it is necessary to fix the plaster mesh over the vapor barrier film. The mesh must fit tightly to the surface, so the use of dowels with “skirts” is recommended.
- The chimney is plastered with pre-prepared cement mortar. The plaster must be applied in an even layer over the entire surface of the structure.
After the layer of plaster has dried, you can line the chimney with decorative tiles or galvanized sheets.
For the box, you can use wooden, plywood panels, fiberboard or chipboard, but they must be protected from moisture by an external coating
Basic Rules
If your home has heating, you will need to create optimal conditions for removing flue gases. There are several ways to remove the pipe depending on the installation location. Its choice is influenced by many factors, and the chimney can be installed:
- in the ridge itself;
- at a distance from him.
Each of the described methods has its own differences and features, but preference is given to installation according to the second option. To maintain the required draft force, the total height of the smoke channel must correspond to the limits of 5-10 m.
Box made of wooden panels
A case of wooden shields can be made in two ways. Let's consider the first method:
- First of all, you need to make a wooden frame, focusing on the dimensions of the chimney pipe.
- Next, the finished frame is covered with slate.
- At the third stage, wooden panels are installed around the pipe.
- Finally, it is necessary to fill the space between the metal pipe and the wooden panels with thermal insulation material. The following can be used as thermal insulation material:
- glass wool;
- slag;
- dry land.
Let's consider the installation technology of the second method:
- Wooden panels are mounted around the pipe, forming a box. The distance between the metal pipe and the wooden board should be at least 5 cm (preferably 10).
- At the second stage, the internal seams are faced. For this you can use asbestos sheets.
- Next, slate is mounted on asbestos sheets.
- At the fourth stage, you need to cover the external seams of the box made of wooden panels. For this you can use cement mortar.
- Next, slag concrete slabs are installed (at a short distance from the metal pipe).
- The slabs must be reinforced using ordinary wire.
- At the end, the space between the plates and the pipe is filled with mortar. For the solution it is necessary to use gypsum and clay.
Protecting the chimney from destruction under the influence of natural factors is an important measure that will extend the life of the chimney. For the protective box, you can use different materials that are available to any craftsman today.
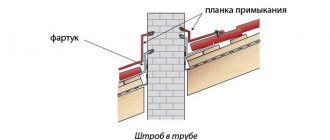
Fighting joint leaks
To create the maximum possible tightness of the junction of the roofing material and the pipe at the points of contact, an internal apron is made using the lower strips.
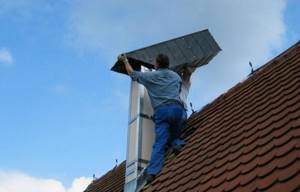
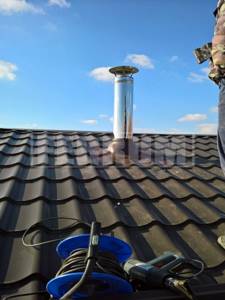
Installation of a chimney passage through the roof.
To make an internal apron, you need the following tools:
- marker;
- long metal ruler;
- grinder with a disk 2 mm thick;
- pliers;
- hammer.
In order to do this, the plank is applied to the walls of the chimney pipe, making marks for the top of the plank. The next step is to punch a groove along the previously marked line.
Installation of the inner apron should start from the bottom wall. The edge of the apron is inserted into the groove, after which it is installed on the remaining walls. The overlap should be 15 cm. Then the edge of the film inserted into the groove is sealed. Having trimmed the lower strips, they are installed and then secured with self-tapping screws.
After installing the lower apron, you can begin installing the tie, which is a sheet of waterproofing material placed under the elements of the inner apron from below. The main function of a tie is to drain water.
After completing the installation of the tie and apron that protect the joints, the roofing material is laid. Then the outer apron is installed. To do this, use the upper abutment strips.
The installation of the apron on the outside is similar to the installation of the apron on the inside. The difference is the absence of a groove and the upper edge is fixed directly to the chimney wall.
Important: today the building materials market offers products that are designed specifically for chimneys with a round cross-section. They are roofing passages that consist of a base (flat steel sheet) and an apron cap. A circular chimney is installed inside the passage.
A circular chimney is installed inside the passage.