Heating appliances are a necessary attribute of any residential building, providing a comfortable temperature for living during the cold period, which in most regions of Russia lasts 9 months. However, additional comfort comes with a certain degree of fire risk. Therefore, special attention is paid to the chimney, through which smoke and combustion products are removed from the heat generators and discharged outside the room. This article will tell you how to remove a chimney through the roof in compliance with all safety requirements.
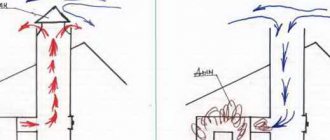
Consequences of poor installation
As a rule, the work of a stove maker or gas equipment installer does not include chimney installation services; the homeowner must ensure the passage of the chimney pipe through the roof independently. The imaginary simplicity of the task makes home craftsmen refuse the services of professional roofers. However, poor-quality pipe installation on the roof can have serious consequences:
- Through an unsealed pipe passage, moisture seeps into the masonry, gradually destroying the brick chimney.
- High humidity inside the chimney pipe stimulates the spread of mold and mildew. Spores of some types of fungus are dangerous to the human condition, so it is unsafe to use an infected tube. In advanced cases, both the chimney and the stove masonry must be replaced
- The penetration of water into the passage of the chimney pipe through the roof reduces the thermal insulation properties of the insulation by half. Moreover, after the thermal insulation layer dries, its characteristics will never return to their previous level.
- Even the rafter system suffers from poor-quality pipe removal through the roof, since moisture penetrating into it through a leaky passage leads to rot and destruction.
- Gaps near the pipe passage disrupt the normal air circulation inside the attic, leading to increased energy losses and heating costs.
By the way, not only stove chimneys are brought to the roof; pipes from gas boilers and ventilation outlets are also placed there, for the installation of which the same methods are used.
How to seal a chimney on a slate roof
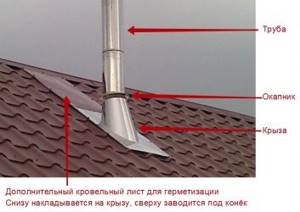
Bringing a pipe or ventilation shaft through the roof involves making a hole in it. When a pipe passes through, there always remains a gap, which, even at its lowest value, will allow moisture to pass through. Today we’ll look at how to achieve perfect tightness at the junction of the pipe and the roof and how to seal the resulting gap between the pipe and the roof.
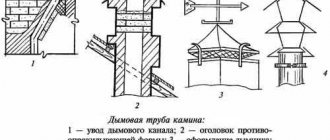
Choosing the location of the chimney outlet and its height
The first condition for a high-quality pipe outlet through the roof is the correct placement of the chimney on the roof. The functioning of the entire heating system depends on this factor, therefore, in order to avoid errors, installation is carried out in accordance with construction and fire safety requirements:
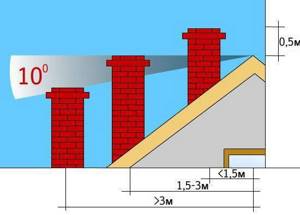
Scheme of standards for placing a chimney on the roof
- Chimney pipes are placed in close proximity to the highest point of the roof, at a distance of 1-1.5 m.
- The recommended height of the chimney relative to the roof ridge to ensure normal stove draft is 0.5-1.5 m.
- The greater the height of the chimney, the greater the draft force in the stove or gas boiler it provides.
- The lower the pipe is located on the slope, the longer its length must be so that the recommended height of the chimney above the roof complies with the recommendations.
- Parameters such as chimney height and cross-sectional diameter are selected according to the recommendations of the manufacturer of the thermal generating device or based on calculations.
- The chimney consists mainly of vertical sections of pipes; the length of horizontal segments should not exceed 1 m.
- The outlet location is placed between the elements of the rafter system so as not to violate its integrity.
The main difficulty of passing a pipe through the roof is that during the passage of smoke, the temperature of the walls increases, which creates a risk of fire of flammable materials in the rafter system.
Elastic penetration
Most often in private construction they are faced with the installation of round metal pipes. To ensure the tightness of the passage, a special device is used - an elastic penetration. This is a product made of high-strength silicone or rubber, shaped like a funnel with a wide flange in the form of a square or circle, called an apron. Thanks to its properties, the elastic penetration takes any shape, adapting to the angle of inclination of the slope. It can withstand extremely high or low temperatures, exposure to aggressive chemicals and comes in a wide range.
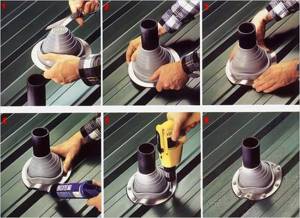
Installation diagram of elastic penetration
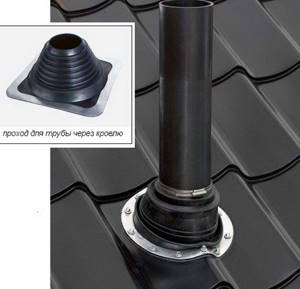
Elastic penetration on a metal chain
When purchasing an elastic penetration, they are guided by the diameter of the pipe and the color of the roofing material. Universal models, in the form of a stepped pyramid, are suitable for any size; adjustment is carried out by trimming the penetration to the desired level. Installing an elastic apron on the roof is very simple, you need to place it on the chimney passage, apply a metal circle with holes for fasteners, treat the joint with fire-resistant sealant and secure it with a screwdriver. For roofs with steep slopes, a special type of plastic penetrations with a specified flange mounting angle is used.
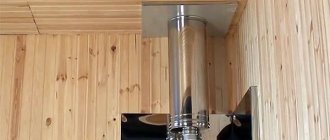
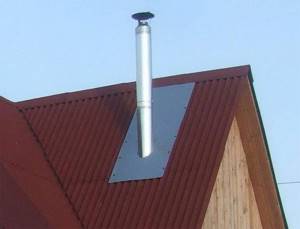
Metal feedthrough
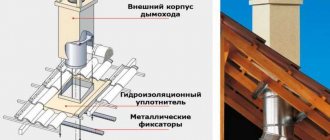
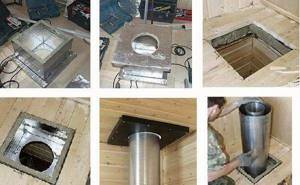
In hardware stores you can find another type of penetration for round pipes - a metal feedthrough. It is used to pass a chimney through a roof that does not have a relief. Finished alloy steel pipes have a standard roof angle, which is adjusted to the roof slope. To perform installation, you must:
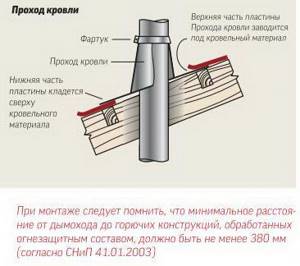
Installation diagram of the passage pipe
Cut a hole of a suitable shape in the roof. To do this, markings are applied to the roof surface using a marker. Depending on the roofing material, cutting is performed with a grinder or sharp scissors, retreating 1-2 cm inside the circle.
- Remove the waterproofing and thermal insulation material from the hole made, freeing the passage for the chimney. If necessary, remove the sheathing elements by carefully sawing them off.
- On the underside of the roof, secure a sheet of fire-resistant material with a hole of the required diameter of such an area that there is a margin of 15-20 cm on each side of the chimney.
- Insert the pipe module into the hole, connect it to the laid chimney, tightening the connection with a clamp.
- Place the outlet pipe onto the pipe, securing it to the surface of the slope with fire-resistant sealant and self-tapping screws with a rubber cap.
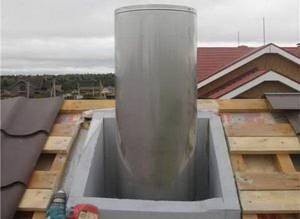
- Add new segments to the pipe so that the height of the chimney exceeds the level of the ridge by 0.5-1.5 m.
Roof passage made of corrugated sheets
Some craftsmen prefer to use a different method - they solder a chimney pipe into the passage pipe in advance, line it with thermal insulating material, for example stone wool, and only then install this structure into the passage.
Self-installation
You can assemble sandwich ventilation yourself, without professional help. To do this, you need to prepare all the elements of the pipeline and become familiar with the stages of the work.
Main details of the chimney:
- Knee at 90 degree angle.
- Adapter for connecting pipes to a furnace or boiler.
- A part with a sealed lid through which the system can be cleaned.
- Tee for transition from horizontal to vertical.
- Mechanism for draining condensate.
- Tee with 45 degree angle.
- If you need to get around difficult places, bends at an angle of 45 degrees.
- Plug to protect the pipe insulation from moisture.
- Clamps for strengthening the connections of individual elements.
- Brackets for fixing pipes on walls.
- Main elements (depending on the length and complexity of the pipeline).
- Cone roof.
- The cone that covers the end of the chimney.
After purchasing all the parts, you can start preparing.
Before installing sandwich chimney pipes, preparation must be completed. It includes several actions:
- Draw the finished pipeline on a piece of paper. Consider where it will change direction to bypass other communications.
- Make a hole in the roof, walls, ceiling. In these places the surfaces need to be strengthened.
- Mark the chimney circuit.
- Install support elements.
Types of connection
Often, when installing a chimney, the pipes are connected “into a socket.” To seal the joints, a special heat-resistant sealant is used. To strengthen connections, you can use special couplings.
There are two options for the location of the sandwich pipe:
- Chimney outlet through the roof. A standard method that involves creating holes in ceilings and roofing.
- Exiting the chimney from sandwich pipes through the wall. This allows you to reduce the load on the floors, but requires more materials for the manufacture of the pipeline.
Once a location has been selected, the number of parts required to construct the system can be accurately calculated.
The chimney is brought out through the wall
The procedure for assembling a sandwich chimney:
- When the holes in the ceiling and roof are made, you can begin assembly. First of all, a special adapter is installed between the heating equipment and the pipe.
- The remaining elements are installed up to the ceiling.
- A special adapter is fixed in the hole, which has two plates and a pipe.
- Where the roofing material pipe exits, a conical roof or stainless steel sheet with a hole must be installed.
- All joints, connections, and chimney outlets must be sealed. For greater protection against fire, it is necessary to additionally insulate the ceilings, the place of contact with the roof.
- The extension of pipes above the roof is calculated according to SNiP.
If you need to connect a sandwich pipe to an old brick chimney, you need to buy a special adapter. Upon completion of work, you should check the reliability of holding the integral structure with brackets and tighten the clamps. Perform a system leak test. To do this, just ignite a small amount of fuel and wait 15–20 minutes. Inspect all joints for smoke leaks.
What do you need to know when choosing a stainless steel chimney (sandwich chimney)?
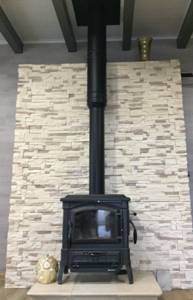
Sandwich pipes are gaining more popularity over time. This is due to their reliability, resistance to atmospheric conditions, and tightness of connections. Simple installation allows you to save on the help of professionals. For the owner of a private house, it is enough to choose the grade of steel, type of insulation, buy all the elements of the pipeline, and carry out the work according to the instructions.
The chimney can be installed both in the stove and in the heat exchange tank. You can place it indoors and take it outside in any way you like: into the side wall and up, directly into the ceiling, etc. The main thing is that there is traction.
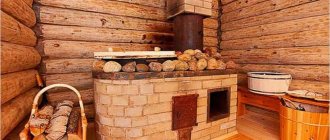
In order to use the stove in the bathhouse as economically as possible, a metal pipe runs directly from it, onto which a sandwich is already mounted. The temperature in this pipe is practically no different from the temperature of the stove, so this system is more profitable. To make the radiation softer, but the heat not decrease, a mesh is made on the pipe into which stones are placed. They will also dry out the steam room well after the stove goes out.
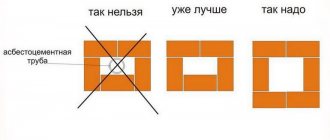
Output of rectangular and square pipes
The chimney of stoves and fireplaces made of brick is most often square or rectangular in shape, so other methods are used to bring it to the roof. This task is for an experienced stove master, and not a home craftsman, because the process uses a special masonry technique. When the chimney approaches the roof, a hole of the appropriate size is cut out in it with an allowance of 2-5 cm, through which the stove maker brings the pipe to the roof. Although heat-resistant brick perfectly retains heat inside the pipe, the inside of the passage is lined with asbestos sheets to protect the rafters from fire.
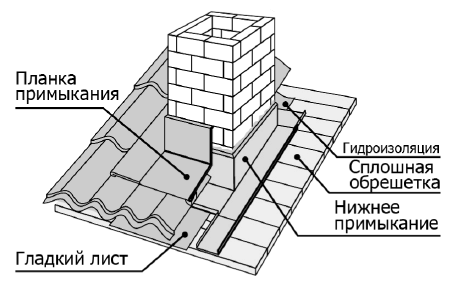
Installation diagram of a decorative additional apron
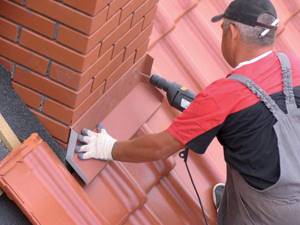
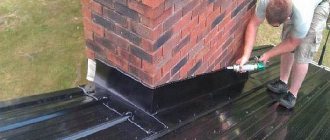
Installing a decorative outdoor splashback
A soft waterproofing tape on a lead or aluminum base is attached to a brick pipe using a metal profile, the lower edge of which is fixed to the roof using sealant. After this, the unsightly waterproofing is covered with a special decorative apron. It consists of four additional parts and is installed under the roofing material, making the passage neat and well protected.
Attachment option
This type of connection of the chimney to the OP is conventionally called an economical option, since the installation of the entire system requires less fasteners when compared with other types of connections. Here the pipe stands and rests directly on the heating device. The connection is simple, but has serious drawbacks. In the mounted version, flue gases are removed by direct flow from the furnace. Because of this, excessive draft is created, which makes the fuel combustion process uneven and also increases its consumption.
Top-mounted chimney connection option
The next problem with a top-mount connection is condensate drainage. During the operation of heating devices, condensate forms, which must be removed from the firebox. Otherwise, condensation or moisture from atmospheric precipitation will fall directly into the firebox, which will lead to a reduction in its service life or destruction. And while a windproof umbrella will protect you from precipitation, there is practically no protection from moisture condensing in the channel.
Another disadvantage of a push-on connection is that it makes cleaning the chimney system more difficult. In this case, to clean the chimney, you need to dismantle the lower elements and securely fasten the upper part of the pipe. Another option is to remove soot from the firebox, if, of course, such a function is provided in the heating device. All this leads to an increase in the cost of cleaning and maintaining the diesel engine.
Installation of the outlet box
The roof structure consists of layers of several materials, the fire-resistant qualities of which are expressed in different ways. While most roofing materials do not burn or support combustion, a rafter system traditionally made from wood does not have such properties. In order to safely remove the chimney pipe through any material, install a passage box:
Output box installation diagram
Exiting the pipe through an asbestos outlet box
- The first step is to purchase or make a box from a fire-resistant material, for example, metal or asbestos. The size of the box is selected in accordance with the cross-section of the pipe, so that there is at least 15 cm between their walls.
- After making the hole, a box is installed in it, the upper edge is aligned with the level of the roof slope.
- Exit the chimney through the hole in the passage box. The edges of the waterproofing film and vapor barrier are glued to the pipe using fire-resistant sealant and reinforced tape.
- Expanded clay is poured inside the box or stone wool is laid to thermally insulate the chimney. Thermal insulating materials are placed taking into account that they should not impede air circulation.
- The outside of the chimney pipe, depending on the shape and roofing material, is finished using an elastic penetration, a decorative apron or a metal pipe.
A high-quality chimney outlet does not spoil the appearance of the roof, does not allow moisture to pass through, and is safe from the point of view of fire safety standards. Follow the correct technology for passing tubes through ceilings to protect yourself and your property.