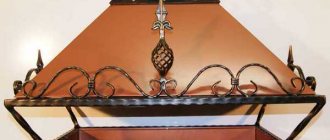
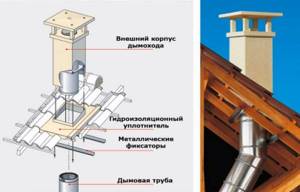
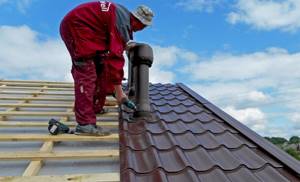
Passage through metal tiles
Metal tiles are sheets of steel, copper or aluminum, which are coated with a polymer layer. In appearance they resemble natural tiles, which are folded in even rows. This roofing material is very popular. If a round pipe is to be passed through the metal tile, flexible adapters are used, which we have already described. When using a square or rectangular brick pipe, a different method of installation is used. It is as follows:
- The connecting unit is being manufactured. It consists of two aprons - internal (main) and external (decorative). The material of manufacture is thin aluminum sheet or tin.
- Before the metal tiles are laid, an internal apron is installed on the sheathing. These are 4 strips located on 4 sides of the pipe. They simultaneously extend under the metal tile (no less than 250 mm) and onto the pipe (no less than 150 mm).
- The apron elements are installed in a groove - a groove that is cut along the perimeter of the pipe to a depth of 10 to 15 mm. The groove is cleaned and filled with fire-resistant sealant.
To install an apron, you need to make a special groove in the pipeSource experttrub.ru
- The apron is attached to the pipe using heat-resistant dowels. The joints between the four planks are soldered. On the slats that are located on the sides, sides are made, the purpose of which is to drain water down.
- The lower part of the apron is installed on the so-called tie - a sheet of metal with sides. This ensures water drainage from the chimney to the bottom of the roof. The width of the tie should be greater than that of the pipe by at least 0.5 m on both sides. Its length depends on the distance from the pipe to the edge of the roof.
- After installing the tie and interior apron, the metal tiles are laid.
- An external apron is installed on top. It is usually a corrugated sheet of lead or aluminum. There is a decorative strip in its upper part. It is attached to the pipe using self-tapping screws. The attachment point is slightly higher than parts of the inner apron. Before fixing the decorative strips, the fastening points are coated with sealant. To attach the corrugated sheet, its back side is provided with a self-adhesive coating.
Finished chimney pipe passed through a metal tileSource tproekt.com
Installation of square or rectangular pipe
Such pipes are most widespread. This is due to the fact that their installation is the simplest. In most cases, the chimney is located strictly vertically.
However, sometimes it may be necessary to adjust the location of the roof exit. In this case, an additional horizontal section is used. In the place chosen for access to the roof, a roofing pie is cut. The structure described above is installed here.
A steel sheet is placed on the attic side. It must have a hole corresponding to the cross-section of the pipe. After the box has been installed, it is necessary to protect the structure from precipitation.
The inside of the box is lined with basalt wool or asbestos sheets. The protective and decorative joint is attached to the pipe using self-tapping screws. The joint around the perimeter of the pipe is filled with a special fire-retardant sealant.

Next, install the inner apron. For this purpose, strips of galvanized steel are used. For them, grooves are made on the brick pipe. They should go along the brick and not get into the joints. The side slats at the bottom should have sides along which atmospheric moisture will flow.
To make the pipe look nice, you can use a metal apron for the entire part of the pipe located above the roof.
Installation stages
How to install a chimney through a wall? Installation begins from the heating device with the connection of the pipe and the boiler, and then proceeds directly to the installation of the structure. How to bring a chimney through a wall? To do this, prepare the place for its passage by first marking it and then making a hole for the passage pipe.
The next stage is installation of the pipe. It is mounted in an opening made in accordance with its dimensions with mandatory insulation of foiled mineral wool.
And then comes the process of connecting the chimney to the heating apparatus. A 3-section elbow is taken and connected to the tee using a transition element.
How to make a chimney through a wall if you need to change its direction? In this case, a tee with a cleaning glass is used, which is easy to dismantle for subsequent cleaning. It is fixed with a bracket.
Then the gas exhaust pipe is fixed on the wall surface with a special fastener with a gap between elements of no more than 2 m.
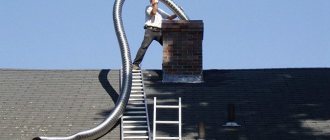
Watch the video of a pipe passing through the roof:
The last stage is the removal of the structure through the roof overhang. In this case, you need to know that at the outlet point it is not allowed to join the pipe elements with each other. Upon completion of installation work, a protective umbrella is installed over the chimney to prevent precipitation from entering the structure.
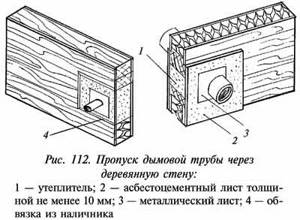
Features of making a chimney through a wooden wall

If it is necessary to install a pipe through a log structure of a building, it will require mandatory insulation with non-combustible material (asbestos or brick).
This is done in accordance with fire safety rules and will allow you to operate the gas exhaust system for a long time with minimal maintenance and repair costs.
The best option is vertical installation of the chimney through a wooden wall, which involves the use of one pipe without bends or turns. To adjust the draft, a gate is installed in it.
The chimney is fastened at regular intervals not exceeding 1 m, and the neck is covered with a protective cap.
And remember that installing a gas removal system is a responsible procedure that requires thorough preparation. After all, the functionality and efficiency of the entire system depends on its correct implementation.
Advice from professionals
Before purchasing and installing a combustion product exhaust system, it is necessary to determine the power of the heating apparatus. The diameter of the pipe depends on it.
Calculation of the height of the structure is carried out to obtain good traction, without which effective operation of the equipment is impossible. A chimney passing through a wall cannot be either too short or too long.
In the first case, smoke and soot will enter the room, and in the second, fuel will be quickly consumed. With high draft, the operation of the equipment becomes ineffective, because heat is removed from the room along with the gases.
To avoid such situations, experts recommend performing all work taking into account existing norms and regulations. The chimney should be connected to the boiler using the appropriate elements - an elbow, a tee or a pipe.
And those who install heating equipment in an already built house should know that the classic installation option will be very difficult to do. In this case, the best solution is to lead the chimney through the wall and install the pipe outside the building.
This design requires mandatory insulation, because with strong heating, temperature loads will lead to the destruction of the wall.
And it can be done in two ways:
- Using a telescopic assembly for the passage of a chimney through the wall (a pipe with a diameter larger than the main one, along the edges of which protective plates are installed)
- In filling the space between the wall and the structure with mineral wool (used only when laying insulated pipes)
Conclusion
A chimney in a load-bearing wall is the simplest and relatively inexpensive option for a finished house. It will relieve the owner from difficulties in passing the chimney through the roof and interfloor ceilings and will allow all work to be completed in a shorter time.
The main thing is to choose the right design parameters and connect them. Indeed, with the slightest mistakes made during the installation process, the operation of all heating equipment can become ineffective and sometimes even dangerous.
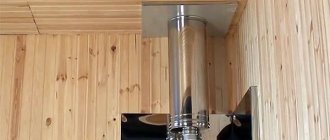
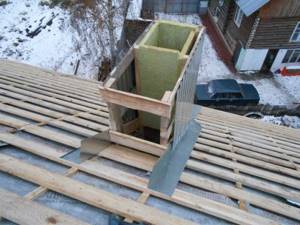
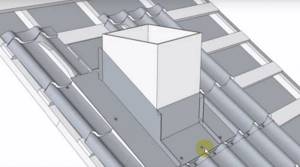
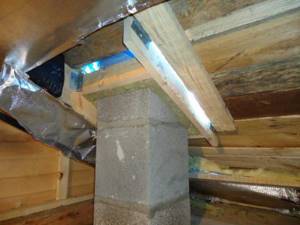
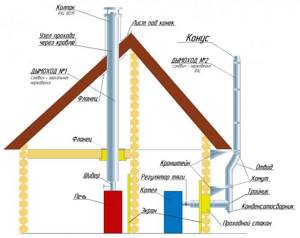
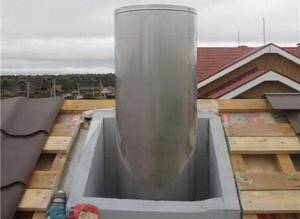
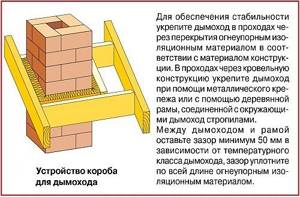
Installation of the outlet box
The roof structure consists of layers of several materials, the fire-resistant qualities of which are expressed in different ways. While most roofing materials do not burn or support combustion, a rafter system traditionally made from wood does not have such properties. In order to safely remove the chimney pipe through any material, install a passage box:
Output box installation diagram
Exiting the pipe through an asbestos outlet box
- The first step is to purchase or make a box from a fire-resistant material, for example, metal or asbestos. The size of the box is selected in accordance with the cross-section of the pipe, so that there is at least 15 cm between their walls.
- After making the hole, a box is installed in it, the upper edge is aligned with the level of the roof slope.
- Exit the chimney through the hole in the passage box. The edges of the waterproofing film and vapor barrier are glued to the pipe using fire-resistant sealant and reinforced tape.
- Expanded clay is poured inside the box or stone wool is laid to thermally insulate the chimney. Thermal insulating materials are placed taking into account that they should not impede air circulation.
- The outside of the chimney pipe, depending on the shape and roofing material, is finished using an elastic penetration, a decorative apron or a metal pipe.
A high-quality chimney outlet does not spoil the appearance of the roof, does not allow moisture to pass through, and is safe from the point of view of fire safety standards. Follow the correct technology for passing tubes through ceilings to protect yourself and your property.
How to cover a roof with your own hands - step-by-step installation
Stage 1. Installation of ondulin on the roof begins with equipping the rafters with lathing on top of the previously laid vapor barrier film. The same vapor barrier can be installed from the attic side. To fill the gaps in the sheathing, insulation is used, covered over the rafters with a waterproofing film. A counter-lattice is installed on top of the sheathing, which makes it possible to create a technological ventilation cavity.
Stage 2. Do-it-yourself installation of an ondulin roof starts from the first row, from the roof slopes. It is better to choose the leeward side for this to avoid blowing under the roof cladding
When attaching sheets, it is important to ensure that their lower edges extend beyond the cornice board. The protrusion is selected individually: the main thing is that the water is effectively drained beyond the roof, to the middle of the gutter
In any case, the protrusion should not exceed 70 mm. When laying ondulin, overlap one wave. The dimensions of the longitudinal overlap are affected by the degree of slope of the slope: usually they are in the range of 17-30 cm. Each sheet requires 20 roofing nails, which are driven through a wave in the center of the sheet.
Stage 3. Laying the second and each subsequent sheet is carried out from its half, to achieve separation of the roof joints in adjacent rows. This installation scheme is used up to the roofing ridge.
Stage 4. Before laying the last rows, additional sheathing is installed under the ridge profile.
For these purposes, it is best to use a standard profile made by the same company that makes the ondulin coating. The size of the overlap of the profile with each other is 12.5 cm. The roof ridge is nailed to each wave.
Stage 5. If the wall and roof structure have a junction, it is decorated with a standard profile from the same manufacturer. The same principle is used to design the connecting areas of individual planes of the roofing surface (valley).
Stage 6. The place where the roof meets the gable board must be well protected from moisture. To do this, one of two methods is used. One of them involves bending the edge of an ondulin sheet, which is nailed to the pediment board. The second technique is implemented by placing a rectangular profile, or gable, on the roof edge: this also allows you to make the junction more aesthetically pleasing.
Types of boxes
The most common boxes for chimneys are made of metal. Use galvanized steel or stainless steel as the most durable material. Ready-made galvanized iron boxes can be purchased with a plastic protective coating in different colors, which expands the aesthetic solutions of the chimney.
We recommend reading: How to clean drains using caustic soda?
To make the chimney protection, a corrugated stainless steel pipe is used. It easily follows the curves of the roofing material. The thickness of the metal used is 0.45-1 mm. For making a box yourself, thin metal is a convenient material to work with.

In combination with mineral wool as insulation, metal boxes can be called a universal design for protecting pipes of any configuration.
The following boxes are more specific:
- Wooden - used to close brick (square or rectangular) chimneys. They install it themselves. Requires installation of an additional external protective casing made of metal or plastic.
- Plasterboard. A box made of fireproof plasterboard can be installed on either a metal pipe or a brick or asbestos pipe.
- Plaster. Protective plastering is used for wood or coal stoves with brick chimneys. For the attic space, it is enough to plaster and whitewash the bur (horizontal section of the attic). The chimney section on the roof is protected with a metal decorative box.
Note! If the roofing material is flammable (for example, ondulin), then the protection should be installed with a spark arrester. In houses where there is a Russian stove, the hog acts as a spark arrestor + additionally reduces the humidity of the attic.
What are the dangers of errors when installing penetrations through the roof?
There is an opinion that the efficiency and safety of an individual heating system depends on the design of the stove and the skill of the stove maker. Few people think that complete combustion of fuel depends more on the chimney and traction force
And only specialists know how important it is to install a high-quality passage through the roof
When building a furnace, the main attention is paid to the temperature stability of the materials. But the fire-resistant brick of the chimney and the mineral insulation of the sandwich pipe are defenseless against systematic moisture
Poor design of the pipe outlet to the roof entails serious consequences affecting the operation of the chimney. Violation of the standards for thermal insulation of pipes from flammable roofing materials and attic floors can lead to:
- to fire in places where the pipe and combustible materials of the house structure come into contact;
- to the formation of a large amount of condensate in the pipe, which will lead to its rapid destruction;
- to the formation of a thick soot deposit on the inner wall of the chimney and a decrease in its working clearance;
- to a decrease in stove draft and the formation of carbon monoxide, which is dangerous to human life.
Poor quality waterproofing of a roof penetration assembly threatens:
- penetration of atmospheric moisture into the attic, which provokes the formation of fungus and mold;
- getting the rafters wet leads to the initiation of wood rotting processes, no matter how well it is treated with an antiseptic;
- destruction of the brickwork of the chimney;
- increased corrosion of the metal pipe;
- by getting the thermal insulation (mineral wool) wet, after which this material becomes completely unusable and loses its thermal insulation properties.
Principles of arranging roof passages
It is important not only to route the chimney through the roof correctly, in compliance with basic rules, but it is also important to correctly determine the exit location. You can't install the pipe wherever you want. Arrangement of roof passages according to the recommendations of professional stove builders is best done closer to the ridge. The advantages of this exit:
- There is extremely little accumulation of snow and, in general, precipitation during the winter season.
- The height of the chimney itself above the roof will be insignificant, which means the harmful influence of external atmospheric factors is reduced.
- The low altitude also contributes to less condensation formation.
The most unfavorable places:
- Near the windows.
- In places of valleys, joints.
By the way, this is an important point, many are silent about this, but not only the quality of the chimney, but also the life of the guests of the house will depend on this factor. The outlet channel cannot be rigidly attached to the roof, otherwise at the slightest vibration of the roof, the integrity is damaged and ignition is possible.
Where to install the ventilation pipe
The location of these elements must be determined at the planning stage.
To ensure good ventilation, you will need to consider the following:
- spot ventilation pipes should be located at a distance of 60 square meters. m from each other;
- the number of ventilation pipes is determined based on the complexity of the design;
- the location of several pipes should be lined up in one line;
- the outlets of ventilation pipes must be tightly insulated;
- The pipe should not be placed further than 60 cm from the ridge.
It is advisable to place ventilation pipes under the riser, since this method can ensure maximum air circulation. In some cases, corrugated adapters are used for this. When installed, the base of the corrugation is kept warm, which will result in minimal wind resistance. The height of the ventilation pipe riser plays a significant role, since if the pipe is small, the draft will be poor, and if it is too long, fastening devices will be needed. Building codes provide clear indicators for the height of ventilation elements:
- for a flat roof - the height of the ventilation pipes should not exceed 30 cm;
- for sloped roofs - no more than 50 cm.
If the roof provides additional areas for recreation, then the height of the ventilation pipe will reach 2 meters.
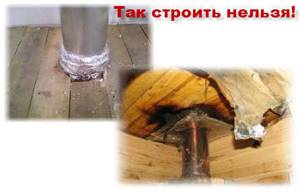
Common installation errors
As experts note, the main mistake is the incorrect installation of the casing in the ceiling opening, bypassing the standard dimensions of the placement, which is fraught with dangerous consequences in the form of a fire. Also among the common violations is the excessively large size of the umbrella on the head of the chimney.
The following errors are also common:
- the penetration is used without filling with thermal insulation material, which eliminates the protective capabilities of the structure;
- a wide gap is left between the penetration and the chimney pipe, as a result of which the filler in the form of fine expanded clay falls down.
Experts recommend equipping the passage box on top with a metal sheet with a hole for the chimney.
A chimney protective casing installed according to standards can significantly increase the safety of the chimney and the heating system as a whole. Also, this measure determines the high potential of the heat generator, its operating efficiency at low fuel costs. If during the construction of the structure the work on equipping the duct for the chimney pipe was not completed, it is worth choosing a ready-made model or making the structure yourself and installing it taking into account regulatory requirements.
Tags: chimney, duct, passage
« Previous entry
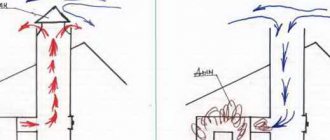
Exiting the pipe through the roof
When equipping a pipe passage through the roof, care must be taken to ensure that two conditions are met:
- passages through the roofing pie must be fireproof;
- the under-roof space should be protected as much as possible from moisture penetration.
Exiting the chimney through the ridge makes all the work quite simple. Due to the fact that the formation of snow pockets on the ridge is impossible, it is possible to achieve better protection against leaks. But at the same time, this method of installing a roof passage means that in the design of the rafter system the ridge beam will not have load-bearing functions. And this requires additional strengthening of the rafters themselves. If there is an attic, installing additional rafter supports may be undesirable or simply impossible.
That is why developers prefer installing a chimney passage on the slope, directly at the ridge. A snow pocket also does not form in this place, and besides, the rafter system does not need additional strengthening. But besides this, the choice of location for the roof chimney is also influenced by the location of the heating equipment. It should be remembered that the horizontal sections of the chimney should not be more than 1 meter in length. In some cases, it is the location of the boiler that becomes the reason for choosing the method of passing the chimney pipe through the ridge.
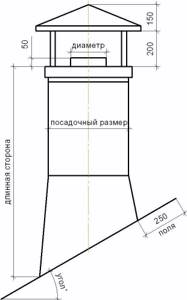
How to install a round pipe
In practice, the following types of such chimney pipes on the roof are used:
- Made from asbestos. They are gradually falling out of use due to poor resistance to overheating and insufficient environmental friendliness of the material used.
- Steel coaxial pipes consist of two pipes - one inside the other. Smoke comes out through the inside, and the space between the pipes is used for air intake. This is used to operate a closed firebox.
- In sandwich products, a layer of heat insulation is laid between two pipes.
- Single-layer metal pipes are used.

If the last of the listed options is used in the house, then it is recommended that in places where it goes through the ceiling or roof, you yourself make sections in the form of a sandwich from two pipes of different diameters.

When running a round pipe through the roof, you need to make a steel sheet with a round hole. The design of the roof box must ensure the correct installation of vapor barrier and waterproofing layers. Manufacturers offer ready-made solutions for such pipes. When choosing, it is necessary to take into account the structural features of the roof and the topography of its surface.
Chimney fire protection
Today, ready-made “sandwich” panels made of steel or ceramics are available for sale. Their installation proceeds as follows:
1. To install a modular system, an asbestos gasket is installed between the stove and the chimney.
2.Then apply a layer of solution on which the module is placed. Level, and secure subsequent blocks with a layer of mortar.
3. The places where the smoke device passes through the roof are well insulated. Fire-resistant insulation of the roof will be provided by a galvanized steel box, secured with staples to the rafters and cross beams at the point where the pipe passes.
Pipe waterproofing
Quick and reliable protection of the chimney from leakage is carried out by applying roll materials.
MAIN STAGES OF INSTALLATION WORK:
1. The pipe is coated with a primer and covered with a superdiffusion membrane. Instead of a primer, it is possible to use polymer-bitumen mastic. The membrane is glued to the roof, the edges are placed on the pipe.
2.The top and bottom ties are made from metal. The bars are stuffed onto the sheathing and the corners are secured.
3. The rolled material is laid overlapping, allowing for proper water drainage on a soft or metal roof. The length of the bottom sheet reaches the roof overhang.
4. The joints are insulated with bitumen mastic. The corners are secured to the sheathing with dowels. The cracks are treated with heat-resistant sealant.
5. Lay the roofing deck, place a PVC apron on top using Onduflesh tape, and complete the sealing.
Device for connecting the roof to the pipe
Fixing a roof leak near a pipe
There is a leaking pipe on the roof of the house - bitumen tape, a polymer cap or a tin apron will solve the problem.
INSULATION WITH BITUMEN TAPE IS 5 STEPS:
1. Using a metal brush, clean the roof around the chimney along the outer lower part.
2. Remove dust and dirt with a damp cloth.
3. At the junction of the pipe and the roofing pie, pieces of bitumen tape are glued.
4. The sections are heated with a gas burner and pressed as tightly as possible to the roof and smoke outlet.
5. Wooden blocks or boards are fixed on top. The service life of the tape is 2-3 years.
Ch Do-it-yourself chimney sealing using bitumen tape
Polymer cuffs reliably protect the joint between the roof and the oval pipe and do not cause any particular difficulties during installation:
1. In the upper section of the cuff, a cutout is made with a diameter less than the thickness of the chimney.
2.Put it on the outer part of the riser and lower it to the roof level.
3. In places where the roof comes into contact with the cuff, a protective layer of sealant is used.
Polymer pipe cuffs are an excellent and inexpensive way to protect your roof from leaks.
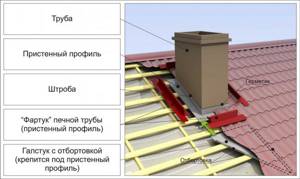
Creation of metal bends
To protect against water, a tin apron with parameters similar to the dimensions of the pipe is put on the chimney pipe. The upper part of the covering is fixed to the vertical structure, compressed with clamps and sealed. The lower part of the apron is installed on the roof over the roof sheathing and secured with self-tapping screws.
Special “layouts” will also help prevent water from penetrating into the ceiling - wide metal strips with a side edge that seals the gap between the top layer of the roofing pie and the pipe. Layouts are placed between the ridge and the passage of the pipe, covered on all sides.
Sealing a pipe using metal “layouts”
Roofing a chimney is an important stage of construction, requiring the correct selection of materials and adherence to the sequence of operations.
When creating waterproofing for the junction of the roof and the chimney system, you should ensure maximum safety and comfort, without fires or leaks.
Features of chimney outlet through different types of roofing
When arranging the passage of a chimney pipe, you need to pay attention to protection from precipitation that will flow down the pipe and roof. To moisture-proof the connection between the pipe and the roof, a protective apron is installed around the chimney. This technology is similar for roofs with different coatings.
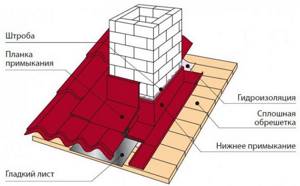
Metal tile covering
Metal tiles are a popular roofing material consisting of thin steel, aluminum or copper sheets coated with a protective layer.
Output of a square or rectangular pipe
If the pipe is made of brick and has a square or rectangular cross-section, you can use the materials included with the coating to pass it through the metal tile roof. Since brick chimneys can have non-standard dimensions, before removal, part of the covering sheets is removed or a hole of a larger area is cut out.
To waterproof the joint, special elastic tapes with an adhesive layer applied to one side are used. One edge of the tape is glued to the base of the pipe, the other to the roof sheathing. The edge is fixed at the top with a metal strip, which is attached to the pipe wall with heat-resistant dowels. All joints are coated with sealant.
To reduce the likelihood of water flowing down the chimney wall, you can make a recess under the bar - a groove
You can make an apron for a square or rectangular pipe with your own hands. It is made from a smooth metal sheet of the same color as the main coating. The upper edge of the apron is tucked under the row of metal tiles located above so that water flowing from above does not fall under it. If the pipe is located close to the ridge, the edge of the apron can be tucked under the ridge or bent to the other side. To protect the passage opening from precipitation, a tie is installed under the apron.
It is better to organize the outlet of the chimney before laying the metal tile covering.
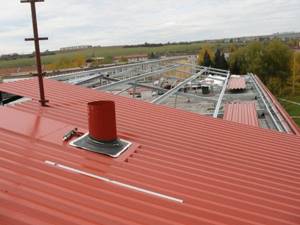
Conducting a round pipe
When leading a round chimney or sandwich pipe through a metal tile roof, roof penetrations are most often used, connected to a cap through which the pipe is routed. A neat round hole is cut in the coating according to the size of the chimney, a universal glass or master flush is placed on the pipe, and the joints are sealed.
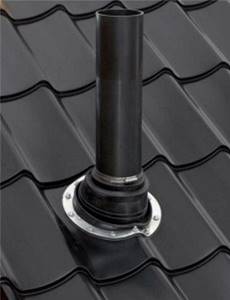
To seal the joint between the round pipe and the roof, special penetrations are used
Video: sealing the passage of a brick pipe through a metal tile roof
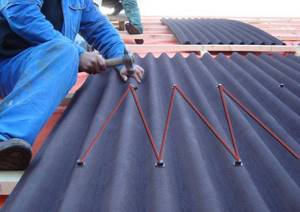
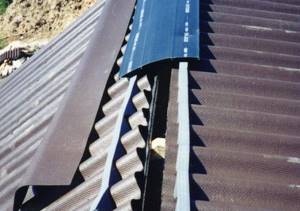
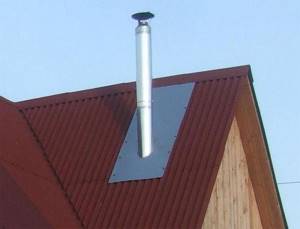
Corrugated roofing
Profiled sheet is one of the most common roofing materials. But a leak can also occur in it if the chimney outlet is not arranged correctly. With this type of coating, it is better to place the chimney vertically. The hole in the roof is cut with a grinder, and it is necessary to ensure that the cut edge of the corrugated sheet is without jagged edges.
Carrying out a rectangular pipe
If it is necessary to organize a passage for a rectangular or square pipe, the apron can be made from galvanized sheet.
- 4 strips are cut out of metal, which will be placed in front, behind and on the sides of the pipe.
- A sheet of galvanized steel is laid from the bottom edge of the chimney to the eaves. This element is called a tie and is subsequently covered with roofing material.
- The slats are tightly attached to the pipe, their lower part is fixed to the sheathing, and the upper part is placed on the chimney.
- A groove is made in the wall of the pipe into which the curved edge of the strip is inserted. First, the bottom bar is installed, then both sides and the top. The sheets are folded under one another.
- Before laying corrugated sheeting, the passage of the chimney must be waterproofed. You can use a regular waterproofing film, which is cut with an “envelope” and glued to the pipe, but it is better to use self-adhesive waterproofing tape.
The upper bar adjacent to the pipe is filled with sealant
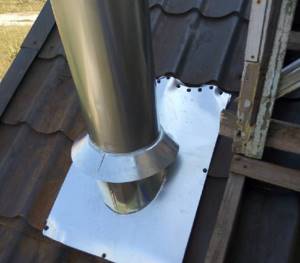
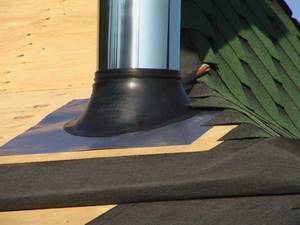
Round pipe outlet
When a round pipe is routed through a corrugated sheet covering, roll bitumen waterproofing or foil bitumen tape is used. A roofing penetration is put on the chimney, which is glued to the sheathing and sealed with a heat-resistant sealant. If the passage is made of rubber, it can melt from the heating of the pipe, so it is necessary to secure a clamp with a heat-resistant gasket under it.
If you use a roofing duct made of heat-resistant rubber, you can avoid its melting
Video: passing a pipe through a corrugated roof
Ondulin roofing
Ondulin is also called “Euroslate”. The peculiarity of this coating is that it is flammable and does not have great strength. Therefore, in order to pass the chimney pipe, you will need to make a large hole in the roof and fill it with fire-resistant material that will prevent moisture from entering.
To waterproof the junction of the chimney and the roof, install a metal roof trim with an apron, the edges of which are placed under sheets of ondulin or use an elastic tape “Onduflesh”. This coating requires additional ventilation.

In the roof made of ondulin, you will need to make a hole for a larger diameter pipe and fill it with fire-resistant material
Video: sealing a chimney on a roof made of ondulin
How to route a pipe through a soft roof
Soft roofing is also a flammable material, so a gap of 13–25 mm must be left between the covering and the chimney. Waterproofing the pipe is carried out in the same way as with other coatings, only instead of an elastic tape, a valley carpet is used or the coating itself is applied to the pipe - bitumen shingles or roofing felt.
When waterproofing the joint between a pipe and a soft roof, the coating itself can be used instead of elastic tape
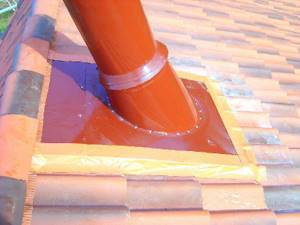
Chimney pipe passage through a tile roof
Separately, I would like to say about the passage of the pipe through the tiled roof. Manufacturers have thought of a special element that repeats the relief pattern of the tiles and has a hole for the pipe. A pipe made of the same material is also matched to it.
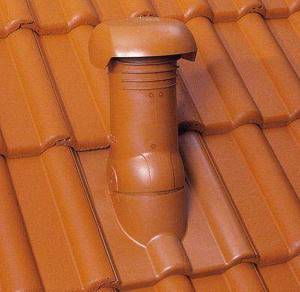
These tile roofing elements are made of highly resistant plastic. They are available in the same colors as tiles, and you can always choose the right shade suitable for a particular building. But such plastic roof parts are installed only for ventilation outlets, since they are unlikely to withstand the high temperatures that accompany the smoke emanating from any furnace.
Making a wooden frame
The frame is assembled from boards measuring 100x25 mm, secured on top with boards of the same size. The part of the box that will rise above the roof is sheathed with OSB. The box is attached to the rafters, if it reaches the attic floor, then they are attached to it. After this, you need to make a junction of the roof.
Proper removal of the chimney through the roofing pie involves arranging your own rafter system around the pipe.
An insulating membrane is fixed to the top layer, and siding is placed on top. A cover from snow and rain is mounted above the box. Once the pipe is installed, it will need to be replaced with a metal cap.
To prevent the roof from leaking over time, the waterproofing is attached to the rafters, then pressed with lathing. A vapor barrier is installed on the inside: the material is nailed to the rafters and pressed with finishing material.
The result of the work is a wooden box that allows you to insulate the ceiling or roofing pie. At the same time, it has a fairly high level of waterproofing.
During construction, it is recommended to adhere to the rules set out in special regulatory documents SNiP. It is also better to place wooden elements away from the chimney.
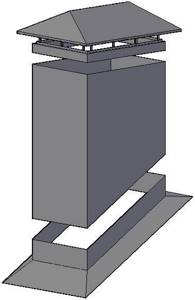
A wooden box will protect the ceiling and roofing pie from exposure to high temperatures, while providing good waterproofing. The box can also be made of non-flammable materials such as ceramics or metal. It can be made from corrugated sheet parts or from a solid metal sheet.
In order to connect the box to the surface of the metal tile roof, painted metal aprons are used. Such elements can be ordered or made independently according to the diagram.
First you need to lay the underlay carpet. The larger its size, the better. Ideally, it should reach the eaves, and the approach to the pipe should be at least 30 cm; the shingles are laid to the bottom of the pipe. Then aprons are installed: bottom and side, with a slight overlap on the bottom. The top apron is mounted with an overlap on the side ones. The pipe is covered with a roof.
Features of metal tiles as a roof
Metal tiles are corrugated steel coverings that are reinforced with a colored layer of anti-corrosion protection made from organic or composite materials. When laid according to technology, such a roof is designed to last for more than half a century. In this case, you will not need to additionally care for the roof, paint it or fix leaks. The steel is reliably protected, and the color coating is designed for use in outdoor conditions.
Advantages of metal roofing:
- light weight;
- ease of installation;
- durability;
- environmental friendliness;
- non-flammability;
- affordable price;
- weather resistance.
The disadvantages include:
- the complexity of covering a roof with a complex configuration;
- a large amount of waste material when laying on a figured roof;
- noise from impacts on metal during rain and snow melting;
- a large number of holes for fasteners are potential sources of corrosion and leaks.
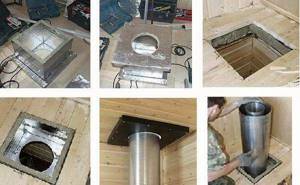
Making a box with your own hands
Metal profiles can be safely considered one of the most commonly used materials for roofing, which is why the components for the device can be matched to the same color as the coating.
Particular attention must be paid to the filler, because safety will depend on this; it is also important to provide for the ingress of precipitation so that after installation it does not penetrate inside. Before describing the detailed algorithm of actions, it is worth taking a look at what the finished structure will look like in the video:
Drawing
To work independently, you will need to first draw up diagrams and supporting notes so that when creating a product you do not make mistakes, but design the ideal device. Among the required documents it is worth highlighting:
- Ceiling cutting device.
- Model of the future box.
- Algorithm of actions during installation.
- Visor type.
The drawing must include the exact dimensions of all elements, we must not forget about the frame, it can be the entire length of the pipe or less, this nuance is adjusted to personal discretion.
Most experts do not advise leaving the upper part without a structure, because such actions will lead to condensation gradually draining from this area, and there can be no talk of a long service life of the item.
Tools and materials
When creating a casing for a chimney, you will need to carry out preparatory work; this includes collecting the necessary components and construction supplies; important details include:
- Roulette.
- Level.
- Scissors for cutting metal.
- Screwdriver.
- Pliers.
From the material, you need to purchase sheets of metal profiles from the nearest store and a square for making the frame, because without rigidity the structure will not be reliable. If expanded clay is used as a sealant, without a base the device will squeeze out, which will affect the appearance of the entire roof.
Size calculation
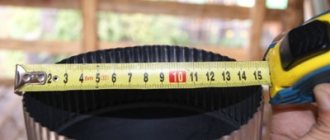
To ensure comfortable passage of the pipe, it is necessary to measure its cross-section and add at least 0.5 mm. It is not difficult to determine the width and length; for this you will need a tape measure; all data is immediately entered into the drawing or diagram for convenience.
Particular attention should be paid to the connection of parts; metal profiles are often fastened with rivets or screws. In order for the elements to be firmly attached to each other, you need to make an indent that overlaps.
Frame making
For the frame, you do not need to take a square of great thickness, since the protective casing serves a decorative function, except for high temperatures, there will be no further load.
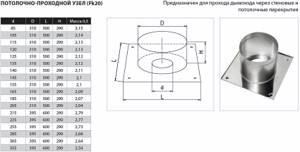
Scheme of ceiling-passage unit
Giving rigidity is the main task of this component of the chimney pipe box; it is better not to use round elements; problems may arise when installing the facing parts. The frame can be welded using a machine, but if it is not available, you should purchase reliable fasteners and use them during installation.
Making a chimney box from a metal profile
Cutting blanks is one of the important stages; precision at the time of manipulation guarantees the successful assembly of the finished structure.
The main elements include:
- U-shaped parts, they must be bent at right angles in a vice.
- Rectangular elements of a certain length and width, data must be taken from the drawing.
- The bottom should be slightly larger than the opening on the roof, otherwise it will not be possible to securely fasten and ensure the tightness of the device.
The direct connection of all components must be done on the ground, and then the finished structure must be lifted onto the roof. It is worth preparing rectangular sections for the bottom in advance; if the owner plans to maintain the integrity of the existing sheets, then it would not be superfluous to pay attention to the waves of the metal profile, having carefully thought through all the nuances, it will be possible to reduce the number of scraps to a minimum, and the ceiling will look like one whole with the casing.