Passage requirements
Of course, in the place where a ventilation or any other pipe passes through the roof, it is necessary to ensure sufficient tightness so that moisture does not enter the building. At the same time, this unit should not prevent precipitation from draining from the roof surface. Another important point is the presence of reliable thermal insulation.
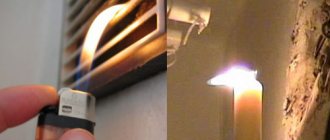
The top of the pipe should be protected from moisture penetration using a deflector. There are certain requirements for the length of the ventilation pipe to ensure sufficient draft inside the structure, although they are not as strict as the standards for chimneys.
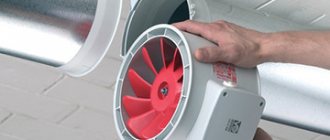
Air exchange through ventilation is often provided forcibly, using an exhaust fan, which is also installed near the transition unit. This mechanism should also be reliably protected from the effects of precipitation and other natural factors. In addition, it is imperative to ensure that the electrical appliance is grounded.
Improper installation of this unit often causes poor removal of sediment from the surface, which can quickly lead to damage to the roofing material. The ventilation duct of an apartment building can cause a lot of trouble if it opens onto the roof across the slope.
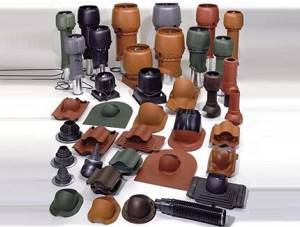
In addition to the assembly of the passage of the ventilation duct through the roof, additional elements may be needed that protect the structure from precipitation, improve moisture removal, etc.
It is much better if the knot is located along the slope, so it will create fewer obstacles to the flow of water. The optimal position is considered to be the location of a large transition unit along the ridge. This option eliminates the need to install additional elements that reduce the resistance of the ventilation pipe to the convergence of precipitation.
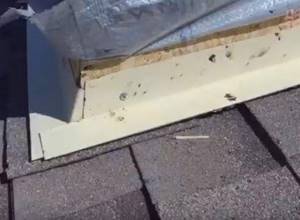
A serious installation error is considered to be the position in which the front apron ends up under the roofing sheet. An apron is a structure that ensures a tight fit of the roof to the walls of the pipe. If the lower part of the apron is placed under the roof, water will flow into the gap, entering the roofing pie and then into the attic space.
The principles for installing a ventilation system transition unit can be used for installing other similar devices, for example, chimneys
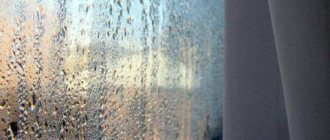
The absence of a thermal insulation layer contributes to the appearance of a temperature difference, which contributes to the formation of condensation on the surface of ventilation pipes. Over time, this situation can lead to damage to the construction material, the formation of mold, oxides, rusty deposits, etc.
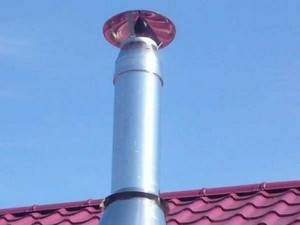
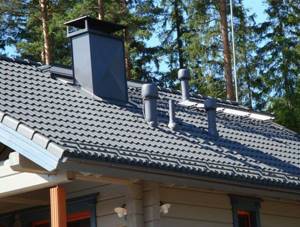
The outer part of the ventilation pipe protruding above the roof must be protected with a deflector cap from the penetration of moisture and precipitation
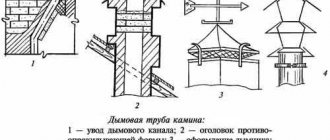
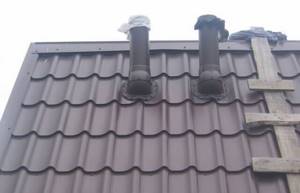
Older ventilation ducts usually have a so-called “otter” - a thickening that allows heated air to cool slightly before escaping onto the roof. As a result, the temperature difference between the air and roof communications will be smaller, which will reduce the likelihood of condensation.
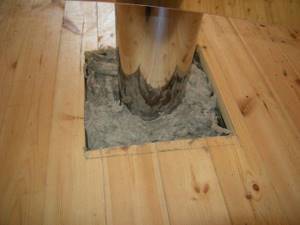
In modern houses, aprons are used, with the help of which the gap between the pipe and the roof is completely sealed. The cuts for installing aprons are formed using a grinder. Insulation of metal and plastic pipes can be done using mineral wool or other suitable material.
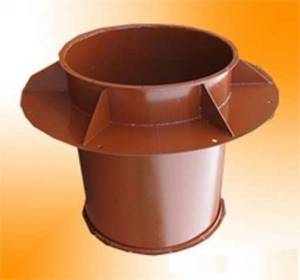
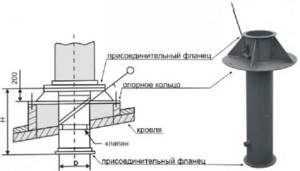
For a round ventilation duct, it is better to choose an industrial model of the transition unit, since making such a device yourself will not be easy
Sometimes a wooden or metal box is used for these purposes. When designing a ventilation system, you should immediately consider the option of arranging a passage through the roof. Experts note that it is much easier to remove a pipe with a rectangular or square cross-section than a round structure.
To ensure a sufficiently tight connection of the ventilation pipe to the roofing material, a square sleeve is usually used, which is placed on top of the pipe. It is filled with non-flammable material, mainly sand or fine expanded clay, which is why this structure is called a “sandbox”.
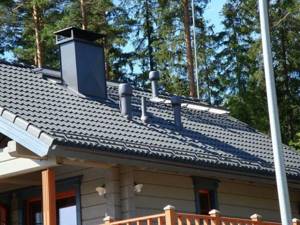
Ventilation above the roof should be installed to a height equal to the height of the chimney pipes. This is necessary to ensure stable traction. This value depends on the distance of the chimney from the ridge fin.
The assembly of the passage of ventilation and the chimney through the roof is carried out after installation of the ventilation system, but before installing the roofing pie and laying the covering
The passage unit must be securely fastened to all roof elements. It is worth paying attention to the distance between the edge of the pipe and the deflector fixed above it. It should be so large that the air masses passing through the ventilation duct can move freely.
What to consider when installing ventilation outlets
There are a number of factors to consider when installing. The shape of the roof, which can be pitched or flat, matters.
In the first case, engineers recommend installing the ventilation outlet as close to the ridge as possible. This will ensure uniform heating of the inside of the ventilation pipe, and the outside will be more resistant to wind and snow pressure in winter.
For a flat roof, the geometry of the ventilation outlet riser comes to the fore: it should be located directly under the exhaust pipe on the roof so that the air can flow out unhindered.
The height of the ventilation shaft above the roof is also important: if the pipe is not high enough, the draft force will be very small and the ventilation will not work effectively. A pipe that is too high also reduces draft, because the structure may be damaged by strong gusts of wind, so additional fastening will be required.
Note! On a pitched roof it is recommended to install the pipe outlet to a height of up to 50 cm, on a flat roof - from 30 to 50 cm.
Requirements for the passage unit
The area where ventilation passes through the roof must be sealed
According to the requirements of the regulations, the passage through the roof for ventilation is made in such a way as not to reduce the level of tightness of the existing coating and to prevent moisture from entering the building. It should also not interfere with the natural drainage of precipitation and must have reliable thermal insulation protection. At the top, the chimney pipe is closed with a special visor (deflector), which protects it from moisture getting inside.
With a forced air exchange system, an exhaust fan is mounted next to the unit, which needs to be insulated from precipitation and moisture. In addition, reliable grounding of the electrical unit will be required. When installing a standard passage unit (CP), additional elements are used to protect the structure from precipitation and help remove moisture. The most rational location is considered to be “along the slope”, in which there is no interference with the flow of water, or along the ridge. The latter method allows you to do without additional elements that reduce resistance. A typical mistake when installing a ventilation unit is placing a sealing element (front apron part) under the covering sheets. Water flows into the resulting gap, which then penetrates the roofing pie and seeps into the attic.
Installation recommendations
It is not difficult to install a ventilation outlet on the roof with your own hands. It is necessary to have the appropriate tools and materials, and to carry out the work according to a pre-designed scheme and in a certain sequence.
Choosing a location for the pipe
The installation of the pipe outlet to the roof must be thought out in such a way that it has a minimum slope or bend.
Ideally, the pipe should be installed strictly above the internal riser of the ventilation shaft. If this is not possible for any reason, it is advisable to use a flexible corrugated pipe to connect the nodes.
Pipe height
The size of the pipe located above the roof is indicated by SNiP:
Additional devices
To increase the efficiency of ventilation, additional elements are installed on the roof. They serve to create an area of low pressure, as well as protection from precipitation and atmospheric moisture:
Where does moisture come from?
Many people wonder where moisture can come from in a nearly sealed system. This is due to the fact that there is always a small percentage of moisture in the air masses. If there is increased humidity, which occurs during fog, rain or in heated rooms, the amount of moisture increases noticeably.
Some moisture can penetrate through the vapor barrier, foam concrete or brickwork. It is almost impossible to create a vacuum between the layers. Due to the influence of temperature changes, water vapor will settle on the cooled surface and penetrate into the insulation material. Due to these processes, the wood structure begins to deteriorate, so roof ventilation must be properly equipped to minimize damage.
Application
A rectangular passage unit (CP) through the roof is used when it is necessary to pass the exit of the ventilation system through the roof of a building or facility.
UP is used for natural or forced ventilation. The design consists of a straight section of rectangular duct with a square skirt. The product should not act as an air duct; it should pass through the assembly. The height of the product is standard – 1000 mm, connection – tire rail No. 20. Our company also produces an insulated passage unit with a rectangular cross-section.
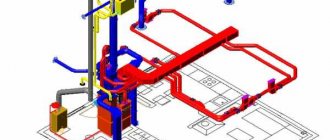
Ventilation system design
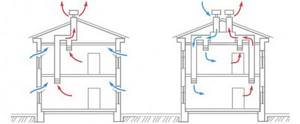
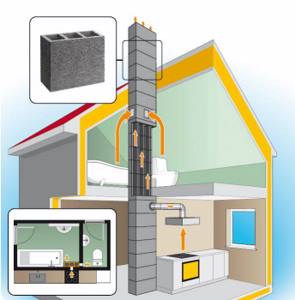
A ventilation system is a pipe that ensures the removal of heated air with the products of respiration and vital activity into the atmosphere. Most private houses are equipped with natural ventilation, the functioning of which is based on the law of convection, the property of heated gases to rise upward.
Industrial, administrative and commercial buildings, where a large number of people are located or special equipment is working, require increased air circulation, which can only be provided by forced ventilation powered by a powerful fan. To determine the type of duct that is suitable for a particular structure, consider the following factors:
- Room volume. The larger the area of the house, the more air there is. This means that more powerful ventilation will be required to ensure circulation.
- Gas and dust coefficient. These indicators are usually calculated for industrial premises where, due to work or the use of equipment, dust and harmful gases appear in the air.
- Humidity and temperature indoors. Ventilation makes the microclimate in a building more suitable for human life, optimizing humidity and temperature to a comfortable level.
- Number of people. In the process of breathing, people consume oxygen and produce carbon dioxide, so the more people there are in the room, the better the ventilation should work, removing waste air. Therefore, air duct installation is carried out primarily in administrative and commercial buildings.
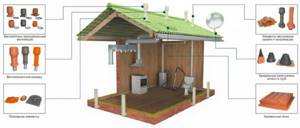
Residential building ventilation system
Ventilation in “warm” and “cold” roofs
Different types of ventilation systems
Note! Another reason to think about the need for ventilation equipment in a private residential building is the presence of heating equipment that runs on solid fuel. During the combustion of wood, oxygen is involved, which causes the air in the room to “burn out”, making it stuffy and difficult to breathe. Therefore, when installing a wood-burning stove or fireplace, they not only build a chimney, but also install an air duct passage through the roof.
Planning ventilation passages
Ideally, planning of ventilation passages should occur at the design stage of a residential building, or during the construction process before closing the building contour (arranging windows, doors and roofing).
But in practice, it is often necessary to reconstruct engineering systems in an already finished house and build on the existing design features and layout of residential and technical premises.
If there are defects in the design of the system, this is fraught with the accumulation of unpleasant odors in the room, increased concentrations of carbon dioxide and carbon monoxide, and the occurrence of reverse draft during changes in weather conditions.
How to install a chimney on the roof
The ventilation system helps in solving the issue of ensuring an optimal microclimate in the premises. There are sanitary and hygienic standards for air parameters in ventilated rooms. It must be of a certain humidity, free of dust and harmful substances.
There is nothing complicated about installing ventilation ducts. But before you start this work, you need to complete the project. It contains a plan and specification that takes into account all the elements of the mounted structure, as well as their laying and installation locations.
Installation of ventilation elements must be carried out in accordance with SNiP and safety standards. For the most productive operation of ventilation, designers determine the location of the system, its components, cross-section and dimensions of the structure. Individual calculations are carried out in each specific case. One of the important stages of work is the location of ventilation pipes on the roof. Their output is carried out from the wall, or directly from the equipment.
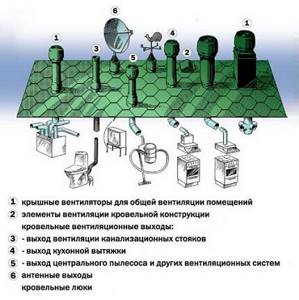
Purpose of the ventilation pipes exiting to the roof:
- for air flow into the room;
- for air circulation in the attic;
- for installing a sewer riser pipe.
When choosing a location for installing the ventilation pipe outlet on the roof, you must ensure that nothing can interfere with the outflow of ventilated air. Taking into account operational needs, designers calculate the dimensions of the structure. The most convenient place to install an exhaust pipe on the roof is the pipe outlet through the ridge
It becomes possible when the rafter system does not have a ridge beam. With such an outlet to the roof, the ventilation duct is easy to insulate.
The most convenient place to install an exhaust pipe on the roof is the pipe outlet through the ridge. It becomes possible when the rafter system does not have a ridge beam. With such an outlet to the roof, the ventilation duct is easy to insulate.
For rafter systems that include a ridge beam, it is rational to connect to the roof close to the ridge. Then additional fixation of the ventilation duct will not be required.
Conclusions and useful video on the topic
This video will show you how to install a ventilation outlet on a metal roof:
Video of installing a ventilation outlet on a soft roof:
This video shows an option for installing slopes:
There is nothing complicated about installing a ventilation outlet. Thanks to a wide selection of materials, you can make and install such an outlet either independently or by using factory-made products that are undeniably attractive.
The main thing during installation is to ensure the tightness of the passage through the roof, the correct height, reliable fastening and good thermal insulation.
Tell us about how you created a passage through the roof with your own hands. It is possible that you have information on the topic that may be useful to site visitors. Please write comments in the block form below, ask questions, post photographs.
Source
Passage units for a concrete roof and non-standard schemes
Installing a unit in a concrete roof base is not much more difficult than a regular one. In most cases, a concrete roof has a soft roof made of fiberglass. The hole in the concrete slab for ventilation is laid at the design stage. The most rational way would be to use a special plastic cup, which is inserted into the hole and fixed from the inside.
Before laying on the roof waterproofing, the supporting surface of the plastic assembly is treated with sealant and laid with centering on the marking of the position of the ventilation pipes under the roof. Treated timber spacers can be used to secure the vent pipe inside the assembly. If the stacked glass is made of plastic, it is covered with thermal insulation and glued with polyurethane foam mastic. Steel or asbestos glasses can be filled with molten bitumen mass.
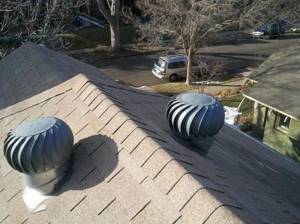
Increasingly, for the installation of ventilation units on the roof, structures with an increased diameter of the main line, but with a lower outlet height, are used. To maintain the efficiency of the exhaust device, the ventilation outlet is equipped with a deflector and a fan with a wind speed sensor. At relatively high wind speeds, the deflector can provide a 30% increase in thrust. In calm weather, stable ventilation is ensured by the built-in fan.
.
In addition to the deflector, there is a rather unusual option for increasing the efficiency of the exhaust device. In the passage unit, the ventilation pipe is made of two halves. The lower part is installed motionlessly in the glass, according to the standard scheme. The upper part has a rotating vane type attachment. Under the influence of wind force, the nozzle turns in the desired direction, thereby, thanks to the ejection effect, the nozzle increases the draft in the ventilation duct by almost 50%.
UE marking
Today, the industry produces eleven standard-sized types of ventilators, including those for ventilation of seam roofs and corrugated sheets. For original designs of ventilation systems and aerators, non-standard versions of CP are manufactured.
Typical designs of units are marked with alphabetic and numerical designations that define their characteristics and elements:
- The letter combination UP indicates a passage node.
- Numbers 1 and further 01-10 indicate typical sizes of units without a condensate ring and valve (for example, UP1-01).
- Numbers 2 and further 01-10 indicate typical sizes of units with a valve, but without a condensate ring (for example, UP2-01).
- Numbers 3 and further 11-20 indicate typical sizes of units equipped with a valve and a condensate ring (for example, UP3-22).
Important! The choice of ventilation units for ventilation output in one design or another is made by designers.
The type of UP is directly related to the environmental climate, the need to install an aerator, and the design of the seam roof and corrugated sheeting.
The roof structure with a built-in control unit for the ventilation duct exit is often called a roof penetration. The passage unit is fixed on the roof using braces secured with brackets and clamps. The UP branch pipe is connected to a flange, fixed to the concrete glass with an anchor as a support. Often, a “skirt” is constructed on the roof penetration to protect the joints from water getting inside.
The outlet of the ventilation duct and ventilation of a soft roof (as opposed to a seam roof) has some features in the installation of the UP. It is made from galvanized steel sheet along with mineral wool, which serves as a heat insulator. Deflectors (also galvanized) or umbrellas are installed inside to protect against moisture.
Advice! If there is a fan in the unitary unit, it is recommended that the internal part be made of perforated steel sheet.
The power supply output is placed in plastic casings. The design of the ventilation unit on the attic roof in this embodiment will perform a sound-absorbing function.
For reinforced concrete roof structures, concrete slabs with ready-made holes for the exit of ventilation ducts are installed at the penetration points. When the size of such an opening cannot provide the required reliability characteristics of the floor slab, the roof penetration and ventilation outlet should be constructed in monolithic concrete.
Installation of a ventilation outlet on the roof
Device
There are several elements in the roofing system:
- Openings located under the roof overhang. They are usually covered with soffit grilles, which provide protection against the entry of insects, rodents and birds. Also, similar holes are located along the ridge. The details allow air masses to circulate under the roof. The holes under the overhangs can be replaced with hemming, in which there are small gaps.
- Dormer windows. They are located in the gable and are used as ventilation components for the attic area.
- Ventilation outlet. This section of pipe is used to connect an exhaust duct from a general house ventilation system or to ventilate an attic.
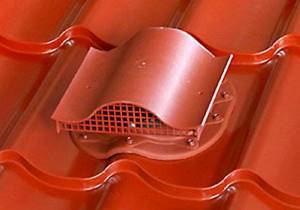
- Aerators. Other names of elements are deflector, weather vane. They are cut into the roof next to the ridge. The components allow air to be removed from under the roof, performing a function similar to the hole under the ridge. Aerators are used when the snow cover on the roof exceeds 3 cm, due to which the ventilation hole under the ridge is muffled.
There are two types of aerators:
- point;
- linear or continuous (located along the entire length of the slope or ridge).
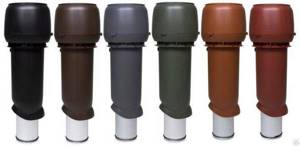
Also, aerators may vary in location. There are products located on the ridge or slope. Elements may have the shape of a “mushroom” or a tile. Devices can be made of stainless steel, but variations made of polypropylene are currently in demand
They have an affordable price and attract attention with a variety of colors.
Aerators have replaceable elements called penetrations. Such a design should be selected based on the material used for the roof.
How is the ventilation passage through the roof arranged?
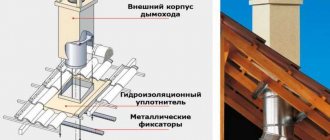
The passage unit consists of the following elements:
- A hole in the roof having the appropriate shape and size.
- An air duct passing through an opening.
- Penetration , tightly installed on the passage section of the air duct, having a support ring and a connecting flange. It has a certain angle of inclination, as well as a specific relief that repeats the pattern of a particular type of roofing.
The main element of the software is the penetration itself, which ensures the functionality of the device. There are different designs of penetrations.
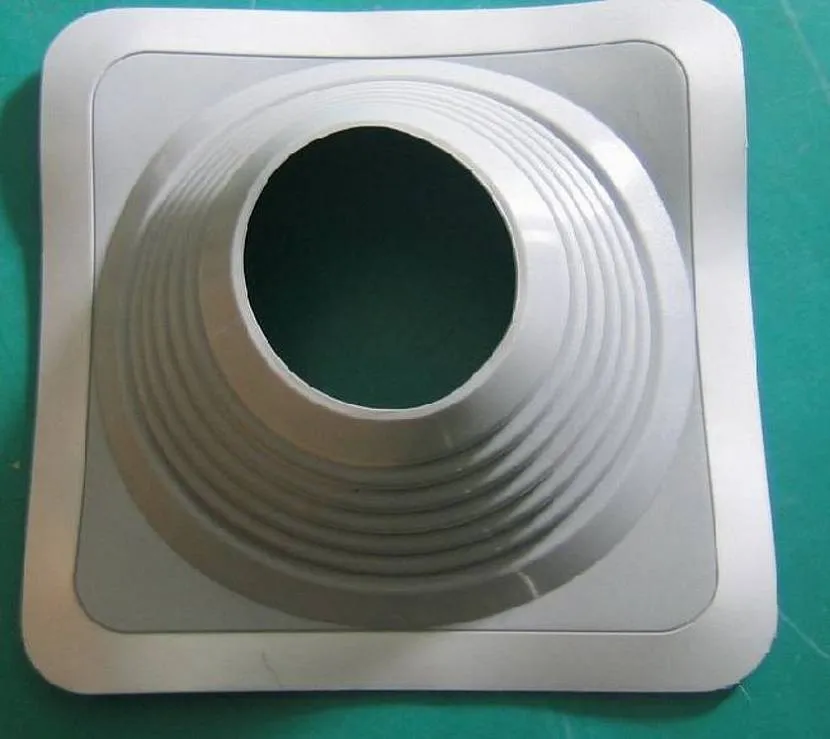
Recently, elastic structures have been gaining popularity because they are versatile and can be used on any type of roof. Source orchardo.ru
Elastic penetration is made from special types of rubber or other flexible materials that are resistant to atmospheric influences, changes in temperature and humidity, and exposure to ultraviolet rays. It has a corrugated connecting sleeve that allows you to change the shape and is suitable for different angles of inclination. The height of the sleeve can be different; the greater the angle of inclination, the higher the penetration sleeve should be.
In addition to elastic structures, there are plastic products. They are resistant to moisture, tolerate temperature changes and exposure to ultraviolet rays. As a rule, plastic UP are produced for various types of roofing as additional elements.
It is necessary to clearly distinguish between the passage through the roof for the air duct and for the chimney. Despite the similarity of functions, these elements have one fundamental difference: ventilation passages work with air flows of normal and low temperatures, and chimneys remove hot combustion products and require fire-resistant protection.
Chimneys need fire-resistant protection Source proroofer.ru
Capacity and required length of the ventilation duct pipe
To create the correct microclimate in the house, it must be equipped with an optimal air circulation system. Its efficient operation is ensured by correct calculations of the diameter and length of the pipe through which the ventilation will exit to the roof. Depending on the type of ventilation system in your home, these calculations can be done in different ways. An incorrectly calculated height of the pipe above the roof contributes to the formation of oxygen deficiency in the room and an increase in humidity. If there is an error in the design of the hood, mold can easily appear on furniture and walls, and there will always be evaporation on the windows.
In most cases, residential buildings have natural air circulation. The influx of air from the street occurs through a special valve or window, the outflow is provided by a ventilation passage through the roof. Due to cooling, the speed of air movement can decrease.
According to current SNiP, the amount of air flowing into the room should have the following values:
- 3 m³ per square meter of ventilated area per hour - for residential buildings. This volume does not depend on the number of people in the room. According to sanitary standards, people temporarily staying in the building need 20 m³ of supply air per hour, while permanent residents need 60 m³;
- At least 180 m³ of air per hour – for utility rooms.
To calculate the diameter of the ventilation pipe, they use a system that has only natural air flow; the installation of forced devices to ensure air circulation is not considered. The simplest method of calculation is the ratio of the cross-section of the ventilation duct opening to the area of the room. For 1 m², a residential space requires 5.4 m² of channel cross-section, and a utility room requires 17.6 m², but to obtain more accurate figures, more complex calculations should be carried out.
All ventilation ducts present in the building, where the air flowing outside through the pipe moves, are connected to a ventilation pipe that carries out the ventilation to the roof. To calculate the height of a given pipe, you need to know its diameter and use a special table.
The cells indicate the values of the air duct sections. The left column in the table contains the width of the pipes, and the top line indicates the height of the pipes in accordance with a certain diameter in millimeters.
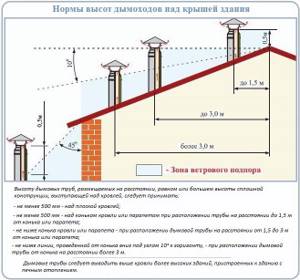
In this case, the following SNiP standards also need to be taken into account:
- If the air duct is located no more than one and a half meters from the ridge, its height should not exceed half a meter. If the pipe is located at a distance of 1.5 - 3 meters from the ridge, it is not worth erecting it below the ridge.
- If the chimney and ventilation pipe are located next to each other, their height should be the same. If this rule is violated, smoke may enter the room from the heating element.
- On flat roofs, the height of the pipe should not be less than half a meter.
When choosing a vent pipe and its location on the roof, it is also worth considering wind resistance. To calculate natural ventilation, you can use special programs, which will greatly simplify the matter. To do this, it is necessary to determine the required amount of air entering the room. These programs also calculate parameters such as:
- Air duct pipe shape;
- Resistance generated by air movement;
- Average temperature indoors and outdoors;
- The degree of roughness of the internal walls of the air duct.
In this way, the height of the ventilation pipe above the roof is quickly and easily calculated to ensure the best air movement under given conditions.
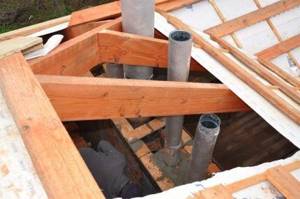
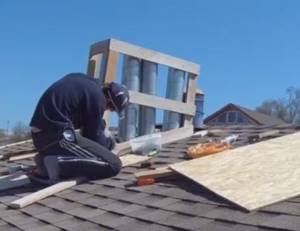
Box installation steps
After the location for the passage of ventilation pipes through the roof has been chosen, it is necessary to carry out all the work in the attic (install a pipe or pipes) and only then begin to construct the duct. This procedure is typical for private houses, so the different options have been well researched and a standard solution can be offered that is suitable for almost any situation.
Required materials and tools
Before you decide to make a ventilation box on the roof on your own, you need to understand that this event will last at least one daylight hours. Therefore, you need to check the weather forecast to be sure there is no rain or wind.
Any work on a pitched roof must be carried out taking into account safety requirements. To do this you need:
- have a safety rope tied to your belt;
- wear the right shoes that don’t slip or fall off your feet;
- install two ladders on the roof slope on the sides of the place where the box will eventually stand.
Neglect of safety rules may lead to the absence of a box on the roof in the near future, due to the installer ending up in the trauma department of the hospital.

Ideally, the climb to the roof should look like this. But usually an ordinary ladder is placed on the roof with an attached corner, which is held by the ridge
When carrying out the work you will definitely need the following tools:
- heavy hammer;
- screwdriver;
- wood saw;
- metal scissors;
- knife and scissors for soft materials and films;
- level;
- grinder (if the roof is covered with galvanized or metal tiles).
It is also necessary to take care in advance of a sufficient number of wood screws, construction tape, small nails and other consumables.
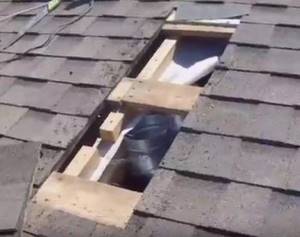
Cutting a hole on the roof
To accurately determine the position of the hole, you need to drill 4 holes from the inside in the corners of the future box. Then, using a ruler, you need to draw an outline and start cutting it out.
If the coating is metal, then you need to use a grinder or metal scissors. You can remove roofing felt or other “soft” material with any suitable tool: a knife, scissors, a jigsaw.
If it is possible to save some of the sheathing boards without damage or with minor cuts, then this should be done
It is easier to remove a solid sheathing with a jigsaw, but you can also use an ordinary saw. Before doing this, it is better to determine from the inside where the nails and screws are attached so as not to “catch” them.
Formation of a wooden frame
The frame can be made from a 35 mm thick edged board (there is no point in being thicker) or a 50 × 100 mm block. The vertical posts should rest against the floor of the attic, and not be attached to the sheathing or rafters, since the box will have a large windage and can be blown away by the force of the wind.
Above the roof, the frame is tied along the top and a stiffening belt must be additionally installed at the roof level. It will also serve as a base for attaching the sheathing.
After the frame is erected, the pipes are extended from the attic to the top of the box being built. If the ventilation system is made of branded elements, then there is nothing complicated in this procedure.
If the pipes are not made of metal, then it is better to install them after assembling the frame, since plastic is easily susceptible to impact and can be broken during operation
It is necessary to align the pipes exactly vertically, as well as to ensure their symmetrical arrangement inside the box. It is necessary to meet the condition that there is at least 5 cm of space from the pipe to the edge of the box, which will be filled with insulation. And the top must be level, for which you will need to use a level.
Insulation of the internal space
Before laying the insulation material, you need to hem the boards covering the box from below at the level of the attic ceiling. This must be done so that the insulation does not fall down.
Since it is impossible to put solid material into the box, there are two options left:
- freely deformable material such as mineral wool;
- bulk material such as perlite sand, fraction 0.16 - 1.25 mm.
Expanded clay (thermal conductivity is not low enough), foam chips (coarse-grained), sawdust (can rot) are not suitable for this purpose.
Mineral wool must be laid very tightly, so that there are no cold bridges. Therefore, in units of volume, its consumption will be almost twice as large as the space of the box filled with insulation.
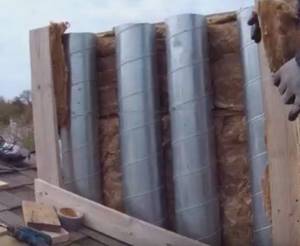
It is easier to lay mineral or basalt wool when the box is still standing as a frame. It will be quite difficult to push the material between the stiffeners and the wall
Perlite is very “fluid”, so it perfectly fills all voids. But to prevent it from leaking out, the inside of the box will need to be lined with dense fabric such as geotextile. When working with perlite, you need to wear safety glasses and a mask, especially if there is wind on the roof. After backfilling, it is better to immediately put a layer of mineral wool or foam plastic with holes under the pipes, since perlite can swell.
The frame needs to be covered with OSB board or board, thickness 1.0-1.5 mm. To save time, you may want to pre-cut the side walls according to the dimensions calculated for the box. However, practice shows that this is not worth doing. When installing the frame, unexpected deviations often occur that slightly change its dimensions.
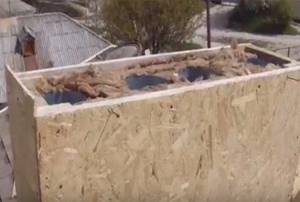
After insulation with mineral wool and installation of the walls, the box looks like this. The insulation should be flush with the ventilation pipe outlets
If the walls of the ventilation duct are assembled from several elements, then you need to remember that there is no special need for the joints to fit tightly. Therefore, there is no need to waste time on adjustment.
Waterproofing the ventilation duct
One of the dangers for insulation such as mineral wool is that water gets into it and its subsequent freezing. Therefore, it is necessary to perform a vapor barrier.
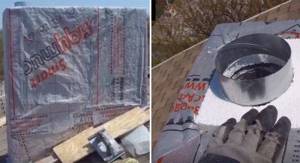
For waterproofing, reinforced polyethylene film or polymer membrane is used. It is advisable to apply it in one piece
In the center of a piece of waterproofing material you need to cut a hole 2 cm smaller than the diameter of the pipe. Then cuts must be made along the inner edge, no more than 1 cm deep. When placed on the pipe, such an element will tightly close the gap between it and the plane of the slope.
The film can be pressed down on top with polystyrene foam, cutting holes for the pipe outlets. After this, the upper part of the box must be reinforced with mesh and cement.

It is better to cover polystyrene foam and mineral wool with cement. Otherwise, the birds will get to them and try to take them away for nests. In this case, insulation and vapor and waterproofing will be compromised. Before laying the covering, the area around the outlet of the ventilation pipe is covered with a waterproofing carpet
If the pipes are below the cement level, then inserts need to be added. To prevent this situation from happening, it is better to immediately install ventilation outlets with a height reserve (10-20 cm), since cutting off the excess is easier than delivering additional fragments.
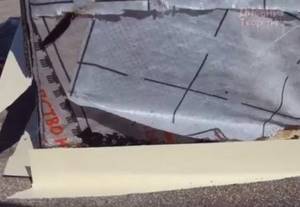
Ensuring waterproofing of the base and sides
When it rains or snow melts, streams of water flow across the roof. Particular care must be taken to prevent them from getting under the ventilation duct.
There is a rule that ensures that water does not enter when it flows freely along an inclined surface: the upper waterproof element must be pushed over the lower one. According to this postulate, the waterproofing design of the ventilation duct located on the roof is designed.
The outer side of the rib, which will be facing down, must be coated with liquid roofing felt or double-sided bitumen tape glued to it. Then no splashes will get under it
First, you need to nail the junction strips to the base of the box. They look like corners with a side width of 5-7 cm. It is better to fasten them not with nails or screws, but with bitumen mastic or liquid roofing felt.
The strip, which will be on the side closest to the ridge, must be pushed under the roofing. Then water will not flow under it, into the under-roof space and into the attic.
The waterproofing that protects the sides of the ventilation duct can be roofing felt, soft tiles, rolled bitumen and bitumen-polymer roofing, polymer membrane, galvanization or any other durable material with water-repellent properties.
If it is not solid, then it must be fastened from the bottom so that the upper parts are layered on the lower ones.

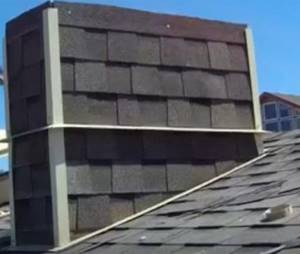
A ventilation shaft equipped with a duct can be finished with any material, including flexible bitumen shingles and similar rolled material. After waterproofing the box will look like this
If desired, you can install an additional visor in the middle, although if the deflector for ventilation pipes grouped in one shaft has large protrusions, then there will be no point in it.
The corners should be covered with a metal or plastic corner (with an edge width of 5-7 cm), which should be placed on top of the waterproofing. This is the simplest solution
If soft material was used for cladding, then it is advisable to coat its joints with some kind of adhesive. Liquid roofing material is suitable for this. This is necessary so that strong winds do not fray the waterproofing over time.
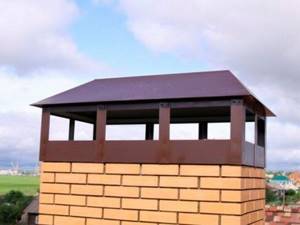
Installing and fixing the umbrella
There are 2 options: order a visor from manufacturers or make it yourself. As in the case of the sidewalls, there is no need to make an umbrella-deflector for the box in advance, since the dimensions of the constructed object may differ from those calculated, which will lead to problems with joining the parts.
You can order a visor from companies that create metal products. You need to measure the outer perimeter of the top of the ventilation duct, select the color and shape of the cover. Typically production time takes 1-2 days. During this period, you need to cover the ventilation with a temporary cap, for example, made of plywood with roofing felt nailed on top of it.
You can make a simple cap out of metal yourself. To do this you will need corners, a sheet of metal 1.0-1.5 mm thick and the ability to work with welding
The hood can also be attached to vertical bars that form the frame of the entire ventilation duct. In this case, they should initially be 20-30 cm higher than the pipe outlet. The deflector can be made single-pitch from a wooden panel covered with a galvanized sheet on top. With this solution, it is not necessary to have a welding machine and the ability to work with it.
All wooden parts of the lid must be coated with antifungal impregnation or weather-resistant paint for external use, for example, brand PF-115. Upon completion of installation, you need to check that the installed visor does not wobble, otherwise the influence of wind will gradually loosen the fastenings.
Features of installation of a standard design
Units for penetration of ventilation communications of industrial production are carried out in accordance with the requirements of GOST-15150. It is believed that the air temperature inside the communication pipe should not exceed 80 degrees, and the humidity of the flow should be within 60%.
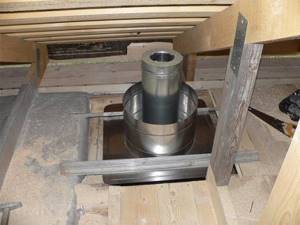
The passage of the ventilation pipe through the roof usually has a square configuration; this must be taken into account when choosing the shape of the air duct and the type of transition unit
To calculate the passage unit, you should take into account such indicators as the slope angle of the slope and the distance from the element to the roof ridge.
A typical transition unit can be made in the following variations:
- with or without condensate ring;
- with insulated or regular valve or without valve;
- with manual or mechanical control for valve;
- with or without spark protection, etc.
The options listed may vary depending on the situation. For example, there is no need to install a mechanical valve if the system is stable and does not need constant adjustment. It is also possible to manufacture a penetration unit to order.

Typical roof penetration units made at industrial enterprises are very diverse; they are selected depending on the size of the pipe and the characteristics of the roof
Structures of this type are made of polymers, stainless steel with a thickness of 0.5-0.8 mm and black steel with a thickness of 1.5-2 mm. The cross-section of the finished transition unit can be round, oval, square or rectangular. The specific model is selected depending on the type of roofing material and the parameters of the ventilation pipe.
Although foreign-made passage units are usually of high quality, they are not always adapted for local climatic conditions, so it does not hurt to carefully study the offers of domestic manufacturers.
They are usually labeled as follows:
- the letters UP with an index from 1 to 10 indicate a design without a capacitor ring and valve;
- indexes from 2 to 10 indicate devices with a manual valve, there is no ring;
- The designation UPZ is assigned to devices with a special platform for the actuator for the valve, which is provided for by the design.
Complete models of transition units include embedded bolts and nuts that are attached to wooden structures and reinforced concrete cups intended for installation. Mineral wool is successfully used for thermal insulation, which is recommended to be protected with a layer of fiberglass.
If it is necessary to install a ventilation unit with a safety valve, you should pay attention to the pipe intended for it. A valve must be attached to the bottom flange of this element. The upper flange is designed to fix the position of the air duct. Clamps and brackets are used as fasteners for braces.
To further protect the ventilation riser from moisture, you need to use a skirt. The condensate collector is welded to the pipe.
It is designed to remove moisture from air masses that move along the ventilation duct. To control the valve, a mechanical unit is used, which should be installed on the shelf intended for it.
This element should not be installed next to the condensate collection ring in order to maintain the integrity of all elements of the penetration. Typical models of units are usually installed before the start of roofing work: first, the air ducts of the ventilation system are installed, then the passage, and the roof is installed after that.
It is recommended that upon completion of the work, seal all joints, including the junction of the assembly elements with the roofing.
To do this you should:
- clean the surfaces of the pipe and roof from contamination;
- seal the lower part of the air duct and the adjacent area of the roof with foil paper;
- fill the holes with sealing compound.
These measures will help protect the penetration from moisture and create additional thermal insulation of the structure.
The article we recommend will familiarize you with the rules for installing the ventilation system itself, in which the nuances of design and organization are discussed in detail.
Characteristics of domestically produced UE
UP for ventilation ducts must be manufactured in accordance with GOST 15150. This document contains recommendations on UP sizes and element clearances when installed on the roof.
UP products of various sizes and shapes are produced in industrial serial production. The basic requirements that must be met for ventilation units and elements are as follows:
- the assembly must be made of metal at least 1.19 mm thick;
- the diameter of the round section UE should be in the range of 10 – 12.5 cm.
- nodes with a rectangular cross-section have no size restrictions;
- the unit must be treated with an anti-corrosion coating;
- the size of the support ring should exceed the diameter of the pipe by 30-40 cm;
- the total length of the UE structure should, as a rule, not exceed 100 cm (the valve is not taken into account);
Since the ventilation system works as an aerator, before choosing the type of unit, you should calculate their installation diagram and take into account the room parameters:
- humidity level;
- degree of gas contamination;
- possible minimum and maximum temperature values in the building;
- dust content and others.
Main mistakes in installing a ventilation system: how to avoid them
Considering that today many people install the roof of their home on their own, let’s look at the most common mistakes when installing ventilation systems.
- SNiP standards are not taken into account.
- Unsuitable ventilation elements selected.
- The ventilation ducts are not located symmetrically.
- The system throughput was incorrectly calculated and the heat balance was not taken into account.
- Installation work was carried out incorrectly.
The basic rule when designing ventilation systems is that the more proportional and shorter the ventilation is, the more efficiently and with less noise it will work.