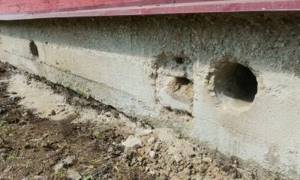
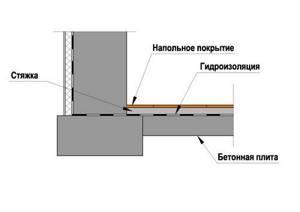
Many country houses have ground floor floors located at some distance from the ground. The basement often becomes damp, moisture accumulates there and mold grows, gradually destroying the building's structure. In order for air to circulate and problems with dampness to arise, it is necessary to organize proper ventilation of the underground space. Such ventilation is carried out through special openings - vents.
They are provided at the construction stage of the building or are made in a ready-made wall or in the foundation. After the arrangement, the question arises about the need to close the vents in the basement for the winter period. Some experts say there is no need to close them. Let's figure it out.
Proper production of ventilation
To have a dry basement, good ventilation is necessary.
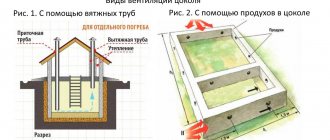
Such ventilation in the foundations is included in the design when organizing the formwork. To organize the vents, it is necessary to take into account their location above the ground. The height of the vents from the surface should not be less than 30 cm, so that in the spring melt or rain water does not leak through them. It is likely that in some cases, the ventilation holes will need to be made higher if the height of the foundation allows. It all depends on the climate and the amount of snow. Please note that wooden beams cannot be used to organize ventilation. For vents, it is better to use plastic or asbestos pieces of pipes with a diameter of 110-130 mm, mounted in concrete (at the stage of pouring it).
Boxes and beams are pulled out from the foundation no earlier than a month after it is laid. During this time, they “stick” to the concrete, and it is difficult to knock them out. For this operation you need to perform the following steps:
- After the concrete has dried, take a metal drill and drill into the block on both sides, in the center or around.
- Then take a wood drill and drill a hole through, and the drill should not be more than 2.5 cm.
- Having made a through hole, you need to use a semicircular chisel to expand the hole from the center in any direction.
- Then, using a straight chisel, the frozen side is beaten off.
The procedure for removing beams clogged in this way is quite labor-intensive. Therefore, it is better to use other methods, for example, vents can be made using metal boxes instead of bars, since it is easier to knock it out of the foundation. You can also use sewer pipes for this. In this case, the ventilation vents are positioned strictly one against the other.
Peculiarities
For high-quality arrangement of the ventilation subfloor, the windows are covered with special lattice covers (made with your own hands from meshes or gratings). This is done to prevent animals from entering the house through the vents. The diameter of the boxes is selected in proportion to the ventilation covers. If the vents are not made in advance, they are drilled using diamond core bits.
The shape of the holes can be very different: square, round, triangular. But, as a rule, they are made rectangular. The vents must be positioned evenly, at equal distances from one another. If the house is cold, it is better to close the holes. But in wooden houses they are not closed under any circumstances, especially if the house is new.
If there is no ventilation or blocked openings, you may incur costs associated with repairing the foundation or cleaning the walls from the resulting rot and mold.
A little about the positive aspects
Unlike other methods of organizing ventilation, vents have much more advantages. The main ones:
- long service life;
- low price;
- reduction of heat loss;
- environmental cleanliness;
- practicality.
None of the other methods of ventilation can compare in efficiency and practicality with vents.
Moisture protection
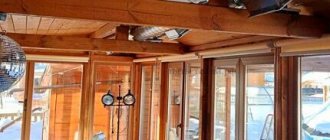
Each built house, as a rule, has a special hatch through which you can go underground. When there is no such move, you need to make it yourself. All underground structures in a wooden house must be systematically inspected for their condition.
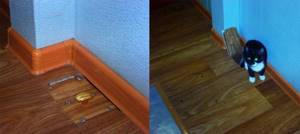
In old houses, there are hatches in the floor not only for people, but also for cats.
Every year you should inspect the foundation of the house, floors, and lower crowns in a wooden house. Wooden structures must be free of traces of fungus and insect nests.
The underground should have regular dry soil. When constructing modern foundations, builders must remove vegetation cover. This was not done in old houses, so if the house was built a long time ago, you should fill it with sand yourself. It will allow you to quickly and effectively remove moisture from the subfloor.
If the area is low-lying and the soil is wet, then underground the surface of the earth should be covered with some kind of waterproofing material. It is recommended to leave the middle part open to ensure ventilation. When the surface of the earth is covered with waterproofing, the underground will not become waterlogged during rains, so condensation will not appear on structures in a wooden house or cottage. It is necessary to waterproof the soil only if the soil in the dacha near the house is really damp.
Why is ventilation in the basement so necessary?
The construction of any private house requires compliance with all norms and rules, which will later have an impact on the comfort and coziness of its residents. But, some builders often forget that some work also concerns the “underground”. After the builders have built the foundation, it is necessary to make ventilation holes in it. In addition, they are made according to certain rules that will make it possible to make the house as warm and dry as possible during operation. A ventilated foundation allows you to get rid of condensation, which is the main enemy of any building. It is because of its effect that small drops of moisture appear on concrete, metal and wooden surfaces.
Having decided to make a monolithic foundation, the need for ventilation will be even greater. In a closed enclosed space, due to the temperature difference in the house, outside and underground, the condensation process accelerates. Building materials that are in such an environment quickly lose their strength properties. Mold forms on the walls of the basement in a private house, which can very quickly spread to the walls of the rooms. Fungal growths are harmful to human health. By inhaling them, his body succumbs to the threat of asthmatic and allergic diseases.
The need for ventilation is also caused by the slow but dangerous accumulation of radon gas in the basement. Even in small volumes, this radioactive gas poses a great threat to the human body. There is a theory that radionuclides show their activity when interacting with metals, as well as with moisture. It is the lack of ventilation in heated houses that leads to the negative manifestation of radioactive gas. In addition, if the construction of a dwelling is planned on the territory of metal deposits, it is impossible to do without foundation ventilation.
Installation of a forced ventilation system
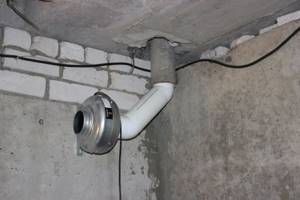
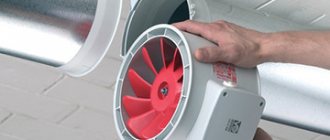
Most often, forced ventilation is created on the basis of natural ventilation, in which a fan is simply mounted.
Most often, forced ventilation is created on the basis of natural, and therefore involves the implementation of all stages of the work of the previous scheme, but with the obligatory installation of a fan (power up to 100 W) in the cavity of the exhaust pipe.
After installing the fan, you should lay the cable and take care of the switch. It is also better to cover the lower end of the pipe with a protective grille, and the upper end with a mesh with a visor. They will protect the system from foreign bodies, snow and moisture.
By adapting a windmill to a fan, you can eliminate the use of electricity.
Along with this option, there are other methods that provide forced ventilation:
- Installing a deflector on the top of the hood. It creates a zone of rarefied air, which improves its circulation.
- Installation of a rotating diffuser-vane on the top of the supply pipe, which operates in gusts of wind.
- Installation of a heating lamp (Minion type) in the exhaust pipe. By providing heating of the air in it, it will speed up the process of its removal.
- Installation of a monoblock or modular system. Being fully mechanized, it creates ideal conditions for storing food even in large cellars. But it has a high cost.
Regardless of the method of creating forced ventilation, it is recommended to make a bend in the exhaust air duct under the ceiling and place a condensate collector in it - a piece of pipe with a hermetically sealed glass. This way you can prevent it from accumulating and freezing on the walls, which will clog the air duct.
How to properly close vents
First you need to understand what products are and why they are needed. A vent is a small hole in the foundation that opens to the outdoors and allows air to circulate in the crawl space or basement. They can be made in the form of a pipe extending from the underground up to the roof. The essence of the pipe is the same - organizing air circulation.
Ventilation of walls and subfloors is very important for a private home
Ventilation of the basement and subfloor is necessary for several reasons:
- Firstly, no matter how well the waterproofing of a concrete foundation is done, it still absorbs moisture. This is the physical property of concrete. And from the water it begins to rapidly collapse, as a result the house can skew on one side, which can cause it to simply collapse. Thus, constant ventilation is a necessity for the basement.
- Secondly, ventilation helps remove harmful fumes from the soil from the basement. For example, breathing radon vapor is considered extremely hazardous to health. You also need to remember that mold and other types of fungi that destroy concrete quickly develop in stale air.
- Thirdly, ventilation allows you to maintain the recommended temperature in the underground – more than 0 degrees. This is necessary to preserve the concrete and wooden floor elements.
You can buy special vent plugs of the required diameter at a hardware store. They have adjustable valves and, having installed them once, you won’t have to return to this issue.
In general, there are no special rules for closing air holes. The main thing is to make sure that no water gets into it. If snow, or even more so rain, can flow into the air, then this threatens a flood. Therefore, you need to dig a drainage groove to drain water from the wall where the ventilation is located. It is advisable to make a shield over the hole to cover it from rain.
What it is?
Vents are ventilation openings.
They are made in that part of the belt that rises above the ground level. If the strip foundation is combined with a basement or ground floor, vents ventilate the underground part of the building, providing it with normal humidity and air circulation.
If the house is built on a strip dug into a trench, vents are needed to ventilate the space between the ground level and the subfloor.
Why are they needed?
The basement part of the building must be equipped with ventilation. You can ventilate the basement using forced ventilation stretched through the ceilings and walls of the house. But this option is quite expensive, complex, and not entirely reliable.
The fact is that basements and basements are characterized by high humidity. Moisture penetrates into the underground part of the building through the floors and walls. Soil saturated with moisture transfers it to building materials, even if they have maximum moisture resistance and are protected by additional insulation.
If moisture is not removed by ventilation, it will accumulate and then rise further - to the floor and walls of the above-ground part of the building. The result is that it will penetrate into living spaces, and with it fungus and mold, which are harmful to humans and can also destroy wall and finishing materials.
Vents provide ventilation to the basement, making it suitable for use, protecting the above-ground floor of the house from moisture. When positioned correctly, they help ventilate the basement. If necessary, the ventilation system is supplemented with forced ventilation.
What will their absence lead to?
Without ventilation of the basement, equipped under a building with a strip foundation, residents are highly likely to encounter the following problems:
- The basement will become unsuitable for storing things, food, equipment - all of this will become damp and acquire an unpleasant odor.
- The walls and floor of the basement will begin to collapse.
- Moisture will rise to the first floor of the house, and dampness, unpleasant odors, mold, and mildew will appear in the rooms.
- The outer walls of the house will become saturated with moisture, which will negatively affect the technical characteristics of the wall building material.
- Moisture stains will “creep” along the exterior and interior finishing, thereby ruining the design of the building.
Radon release
A separate problem with unventilated bases is the release of radon. Radon is a clear gas produced by the breakdown of uranium found in most types of soil.
Radon is radioactive and extremely hazardous to health. Emitted from the soil in an open area, it dissipates, mixes with the air and becomes practically non-hazardous (with the exception of radon-hazardous areas near gas and oil production).
Being under the foundation of the building, radon cannot be freely released or mixed with the air. Therefore, it seeps through micro-cracks in the foundation into the building. The first thing he does is go to the basement. Here it needs to be “blown” out using ventilation.
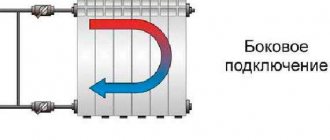
Location of vents
Ventilation diagram
To ensure the most effective ventilation and protection from radon coming from the ground, building codes and regulations (SNiP) recommend placing ventilation openings no lower than 0.7 m from the ground level. However, due to the design features of the building, it is not always possible to fully comply with these recommendations. Therefore, practical considerations should be followed:
- in order to prevent flooding of the underground space, the height of the vent in the strip foundation from the ground level should be located at a height not less than the level flooded with melt water (in most regions this is no more than 30 cm);
- to avoid debris and dust getting into the vents, it is necessary to make them as high as possible from the ground level, as far as the foundation design and floor level allow;
If the foundation base of the house is not high and the ventilation holes, if made in the body of the foundation, will be too close to the ground, they can be made along the edge of the foundation, or between the first and second crowns of the outer wall.
How to fix the situation
What to do if there is a foundation, but they forgot to make vents or their sizes are insufficient for normal ventilation - fungus, high humidity and other “charms” have begun to multiply in the underground. There are several ways to solve the problem:
- Increase the size of existing ones or drill new ones. Drilling into a monolithic foundation is not an easy task. This can be done either using a crown of a suitable size. If you don’t have a crown, you can take a long, large-diameter drill and use it to drill many small holes around the perimeter of the vent. Then the remaining gaps are drilled, and the uneven surface is then either sanded or simply covered with a grid. Another way is to order diamond drilling. In this case, special equipment is used, holes are drilled much softer, without shock loads.
- If it is not possible or desirable to make new or expand old vents, you can improve draft by connecting one or more pipes from the vent to the roof. Due to the pressure difference, the draft will be better and the humidity will decrease.
- Make forced ventilation. To avoid turning it on/off manually, you can set a timer or a differentiated thermometer. It will turn on the fan when the temperature in the underground is higher than outside (a condition for condensation).
- Reduce the amount of moisture entering the subfloor. Most often, the source is soil, especially when the groundwater level is high. It is covered with a vapor barrier. Thick polyethylene film (thickness from 150 microns) is suitable. It is laid so that one sheet overlaps the other by 10-15 cm. The joints are taped with double-sided tape (you can do it twice - at the beginning of the “overlap” and at the end). The film is placed on the walls by 20-30 cm and secured with a strip. To prevent the film from being damaged during further use, a layer of sand is poured over it or a skinny screed 3 cm thick is made. If the foundation, blind area and base are insulated, this gives a good effect - in combination with a ventilation pipe leading to the roof. If there is no insulation, condensation will form on the film. By making a slope in one direction, moisture can be collected and removed outside the subfloor. This option, although worse, works.
- For ventilation of the underground in a bathhouse (heated) or in houses with stove heating, there is another solution - install the stove so that the air is drawn from under the floor (make a vent below the level of the finished floor).
- No underground floor - no ventilation needed. To implement this axiom, the entire space from the ground to the subfloor is filled up. The most affordable material with good heat-insulating properties is used. Usually this is expanded clay. Its disadvantage is that it is hygroscopic and is capable of “pulling” water from the ground. If the groundwater level is high, if you do not provide high-quality waterproofing on the ground (film extending onto the walls), things can only get worse. There is a second suitable material with better thermal insulation characteristics and is completely non-hygroscopic - granular foam glass or broken glass. This material appeared relatively recently and few people know about it. For this case - an excellent choice. True, it is more expensive than expanded clay, but it is also many times warmer and safer (expanded clay is often environmentally unsafe).
Which ventilation scheme should I choose?
So, we have figured out whether an underfloor ventilation system is needed, and now it remains to decide which scheme to choose for specific conditions. There are several important points to consider when choosing a system. The operation of ventilation largely depends on the type of climate in a particular area, average street temperature, etc.
When installing natural ventilation, the main rule must be observed: the supply openings are located below the exhaust openings. The greater the altitude distance between them, the more efficient the system is.
Natural ventilation is more effective in winter, since it is at this time that a large difference is recorded between the temperature inside the underground and outside, which ensures good circulation of air masses.
However, with an even greater drop in temperature, there is a possibility of an excessive increase in air exchange, which is also not particularly good, as it can lead to freezing of structures. Therefore, if the temperature drops significantly, the vents must be closed.
If the house has supply and exhaust ventilation, it makes sense to connect the exhaust from the basement to the general circuit. This way, the outflow of air will be stimulated in any weather.
To install a combined ventilation system for a small underground area, it will be enough to install one pipe. In order for it to provide both output and reception of air masses, it needs to be divided vertically into 2 channels.
Such ventilation pipes are sold in hardware stores. Each channel has its own valve to adjust the flow intensity. The functioning of such ventilation is checked quite simply: you need to attach a sheet of paper to the outlet holes one by one.
Features of laying holes for ventilation
Ventilation for a particular house begins to be calculated during the design of the structure. To answer the question of how to ventilate the foundation of a particular building, you should take into account a number of important factors. These should include the following points:
- location of the future structure;
- how protected the house is by nearby houses;
- Rose of Wind.
Usually, to organize a ventilation system in any private house or bathhouse, it is enough to provide two through holes in the foundation. However, there are exceptions to the rules, and to make sure of your choice, you should accurately calculate their number depending on the location of the future home. To do this, at the hole design stage you need to build on known building codes. According to them, the holes in the foundation for ventilation should have a size equal to 1/400 of the total area of the basement.
The diameter of such holes directly depends on the perimeter area of the future private building. A hole of 25 cm is considered ideal, but this is not always feasible. In this case, it can be made smaller, but it is not recommended to lay holes with less than 11 cm in diameter. It is better to make such holes a little larger than necessary. This can be easily fixed with the help of special plugs that will reliably protect against through air flow.
To avoid the formation of air pockets, the first hole near a blind corner should be placed at a distance of approximately 90-100 cm. If the foundation provides for the presence of ceilings, then similar holes are also made in them. They should be laid in an even number and placed in pairs in the foundation. The outer side of the vent should be located at a distance of approximately 10 to 15 centimeters from the level of the ground cover. The finished holes do not need to be covered, as this will impede normal air flow. Next you need to decide where you need to place them.
If a private house under construction is located in a depression (lowland), there are other buildings nearby, or there are natural obstacles to air movement, then they need to be installed along the entire foundation. This ensures the most efficient ventilation of the foundation in a private house. In the cold winter, the owners, due to their illiteracy, try to completely close these holes with some material, thinking that all the heat escapes through them. This should not be done under any circumstances. Because then moisture and harmful radon begin to accumulate in the basement, which simply poison the residents of this private house.
That is why you should strive to ensure that the ventilation system in the house functions all year round, especially in winter. There is no need to harm your health and your home; it is quite easy to shorten its service life, but it is very difficult to restore it. To prevent it from being cold, first of all, before frost, you need to seal all the existing cracks and gaps in the house.
Calculation
Schematic display of location and size. The optimal number of ventilation windows should be one per 2-3 meters. It is worth considering where the wooden house is located; if it is located on a hill, then two vents will be enough, for a house in the lowlands from four. It is advisable for homeowners who are building a house to know the local wind rose diagram (a diagram of the wind regime in a certain place based on long-term observations) so that the ratio of air flows on each side is not a problem. Let's look at an example of how to make the calculation.
Let's say the dimensions of the foundation are 5 by 6 meters. The planned dimensions of the vents, which have a rectangular cross-section of 20 by 25 cm. It is necessary to calculate the minimum permissible number of windows and correctly position them along the walls.
The required area of the vents is determined by the formula:
S = F/400 = 30/400 = 0.075 m2,
where: F – basement area.
The required number of vents is determined as follows:
N = S/P = 0.075/0.05 = 1.5 ≈ 2 pcs.
where: P = 0.2x0.25 = 0.5 – area of one vent.
It turns out that you need 4 holes to avoid unventilated “bags”. They can be placed on the short or long side of the house. But the best ventilation will be if the vents are located on the short sides. The height above the ground is not lower than 30 cm from the ground.
Algorithm for arranging ventilation holes in the foundation
Tools needed for work: hammer, sledgehammer, shovel, drill or hammer drill.
In order to make vents, you need to prepare the following tools and materials:
- shovel;
- hammer;
- sledgehammer;
- drill or hammer drill;
- wood drill with a diameter of 2.5 cm;
- metal drill with a diameter of 1.4 cm;
- straight and semicircular chisel;
- plastic or asbestos-cement round pipes with a diameter of 11 to 13 cm (wooden timber);
- sand.
It is necessary to take care of how to make vents during the construction of the foundation. If we talk about a strip foundation, then each vent is laid at the stage before pouring the concrete mixture. It should be remembered that the height from the soil level to the vent should be 30 cm or more. If this condition is not met, moisture generated when snow melts in the spring can enter the subfloor and flood it.
The diameter of the holes depends on the size of the foundation perimeter. The longer it is, the larger the diameter of the vents should be. Most often, ventilation openings are installed with a diameter of 10 to 15 cm. It is also necessary to remember the basic rule: all vents must be located parallel to each other in parallel walls.
Typically, vents are made from round pipes of a certain diameter. You can also use a wooden beam, but experts do not recommend this. This is explained by the difficulties that may arise when removing timber from hardened concrete. Within a month, while the concrete solution is drying, the timber will stick firmly to it, and it will be quite difficult to remove it.
In the case when pipes are used to make an vent into the foundation, the process is greatly facilitated. First of all, it is necessary to cut the pipes into pieces, the length of which will be equal to the width of the formwork and, accordingly, the width of the future foundation. Then sand is poured into each piece; both ends must be plugged with unnecessary rags or paper to avoid sand spilling out and concrete penetrating into the pipe. After this, the pieces of pipes are placed in the marked areas of the formwork so that they rest closely against the parallel sides of the form. After placement, future ventilation holes are filled with concrete.
How to remove wooden beams from hardened concrete
Construction of a strip foundation.
If beams were laid in concrete, then to remove them you will need to carry out a number of the following measures:
- Using a metal drill, make 2 holes parallel to each other around the perimeter of the block or 1 hole in the center. Then use a wood drill to drill the hole through.
- Use a semicircular chisel to widen the hole to one side of the block, and use a straight chisel to knock this part away from the hardened concrete. Thus, it is necessary to remove 2 corners of the beam.
- After this, the remaining 2 corners are knocked out using a sledgehammer.
When the concrete solution of the strip foundation has dried, both ends of the vents are freed from paper and sand. After this, each ventilation hole must be equipped with a grille, which will not only provide a constant flow of fresh air into the underground room, but also protect it from the invasion of rats, mice and insects.
By learning how to make ventilation holes in your basement, you will extend its life and save yourself from the need for renovations in the basement.
An underground room equipped with ventilation will remain dry throughout the year, regardless of weather conditions and the level of melt water. And this, in turn, will protect it from the appearance of dampness, mold and mildew.
Working with the floor
Here's what you'll need during the process:
- drainage pipe;
- concrete solution M 100;
- Boer;
- gravel;
- steel strip.
Usually the work starts from the walls, but in this case the primary work starts from the floor. There are 2 options that are equally popular, so it’s worth considering them separately.
Option 1 is difficult.
Diagram of the external basement drainage system.
This option is usually used in permanent cellars, where moisture accumulates regardless of the level of ventilation in the room.
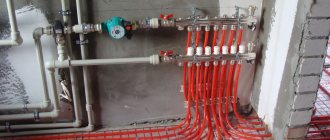
First you need to organize a drainage system. To do this, drainage pipes are laid in increments of 0.4-0.5 m, and at the end they are connected together by another pipe. A 60-70 cm hole is drilled in one of the corners, into which ¾ of the gravel is poured, and the remaining space is occupied by a pipe outlet. The volume of moisture is much lower than the drainage can let through and the soil absorb.
After this, the pipes are lined on both sides with thin steel strips to protect them from the effects of concrete. Next, the floor is poured with concrete exactly at the height of the pipes, and to level the floor, perforated steel sheets are laid on the pipes, which are simultaneously sunk into the concrete.
Option 2 is simple.
The good thing about an earthen floor is that you can expand the basement at any time.
A simple option does not mean a bad one. An earthen floor allows moisture to be absorbed immediately, but does not provide high reliability. The earth is malleable, so shelves and racks will push the ground with their legs over time, which can cause balance to be disrupted. The second disadvantage is the access of some insects and worms to the basement, which can cause inconvenience.
But at the same time, the advantages include the possibility of additional expansion of the basement in depth (there are situations when even in the underground it is necessary to make an additional “invisible” niche), as well as accelerated cooling of the air due to the close proximity of the ground.
Which of the two options is closer - everyone chooses for himself. The first option is more modern and sophisticated, while the second can be called time-tested.
Return to contents
Calculation of vents
Indeed, construction according to a plan verified by design calculations allows you to do without errors and subsequent alterations, and this is the key to saving both time and money. But the preliminary calculation of vents in the foundation, which is carried out at the design stage, has only an approximate, estimated nature of the number and location of vents.
The calculation of air vents in the basis, which is carried out at the stage of designing a house, is only of an estimation nature
There is no universal formula or algorithm here; there are only recommendations prepared on the basis of standards. The fact is that before the foundation of a building appears, it is impossible to accurately predict in advance how drafts under it will manifest themselves.
There are the following general rules regarding how to make vents in the foundation (their sizes, location and arrangement of holes are taken into account):
- A complete and functional installation of vents in the basement is impossible without the free movement of air under the floor, so the logs must be located at least 25 cm above ground level. And the distance between them is taken to be about 55–65 cm. If the floor is low, then no There can be no benefits from having vents.
- The vents are made strictly opposite each other, that is, they are placed on the same line perpendicular to the walls.
- The distance between the vents is chosen to be no more than 3 meters, the height from the ground level to their base should be at least 15 cm, to the upper edge of the base - 15–20 cm. A rectangular hole with a side width of at least 14 cm has sufficient dimensions for ventilation tasks. Thus, the number of vents in the foundation of an average private house will be no more than 8, that is, two in each wall.
- If the house has internal load-bearing walls resting on transverse foundations, then such walls create a barrier to the free movement of air through the underground. Therefore, the placement of vents should also be planned in the base of the internal load-bearing wall. Their size is made slightly larger in diameter than the vents under the external walls in order to provide greater freedom of air flow and improve its circulation in the space between the joists. A good solution would be to plan, instead of an vent, a non-closable technical opening for access to underground parts of communications.
- To protect against small pets and rodent pests from crawling into the underground, a fine mesh or decorative grille is inserted into the openings of the vents.
It is easier to foresee in advance and exclude a cubic cavity from the concrete being poured, rather than then think about how to make vents in the finished foundation.
To do this, in the place where the vent is supposed to be placed, a so-called boss is laid - an easily removed piece of log or several bricks with wedges placed between them.
Wedges are needed so that the bricks can be easily removed from the finished base. Instead of a boss, you can use a short piece of large-diameter pipe with sand poured inside and capped ends. This is done so that the pipe is not flattened by the impressive mass of concrete of the strip foundation. After demoulding, they do not need to be removed.
Ventilation in a wooden house is much easier. To obtain a hole of the required size, it is enough to make a notch between the logs of the fence.
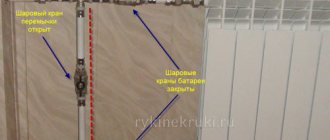
Closing the holes
Often, home owners are interested in the following question: do they need to close the holes in the cold season?
If the room is heated and people constantly live in it, then closing the vents is not recommended. If the holes are closed, the resulting temperature difference will contribute to the appearance of rot and condensation. This will lead to the general destruction of the building.
If the building is used only in the warm season, the openings should be closed at sub-zero ambient temperatures.
Vents must provide a constant flow and ventilation of air. To do this, the holes can be closed not completely, but partially.
When answering the question of how to close vents in the foundation, many experts advise using a special plastic mesh to protect against rodents. When closing the openings during the winter cold, it is recommended to use a breathable material to maintain minimal ventilation. Do not use improvised means to close it. This can lead to improper operation of the ventilation system and subsequent destruction of the entire building.
There is no need to avoid the issue of installing vents. This easy-to-perform work guarantees the proper operation of the building. Air ducts will provide clean, ventilated indoor air and rid the house of the proliferation of fungi and bacteria.
Recently, many have begun to neglect the construction of air outlets, justifying this with the European construction system. The fact is that they really don’t use vents during construction there. However, the technology is completely different. Construction work in our country is carried out using domestic technology using foundations and basements. In this case, it is extremely necessary to arrange them at the base.
Ground floor finishing
exterior decoration
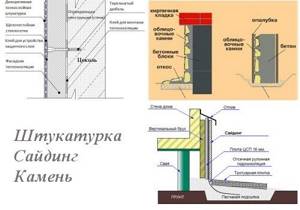
The finishing of the basement floor must be carried out comprehensively: outside and inside. For finishing, you can choose any building materials, but for exterior finishing it is better to choose materials that can serve as a barrier to moisture and snow.

The most common methods of exterior finishing of the basement are plaster, stone cladding and siding. For exterior finishing, silicone, acrylic and decorative plasters are used. Let us tell you that plaster for exterior finishing is a ready-made dry mixture, from which you make a working solution yourself.
Plaster for the base will provide the following conditions:
• high vapor permeability
• protection against mold, mildew and microorganisms
• will create an attractive appearance.
Plaster work on the exterior finishing of the basement floor is carried out according to the technology declared by the manufacturer of the dry mixtures.
Properly executed exterior finishing of the basement floor is a guaranteed high-quality platform for interior finishing.
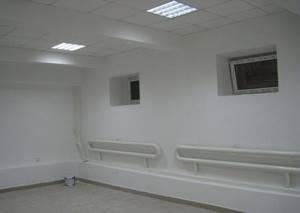
interior decoration
For the interior decoration of the walls and ceiling of the basement, it is better to give preference to water-repellent plasterboard and cement-based plaster. For the floor, it is better to screed, install a “warm floor” system or a finishing coating. Expanded clay is considered the best choice of material for the insulating layer of the floor screed.
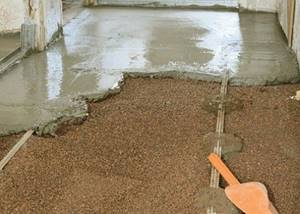
Floor insulation with expanded clay
The technology for floor insulation with expanded clay is as follows. The prepared concrete base of the basement floor is covered with plastic film and metal profiles are installed. The resulting cells are filled with insulation. Then the concrete is poured into which a reinforcing mesh is embedded for reinforcement.
The resulting layer - expanded clay concrete - is left until completely dry. Having gained strength, a cement screed is applied to the concrete layer. This can be a self-leveling or self-leveling screed. This screed design can be considered an ideal option for the foundation of a basement and subsequent decorative finishing. Floor tiles can be used as decorative finishing.
We finish walls and ceilings
Plasterboard slabs are cut into fragments of the required size. On the walls, a lathing made of metal profiles is provided for fastening. Before installing the slabs, the wall joints are primed and glued with serpyanka.
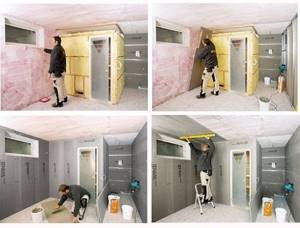
For fastening drywall, special disc-shaped dowels are used. To finish the walls and ceiling of the basement, you can use light colors of paint or facing material, which will visually increase the volume of the “former” basement.
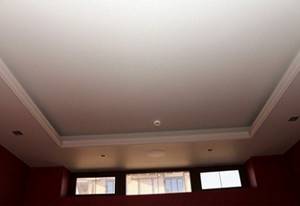
It is better to finish the ceiling of the basement floor after the electrical lighting of the basement has been installed. The electrical supply diagram is practically no different from the electrical wiring diagram, for example, of a garage. To illuminate the room, it is preferable to install ceiling and spotlights, as well as mount a light panel.
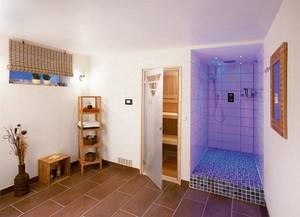
There are a lot of options for finishing the basement.
Which option do you prefer?
Do-it-yourself vents
I will say right away that it is quite difficult to make vents in the foundation with your own hands, since the thickness of the tape ranges from 40-60 cm. And drilling reinforced concrete of such thickness is long and expensive.
There are several ways to make holes in the foundation:
- The superstructure of the basement part is made of bricks and with pre-drilled openings. This method is the most correct and quite simple, but applicable in all cases. So, for example, if the walls have already been erected, then, of course, it will not be possible to build a basement.
- Making holes with a hammer drill is the most popular and affordable method among private developers. Depending on the brand of concrete and the degree of its reinforcement, it will take from several hours to one full working day to complete one blow. In this case, you will have to spend several concrete drills. Holes are drilled around the perimeter of the ventilation hole; the hammer drill should not be used at full power and the drill should be periodically moistened with water to avoid overheating.
- Use core bits and drill out the concrete step by step, piece by piece, and then use a hammer drill with a pick to knock out the concrete. This is also a difficult and slow method.
Vent device
Vents in the wooden foundation are arranged in embedded beams, which are located between the 1st and 2nd crowns. It is possible to install them between the foundation and the first log. In both the first and second cases, holes can be made with your own hands by making through cuts in the logs.
Ventilation of the foundation in your private home can be either natural or forced. With the natural type, air flows circulate under the flooring without special devices or hoods. To create a forced flow of air masses, supply and exhaust devices with natural and forced air supply systems are installed.
Do you need vents? As construction practice shows, vents in the foundation are absolutely necessary, and they must be installed at the stage of erecting the foundation structure.