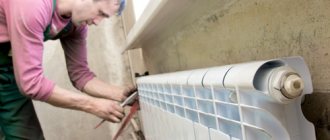
Types of battery mounting
Designs for fixing heating sections are usually divided into two types. Each of them performs its own function and is used in individual conditions.
Wall mounts for heating radiators are considered quite reliable, provided that the partition is of normal strength. The list of such fasteners includes:
- Anchor brackets. They come in long and short depending on the size and weight of the heater you need to install.
- Special elements with the ability to adjust the height of the battery. The design includes a special plate and a moving mechanism.
- Anti-noise holders. The design is standard in appearance and has rubberized parts. With their help, noise and vibration emanating from radiators and walls are absorbed.
- Corner fasteners. These are small metal structures designed to mount small-sized batteries with a low mass index.
Floor brackets for heating radiators are used in individual cases. For example, if it is not possible to fix the battery on the wall due to the structural features of the room. Among these details are:
- Stands with soles. They are designed for heavy radiators and are screwed directly to the floor with long dowels.
- Additional floor mounts, which are used in case the wall mounts are not enough to hold the battery.
- Racks with and without regulator. Their design provides hooks that are fixed not only to the floor, but also to the wall.
- Details in the form of an ordinary stand with a wide sole. They are not fixed to the floor. Used for small heaters.
- Tripod holders. Convenient, stable floor bracket. This is often used if the radiator needs to be installed away from the partition.
Floor structures are also used if the room has panoramic windows or the walls are made of plasterboard. Such elements are not able to withstand radiators.
Floor mounting method
It is used much less frequently compared to the mounted one.
Main reasons for choosing floor installation:
- Inconsistency of wall material with the required load. Relevant for aerated concrete and plasterboard walls.
- The need to strengthen the wall mounting. Used for heavy weight models, primarily cast iron.
- Cannot be placed on the wall due to lack of space.
- Lack of a suitable wall (a panoramic window is installed in the room).
- Design decision.
Among the main types of floor holders are:
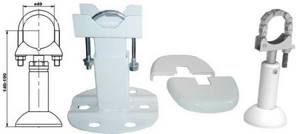
- Adjustable fasteners. Some models are equipped with plastic covers.
- Non-adjustable holders. Some models are also equipped with plastic covers.
- Combined holders.
- Special holders with a width of 80 to 100 mm.
Photo 2. Brackets for floor installation of radiators. They are racks that are attached to the floor.
Floor-standing types are made of cast iron, steel or other alloys designed to support the weight of certain battery models.
Marking the installation site
Before purchasing a mount for radiators, you need to decide on the method that will be used for fixation. After this, they begin marking, taking into account the requirements from SNiP.
- When installing a wall-mounted radiator, it is worth considering that its center should be located in the center of the window sill. The permissible error is no more than 20 mm.
- It is recommended to purchase radiators whose dimensions will correspond to 75% of the length of the window sill.
When installing a floor radiator battery, markings are made on the final or rough surface. To accommodate the battery in six sections, you will need two brackets. The greater the number of sections, the more fasteners.
After considering all the placement standards, they begin to draw auxiliary lines.
- Having chosen the middle of the window, draw a vertical line from the window sill to the floor.
- If there is a lower wiring, make a horizontal line; the upper edge of the battery will run along it.
- If there is additional lateral wiring, make another horizontal line, which will become the border of the lower part of the radiator.
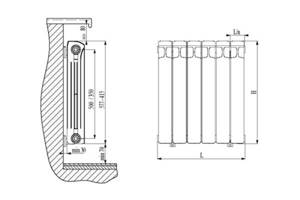
Using these lines as a guide, the brackets are installed. The distance between the bottom and top must be at least 300 mm. The distance from the wall to the seat is 80 mm. As a result, a mounted battery on a holder should occupy no more than 130 mm of space from the edge of the window sill.
Any wall-mounted radiator battery can be installed on floor holders. In this case, the height from the floor to the middle of the heating equipment should be 140-190 mm.
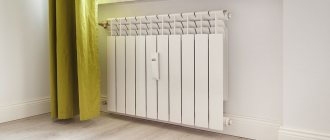
Where and how to place
Traditionally, heating radiators are installed under the window. This is necessary so that the rising warm air cuts off the cold from the window. To prevent the glass from sweating, the width of the heating device must be at least 70-75% of the width of the window. It must be installed:
- in the middle of the window opening, permissible deviation - 2 cm;
- distance from the radiator to the floor - 8-12 cm;
- to the window sill - 10-12 cm;
- from the back wall to the wall - 2-5 cm.
Distances from radiator to window
These are all recommendations, the observance of which ensures normal circulation of warm air in the room and its effective heating.
How to hang a radiator on a bracket
The mounting methods for radiators vary depending on the type of battery selected. Each option has its own step-by-step instructions.
Often, cast iron radiators are installed under the window. This makes it possible to achieve proper air circulation throughout the room.
- First of all, the points where the fastenings should be installed are determined. The bracket for the cast iron radiator should be located exactly in the place where the sections of the cast iron radiator are connected to each other.
- Fix the bracket for cast iron batteries 2-3 mm above the center of the section of the heating inlet pipe into the battery. All fasteners are installed in the same way.
- The lower holders are installed using the same technology.
- In order for the brackets to have a tight adhesion to the wall, it is necessary to first drill a hole of the required length with a diameter 1-1.5 mm less than the diameter of the thread of the fastener.
- Dowels are inserted into the prepared holes, into which threaded brackets are subsequently screwed.
- After making sure that the installed elements are reliable, hang the cast iron radiator. After it is securely seated in the grooves, you can begin soldering the heating communications.
Steel batteries are mounted on wall and floor brackets. This work is carried out in stages.
- The holes are prepared and self-tapping screws are screwed into them. The gap between the cap and the wall should be 3-5 mm.
- Next, the brackets are hung on the wall, after which the screws are screwed in until they stop.
- The radiator is hung on wall fasteners.
- The floor clamp is installed and adjusted to the battery.
After installing the battery, solder the pipes and additional radiator elements - thermostats, regulators.
In private homes, it is customary to install steel heating radiators on long metal brackets. They are intended for both lower and upper fixation. Installed on the wall using self-tapping screws.
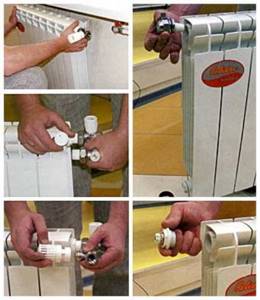
Aluminum batteries have a special holder directly on the case. Brackets are often included. To hang a radiator on the wall, you must:
- Measure the center of the window and correlate it with the axial part of the heating device.
- Place boundaries with a simple pencil on the wall in accordance with the dimensions of the structure.
- Step back two sections from the edges of the battery, mark the distance taken and transfer it to the wall from the drawn border of the radiator.
- Drill holes in the indicated places, and then fix the brackets in them.
- After this, the batteries are hung and connected to the general heating system.
Before installing a bimetallic radiator on the wall, be sure to install brackets that will support the weight of the heating structure. It is important to follow the following rules here.
- The distance from the radiator to the wall must be at least 50 mm.
- The structure is hung with a slight slope forward; accordingly, the fastenings are installed in a similar way.
- The plugs must be located exactly at the same level as the system pipes.
Tying polypropylene pipes instructions
Radiator piping can be done using a variety of pipes, but experts recommend using polypropylene pipes. Ball valves for piping are also purchased in polypropylene; they can be straight or angular; this option is the simplest and most inexpensive. Brass fittings are more expensive, and their installation is more difficult.
Polypropylene strapping is done as follows:
- the coupling with a union nut is inserted into the multiflex, which easily connects to any outlet;
- The pipes themselves are attached to the walls at a convenient height; they should not fit tightly to the surface; it is better to leave a gap of 2-3 cm. The pipes are secured using special brackets, which are fixed to the wall with nails or self-tapping screws.
Polypropylene piping to radiators can also be carried out when laying pipes in the wall, in which case they come to the surface only at the connection points.

Radiator piping can be done using a variety of pipes, but experts recommend using polypropylene pipes.
Battery fasteners can be very different, most often it is a pin connection that is fixed to the wall surface. Corner brackets can also be used, which also allow radiators to be suspended at the required height. For panel batteries, fasteners are supplied included; for sectional batteries, they must be purchased separately. Typically, two brackets or pins are sufficient for one section.
The taps are connected as follows:
- the tap is disassembled, the fitting and union nut are screwed into the radiator;
- Use a special wrench to tighten the nut tightly.
As you can see, this process is extremely simple. To perform such work, you only need to purchase a special plumbing wrench for American women, without which it is unlikely that you will be able to simply install a faucet.
To install batteries and tie them, the following materials and tools are required:
- a set of special keys;
- seals for threaded connections;
- tow and thread paste;
- threads for carving.
Features of connecting radiators
Heating installation has some features:
- It is necessary to maintain a distance of 100 mm from the radiator to the window sill. If the gap between the batteries and the bottom of the window sill is different, then the heat flow is disrupted and the effect of the heating system will be low.
- The distance from the floor surface to the battery should be 120-150 mm, otherwise a sharp temperature change will occur.
- In order for the heat transfer of the equipment to be correct, the distance from the wall must be at least 20 mm.
At the same time, we take into account that the installation and efficiency of heating radiators is greatly influenced by the installation method: under an open window sill the efficiency of the heating system is maximum - 96-97%, in an open niche - up to 93%, in a partially closed form - 88-93 %, completely closed - 75-80%.
The heating radiator can be installed using a variety of methods; its piping is done with metal, polyethylene, polypropylene pipes
During installation, it is important to correctly position not only the pipes, but also the batteries themselves, and make the connection in accordance with all recommendations and standards. In this case, the heating system will work very efficiently and will not require repair work. Share a useful article:
Share a useful article:
How many brackets are needed?
The number of fasteners is calculated taking into account the number of radiator sections. Batteries typically consist of six sections, so you will need two brackets on each side (bottom and top).
When choosing a mount, the weight of the radiator must be taken into account. After hanging, it should not bend or dangle in the prepared hole. If the walls do not allow for reliable fixation of the heaters, it is better to use the floor mounting option.
How to install heating radiators yourself
Installing heating radiators with your own hands is not feasible for every person. At a minimum, this process requires mandatory preparation. If this situation is handled unprofessionally, the result could be devastating.
If you live in a multi-storey building, the best solution would be to call specialists due to the fact that there is a risk of flooding not only in your home. In a private house, it is possible to carry out the installation and installation of heating radiators with your own hands, but this requires considering the main stages of installing batteries.
What is needed for installation
Depending on the features of the heating design, the number and list of components required for installation will be associated with this. For example, with a single-pipe heating system, a bypass for the circuit will be needed. If problems occur, it will be possible to disable only the device in which this component is installed and will not require shutting down the entire system. This is especially important in winter, when turning off the heating will be very uncomfortable at low temperatures.
The number of components needed to install radiators with your own hands is also calculated according to the connection method and type of batteries. According to the diagram, couplings, adapters, angles and nipples are collected.
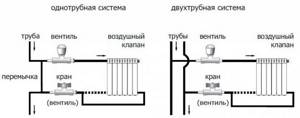
Photo of the diagram for inserting batteries into the heating system
Also, inserting a heating device will require shut-off valves. Selection of radiator type of fittings is required. There is no need to pay special attention to complex ball valves with “American” design, which require qualified knowledge. Ensuring airtightness without serious experience in this will not be easy.
To independently connect heating batteries to the pipeline, you will need fittings that will match the dimensions of the radiator and pipe threads. A sleeve will be screwed onto the bends; after twisting, it is inserted into the structure. Do not forget that after purchasing cast iron heating radiators, before installing them, you need to check the compliance of the brackets with the material of the wall on which they will be mounted.
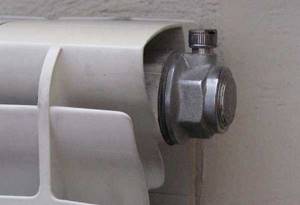
To be able to release air, the installation of a Mayevsky tap is required. Usually, it is present in the factory configuration, but if not, you need to purchase it.
Criterias of choice
A radiator valve is, as a rule, a ball-type device that regulates water flow and connects pipes to the radiator. Installed on the bypass, risers, at the top of the battery, in places where air accumulates to bleed it.
Choosing a suitable faucet is not difficult, just know a few nuances:
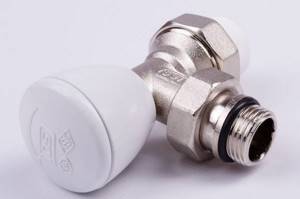
- the diameter of the pipes to which it will be connected (DN, in millimeters or inches);
- working pressure (PN, in the range of 15–40 and above);
- type of connection, presence of thread inside or outside, American.
The choice should take into account the purpose of the reinforcement, its location, and the properties of the environment
The ratio of the input and output of the valve in the radiator, their relative position is also important
When choosing, you should consider the characteristics of the cranes:
- Ball valves, although the most common and affordable, are not very effective. It has only two modes: closing/opening;
- a cone valve is a more acceptable option due to the possibility of an intermediate position. Disadvantage: the tap must be returned to its original position and constantly monitored;
- An automatic thermostat is the most efficient, reliable, but also much more expensive than others. When installing it on a one-pipe system, a bypass must be present.
Calculating the location
For those who want to install heating radiators on their own, do not forget that the sections of pipes that lead to the units must be placed with a (small) slope - towards the coolant flow. If the installation is laid exactly horizontally or is skewed, air will concentrate in cast iron or steel radiators. It will be necessary to blow it regularly by hand to prevent a decrease in thermal output.
The best solution would be to match the central axis of the radiator and the axis that passes through the center of the window.
Battery axis markings
Deviations may be acceptable that do not exceed two centimeters, which cannot be determined visually. But this advice is not a requirement.
Installing radiators for heating with your own hands requires compliance with several mandatory recommendations:
- The battery supply elements must be installed, calculating the location so that the slope is 0.005, it is recommended to increase it to 0.01. In this case, one meter of the pipeline must slope towards circulation - and at least by 0.5 centimeters. The angle of inclination is determined according to the length of the pipe sections that are being installed.
- There should be six to ten centimeters or more from the floor to the battery.
- From the bottom of the window sill to the top of the radiator - five to ten centimeters.
- From the plane of the wall to the radiator - three to five centimeters.
- Mandatory compliance with horizontal and vertical directions is required.
- To increase the efficiency of the battery, it is necessary to install a special shield made of special heat-reflecting material before installation. You can also simply cover the surface of the wall with a composition that has similar characteristics.
Some subtleties of hanging a radiator, advice from experts
After installing the radiator on the installed fasteners, it is necessary to check the correctness of its placement in the horizontal and vertical planes.
Checking the correct placement of the radiator in horizontal and vertical planes
It is allowed to lift the edge of the radiator on which the air vent is located. This will ensure that the air trapped in the system accumulates at the highest possible point, and its release will be carried out quickly and with maximum efficiency.
Air vent for radiator
But a change in level of more than one centimeter is unacceptable, as is a reverse tilt. In this case, the formation of an air lock is guaranteed, and the supply of coolant further along the pipeline will be limited or stopped.
Advice! Almost all companies producing heating devices require installers to install only on pre-prepared walls. That is, the surface must be smooth and clean. This will allow you to correctly mark the locations for fasteners.
The heating radiator is hung on two hooks (brackets), which are located in the upper part, and the third must be installed as a support for the lower edge of the device. The installation worker must remember that the number of brackets is determined by the weight and length of the battery.
Marking radiators with brackets
Due to the fact that radiators have a sectional design, this makes it possible to accurately determine the number of sections that will be required to heat a room under specific conditions. Information on the correct calculation and marking of this quantity is required before purchasing batteries.
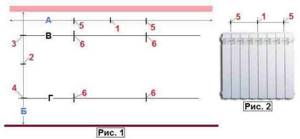
Photo of radiator layout diagram
If you follow the rules for step-by-step installation of radiators, then one square meter of the heating surface area of the battery will be equipped with one bracket.
The heating radiator must be marked taking into account the following features:
- To begin with, radiators with brackets and installation points are marked, taking into account the above rules.
- Before drilling holes, one more check of all distances is required.
- Dowels are inserted into the drilled holes, and then the fasteners are screwed into them.
- Provided that the markings are correctly made, the battery should lie tightly on all supports that are mounted and rest securely on all of them.
- Subsequent work will involve connecting a homemade heating battery to the communication system.
Tools and materials
The following tools and materials will be required for installing heating radiators: torque wrenches with dimensions that will make it possible to follow the torque with a high level of accuracy. Due to the fact that the coolant will pass through the system under pressure, if the level of tightness is insufficient, a jet may appear from the connection point.
If over-tightened, the thread may break.
For this reason, complete study and adherence to the instructions for each unit is required. It is in them that the values of dynamometer torques will be indicated. You will also need: a sealing agent, sealing tape and tow with oil paint.
Characteristic
Brackets for heating radiators are fastening elements of any design, shape, and size , made of steel, cast iron or other metals or alloys.
Products are divided into:
- hanging fasteners designed to secure the radiator to the wall;
- floor stands.
There are both adjustable and non-adjustable holders of both varieties.
Important! The key to proper installation of any heating battery is the selection of fasteners that match the characteristics of the model being installed. It is optimal to use those that come with the radiator.
Radiator installation process
Before you begin installing heating radiators yourself, you must completely shut off the circuit and drain the water from the system. Complete removal of residual water is carried out using a pump. Next, a thorough check of the level of the radiator, which is hung on supports horizontally and vertically, is carried out. All plugs are removed from the unit.
Radiator installation process
Next, a bypass with a valve is connected (this is only required for a single-pipe circuit). For a two-pipe system, only a squeegee with a connected valve is used. Using threaded fittings, the battery is connected to the heating system, and tow or another type of sealant is used to seal the joints.
A bypass is needed to turn off the heating device without turning off the rest of the system. The valve regulates the circulation of the coolant. The bypass is installed on the radiator between the conductive pipe and the return pipe with taps.
It can be clarified that there is no need to remove the packaging film from devices made of aluminum, steel or bimetal until installation is complete.
Upon completion of the radiator installation process, pressure testing will be required. This can be done by a professional because he has not only experience, but also a special apparatus.
Technique for performing work on connecting radiator sections
Extending radiators is a useful skill for a home handyman. Knowing how to join sections, it will not be difficult to provide your own microclimate in each room.
Before connecting two radiators, a power calculation is made. The formula is simple - 10 m2 requires 1 kW of thermal power. The section's performance is indicated in the data sheet. This data will be useful for calculations. Then you need to buy the required number of elements, find tools and assemble the heating device.
Tools and components for work
To assemble a heating radiator with your own hands, you will need:
- wrench or adjustable wrench;
- radiator key;
- plugs with right and left threads – 1 pc.;
- nipples;
- paronite gaskets;
- intersection gaskets made of durable, flexible material;
- battery sections;
- sandpaper of fraction No. 120.
Thread gloves are useful for protection. It is more convenient to install the batteries with two people; an assistant will not hurt.
Step-by-step battery expansion process
Do-it-yourself heating radiator assembly can be done at any time. If the heating season has already begun, the network must be shut off, the coolant must be drained from the circuit and the heating device must be dismantled.
How to connect the battery:
- Place the dismantled radiator on a horizontal plane. To avoid scratching the coating of the battery and table (floor), lay a cloth. Remove all additional elements - taps, temperature sensors. To wash the battery, take it into the bathtub, open the plugs and rinse with a stream of water.
Check the integrity of threaded connections and ends of the heating device. If there are deposits, sand the joints. Place the battery back on a flat, horizontal surface. The area is chosen to be level to ensure the tightness of the joint. The slightest curvature of the position will lead to an uneven joint. For seals, only paronite gaskets are chosen. This is a durable, flexible material that can withstand heat without loss of quality. Check the quality of nipple threads
Smooth and uniform cutting without chipping is the key to a strong joint. Move the sections together, placing spacers between them. Carefully begin to tighten the nipple. The part has a left-hand thread on one side and a right-hand thread on the other. This means that when rotating, both sections are attracted
It is more convenient to carry out work with a special radiator wrench. The tool may come complete with a battery, but is also sold separately.
This means that when rotating, both sections are attracted. It is more convenient to carry out work with a special radiator wrench. The tool may come complete with a battery, but is also sold separately.
- Grab the sections a little, check the evenness of the joints and tighten until tight. The number of turns of the nipple turns on each section must be equal.
Knowing how to increase the heating battery, it is not difficult to assemble a system with the required power indicators. After building up the sections, the radiator is checked for leaks.
For a household check you will need:
- a piece of pipe with a cross section of 15 mm;
- automobile pump with pressure gauge;
- tire nipple.
Now solder the nipple to the pipe and insert it into the radiator. This design is needed for air pressure testing. Install a plug on one of the radiator inlets. Connect a car pump with a pressure gauge to the nipple. Pump air at a pressure of 1 bar. If the tightness of the joints is broken, a whistle of escaping air will appear. You need to find a leak, tighten the nipple or change the gasket. Carry out the pressure test again. If there are no leaks, install the radiator into the network.
Pressure testing with water is carried out in the same order. Instead of air, colored water is pumped in. Let the device stand for 5 hours and inspect for leaks. If there is a leaky joint, water will leak out. Tighten the joints, check again, install the battery into the system.
An extended battery increases in weight. Before installing the radiator, it is advisable to strengthen the fasteners and screw in additional brackets. This will protect the device from collapse, because the battery will be even heavier with coolant. The device is integrated into the network at a selected location, taking into account the increase in battery length.
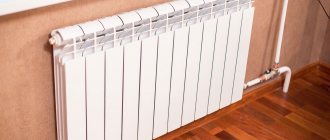
Mounting for heating radiators: selection, installation and types of holders
Radiator heaters are usually placed under windows. Only sometimes the project provides for a different location. To fix the heaters, wall or floor mounts for heating radiator batteries are used. At the moment there are many types of them.
Fasteners for heating radiators are very diverse.
Connection diagrams for heating devices
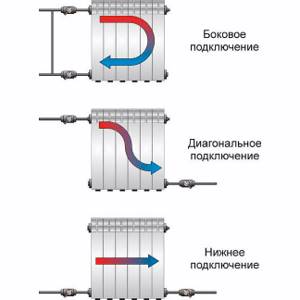
Work on installing radiators must begin with determining their connection diagram. In practice, 3 methods are used, they are defined by building regulations:
- Side. They are used very often, since it is the one that provides maximum thermal output.
- Diagonal. Most effective when connecting long heating appliances.
- Bottom connection. Used for heat supply systems from pipes, which are placed directly under the floor covering.
Connection diagrams for heating devices
Selection and installation of fasteners
When choosing fixing elements, you should focus on the following points:
- material from which radiators are made;
- battery sizes;
- wall material;
- window dimensions , their number and location features;
- room design project.
Important! The instructions note that the heavier the heater, the thicker the holder should be. The materials of the radiator and fasteners must match each other.
Having assessed the above aspects, you will be able to choose the right type of holders and determine the required number.
Calculation of fasteners
Distances that must be maintained when installing batteries.
When installing under windows, the following distances are maintained:
- from the floors should be at least 8-12 cm;
- about 3-5 cm to the walls;
- to the window sills at least 6-10 cm.
About how many fasteners are needed for a heating radiator.
Their number depends on the length of the heating device.
- When there are few sections - up to 10 pieces, 2 holders are placed at the top, and another one is mounted at the bottom.
- If the battery consists of 10-14 elements, 3 fasteners are installed at the top and 2 at the bottom.
- For each subsequent 4-7 sections of cast iron batteries and 10 analogues of aluminum and tubular batteries, add one support at the top and bottom with your own hands.

Every detail has its place
Marking for mounting holders
A very important question is how to mark the mounts for radiators.
- The best option is when the heater is located exactly in the middle of the window. Based on this, find the center of the opening on the wall and draw a vertical line.
- Then there are 2 options. If the wiring is bottom, draw a horizontal line marking the top edge of the battery. When installing radiators with side connections, the placement of heating pipes is important. In this case, set aside a horizontal line coming from the supply (upper) pipe.
- Measure the spaces between the holders on the battery. Set them aside relative to the drawn lines.
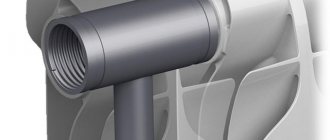
Fasteners for cast iron batteries
Since these are the heaviest heating devices, the holders for them are the most massive: they must hold considerable weight for years. These can be individual or curved pins attached to a bar. In any case, when making mounts for cast iron batteries, thicker metal is used. In price lists it usually comes with the addition of “reinforced”. Can be painted (standard color is white) or not. Some manufacturers paint it in the desired color upon request (when ordering a radiator, specify the type of fastener and its color).
The mount for a cast iron battery is made reinforced: made of thicker metal
When purchasing, you will need to take into account the dimensions: fastenings for sections of different depths are made specially, since it is necessary to ensure a distance to the wall of at least 3-5 cm.
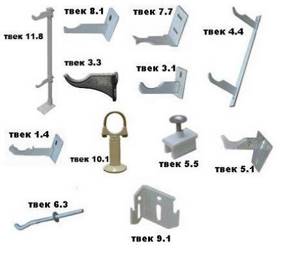
Types of holders
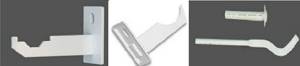
Hooks on a steel bar.
The procedure and rules for installing batteries are independent of their type, only the type of holders changes.
Supports for radiators made of cast iron
Fastenings for cast iron heating radiators are the thickest and heaviest, because... must bear a lot of weight for years. These curved pins or flat hooks are produced separately or are attached to a steel strip in 2-3 pieces.
The products are not painted or a white (standard) coating is applied to them. You can choose a different color upon request.
This type of mounting is most common for cast iron radiators.
The photo shows a steel pin holder.
- Pin holders made of cast iron.
- Adjustable steel supports. They make it possible to change the gap between the wall and the radiator, while simultaneously aligning the battery horizontally and vertically.
- Steel pin brackets.
- Holders grouped on a metal strip.
Note! Before purchasing, consider the dimensions of the supports. They are produced for fastening sections of different depths. In any case, the holder must provide a gap to the walls of at least 30-50 mm.
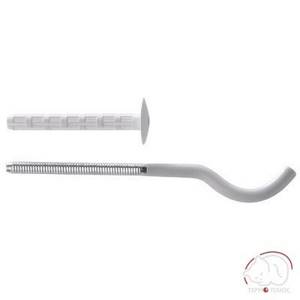
In addition to pin brackets for batteries, hooks are produced from cast iron. They are equipped with dowels. The product is mounted as follows: a hole is drilled into which a plastic dowel is driven. A holder with a thread on one side is screwed into it.
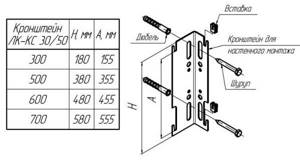
Brief instructions for installing brackets.
In addition to wall fixation, there is also floor installation of cast iron using legs. Their price depends on whether their height can be adjusted or not.
The upper arcs that secure the sections to the support also differ. They are made of steel wire or have the form of a chain of interconnected movable links. In any case, the radiators are fixed to the stop with bolts and arcs.
Fasteners for bimetallic and aluminum batteries
Universal holder for bimetal and aluminum.
The mount for aluminum radiators and bimetal is similar to those for cast iron, but is made of thin metal.
- The most popular corner universal holders are for both types of devices. They are equipped at the top and bottom with recesses for the collector. Thanks to this, they can be mounted on both the left and right.
- Legs for bimetal and aluminum are not produced. But they produce racks that allow for floor installation of batteries. First, such a support is attached to the floor, then the radiator is placed and attached to it.
The use of floor stands is optimal when the walls cannot support the additional weight. For example, it is difficult to attach radiators to sandwich panels, glass, and plasterboard.
Steel instrument supports
Standard fasteners for panel radiators.
There are two types of such devices: panel and tubular analogues.
They require different types of fasteners.
- Special brackets are welded to the rear walls of panel batteries. With their help, devices are hung on brackets. This mount for steel heating radiators has a special shape designed for brackets.
Note! When installing panel devices, you should carefully monitor the vertical placement of the brackets, because 4-6 staples should fit exactly on the hooks. It is necessary that the wall is absolutely smooth and even.
- Since the weight of the radiator is small, it will be enough to fix it on the brackets from above. You can put supports from below, they will give it a horizontal direction. They cling to the brackets with hooks and only rest against the wall.
- For greater reliability, the part of the mount for steel radiators facing the wall is expanded.
Wall mount
The wall-mounted method of mounting batteries is the most common when installing heating systems. The selection of fasteners is carried out taking into account the weight of the battery and the material from which it is made.
Fasteners for cast iron batteries
These clamps are distinguished by their massiveness and increased strength. As a rule, in price lists they are marked “reinforced”.
Photo 1. Brackets for cast iron heating radiators. The products are highly durable.
For wall mounting of cast iron radiators, the following types of fasteners are used:
- Non-adjustable cast iron fasteners.
- Adjustable, made of steel. They allow you to change the distance between the wall and the radiator, which makes it possible to make adjustments in height and horizontally.
- Pin holders made of steel.
- Holders on the bar. This is a steel strip with two hooks for attaching the upper and lower battery collectors, which is attached vertically to the wall.
Attention! When installing cast iron radiators, it is important not only to select suitable fasteners, but also to take into account the wall material. For brick and concrete, as a rule, standard hanging brackets are sufficient. For plasterboard or wooden walls, reinforced floor fasteners are used that can take the main load.
For aluminum and bimetallic radiators
Unlike cast iron analogues, fasteners are lighter and less massive.
are used for wall mounting :
- Corner fasteners made of steel. Depending on the mass of the radiator, conventional or reinforced models are used. They have two recesses that allow it to be fixed to both the lower and upper manifold.
- Steel pin holders. They are divided into molded and round models.
- Universal wall fasteners with polymer coating. The brackets themselves are made of steel, and the polymer pad serves to prevent the battery from moving due to thermal expansion.
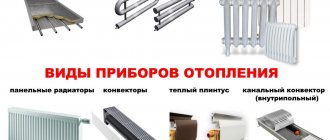
What are heating radiators?
The main indicator of the quality of radiators is their heat transfer rate. It depends entirely on the material from which the heating device is made. The most popular are:
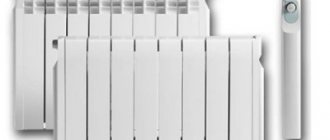
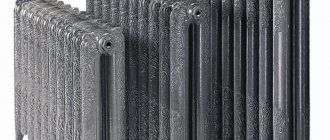
- Cast iron batteries. Advantages: huge service life due to the very thick walls of the product, high resistance to corrosion, heat transfer for some time even after the heating is turned off. Disadvantages: heavy weight and associated installation difficulties, unaesthetic appearance;
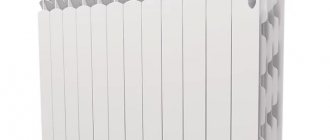
- Aluminum batteries. Advantages: the highest heat transfer coefficient, low weight, very quick installation, high permissible pressure - up to 20 bar, the ability to combine an unlimited number of sections, elegant appearance. Disadvantages: low anti-corrosion performance and rapid deterioration of aluminum in places of contact with other metals;
- Steel batteries. Advantages: relatively light weight, heat transfer begins after switching on in a very short time. Disadvantages: weak resistance to pneumatic and hydraulic shocks, low heating temperature, rapid cooling, maximum pressure - 10 bar, low service life;
- Bimetallic radiators. The most versatile variety, combining the advantages of all the above-mentioned types of batteries. The inner layer is made of steel, which protects the radiator from corrosion and increases operating pressure. The outer part - the casing - is made of aluminum, characterized by the highest heat transfer. Bimetallic radiators can easily withstand strong pressure changes and are very easy to install. A classic example of such a product is the global style plus 500 heating radiators, reviews of which are purely positive.
How to choose a battery holder?
When choosing a bracket for a heating radiator, you need to pay attention to:
- Alloy composition. It must be hard, durable, non-toxic;
- Product coating. To protect against corrosion and rust, the product must not only be painted, but also galvanized;
- Dimensions (length and thickness of the product) and maximum withstand load;
- The presence of a coating that softens noise arising from thermal expansion;
- Possibility of additional adjustment of distances to the floor and wall.
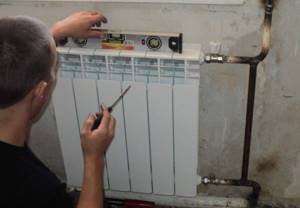
Radiator installation
Those who are wondering how to hang a heating radiator without the help of professional plumbers need to know what steps this process involves. So, you need:
- prepare equipment and materials;
- calculate location;
- install brackets;
- hang the radiator;
- seal or solder the joints;
- check the entire system for functionality.
We purchase the necessary materials and equipment
To begin with, it should be noted that it is not recommended to install radiators in winter. And even if you decide to install heating yourself, in any case you need to call a plumber who will disconnect your apartment from the riser. To fix the radiator on the wall, you will need such components for heating radiators as: corners, bushings, nipples, brackets, brackets, couplings, adapters, tow, valves, keys. If you plan to install cast iron batteries, you also need to purchase Mayevsky taps, designed to bleed air from the heating system and prevent airing. Aluminum and bimetallic radiators are equipped with them initially.
Calculating the location
This stage is important to ensure that the heating device works at full capacity and does not collect air. To do this, sections of underwater pipes should be installed at a slight slope relative to the floor. The minimum slope is 0.5 cm. Here are the optimal battery location parameters:
- 3-5 centimeters from the wall;
- 10 centimeters from the floor;
- 5-10 centimeters from the windowsill.
If the selected type of battery does not have high heat dissipation, you can also install a heat-reflecting tap on the wall behind the battery. It is usually made of insulating material or a special heat-reflecting substance that is applied to the wall.
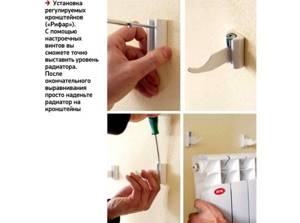
Installing brackets
Brackets are mounts for heating radiators in the form of durable metal hooks installed inside the wall.
It is easy to calculate the number of brackets: 1 piece per 1 m2 of battery. Of course, even if the entire battery area does not exceed 1 square meter, you will still need two brackets, since fixing the structure on one will be very unreliable. Now you need to mark their location: we use a tape measure and a level for this.
Then we drill holes in the wall, install special dowels in them, tighten the fasteners for the heating radiators and use our hands to make sure that the brackets sit tightly and do not wobble. If the choice fell on cast iron radiators, you may need a special mount for cast iron heating radiators - floor support elements in the form of legs. They will help distribute the weight evenly across all fastenings.
Installing the radiator
The last stage of radiator installation. We hang the battery and check how tightly it fits, whether the weight of the structure is distributed equally across all fastenings. Try to shake the radiator a little: if the fixation is strong enough, you can move on to the next step.
Connection and assembly of connections
There are three different radiator connection schemes:
- lateral one-sided. The most popular option. The inlet pipe is connected to the upper pipe, and the outlet pipe is connected to the lower pipe on the same side;
- diagonal connection. More suitable for long radiators in large rooms and ensures uniform heating of the entire battery. The inlet pipe in this scheme is connected to the upper pipe on one side, and the outlet pipe to the lower pipe on the other;
- bottom connection. It is used in cases where the heating system is hidden in the floor. Both inlet and outlet pipes are connected to the lower pipes from different sides. Heat transfer with a bottom connection is approximately 10% less than with a side connection.
Let's start assembling the connections. Regardless of which heating radiator fittings you purchase, you must carefully seal each connection.
Special tapes, silicone, sealant or good old tow are used as seals. If the purchased battery is protected with a special film, it is better to remove it only after thoroughly crimping each connection.
Now all that remains is to return the water supply to the heating system and carefully check all connections for leaks.
Advantages and disadvantages
Modern bottom connection radiators have many advantages:
- installing batteries of this type allows you to achieve a laconic interior without unnecessary technical elements;
- the original design involves the installation of a device direction adapter;
- pipe connections immediately go into the floor or wall;
- Almost all modern radiators come with a built-in thermostat.
Like any other device, these newfangled devices are not without their drawbacks.
- For a beautiful aesthetic appearance, pipes are usually installed in the floor or hidden under the baseboard. In the event of an accident, it will be difficult to notice the malfunction immediately. Solving the problem can also be difficult. Pipe repairs cannot be performed without dismantling the floor covering; as a result, you will have to eliminate not only the pipe malfunction, but also floor defects.
- Most experts believe that the bottom connection loses in terms of heat transfer compared to side-connected batteries. It happens that with a bottom connection, multi-section radiators warm up in parts. Of course, this problem can be solved, but it is best to use these devices in private homes.
- Each battery section must be equipped with a separate air vent.
- Radiators with bottom connections are strictly prohibited from being used for a gravity heating system.
- For efficient operation, you will need to install an additional circulation pump.

There are several ways to connect a radiator:
- side;
- diagonal;
- cross;
- lower.
If the pipe exit is meant only on one side, then this is a one-way connection. Hot water is supplied through the upper part of the battery, at the bottom of which there is a plug for draining cold water.
With a multi-sided connection, hot water comes from one end, and cold water is discharged from the other side of the structure. This is an ideal option for houses with individual heating. Its advantages include the versatility of supplying water to the radiator: from top to bottom, from bottom to top, and even from bottom to bottom. It is worth noting that the length of the pipes for supplying and draining water in this case is much shorter.