Home / Solid fuel boilers
Back
Published: June 26, 2019
Reading time: 5 min
0
2251
Pellet boiler (PC) is a heat generator that is used to generate hot water for heating and hot water needs and uses solid fuel - pellets in granules.
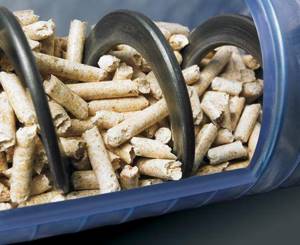
They are made by pressing wood waste: shavings, sawdust, straw, sunflower and buckwheat husks with dimensions of 5-10 mm in diameter and up to 7 cm in length . The calorific value of pellets is 4500 Kcal/kg , which is almost equal to that of low-calorie coal and some wood output.
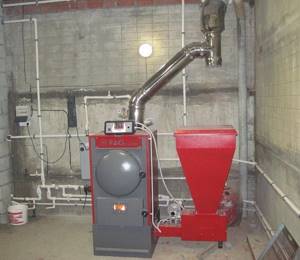
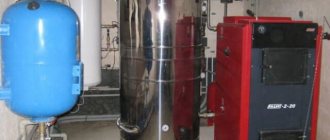
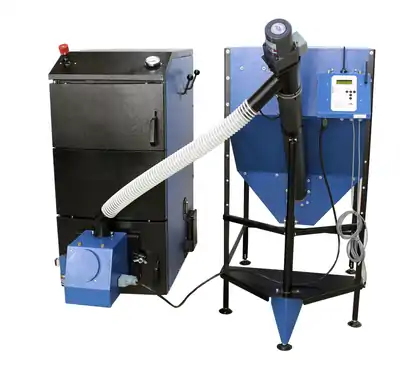
Modern PCs differ from conventional coal or gas boilers and consist of four main components: a boiler with a pellet burner for combustion, a pellet storage hopper, a fuel supply mechanism to the furnace and an accumulator tank.
The installation of a pellet boiler is carried out by a specialized installation organization. It is equipped with an automatic fuel loading system, which allows it to operate autonomously for several weeks.
- 1 Technical conditions for installing a pellet boiler
- 2 Requirements for the premises under the boiler
- 3 Installation location
- 4 Necessary tools and materials
- 5 Installation of a pellet boiler
- 6 First start of the boiler
Boiler Assembly Guide
Pellet boilers have a rather complex design. The instructions for assembling them will also be difficult and multi-step. For greater convenience, the assembly process of each main unit is considered separately. Buy or make the necessary elements, and then simply assemble them into a single system.

It is highly recommended to buy this element of a pellet boiler ready-made. The burner is where you will spend the most money.
Making a burner yourself is almost impossible for the reason that this part of the boiler is not simply a container for igniting loaded granules, but a complex control and regulatory mechanism.
Pellet burners are equipped with special sensors and have several preset programs that allow you to achieve the most efficient fuel consumption and ensure the most efficient heating of your home.
Housing and heat exchanger
You can handle the assembly of the housing and the manufacture of the heat exchanger yourself. It is best to make the boiler body horizontal - with this placement of the unit, maximum heating efficiency is achieved.
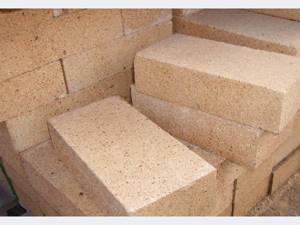
It is recommended to use fireclay bricks to make the body. You simply assemble a kind of box without a top cover and place a heat exchanger in it with connected pipes and other elements. Brick is recommended for the reason that it accumulates heat much more efficiently than cast iron, steel sheets and other popular materials.
The heat exchanger of a pellet boiler is a system of pipes interconnected and connected to the heat supply pipes of a private house.
First step. Assemble a rectangular heat exchanger from square pipes. To do this, cut the pipes into pieces of the required length and weld them into a single structure.
Second step. Make holes in the profile that serves as a vertical post for connecting round pipes.
Third step. Prepare holes in the remaining front pipes for drainage and water connection pipes. Hot water will be discharged through the top hole, cold water will be supplied from below.
Use metal pipes with a length of 150 mm. Next, you can use polypropylene pipes. Be sure to install ball valves where the pipes connect to the boiler. Additionally, you can install filters if necessary.
Fourth step. Weld the back of the unit to its front and weld the side pipes.
At the same stage, select a convenient place to connect a chimney pipe with a diameter of 10 cm. At the bottom of the heating unit, provide a small chamber for collecting ash. Also, the design of a pellet boiler necessarily includes a firebox. More about him later.
In the firebox, as already noted, pellets are stored and from here they are supplied to the burner.
First step. Prepare the necessary materials and equipment. You will need an auger with a diameter of 7.5 or 10 cm, an electric motor and a metal casing. You will connect the engine to the pellet burner control unit.
The function of a metal casing can be performed by any container of suitable volume with sufficiently thick walls.
Second step. Install the inlet pipe of your auger into the discharge mouth of the casing. Connect a corrugated plastic pipe to the other part of the auger to supply granular fuel to the burner.
The burner sends a signal to the electric motor - it starts the auger - the combustion chamber of the pellet boiler is filled with the required amount of pellets.
In conclusion, all you have to do is assemble all the listed elements into a single structure. Do this and proceed to installing the boiler.
Alternative options for DIY
In addition to solid fuel and electric boilers, a number of alternative heating units are suitable for self-production:
- Induction boilers
They are transformers consisting of a primary and secondary winding. In such a boiler, the electricity on the external winding is converted into an eddy current, and the created magnetic field is transferred to the internal winding, which transfers energy to the coolant.
- Condensing boilers
They retain the thermal energy of condensate, therefore they are considered more efficient than gas and even solid fuel ones. Steam condensation occurs in a heat exchanger with a special design - it is this that provides such boilers with a 15-20% efficiency advantage over traditional gas equipment.
- Liquid fuel boilers
Such units evaporate waste and then burn its vapors. The energy thus obtained is transferred to a heat exchanger, which heats the heating agent of the heating system. Equipment of this type has two significant disadvantages - low efficiency and a large amount of emissions into the atmosphere.
- Combination boilers
This equipment is universal in use, but to manufacture it yourself will require remarkable skill and excellent knowledge of the operating principles of various types of heating equipment. The individual components of such units can be quite expensive, but in general, combined boilers can pay for themselves in no more than 5-6 seasons.
Common problems and errors
Low efficiency and frequent breakdowns of heating equipment are a clear sign of mistakes made during its installation. Most often, problems arise due to insufficient heating of the coolant. As a result, this leads to the appearance of a large amount of tar or soot.
Incorrect adjustment or lack of protection against boiling water is one of the most common problems. Because of this, the coolant heats up excessively, which negatively affects heating appliances, pipes and other equipment.
If the heating system is not highly efficient, then you should pay attention to the quality of the sealing. To do this, you need to check whether the boiler and other structural parts of the system are reliably insulated
It often happens that the owner of the house allocates only a few square meters for the boiler room. As a result, he is faced with the following problem - servicing the heating system becomes extremely inconvenient and even unsafe.
How to install heating correctly
In order for a finished heating system with a natural circulation type to function correctly and efficiently, it is important to adhere to certain rules when installing it. In general, the installation diagram looks like this: In general, the installation diagram looks like this:
In general, the installation diagram looks like this:
- Heating radiators must be installed under the windows, preferably at the same level and maintaining the required indentations.
- Next, install the heat generator, that is, the selected boiler.
- Install the expansion tank.
- The pipes are laid out and the previously fixed elements are joined into a single system.
- The heating circuit is filled with water and a preliminary check for the tightness of the connections is performed.
- The final stage is to start the heating boiler. If everything works correctly, then the house will be warm.
Please pay attention to some nuances:
- The boiler should be located at the lowest point of the system.
- The pipes must be installed with a slope towards the return flow.
- There should be as few turns in the pipeline as possible.
- To increase heating efficiency, pipes with a larger diameter are required.
We hope this article will be useful to you, and you will be able to independently install a heating system without a circulation pump in your country house.
A heating system with natural circulation of liquid is a closed device of the gravitational (gravity) type, which allows you to heat rooms in a private house regardless of the power supply.
This advantage of the design makes it possible to use it in regions with problems or complete absence of a central electrical network. The system is economical, but for its proper functioning you will need to make accurate calculations.
How does a collector work and what is it for?
An example of connecting a heated floor collector.
The design is used to mix the coolant that comes from various heating circuits. Subsequently, the device distributes the coolant along these circuits. By mixing, the temperature of the liquid will equalize. Therefore, the temperature in rooms that are heated will be stable.
You should know that the quality of the floor heating system will depend on the correct assembly of the collector structure.
The operating principle of the heating system is as follows: the hot coolant, after passing through existing circuits and pipes, will cool down, and under the action of the pumping structure or natural circulation will flow back into the collector. In this element, the coolant is mixed through a return pipe. The proportions of hot and cooled coolant can be adjusted by valves. Temperature control is carried out using special heat and pressure sensors. If the heating system is too long or there is no possibility of natural circulation in the house, then a circulation pump will need to be included in the collector structure.
A standard manifold consists of the following elements:
Diagram of a water heated floor.
- two-way or three-way mixing valve;
- shut-off valves;
- balancing valves;
- temperature sensor;
- pressure gauge;
- circulation pump;
- element for automatic air exhaust;
- fitting;
- tees;
- adapters;
- nipples.
You will also need some other elements for installation.
The design functions as follows: if the temperature exceeds a certain value, the thermal head will close the valve, and a small amount of hot coolant will be supplied. As the coolant cools, the valve will supply more liquid. The heat carrier is supplied from the return pipe with a continuous pressure, and from the supply pipe - if necessary. Consequently, the average temperature of the liquid will remain constant.
Features of the scheme of primary-secondary rings
This scheme provides for the organization of the primary ring
, through which the coolant must constantly circulate. Heating boilers and heating circuits are connected to this ring. Each circuit and each boiler is a secondary ring.

Another feature of this scheme is the presence of a circulation pump in each ring.
The operation of a separate pump creates a certain pressure in the ring in which it is installed. The assembly also has a certain effect on the pressure in the primary ring. So, when it turns on, water comes out of the water supply pipe, entering the primary circle and changing the hydraulic resistance in it. As a result, a kind of barrier appears on the path of coolant movement. Since the return pipe is connected to the circle first, and after it the supply pipe, the coolant, having received considerable resistance at the supply pipe, begins to flow into the return pipe. If the pump is turned off, the hydraulic resistance in the primary ring becomes very small and the coolant cannot float into the boiler heat exchanger. The piping continues to work as if the disconnected unit did not exist at all.
For this reason, there is no need to use one complex automation system to turn off the boiler
. The only thing that is needed is to install a check valve between the pump and the water return pipe. The situation is similar with heating circuits. Only the supply and return lines are connected to the primary circuit in the opposite order: first the first, then the second.
It is advisable to include no more than 4 boilers in such a scheme. The use of additional devices is impractical.
Universal combined scheme
This system has the following harness:
- Two common collectors or hydraulic collectors
. The first one is connected to the boiler supply lines. To the second - return lines. There are shut-off valves on all lines. There are circulation pumps on the coolant return pipes. - The membrane tank is connected to a large return manifold.
- The indirect heating boiler is the link between two collectors. On the pipe that connects the boiler to the supply manifold
, there is a circulation pump and a shut-off valve. The pipe connecting the boiler to the return manifold also has a valve. - The safety group is installed on the coolant supply manifold.
- The make-up pipe is connected to the manifold, which is located on the hot water supply line. To prevent leakage of hot coolant through this pipe, a check valve is installed on it.
- A certain number of small hydraulic collectors (there may be two, three or more)
. Each of them is connected to the above-mentioned common manifolds. These hydraulic reservoirs and large reservoirs form the primary rings. The number of such rings is equal to the number of small hydraulic collectors. - The heating circuits depart from small hydrocollectors. Each circuit has a miniature mixer and circulation pump.
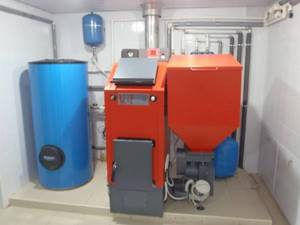
A solid fuel boiler always requires constant attention from the residents of the house, because after the firewood loaded into it burns out, heat stops flowing to the heating radiators. Of course, a heat accumulator can improve the situation, but after it cools down, the heating system will cease to be a heating system. Combination wood-gas heating boilers or two boilers, one of which runs on solid fuel and the other on gas, can make life easier for the owners of a private home.
Any of these two options makes it possible to obtain the desired heat in the case when there is no firewood left in the firebox, but there is still gas in the cylinder. The gas-firewood unit is suitable for those people who do not want to spend much effort and money on organizing a complex installation. However, practice shows that it is better to combine two different boilers. The smallest advantage of this approach is the constant operation of the network, despite the possible breakdown of any of the devices. If the gas-firewood device breaks down, the system stops working and the rooms in the house will be cold.
Features of installation of PPR pipelines
When piping a boiler, polypropylene pipes and fittings are connected mainly by cold or hot welding; when connecting to metal pipelines, threaded connections are used. Screwing on is much more convenient, but because of them, assembling the system will cost significantly more.
True, if you want to connect a polypropylene pipeline to a metal counterpart, you cannot do without threaded fittings.
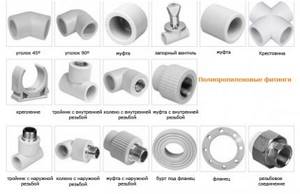
An extensive line of fittings is produced to form linear and nodal connections of polypropylene pipes
“Hot” welding is done with a special apparatus (soldering iron, “iron”). The pipes are heated using a suitable nozzle to a melting temperature of 260 degrees, and then the parts with softened edges are pressed against each other. The result is a reliable and monolithic connection.
Before welding, the foil of reinforced pipes must be cleaned. Otherwise, it will interfere with the connection of polymer products, making the seam fragile. With fiberglass, these unnecessary steps will not be required. It melts easily along with the plastic.
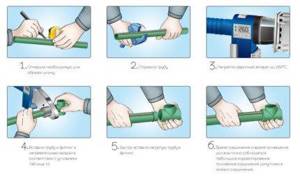
PPR soldering technology is extremely simple, all work can be done with your own hands (+)
Cold welding involves the use of a specialized adhesive composition. In recent years, this method has rarely been used, because the result is not reliable enough.
In heating systems, threaded connections should be sealed with paronite or high-temperature sealant. Do not forget about the fairly high operating temperature of the coolant.
There is one more nuance of using polypropylene for piping a heating boiler. Antifreeze and plastic are a pretty bad combination. It is recommended to use water as a coolant for a system of plastic pipes.
Pellet quality
External parameters
Heating with pellets is considered economical, but this only happens if you use high-quality pellets. Before purchasing a large batch, you need to burn a small volume in your boiler; this is the only way to accurately assess their quality. If this is not possible, some conclusions can be drawn from the appearance of the granules.
Pellets should be smooth to the touch with a minimum of roughness. A smooth surface shows that all important parameters were met during production. At the right temperature, the wood releases a natural adhesive called lingin, which when hardened reliably holds small particles together.
Hardness can be tested by trying to break a pellet. The more difficult it is to do this, the better the quality of the fuel. Also, the ease of destruction may indicate improper transportation, during which the destruction of particles began.
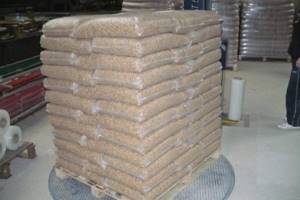
It is better to buy pellets packaged in bags. Thus, they are less likely to deteriorate during transportation. It is more reliable to take granules with a diameter of 6 mm, since they are produced on foreign equipment.
Pellets in bags
This type of fuel should have virtually no odor. A slight smell of the material from which it was made, for example, wood or seeds, is allowed. A rotten smell indicates improper storage, and a strong chemical smell indicates the use of unnatural adhesives in production. Color does not affect the quality of the pellets and depends on the source material.
Another easy way to check the quality is to dissolve a few granules in water. They must dissolve completely, otherwise it means the presence of synthetic additives. In this case, a large amount of heavy sediment should not appear, which indicates a high degree of ash content.
Quality classes
In Europe and the CIS, a general labeling standard ENplus has been adopted, which indicates the parameters of pellets. It regulates the ban on the use of chemicals in production and the standard size of granules: 40 mm in length and 6 mm in diameter. The moisture content should not exceed 10%.
There are three quality levels:
- Class A1. Made from coniferous and deciduous wood. Permissible ash content is from 0.5% to 0.7%. Most are used for domestic boilers.
- Class A2. The raw materials for them are mixed wood species. The ash content reaches 1%.

Mixed wood pellets - class A2 - Class B. The third class is used in large industrial production and has an ash content of up to 3%.
Also, companies that have received this certificate guarantee a high level of quality in product transportation. And this is extremely important, since if transported incorrectly, pellets absorb moisture and their efficiency level decreases significantly.
Components of the strapping
Which components and elements will be included in the set of heating system components depends on the type of heating system:
- Heating with natural (gravitational) circulation of heated water (coolant) - popularly called “physics” heating;
- Forced circulation – with connection of an asynchronous circulation pump;
- Mixed scheme.
Set of strapping elements
In a scheme with natural water circulation, the set of piping elements will be as follows:
- Heating boiler - after it, the heated coolant rushes up and moves through the pipes, returning to the boiler slightly cooled;
- Heating piping pipes - most often for a “gravity” scheme, metal pipes are used that are larger than plastic pipes, with a diameter of up to 2 inches. The diameter is selected based on the need to minimize coolant resistance for its unhindered circulation;
- Expansion tank - installed at the highest point of the system, and can be open or closed in design;
- Heating devices – radiators, radiators or registers;
- Mayevsky tap - installed on the heating radiator to bleed air;
- Fittings - welded or threaded turns, doubles, tees made of cast iron, brass, bronze, copper or stainless steel, tees, drains and other types of connectors;
The advantage of the “physics” system: easy independent installation, simple circuit, common parts and assemblies, low cost of components.
Disadvantages: large size of components, inertia, insufficiently fast heating of wiring and heating devices. Heating circuit with gravitational water circulation
Features of pellet boilers
Heating equipment using compressed wood pellets as fuel has appeared relatively recently. But from the moment of their invention, such boilers immediately won the recognition of millions of customers.
If it is not possible to install gas equipment in your home, then it is recommended to purchase pellet equipment. The advantages of this type of heat generators include:
- Autonomy. Thanks to the presence of a control unit and a system for automatically turning on the burners, once you load fuel, you can forget about it for 2-4 weeks.
- Safety. Pellet boilers have multi-stage protection, which avoids pipeline explosions and fires.
- Efficiency. On average, the efficiency of equipment ranges from 87 to 97%.
- Cheap service. Pellets are inexpensive, and the ash pan needs to be cleaned no more than once a month.
- Durability. The service life of the units is at least 25 years.
- Compactness. Most often, the models are relatively small in size.
If you become familiar with the advantages of this type of heating equipment, it becomes clear why it has so quickly gained popularity among residents of Europe and America.
If you believe the statistics, pellet heat generators will take leading positions in both the domestic and global markets in the coming years
The widespread distribution of units operating on pellets is hampered by the rather high cost. Not everyone can immediately shell out a tidy sum for the boiler itself, the burner and additional equipment.
Common Mistakes
During the installation of a heating system, mistakes are often made, including:
- Lack of control of the return water temperature (this error leads to condensation, soot and tar appearing in the boiler). There are several options to solve the problem; installation is required: - return water recirculation; — three-way valve; - hydraulic guns.
- Damage to the tightness of the chimney, bunker and boiler, reducing the efficiency of the device.
- Lack of thermal insulation of the base (condensation may form due to temperature differences).
- The first start-up is very important and must be carried out by a specialist (the controllers are not configured, this must be done on site, taking into account the burner power and operating mode, chimney draft). Therefore, commissioning work must be taken seriously.
- The size of the boiler room does not comply with the manufacturer’s recommendations. There is often a situation when a pellet boiler installed in a small room suddenly needs cleaning at a certain stage of operation. And this process involves removing the auger, which, due to its length, rests against the wall of the room.
- Lack of supply ventilation
Some technical features of installing a pellet boiler:
— A return temperature controller must be installed. You will get rid of condensation, reduce the formation of soot, and increase efficiency. — The chimney, boiler, bunker and combustion chamber container must be sealed.
In case of power outages, it is worthwhile to provide a source of uninterrupted supply.
Please note that installing boilers of this type is a complex and responsible job. The installation of boiler houses using pellet equipment should be trusted to specialists and companies that have the appropriate licenses. The quality of heating of the room and the amount of savings that will be spent on the subsequent operation of the system depend on the correctness of the work performed.
>Gas or pellets?
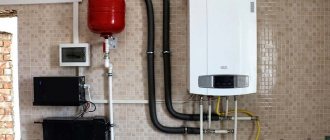
Wiring diagram with photo
The process of connecting the device to hot water supply and distribution networks is carried out in stages, in compliance with a number of rules. The pellet boiler wiring diagram for each model may be slightly different. Below are general instructions (piping is done after installing the main structure and connecting the burner):
- Installation of a boiler and expansion tank.
- Pipe wiring.
- Installation of a system of devices for maintaining reverse flow (two pressure gauges, a circulation pump, a thermal head).
- Installation and regulation of a water recirculation system (for this, three-way valves and hydraulic arrows are installed).
- Installation of air vent valves. It is recommended to install several such valves, at an equal distance from each other.
- Installation of collectors (that is, pipe sections with bends). They are connected to “consumer” objects, which can be radiators in rooms, coils in bathrooms, or heated floors.
- Installation of additional equipment: pressure gauges, safety valves, flow meters.
EXAMPLES OF ILLUSTRATIONS:
Option 1
Connecting the boiler to the heating system
Installation of a pellet boiler with an indirect heating boiler
An example of a stroke in the photo
Photo 2
Step-by-step installation description
Experts do not advise beginners who have never dealt with heating and plumbing systems to install and connect pellet heating boilers using diagrams from the Internet. But knowing how installation is carried out and what nuances are important to observe in the work will allow you to control the work of contractors.
The system installation is carried out according to the following scheme:
- Installation of main equipment:
- Installation of the boiler in a designated place.
- Installation of the fuel bunker away from the boiler.
- Installation of pellet screw feeders in the bunker.
- Fixing the pellet feeder pipe with clamps.
- Installation of burner, exhaust pipe and hose.
- Pellet boiler wiring.
- Fill the system to the specified operating pressure.
- Connection to the chimney. The cross-section of the chimney must correspond to the cross-section of the boiler flue pipe. Natural draft must be at least 12 Pa.
- Installation of additional elements such as safety valves (they are not required, but increase the convenience and safety of use).
- Electrical connection. If there is an increased risk of regular power outages, it is recommended to supplement the system with a suitable UPS model.
Attention: the article provides a general installation diagram. Installation details may vary depending on the specific model. A more detailed diagram is given in the instructions, which must be issued when purchasing the boiler.
EXAMPLES OF ILLUSTRATIONS ON THE TOPIC:
Installation of the boiler base and fuel bunker
Two options for connecting to the chimney
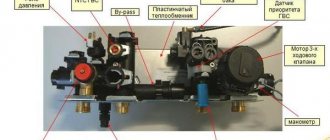
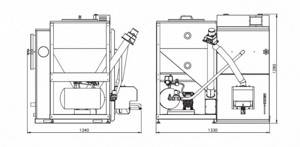
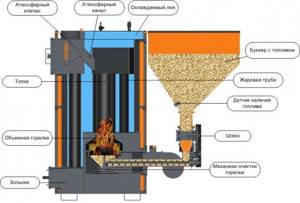
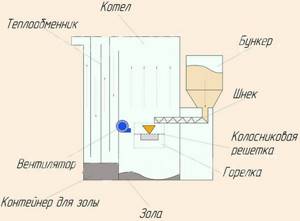
Pellet boilers - device
Main parts of the unit:
- fuel housing with heat exchanger;
- pellet burner;
- hopper for loading granules;
- a mechanism with a screw for supplying fuel to the combustion zone;
- Control block;
- temperature sensor;
- other small components.
The main feature of a pellet boiler is the pressurization system. If you simply pour a portion of pellets into the firebox of a conventional stove, the air flow will be poor and instead of a hot flame, the fuel will smolder.
Pellets are poured into a separate hopper and fed into the boiler using an Archimedes screw (or auger) through a pipe. In the combustion zone there is a heat exchanger (pipe in the form of a snake, spiral or grate), filled with coolant and connected to the heating system.
Spent fuel waste is poured into the ash pit.
Fully automated factory designs require minimal human intervention. The control unit controls the supply, degree of combustion and ash cleaning.
Additional settings
When the main parameters are set, you can move on to the auxiliary ones.
The first option is that you can adjust the ignition time of the pellets. By default it is 5 minutes. This is exactly how long the special halogen lamp is turned on, which is responsible for igniting solid fuel.
High quality pellets ignite faster - in 3-4 minutes, and in this case the ignition time can be reduced. In the case of inexpensive fuel, it is recommended to increase the parameter to 6-7 minutes.
Also, installing a pellet burner in a solid fuel boiler necessarily involves setting such indicators as:
- burn-out time (characterizes the maximum fan power after stopping the fuel supply);
- coolant temperature “return” (once it is reached, the burner changes the “Heating” mode to “Maintenance” - it is set to approximately 60 ° C);
- supply coolant temperature (critical value within 90-95° - at this temperature the supply of pellets stops, and an “Overheating” warning signal appears on the control panel display);
- auger control (two modes - “On” and “Off” - when activated, pellets are smoothly fed into the combustion chamber).
If the burner operation must be stopped, under no circumstances should the plug be pulled out. Such a sudden disconnection from the power supply will provoke a pressure surge inside the system, which will lead to the fan stopping, which, in turn, will provoke the release of soot and ash onto the internal elements of the boiler and extinguishing the pellets. Next time the fuel will ignite noticeably worse.
APG-25 will pause operation if you press the red “Stop” button on the control panel twice. Pressing once will enter the system into pellet burning mode.
Correct setting of a pellet boiler is the key to its smooth operation.
Selecting the power of the heating boiler
A heating boiler piping is a system of pipelines and equipment designed to provide radiators with coolant. Simply put, it's everything except the batteries.
The first step is choosing a heating boiler, the performance of which must be determined in advance.
The calculation of the required power of the heating unit is influenced by many factors, these are:
- volume of the building;
- number of windows and total glazing area;
- number and area of doorways;
- thermal conductivity of materials used in the construction of walls;
- degree of insulation of load-bearing structures;
- average annual temperature in the construction region;
- location of the building, i.e. Which side of the world faces the main, traditionally most glazed, façade?
However, there is an average indicator that, without in-depth calculations, allows you to determine the required performance.
For the middle zone, 1 kW per 10 m² of heated area can be taken as a starting point (but not a guide to action!). It is imperative to add a reserve of at least 20% to the design power of the heating boiler.
Next, you need to decide on the type of heating boiler: autonomous or manual loading.
Factors influencing choice
When choosing a high-quality, reliable unit, pay attention to the following characteristics:
- For power. Household appliances have relatively low power. To provide heat to a living space, 15 kW is enough. For 10 sq. m. accounts for 1 kW. A boiler with this power can heat a house measuring 150 square meters. m.
- On the efficiency factor. For pellet boilers, efficiency varies from 80 to 95%. The high rate is achieved due to the quality of the granules and the design features of the device.
- By burner type. There are retort and stoker burners. The first ones have smoke directed upwards. They are unpretentious to fuel quality and operate for a long time without cleaning. The efficient operation of the stoker burner is achieved due to the high quality of the loaded granules. The main disadvantage of such a device is that it often gets clogged.
- To the level of process automation. Some pellet boilers can operate without human intervention. Such devices are controlled remotely using a mobile phone. A special program allows you to turn the device on and off and adjust the temperature from a distance. In the event of a malfunction, information about failures is sent instantly to the mobile device.
- On the design of the heat exchanger. They are horizontal and vertical, flat and tubular. Experts recommend choosing vertical heat exchangers with turbulators, which spend most of the energy on heating the coolant and do not allow ash to settle in large quantities.
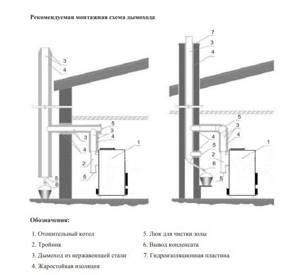
Chimney for a pellet boiler: the importance of correct installation
Thanks to good traction, the efficiency of the pellet installation increases. If the chimney is made correctly, then it will be able to provide the required draft, despite the weather conditions. You can find out what a homemade chimney looks like from the photo.
A device is installed in this chimney that will remove condensate. The correct approach to installing the cap will be the key to protection against aerodynamic support or pipe blocking.
When installing a pellet boiler, special attention must be paid to the installation of the chimney
Most often, metal pipes are chosen for the chimney, which are equipped with cleaning hatches and insulation. Speaking about the clearance between the outer surface and the roof, it should be no more than 13 cm. It would not be out of place to say that for a pellet boiler, both small draft and too large one are dangerous. To avoid this, additional installation of a gate valve and stabilizer will be required.
Choosing a location for installation
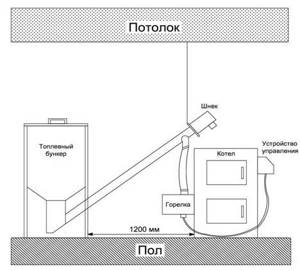
After the room for the heating system has been prepared, you need to decide on the place where to install the boiler. Here are a few requirements:
- The floor where the boiler is placed must be level. Only a strictly vertical position of the device is allowed without any tilting.
- The platform under the boiler must be strong to support the weight of a fairly heavy device (some models weigh over 200 kg).
- The boiler can only be placed on a fireproof surface. Tile or concrete are best. Installation on a raised heat-insulating base is allowed.
- There must be at least 1.5 meters from the front wall of the pellet generator to the wall of the room.
- The floor under the boiler should not cool down very quickly when the device is turned off, so that condensation or ice does not form.
In order to subsequently use the system as convenient as possible, the installation of a pellet boiler must be carried out with the expectation that it will need to be constantly approached. At least 1.5 m of free space is required in front of the front wall of the boiler (to add fuel, monitor the flame and draft, and carry out cleaning). If this is not taken into account, then sooner or later the device will need to be dismantled.
Installing a pellet boiler: step-by-step instructions
Before you start installing a pellet boiler yourself, it is very important to prepare a separate room, the floor and walls of which should be made of material that does not burn. The floor is best made of concrete or ceramic tiles
Make sure that the distance between the unit and the walls is sufficient for its maintenance, and that the surface on which it stands is perfectly flat. As for the space between the front side of the installation and the wall opposite it, it must be at least one meter. The acceptable temperature in the room where the boiler is located is not lower than +10 degrees.
Another important condition in the installation is the correct arrangement of the boiler room, namely exhaust and ventilation, because the boiler firebox absorbs a large amount of air during combustion, and all the results of combustion are distributed outside.
When installing a pellet boiler with your own hands, it is better to follow the step-by-step instructions
There are 6 rules that must be followed during installation and design:
- The diameter of the connector for the smoke outlet should be smaller than the cross-section of the chimney; it is calculated based on the power of the boiler;
- The chimney pipe must be at least half a meter higher than the roof;
- The chimney must be made exclusively of material that does not burn and does not allow gas to pass through;
- Make sure that there is a gas outlet at the bottom of the chimney;
- Be sure to protect the chimney from possible precipitation and provide additional thermal insulation;
- There should be a cloth in the chimney that will close the hole and provide access in order to clean it inside in time.
If the system for combustion products is not made correctly, this can lead not only to poor efficiency of the work process, but also to a threat to human health.
How to calculate the required volume of a heat accumulator
A tank that is too large or too small for storing heat in the form of a heated coolant is an ineffective solution, therefore the required volume of the tank is subject to mathematical calculation, the exact results of which are difficult to obtain due to the approximate initial data - heat losses in the room, the properties of the insulation of the walls and the foundation of the house, heat-insulating qualities of building materials of walls, ceilings and partitions, the same parameters of window and door openings.
But it is still possible to roughly calculate the heat accumulator, and this technique is designed specifically for ignorance of the exact heat losses of the building, especially if it is just to be built. The choice of size and volume of the tank for the heat accumulator can be made based on the following parameters:
- Total area of heated premises;
- Thermal power of heating equipment.
These two parameters determine the volume of TA.
Let's say you need to calculate the volume of a heat accumulator for a heating system based on the heated area of the room. The formula for calculation is simple: the area in square meters is multiplied by four (Sx 4). For example, a house with a total heated area of 50 m2 will require a 200 liter tank. With such a volume of TA, as practice shows, the boiler can be loaded with solid fuel only once a day. This is very good savings and very good efficiency.
Knowledgeable owners will say that you can simply install a pyrolysis boiler, which will work the same way. But the operation of such a boiler is a little more complicated and less efficient, since:
- First, the fuel ignites and burns;
- Then the air supply is limited;
- The last thing to activate is the smoldering of the fuel (pyrolysis).
When the fuel ignites, the temperature of the coolant increases sharply, and the pyrolysis process maintains it at a given level, and during pyrolysis a lot of thermal energy simply disappears into the chimney pipe, heating almost nothing. Another disadvantage is that during heating peaks, the coolant can boil and splash out of the expansion tank, and when using PVC pipes for heating distribution, they quickly fail due to high temperatures.
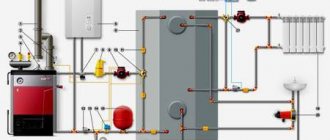
Strapping scheme
Pellet boiler wiring diagram (click to enlarge)
Installation of a heat generator consists of the following steps:
- installation of distribution comb;
- installation of a pumping circuit for consumers;
- installation of safety devices;
- installation of an expansion tank and shut-off valves;
- connecting the unit to the supply and return circuits;
- starting the coolant into the circuit;
- test run of the boiler and quality control of its operation.
The installation of a heat generator has its own characteristics. It all depends on the type of boiler, its power, features of the heating system and hot water supply. It is worth considering that high demands are placed on the harness. There are reasons for this.
You might like the article about fuel consumption in pellet boilers.
You can read about the types of pellet boilers here.
You may also find this article about Buderus pellet boilers useful.
First of all, it is worth noting that for the installation to operate, fuel with low humidity must be used. It is also important that the structural elements of the boiler heat up to high temperatures. Poorly executed piping can cause malfunction of the heat generator and lead to rapid wear of its individual parts and assemblies.
According to fire safety standards, piping of a pellet boiler must be done using a pipeline made of non-combustible materials. Today, polypropylene pipes are considered the ideal solution. But in practice this is far from the case. At the outlet, the coolant has a high temperature, which significantly exceeds the heating temperature limits of polypropylene pipes. As a result, this leads to rapid wear of the system.
Pellet boiler
In order to wire the heat generator, you must perform the following steps:
- install the boiler;
- connect the appropriate burner;
- install a bunker for storing a specified number of pellets;
- install a screw through which fuel will be supplied to the combustion chamber;
- installation of a control panel for equipment operation.
Once all these steps have been completed, you can proceed to the following steps:
- install a pressure gauge, relief valve and air vent;
- if necessary, install a thermal valve sensor;
- install a chimney whose dimensions will meet all requirements;
- installation and connection of all devices that will support the reverse flow of coolant;
- installation of an uninterruptible power supply, which will prevent interruptions in the operation of the boiler.
Correct boiler settings
When buying a pellet boiler, first of all you need to pay attention to the availability of service centers and official representative offices in the region where the boiler is installed. The pellet boiler is fully automated and requires proper configuration and maintenance. Correctly setting up the boiler will increase its service life, reduce fuel consumption and simplify cleaning the boiler. Start-up and commissioning of this kind of automated equipment must be carried out by a specialist authorized by the manufacturer. In fact, there are no restrictions on starting the boiler and putting it into operation; this procedure can be performed by the installer who installed the heating system, and of course by the user himself. But in this case, all responsibility and further maintenance falls on the person who carried out the launch.
What is important to know to set up a pellet boiler yourself? First of all, you need to understand that an automatic pellet boiler has several operating modes. The most basic and those that require more attention are three: Ignition, Work, Pause. Boiler manufacturers use different types of automation in which all kinds of additional modes can be used, such as: Combustion Stabilization Mode, Modulation Mode, Supervision Mode, etc. When we already have an idea of the modes, it is important to understand how the boiler should behave in each mode.
Ignition mode - when a certain portion of pellets is supplied to the burner using an igniter, or in manual mode it is ignited and complete combustion is stabilized. The boiler usually spends about fifteen minutes in this mode, during which time it also supplies pellets in certain portions, while the boiler automation monitors the temperature of the flue gases. In this mode, it is very important to set up a sufficient amount of pellet supply and air injection so that the temperature of the flue gases rises rapidly. After the flue gases reach 60 degrees, the chimney is considered warmed up, and the automation switches the boiler to Operating mode.
We recommend: Penoplex - technical characteristics, dimensions, prices and installation features
The operating mode is very similar to the ignition mode. The boiler spends most of its time in this mode. It is at this time that it heats the boiler heat exchanger and brings the temperature in the heating system to the set temperature. During our work, we no longer need to quickly warm up the chimney. Our task is to achieve correct and complete combustion of pellets, a stable and clean flame. Two parameters are subject to adjustment: air blowing power and the number of supplied pellets. The air power is usually regulated in a ratio from 30 to 100 percent, the number of pellets supplied to the burner is regulated in a cyclic ratio, and after a certain period of time a certain portion of pellets is supplied. It is important to understand that the portion of burned pellets corresponds to the declared power. For example, a fifty kilowatt boiler will not be able to provide heat to the room if the supplied pellets are too small, even if the flame is stable. The average heat transfer of pellets from one kilogram when burned can produce up to five kilowatts of thermal energy per hour. The quality of the fuel can greatly affect the consumption of pellets, and in some boilers, the operation of the burner.
Manufacturers of pellet boilers provide standard operating settings. Each power has its own number of pellets per hour and its own air blowing power. Our task as a user or boiler setup specialist is to adjust these parameters so that pellet combustion is complete and consumption is minimal without loss of boiler performance.
This begs the question, where to start setting up a pellet boiler?
We recommend that you first start by adjusting the air and blowing power of the fan. The blowing power may vary for each boiler; it is usually influenced by a number of factors, such as chimney draft, pellet quality and even burner type. The amount of air pumped into the burner should be the minimum necessary for complete combustion of the fuel. This can be determined by the color of the flame.
The correct flame has a yellowish tint, the flames rise upward, the combustion is even, high and stably kept at the same height. It is in such a flame that maximum efficiency is achieved.
Is the flame reddish with noticeable smoke? There is not enough oxygen for combustion; this can be affected by both an incorrectly installed chimney and too little air blowing power. Try adding blowing power and observe the result.
If we observe an aggressive flame, and pellet coals jump up and fall into the ash pan as unburnt pellets, there is too much air blowing, we recommend reducing the air to the minimum required for combustion.
After the flame has been normalized and it meets all the parameters of proper combustion, it has a yellowish tint. Let's move on to adjusting the auger feed. As mentioned above, the auger operates cyclically, feeding certain portions into the burner. Before setting up the auger feed, you need to understand what type of burner your boiler has. A torch burner requires the minimum required number of pellets when burning, so that the pellets do not clog the air supply holes. In such burners, pellets are usually fed in small portions. If we are dealing with a retort burner in the form of a bowl with bottom fuel supply. Here the fuel supply occurs somewhat differently; the pellets supplied from below constantly raise the combustion. Our main task is to adjust the optimal supply of pellets to the burner so that the fuel during combustion is always at the same level. Combustion should occur in the upper part of the burner, and the pellets should not spill over the edge of the burner or sink below the level.
After we managed to select the ratio of pellet supply and air inflation, we should observe the temperature of the water in the system, whether it tends to the set one, and at what speed. Is the boiler gaining temperature very slowly or is the temperature stuck in one place? This means that the boiler is not operating at rated power; it is necessary to add fuel supply and adjust combustion.
The final mode is Pause or Stop mode. The pellet boiler goes into this mode when the set task, namely the set temperature, has been achieved. In this mode, the boiler completely turns off the operation of the auger and fan, and waits for the water temperature in the system to drop by several degrees, after which it starts working again, before checking the combustion.
We recommend: Double-circuit electric boilers: how to choose an energy-saving water heating boiler unit, review of the best models and their characteristics, reviews and prices
The question is very often asked: Is it necessary to reconfigure the boiler when changing fuel? If these are fundamentally different fuels then - Yes.
For example: We made a tincture using wood pellets, and a little later we decided to switch to husk pellets. Husk pellets burn a little faster than wood pellets and the feed ratio of the auger to the fan needs to be changed.
If the fuel is simply from different batches or from a different manufacturer, then only a slight adjustment of one of the parameters will be necessary. Pellets may differ in density, humidity, calorie content, as well as ash content and the likelihood of caking and cake formation.
Pellet boilers have gained popularity in the line of solid fuel boilers due to their autonomous operation and convenient operation. Such boilers can work from 2 to 10 days on one loading of the bunker and with cleaning the boiler every 4-5 days, while a long-burning boiler with automation will not last even 24 hours and needs regular cleaning before each loading of firewood. However, pellet boilers require proper tuning and it is better to entrust commissioning work to a specialized organization. A properly configured boiler will easily develop the specified power, and the savings on pellets will pleasantly surprise you.
Recommendations for making a boiler
The first thing to do is choose the design of the unit. Here the recommendations are as follows: do not complicate your work and choose the boiler design taking into account the future. In simple words, it is worth separating those elements that you can make yourself from others that you will have to purchase. The latter includes a burner device with a set of automation.
Some craftsmen suggest making a burner with their own hands, but this unit is quite complicated, you can spend a lot of time and effort on it, and as a result, the functioning and consumption of the pellet boiler will be unpredictable. It’s probably easier to buy a finished product and put it in a homemade unit, but everyone decides this question for themselves.
To choose a design that takes into account the perspective, you need to make it universal. That is, it is proposed to make a homemade pellet boiler in the image of a conventional solid fuel unit, in which it is possible to burn wood and coal. In essence, the heat exchange processes occurring in both types of heaters are identical, only the fuel and the method of burning it differ, as shown in the figure:
So, we boldly accept the design of a traditional solid fuel boiler with the possibility of embedding a burner device on a mounting plate instead of the loading door. This will provide the following benefits:
- Since the production of pellets is not yet very widespread in our country and there may be interruptions in the fuel supply, you can remove the pellet burner at any time and heat your home using wood or coal.
- It will be possible to use natural gas or diesel fuel by installing a gas or diesel burner instead of a pellet burner.
To fire the boiler, it is best to use heat-resistant steel 5 mm thick. The ideal option is steel alloyed with chromium and molybdenum (stainless steel), but it is quite expensive, and special skills are required to weld it. For this reason, pellet boilers are made of ordinary carbon steel St20, and for the casing of the water jacket, grade St3 with a thickness of 3 mm is suitable. It is preferable to take blanks for doors and flame tubes for the heat exchanger from the same metal as the combustion chamber. The grate is cut out of steel 10 mm thick or simply purchased ready-made. Well, for the chimney and coolant pipes you will need pipe sections of appropriate diameters.
Assembly is carried out by welding, using drawings of a pellet boiler
Particular attention should be paid to strengthening the walls of the water jacket with pieces of steel strip or angle, as well as the removable design of the loading door. Upon completion, welds must be tested for permeability and defects must be eliminated
Application of buffer tank
The wiring diagram for a solid fuel boiler with a battery tank is not widely used. It is quite cumbersome, but allows for more correct heating operation. Its advantages:
- Stabilization of temperature in the system due to the increased volume of water in the circuit;
- Possibility of reducing the number of approaches for adding fuel to the boiler furnace due to the accumulation of excess heat in the storage tank;
- Possibility of accumulating clearly unnecessary excess thermal energy when using too powerful a boiler or excessive stacking of firewood.
The heat accumulator circuit has one drawback - it is necessary to allocate space for the device itself. The volume of the container used reaches several hundred liters, so you will need free space to place the tank.
There are many schemes for connecting buffer tanks. The simplest of them involve the use of the same coolant in the boiler and in the heating system. A more efficient scheme is using a three-way valve with a thermostat, which ensures a more uniform and economical consumption of thermal energy from the buffer tank.
Schemes with two circuits are also used. In this case, heat accumulators of heating systems are equipped with heat exchangers connected to solid fuel boilers. Heat exchangers heat the water in the tank, which is the coolant of the heating circuit. This option is distinguished by its efficiency and more uniform heating.
This scheme with a buffer tank is gentle for solid fuel boilers that are not designed for high heating pressure. And in this case, the coolants will be separated, the pressure in the tank and in the radiators will not in any way affect the pressure in the boiler itself and the heat exchanger.
Using a single-circuit solid fuel boiler often forces you to look for schemes for organizing hot water supply. For these purposes, you can adapt a storage or instantaneous water heater. It is also possible to use a more advanced heat storage tank with a built-in DHW circuit coil. This piping scheme will be an optimal and profitable solution, as it will solve the problem with hot water supply.
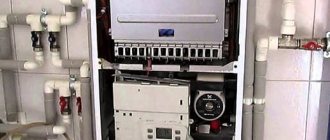
Device
The structure of a pellet boiler with the designation of the most important elements and components (click to enlarge)
Apart from the pellet burner for the boiler, which is almost impossible to make at home, all other structural elements will have to be completed independently. It will take a lot of work for the result to meet expectations.
Having experience in such work, assembling a heat exchanger and laying out a combustion chamber from fireclay bricks is quite a feasible job. You can also handle installing the burner, but you will have to work hard with the fuel supply system. This most important node in each specific case turns out to be exclusive. It is necessary to ensure an uninterrupted and reliable supply of fuel pellets to the burner (read about boilers with automatic fuel supply here).
The density of pellets is high, and a large number of them cannot burn at the same time.
It is almost impossible to ensure the correct mode during manual control unless you are constantly nearby. Therefore, the device is equipped with automatic systems, and they cost a lot.
This is a factor in the high cost of the entire structure. One or more programmers cope with the task without outside interference. Even a small fuel bunker can autonomously heat a house for up to three days. If you assemble a more solid structure with a large supply of pellets, then the service life can be increased significantly.
Additional costs will also be incurred for the purchase of a motor for the screw mechanism and its automatic connection. Before assembling a pellet boiler with your own hands, you need to draw up drawings of the future boiler, calculate its dimensions depending on the area of the available space for its installation.
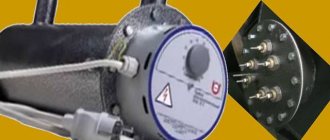
The main part of a pellet boiler is the burner
Similar to factory models, the main focus is on assembling the body and fitting all components. Assembly kit includes:
- Sheet steel 4-6 mm for the manufacture of the boiler body.
- Bunker material. It can be made from sheet metal (a thickness of 1-2 mm will be enough), multi-layer plywood, or wood.
- Screw. It is selected according to size or, if you have the skills, you can do it yourself.
- Chimney pipes. Metal or asbestos and mounting kit.
- Control system. Provides automatic control over the operation of the boiler.
- Motor for operating the screw mechanism.
- Pipes for heat exchanger. Square cross-section products are recommended.
- Pipes and fittings for connecting the heating system.
- Fireclay brick, if the combustion chamber is made stationary.
- Grate. It will provide air access to the combustion site.
basic settings
A pellet solid fuel boiler is considered very convenient to use, but unlike other solid fuel models it requires proper configuration. A correctly configured ratio of parameters directly affects indicators such as the power and efficiency of the boiler.
A very common question: is it necessary to reconfigure the boiler when changing a batch of pellets? Yes, your solid fuel boiler using different pellets will work differently. The ratio of components from which pellets are made is different for each manufacturer and therefore the combustion process will also be different.
The principle of a pellet solid fuel boiler is quite simple: a worm mechanism (auger) feeds small granules of compressed wood, coal, biomass, etc. (pellets) into the burner, and air is also forced into it to ensure the required flame power.
Two parameters are subject to adjustment: pellet supply speed and air blowing power. The air supply is adjusted by simply selecting the rotation speed of the blower fan, usually either on a scale from 1 to 10 or in % from 1% to 100% (depending on the model of the solid fuel boiler). The pellet feeding speed is adjusted by increasing or decreasing the period between activations of the worm mechanism. The rotation speed of the screw is always the same.
The amount of air pumped into the burner should be the minimum necessary for complete combustion of the fuel. This can be determined by the color of the flame. A red flame with noticeable smoke is a sign of lack of air. A white flame means the fan is blowing too much air.
The correct flame is yellow. An additional sign of proper air supply is that the flame not only rises upward, but also diverges slightly to the sides.
When adjusting the air supply, do it in the minimum permissible increments. The more accurately you set the minimum required point, the more boiler power and less pellet consumption you will achieve.
First of all, the air supply is adjusted, and then the pellet feeding speed.
The feed rate of pellets into the burner should be optimal. If too few pellets are supplied, then it will be difficult to accelerate the solid fuel boiler to rated power - there will simply be nothing to burn, and if there are too many pellets, then excess fuel will fall out of the burner.
The APG-25 Teplodar pellet burner is started by pressing the button located on the side of the hopper once. The device is put into standby mode. To go to the main equipment settings, you must simultaneously press the “Left” and “Right” arrows. Secondary parameters of APG-25 are set during heating or maintaining temperature.
We recommend: Heat-resistant paint for metal for furnaces: types of heat-resistant paint up to 1000 degrees and features of use
The user needs to set two main parameters:
- Feeding time in “Heating” mode
. The default is 9 seconds with a cycle time of 20 seconds. This is a system setting for a 20 kW boiler heating a room of 180-200 square meters. m. If such power is not needed, the indicator is reduced to 5-6 seconds. The feeding time in the “Maintenance” mode is determined automatically. - Fan power
. The user manual indicates which blade rotation power is selected depending on the pellet feeding time. The parameter is set manually. If the fuel supply is short, the fan operates in moderate mode.
The fan power also affects the speed at which ash is blown out of the fryer. For poor quality pellets, it is necessary to set the parameter slightly higher than the table value, in particular, when working in the “Maintenance” mode.
Pellet equipment piping
The piping of a pellet boiler is everything that is located between the source of thermal energy and the radiators that release heat to the room. It may seem that it is enough to connect the boiler and radiators with pipes and you can enjoy the warmth in the house. But it's not that simple. Even an economy class Faci pellet boiler costs at least 130 thousand rubles. If the connection is made incorrectly, expensive equipment will quickly fail.
It is better to entrust this work to a specialist
Piping of heating boilers is distinguished:
- according to the method of pipe routing
- by type of natural circulation
- by the type of forced circulation of coolant using a pump.
Let's consider what elements the piping of a solid fuel boiler consists of.
Table Fuel consumption for the season*
| Type of fuel | Unit | House 60 sq.m | House 100 sq.m | House 150 sq.m | House 200 sq.m |
| Pellets | kg | 2380 | 3970 | 5960 | 7950 |
| Firewood | skl.m³ | 8 | 13 | 20 | 27 |
| Gas | cubic meters | 1309 | 2181 | 3271 | 4362 |
| Coal DG | kg | 2150 | 3580 | 4370 | 7170 |
| Anthracite coal | kg | 1780 | 2970 | 4455 | 5940 |
Useful features and disadvantages
It is also worth considering installing a universal solid fuel boiler with built-in electric heating elements. Some models even have a hob, which does not require additional external finishing.
Electric boilers can easily withstand power outages for up to 6 months. This makes them a good option in case of irregular use of the system or in case of interruptions in the supply of electricity needed to heat a private home.
At first glance, heating systems seem complex. However, the principles by which the heating system works are very simple. A properly designed and implemented system can work for years without any intervention.
DIY pellet boiler
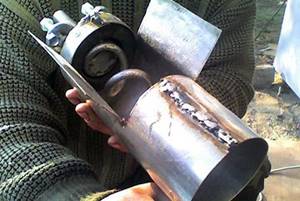
The most complex and expensive element of the system is pellet burners for boilers.
Such a burner not only burns fuel, but also regulates combustion, automatically cleans itself and maintains the temperature selected by the owner.
Some types of burners can be switched from pellet heating to electric (for example, at night at a reduced rate), and can also be controlled via a smartphone.
This is a high-tech element, which is very difficult to recreate at home. Such an automatic pellet boiler costs about 60-80 thousand rubles.
There is a more inexpensive option - semi-automatic burners, for example, Pelletron-MB 15 kW. Such a burner costs about 14 thousand rubles.
If it is possible to make a burner yourself, then you will need to develop or find ready-made drawings and understand them well.
The most difficult thing is to adjust the speed of feeding the pellets into the burner so that they have time to completely burn out. To do this, you will need a combustion sensor, which can be made from a phototransistor. It reacts to the brightness of the glow and regulates pauses between pellet feeds (when the brightness of the glow drops, it turns on the feed).
To ignite fuel, you can use a glow plug from a car heater or a soldering hair dryer.
Turbocharging fans are not winged, but .
The most economical option when choosing a heating system for a private home is to install gas equipment. Gas boiler for heating a private house. basic selection criteria and installation rules.
Which wall-mounted gas boiler option is best to choose? Read here.
Are you planning to install gas heating in a private home? Then the next topic will be interesting for you: https://microklimat.pro/otopitelnoe-oborudovanie/kotly/dvuxkonturnye-gazovye-kotly-dlya-otopleniya-chastnogo-doma.html. You can read everything about choosing and installing a double-circuit gas boiler, and also get an answer to the question: why is a double-circuit option preferable to a single-circuit one?
Manufacturing of pellet supply unit
Bunkers can vary in shape and size (the larger the bunker, the less often you will need to load pellets). Welding a container will not be difficult, especially since even a small factory-made tank will be expensive - from 18 thousand rubles. and for a homemade structure, you can even put together a plywood box on a stand. Inside the bunker, the bottom is made with a slope towards the auger (for feeding pellets).
A shaft pipe is installed to supply fuel to the burner. It can be made from ordinary plumbing plastic pipes and corrugations, or a steel tube.
Construction of a pellet boiler
An auger is mounted inside. It is curled from flat-section tire wire or a factory model is ordered, which will be more reliable. The length of the auger will depend on the distance of the tank from the furnace. The drive is done through a gearbox from an electric motor of suitable power. Sometimes a mechanism from car window lifters is used. It just produces low revs, which makes it the most suitable option.
If the hopper is installed above the burner, then it is possible to design a structure without a screw mechanism.
Heat exchanger manufacturing
The heat exchanger design is selected according to the size of the furnace. You can cut round pipes and weld them with a comb into two longitudinal pipes (it will be more convenient to work if the longitudinal pipes have a rectangular cross-section).
All welding seams must be checked for leaks, and then the heat exchanger must be installed in the furnace body, bringing out the pipes for connecting the supply and return.