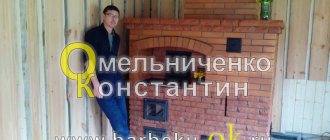
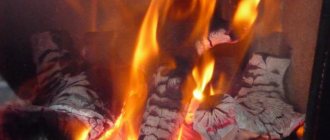
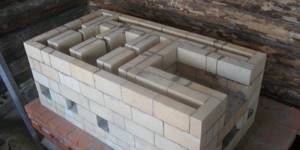
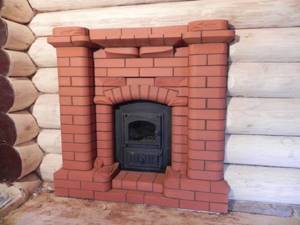
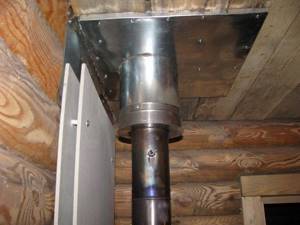
In Russia, Russian stoves installed near the door in the corner have always been valued. They can have different shapes, sometimes even unusual, but the basic size must be respected (142x213x180 cm). A stove of this size heats a room of 30 m2 with its heat. The Russian oven produces very tasty and memorable dishes, for example, pies with various fillings. Laying such a stove requires strict adherence to the sequence and quality of all joints.
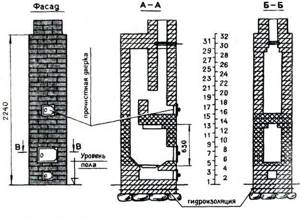
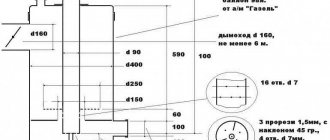
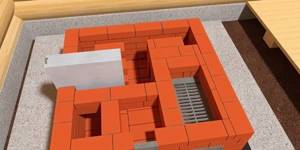
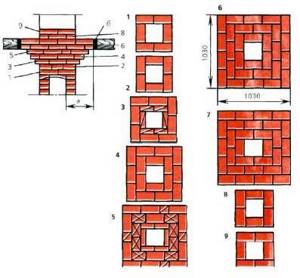
Diagram of the design of a heating rectangular thick-walled stove PTO-2300.
Drying the oven
Drying a Russian stove lasts approximately 30 days. This requirement cannot be waived. If you decide to flood the stove without waiting for the allotted time to dry, then, most likely, cracks will appear in the seams, and no amount of putty will be able to repair the damage - you will have to redo everything.
Recommendations for properly drying the oven:
- After laying out the furnace, during the first 14 days, all valves and hatches must be opened for cleaning so that the entire structure can dry naturally. Alternatively, you can put a 200-watt incandescent lamp in the firebox and turn it on constantly so that the air in it can circulate freely.
- This is followed by 14 days of forced drying, during which the firebox door and cleanout hatches will need to be closed, only the dampers should remain open. During active drying, on the first and second days you need to burn 3-4 kg of wood. After this, every day you need to add another 1-1.5 kg of firewood.
- At the drying stage, before moving on to heating, keep an eye on the metal elements of the stove - if moisture stops condensing on them, this will indicate that the stove is almost completely dry.
- After another two weeks, you can try to heat the stove at full power. After a full day of heating, the next day all seams should be carefully checked for damage, especially near the firebox. The slightest cracks are not covered immediately, but at the end of the season.
- If the stove has not been heated for a long time, its startup should continue for 3-4 days.
- Sometimes a cooled stove at the beginning of the heating season does not want to flare up, or smokes. In this case, you need to open all the lower hatches for cleaning and put a lump of crumpled newspaper in each of them. A few minutes after setting the newspapers on fire, a draft should appear; the main thing is not to forget to close the cleaning hatches after that.
In conclusion
In this article we learned in detail how to make a Russian stove with your own hands. It turns out that this is not a difficult process, and anyone can handle it.
What materials are used for laying a brick oven?
Preparing for the construction of a furnace is a troublesome, but enjoyable undertaking. You will need to decide what material you will use to build the oven, what solution to use, what doors and other elements to purchase.
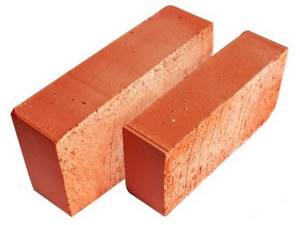
First you need to decide which brick will be used. There are several types of it:
- Ceramic is the most common and popular material for laying a stove.
- Silicate is a type of brick that is categorically unsuitable for the construction of stoves.
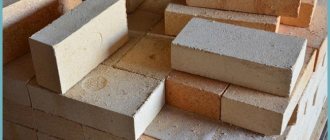
- Fireproof - well suited for the construction of furnaces. Most often they are used to lay the firebox of brick stoves and fireplaces. They can be refractory, fireclay and others.
IMPORTANT! When choosing the type of brick, avoid hollow and hollow types. They are not strong enough.
The next thing you need to decide on the solution. Most often, clay is used for these purposes. For ceramic bricks - red, for fireproof bricks - special fireclay clay. You can purchase ready-made mixtures at construction stores and dilute them according to the instructions.
Some kiln craftsmen still prepare masonry mortars with their own hands. To do this, they mix river sand of a fraction of one to one and a half millimeters, clay and water. The proportion of sand and clay is 2.5 to 1.
Additional accessories include grate bars (special grates, which in the future will be located between the firebox and the ash pit); doors for the firebox and vent, soot cleaners, valves and dampers.
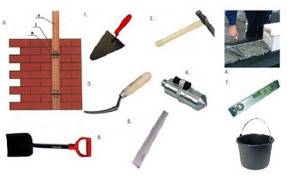
To build your stove you will need the following tools:
- plumb line;
- measuring tape;
- trowel;
- spatulas of different sizes;
- metaba;
- wire;
- level;
- metal pieces;
- containers for solutions.
Preparatory work
Before starting work, it is necessary to decide where the heating structure will be located. The choice of location determines its configuration and size.
When planning, you should remember that the chimney should not be located near the rafters - closer than 15 centimeters. Otherwise, trouble may arise.
For inexperienced stove makers: it is recommended to first build a model of your future stove from bricks without mortar. This will allow you to notice design flaws in time and correct them.
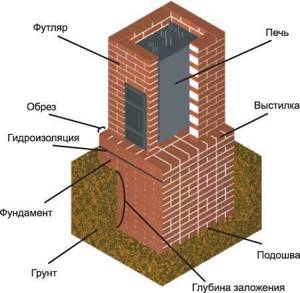
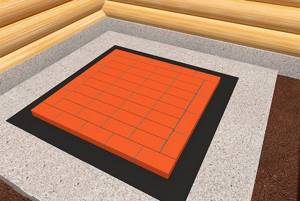
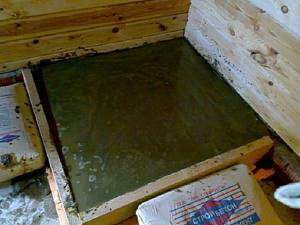
An important element of any furnace is its foundation. It should be larger in area than the oven itself. The base must also be provided with preliminary waterproofing.
Making the foundation for the stove
The foundation can be made from any brick; some stove makers use crushed stone to make it.
The most durable stove will be the one whose foundation was laid along with the house in which it is located. It is worth noting that both foundations are laid separately from each other. Otherwise, settlement of the building walls will lead to a violation of the geometry of the heating device and damage its integrity.
If the stove is built in an already finished house, then several difficulties will have to be overcome. If wooden floors are installed indoors, they will be dismantled at the construction site. The possible offset from the external contours of the future furnace is 15 centimeters.
- A foundation pit is being dug. Its depth depends on climatic conditions and the level of soil freezing. For the middle latitudes of Russia, the optimal depth will be 0.8 meters. The bottom of the pit is covered with a layer of sand 15 centimeters high. A layer of crushed stone is poured on top. Both layers must be compacted thoroughly.
- The next step is to stick wooden stakes into the corners of the future stove, and attach the lathing to them. It turns out to be a kind of formwork for the foundation. Its wall joints must be covered with polyethylene so that cement does not leak into the cracks.
- Let's move on to pouring the foundation. Concrete mortar is mixed from M-400 cement, sand and crushed stone. It is important not to overdo it with water; the consistency of liquid concrete should be of medium fluidity. Otherwise, the strength of the foundation will be less.
- The mixture is poured into the formwork, compacted and the surface is leveled using the rule.
IMPORTANT! The upper edge of the stove base should be located centimeters below floor level.
A few hours after the initial setting, the formwork is wrapped in film. It is necessary to wait until the concrete solution dries completely, this takes several weeks.
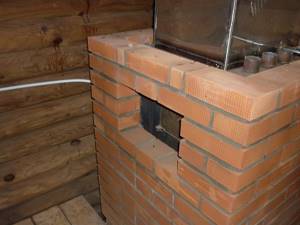
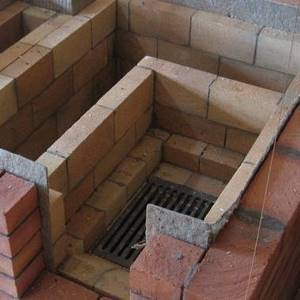
Laying and lining of the firebox and furnace wells
The laying and lining of the furnace should be carried out only according to accurate, pre-made calculations. Fireboxes up to 42 cm wide should be covered with a simplified triangular vault, placing the brick flat, followed by continuation of the masonry walls, which will firmly press the heels to the underlying rows of masonry. If such a vault is erected without continuing the masonry, this may cause the heels to shift due to the thrust of the vault, and then lead to its collapse.
To avoid this, the heels laid under the arch for laying the firebox must be tightened using pieces of square, rectangular, corner or T-steel connected with a wire harness. A wire bundle consists of several wires twisted together using a nail.
The harness should be located inside the masonry, in the seam. If the harness is open, it will quickly burn out. Instead of wire, you can use strip steel, firmly fixing it to the bars. In some designs, the ends of the bars may extend outward. In this case, they should be tied together with strands or round steel rods with threads and nuts at the ends, for which holes should be drilled in the ends of the bars.
Fireboxes with spans up to 38 cm can be covered by releasing bricks from the side walls of the masonry. To firmly fix the overhanging supporting bricks, the side walls of the masonry must be located at least four rows of masonry above the row to be overlapped. The more rows are laid out, the better the laying of the furnace fireboxes, this way you can avoid the ceiling tipping over inside the furnace.
In the process of laying furnace wells, it is recommended to block the combustion openings with various jumpers. It is forbidden to rest bricks on the door frame. If the width of the combustion hole is less than 250 mm, it is blocked into a lock by cutting off the brick. If the opening width is more than a brick, it is necessary to make a brick lintel.
Description of the masonry
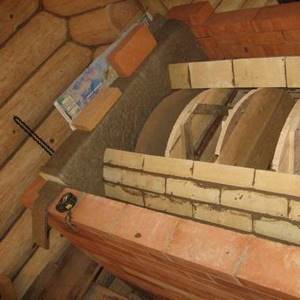
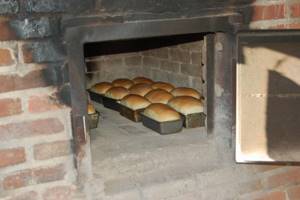
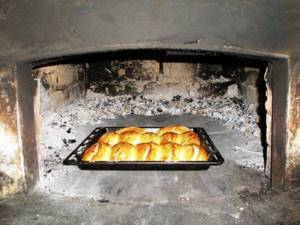
The hearth is often worn out and pits form on it, so if the seams are sandy, then it will be easy for you to remove the unusable bricks and replace them with new ones. But it is best to make the hearth from fireclay bricks. Sand seams allow heat to pass through better from under the hearth, which means that pies and bread will bake better. Under the hearth a floor is made of boards. Over time, the boards become deformed and the hearth collapses. The ceiling shown in the order is rigid and cannot be deformed. It consists of brick overlaps-4, on which a brick floor-5 is placed. For greater strength, the core bricks are placed on rib-6. The ceiling over pole-7 is made from any available material - spring steel, two metal corners and a channel (i.e. a wider corner with sides). In order to better illuminate the hearth and working chamber, you can omit covering one of the side walls (shown by the dotted line). At the corner, place a brick column or install a metal stand. On the 20th row a round pipe for samovar-8 is installed. Stoves-9 are laid out, from which heat comes in and small things can be dried in them. On the 22nd row, a cleaning chamber is made, where a box for soot-10 is installed. The arch is placed against the back wall slightly higher than the front of the pole. This is so that there is more hot air underneath. For this purpose, a protrusion is made in arch-11 above the mouth. It also serves as a spark arrestor. Fans of simple masonry may not make both a recess for the damper and a protrusion in the arch.
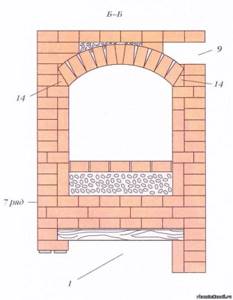
Russian stove vault
Sometimes the vault is made very low, almost level with the top of the mouth. In such an oven, the pies are burning on top, but damp on the bottom, because the hot roof is close. It is not necessary to cut wedge bricks in the masonry of the vault. The seams at the bottom of the vault should be reduced to nothing, and at the top they should be up to 1 cm. For the strength of the vault, it is good to occasionally insert brick plates - wedges - into the seams of each row before driving the castle bricks. Key bricks (the last row in the vault is best done from the front of the vault. After finishing laying the vault, it may turn out to be uneven at the top, which means it is not even at the bottom. This happens due to uneven boards in the formwork. To straighten the vault from below, you need to put it on take a board and, where the tubercles are visible, hit it with a hammer, then the vault is leveled. Afterwards, moisten the seams well with water. I usually lay vaults without formwork, slowly, with dry bricks.
Correct brick laying
Scheme of laying the foundation for the furnace.
When laying bricks, you need to constantly check the verticality of the structure with a plumb line. Similar checks need to be done after about three rows. When working, the masonry is checked for horizontalness using a level with a lath. As you know, during the course of laying bricks, it is often necessary to chop, and sometimes even cut. Before doing this, make a notch on the brick. Thanks to this simple element, you will make your work much easier.
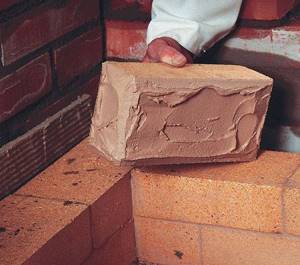
To obtain a thin seam, some nuances must be observed. In particular, the layer of mortar being laid out must certainly be thin, but at the same time, the seams must be complete and fit tightly to each other so that no voids or cavities arise. In addition, the clay is applied to the brick with your hands, or with a trowel, while feeling it with your fingers and leveling it to the required thickness. This is necessary so that the remaining lumps and large grains of sand are not missed in the solution layer.
After the layer of mortar has been applied, they begin to lay bricks on it, which must first be driven dry immediately to a full row. Next, the ready-made mortar is taken from the box, the selected brick is placed with the left hand, and the mixture is carefully spread under it
The solution is leveled with your fingers along the row that was laid out earlier. In this case, the solution remains on the hand; it is cleaned off with the edge of a brick. The next step is to lay the brick on the mixture with your left hand, using light pressure to push it forward, while ensuring rubbing in the seams.
Peculiarities
The Russian stove simultaneously performs many functions to ensure comfortable living in the house:
- heating the house in cold weather;
- cooking food;
- drying the crop for subsequent storage;
- providing the home with hot water.
An old Russian stove
Of course, a Russian stove is not an absolutely ideal device, and it has disadvantages. Cooking food in an oven is not so easy - not every housewife knows how to use a grip and pots. Maintaining a fire is also not the easiest thing. How many men are accustomed to lighting the stove and chopping wood with their own hands? Also, the stove as a heating device has a design flaw - heat is released at a height of more than a meter, above the floor. In modern ovens they have tried to eliminate this shortcoming. To do this, smoke circulation channels are located below, heating the stove over its entire height. To make cooking easier, the design includes a cast iron stove.
Clay mortar for masonry and subsequent plastering, if necessary, of the stove
Otherwise, gradual cracking of the masonry seams may occur, which leads to deterioration of draft, the appearance of cracks through which smoke can leak into the room, threatening the fire safety of the house.
Dutch oven masonry diagram.
It’s not that difficult to prepare the solution yourself; the main thing is to follow the correct proportions and recommendations. To prepare the solution, you will need a metal tub or a strong wooden box made from boards in such a way as to minimize the cracks through which liquid will flow, a shovel for pouring sand and pre-mixing, a hammer drill with a mixer attachment will be needed for high-quality mixing of the solution and breaking small lumps of clay, which is difficult to do with a shovel.
The first thing to do when starting to prepare the solution is to prepare the clay and sand. You can check the clay for fat content in the following simple way: mix a small amount of solution, lower a wooden slat into it, if when you lift the slat the solution remains hanging on it in lumps - the clay is greasy. If it slowly slides down the entire mass, leaving only small clumps on the rail, the clay is of normal fat content. In the case of thin clay, the solution will not stick to the lath at all. The greasy mortar is very plastic, but will shrink greatly when drying the oven and stick to your hands during the laying process. A solution made from thin clay will not shrink during firing, but will crumble from the seams. It would be optimal to use solutions of normal or medium fat content, which after firing will not crumble from the masonry and shrink excessively. According to the fat content, it is necessary to dilute the solution either with sand if the clay is fatty, or add clay if it turns out to be thin.
Scheme of operation of a brick kiln.
The cooking process is as follows. Clay is poured into a prepared clean container, large pieces are broken into smaller ones, no larger than a fist. Fill everything with water so that the water covers the clay, but is not significantly higher than its level. You need to wait until the clay is well soaked. Usually the clay is soaked overnight, and by the morning it has time to soak well. Then mix it, adding water if necessary, to end up with a mixture similar to milk. The mixture is then strained through a small sieve to remove any unwanted particles that may be present in the clay. Then add sand according to the proportion and mix everything until the consistency of sour cream. To do this, it is most convenient to use a hammer drill with a mixer attachment.
If you are not sure that the prepared mortar will turn out to be of high quality, and there is a brick factory nearby, then this option for clay mortar is also possible: buy defective unfired raw brick from the factory and use it to prepare the mortar. The composition of such a solution will exactly correspond to the brick and, accordingly, will have good astringent properties.
How to properly prepare a clay solution
Required material:
Scheme of a blast furnace for in-house production.
- clay and sand;
- sieve with cells 1.5x1.5 mm;
- stirrer for solution.
The laying of a Russian stove must be done with high quality, which largely depends on how correctly the clay mortar is prepared and the thickness of the seams, as well as on compliance with the binding of the brick and its quality. In order for the solution to shrink slightly, dry without cracking, firmly bind bricks together, and withstand high temperatures without collapsing, it must have average or normal ductility. It is better to prepare clay mortar from raw brick, as it contains the required amount of clay and sand. For the solution, it is better to take fine sand, that is, cleared of vegetation and gravel. It should be sifted through a fine-mesh sieve (1.5x1.5 mm). The amount of sand directly depends on the quality of the clay, which can be checked in the following way.
Add water to a ten-liter bucket of clay and mix with a long mixing board until it becomes creamy. If the solution covers the mixer with a layer of 1 mm, it means that it is of low plasticity, and fatty clay should be added. If the solution covers the board with a layer of 2 mm, and the clay sticks in separate clumps, then the plasticity is normal. If you get a thick layer that sticks to the mixer, it means the clay is highly plastic, and you need to add sand. It should be added in small portions until the plasticity becomes normal. When preparing the mortar, the main thing to remember is that only a plastic mortar of the required thickness will fill all the unevenness of the brick well, and the seams will be dense, durable, and gas-tight.
About the heat exchanger
When building a brick stove with a water heating boiler with your own hands, you should take into account many factors and calculate the project as a whole. Any type of materials and structures have their advantages and disadvantages.
There are several ways to install a water register in a furnace:
- Inside the hearth;
- In the chimney;
- In the body of the stove, next to the hearth.
Depending on the location, choose the material for the heat exchanger and its shape:
- Copper - effective due to the high thermal conductivity of the metal, but due to the low melting point of copper, constant circulation of water in the system is necessary;
- Steel - heat-resistant steel with a wall thickness of 4-5 mm is used for boilers. For long service life of steel structures, it is not recommended to drain water from them.
- Stainless steel is expensive, but the most suitable material for a boiler. The only disadvantages include the complexity of manufacturing.
When choosing the type of material and installation location of the heat exchanger, it is worth remembering that by placing the water circuit in the fireplace, in the summer the entire system will heat up; to avoid this, you will have to remove separate batteries to remove excess heat.
When installing a heat exchanger in the chimney, additional dampers are added to the stove design, which do not heat the boiler during summer operation of the stove. It should be taken into account that the heat exchanger must be larger in volume than when built into the fireplace. In addition, the boiler should not reduce the throughput of the smoke channels.
Calculation of power and dimensions
For normal heating of the room, it is necessary to correctly calculate the register area and its power. For a brick kiln, an approximate calculation is sufficient; it is impossible to make an exact one, due to many factors and variables.
It is known from practice that heating 10 m2 of space requires 1-1.5 kW of energy. From one square meter of heat exchanger you can get 5-10 kW. To determine the register power more accurately, you need to consider:
- Location of the coil in the furnace;
- Type of fuel - wood, coal. When burned, wood produces less thermal energy.
- Approximate temperature in the hearth and location of the heat exchanger;
- Average water temperature throughout the entire circuit;
- The heat transfer coefficient of the material from which the coil is made.
As the fuel burns, the power of the heat exchanger will decrease, so it is better to increase the calculated coil area by 10-15%.
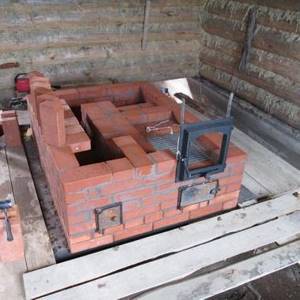
Preparation of materials and tools
To build a Russian stove with a flood chamber with your own hands, you need to prepare in advance the full amount of building materials, tools, auxiliary equipment, as well as shaped parts made of cast iron and steel.
Materials
To design a Russian stove of traditional shape and dimensions: 1.9 - 2.0 m high, 1.6 m wide and 2.38 m long, you will need:
| Name of material or shaped part | Unit | Quantity |
| Tempered red brick M - 200 | Thousand PC. | 1,75 |
| Fireclay fire-resistant brick | Thousand PC. | 0,23 |
| Oily clay | kg | 250 |
| river sand | kg | 300 |
| Hob with two burners 40x70 cm | PC. | 1 |
| Grate 20x28 cm | PC. | 2 |
| Grate 25x38 cm | PC. | 1 |
| Fire door 25x21 cm | PC. | 1 |
| Fire door 25x18 cm | PC. | 1 |
| Cleaning door 13x13 cm | PC. | 2 |
| Blower door 25x15 cm | PC. | 1 |
| Smoke damper 18x26 cm | PC. | 1 |
| Damper 38x45 cm | PC. | 1 |
| Water heating tank 28x12x50 cm | PC. | 1 |
| Steel corner 5x60x60 mm | m | 1,5 |
| Steel strip 5x50 mm | m | 20-25 |
| Steel sheet 5x50x50 mm thick | PC. | 1 |
A Russian stove with a flood chamber is a rather massive structure and requires reliable support. When calculating its dimensions, not only the weight and dimensions of the furnace are taken into account, but also the soil composition and groundwater level in the area of the future pit. The support in the form of a rectangular slab should be wider than the main structure by 10-15 cm in each direction, and the depth, depending on the characteristics of the soil, should be 50-80 cm.
Concrete can be purchased ready-made, but it will be cheaper to mix it yourself. To build a monolithic foundation slab 1.7x2.5 m and 0.6 m thick, you need to purchase:
- crushed stone - 4.2 m3 (0.7 m3 - for the underlying layer and 3.5 m3 for concrete);
- sand - 3.5 m3 (0.43 m3 - underlying layer and 3 m3 - in concrete mortar);
- cement M400 - 0.66t (13 bags);
- reinforcement with a diameter of 8÷10 mm - 85 m (53 kg);
- board for formwork 40 mm thick - 0.2 m3;
- roofing felt - 9 m2;
- polyethylene film - 5-6 m2.
Tools
A standard stove maker's kit should consist of:
- Trowels (trowel) - used to take the masonry mixture from the container and distribute it over the surfaces of the brick. During the process of laying a Russian stove, a trowel is also used to clean off excess mortar that has protruded beyond the seam.
- Hammers - picks - split and trim brick blocks to fit individual masonry segments or give them a certain configuration.
- Joints are a special tool for designing seam lines.
- Cords - moorings - control the straightness of the rows and the perpendicularity of the walls, but more often craftsmen perform this work with a plumb line and a building level.
- Ordering - necessary to align the thickness of horizontal seams.
- Plumb line - a device for checking the verticality of walls.
- A building level is a tool for controlling the evenness of each row.
- Rules - used to create a smooth plane on top of the foundation structure.
- Shovels and two containers for making concrete and mortar.
- Measuring bar - for measuring the thickness of the seam.
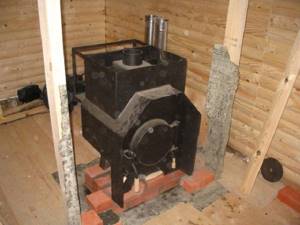
How to line an iron stove with bricks with your own hands: choosing tools and materials
Metal stoves are often installed in small private houses or outbuildings, where there is not enough space for massive brick structures of this type. Such a stove has many positive qualities, but it is not able to retain heat for as long as a real brick one. Therefore, the question very often arises of how to line an iron stove with bricks with your own hands and thereby achieve greater heat transfer, but at the same time not increase its size too much.
How to line an iron stove with bricks with your own hands
Building materials and tools for lining the stove with bricks
It is not difficult to carry out this work yourself if you have basic bricklaying skills and prepare all the necessary tools and building materials in advance.
Tools
Tools and equipment for work you will need:
Tools needed to line a stove with bricks
1. A trowel for applying mortar and collecting its excess after installing the brick in place.
2. A hammer with a pick will be needed to separate the required part from a solid brick.
3. Jointing is needed to refine the seams.
4. The mooring cord is used to control the evenness of the masonry of horizontal rows and corners.
5. Order, which includes:
- a special strip that maintains the evenness of the masonry along the entire height of the building;
- holder that secures the rail;
- the wedge raises a certain masonry element to the desired level.
6. The plumb line provides control over the verticality of the structure.
7. The levelness of the horizontal rows is verified using a building level.
8. The rule in this case will serve as a stand under the building level when checking the evenness of the masonry walls in relation to each other.
9. A shovel is needed to mix the solution.
10. Container for mixing the solution.
Construction materials
The choice of materials must be approached with the utmost responsibility if you want the stove to operate efficiently and without interruption for a sufficiently long period of time.
1. You need to choose a brick for the stove of high quality with pronounced fire resistance properties. It must be solid, that is, have no voids in its structure. You can purchase a material that has a relief pattern on the outside or a perfectly smooth version. Sometimes the relief of a brick allows you to make the masonry a decorative addition to any room.
Red burnt solid brick is what is required for lining the furnace
The amount of brick is calculated based on the size of the metal furnace and the additional area around it into which it is planned to be expanded. In addition, it is necessary to take into account the base for the stove, which should consist of one or even two rows of solid masonry.
If the stove will be lined on top, as well as a brick chimney, it is worth calculating these parameters.
It is also worth considering how best to lay the brick - install it on a narrow side (this will be more economical in terms of material consumption, but will negatively affect the efficiency of the stove) or on the wide side.
If you make a rough calculation, without taking into account the thickness of the seams, then the initial data will be the total surface area of the planned masonry and the side area of one brick. Further actions are simple - dividing the first value by the second will give the required amount of material in pieces. When making an accurate calculation, the thickness of horizontal and vertical seams is also taken into account. But we should not forget about creating a “reserve” of 5–10%.
2. For high-quality masonry, you cannot do without the right mortar, which will not crack when drying and in the future, when the brick walls are very hot.
If you have no experience in preparing clay mortar, it is better to use a ready-made dry heat-resistant mixture
The easiest way is to use ready-made fire-resistant building compositions for laying stoves, sold in specialized stores in the form of dry mixtures. They already contain all the necessary components for high-quality work and preservation of the masonry in extreme temperature conditions. The process is greatly simplified - the main thing is to mix the solution from the finished mixture to the desired consistency in accordance with the instructions included with it.
You can do it another way by making a traditional clay-based solution.
However, it must be remembered that this is a rather complex process, since the clay must have a certain fat content, and the mixture must have optimal proportions. To do this, you need to conduct tests by mixing and drying several different versions of the solution, which are made up of different parts of clay and sand. Only after conducting such an experiment and carefully evaluating the resulting samples will it be possible to make the right choice.
We can say that composing such mixtures is an entire art, the secrets of which are kept by stove masters. Such mortars are necessary for laying brick kilns, where smoke and gases released during fuel combustion pass through the channels, so the seams between the bricks must be extremely reliable, and a good clay mortar can ensure tightness. But in order to line a metal stove, it will be enough to use a ready-made dry mixture.
3. In addition to these basic materials, you will need a sheet of heat-resistant and waterproofing material, which is placed under the base of the stove. Roofing material is a good choice.
4. If you plan to completely close a metal stove, including one with an upper brick vault, you may need metal profiles (corners or strips) for the lintels along which the masonry will be carried out.
Prices for masonry mixtures and special-purpose adhesives
Masonry mixtures and special-purpose adhesives
Preparation for the process of laying facing walls
When installing a metal furnace, a rigid non-combustible base must be prepared for it in advance, so in most cases the area for lining it with bricks will already be ready. If the base does not meet the requirements, and it is decided to do the lining some time after installing the potbelly stove, then you will have to dismantle the chimney in order to remove the metal stove from the place where it is installed for the period of preparatory work. This process is carried out to thoroughly prepare the site.
- If the floor is concrete and strong enough, then a waterproofing material - roofing felt - is laid over the installation site of the stove and future brickwork. The sheet of roofing material should be 100 ÷ 150 mm wider than the base area.
— When the base is ready, the metal furnace lining will run along its edges, so the size must be appropriate.
— The base for installation is laid out in one or two continuous rows and left to dry. The time for complete hardening of the solution can be found from the information on the packaging of the masonry mixture.
One or two continuous rows must be laid as a base
— After the laid base has gained the necessary strength, the stove is installed in place, and it can be immediately connected to the chimney.
— At the corners of the base, four bars are installed exactly vertically, which will need to be aligned with during laying.
Installed vertical bars will be a good help for smooth masonry
- If the floor is wooden and reliable, the work can be carried out in the same way as on a concrete base, but it is still better to remove some of the boards and make a strong foundation.
— When the boards are removed, a small pit is made in the underground soil for a strip foundation - its depth can be from 30 to 50 cm. This parameter will depend on the height of the brick walls being built. It should be located in the place where you plan to install the walls of the outer lining of the furnace.
— The bottom of the pit is strengthened with cushions of sand and crushed stone. Then formwork and reinforcement cage are installed there.
— Next, concrete is poured into the pit (usually in a 3:1 ratio of sand and cement) and left until it sets completely.
— After the foundation has set well, 120 ÷ 150 mm of soil is removed from the site inside it, crushed stone is poured and compacted onto this place and a reinforcing mesh is laid.
— Then this area is filled with concrete mortar, 50 ÷ 70 mm thick, leveled and left to gain strength.
Poured concrete base for further installation of the furnace
The brick base will be laid out on this site. When using this technology, one row of continuous masonry is sufficient. But waterproofing material still needs to be laid on the site.
Such a foundation is necessary if the walls of the furnace will be laid out all the way to the ceiling, and the chimney will also be built from brick. If the walls are built only to the height of the furnace, and the floor underneath is sufficiently reliable, then a foundation is not necessary.
- When arranging a site for installing a stove and facing walls, you need to take into account that it should be 60-80 mm larger around the perimeter of the future structure.
Approximate diagram of the relative position of a metal furnace and brickwork
- It is imperative to leave a gap of 100 or even 120 millimeters between the walls of the metal stove and the masonry - it will be a good air gap and will allow you to keep the stove hot for a longer period.
Is it possible to install a stove and line it with bricks on a wooden floor?
Sometimes a metal stove is already installed on a wooden floor, and at the same time you really don’t want to start the labor-intensive work of pouring a separate foundation for it. If it is possible to maintain the “status quo”, that is, leave the stove in place, only by covering it with brickwork?
It turns out that this is also quite possible, but, of course, subject to a number of conditions:
- The first is training in proper heat insulation of the base (in principle, it should already be there). In this capacity, you can use a sheet of asbestos with a thickness of about 55 mm, laid on a wooden flooring and covered on top with a 1.5 ÷ 2 mm metal sheet, so that its area is sufficient for both the installation of the stove and the laying of its brick cladding.
- Secondly, a wooden floor must have the necessary strength potential to cope with the increasing load on it. Here it’s a little more complicated, since you’ll have to make certain calculations.
The strength of the floor is ensured by flooring boards (their thickness must be at least 40 mm) and joists (or floor beams if the floorboards are laid directly on them). The ability of the joists to withstand the load depends on their condition (it is clear that rotten or sagging parts must be replaced). But the main thing is the cross-section of the lumber from which they are made.
This means that in order to make a decision about the permissibility of installing a lined stove directly on the floor, you will have to carry out an audit - temporarily dismantle the flooring in the area where the heating device is planned to be placed. This will allow you to see both the dimensional parameters and the condition of the lag.
To assess the load-bearing capacity of the logs, you can use the table below. It shows the permissible, maximum and unacceptable loads on the logs, expressed in kilograms per square meter. Moreover, the indicated indicators are calculated for a lag installation step of 600 mm - as the most “running” one.
| Lumber cross section | Span length of a log or beam (distance between support points) | ||||||||
| 2 m | 2.5 m | 3m | 3.5 m | 4 m | 4.5 m | 5 m | 5.5 m | 6 m | |
| BOARDS | |||||||||
| — 100×50 mm | 733 | 587 | 489 | 419 | 367 | 326 | 293 | 267 | 244 |
| — 150×50 mm | 1650 | 1320 | 1100 | 943 | 825 | 733 | 660 | 600 | 500 |
| — 200×50 mm | 2933 | 2347 | 1956 | 1676 | 1467 | 1304 | 1173 | 1067 | 978 |
| BRUS | |||||||||
| — 200×100 mm | 2867 | 4693 | 3911 | 3352 | 2933 | 2607 | 733 | 2133 | 1956 |
| — 200×200 mm | 11733 | 9387 | 7822 | 6705 | 5867 | 5215 | 4693 | 4267 | 3911 |
| LOG | |||||||||
| — Ø 200 mm | 6912 | 5529 | 4608 | 3949 | 3456 | 3072 | 2765 | 2513 | 2304 |
| — Ø 220 mm | 9199 | 7359 | 6133 | 5257 | 4600 | 4089 | 3680 | 3345 | 3066 |
| Load parameters with the required safety margin for beam deflection in blue. | |||||||||
| The maximum permissible load parameters in green in the table . | |||||||||
| Inadmissible values (more than twice the norm) are highlighted in red | |||||||||
All that remains is to determine this very load on the floor in order to use the table to navigate the issues of permissibility of continuing work according to the “simplified scenario”, without pouring the foundation. But the reader will certainly be helped with this by a calculator for calculating the total load on the floor, which will be the sum of the mass of the stove itself with all its features, and the weight of the future brickwork.
The calculator is intuitive, and there should be no issues with its use. The calculation program used a standard red solid ceramic brick, 250×120×65 mm in size, with an average weight of 4 kilograms as the facing material in the calculation program. The weight of the masonry mortar is also already taken into account by the calculation algorithm.
Calculator for calculating the total floor load from a brick-lined metal stove
Go to calculations
If the resulting value fits into the “blue field” of the table above, then you can afford not to pour the foundation.
What else should you consider before starting masonry?
When moving on to lining the iron body of the stove with bricks, it is necessary to take into account some nuances that will make the work easier and ensure effective safe operation of the heating device.
- Any stove installed in a wooden house or against a wall made of flammable material must be separated by heat-resistant insulation.
Insulation can be made from asbestos boards, isover and other fireproof materials. It is better if such an insulating screen is made even in two layers, as shown in the photo.
A double heat-resistant screen will reliably protect walls from fire
In addition, the heating device, as well as the chimney, must be located at least 200 mm from the wall.
- 25 ÷ 30 minutes before the start of brick laying, it is recommended to immerse it in cool water. This process is carried out to strengthen the brick and to ensure that its porous surface does not immediately dry out the mortar placed between the blocks, drawing liquid out of it.

Pre-soaking the bricks will make the masonry especially strong.
If the mortar dries naturally, the materials will be provided with good adhesion and the masonry will be quite strong.
- It is very important to carry out the laying in a row, without starting several rows at once - this can disrupt the entire order of the work, and it will turn out sloppy.
- Having folded 2-3 rows, it is necessary to immediately “join” the seams while the solution remains wet and plastic. When carrying out this process, you must immediately remove any excess masonry mortar that appears.
Decorating seams with jointing
- Laying a “quarter brick”, that is, installing it on a narrow edge, is somewhat more difficult than laying a “half brick”. If, nevertheless, for the purposes of economy, this particular option was chosen, then during installation it is necessary to carry out especially careful constant monitoring of the vertical and horizontal planes.

“Quarter brick” masonry will require special care to ensure that the walls are vertical and horizontal
The process of lining a metal stove with bricks
- Between the vertically installed bars, the height from floor to ceiling, a cord is stretched perfectly horizontally. In the process of raising the masonry, this landmark is also moved higher. Each row is aligned using this tensioned level-beacon.
- The width of vertical joints between bricks is usually from 5 to 7 mm, horizontal from 8 to 10 mm.
- It is very important for ventilation, the active flow of heat into the room by the convection currents created in each of the rows or to leave a small hole through the row. Sometimes the masonry used to decorate an iron stove is made “lattice” with numerous holes.
“Lattice” masonry around the sauna stove
In this way, for example, they lay bricks when lining sauna stoves so that the heat warms up the room faster and, at the same time, due to the thermal inertness of the bricks, the walls of the heating device themselves do not cool down longer.
- The laying of the first row occurs in the usual way, but it must be done perfectly, as it sets the direction of the entire wall.
- After laying out and pressing the bricks of the first row, excess mortar must be collected immediately. If the brick is difficult to install due to excess mortar, then it is knocked down with a rubber hammer.
For the first rows of masonry there are special requirements for evenness in the vertical and horizontal planes
- When lifting the masonry and reaching the door of the ash pit, and then the firebox, it is very important to carefully pay attention to the side of the window being laid out where the hinges are located. When laying each of the bricks next to the doors, you must check how freely they open.

The masonry should not interfere with the free opening of the doors
- Laying is done up to different levels of the furnace. Sometimes it is finished at the level of the stove or even the chimney is covered with it. However, in the latter case, the metal chimney pipe must be assembled into an extremely reliable structure and from the most resistant materials, since it will no longer be possible to reach it after the work is completed.
Ventilation holes must be left near the chimney.
Several ventilation holes must be made in the brickwork around the chimney.
- The masonry should be clean and neat, therefore, after laying several rows, it is necessary to clean off the solution that has not yet hardened, and wipe off its remains with a damp cloth.
After completing the masonry, it should dry well, preferably naturally, without heating. In this case, the likelihood that the mortar on the seams will crack is reduced.
Video: example of lining a sauna stove with brick
Prices for refractory bricks
Fire brick
Options for lining a metal stove with bricks
In addition to covering the potbelly stove completely or up to the level of the stove, some people choose other options, covering only a certain part of the body with brick.
Only the back part of the “potbelly stove”-fireplace is covered with bricks
In this case, a small potbelly stove serves as a firebox for the brick part of the stove, and its back wall is neatly embedded in the main brick structure. Such a stove can serve as a fireplace for pleasant evenings, warm the room, and on a built-in shelf you can warm up a kettle or, after returning from the rain, dry clothes and shoes.
The upper surface of the stove is not lined - it serves as a hob
This option is suitable when you need to have a wider hob. The bricks laid around it, heating up, will serve as its continuation. The metal body is covered on all sides with brickwork, so you can’t accidentally get burned on it. The heat from such a structure will take about three to four times longer than from a “bare” stove, so the work to transform a potbelly stove into a full-fledged heating structure is worth setting aside time and putting in the effort.
The stove is completely built into the wall and turned into a fireplace
Another option for turning a compact modern potbelly stove into an aesthetic fireplace, whose back wall opens into another room, where it is also lined with brick. The heat transfer from such a stove-fireplace increases several times, and it looks much more respectable. Here the potbelly stove looks like a fireplace insert, and the appearance of massiveness of the building is created due to the neatly placed masonry around the metal stove.
Homeowners are also offered ready-made construction kits made of natural or artificial stone, which allow them not only to cover a metal stove, but also to simultaneously build a fireplace portal that will become a real decoration of the room.
Video: cladding a metal stove using a fireplace kit
Depending on which part of the metal stove requires lining it with brick, you can come up with other, your own options. The main thing in the work is to avoid mistakes in the design of combustion waste disposal and to comply with all necessary safety measures.
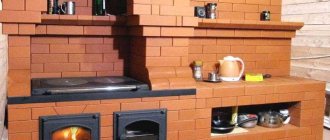
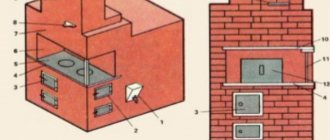
Typical heating and cooking stove
Furnace layout diagram
It is recommended to begin familiarization with stove craftsmanship by studying the instructions for laying the most popular version of a heating and cooking stove.
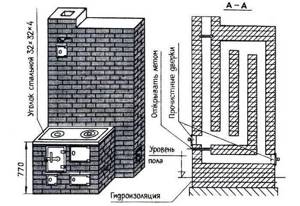
Diagram of a heating and cooking furnace
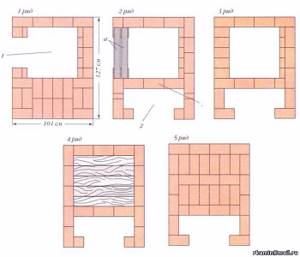
First step. Lay out the first row of the oven. At this stage, you must strictly monitor the perpendicularity of the corners and the evenness of laying the bricks. The durability and overall quality of the finished heating and cooking structure directly depends on the correct arrangement of the starting row.
Second step. After laying out the initial row, install the blower door.
Third step. Lay out the 2nd row with regular masonry.
Fourth step. Proceed with laying out the third row. At this stage, you need to trim your bricks from both sides so as to create the optimal configuration for the blower. Make sure that the row has a height corresponding to the height of the blower door.
Fifth step. Proceed with laying out the fourth row. It must be placed from left to right. Install the ash pan door. During the laying process, be guided by the pre-selected stove diagram. On the same row you need to close the blower door. Create a hole above the ash chamber.
Sixth step. Lay out the fifth row with the ash pan opening narrowed. Otherwise, the masonry of this row is similar to that of the fourth.
Seventh step. Lay out the sixth row of fireproof bricks. You can also use simple brick, but it will fail much faster than its fireclay counterpart.
You need to chop the brick in front of the grate. This will make it possible to place better quality fuel in the future. The grate itself will rest securely on the 5th row of the stove masonry.
Leave approximately 1-1.5 cm gap between the sixth row and the grille. Fill the gap with sand.
Kitchen stove masonry
Eighth step. Lay out the seventh row. At this stage, you need to create a U-shaped channel and block it so that one channel turns into three at once.
Ninth step. Install the firebox door. To support the door, use the 6th row of masonry.
Tenth step. Lay out the eighth and ninth rows in the same way as the seventh row. The height of the ninth row should correspond to the fire door.
You need to close the left channel and the combustion baffle. Bricks for this should be prepared in a special way. Preparation comes down to chipping bricks on both sides to ensure smooth and high-quality transportation of gases from the furnace to the furnace channel.
Ordinal masonry
Eleventh step. Lay out the tenth row of fireclay bricks. In this case, the products themselves must be placed strictly vertically. Be sure to check the verticality using a level. You will lay the cooking floor on top of this row.
Ordinal masonry
Twelfth step. Close the combustion chamber door. Only two square channels will remain in the design.
Further laying of the heating and cooking unit is carried out in exactly the same way as the laying of ordinary heating stoves. Follow the chosen ordering scheme.
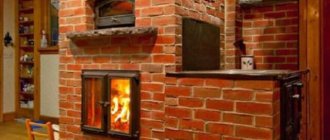
An example of a heating and cooking stove
Finally, install the hob with damper, firebox door and door cover. You also need to equip the ventilation chamber and chimney. Select the design and material of the chimney individually in accordance with the dimensions and other important characteristics of the stove.

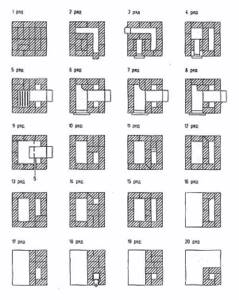
Orders of heating and cooking stoves
Basic rules for laying a good stove.
I will tell you a few secrets, the knowledge of which will allow you to build a well-functioning sauna stove that will not smoke and will not fall apart after several fireboxes.
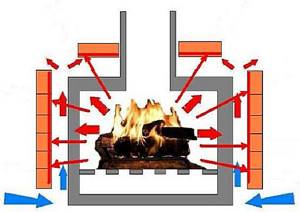
1. All protrusions along the path of the smoke (high - exit of hot gases, turns - lower turns, passes - upper turns) are rounded. The smoke paths should be as smooth (as possible) and even. Plastering of smoke channels is not allowed; during the laying process they are simply thoroughly cleaned of the mortar.
Having laid several rows, we remove the deposits of clay-sand mortar inside the smoke channels with a spatula. Then, with a wet rag, wash off the remaining clay-sand solution.
2. The cross-section of chimneys and smoke circulations nowhere (including at turns) should not be less than the cross-section of the heil. If the higho consists of several holes, then their total area is taken into account.
3. There should be no narrowing of the channel in the chimney (from the inlet to the top of the pipe).
Wall masonry.
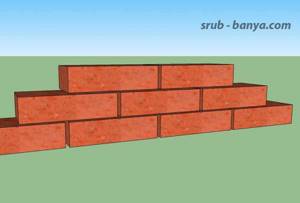
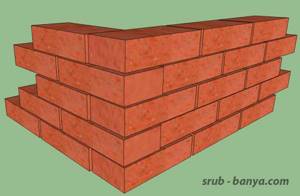
Corner laying. 4. The brick is laid in such a way that the bricks must be tied together - each upper brick lies on the two lower ones, covering the joint. The joint of the lower ones should be approximately in the middle of the upper (covering) brick. Bandaging the corner is carried out according to the same principle. 5. As I already said, the bricks in the masonry are placed in such a way that the burned sides come into contact with fire and smoke, if possible. |
Preparing bricks for laying.
The furnace is assembled in rows; a selection of drawings of all rows is called ordering. The processing of bricks is carried out during the laying process.
Numbering of bricks in a row. We first lay out each row without mortar - dry. The bricks are adjusted (shaved or trimmed) so that the vertical gaps are 5-10mm, ensuring the evenness of the external walls, verticality of the corners, and evenness of the smoke channels. Each brick in a row is numbered in accordance with the developed scheme. |
Brick sanding. One of the stove brick spoons may have a corrugated surface. This unevenness is convenient when plastering the stove. But since the sauna stove is not plastered, in order for the outer walls of the stove to be smooth, the unfired side is sanded. Grinding sequence: first, large irregularities are removed with a grinder with a diamond wheel, then fine grinding is done manually with an abrasive stone (wheel). |
After the bricks are fitted and numbered, they are soaked in water. Soak until no more bubbles appear. After soaking, the row can be placed on the solution.
There is an opinion that it is not necessary to wet the stove bricks in order for the stove to dry faster. However, in order to lay slightly wetted bricks, you need to be a good specialist, since after applying the mortar to the brick there are only a few seconds to lay it correctly - the mortar sets very quickly on dry bricks. And since we are far from being professionals and, besides, even among professional stove makers there is no consensus on whether to soak or not to soak, we will soak the bricks.
Before laying, we dip the fireclay brick in water for just a couple of seconds just to wash off the dust. Apply the refractory mortar with a spatula or trowel. You need to work very quickly, since fireclay instantly absorbs the moisture of the solution.
The fireclay core absorbs the adverse effects of high temperature, protecting the furnace array made of ceramic (clay) bricks from destruction. The refractory mixture is sintered only in the high temperature zone - in the firebox and in the heat area (the release of hot gases into the smoke circulation).
Despite the fact that there is no strong adhesion between the fireclay bricks, the design of the fireclay core is such that it is stable and not subject to movement or destruction. The problem can only arise if you come across poor quality fireclay bricks. Such bricks begin to deteriorate (crack, chip) after 2-3 years of operation. But even this brick will be enough for 5-6 years. Then repairs are needed.
The uniqueness of brick kilns is that they are absolutely repairable. For example, in the furnace that I will talk about, it is easy to completely replace the fireclay core by disassembling the side of the furnace.
When laying the fireclay core, you must carefully ensure that the distance between the bricks of the fireclay core and the furnace mass is 8-10mm. This is necessary for the free thermal expansion of the fireclay core from exposure to high temperatures and the unhindered passage of secondary air from the explosive doors to
Under no circumstances should ceramic and fireclay bricks be tied together during the laying process!
Ceramic and fireclay bricks have different coefficients of thermal expansion and such masonry will quickly collapse.
Rules for laying the furnace vaults of an outdoor stove
When laying furnace vaults, it is necessary to block the combustion openings, fireboxes, and chambers using simple and complex shaped lintels. The ceiling in a wall is called an arch or arched lintel, and the ceiling between the walls is called a vault.
To cover large spans, an arched ceiling is used.
Vaults can be steep, flat or gentle. The semicircular arch is equal to half a circle. A gentle vault is less steep. The three-center arch is even flatter, thanks to its design, heating occurs evenly over the entire surface
This is important when baking pies. The number of bricks in the arch and rows in the vault must be odd
The middle odd brick is called a castle brick. The bricks on which the lintel or arch rests are called heels. To give them the desired shape, such bricks have to be trimmed. The space covered by any jumper is called a span. The lifting height of a vault or arch is the lifting boom.
The construction of any lintel must begin with the laying of bricks on which it will rest. They should be hewn out according to a template. Since the height of the arch or vault can be different, the angle of the heel changes. You cannot use one heel shape for all arches and vaults.
The laying of the furnace firebox begins with the preparation of circles and foot templates; for this, on a sheet of paper, cardboard or plywood, it is necessary to draw a vault of the desired shape so that an odd number of rows of masonry can fit in it.
You can easily and quickly build a vault on two boards. An axis should be drawn in the middle of the narrow board so that it intersects the wide board. At a distance of 3-5 cm from the bottom edge of the wide board, you need to draw a straight line A-B, marking the width of the firebox on it. The axis should run in the middle of the firebox, between points B and D. On the axis from line A-B, the height of the arch lifting boom should be measured upward. The resulting point can be designated by the letter D. After this, you need to select the center O in such a way that the circle passing from it, forming the arch, runs through points B, D and the upper point of the arch lifting arrow.
The rules for laying a furnace recommend using formwork for the arch, which is laid on prepared circles.
After installing and securing the formwork, a nail should be driven into the central point O, from which the circle was drawn, and strong twine should be attached to it, which is necessary for checking the rows of the vault and marking the bricks to be laid. The brick for laying the vaults must be hewn, giving it a wedge-shaped shape.
In this case, the seams have the same thickness. When using regular brick, the seams will be thinner at the bottom and thicker at the top. They must be completely filled with solution.
The heels should be trimmed and laid very carefully, since filling large voids with mortar and crushed stone can lead to settlement of the vault or arch and their destruction.
The laying of the vault should begin from the edges, from both heels at the same time, moving towards the middle of the vault or towards the castle. The bricks need to be fitted tightly, so that they almost touch each other on the side of the firebox.
The last thing to be inserted into the row of masonry of a vault or arch is a castle brick, greased on both sides with clay mortar. It is advisable to strike only with a log or a mallet, since an ordinary hammer can split the brick.
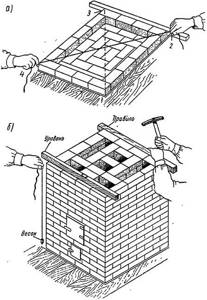
Laying formwork for the vault
Having made two circles, you should begin installing the formwork. In the span of the vault, you need to install racks on the wedges (two for each rack). Then you need to use wedges to level the formwork. You need to put purlins on the racks, then circle them, and then put boards on them for sheathing or flooring. The boards should be narrow, they should be lightly but not tightly nailed to the circles. After this, the formwork should be checked again and leveled, removing or knocking out the wedges. It is better to make the formwork detachable to make it easier to remove and, if necessary, use several times. The racks must be made with lugs at least 50 mm deep and wide enough to fit the circle tightly. For the vault it is necessary to make at least two circles. When installed on racks, the circles should protrude by 20-30 mm. Racks with circles must be installed on wedges, which, in turn, must rest on bricks laid in two or three rows. In order for the circles to be able to fall freely when removing the formwork, their length should not reach the furnace walls by 20 mm.
It is necessary to attach sheathing or flooring made of narrow slats 3-4 cm close to the circles. The slats should be attached so that the masonry seams are in their middle. In order for the formwork to lower freely during disassembly, the length of the sheathing bars must be 20 mm shorter than the firebox or furnace. In order for the formwork to hold firmly, wedges must be placed between the circles and the walls of the furnace, which should be removed before disassembling. The laying must be carried out so that the seam narrows at the bottom and widens at the top. When installing the formwork, it is necessary to check the accuracy of its position many times, using wedges for this. Then the tested formwork should be secured by driving wedges between it and the walls of the furnace.
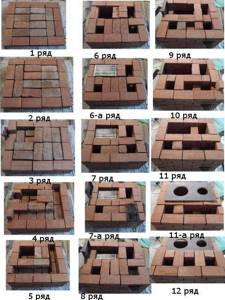
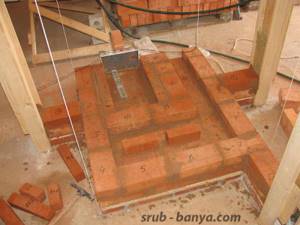
First laying rows
The first fitting row of bricks is marked and laid out on the foundation, without mortar for now. They check with a level whether the row is horizontal, and then check it with the drawing. Without a pre-drawn plan, a smooth stove will not work.
Several of the bricks being tried on are dipped into water for a couple of minutes for better subsequent setting with the mortar, and at the same time the mortar is placed on the vacant spaces, leveled and a wet brick is slapped on top.
In the photo: masonry of the stove.
All bricks are connected to each other with mortar during the laying process, and the remaining mortar is immediately removed. Having laid out this row, cover it with roofing felt, preferably in three layers - this will be the waterproofing, and the first row of the stove will be considered not the one that has already been laid, but the other one, which will be on top of the insulating layer.
§ 4. Basic rules and sequence of work when laying stoves
When starting to lay the stove, you should make sure that its foundation is laid correctly and firmly, and that the installation site of the stove is protected from precipitation (rain, snow).
Then you need to check the correct rotation of the stove in relation to the walls of the room, and determine whether the flow beams or rafters are interfering with the unhindered passage of the chimney through the ceiling and roof.
After a preliminary check, the stove maker lays two layers of brick (flat) on top of the foundation and a waterproofing layer (roofing felt, roofing felt, cement layer) over them.
When laying out the first rows, you must carefully ensure that all sides of the masonry are parallel. This can be checked with a square or a string (Fig. 113).
Rice. 113. Checking the correctness of the furnace laying: a - checking the correctness of the furnace laying; b - checking the furnace masonry with a weight, level and rule
The string is applied from one corner of the masonry to another (diagonally), and if the distance between corners 1-3 and 2-4 is the same, then the masonry has the correct shape.
The laying out of the critical parts of the stove - the firebox and smoke circuits - is carried out with a preliminary selection of bricks and laying each row dry (without mortar). Dry laying is done with tied seams, fitted and hewn bricks. And only after that the entire row is laid on the solution.
Without preliminary layout, you can lay less critical parts of the stove and continuous rows without smoke circulation.
Refractory and ordinary bricks expand differently when the temperature rises, so their masonry should not be bandaged to avoid the appearance of cracks.
The thickness of the seams should be as small as possible: no more than 5 mm for ordinary bricks and 2-3 mm for refractory bricks. In order for the seams to be thin, the clay mortar must be prepared without lumps or impurities, and not too thick.
The bricks must fit snugly against each other with all their edges; It is not allowed to fill the gaps with inaccurately chopped crushed stone.
Brick should be trimmed and chipped as rarely as possible, since the hewn surface is always less durable. It is not permitted to turn such a surface into the firebox or smoke vents.
It is impossible to lubricate the inner surface of the firebox and channels with a clay solution, since the clay will quickly crack from exposure to fire, fall off and clog the smoke circulation.
In order for the surface of the masonry to be smooth, it must be done very carefully, after every 5-6 rows it must be rubbed with a wet rag and the clay mortar squeezed out of the seams must be removed. Every 3-4 rows it is necessary to check the correctness of the oven walls using a rule, level and plumb line.
When laying the brick, it must be well wetted (immersed in water). Otherwise, as a highly porous body, it will quickly absorb moisture from the solution, and the dehydrated (dry) solution will not be able to “set”, and the masonry will be fragile. To remove dust that prevents the mortar from setting, refractory bricks are only moistened with water.
Bandaging the seams when laying stoves is mandatory. Overlapping vertical joints is done by no less than 1/2 brick, and overlapping 1/4 brick is allowed, as an exception in some cases.
When lining fireboxes from refractory bricks, it is necessary to use a refractory mortar without tying the lining with the masonry made of ordinary bricks. If it is not possible to carry out the lining separately, then the walls, under and roof of the firebox are entirely laid out from refractory bricks.
When using ordinary bricks to lay the firebox (when firing the stove with wood), the inner masonry of the firebox should also not be tied up with the masonry of the outer walls, because, although the material is homogeneous, the inner layer will heat up much earlier and, expanding more than the outer one, can disrupt the integrity of the masonry.
The design of a deck oven and its operating principle
To heat country houses, they increasingly began to resort to brick stoves, abandoning a variety of electrical appliances and gas. The stove has always made it possible to quickly and for a long time warm a living space with living heat.
The main thing in stove heating is the ability to initially accumulate heat and then gradually release it. The most economical option for brick fireboxes is a hearth stove. It is more common throughout the world.
A stove is called a hearth if it has a surface where fuel for kindling is placed.
The hearth oven is loved for its economical use. Top combustion in such a furnace occurs evenly and does not consume a lot of fuel. During the combustion process, the fuel is oxidized due to air masses entering through the furnace door, which releases heat.
If you look at the structure of the hearth stove itself, you will get three main parts of the firebox:
- The lowest tier is a chamber for loading heating material.
- The level above is responsible for combustion. The highest temperature is recorded in this area.
- The upper floor removes gases after burning wood and generates heat.
Important Reminders
For proper and efficient operation of the stove and for safety reasons, the following combustion rules must be observed:
- During the fuel combustion process, it is necessary to close not only the firebox door, but also partially the view with the valve.
- Only after the firewood has burned heavily, when there are large voids between them (air flows through them to cool the stove), is it allowed to slightly move the wood.
- Burnt-out firebrands and coals should be in the center of the firebox in the draft path. They are surrounded by burning coals. At the same time, the traction force is reduced.
- If the flame turns blue on burnt coals and then disappears, carbon monoxide will form. In this case, the coals are moved closer to the door, leveling them over the grate area. The door is tightly closed and the pipe is opened for 10 minutes for the final release of carbon monoxide.
- It is not recommended to heat the stove with wood at night. Following this rule will help avoid severe carbon monoxide poisoning, which can lead to death.
- To remove gases from the furnace, using coal or peat, a hole with a diameter of 15 millimeters is made in the smoke valve.
- Since the ash pan door regulates the air supply to the oven, the ash pan must match the size of the grate.
- If they are heated with coal, they first burn wood in the stove, and then pour the coal onto the burning coals of the firewood in a layer of 60 millimeters. After this layer of coal flares up, pour out the next layer 150 millimeters thick. It must be maintained during the entire combustion process. In this case, the oven will heat up for a long time, well and evenly.
- Avoid any gaps in the stove masonry. It is necessary to ensure that the oven devices close the oven tightly, ensuring uniform heating of the oven.
- Damage to the internal partitions of the oven may cause uneven heating. In order to correct this deficiency, it is necessary to dismantle one of the walls of the furnace, rearrange the partitions and lay the furnace again. Even small cracks should not be left in the oven.
- The floor under the stove is covered with felt, which is soaked in liquid clay, and covered with roofing steel, which is painted with oil paint on both sides.
- The furnace is sometimes laid on trenches - columns consisting of two rows of bricks across the entire width of the furnace. They form an air gap between the hearth and the furnace floor, promoting space ventilation and cooling. A distance of 7-13 millimeters is maintained between them and they are covered on top with a furnace bottom, consisting of two rows of brickwork. It must be strictly horizontal.
The average duration of furnace firing is 1-1.5 hours. The surface of the furnace after firing in rare cases heats up to 900 degrees Celsius. The normal heating temperature of the furnace is 700 degrees Celsius. When the temperature is too high, an unpleasant odor is released from the dust burned on the stove. However, in any case, the oven should not be overheated. As a result of its overheating, cracks form and the stove masonry may become damaged.
It is not profitable to build a stove that is too large and is not heated every day. It will take up a lot of space in a building that gets very hot. To cool such a room, the vents are opened, which entails excess fuel consumption, and this is unacceptable when it is necessary to properly heat the stove.
Chimney diagram
The last stage is the construction of the chimney. This is a separate science, and in order to better understand it, below is a diagram of a chimney for a Russian stove:
In addition to the pipe itself, the stove chimney has the following elements:
- cutting: needed to provide fireproof insulation from the wooden floor of the house with a thickness of 1.5-2 bricks;
- otter: this is the assembly of the chimney passing through the roof;
- head: a multi-purpose element that improves traction, provides strength, and so on.
The masonry is made in accordance with the diagram from the same mortar as the stove, but only up to the roof level. There the solution needs to be changed to cement-sand, resistant to environmental conditions. It is recommended to plaster the section of the stove chimney located in the attic with a layer of clay over a metal mesh to prevent condensation from forming inside. Ideally, it is worth insulating the outer part of the chimney, for example, with basalt fiber.
Rules for direct laying of a brick stove
The structure of the furnace also begins with the construction of a foundation for it. And you can read about this in the article “How to properly make a foundation for a stove.”
- The foundation is made with one slab of reinforced concrete. When the foundation is on trenches, a strip foundation using rubble stone is used. The foundation must exceed the dimensions of the body by at least 5 cm. Three layers of roofing felt are laid on top as insulation. After 5 mm of asbestos and then roofing sheet iron. We lay a sheet of felt soaked in a thin masonry compound on it. Wait for the felt to dry before starting work. A separate foundation is needed for almost all brick structures due to their fairly heavy weight. If you have a floor on joists, you must first strengthen it with jumpers. When there is a monolithic foundation under the house, you can simply lay down the bedding and start laying it out.
- The outside of the furnace itself is laid using red bricks on a cement-sand mixture (it is undesirable to use clay for a number of reasons). This creates the flood part of the structure. The fire or combustion part is made of ceramic bricks, alternating with fireclay bricks.
- In front of the door closing the ashpit and the vent in the floor area, a metal sheet for the roof is placed on a 5 mm asbestos pad. One of its edges from the root side is laid on top into the nearest seam between the bricks. The sheet should protrude by 0.3 m, and to the sides - by 0.15 m or more. The protruding edges are bent and nailed to the floor.
- In a gas convector, channel transitions in the lower area should be ½ larger than the upper ones. (For reference: cross-flows are the lower channels, passes are the upper ones). For what? To facilitate the removal of accumulated soot underneath. For the same purpose, the edges of the upper channels are rounded.
- At a temperature in the chimney of no more than 800, the stove is constructed from ordinary bricks with a cement-sand mixture. If necessary, the chimney is divided with basalt cardboard or asbestos with a thickness of at least 5 cm, which is determined by fire safety.
- The wind barrier is the fluff, which plays an aerodynamic role and helps prevent the stove from smoking. Its height should be 2 rows of brick. The protrusion behind the chimney is half a brick long.
Construction of a Russian stove with flooding
There are many design options for a Russian stove, but its constituent elements are always heating and cooking sections, an oven and at least a small-sized stove bench.
A modern Russian stove is additionally equipped with a flood chamber (an additional combustion chamber), thanks to which it heats up faster and releases more heat into the room. It can also be used for cooking in the warm season, when there is no need to heat up the entire oven.
Construction of a Russian stove with flood:
- Foundation. Stone, brick or concrete are used for its construction.
- Sub-kilns are cavities in the lower part of the stove where firewood is dried for storage.
- Cold stove - recesses in which you can store kitchen utensils.
- The six is a flat horizontal section in front of the entrance hole to the furnace. Cooked food left on the grill stays hot longer. Some stove models have a hob installed in this place.
- The hearth is the bottom of the furnace or cooking chamber. It is located at a slight angle to the pole, which makes it easier for heavy cast iron to move.
- The folds are the transitional plane between the hearth and the hearth.
- Cooking chamber or crucible - a cavity inside the oven intended for storing firewood and placing utensils made of heat-resistant material for cooking. The ceiling of the furnace, like the hearth, has a slope towards the entrance.
- Overtubes are cavities above the pole where smoke collects. It is the base of the smoke exhaust duct.
- Samavarnik (dushnik) - a narrow channel entering the chimney. Previously, a samovar pipe was connected to it. In modern models of Russian stoves, a choke is rarely installed.
- Chimney - a vertical channel above the hearth, designed to remove fuel combustion products into the atmosphere.
- Fluffs are an extended segment of the chimney located close to the ceiling.
- View - a small window with a door designed to completely cover the chimney. Through it there is access to the valve, which is used to adjust the draft in the furnace.
- The damper is a thick sheet of steel with well-finished edges and a handle. Serves as a door for the inlet of the furnace.
- Grate bars are cast iron grates installed between the fuel chamber and the blower.
- The bench is a large horizontal plane located behind the chimney. Underneath it there are channels with circulating streams of hot air, so during the firing of a Russian stove it is always warm, and if you close the necessary valve, it will retain heat for a long period of time.
Russian stove with a trench (right)
Example 2 (flood below, right)
How to fold a stove firebox with your own hands
The furnace firebox consists of a ashpit (ash pan) with a door, a grate and a combustion chamber (firebox) with a door.
Dimensions are determined based on the volume of firewood for simultaneous loading. The width of the combustion chamber is equal to its door or slightly wider on both sides.
The height of the firebox should facilitate complete combustion of fuel, which is achieved by having free space in the chamber after loading firewood. Recommended height 80-100 cm.
Reference. The depth of the furnace firebox must accommodate the length of the combustible material; there are no other restrictions.
The combustion chamber is connected to the ash pan via a grate . The latter is designed to supply air during combustion and collect ash. When installing the grate, it must be buried below the level of the fire door to prevent burning coals from falling onto the floor.
The firebox must have bevels in the direction of the grate to move the ash into the ash pit. The gap between the masonry and the grate must be at least 5 mm to prevent brick rupture as a result of the difference in expansion of the brick material and metal at high temperatures.
The choice of materials for masonry and flooring, how to process the structure
The structure is made of red clay brick with lining (lining) of fire-resistant material. When choosing a brick material, you need to pay attention to ensure that it is not burnt or cracked. High-quality brick, suitable for stove masonry, has smooth edges, sharp edges and a uniform color; when tapped, a clear, almost metallic sound is heard.
Attention! Sand-lime brick is not suitable for the construction of the device.
The following materials will be required:
- red brick - for walls;
- refractory and wedge-shaped (fireclay) bricks - for lining and forming the ceiling;
Photo 1. Refractory brick used for laying the furnace firebox. Before using the material, you must ensure its integrity.
- clay, sand, water - for solution;
- cast iron grate;
- doors of the combustion chamber and ash pan;
- steel strips or wires - for fastening doors;
- asbestos sheet - for a fireproof gasket between the masonry and the doors.
To connect the stove masonry, you can buy a ready-made mixture or prepare the solution yourself. In high-temperature zones, compositions made exclusively of red clay, sand and clean water are used. The quality of the solution depends on the viscosity, plasticity and fat content of the clay. Sand for construction must be free of dirt and impurities.
Preparing tools
will allow you to make a structure with your own hands :
- furnace hammer;
- trowel - for applying the solution;
- large container - for preparing the solution;
- building level - to control the correctness of the masonry;
- measuring instruments - ruler, tape measure, square;
- plumb lines - to determine the outer contour.
How to properly cover the firebox and make a roof for a brick oven
the exact layout must be determined and a foundation with a layer of waterproofing must be laid.
Before laying on the mortar, you need to assemble the structure without it - to accurately adjust the bricks to size.
The phased construction looks like this:
- Prepare a solution.
- The first row is laid on the foundation without gaps and formed under the stoves.
- On the second row, the formation of the ash pan and the fastening of its door begin. To do this, mark the center of the future firebox and place the blower strictly under it. A flexible wire is passed through the holes in the door frame and its ends are twisted into a bundle. Wire bundles are fixed in the masonry layer.
- of the blower and the location for laying the grate are formed
- Secure the combustion door with wire. The door frame is insulated with a gasket made of non-combustible material.
- of the firebox and the vault with a hole for connecting the chimney are formed
- is lined with refractory bricks.
Important! During construction, you cannot combine simple bricks and refractory bricks due to different expansion coefficients. When heated, such masonry will burst.
Furnace designs for private low-rise construction
About 150 bell furnace designs have already been created and brought to life. All of them have stood the test of time and are working successfully. Kuznetsov’s team of like-minded people continues to develop new options, improving existing ones. His website contains complete information with detailed descriptions and recommendations for making stoves.
Models are indexed and written with abbreviations. For example, OVIK stands for “heating and cooking stove by Igor Kuznetsov.” OIK is simply “heating”, etc. Each project is accompanied by step-by-step instructions and visual ordering, made in the AutoCAD program.
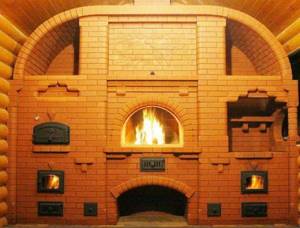
Combined model of a stove with a fireplace: the location of the fireplace on the stove is selected based on the layout of the room - a side fireplace, a back fireplace and a side fireplace with a stove bench
There is no need to do calculations and calculations: the site provides accurate measurements and descriptions of finished projects. If necessary, you can contact Kuznetsov and discuss the design conditions with the formulation of a specific task.
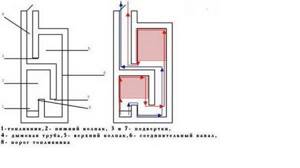
Vertically located hoods allow you to build a narrow stove if the room is very small.
The stove can be installed in any home: a new building or an already built one. But construction in a finished house will cost more, since the roof will have to be partially dismantled to remove the chimney. It is better to schedule work for warm weather. To choose the right place to install the stove, you should remember that the closer it is located to the center of the room, the more uniform the heating will be. At the same time, the stove is located closer to the front door - it is more convenient to bring in fuel.
Video: construction of a Kuznetsov furnace with a water boiler
A round-shaped dome stove operates with the greatest heat output. But if we are talking about a small room and the radius of the furnace circumference is less than 2 m, complications arise with the installation of furnace castings - firebox doors, cleaning pockets, etc. Metal parts designed for flat surfaces are not placed in semicircular shapes: gaps and cracks will appear, which is unacceptable.
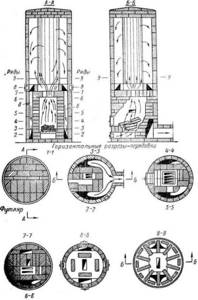
A schematic representation of the functioning of the furnace with horizontal cuts and orders helps to better understand the specifics of laying bricks
An experienced craftsman with an assistant lays out a bell-type stove in 2–3 weeks (depending on the complexity of the model). The process is unhurried and requires great care; the fitting of all parts must be careful, with measurements. A beginner will need more time, and you need to be prepared for this before starting work.
Useful tips
Regarding the solution
To save time and effort when laying a facing row, cover it with 60 cm wide masking tape. This will allow you not to be constantly distracted by checking the mortar on the front side of the bricks. Just when the solution has set, you can remove the tape and sweep the masonry with a brush with stiff bristles.
You can prepare the masonry mortar yourself, or you can purchase it in specialized stores. There is a lot of choice now. Make sure the mixture is fireproof. It comes in different packaging from 5 to 25 kg. If you are installing a stove, it is better to take a large package at once. For cosmetic repairs, you can use 5 kg.
Since ceramic brick can withstand heating up to 650 degrees, to preserve the integrity of the masonry, you need to insulate the fireclay (masonry) using cardboard with a thickness of at least 5 mm.
Regarding the masonry process
To facilitate the laying process in certain places of the structure, as well as for a greater visual effect, you need to use a regular 50 mm metal corner. It should not be visible from the outside, but it should press the bricks on both sides.
According to professionals, six corners will be needed for the “over-stove”, and the length of each should not be more than 75-80 cm (otherwise the corner will deform and sag due to heating).
To comply with basic safety rules and to give the stove an attractive appearance, it is best not to use metal corners on the front side. It is advisable to replace it with a wedge-shaped lock.
Your stove will serve faithfully for many years if all its components (damper, grates, doors, etc.) are placed in grooves with a depth corresponding to the thickness of the fittings.
For the front part of the jumpers, use metal studs with threads with a diameter of at least 16 mm. Their use will allow you to conveniently form the finish on the front of the stove without using corners to hold the bricks.
After we have prepared the brick for the lintel, we drill a hole in the middle, place it on a pin and coat everything with mortar. Then we tighten it. When the jumper has been put in place and the sagging has been determined “by sight”, the structure should be strengthened with another stud.
It is possible to make molding bricks yourself, even if you are not a high-profile specialist. The main thing is patience and desire. Often you want to decorate the stove's masonry with decorative elements (rounded edges, armour-style, curly, etc.).
All you need is a grinding machine, a diamond cutting wheel for ceramics, and an assistant who will need to constantly water the bricks during the grinding process.
Do not forget about safety precautions when working with a sander to avoid injury and dust getting into your respiratory and vision organs.
Regarding the straight seam
There are some tricks for laying out a perfectly even seam. It is worth laying two metal quadrangular rods with a thickness equal to the thickness of the seam on a row of masonry. Typically 8 mm. The solution is applied on top. Then bricks. Remove the rods after laying the last brick in the row. But! It is no longer possible to set bricks after this procedure! Otherwise, the masonry will deform.
Know that if you do not want to destroy the masonry, then the length of the pond should be no more than a meter. To facilitate the sliding of the rod at the time of removal from the solution, it should be lubricated with waste oil or taut.
Fireplace arches are in fashion now. Use your imagination, a little more time. To create an arch, the easiest way is to use plasterboard with a thickness of 12 mm. The process is simple: we cut out the arch of the shape you need, install it on the workplace, press it to the base using something at hand and lay out the prepared bricks of the desired shape along the guide of the template.
Regarding pipe laying
The main mistake when laying out a pipe is an inclination of more than 5 degrees relative to the base. This is unacceptable, as it will lead to time-consuming correction of the work. There is a way to prevent such a mistake: first lay out the base of the pipe.
Then, using a plumb line, determine the point on the roof where your pipe should go and secure the self-tapping screw. And so on for each corner of the pipe. Next, stretch the bright threads from the base to the roof and carry out the laying, focusing on them. As professionals advise, the best pipe is 1.5 × 2 bricks.
The pipe should be 1.5 m or more from the roof ridge and protrude 0.5 m in height.
After the pipe is erected, it will need to be properly insulated. You can find out how to do this correctly here.
Shield schemes
A rough stove can have several purposes and, depending on the purpose of its use, different types of shields are built. Let's consider the possible options for shields:
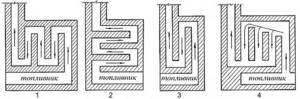
- Sequential stroke with vertical channels. To build this type of shield, the least amount of materials is required. The scheme is easier to implement for those who do not have sufficient experience, due to the simplicity of the design. If the shield circuit is constructed correctly, the resistance to gases will be the greatest, and the thermal efficiency will be average.
- Sequential stroke with horizontal channels. It is much more difficult to build a circuit than the previous one, but they do not differ in parameters. Thermal efficiency increases by reducing gas resistance.
- Sequential stroke with long vertical channels. The main advantages of the scheme are that the ease of construction corresponds to the first type, and the thermal efficiency corresponds to the second. The disadvantages will be the need for additional construction of the foundation and high costs of building materials.
- Parallel move. A furnace with a shield with a parallel stroke is not compact, it takes up a lot of space, but it has the highest thermal efficiency. It is possible to reduce the furnace power.
(no votes yet)