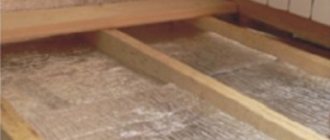
In country houses, the floors are usually wooden. Often they are located directly on the ground or above the basement. Of course, floor insulation is a must, but I don’t really want to invest a lot of money in seasonal housing. Therefore, people are in search of a thermal insulation material that combines low cost and good thermal insulation characteristics.
The best option is to insulate a wooden floor with polystyrene foam. I wonder why?
Harm to human health from polystyrene foam
It is difficult to give a definite answer to this question.
There is a strong belief among the general public that polystyrene foam is capable of releasing a considerable range of substances that are potentially hazardous to human health. At the same time, the history of the use of polystyrene foam dates back to the middle of the 20th century, and during this time scientists were unable to identify at least one disease that would be directly related to the use of this material for insulation. Moreover, it is successfully used not only in the construction industry, but also in food production. It is known for certain that polystyrene foam can emit a carcinogen called styrene that is dangerous to humans. The process occurs only when exposed to direct sunlight or high temperatures. But standard operating conditions of the material do not imply the influence of these factors, since some kind of coating is applied on top of the foam. Under such conditions, the concentration of styrene in the atmosphere does not exceed standard values, which means it is completely safe.
Expert opinion
Konstantin Alexandrovich
If you cannot choose between the desire to insulate yourself with minimal time, effort and finances and concern for the health of your household, you should insulate the floor surface from the outside, and not inside the living rooms.
Conclusion
The review examines all options for carrying out floor insulation work using Penoplex. Choose the one you need and implement it according to the recommendations from the corresponding section. The video in this article will help you understand some of the nuances even better, and if you still have questions, write them in the comments under the review.
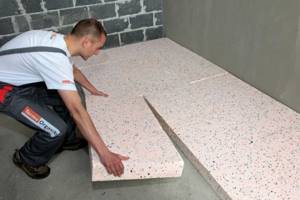
Penoplex is considered one of the best floor insulation materials due to its technical properties. The technology for installing it, although it has certain nuances, is not highly complex, so anyone with minimal construction skills can perform floor insulation with penoplex.
Floor insulation with penoplex
What is expanded polystyrene
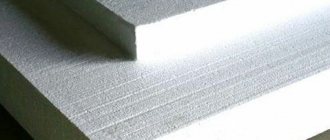
What is polystyrene foam and why is it used for floor insulation? It is a type of foam made by combining hydrogen and carbon atoms. It is made by foaming granular extruded material with volatile petroleum products. To obtain the desired result, water vapor is used. The result is a durable substance with a cellular structure, which retains its heat and waterproofing properties for a long time. It does not rot and allows you to work with it at any temperature and even in rain and snow.
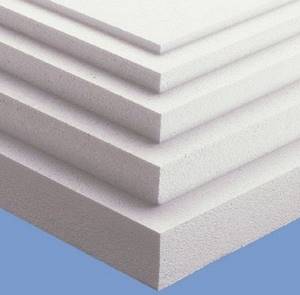
It is available in the form of slabs and panels of different sizes, which makes its installation simple and does not require special skills. Moreover, it is easy to install and does not require special fastening. Easily cut with a regular knife to obtain the required size. The owner of the house can easily cope with such work on his own, without involving a team of specialists.
The main thing when insulating a floor with polystyrene foam is to follow a certain laying pattern:
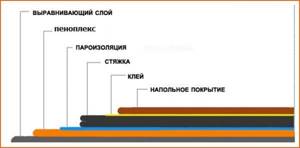
1. Before laying the insulation, it is necessary to carry out preparatory work - using a cement screed, the floor surface is leveled.
2. In order to achieve a soundproofing effect, spread a special thermoacoustic film over the cement.
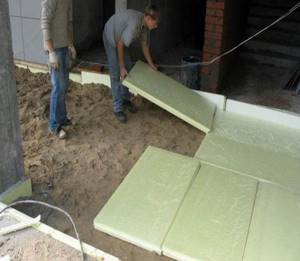
3. Then the polystyrene foam boards themselves are laid. They do not need to be fastened together or glued to the floor. Just join the edges of the slabs so that they lie freely.
4. To waterproof the floor, cover the polystyrene foam with waterproofing film. For these purposes, it is not recommended to take material that is too thin; it will be of little use. A film with a thickness of 0.2 mm or higher is best suited.
Please note that in places where one piece of film is connected to another, the film should be overlapped so that the overlap width is at least 10 cm
5. In order to strengthen the structure, another layer of cement screed is applied with a height of 5 cm or a little more.
6. The final stage is laying the flooring: linoleum, laminate, parquet, tiles or any other.
Characteristics
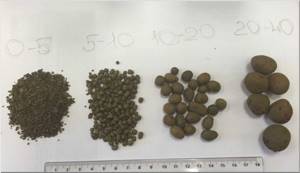
Foam boards differ in their thickness (2–10 cm), weight and density (15–35 kg/m3); the appropriate material is selected based on operational requirements and conditions. The recommended thickness for floor insulation located on the ground floor is 10 cm. It is enough to ensure the warmth of the floor and protect the floor covering from mold formation. Already from the second floor the thickness is halved. An insulation thickness of 5 cm is sufficient to provide heat and sound insulation on the upper floors.
On a note
It is sometimes called a “2 in 1” material because it simultaneously helps to heat a room in winter and maintain good neighborly relations by muffling the noise caused by movement on the floor.
The density is maximum, which allows it to successfully withstand sufficient loads.
Popular floor insulation schemes
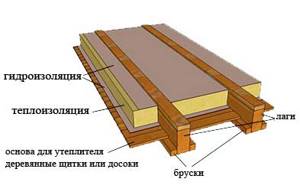
In practice, most often, two schemes for insulating the floor of the basement/lower floor are used. The first is the most reinforced, when the insulation is present both under the joists and between them. Such thermal insulation, as described in the first case, is used only in northern latitudes, where the ground freezes quite noticeably in winter.
But most often, on the first floor of a building, logs are mounted on top of the screed, and in some cases, on top of well-planned soil.
Let's look at both examples suitable for the basement floor, and then we'll talk about insulating the floors of the upper rooms.
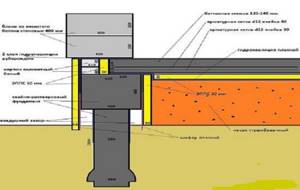
The diagram provides options for floor insulation for the lower floors. The DSP layer can be simplified, which is what most owners prefer to do
Reinforced thermal insulation option
According to this scheme, first, even before installing the logs, it is necessary to level the soil and insulate it with the bottom layer.
As insulation for the first layer, builders can choose:
- expanded clay concrete;
- planned layer of expanded clay;
- extruded polystyrene foam;
- a hard and denser type of penoplex.
Logs are already installed on top of it, after which the space between them is also carefully filled with insulation. This time it can be the same penoplex or one of the varieties of cotton wool.
In this case, people often resort to double waterproofing - one is laid between the upper and lower layers of insulation, the other is placed on top of the upper one, on which the counter-battens for ventilation and, directly, the floorboards will be attached.
In this option, penoplex was chosen as the bottom layer of insulation. The material of the top layer does not have to be identical to the bottom
Conventional insulation scheme
Everything is clear here. The logs are mounted directly on top of the leveled ground surface or, in the case of a screed, on it.
Next, a layer of insulation is laid on them. On top of the insulation is a layer of vapor barrier, which, as a rule, is an ordinary thick polyethylene film. Then thin counter-battens are nailed on top of the joists (some may neglect them), after which the final flooring is laid.
If you need to insulate the floor on the upper floors, then you will have to act a little differently. Here, a layer of vapor barrier is first laid on the ceiling material - the same film, then only the logs are installed.
Often in this case, builders lay a kind of subfloor on top of the ground - the basis for the insulation. This is what it will look like on the diagram
When insulating the floor with mineral wool or ecowool, a lower layer of vapor barrier must be present. This is especially true for the second and all subsequent floors.
The space between the joists is sealed with insulation, after which everything is covered again with film. Counter battens are screwed onto the joists with a screwdriver, onto which the finished floor is laid.
We also recommend reading the article where we described in detail how to put wood floor insulation into practice.
Insulation of interfloor floors
Scheme of floor insulation with foam plastic.
This technology for installing penoplex is used for apartments in multi-storey buildings or for private cottages with more than one floor. An interfloor floor is a ceiling that is simultaneously the floor of one room and the ceiling of another. To insulate an interfloor floor with extruded polystyrene foam, you will need:
- penoplex;
- polyethylene film;
- mounting foam or putty;
- scotch;
- cement-sand mixture;
- reinforced mesh.
Thermal insulation of the interfloor floor with penoplex is carried out in several stages.
At the first stage, it is necessary to prepare the floor surface by clearing it of old flooring, construction debris and dust. After that, all floor unevenness must be eliminated using a special putty or polyurethane foam. If the unevenness of the floor is significant, then a rough layer of screed from a cement-sand mixture should be poured.
Floor insulation with penoplex - floor pie diagram.
The second stage of work includes laying waterproofing, which will protect the insulation material from moisture formed inside the entire thermal insulation structure. A polyethylene film is laid on the ceiling with an overlap of 10-15 cm on the walls. If the film is not integral, then at the joints you need to make a ten-centimeter overlap and glue this place with tape, thereby achieving a sealed flooring.
At the third stage of work, extruded polystyrene foam is laid on the waterproofing layer. There are several materials for attaching penoplex, for example, special dry mixtures, mastics, foams and dowels. You can lay slabs of extruded polystyrene foam:
- parallel to the walls, that is, when all sides and corners of the slabs coincide;
- in a staggered manner, when the corners of individual elements do not coincide with each other (this type of installation is reminiscent of brick laying technology).
Which of these two methods to choose is up to you to decide.
The fourth stage includes work to provide a waterproofing barrier on the outside. The same polyethylene film is used for this.
The fifth stage of work is pouring a cement-sand screed. To do this, a reinforced mesh is laid on the waterproofing layer, and a cement-sand mixture is poured on top of it. The thickness of the screed layer should be at least 5 cm, and its complete drying time should be 30 days.
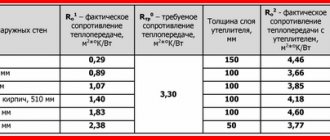
Calculation of insulation thickness
The thickness of the insulation layer plays an important role. It is calculated individually for each home, taking into account design features, climate and type of insulation. The formula is given in SNiP 02/23/2003:
- R – thermal resistance. It is determined from the tables in the SNiP appendix.
- A is the thermal conductivity coefficient. Each type of insulation has its own. The value is indicated by the manufacturer or can be found in the SNiP tables.
If you need to lay a thin layer of insulation, it is better to use extruded polystyrene foam and other materials in mats or rolls. Mats increase strength and elasticity.
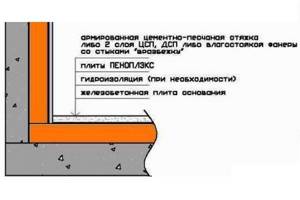
Penoplex under floor screed - general information
Due to its high strength, penoplex is a universal material - it is suitable for thermal insulation of absolutely any surface. The big advantage in this regard is its ideal flatness, which makes it easy to clean the external floors.
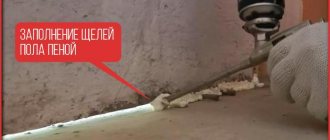
The sheets themselves are stacked at a short distance from each other. Subsequently, the resulting void seams are eliminated. For this purpose, special construction foam is used, and sometimes adhesive tape is used.
Foaming voids with polyurethane foam Source sdelaysam-svoimirukami.ru
Features of the classic screed
This type of screed is considered the most common. It contains several ingredients - cement, sand and plasticizers.
It is important to pay attention to strength
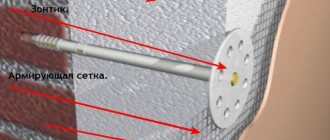
You should also remember about the junction of walls and poured concrete - here it is important to insulate the vertical surface. To do this, you can use foamed polyethylene (12-15 cm) around the perimeter, and pre-coat the walls with a primer
Watch this video to see how to mix the solution yourself:
It is also important to remember about the beacons - without them you cannot start the pouring process. Otherwise the surface will be uneven
The filling technique itself involves working from the far corner (here we will work with a level). After leveling the previous layer and before pouring the next one, a reinforcing mesh is placed.
To prevent cracks from appearing in the frozen surface, you need to water it with water for three days. Drying takes several days. Only after all these procedures is the facial finishing performed.
Self-leveling mixtures
To understand what thickness of penoplex to choose for insulating a floor with a screed made from a self-leveling mixture, it is necessary to take into account the type of room. The greater the load on the floor, the thicker the slab should be.
In this case, it is important to take into account the thickness of the layer of the mixture itself under the screed - in this case it is no more than 2 cmSource remstroidomufa.ru
3 advantages of self-leveling mixture:
- does not require manual alignment;
- distributed with a needle roller;
- dries faster than cement.
The importance of leveling the underlying base should be kept in mind. If any defects remain, there will be a difference in height, and, as a result, an uneven screed
The finishing itself can be anything - from ceramic tiles to wooden parquet. If the technology has been followed, the result will be excellent.
Briefly about the main thing
Penoplex is characterized by two properties. The first is its low thermal conductivity, due to which it has good thermal insulation. Secondly, the slabs are not susceptible to mold and mildew; they create a good soundproofing layer, while rejecting moisture.
Another advantage is that penoplex is universal in use - it can be used regardless of the base flooring.
But here it is important to understand what thickness of penoplex to use for the floor under the screed. Further load on the surface (purpose of the room) has a huge impact.
If this is, for example, a warehouse or a garage where a car will be stored, it is better to choose denser slabs.
The type of finishing does not matter. It all depends on the preferences of the owner of the premises. You can choose laminate, tile, plywood or parquet.
Another mandatory point is waterproofing. If this layer is skipped or installed incorrectly, spilled water may accumulate under the finish coat. Penoplex does not absorb moisture, and it will be quite difficult to dry it.
Source
Advantages of the material
Penoplex has a number of advantages.
- Low thermal conductivity. Thermal insulation characteristics are almost 25 times higher than those of expanded clay concrete.
- Good resistance to moisture and fungal microorganisms.
- Mechanical strength. Due to the high density (exceeds 22 t/m²), thermal insulation work can be carried out without constructing a frame.
- Light weight and versatility. The material is perfectly compatible with underfloor heating systems of both water and electric types.
- Fire resistance. Penoplex has a high combustion temperature, which is especially important when used in wooden houses.
- Affordable price. Despite the fact that this material costs a little more than polystyrene foam and some other types of insulation, its effectiveness fully pays off.
Cost of work and materials
The minimum price per sheet fluctuates at 0.7-0.9 and 1-1.2 USD with a density of 25 and 35, respectively, with a thickness of 20 mm.
It is best to entrust floor insulation with polystyrene foam to professionals. Prices for their services for laying insulation are approximately from 1 to 1.5 USD. per square meter. Of course, there is a separate price for additional work, such as dismantling the old floor (if necessary) or installing joists. But if you have no experience, thanks to the quality of professionals, the floor will last much longer, and the insulation will be installed much better.
As for the material itself, the minimum price per sheet fluctuates at 0.7-0.9 and 1-1.2 USD, with a density of 25 and 35, respectively, with a thickness of 20 mm.
If we are talking about such a unit of measurement as a cubic meter, then the price reaches approximately 35-36 USD, with a density of 25 and about 45 USD. at a density of 35, in this case the thickness of each sheet can be selected. Of course, this price is approximate, so you can find the material slightly cheaper or more expensive.
Reviews about polystyrene foam as an insulating material are very varied. However, with the right choice of the material itself and entrusting the installation work to specialists, it is excellent in terms of thermal insulation and very durable. Positive reviews are also associated with the price of foam, especially when it comes to comparison with other materials. Negative reviews occur when it comes to exposure to rodents, for this the material must be properly processed.
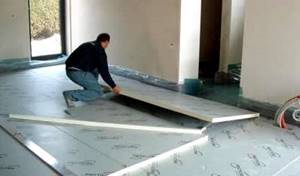
Stages of work
The horizontal surface under the floor must be thoroughly cleaned and leveled. If you decide to insulate the floors in an already inhabited house, then before carrying out the work it is necessary to dismantle the floor covering. If it is still in good condition, then remove it carefully so that after work you can put it back in place. Well, if you plan to replace the coating, then you don’t have to stand on ceremony and remove it quickly. Check the condition of the subfloor. If it is deformed or there are defects, carry out work to strengthen it.
Prepared wooden logs must be positioned and secured in such a way that there is a space of no more than 70 cm between them.
The boards on which the penoplex will be laid must be hemmed to the joists or secured to bars specially designed for this.
Before laying the insulation, it is necessary to treat the logs and all wooden elements with antiseptic solutions. This precautionary measure will protect the tree from rotting and damage by bugs. After antiseptic treatment, it would also be useful to treat with a moisture-repellent agent.
First you need to lay out a layer of thick waterproofing film on the boards or plywood , so carry out the work of installing the waterproofing. Keep in mind that this material is overlapped (about 15 cm) to ensure complete tightness and high-quality protection from moisture.
It is possible that it will be useful for you to study the material about insulation for the walls of a house outside under siding.
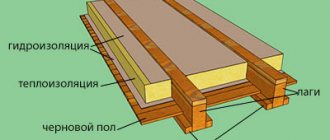
Floor insulation scheme.
The next step is the direct installation of insulation on wooden boards. When laying out the penoplex, carefully ensure that no gaps or cracks form during the work. Careful placement of the material will provide reliable protection from the cold.
For additional protection from moisture, you can stretch polyethylene film over the surface of the insulation. This technique is of particular importance if the house is located in a swampy area and the climate is rainy.
The floor covering is laid on top: laminate, parquet, solid wood, etc.
By the way, similar work can be done in an ordinary apartment. Such insulation is of particular relevance if you live in an apartment building on the ground floor.
Penoplex can also be used as an insulator under a “warm floor” system. In this case, it will provide additional protection of the room from blowing and heat loss. In order to lay the material in this case, a concrete screed with floor pipes built into it is used.
You will probably want to find out more information about whether it is possible to insulate the ceiling and floor with sawdust.
Material characteristics
It’s worth starting with the fact that, depending on the scope of application, a material of one density or another is chosen. Insulation of the floor structure is carried out using penoplex grade 35 or 45. There is also material of grade 31, 31C and 45C.
Characteristics of penoplex grades 35 and 45
Penoplex insulation grade 35 is a universal insulation material and can be used not only for floors, but also for walls with a foundation.
Table 1. Excellent performance qualities of grade 35
| Indicator name | Units | Meaning | Explanation |
| Density | Kg/m3 | From 28 to 38 | The material can withstand significant loads. |
| Coefficient of thermal conductivity | W/m×°С | 0.03 | This is a fairly low figure that guarantees the energy efficiency of the floor structure. |
| Hygroscopicity | % | 0.4 | When testing was carried out during the day, the material absorbed moisture in the specified volume only in the first 10 hours. |
| Flammability | Category | G1 | When combined with a concrete screed, which is not subject to combustion, such insulation, which already belongs to a high category of fire resistance, is completely fireproof. |
| Noise absorption | db | 41 | Relevant for apartments and multi-storey buildings |
| Tensile strength | MPa | 0.4 – 0.7 | The material allows you to create a reliable, solid base. |
| Temperature range of application | °C | -50 to +75 | It will be an ideal material for insulating screeds on cold concrete floors. |
Penoplex insulation grade 45 has a higher density, therefore it is more often used for insulating screeds on a soil base. This heavy-duty material is even used in road construction.
Application of penoplex in road construction
Table 2. Excellent performance qualities of grade 45
| Indicator name | Units | Meaning |
| Density | Kg/m3 | From 40.1 to 47 |
| Coefficient of thermal conductivity | W/m×°С | 0.03 |
| Hygroscopicity (tested during 24 hours) | % | 0.2 |
| Flammability | Category | G4 (together with a heat-resistant coating does not play a role) |
| Noise absorption | db | 41 |
| Tensile strength | MPa | 0.4 – 0.7 |
| Temperature range of application | °C | -50 to +75 |
Standard marking on the packaging of Penoplex insulation
On the packaging of penoplex you can see the following types of markings:
Characteristics of the main types of insulation
To summarize, we can distinguish several types of penoplex that are used to insulate floor screeds:
- "Penoplex" grades 35 and 45, suitable for roofs, floors above warm and cold basements, in garages and storerooms.
- “Penoplex Foundation”, which has high moisture resistance, heat and sound insulation properties and can be used not only for insulating foundations, but also for ground screeds.
- "Penoplex Comfort" is a common type of insulation for interior work and is not afraid of high humidity. Placed on a rigid base (concrete floor slabs).
Heat loss at home
If we consider the cooling map of a building, the floor accounts for up to 40% of heat loss. Accordingly, not only it should be insulated, but also all other elements of the building - the roof and walls. An integrated approach makes it possible to maintain a constant temperature in the house both in summer and winter.
The industry does not offer many materials for such work, so today we will focus on one - penoplex, which:
- easy to use;
- manufactured using a high-tech method;
- makes it possible to create the optimal temperature in the room.
Just like polyurethane and expanded polystyrene, it is a type of foam plastic. Therefore, its technological characteristics fully meet our needs.
Proper insulation of a wooden house with penoplex
We insulate the floor with our own hands
What is the best way to insulate a floor?
Such a question has at least once occurred to a person who, during the cold season, felt all the “charm” of a floor covering containing cavities and all kinds of holes. Nowadays, you can insulate a floor with your own hands quite quickly and without much effort. In addition, there is a huge selection of modern materials, thanks to which it is possible to create the most optimal thermal insulation and protect the room from the penetration of cold air.
Nowadays, when choosing how to insulate a floor, consumers are simply shocked by the huge amount of available materials. There are foam plastic, polystyrene, and mineral wool, but the most common and popular method of insulation is the so-called “floating” screed. Technology for creating a floating screed
Those who want to learn how to make an insulated floor need to know what exactly such a floating screed is.
This technology is one of the varieties of cement-sand screed, which differs from the traditional one only in the absence of a rigid connection with the walls and base of the room. This type of screed has a special insulation layer, which means that it can be used to effectively insulate the floor on the 1st floor. However, this type of floor insulation is perfect for any other floor.
Floor insulation scheme The installation of an insulated floor should begin with the creation of an effective waterproofing barrier.
The answer to the question of whether it is necessary to insulate the floor depends on the correct execution of this stage of work. If the waterproofing is done efficiently, then such a barrier will prevent the penetration of moisture from the lower floors and basement, prevent the thermal insulation from getting wet, and the air temperature in any room will increase even if the previous heating mode is maintained. Waterproofing begins with applying a layer of mastic to the base and lining the surface with roofing material.
Benefits of penoplex
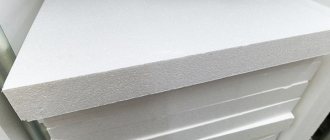
This insulation is available in the form of slabs of various thicknesses. The standard slab width is 600 mm, length – 1200 mm and 2400 mm. The minimum sheet thickness is 20 mm, the maximum is 100 mm. Depending on the thickness, the package can contain from 4 to 20 sheets of penoplex.
PENOPLEX®COMFORT is a unique brand of thermal insulation boards that is ideal for thermal insulation of country houses or city apartments
The main advantages of this insulation include:
- zero water absorption;
- low thermal conductivity and vapor permeability;
- absence of harmful fumes;
- resistance to microorganisms;
- high strength.
Properly installed insulation will reliably protect the room from cold, noise, moisture penetration, and will create comfortable conditions even in the most severe frosts. Unfortunately, penoplex is not resistant to solvents and high temperatures, and also has a fairly high cost. But, despite this, it is used very widely for floor insulation, gradually replacing mineral wool and foam plastic.
Calculation table of thermal insulation in different regions
Table of penoplex parameters
| Sheet dimensions, mm | Sheet thickness, mm | Amount in a package | Insulation area for one package, m2 |
| 1200x600 | 20 | 20 | 14,4 |
| 1200x600 | 30 | 14 | 10,08 |
| 1200x600 | 40 | 10 | 7,20 |
| 1200x600 | 50 | 8 | 5,76 |
| 1200x600 | 60 | 7 | 5,04 |
| 1200x600 | 70 | 6 | 4,32 |
| 1200x600 | 80 | 5 | 3,60 |
| 1200x600 | 100 | 4 | 2,88 |
Penoplex. Installation instructions from the manufacturer
We insulate the ground or on the ground
There are cases when it is necessary to protect not structures from freezing, but rather the land on which construction is planned, for example, a low-temperature refrigeration chamber.
Attention! This is simply necessary, since frozen soils, after thawing and re-freezing, can swell, which, over time, threatens the building’s foundation with destruction. One way to block the penetration of cold through the floors of the chamber into the base underneath is insulation with foam plastic on the ground
The same technology is used to insulate floors in private homes. where this construct is placed directly on the ground
One way to block the penetration of cold through the floors of the chamber into the base underneath is insulation with foam plastic on the ground. The same technology is used to insulate floors in private homes. where this construct is placed directly on the ground.
The instructions on how to do this in practice are simple and identical for work on installing floors on the ground in a home or for industrial purposes:
- Crushed stone is poured onto the prepared (leveled and compacted) base, then sand. Each layer is carefully compacted.
- A polyethylene film is placed on a sand bed.
- Next, polystyrene foam is laid, preferably in two layers. We start work from the corner. The second layer of foam is laid starting from the middle of the sheet of the first layer. This way you will ensure that the seams between the sheets of the next row are shifted in relation to the previous one.
insulate floors in private houses. where this construct is placed directly on the ground.
The instructions on how to do this in practice are simple and identical for work on installing floors on the ground in a home or for industrial purposes:
- Crushed stone is poured onto the prepared (leveled and compacted) base, then sand. Each layer is carefully compacted.
- A polyethylene film is placed on a sand bed.
- Next, polystyrene foam is laid, preferably in two layers. We start work from the corner. The second layer of foam is laid starting from the middle of the sheet of the first layer. This way you will ensure that the seams between the sheets of the next row are shifted in relation to the previous one.
Insulating the floor in a private house: how to do it yourself” href=”https://shkolapola.ru/ustroystvo/uteplenie/378-uteplenie-pola-v-chastnom-dome”>insulating floors in private houses. where this construct is placed directly on the ground.
The instructions on how to do this in practice are simple and identical for work on installing floors on the ground in a home or for industrial purposes:
- Crushed stone is poured onto the prepared (leveled and compacted) base, then sand. Each layer is carefully compacted.
- A polyethylene film is placed on a sand bed.
- Next, polystyrene foam is laid, preferably in two layers. We start work from the corner. The second layer of foam is laid starting from the middle of the sheet of the first layer. This way you will ensure that the seams between the sheets of the next row are shifted in relation to the previous one.
Advice! To determine the thickness of the thermal insulation layer to protect the soil from freezing, an accurate calculation must be performed, taking into account two factors. Firstly, the nature and group of soils in the proposed construction site, and secondly, the temperature regime in the designed refrigeration chamber.
- The next stage is covering the heat-insulating layer with polyethylene film, with the edges raised 10-15 centimeters above the level of the future floor.
- Next, the frame is installed and a concrete base is poured for industrial facilities, or a screed is made over a reinforcing mesh for the subsequent finishing layer in residential premises.
It is advisable to cover all joints of foam sheets with putty.
Pros and cons of EPS
Penoplex is more expensive than regular polystyrene foam, but its price is quite justified. EPS has a lot of undeniable advantages, however, the material also has disadvantages.
Advantages
Among the positive qualities of extruded polystyrene foam, several strengths can be noted. These include:
- Environmentally friendly. Since EPS does not emit harmful substances into the surrounding space, it can even be safely used to insulate the floors of children's rooms.
- Ease of use. Unlike polystyrene foam, penoplex can be cut very well with a sharp knife. There are also few crumbs left.
- High moisture resistance. It is determined by the structure of the material itself, which is why penoplex is used for internal and external insulation.
- Resistance to mechanical deformation. This is the main advantage of penoplex, thanks to which it is so popular for floor insulation.
- A high degree of sound and heat insulation, along with a small thickness and lightness, make the insulation almost ideal for apartments in multi-storey buildings.
- Long service life. Manufacturers of extruded polystyrene foam assure that this insulation, with error-free installation, will last 50 (or more) years.
- Some types of slabs are equipped with counter-directional protrusions, guaranteeing almost one hundred percent solidity of the heat-insulating layer without additional sealing.
These advantages of penoplex provide a chance for simple, relatively quick insulation of the balcony floor; despite the speed of work, it will be of high quality.
"Long Minus"
Good material has disadvantages: it is afraid of solvents and very high (low) temperatures, but this disadvantage can be ignored. But it should be noted that the price is quite decent, which cannot be considered an advantage either. But penoplex has one big disadvantage - the relative ease of ignition and the release of toxic substances during combustion.
Since the shortcoming is significant, it requires some explanation. All building materials are divided into 5 groups, differing in the degree of flammability. The safest ones are “NG” - non-flammable. Its “bright” representative is mineral wool. The most unreliable group is “G4”. The materials included in it are capable of spreading flames. An example is ordinary white foam.
There are several brands of penoplex; they are intended for different areas of the apartment, so they must differ in flammability class. Manufacturers position some brands (with fire retardant additives) as belonging to “G1” - the group that contains low-flammability, self-extinguishing types; they are not characterized by the spread of fire.
In reality, everything is not so rosy, this is the opinion of the builders. They are more skeptical and classify almost all brands of penoplex into the “G3” and “G4” groups. It contains materials that are quite difficult to ignite, burn steadily, but tend to fade. Extremely toxic smoke is the main danger to humans: it should not be inhaled under any circumstances.
If you plan to insulate the floor with penoplex yourself, then the best type for any premises, and especially for small balconies, are brands with a minimum degree of flammability. Reliably fencing them with materials that are not afraid of fire is the most important condition, and it is also quite feasible. Therefore, recently extruded polystyrene foam has been successfully squeezing out its competitors - mineral wool and polystyrene foam, because the list of its disadvantages is very small, but its advantages are significant.
Insulation of the concrete base
Concrete floors are distinguished by high reliability indicators; they are usually very smooth and durable; they are not afraid of serious loads. However, it cools down quickly, does not retain heat, and the cold lets in easily. That is why concrete floors must be insulated. And here, too, polystyrene foam comes to the rescue. However, depending on whether there is a basement under the concrete floor or not, the insulation technology will also differ.
Floor screed with foam plastic
If there is a basement
This section is relevant for owners of private houses or those who have apartments on the ground floors. Concrete floors in these cases are quite cold, and even a good floor covering will not save you from discomfort. Here it is recommended to mount the insulation on the basement side, then the concrete slab itself, that is, the ceiling, will be in a layer of air and will better retain heat, and the cold will not penetrate into the house.
It is best to use foam plastic with a thickness of 5-10 cm, as is the case with wooden floors
If the concrete slab is uneven, then in any case it is important to prepare it for the installation of foam sheets. All cracks on it, if any, are sealed with polyurethane foam.
Insulation of the floor above the basement without heating
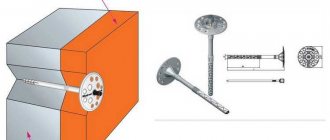
You can fix the foam on the concrete using dowels 12-14 cm long. You need to work slowly, drilling holes in the concrete with a hammer drill, marking places for fastenings. Before fixing the material, apply a special adhesive suitable for foam plastic to the surface of the concrete. The joints between fixed sheets can be covered with polyurethane foam.
Cellar insulation with foam plastic
No basement
If there is no basement in the house, and the apartment is located above the first floor, then another technology for floor insulation with foam plastic is used. In this case, the sheets are installed above a concrete surface. The old floor covering is completely removed, all cracks in the base are sealed, and the floor is leveled. It is best to seal cracks with thick cement mortar. Only after this is the floor waterproofed with special compounds or materials. The easiest way is to use bitumen mastic, but in some cases roll material will also be convenient.
The use of polystyrene foam for floor insulation
Afterwards, a reinforcing mesh or ordinary masonry is laid on the surface of the waterproofing. And only then sheets of foam plastic are placed on it. But here you can use thin sheets about 2-3 cm thick. The main thing is to install it with a minimum of joints so that cold bridges do not form. It is best to fix the foam with special glue.
Next, after laying the foam, the beacons are installed using a laser level. They can be fixed with the same mounting adhesive. Beacons are placed at a distance of no more than 1.4 m from each other, but at the same level. After this, a screed solution is poured over the foam - a regular concrete screed is performed, and the foam will be sealed on both sides with concrete surfaces.
Beacons for foam screeds
Floor design in a wooden house
Regardless of the cottage construction technology and the wall material used, the following factors influence the choice of floor pie design:
- floor - a floor on the ground can be made only in the lower level;
- planned floor covering - for tiles and most facing materials it is more convenient to have a floor on the ground; it is better to lay parquet on a wooden subfloor;
- type of foundation - to reduce the construction budget, wooden buildings are erected on poles or MZLF; on wet soil, floating and insulated slabs are used; in swamps and steep slopes, pile-screw grillages remain the only option.
Flooring on beams
Unlike flooring on the ground and floor slabs, a wooden decking structure on beams is cheaper for the developer. Wooden flooring can be made on any floor. However, protecting wood taking into account operational and structural loads is much more complicated:
the wooden floor pie is covered with a vapor-proof film or membrane; however, the protection does not cope with moist air inside the house 100%; some of the moisture penetrates the floors and is absorbed by the lumber; after which, when the humidity in the cottage decreases, the wood tries to evaporate excess moisture; if the lumber is surrounded on all sides by vapor-tight insulation, then this is impossible to do; elements of supporting structures darken and begin to rot, fungus and pathogenic microbes grow and spread on their surfaces.
After foaming the cracks, the evaporation surface of the lumber sharply decreases.
The vapor permeability of mineral wool insulation 0.45 is an order of magnitude higher than that of foam plastics (0.03) and 15 times higher than that of extruded polystyrene foam (0.013 Mg/m*h*Pa), and the hygroscopicity is at least twice as high.
Advice! Experts recommend replacing floor insulation in a wooden house made of polystyrene foam or extruded polystyrene foam with thermal insulation made of basalt wool.
Floor on the ground
A reinforced concrete floor cast at the site of operation, resting on the soil, is called a ground floor. The slab has lower waterproofing and is cut off from the foundation by a damper layer, that is, it is floating.
It does not take structural loads and distributes only operational loads from the weight of furniture and people inside the room to the ground. However, even with a minimum thickness of 7 - 10 cm, the dead weight of the structure is much higher than that of a beam-based ceiling.
Therefore, the insulation must have the following qualities:
- high density - so that the floor slab on the ground does not sag over time;
- low hygroscopicity - despite waterproofing, concrete can absorb soil moisture, so thermal insulation must retain its properties when wet.
Foam glass and extruded high-density polystyrene foam have these properties.
Due to heavy loads and the possibility of subsidence in floors along the ground, high-density EPS is used rather than PSB foam.
The polystyrene foam sinks under the floor's own weight along the ground, and mineral wool loses its thermal insulation properties when wet. Therefore, these two materials are not suitable for flooring on the ground.
The finished floor on the ground is a slab foundation; the easiest way is to make a 10 cm reinforced screed inside the MZLF. It is much more difficult to implement a floor on the ground inside the grillage:
- the grillage beams must be kept clear of the ground;
- in high (hanging) grillages this happens automatically;
- in low (ground, underground) the air gap is protected on the sides with sheet materials so that soil does not fall inside it;
- the base inside the grillage must be compacted with a vibrating plate or vibrating roller to ensure normal load-bearing capacity.
Since it is difficult to make a floor on the ground in a hanging grillage, a slab floor is poured and supported by foundation beams.
In a hanging grillage, the soil will fall out from under the beams; when the base is compacted inside a low grillage, the likelihood of destruction of sheet materials that block access to the air gap increases when soil pressure on them increases.
Laying polystyrene foam on sand. Installation of foam plastic under the screed
Due to its low weight and special structure, installing foam plastic under a floor screed is quite easy and quick to complete. To carry out the work, you will need a building level, guides (beacons), a rule or lath, a spatula, a hacksaw or a construction knife, a leveling solution (concrete, cement-sand or self-leveling mixture), waterproofing (film or mastic), adhesive tape, reinforcing mesh, Styrofoam.
Process steps
- Preparing the base. Initially, the rough foundation must be prepared for pouring the screed. If there are deep cracks or chips on the floor, they should be covered with cement mortar. All peeling and weak areas must be cleaned of destroyed material. Next, the surface should be cleaned of dirt and dust. The ideal option for this is to use a construction vacuum cleaner. However, you can get by with an ordinary broom.
- Leveling the base. To obtain a level base, you can use special leveling mixtures or cement-sand or concrete mortar. The thickness of such a layer should be 3-5 cm (depending on the differences in height of the base). The composition should be thoroughly dried before proceeding with the next steps. The drying period depends on the characteristics of the leveling mixture. Leveling the base
- Laying a waterproofing layer. Foam plastic is resistant to moisture, but it is still recommended to provide waterproofing. As a rule, special films are used as such materials, which must be laid on top of each other with an overlap of 5-10 cm. The joints are glued with any adhesive tape. It is also necessary to provide for the film to extend onto the wall to a height of 7-10 cm. In some cases, a special mastic can be used instead of the film. The composition is applied using a brush or spatula. The entire floor surface is treated. Laying the waterproofing layer
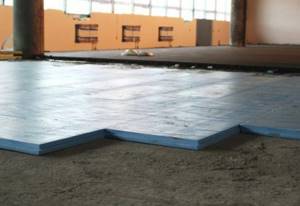
- Laying foam. Polystyrene foam is laid on the waterproofing. Initially, the plates should be attached with special glue. The composition is applied to the slabs using a spatula, after which the insulation is laid on the prepared base. The glue should not cover the entire surface, but only the edges and a few points along the central axis. The slabs must be laid close to each other, spaced apart (adjacent transverse seams should not be located in one straight line). If during the installation process gaps have formed between them, they should be filled with special mastic or adhesive putty. This will eliminate the occurrence of cold bridges and reduce heat loss in the future.
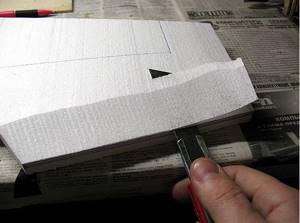
- Finally, as a rule, the foam boards need to be cut. For this, it is best to use a regular wood saw. You can also use a knife (even a kitchen knife will do). For accurate cutting, it is necessary to measure the remaining distance to the wall, which is deposited on the foam. The material is cut according to the marks made.
- When laying foam plastic and installing screed in the future, you should leave a small gap between the floor and the wall. Subsequently, the free space is filled with damper tape. This design feature will save the base from deformation in the event of shrinkage of the building. After insulating the entire surface, the slabs are additionally secured to the base using disc-shaped dowels. This will ensure reliable fastening of the thermal insulation and prevent the slabs from moving in the future.
- Screed reinforcement. To complete this stage, a concrete or cement-sand screed 1-1.5 cm thick is poured onto the fixed insulation. A metal reinforcing mesh is then laid on it. Thanks to this stage, the strength and durability of the screed will be significantly improved. Reinforcement and filling of screed
- The final stage is pouring the final layer of screed. For this, a concrete mixture is used. The thickness of the layer should be within 5-6 cm. To obtain a flat surface, beacons are initially installed, which are attached to the solution. To position them correctly, you must use a building level. In this case, you need to focus on the highest place on the floor. The fixing solution is applied in large strokes along a straight line. Then the beacon is placed on it and pressed tightly. Next, the concrete mixture is scattered over the surface and leveled with a rule or a lath. The surface is finally leveled with a spatula. During operation, it is recommended to periodically pierce the solution with a metal rod. This will remove the remaining air from the thickness of the viscous solution, which will have a positive effect on the strength of the screed.
Reinforcement and filling of screed
Insulating the floor with foam plastic under a screed in a private house at the next stage involves reinforcement. To do this, a cement-sand mixture is poured onto the thermal insulation, the thickness of which can be from 1 to 1.5 cm. A reinforcing mesh is placed on top. Thanks to this stage, the durability and strength of the screed will be improved. The finishing layer is poured at the next stage. To do this, you should prepare a concrete mixture, and the thickness of the layer varies from 5 to 6 cm. In order to obtain a flat surface, beacons should be installed, which are pre-fixed to the solution. To position them correctly, you need to use a level. In this case, you should focus on a high place on the floor.
The solution is applied in slides in a straight line. The beacon is placed on them and pressed well. The concrete mixture can be scattered over the surface and leveled with a lath or rule. Finally, the surface should be leveled with a spatula. When insulating the floor with foam plastic under a screed, the instructions, as a rule, help novice craftsmen. From it you can learn that when working, from time to time it is necessary to pierce the solution with a rod. This will remove air, which will have a positive effect on the strength of the screed. Subsequent work may be carried out only after the finishing layer has completely dried. This stage will take approximately 28 days. In order to prevent cracking of the surface within 10 days, it should be moistened with water.
Insulating the floor with foam plastic under the screed, reviews of which are often positive, can be carried out in tandem with a heated floor system. It can be water or electric. In this case, the waterproofing is located not only under the thermal insulation, but also on top of it. The best option is to use polystyrene foam, which is supplemented with a foil layer. With this coating you can achieve heat reflection, which has a good effect on the microclimate of the premises. According to home craftsmen, this option is sometimes replaced by the use of a foil backing as a top waterproofing material.
Buyers are advised to take the choice of foam thickness seriously. When carrying out work in private and multi-storey buildings, this parameter will differ. The closer the base is to the foundation, the thicker the thermal insulation should be. Consumers are advised to purchase 10-centimeter slabs for insulating the first floors, while a 5-centimeter sheet is suitable for work on the upper floors.
Advantages of polystyrene foam as floor insulation
It is popular to use polystyrene foam for heated floors because it has the following advantages:
- Excellent heat insulation and frost protection
. The thermal conductivity of the material is low due to its porous structure. In this regard, polystyrene foam perfectly retains heat in the room. - Good sound insulation
. The material absorbs both sound waves coming from the room and those coming from outside the building or its lower levels. The insulation layer reduces the level of vibration of the ceiling. - Fire resistance
. Polystyrene foam does not burn when exposed to direct fire, and to be more precise, it instantly extinguishes. It is worth noting that even during the shortest period of combustion, harmful volatile substances are released that pose a danger to the human body. It is not recommended to use such insulation in industrial facilities with an increased risk of fire. - Resistant to exposure and moisture penetration
. The resistance of polystyrene foam to moisture is very high, since the material does not absorb water. When using it, you can refuse to install waterproofing. - Long service life
. Foam sheets do not deform and are resistant to subsidence and rotting during operation.
Based on the foregoing, we can conclude that polystyrene foam is a universal material and can be used in the construction of a wide variety of buildings. Floors treated with foam plastic are reliably protected from the effects of cold air masses.
Disadvantages of polystyrene foam
Polystyrene foam is far from an ideal material; it also has its own disadvantages, which you need to know about in order to draw your own conclusion whether or not to buy such material for floor insulation. The main ones are the following.
- Low strength indicators. The material is easy to damage or break. But at the same time it is easy to cut.
- The material is afraid of the effects of varnish or paint - it is destroyed because of them.
- This is not a breathable coating, although it is full of air in itself.
- If there are mice or rats in the house, they can greatly damage this type of insulation. Therefore, it is best to cover foam blocks with plaster.
- This is not an environmentally friendly material, and if it is set on fire, it releases a huge amount of toxic fumes into the air. But the foam itself is absolutely safe for humans.
- You still need to create a frame for foam plastic, but in the case of this material it can not be made as powerful as when using the same mineral wool.
The use of polystyrene foam for floor insulation has its disadvantages
Expanded clay
This material is quite popular for screeding in private homes on a pre-prepared soil base.
This option has a number of advantages:
- Non-flammability. The material does not burn, does not support combustion and does not emit toxic substances when exposed to temperature.
- The created layer of thermal insulation does not contribute to the appearance of mold and mildew. No rotting occurs when exposed to water.
- Excellent soundproofing effect.
- Ability to withstand large temperature changes without changing characteristics.
- Reasonable price making it affordable.
Expanded clay is clay that has boiled at a high temperature; therefore, the material is absolutely harmless.
The material is laid according to the following scheme:
- The base is being prepared. If the work is carried out on a foundation made of soil, then a foundation pit is built with a layer of sand, everything is carefully compacted.
- Depending on the necessary requirements for thermal insulation, a layer of expanded clay is poured.
- Additionally, a reinforcing layer is made.
- The prepared solution is poured over the structure.
Thus, the screed is created quite quickly, and the result is of high quality.
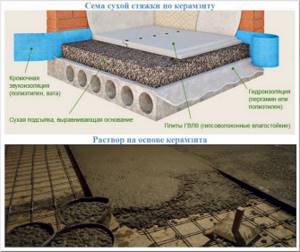
Bulk insulation materials are more suitable for arranging a dry screed; in the wet version, expanded clay is better used as a mortar filler (expanded clay concrete)
Planoplan
Another online service for creating an interior. The catalog contains real furniture, not something created by programmers. You can create a drawing of an apartment as a background and drag and drop images onto it. The layout can be your own or standard.
In objects you can change the texture, color, add matte or gloss, change the scale, and some spatial parameters. There is a PRO account, which has wider capabilities.
There is no need to pay for use.
Disadvantages: the service only works online.
Website: https://planoplan.com/
Polystyrene foam qualities
These qualities are used for thermal insulation of rooms inside and outside. Foam plastics are moisture and vapor proof, so water does not affect the thermal insulation properties.
The use of these materials to insulate a room from the inside confronts builders with the task of protecting against condensation. Warm air coming into contact with the cold surface of the walls leads to the formation of dew drops on them. Once under the foam, the liquid cannot evaporate. This leads to the destruction of concrete, brick and wood.
Foamed polymers are flammable, so additional fire safety measures must be taken.
When ignited, the foam releases toxic substances. There are also fire-resistant foams on the market, which are more difficult to flare up. In terms of ease of ignition, they are comparable to wood and cost half as much.
Foam plastics are easy to cut and saw, convenient to work with, attach to any surface and are strong enough not to break under their own weight. This allows for simple installation procedures. Such qualities distinguish polystyrene foam from mineral wool and other insulation materials.
Thermal conductivity, 15 times lower than that of concrete, attracts mice, which nest in foam plastic insulation in families and colonies. Foam insulation requires regular treatment of the premises to prevent rodents.
If mice are already infested, it will be difficult and expensive to get rid of them.
Foams differ in density and hardness. From soft, easily crumbling ones, such as those used to cushion household appliances during transportation, to hard ones that you can walk on without fear. The denser and stronger the foam, the higher the price and weight. Thermal insulation properties depend slightly on density. When the density is doubled, there is a ten percent improvement.
Good insulation materials are made from polystyrene foam - their thermal insulation properties are 10-15 percent higher than those of analogues at the same density and thickness.
Properties of foam plastic
Foamed polymer insulation is used very widely for insulating underground spaces and screeds.
Insulating floors with foam plastic is a completely normal and even obvious procedure.
It is enough to familiarize yourself with the properties of this material:
- Polystyrene foam consists of 97% natural insulation: air. These are polystyrene foamed in a special way, polyethylene foam, polyurethane foam and other polymers. Of course, such a material conducts thermal energy extremely poorly, since gases weakly transmit molecular interaction;
- The polymers that make up the material are not afraid of moisture and do not absorb it; moreover, the myriad of bubbles filled with gas are sealed against the environment and each other, so there is no problem of moisture absorption and hygroscopicity;
- High-molecular compounds that make up foam plastic as floor insulation are not subject to electrochemical and biological corrosion, so they can be used even on the ground, in addition, they are not a nutrient substrate for any types of fungal mycelium, so antimycotic treatment is also not required;
- The price of the material compares favorably with competitors with the same or similar thermal conductivity and strength;
- The incredibly light weight of the product significantly reduces transport and loading work, as well as manipulations during installation work;
- The material is easy to process and easily fixed on different surfaces.
Insulating the floor in a private house with polystyrene foam is a simple task that even one person can do.
Another important feature of foam plastics is their durability. Moreover, they not only do not collapse themselves, structurally, but also do not lose their thermal insulation properties over time. In addition, due to its chemical composition, polystyrene foam interacts very well with adhesives, sealants, putties, plaster compounds and other materials.
Polystyrene foam goes well with various materials.
Finally, the material is very easy to cut with a regular construction knife or saw, therefore, during installation work and when adjusting, you will not need any electromechanical devices or devices, everything is done very simply and quickly with a simple movement of the knife.
Cutting and processing products does not cause any problems.
The finished product is produced in the form of slabs of various thicknesses, hardness, composition, etc.
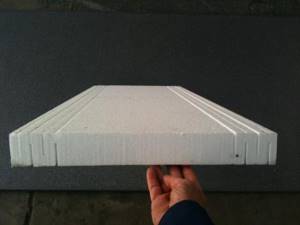
There is often profiling at the edges of the slabs to create a castle effect when assembling coatings, which is quite important from the point of view of thermal engineering and ease of working with the material
The slabs are produced in various thicknesses and densities.
The strength of the slabs can also vary greatly: from wood-like compressed or extruded slabs to soft, coarse-grained products that are not designed to withstand bending or other serious loads, as in a wooden house.
There are also some myths about polystyrene foam. For example, that mice really love him. This is complete nonsense, as Makarevich would say, but we’re not frying eggs here. Seriously speaking, mice treat it the same way as they treat any material where they can nest: wood, mineral wool, drywall, etc.
Another myth says that this product leaves inevitable cold bridges between the sheets. We have already talked about locks, but we also want to remind you about polyurethane foam, a double layer with overlapping seams, sealants and the “direct hands” of installers. This set negates any walkways, bridges, or cold crossings in any direction.
Important points of thermal insulation
- When purchasing insulation material, you need to check its quality. Don't be shy about asking for a certificate for verification. High-quality materials restore their shape after mechanical stress.
- The main criterion for choosing thermal insulation material for residential premises should be health safety, not cost. Remodeling a floor is a labor-intensive and time-consuming process.
- Waterproofing of insulation must be organized on both sides (internal and external).
- It is worth providing a compensation gap between the insulation and the finished floor.
- A metal mesh can be placed on the rough flooring to protect the floor from rodents.
- Between the rough and finished floors, you can organize a heating system using a special heating cable.
- The floor of a wooden house should be well ventilated.
- To increase thermal insulation, the foundation and basement are insulated.
A reliably furnished floor in a wooden house is a criterion for heat preservation. It is not difficult to insulate it yourself, the main thing is to choose the right material. The most popular method is the double floor system.
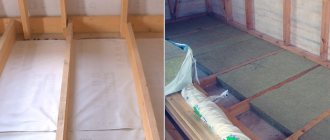
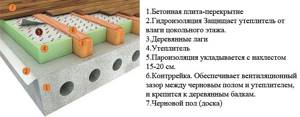
Insulation of wooden floors along logs
Insulating a wooden floor with polystyrene foam is a significant task when carrying out renovations in a house, cottage or ordinary house. Today, wooden floors are no less popular than in the old days, as they place a small load on the slab, regardless of the height.
Wood flooring is a combination of air space between the floor and boards, and a layer of wood.
Therefore, to insulate the floor along the joists using polystyrene foam, you will need to perform a whole sequence of work. But there is nothing complicated here, since anyone can do it without calling a specialist, because wood is the simplest and most convenient means of compaction.
So, to insulate the floor in a wooden house, you need to adhere to the following technology:
- first clean the surface, repair all cracks and smooth out any irregularities;
- then lay a 10 cm thick foam layer on the floor on top. Then apply a waterproofing film on top. Choose only high-quality film, since even the slightest contact with moisture on the thermal insulation material will significantly reduce its quality.
- After this, you will need to make a special wooden sheathing - a log, where the thermal insulation material will be placed. With this floor design, the load will be evenly distributed on the frame.
- Install polystyrene foam onto the film, placing the sheets tightly pressed against each other. After this, be sure to seal all joints and cracks with foam.
- Apply one more layer of film on top, as this will serve as good protection against liquid getting on the foam layer.
Wooden base
The best option is to attach foam sheets from the basement side.
The basement ceiling is thoroughly cleaned of dirt. Poorly held or rusty nails are replaced, the protruding ends are bent and sunk into the wood. The wood is treated with deep penetration antiseptics.
Sheets of foam plastic are attached to the adhesive, with self-tapping screws, using slats. The gaps between the sheets, as well as between the expanded polystyrene and the wood (beam) are filled with putties, pieces of polystyrene foam, polystyrene foam, and closed with construction tape. Then everything is covered with a vapor barrier covering the walls of the basement.
Additional external finishing with sheet materials and plaster is required. This will prevent the possibility of mechanical damage to the foam.