Insulation of facades in winter using SFTK wet facade technology
Previously, when carrying out work in winter, it was necessary to create a minimum daily temperature of +5 C or higher in the work area.
When applying decorative plaster, it was necessary to raise the temperature even higher to +12 +18 C. To create such a temperature, a fragment of the facade is covered with curtains made of polyethylene film or other rolled materials, and heat guns running on gas, diesel fuel and electricity are installed inside for heating. Let's talk about the operation of heat guns inside a greenhouse and the features of their use.
Electric guns are quite effective at outside temperatures from 0 C to +5 C; if the temperature drops below 0 C, then the electric guns cannot heat the air inside the greenhouse and drive cold air. At negative temperatures outside, electric guns are used only as additional ones, to increase air circulation inside the greenhouse. Guns with a power of 15-30 kW are usually used in the work.
Diesel fuel heat guns are very effective for use in hothouses; they operate at any air temperature and are capable of heating hothouses to fairly high temperatures. But you need to understand that if the ambient temperature drops below -15 C, then the operation of diesel guns will require a very large amount of fuel, and the costs will be very high. Therefore, when carrying out work in winter, you need to monitor the weather forecast during the day and night, plan a schedule of working days and weekends. Work in hothouses takes place around the clock; at night, either a night shift or a person on duty is needed to ensure that the guns work and maintain the required temperature. The quality of diesel fuel is very important; if the diesel fuel is summer, if it is of poor quality, then the diesel gun begins to smoke, and workers can be poisoned with carbon monoxide. Guns with a power of 20-70 kW are usually used in the work.
Gas-powered heat guns are the most effective for use in greenhouses; their operating costs are approximately two times lower than when working with diesel-powered heat guns. With all these advantages, you need to understand that gas guns are the most dangerous; they operate on gas cylinders, from one to three cylinders per day. It is also necessary to have a place at the construction site for the safe storage of a warehouse stock of full and empty gas cylinders, to conclude an agreement for the removal and timely delivery of gas cylinders to the construction site. The biggest danger of gas lugs is that when the gas leaves the cylinder, the cylinder becomes very cold and becomes covered with ice and frost; if measures are not taken to heat the gas cylinder, the intensity of the gas flow drops significantly and the gun goes out. Further, if you do not react in time, a gas explosion will follow inside the greenhouse. Gas guns with a power of 30-70 kW are usually used in the work.
A warming house can be made in several ways.
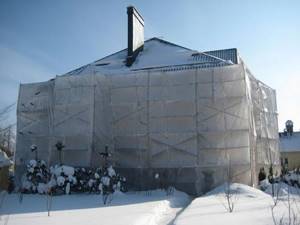
A large canopy made of dense rolled material and used to cover a fairly large fragment of scaffolding.
The advantage is that it is cool and pompous in front of the customer.
The disadvantages are that:
- it is expensive,
- you need to order it at production and wait for it to be made,
- the scaffolding must be very powerful, must withstand weight and wind loads,
- there should not be any pipes or consoles sticking out that could tear the greenhouse in a strong wind,
- It’s dark inside the greenhouse, you need to provide very serious additional lighting around the clock,
- danger for workers during the installation of this stucco on the scaffolding.
You can screw bars to the vertical and horizontal posts and parallels of scaffolding with wire, and reinforced polyethylene film can be nailed to these bars using wooden glazing beads.
The advantages are that
- The polyethylene film is transparent, allows sunlight to pass through, the work area is bright during the day, the sun provides additional heating inside the greenhouse
- very low installation cost
The disadvantages are that
- with such installation of greenhouses it is very difficult to stretch the polyethylene film; the film has wrinkles and is easily torn by the wind
- such a greenhouse is very difficult to repair, if the building is tall, if the building is located in the center of a large city, if there are constant winds in this place, then this method of constructing greenhouses is too ineffective
Frame greenhouses. Reinforced polyethylene film is stretched over frames made of wood. The frames are mounted on scaffolding.
A conductor is made from wooden blocks on an asphalt site or other site. The conductor allows us to make greenhouse frames very quickly and all frames will be the same size, deviations are less than a centimeter.
We install greenhouse frames in the conductor. For the frame frame we use bars 50x50 mm or 40x40 mm. The dimensions of the frames correspond to the dimensions of standard frame scaffolding. Vertically 2 meters, horizontally 3 meters; for rigidity, an additional vertical jumper is installed, dividing the frame into two parts. We fasten the bars together with self-tapping screws and pieces of plywood.
We cover the frame of the greenhouse with reinforced polyethylene film with a density of 120-200 microns. The film must be stretched without wrinkles; wrinkles will cause the film to be torn by gusts of wind. To fix the film, we use either a wooden glazing bead and small nails, or plastic packaging tape (polypropylene) and 12-14 mm staples. The reinforced film is stretched over the outside of the frame.
We drill mounting holes in the frame in advance for future installation of the frames together on scaffolding. It will not be so convenient to do this at altitude.
The scaffolding frames are lifted and mounted on scaffolding, they are tightened together with long self-tapping screws, mounted to the scaffolding posts with knitting wire, the joints between the frames are foamed with polyurethane foam.
It is better to make a snow canopy over a greenhouse from durable tarpaulin, rubberized fabric; it is also good to use old banners and awnings from trucks for these purposes.
Currently, many manufacturers produce special winter series of materials, for example, Ceresit CT85 WINTER, Ceresit CT190 WINTER adhesive. With these materials you can carry out work on insulation and finishing of facades in winter down to temperatures of -15 C. In addition to this, you can use the anti-frost additive Hardass, it allows you to carry out work up to a temperature of -25 C.
Don’t forget that you have people working on your scaffolding; unlike winter building materials, they are not winter-proof, they are cold, they catch colds and get sick. The convenience of winter materials and the anti-frost additive Hardass is that you do not have to spend huge amounts of money on electricity, gas and diesel fuel, you will turn on heat guns for short periods of time to ensure the comfort of your workers, the materials will cope with frost on their own. Also, winter materials and anti-frost additives can solve a serious problem when you have to carry out work on insulating the facades of a building where the thermal circuit is not turned on inside the building. With a heater you heat the outer circuit, but the insulated walls, protected from heat by glued insulation, remain cold. If you use the summer version of glue for gluing, without an anti-frost additive, then it will not be able to set and gain the required grade. In such conditions, you need to use only specialized winter adhesives or summer adhesives with the anti-frost additive Hardass. You also need to remember that winter versions of materials and materials with an anti-frost additive take two to three times longer to set than summer materials.
Internal arrangement of walls
The interior decoration of the veranda is carried out with the following materials:
- lining;
- decorative plaster;
- PVC panels;
- MDF panels.
They all have their own installation specifics.
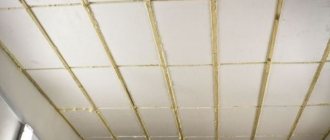
Lining
The interior decoration of the veranda with clapboard is a classic design option.
For a veranda, standard thin lining 5-10mm is usually used. As a rule, this is a board made of wood, wood processing products or plastic. There are differences depending on the profile. There are:
- Standard profile. The option features beveled edges that create noticeable gaps between the panels.
- Calm. It features relatively soft transitions due to the small angle of edge stitching.
- Europrofile. Once the coating is assembled, it forms a specific pattern.
The boards are connected using a special system consisting of tenons and grooves. But keep in mind that working with lining is very difficult. Wooden panels shrink or swell, but plastic ones are not so whimsical.
For installation you will need the following tools:
- screwdriver;
- clasps (special metal latches).
The lining can be positioned horizontally or vertically. You can also try installing it at an angle. It depends on your skill, imagination and the characteristics of the room. And one more tip - do not try to squeeze the tenons into the grooves all the way.
Lining is one of the types of veranda finishing
Decorative plaster
To decorate the veranda from the inside, plaster is often used. This is a mixture that, after being applied to the wall, turns into a finished coating. There is a huge variety of different coatings:
- plaster, which contains colors to give the walls the desired color;
- plaster imitating stone;
- Venetian, which repeats the texture of marble.
The appearance of the veranda also depends on the technique of applying the material. Different results can be achieved by simply using a little more plaster or using different types of strokes. In addition, with the help of plaster you can create sgraffito - stucco paintings on the walls.
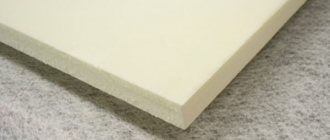
MDF and PVC panels
MDF panels (Medium Density Fiberboard) are wood fibers that were obtained by processing solid blocks of wood. After this, the chips are pressed under high pressure and temperature. The veranda can be sheathed with slabs up to 10 millimeters thick. The finished block has the following qualities:
- has high sound absorption rates;
- withstands high and low temperatures;
- convenient to use.
But the material also has a minus - it reacts poorly to moisture (swells and disintegrates). If condensation often appears in the veranda, MDF panels will not be suitable.
For ease of use, several formats of MDF panels are made:
- separate sheets;
- lining, etc.
They just need to be secured to the wall with screws.
PVC panels are a material made from polyvinyl chloride. It's very comfortable. Since the panels are plastic, they can be bent to fit any room shape.
PVC panels have the following positive aspects:
- light weight;
- high resistance to contact with water;
- resistance to high temperatures;
- low cost.
But there is also a minus - the material cracks in the cold. So if winters are harsh and the temperature often reaches -15, it is better not to use PVC panels in an unheated veranda.
Special fasteners are used for installation. You need to screw the panels in place with a screwdriver. To avoid damaging the material, perform the operation at low power. If you bought a kit ready for installation, then you can do without a screwdriver at all, using only clamps and screws.
Is it better to do a wet façade before winter?
First of all: why should these options be avoided?
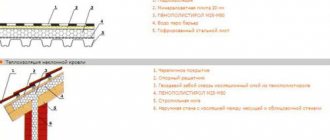
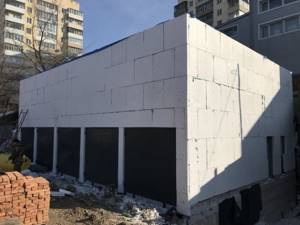
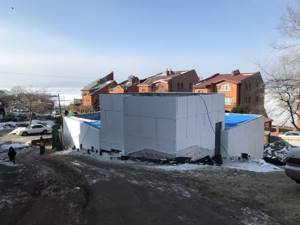
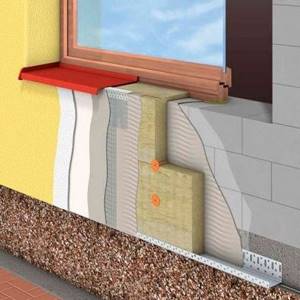
A wet façade is a thermal insulation material (basalt wool or PPS) fixed to the façade wall using adhesive (usually) or mechanically (less often) methods. The top of the slabs is reinforced with fiberglass mesh and plastered. Ordinary plaster is painted or covered with ceramic tiles. The decorative one is self-sufficient, but it can also be painted if desired.
The advantages of this technology are a relatively low price, many design solutions (the ability to give the house an individual look), there are no problems during restoration, space saving in the house - the thermal insulation properties of the cladding depend on the thickness of the insulation, there is no need to take additional insulation measures from the inside.
How to make a wet facade in sub-zero temperatures?
One of the “folk” remedies - adding salt to the solution - does not stand up to criticism: during the installation process and immediately after its completion, the cladding looks good and retains heat, but when it starts to warm up outside, salt stains appear on the facade.
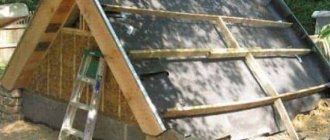
To make a high-quality wet facade in winter, the technology is as follows: a temporary heat-insulating contour is formed.
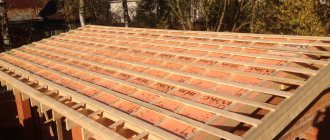
- Construction of forests. They are usually erected in the summer; there are no fundamental differences from standard conditions.
- A waterproof film is stretched around the outer perimeter and special thermomats are installed.
- Heating devices - coal, gasoline, electric - are installed in the work area. Experts do not recommend diesel heaters: the soot formed during operation settles on the thermal insulation material and can impair its adhesion to the covering layer.
Thus, its own microclimate is formed under the film. To apply decorative plaster, you need to maintain a working temperature of + 8 degrees; for the remaining stages of the process, plus five is enough.
In professional jargon, this circuit is called a “warm”. In addition to the fact that it creates suitable conditions for work in any season, it has other advantages:
- insulation from precipitation;
- UV protection;
- from the wind;
- from high humidity.
During construction, all indicators are maintained at the same level, which cannot but affect the quality of the finished facade. To some extent, the warmer also provides ease of work: you don’t have to go downstairs to get a dropped tool.
The method is used not only for wall cladding, but also for masonry, conventional insulation, restoration, roofing and other external work. Its disadvantages are obvious: increasing price, duration and complexity of the process. The cost of the facade increases by about 10 percent.
Selection criteria and types of winter insulation
If we talk about choosing a material for facade insulation, the modern market provides many options.
Previously, foam concrete and expanded clay mixed with concrete mortar were used to insulate buildings in winter. Later, glass wool was used for insulation, and today the number of insulators has increased significantly.
Below are popular thermal insulators, as well as their main characteristics and advantages.
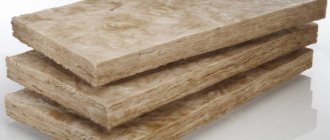
Mineral wool and its modifications have good vapor permeability and do not rot. The insulation is breathable. This fact allows you to prevent the occurrence and development of fungus or mold. It is used primarily for insulating facades in accordance with “dry” technology. Polystyrene foam (expanded polystyrene) is easy to process and is a strong barrier to wind and moisture, but is susceptible to sun. Its scope does not extend to wooden facades. The surface of the material requires treatment with protective compounds. Thermal panels are used not only as insulation, but also as an aesthetic facing material. The first includes mineral insulation materials, including expanded polystyrene (foam) or cellulose, and the second includes decorative types of plaster, metal-plastic, and metal products. Thermal paint is made using different binders. It contains microscopic components in the form of glass spheres with rarefied space. For comparison, 50 mm of insulation corresponds to a 2 mm thick coating of thermal paint. It combines two useful functions: insulation and aesthetics. Izolon is used in the process of insulation using “dry” technology. In winter, it is used as an additional reinforcement of the main insulation, which creates excellent double protection. The material is vapor-permeable, so it is not combined with mineral wool and its analogues, but other heat insulators are chosen.
The choice of insulation is influenced by the climatic conditions of a particular area, as well as the financial situation of the buyer.
Before making a final decision, it is recommended to seek advice from specialists in the construction industry.
Wet façade at sub-zero temperatures. Personal experience and how is it all?
Let's continue the topic of employment of industrial climbers in winter, and specifically focus on the work on finishing the facade using the “wet facade” system.
The insulation (PPS 16 f, 100 mm thick) is completely stuffed using a super cool thing, and after “picking up the snot” the intermediate stage looks like this:
Actually, in 2021 I stopped there
After the holiday break, on the fourth, we are back in action and work continues.
An interesting question arises - the average daily air temperature at this time in the city by the sea is 12, -15, and with a light sea breeze it generally feels like -25, no less - fellow countrymen will understand. Therefore, of course, working outdoors is contraindicated for a number of objective reasons.
The need to build a “greenhouse” is obvious, but how can this be done with minimal loss of time and without risking quality?
Cover the entire façade area? The entire area of one wall? Part of a wall?
Based on the goal of maintaining quality and saving on heating costs, I choose the “part of the wall” option.
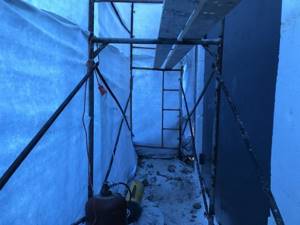
So where to start? Of course, from a supporting frame, which will also serve as a scaffolding:
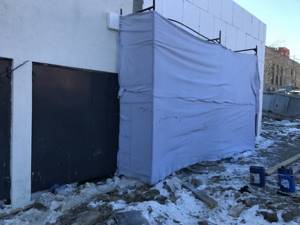
To do this, I use 4 sections of the most ordinary frame scaffolding, wrapped in geotextiles of the “dornite” type, we assemble a portable structure, fastening the Dornit with nylon clamps to the frame (frost-resistant, others crumble)

Then I throw off the second layer of dornite directly from the parapet, on top of the first, where I fix it
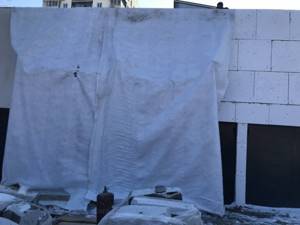
The result is a heat-retaining, but easily blown design of a small volume for warming up.
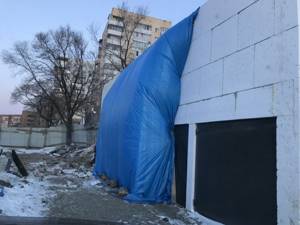
Next you need to get rid of the blowing. A simple Chinese blue awning comes to the rescue:
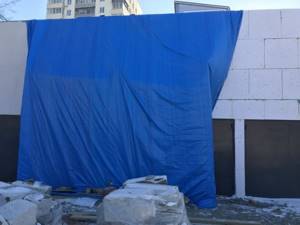
Everything is secured and tensioned in such a way that there are no drafts or cracks:
My constant companion in these façade adventures is a simple window thermometer:
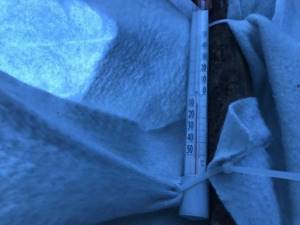
So far the temperature is not working at all.
But the problem is solved with a simple propane heat gun:
And literally 20 minutes after startup, the temperature in the greenhouse rises to a comfortable 18-20 degrees for work with a plus sign:
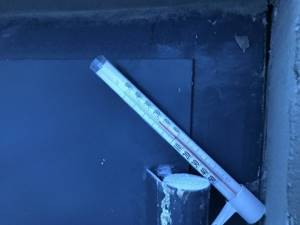
You can start working as soon as the temperature of the base rises above that recommended by the manufacturer of the plaster-adhesive composition, in my case it is -10.
At what temperature can a wet façade be made?
Today everyone strives to insulate their home, whether it is the construction of a new one or the reconstruction of an old one, facade work will almost always include insulation.
Of course, if this is a small country house where you do not plan to live for more than a couple of days, and then in the summer, then insulation in this case can be considered inappropriate. In other cases, this allows you to maintain a comfortable temperature in the house both in winter and summer. Unfortunately, the desire to insulate your home does not always coincide with the desire to do it correctly. Sometimes home owners are overly eager to save money and make mistakes in insulating the facade. This may happen due to the following reasons:
- Using bad materials
- Hiring a cheap team of façade designers (usually in this case there is no normal experience or guarantees)
- Violation of installation technology (most often these are consequences of the second point)
- At best, mistakes when insulating the facade of a private house simply spoil the aesthetic appearance, and at worst they threaten the need to reconstruct the entire facade.
Wet façade and basic installation errors
The gaps must be filled with the same material as the entire façade is insulated. It so happens that the wall of the house will not always be a multiple of the length of the slabs and in such cases gaps will form between the slabs. It is undesirable to have a very small piece of insulation glued to the end of the house, because it will be subject to large wind loads, and it may simply fall off due to the small area of the glue. Therefore, there may be a gap in the middle of the wall. When insulating the façade of a private house, it is very important to seal such gaps with the same material.
Technology for forming an ideally warm wall
There are different ways to properly insulate walls from the outside. Let's consider one of them:
- first, mineral wool slabs are laid around the perimeter of the main wall;
- fastening anchors necessary for fixing the heat insulator are inserted into the masonry;
- mineral wool slabs are placed on anchors, while the fasteners are closed on the surface of the heat insulator using clamps;
- a facing brick is formed on top of the mineral wool;
- All seams in the masonry are thoroughly rubbed using sand-cement mortar.
However, this method of insulation is only possible at the stage of building a house. What to do if it has already been erected, but thermal insulation is still being planned?
How to protect yourself from mistakes when insulating a facade
Errors when insulating the facade of a private house can be minor, which either will not appear (if you’re lucky) or will simply spoil the beautiful view. Or they can be critical. As a result, cracks appear, plaster falls off, bumps and other troubles appear. Therefore, it is better that they not exist at all. It is unlikely that you will carry out facade work yourself, so you can protect yourself from mistakes like this:
- Choose all materials from the same manufacturer, so in case of any damage you can file a complaint and, if everything was done according to the technology, and the problem is in the material, you will be compensated. If you have assembled a set from many manufacturers, then the complaint will not apply.
- For example, in the Baumit system of plaster facades, there are no dowels. But in order for the system to meet the standards, it is allowed to use certified products.
- Selection of quality proven manufacturers
- Careful selection of a team of façade designers. After all, these are the people who will do all the work. And no matter how good the material you buy, savings and poor crew selection can ruin everything. After all, if the technology is violated, the guarantee also does not apply.
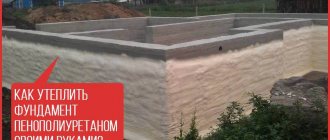
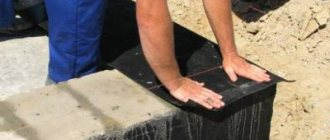
We insulate the foundation of the house from the outside using penoplex
To effectively insulate the foundation, it is recommended to use modern progressive materials. They have many advantages over outdated methods, but only one disadvantage - increased costs. If penoplex is chosen as insulation, you need to follow the instructions:
- High-quality foundation cleaning.
- Waterproofing (bitumen mastic can be used).
- Glue preparation.
- Applying glue to the inner surface of the slab.
- Fastening the plate.
- The next plate is fixed into special grooves on the previous one, which was already installed.
- Repeat the procedure until thermal insulation is completed.
Since the underground part of the foundation will be filled with soil, additional fixation of penoplex slabs will not be required here. However, the top slabs that protrude beyond the ground level should be additionally secured with dowels.
We insulate the foundation of the house from the outside using penoplex. Step by step guide
We insulate the foundation of the house from the outside using penoplex
We insulate the foundation of the house from the outside using penoplex
We insulate the foundation of the house from the outside using penoplex
We insulate the foundation of the house from the outside using penoplex
We insulate the foundation of the house from the outside using penoplex