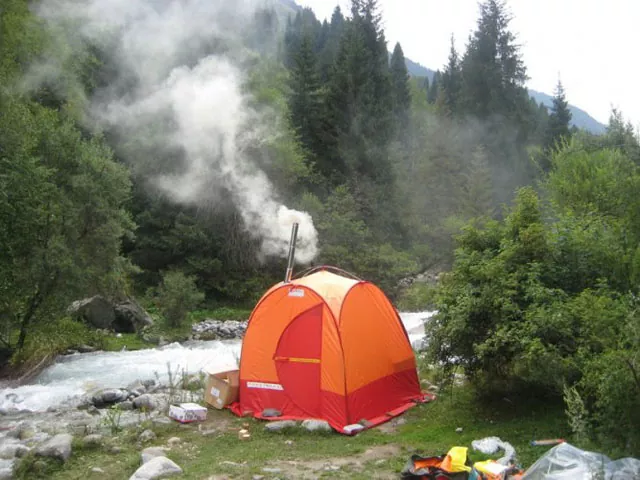
For those who are seriously passionate about hiking, there is no need to talk about what it’s like to wash in a bathhouse after several days in nature. But camp baths can also be an end in themselves, when people go into nature solely for the purpose of steaming and swimming in a beautiful place. For both, we will talk about what a mobile sauna and stoves for it can be.
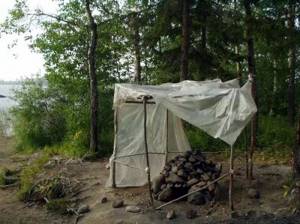
Making a sauna tent “the black way”
The main difference between this option is that the heated stones will not need to be transferred from the fire to the steam room.
In this case, a large frame will be placed directly on top of the hot cobblestones after removing the coals. The manufacturing procedure begins with the construction of the furnace. Making a sauna tent “the black way”
Stage one. Bake
There are two possible options here, let’s take a look at each of them.
Option #1
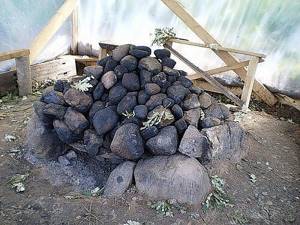
We put a pile of stones and make a hole in it for loading firewood (in the image the hole is on the back side - where the smoke comes from). You will need much more stones than for a white bath, but neither the shape nor the size play a special role.
It is worth noting that this option is quite difficult to implement, so you should be prepared for the fact that the heap will constantly collapse.
Stones for the stove
Option No. 2
Using a welding machine, we make in advance a small frame (40-50 cm high, similar width) from reinforcement rods with a diameter of 5 mm. Once in place, we cover the finished frame with stones. The main advantage of this design is that the stones will rest on the frame, so they will not fall apart. However, they will take longer to heat up than in the option described above.
The principle of laying stones on a frame
Small welded structure for a camp sauna
Camping sauna stove
A camping sauna stove that can easily be converted into a teapot stand or table
Option #3
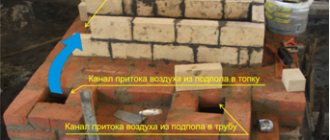
Here, on a pre-selected site, it is necessary to lay the foundation of the heater with sides of 100 cm, having previously dug a small hole under it, 50-60 cm deep. We make a base of flat stones, on top of it we lay rectangular stones measuring 0.4 x 0.5 m in increments of 25 -30 cm.
Fire pit and heater
Kamenka
Warming up the heater
We install stone slabs on top of the boulders so that there is a small through hole in the center of the structure, through which the fire will reach the top of the heater. At the end, we lay another plate (it could even be a mesh or a sheet of thick metal), which will close the central hole.
Having completed the construction of the stove, we load the wood and set it on fire. The stones, as noted above, will heat up for quite a long time. We maintain an intense fire all this time, periodically adding firewood. While the cobblestones are heating up, we begin building the frame.
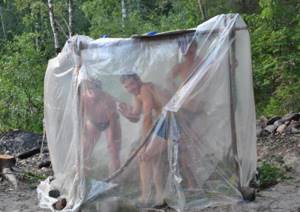
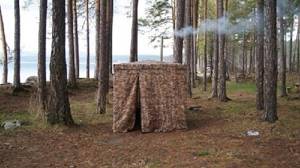
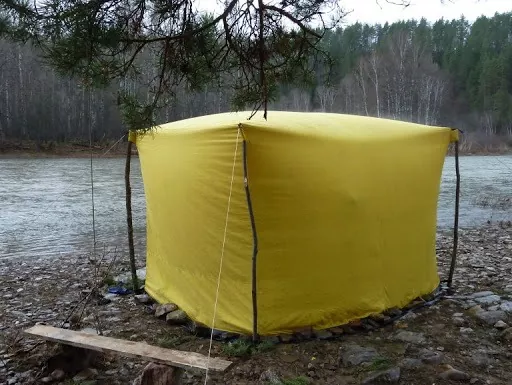
We make the frame using one of the possible methods (in the images below there is a structure of 4 poles). When the stones heat up to the required temperature, remove the coals and cover the frame with film. We press down the film along the perimeter with large cobblestones, and if possible, cover the floor with spruce branches. That's it, you can proceed directly to the bath procedures!
Manufacturing Features
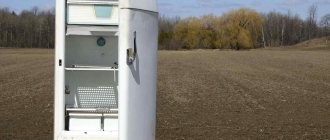
A compact tourist steam room will be an excellent solution for arranging a small summer cottage. A stove for a camp sauna can be purchased in specialized travel stores, where such a device is sold complete with other sauna equipment or as a separate product.
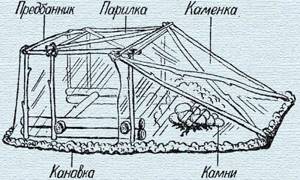
Traditionally, a camping steam room is formed from the following elements: a tent, a frame and a stove. In earlier times, polyethylene acted as a covering for such a structure.
The installation of such a bath was simple, but the film itself did not have high strength. In addition, it required additional drying time and sufficient space in the backpack. And the stove had to be transported somehow.
Over time, companies that produce various products to create comfort in camping conditions came to the aid of tourists. Polyethylene has been replaced by lighter and more durable nylon. But the most important and mandatory element has always been a small mobile stove for a camp sauna.
Among fans of bathing procedures carried out in the lap of nature, a dispute often arises regarding the preferences between a purchased option and a stove for a camping sauna made with your own hands. However, most supporters of such debates are interested in structures that already include a heater. Such a device is usually equipped with a removable chimney.
Particularly popular are reliable bathhouse designs that can withstand strong winds and other adverse weather conditions. In these tents, the entrance can be sealed using a zipper.
Today, for lovers of active recreation, buying a tourist bathhouse with a stove is not a problem. There is a wide range of similar products on the market. When purchasing a mobile steam room design, you need to familiarize yourself with the technical and operational characteristics of the stove. If you have a little experience in construction work, you can make a heating device yourself using simple tools and materials.
Having chosen a place to install a camp bath, you need to dig a hole to lay out the foundation of the stove. The depth should be no more than 0.5 m, and its area should be 2 times less than the 4 m² area allocated for a mobile bathhouse with a stove. The material most suitable for filling the foundation is flat stone.
Below we will consider several options for making a stove for a tourist bath with your own hands:
- Before constructing the steam room frame, the amount of firewood and stones required is collected to ensure a fairly long combustion process, which promotes optimal heating of the cobblestones. Firewood and stones are laid alternately, with the wood flooring going first. After 4-5 layers you can start assembling the frame. The structure should be equipped not far from the furnace for the speedy transportation of red-hot stones. Before stretching the awning, you should dig a hole in the ground to place the hot stones. It is recommended to roll hot stones with a shovel.
- The second option is similar to the first, since it also involves the use of firewood and flat stones, which need to be placed in a hole dug directly at the site of the tent. The material at hand is still laid out in layers. In this case, you cannot do without a large amount of smoke, but the expected result is worth it. The heating temperature of the stones should be quite high, because after the firewood burns and the smoke is released from the sauna, the well-heated stones will become the only source of heat in the tourist steam room. It is worth noting that this option of equipping a mobile sauna with a stove is more suitable for tourists experienced in this matter. You need to be extremely careful when following safety rules. It is important to ensure that the frame is well-stabilized to prevent it from falling and to prevent burns from hot stones. It is advisable that a camp sauna with a stove be installed near a pond. For safety and ease of use, the entrance to the steam room should be located towards the water.
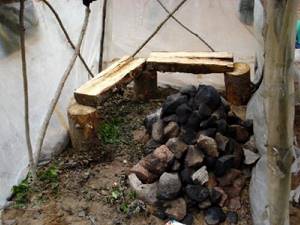
- First, a hole is dug into which a certain amount of firewood needs to be placed so that a large fire can be lit. When digging a hole, you should carefully clean its edges at an angle. This is necessary to prevent the soil from collapsing into the fire. A grate woven from heat-resistant wire is placed on the equipped and lit fireplace. Such a coating must be reliable, because a significant load in the form of a pile of stones will be applied to it. Loops are attached to the corners of the lattice, into which strong wooden stakes are driven. One hour after lighting the fire, you can begin bathing procedures. By using ordinary logs, the mobile steam room is equipped with benches.
Features of heating sources for baths and saunas
In a traditional Russian bathhouse, it has long been customary to provide a lot of steam and less heat. For this purpose, a closed heater is used, located above the firebox. It is lined with heat-resistant brick on the inside while maintaining a small air gap. For such a bath you need to heat the stones up to +500 degrees.
The Finnish sauna requires a low level of humidity - 5-15% and a temperature range of up to +85 degrees. The heater is used open, with slightly heated stones. To supply steam, just pour water on it.
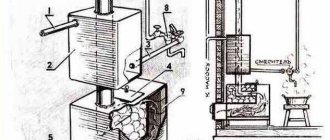
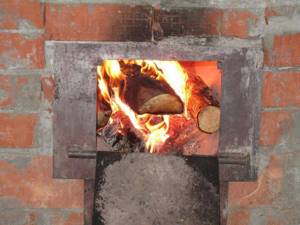
Firebox
This is a two-chamber device. The upper part (furnace) is necessary for burning fuel, and the lower part (ash pan) is necessary for accumulating and collecting ash. These two compartments are separated by a grille, and each of them has a door. Often the lower compartment is left open for air flow, using it as an ash chamber. You can also make holes in the firebox door (dimensions 20x25 cm) with a damper to regulate the air supply.
Kamenka
Above the firebox door, located opposite the entrance, rods measuring 1 cm or more are fixed. The door of the heater itself should “look” at the steam room. Next, stones without mica content are placed in it. It is undesirable to use granite. The more cobblestones, the larger the hot surface.
Firebox
It is better to mount a hatch in the upper part of a sauna stove made of metal with your own hands to create access to the bottom of the compartment and ensure maintenance of the heater. A chimney cover is installed above it. The last stage is the installation of a water tank.
Chimney
This is a pipe for removing the resulting smoke and heating the water supplied to the stones. The chimney must be insulated, as due to its high temperature it is easy to get burned.
Its dimensions must correspond to the dimensions of the iron stove. The thickness of the passages should be equal to half a brick.
It is better to purchase a chimney already assembled with an outer pipe, an internal chimney, and a deflector.
Tank
It is mounted above the firebox. A tap is built into its lower part to gradually supply liquid to the hot stones. On the chimney side, the tank is covered with a steel semicircle with a hole for the chimney pipe. A lid with a handle is mounted on the part of the container that will be filled with water. Just like the chimney, it is better to buy a ready-made tank.
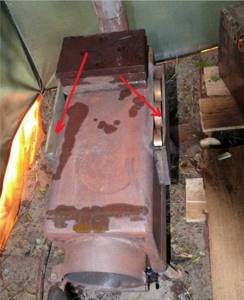
Homemade stove made from profiled pipe for a camp sauna
Made from thick-walled profile pipe 200*200 mm, length 450 mm. Wall - 6 mm. The pipe body is welded upward by 100 mm (a strip of metal is welded around the perimeter). The end walls are made of sheet 8 mm thick.
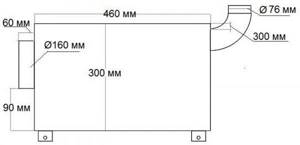
Drawing of a stove for a camp sauna
The hole for storing firewood is a pipe with a diameter of 160 mm. The width of the ring is about 60 mm. The door is welded at a height of about 90 mm from the bottom. Instead of grates, a semicircular sheet with perforation is welded.
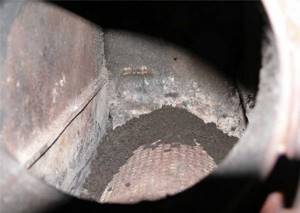
Instead of grates there is a perforated sheet of metal
On the back side of the stove, 30 mm below the top edge, an elbow is welded to remove smoke. It is made from a pipe 76 mm in diameter, and the chimney is made from the same pipe (several pieces with a total length of 220 cm). On the pipe there is a water tank, above the tank there is a gate for adjusting the draft.
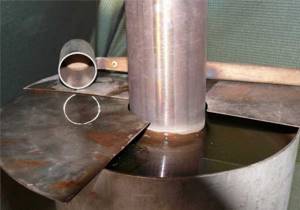
Water tank on a pipe
To screen the fat coming from the walls, a casing was made, which also serves as a lid for the heater. The stones are placed on the upper surface of the oven, under the screen. During operation, it was found that it is better to use cast iron pigs - their total weight is 15-20 kg. They heat up faster and produce normal steam without flooding. So that the water supplied to the heater flows down, holes are drilled in the cast iron bars in a checkerboard pattern. The prepared bars are placed under the shirt in three layers. And still water flows through the holes to the lower level.
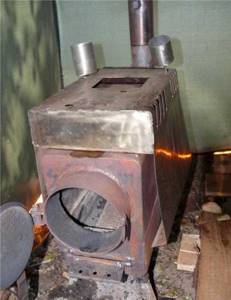
Working version of the furnace with a screen
The stove worked well in this version, but carrying a bunch of cast iron ingots is not the greatest pleasure. As an experiment, pockets were welded into the upper part of the sidewalls. One contains stainless steel circles, the other remains empty.
Modified homemade stove for a camp sauna
When the temperature is close to the required one, water is poured into the empty pocket using a ladle on a long handle - about 400 ml. It evaporates quite quickly. The second time they put 70-100 ml into the pocket with the discs. The steam room is full of steam. While you are steaming, the “stones” restore the required temperature, because the stove for a camp sauna is heated all the time as long as you want it.
With this improvement - pockets for “stones” and steam - the portable sauna stove began to create very comfortable conditions for steaming. You can bring the humidity up to 50-60% without raising the temperature too much (provided the tent is sufficiently insulated and protected from wind). True, the design cannot be called light - without “stones” it weighs 25 kg and is transported in the trunk. But it can be heated all the time, without any problems.
Important Terms
A camp sauna can be made only under certain conditions. The resting place must meet the requirements below.
| Photo | Conditions | Description |
| The presence of a body of water is an important factor | First of all, there must be water there. | The ideal option is to choose a place on the bank of a river or other body of water. |
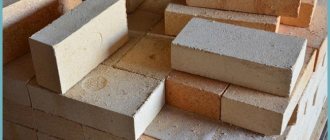
| Stones for the stove | There should also be stones there. | Layered cobblestones should not be used, as when heated, they can fly apart into pieces, causing serious injuries to steamers. The stones should not be too small or too large, the optimal size is 100-120 mm, the shape is somewhat elongated. If the stones are smaller, they will not be able to accumulate the required amount of heat and will cool down very quickly; Large specimens will take a very long time to heat up. Although, if you have time, you can build a kind of foundation from large stones for a future fire. If there are no boulders, then it is quite possible to use pebbles. As for the quantity, for each person who will steam, you will need 1 bucket of stones. Therefore, each participant is required to collect a bucket of boulders for themselves. |
| Frame material | Near the resting place there should be thin young trees (or better yet, dead wood), which will be used to construct the frame (if the aluminum posts were not prepared in advance). | From these trees you need to make poles with a diameter of about 30-40 mm, and you should also think about the method of attaching them in advance. |
| Firewood | A fire will require firewood, and in large quantities, because it will burn for at least 3-4 hours. | Excessively thick logs are not suitable for this, as they do not burn well. The maximum diameter of the firewood should be 100-150 mm - this way they will quickly burn out and transfer all the heat to the stones. |
Heater for a camp sauna with the possibility of periodic heating
The easiest way to heat a camp sauna tent is to build a pyramid of stones, cover it with wood like a pioneer fire, set fire to the wood and thus heat the stones. After burning, the remaining firewood is removed, the tent is stretched out from above, spruce branches are thrown on the floor and soar. The disadvantage of this method is that the heater requires single heating. There wasn’t enough firewood/temperature to heat the stones properly—you won’t be able to really take a steam bath, since it’s impossible to heat up again.
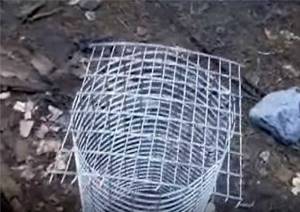
There is a simple solution that allows you to heat stones repeatedly: make a pipe from a metal mesh, which is filled with stones. This pipe can be placed/removed into the fire as many times as necessary. This, of course, is not a full-fledged stove for a camp sauna, but you can take a steam bath. The manufacturing process of a “multi-turn” heater is simple.
We take a piece of metal mesh with a rod thickness of 2-3 mm. A whole sheet turns out to be too large a container (not to be lifted), so we cut it in half. It’s more convenient to use metal scissors or a grinder with a metal disc, but you can also use the cutting edges of pliers. You need to cut approximately in the middle of the cell, leaving “tails” of the wire. Using a pole or tree trunk, we give the mesh a rounded shape, twisting it into a cylinder.
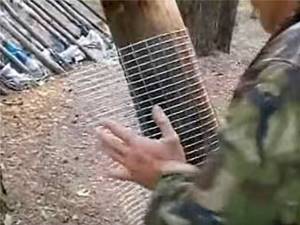
Roll the mesh into a cylinder
We take pliers or pliers and make hooks from the protruding pieces of wire - we bend them approximately in the middle of the length.
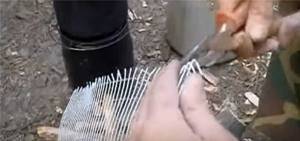
Making hooks
Hooking the edge with hooks, we form a “pipe”. Now you need to bend the hooks from the inside so that the mesh is held firmly and the wire cannot hurt.
Bend the hooks from the inside
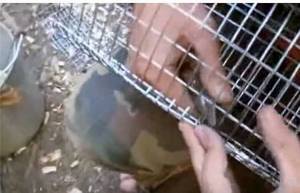
We form the bottom and lid from square pieces of mesh. They must be cut so that they can be secured to the cylinder with “hooks”.
We make a bottom and a lid from square pieces of mesh
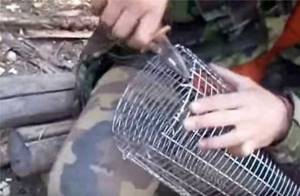
We also secure them with “hooks”
Actually, the grid itself is already ready. For convenience, you can attach handles to it - it will be more convenient to carry. There is one subtlety: choose large stones and lay them with decent gaps. The flame must penetrate into them in order to heat them well from all sides.
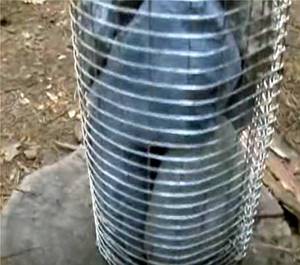
Loading stones should be at large intervals
The net can be placed on the stove or placed in the fire. You can make several to maintain the required temperature and humidity. While you are steaming with one or two, several more are heating up.
Advantages and disadvantages of setting up a portable sauna on vacation
Among the disadvantages of a homemade portable bathhouse are:
significant costs of time and effort for assembly; the importance of preliminary preparation and the availability of a number of materials; difficulties with dismantling the structure and moving the wet awning.
The use of factory products is associated with the following difficulties:
- high cost of the finished structure;
- mandatory availability of transport to move equipment.
For more domesticated steam room lovers, the option of installing a mobile sauna-tent on a personal plot is suitable. There you won’t have to periodically assemble and disassemble it. Although, not everyone will agree to exchange unity with nature on the banks of the river for a simple relaxation at their own dacha.
What is a mobile sauna
Essentially, it’s just a set of a special tent and stove. When traveling, it replaces a stationary sauna. Sauna tents are used during hikes, fishing or hunting, in camping camps, at dachas and in sanatoriums.
Portable bathhouses have their advantages and disadvantages.
Advantages:
- Relatively compact - the kits fit into a backpack.
- Quick assembly, if we talk about professional options.
- Possibility to use them as regular travel equipment. Food is cooked on the stove, and the tent is suitable for spending the night.
Flaws:
- The need to observe certain safety measures when using.
- The covering material can take a long time to dry, which is not always convenient when hiking.
- The price of professional products is quite high - approximately 20 thousand rubles for a tent alone, plus the cost of a stove.
Stove-heater
This simple variety has several ways to create it.
Option 1
Using an iron barrel without a bottom or top. The resulting container is half filled with bricks placed on edge and a grate laid on top. Stones are placed in the remaining 2/3 of the space and a chimney is installed. At the end, such a homemade stove in the bathhouse is covered with a lid made of sheets of steel.
Option 2
Bricks are not used for the construction of the stove. Sequence of work:
- Prepare diagrams and necessary tools.
- In a long pipe, cut a hole for the blower with dimensions of 5x20 cm. Inside the pipe above it, fix the mount for the grate.
- For the firebox, make a hole 25x20 cm. Above it, mount fastenings for rods, the size of which is about 1 cm.
- On the other side of the oven, create a hole into which the liquid will flow. Place stones in the heater.
- Make a slot for the chimney. Install a tap at the bottom of the pipe.
- Form a lid on the heating tank with a slot for the chimney, a hinge and a handle.
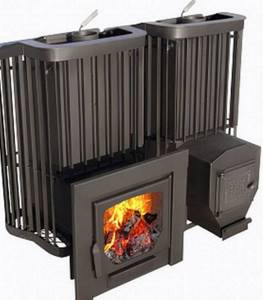
Option 3
This stove has 2 heaters. It is made by analogy with the previous ones. The difference is that 4 plates are used to connect two heaters.
Advantages and disadvantages of a stove manufactured locally and imported
A stove made on site could be considered the best option for a hiking trip, if its participants are normal about the preparatory work that precedes the bathing procedures.
Because to heat the stones you need to collect a fairly large amount of firewood - this is at least two hours of active collection , and only dead wood is suitable, the firewood should not be too thin, because thin ones burn quickly and do not give the necessary heat, but not too thick - not more than 15 cm in diameter.
In the absence of what was brought, it will take time to make a frame from poles .
And the fire itself with stones should be maintained for up to 6 hours.
So we can come to the conclusion that the main advantage of making a camping bathhouse on site is that it does not weigh down the load that is taken on a hike. But at the same time, its main drawback is the need to invest enough work and time in its preparation.
At the same time, the stove you brought with you is also not without its drawbacks. We have already said that only the lightest models can be taken on a hiking trip . But they are the ones with the least power .
On the other hand, purchased stoves are indispensable in the cold season , when they not only warm the tent, but also allow you to cook in it. And this - in addition to the steam room in the coldest weather!
They cost not to say that they are very cheap , given the service life of such thin steel, but this is the price to pay for stainless steel.
In our opinion, buying a stove is cost-effective only for avid tourists traveling at different times of the year.
Kinds
Varieties:
- Steam room in a tent. Takes up minimal space. It consists of three parts - an awning, a frame, and a stove. All elements are prefabricated.
- Industrial sauna for travel. Resistant to different weather conditions. The structure is assembled quickly, but to place it you need a sufficient amount of free space with a flat base.
- Mobile steam rooms with stove. They consist of a metal frame, which is covered with dense polyethylene film. A stove is installed inside and a chimney is installed.
The choice of a hiking steam room depends on the method of travel, conditions, and number of visitors.
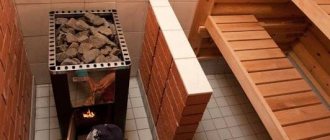
Steam room in a tent (Photo: Instagram / mobilnaya.banya.samara)
Long-burning potbelly stove
The potbelly stove has become a real symbol of Russia since the times of the Revolution and Civil War.
This is the name given to the simplest iron stove of a cylindrical or cubic shape. Its advantage was that the smoke channel - an ordinary iron pipe - could be taken out anywhere - through a wall or roof, into a window.
Taking the simplicity and practicality of a potbelly stove, you can make a small stove that will embody some simple ideas that significantly increase its efficiency, safety and environmental friendliness.
Basic scheme
The classic potbelly stove has a cylindrical design. However, it is difficult to do this when making it yourself, so you need to take a cube or parallelepiped as a basis.
Contains the following structural elements:
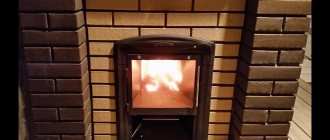
- Firebox. This is the chamber in which fuel combustion occurs, most often wood. The walls and bottom of the firebox must be thick, since they bear the main temperature load. There is a door in the front for storing firewood in the firebox; if desired, it can even be equipped with heat-resistant glass.
- Ash pit (ash pan). The compartment under the firebox is separated from it by a grate. The ash pan is also equipped with a door, only of a smaller size. It is used to remove ash and ash. which fall through the grate from burnt firewood. But this is not the only point of the ash pan - air is sucked in through the ash door and passes through the fuel layer from below, ensuring the best combustion.
- Smoke channel. To arrange it, a round hole is cut out in the upper part of the stove, a piece of steel pipe is inserted into it and scalded. In the future, you can attach other sections of the pipe here or use a factory sandwich chimney with special locks.
Expert opinion Dmitry Konstantinovich Levin
Some manufacturers of homemade stoves believe that the design with a blower and grate is not suitable for a sauna stove - it creates too much draft, which prevents complete combustion of the wood. Instead, it is proposed to lay the firewood directly on the bottom of the stove, and ensure air flow by drilling several round holes in the lower part of the combustion door and equipping them with a sliding damper.
How to make a door
The door is made of a thick sheet of metal. For fastening, you can use store-bought factory hinges or make your own. To seal the fit, an asbestos thread is used - it is wedged in a groove cut by a grinder.
If there is a suitable sheet of heat-resistant glass, it is inserted as follows: cut a window in the door and grind the cut area. Then they lay the glass, lay asbestos fiber around the perimeter, invisibly from the outside of the part, after which, using small steel tongues, I make tacks on each side.
The turning handle of the latch is easiest to make from the outside.
Homemade secondary gas afterburning system
The main disadvantage of a potbelly stove is its low efficiency. A stream of air passes quickly and strongly through the entire oven, carrying with it not only unburned food, but also heat. As a result, the case does not warm up sufficiently and gives off less heat. To solve this problem, a simple but ingenious modification was invented.
By placing two steel sheets above the firebox, the smoke passage channel can be significantly increased the length of the path that burnt gases travel before exiting through the chimney opening:
- The first horizontal sheet is welded directly above the firebox so that a channel remains for the passage of gases in the rear part of the stove.
- The next sheet is cooked higher, offset so that the passage is now at the front of the oven. It turns out that smoke, gases and heat, once in this labyrinth, snake through it all the way to the chimney. Along the way, they give off all the accumulated heat to the sheets, side walls and top plate of the oven.
If you drill several holes from the bottom from the back and cover them with a screen made of steel sheet, then at the top point, when fresh air, but already heated by the screen wall, meets unburned gases, the process of afterburning secondary gases will take place in the channel, which will lead to a significant increase in efficiency ovens.
Bathhouse on a camping trip - how to organize it
Regardless of what type of bathhouse we are talking about - mobile or stationary - it must contain the steam room itself , which holds the steam and hot air, as well as the stove that produces this heat and steam. But shelves - if possible.
Accordingly, if there is no ready-made steam room on site, you need to bring it there , and the stove for the steam room can either be assembled from scrap material or use a purchased one . An intermediate option is to take with you some blanks to create a stove on site. But first things first.
Another factor will be the nature of the hike.
The hardest thing is for those who want to take a steam bath while hiking .
They will have to carry extra pounds on themselves. It’s easiest for those who drive to the place by car - they don’t have too strict restrictions on weight, so they can take a heavier stove, for example. The remaining cases (water tourism, horse tourism) are somewhere between the first and second. The easiest way, of course, is to take polyethylene with you , cut racks on the spot, and use stones found on the spot , heated by a fire, as a stove. In this case, the load will increase only by the weight of dense polyethylene.
But let's not get ahead of ourselves. Below we will describe various homemade and purchased options, but for now we will talk about their pros and cons.
Projects
A transportable bathhouse made of timber can be selected in accordance with the finished project, which differs in size and layout, or ordered according to your own project.
In addition, ordering a finished bath involves delivering the goods to the client with full installation and assembly on site.
We invite you to read: Installation of beacons for plastering walls
An important point is the fact that the cost of the project is affected only by the number of partitions, doors and other components, and not by their location. If you want to move this or that element, the cost should not change.
Among standard projects, the most popular are baths with dimensions:
- 3 by 4 m;
- 4 by 4 m;
- 5 by 3 m;
- 6 by 4 m;
- 6 by 5 m;
- 6 by 6 m;
- 6 by 8 m;
- 8 by 9 m;
How to choose a place for a mobile sauna
The frame is placed on the shore of a suitable body of water - a lake or river. An area with dense, non-flowing soil is suitable; The tent must be secured, otherwise burns and bruises are possible.
See if the parking lot has everything you need: suitable stones, poles for the frame, dead wood for kindling. Sometimes it is not possible to find a site that suits all parameters - you need to act according to the situation. In any case, the tent is set up close to the water, and you can bring stones and firewood.
Do-it-yourself camping sauna stove
Stove for a camping sauna made of stones.
Choose stones for the stove that have a flattened, elongated shape and are wide enough. You cannot use heterogeneous stones, interspersed, or multi-layered. When heated, they can explode into many pieces, injuring people. The length of a suitable stone is 15-20 centimeters. Do not use granite; when burned, it will turn into a pile of sand.
Lay out the stones in a suitable shape. It will be easier to alternate stones with firewood. The result is a multi-layered, but simple design. Lay wood chips first, then firewood. Keep it burning for several hours. After the wood has burned thoroughly, the coals are taken out. Only boulders remain. Rinse them with pre-heated water.
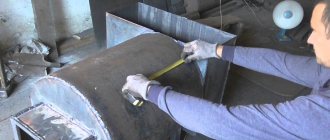
There is a more difficult option that needs to be prepared in advance. Then, in nature, it will be enough for you to set up such a stove and take it home on the way back. What is needed for this? Steel sheets are strong, but thin (2-3 mm). Using welding, we manufacture the main elements: grate, chimney, combustion chamber, ash pan, damper. To this kit add a stainless steel container for liquid and a tray on which to place the stones.
Safe installation of a bathhouse and placement of a stove in it
For metal and homemade stoves the following requirements must be met:
- A camp sauna is always placed on a flat, hard surface near a water source. This is necessary for reliable fastening of the guy wires and installation of the stove in a horizontal position.
- Try to locate the stove away from the entrance. It's more convenient and there's less risk of getting burned.
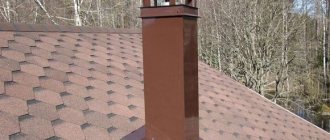
- For a metal structure, protective screens on the sides are required. The chimney at the exit from the tent is equipped with a special fireproof liner. A spark arrestor is installed at the end of the pipe so as not to burn the scarf. It will serve as a deflector - enhance traction and protect from precipitation.
A camp sauna is not only useful, but also easy to set up on your own. Lovers of everything ready-made can purchase a stove and sauna in the store, but for romantics there is always the option of a real heater.
Buying a ready-made camping sauna
Poshekhonka
Making hooks
A camp stove is sometimes a great help for travel lovers on the road.
Seasoned campers know that having access to an efficient and reliable heating source is very important. Without fire you can't cook food, you can't boil water to make it drinkable
It is especially valuable to have a heating source if tourists are caught in bad weather on the road.
A camp stove is used by tourists for cooking and heating.
For many tourists, one of their favorite entertainments during outings is a camp sauna. Its creation and subsequent bath procedures are not an easy task, but a very interesting one. A stove for a camp sauna can be bought in a store, or you can make it yourself (depending on the needs and capabilities of tourists).
At retail outlets you can purchase a whole kit for installing camp baths. Some of them include a stove, a tent, even ladles and benches. For those who prefer to do everything with their own hands, there is the opportunity to install such a structure themselves.
You can make a good heating device from a potbelly stove or even an old piece of pipe. But these options are only suitable for those who travel using vehicles. A potbelly stove weighs quite a bit, and the awning from which the sauna “room” is created is quite heavy.
The heating device for the bath is carried out before building the frame. You will need a lot of stones and firewood: burning must take place for at least three hours to heat the stones to the desired temperature.
Place a layer of firewood in the selected area and cover with a layer of stones. Again - a layer of firewood, then stones. So, they put 4-5 layers, there should be enough firewood to heat the stones until red. Build a frame not far from the fire (so that the hot stones can be quickly rolled there). Before setting up the awning, dig a hole in the ground for the stones. It is better to use a shovel for rolling.
Another version of the stove for mobile baths differs from the first in that only flat stones are needed. From them, in a hole made right inside the bathhouse, a structure is formed: a layer of firewood, a layer of stones. There will be a lot of smoke, but the sauna will be hotter. The stones need to get hot enough that when the wood burns and the smoke is released, they can keep the inside warm. This method is more suitable for tourists who have extensive experience in heating baths.
It is necessary to follow safety rules if you decide to organize such entertainment on a hike. Be sure to ensure that the frame is stable. The awning must be held securely. If the sauna awning collapses while people are under it, you can get serious burns due to hot stones.
A stove for a camping sauna, or a tourist stove for a steam room
Many specialized stores sell entire sets of tourist baths. They mainly consist of the following elements: stove, tent, benches and ladles. Those who like to use home-made devices will be happy to try their hand at creating a unique and useful design.
Using a potbelly stove and a piece of old pipe, you can make a good device. However, this kind of design is suitable only for those who have a vehicle at their disposal. After all, such a load as a stove and a fairly spacious tent for providing bath procedures has a considerable weight. Therefore, hikers must have certain skills in order to build a camp bathhouse from objects that are located near the chosen camp site.

Improved hiking heater
What is inconvenient about the option with stones stacked in a pyramid is that it is difficult to regulate the heating of the stones. They piled wood around and set it on fire. You no longer have a strong influence on the process. There is an option when, using grates you carry with you, you create something similar to a fireplace. Large stones or bricks are placed on the sides, a metal/cast iron grate is laid on them, and stones are placed on top of it. In this case, you can heat them to the desired temperature by placing firewood in the “hearth”. This stove for a camp sauna is one of the most primitive, but its effectiveness is no less effective.

Camping sauna heater with grate
Our grandfathers and great-grandfathers did something similar, but more thorough, in the black baths
Please note that the stones must be placed with a gap so that flames penetrate between them and hot air flows
Another option is to weld a frame from reinforcement and cover it with stones. This design is less demanding on the shape of the stones - bricks or flat stones are not always found.
All of these were methods suitable for generating steam - for creating an atmosphere close to a Russian steam room. But you can also create a dry-air sauna in nature. And it’s quite simple. Even without a stove. You will need to find a place near a ravine or ravine, build a fire below, and place a sauna tent above. Stretch a pipe between the tent and the fire, lower one end into the fire (the edge should extend 30-40 centimeters beyond the perimeter of the flame), and bring the other into the tent. That's all.
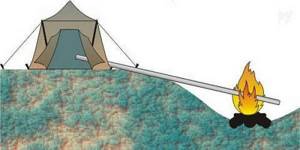
Method of organizing a camping dry-air sauna
Cold air is sucked into a pipe outside the fire (it is in a recess, so the smoke rises upward). As it passes through the fire, it heats up and enters the tent hot. This camping sauna works best in calm weather.
Camping sauna stoves from the store
There are a lot of stoves for camping saunas in stores. There are well-known companies that specialize in the production of sauna stoves in general. You can read about them in this article. But there are also little-known manufacturers that offer interesting options at a more affordable price.
Shore
The stove is made of AISI 304 stainless steel. The front and rear walls of the firebox have a thickness of 1 mm, the rest - 0.8 mm. It is interesting because it has a convection casing, which also serves as a heater. It is several centimeters higher than the body. Stones are placed in the resulting “trough”. Bookmark weight is about 20-25 kg. This option is good because the streams of hot air rising along the walls transfer a significant part of the heat to the stones, from which you can get good steam.

Camping stove for bathhouse Bereg
One of the good ideas is a glass on the door with the ability to regulate the air supply and, accordingly, with the ability to influence the temperature in the steam room.
Option #2. Making a stove from pots
If you plan to make a two-layer oven, you can use stainless steel pans, which are also called tanks with lids (they are quite cheap). This design is perfect for a hike, as it is budget-friendly and easy to implement. The costs for it are practically zero, it will effectively replace a fire, and the fuel for its operation can be found in any forest.
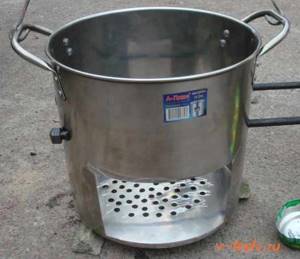
From a constructive point of view, a two-layer oven is two pans of different sizes inserted into each other. An opening of approximately ? height in order to load fuel. But at the bottom there are parallel grate slots with rotating bridges or ordinary holes.
A stand is placed on this grate. Then the stand is loaded with firewood, and a second smaller container is placed on top of all this - it will be heated by the flame. The second pan will be surrounded by fire and the heated walls of a larger container, due to which fuel consumption is minimized and the heat generated is saved.
Note! The bow for the pot must be made in the form of a separate removable element. The described design of a camping stove is extremely simple, and therefore is compact and portable.
You can easily pick it up along with the burning wood and move it to another place (if, for example, it starts to rain and the fire needs to be moved under a canopy)
The described design of a camping stove is extremely simple, and therefore is compact and portable. You can easily pick it up along with the burning wood and move it to another place (if, for example, it starts to rain and the fire needs to be moved under a canopy).
Manufacturing
There are several methods for making a homemade camp stove that have been tried by many people. A simple stone stove:
- Collect large boulders on the banks of a river or lake. Chop large dry firewood.
- Draw on the ground where the heater will be installed.
- Using a sapper shovel, dig out a layer of soil 20 cm deep. Make bevels along the edges of the hole inward.
- Lay dry firewood as the first layer, with stones on top. Repeat the steps until you get a multilayer pyramid.
- Light the first row of wood, gradually adjusting the stones so that they do not fall apart.
Gradually, the firewood will burn out, leaving hot boulders in place of the heater, which are suitable for creating steam.
To manufacture a more complex design, you will need to prepare tools and consumables. After this, you can begin manufacturing the equipment.
Preparation and drawing up of drawings
To accurately calculate the amount of materials, you need to prepare a drawing. To do this, on a sheet of paper you need to draw the oven as an assembly, the elements separately. Indicate exact dimensions and joint locations. In addition, you need to buy a special tent from which an impromptu steam room will be made.
Tools and materials
After creating the drawing, you need to prepare consumables and tools:
- stainless steel sheets up to 1 mm thick;
- reinforcement of different sections;
- hinged door;
- tubes for chimney assembly;
- metal strips for making locks.
The tools you need are a welding machine and a grinder with discs.
Equipment manufacturing
Stages of assembling a camp stove:
- Cut out individual parts of the body from stainless steel sheets.
- In the front part, cut a hole for hanging the door.
- Make a hole on the back of the body to which the chimney pipes will be connected.
- Attach homemade locks to each part of the body, with the help of which you can assemble the structure in field conditions without tools.
It is especially recommended to cut out the legs from the reinforcement and prepare fastenings for them.
Technologies and methods
A homemade stove for a camp sauna can be made without any problems. The simplest version of this design is based on the use of gratings made of a thick steel rod or a welded product similar to a taganka. In this case, the assembly is carried out like this:
- lay flat stones in the base;
- allocate space among them for the firebox;
- lay a grate or rods;
- cover them with pebbles.
In this case, the following will be useful for a mobile oven:
- unnecessary steel boxes;
- parts of masonry mesh;
- pipe sections.
All steel frames are filled with stones of suitable size. Then they just need to be laid on the fire. Such a solution is beneficial due to:
- maintaining cleanliness;
- minimal risk of stones falling off;
- reuse possibilities;
- speed of preparation;
- quick warm-up.
A do-it-yourself metal stove made in this way will have to be placed at a short distance from the walls of the camp bathhouse. This will prevent burning of the canopy. You can prevent the spread of ash and cinders throughout the tent by digging the fireplace to a shallow depth. In winter, the bottom is covered with spruce branches or special heat-protective mats. When placing a stove in a camp sauna, you need to choose a place with a flat and solid base, close to a water source and away from the entrance.
How to make a mobile sauna stove with your own hands
It's not always possible to take a real stove with you. This may be due to weight restrictions on a long trip, or a spontaneous desire arises to put a bathhouse on the bank of a river in a beautiful place. Building a simple stove is not a problem in this case.
You will need a minimum of tools - an ax, a shovel and large stones in sufficient quantities. The structure of this stove will resemble a black bath.
The simplest stove-heater
The procedure for making it yourself is as follows:
- First, the place for the foundation . Using a shovel, a small recess for the firebox, 20-30 centimeters deep, is torn off. The edges of the pit are made slightly beveled so that they do not crumble during heating.
- Dry small logs are placed in the pit and covered with a layer of medium-sized stones. Then the firewood is placed again. The layers alternate until you get a neat pyramid. You should not lay out too much stones - they will take a long time to warm up and you will need to burn a lot of logs.
- We set fire to the lower wood and let all the fuel burn out. We periodically adjust the stones so that our structure does not fall apart. At the end you should end up with a small pile of well-heated pebbles.
Important! It is best to take stones for the stove that are smooth and without cracks. They will have to be heated red-hot, because they will be the only source of heat in the bathhouse.
- We cover the improvised oven with a steam room tent . The frame can be made of thin poles and covered with polyethylene or thick waterproof fabric. Hot water is heated in a bucket or tank directly on the heater during combustion.
- You can build an improved version of such a stove. For this you will need large flat stones. A small depression in the ground is lined with pebbles in the shape of the letter “P” and covered with a boulder. Firewood is placed on top. Then you need complete burnout. Coals and ash can be removed so as not to spread dirt throughout the steam room. The effectiveness of this option is higher than that of a simple pile of stones.
Dig a homemade stove with a small moat to drain water during washing.
Advanced design using metal parts
For construction you will need a pre-prepared lattice made of thick rods or a welded structure in the form of a taganka. Building a stove with their help is even simpler: lay a base of flat stones with a place for the firebox, then a grate or steel rods, and pebbles on top.
Suitable materials for construction are an old iron box, a piece of masonry mesh, or a piece of pipe . Any metal frame is filled with stones of suitable size and placed on the fire.
After burning and heating the heater to the desired temperature, it can be transferred to our camp sauna.
The advantages of this design:
- Cleanliness in the steam room.
- Fast production and warm-up.
- There is no danger of stones falling off in the bathhouse.
- Convenient to reuse.